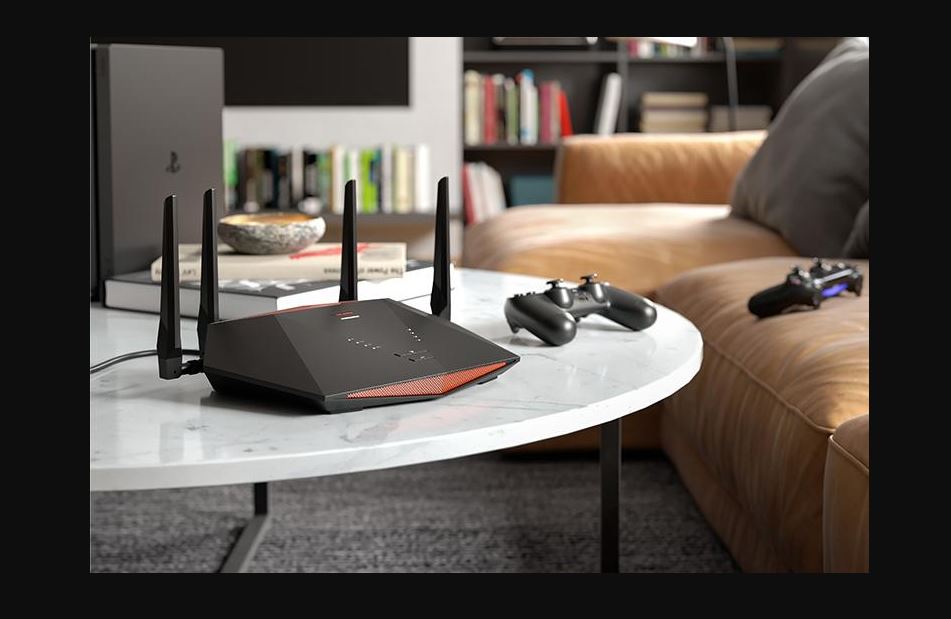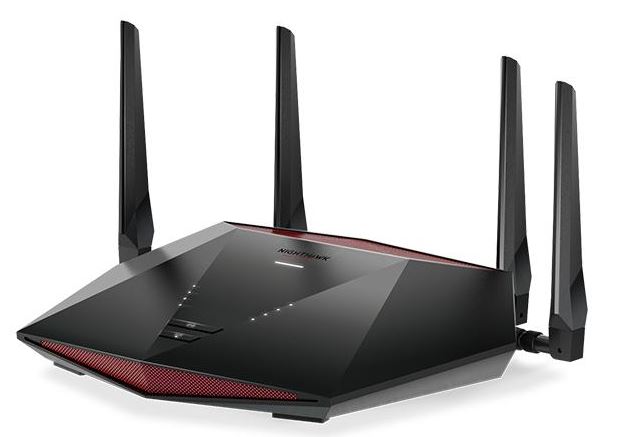
NETGEAR XR1000 Nighthawk Pro Gaming WiFi 6 Router
About NETGEAR
With the newest, fastest networking technology, NETGEAR makes it simple for you to have the smartest home in the area. With the aid of our selection of simple-to-use gadgets, you can watch more movies online, stream them more frequently, stream practically anything without buffering on your tablet, check in on your house from your smartphone, and preserve and safeguard all of your family’s memories. Your home networking system will offer the speed, range, and performance you need, whenever you need it, from the most cutting-edge wireless internet connectivity to superior streaming and storage solutions. We at NETGEAR concentrate on anything related.
Hardware Setup
This user manual is for the NETGEAR Nighthawk® Pro Gaming Router XR1000. The manual describes how you can set up the router and access the router web interface to monitor your network and configure the router features. This chapter contains the following sections:
- Unpack Your Router
- LEDs and Buttons on the Top Panel
- Back Panel
- Attach the Antennas
- Router Label
- Position Your Router
- Cable Your Router
For more information about the topics covered in this manual, visit the support website at netgear.com/support.
Unpack Your Router
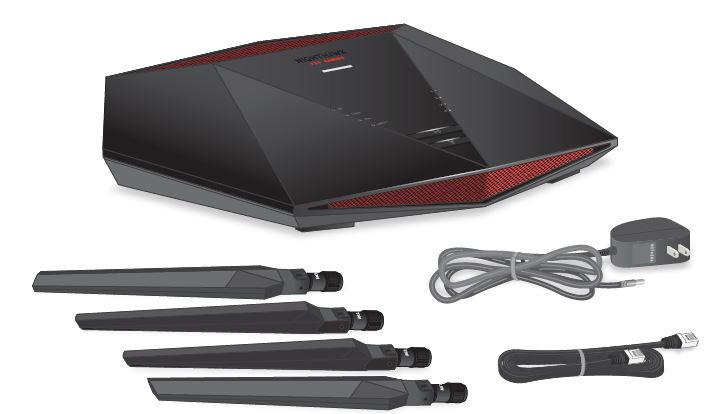
Your package contains the Nighthawk Pro Gaming router, four antennas, a power adapter, and a flat Ethernet cable. The package also contains the installation guide (not shown in the following figure).
LEDs and Buttons on the Top Panel
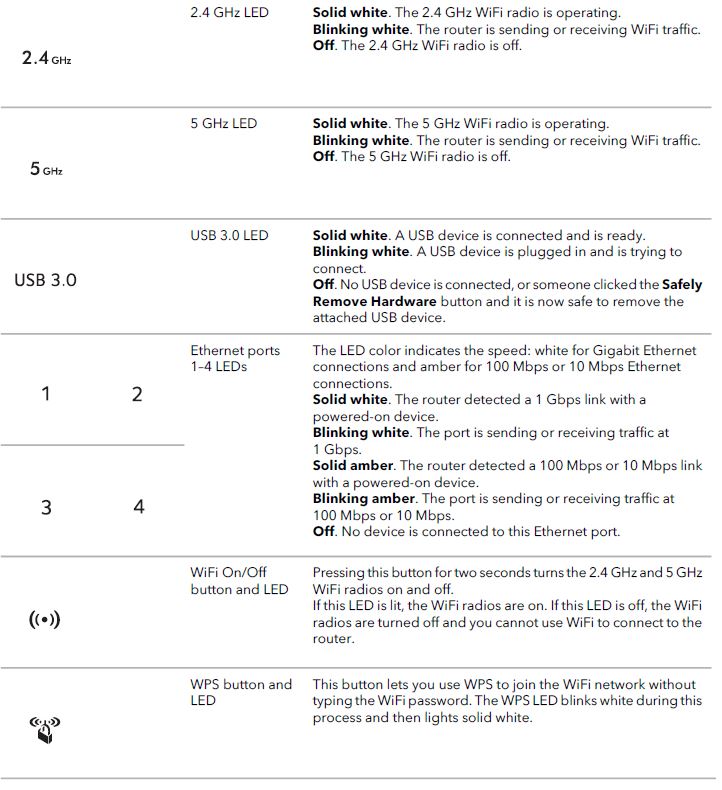
The status LEDs, WiFi On/Off button with LED, and WPS button with LED are on the top panel.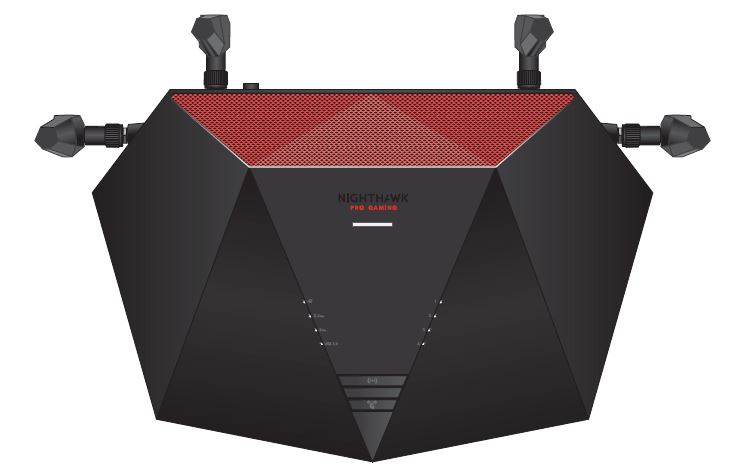
LED descriptions

Back Panel
The following figure shows the back panel connectors and buttons.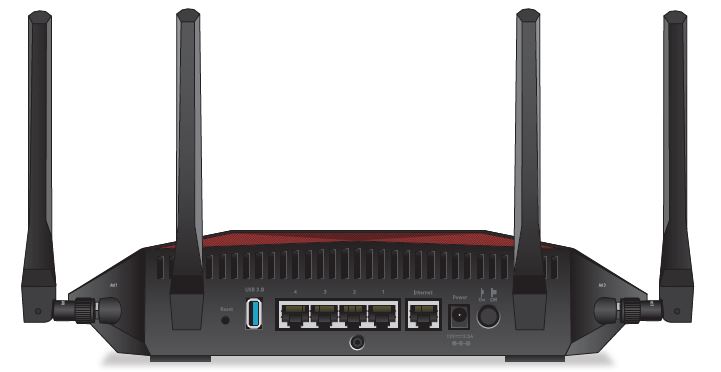
Viewed from left to right, the back panel contains the following components:
- Reset button. You can press the Reset button to reset the router to the factory default settings. If you press and hold the Reset button until the Power LED starts blinking amber, the router restarts and returns to its factory settings. For information about the factory settings, see Factory Settings on page 228.
- USB 3.0 port. You can connect a USB storage device to the USB 3.0 port.
- Ethernet ports. You can connect a LAN device to each of the four Gigabit Ethernet RJ-45 LAN ports numbered 1 through 4.
- Internet port. Connect the yellow Gigabit Ethernet RJ-45 WAN port to a modem such as a cable modem or DSL modem.
- DC power connector. Connect the power adapter that came in the product package to the DC power connector.
- Power the On/Off button. Press the Power On/Off button to provide power to the router.
Attach the Antennas
The router comes with four antennas.
- One antenna marked Ant 1 for antenna post marked Ant 1 on the right-side panel.
- Two antennas marked Ant 2 for the two antenna posts marked Ant 2 on the back panel.
- One antenna marked Ant 3 for the antenna post marked Ant 3 on the right-side panel.

Figure 4. Ant 1 to post 1 and Ant 3 to post 3

Figure 5. Ant 2 to post 2 (the back panel provides two Ant 2 posts for two Ant 2 antennas)
To attach the antennas:
- Align the antennas with the antenna ports on the router. Observe the markings on the antenna and on the antenna post. Connect each antenna to its corresponding antenna post. The antennas marked Ant 2 can be attached to either antenna post marked Ant 2 on the back panel.
- Attach the antennas on the threaded antenna posts.
- For the best WiFi performance, place the antennas in a vertical position, as shown in the previous figures.
Router Label
The router label on the bottom panel of the router shows the login information, WiFi Network Name (SSID), network key (password), serial number, and MAC address.
Position Your Router
The router lets you access your network anywhere within the operating range of your WiFi network. However, the operating distance or range of your WiFi connection can vary significantly depending on the physical placement of your router.
Position your router according to the following guidelines:
- Place your router near the center of the area where your computers and other devices operate, and within line of sight to your WiFi devices.
- Make sure that the router is within reach of an AC power outlet and near Ethernet cables for wired computers.
- Place the router in an elevated location, minimizing the number of walls and ceilings between the router and your other devices.
- Place the router away from electrical devices such as these:
- Ceiling fans
- Home security systems
- Microwaves
- Computers
- Bases of cordless phones
- 2.4 GHz and 5 GHz cordless phones
- Place the router away from large metal surfaces, large glass surfaces, insulated walls, and items such as these:
- Solid metal doors
- Aluminum studs
- Fish tanks
- Mirrors
- Brick
- Concrete surfaces
The following factors might limit the range of your WiFi:
- The thickness and number of walls the WiFi signal passes through.
- Other WiFi access points in and around your home might affect your router’s signal. WiFi access points are WiFi routers, WiFi repeaters, WiFi range extenders, and any other device that emits a WiFi signal for network access.
Cable Your Router
Connect your router to a modem and power on your router.
To cable your router:
- Unplug your modem, remove and reinsert the backup battery if it uses one, and then plug the modem back in.
- Use the Ethernet cable to connect the modem to the yellow Internet port on the router.
Note: If your Internet connection does not require a modem, connect your main Ethernet cable to the yellow Internet port on the router. - Connect the power adapter to your router and connect the power adapter to a power outlet.
- Press the Power On/Off button on the back panel of the router. The router’s Power LED lights are solid white when the router is ready.
Connect to the Network and Access the Router
You can connect to the router’s WiFi networks or use a wired Ethernet connection. This chapter describes the ways you can connect and how to access the router and log in.
The chapter contains the following sections:
- Connect to the Router Network
- Types of Logins
- Use a Web Browser to Access the Router
- Manage Your Router With the NETGEAR Nighthawk App
Connect to the Router Network
You can connect to the router network using a wired, WiFi, or WPS connection.
Note: If you set up your computer to use a static IP address, change the settings so that it uses Dynamic Host Configuration Protocol (DHCP).
Connect to the router using a wired connection
You can connect your computer to the router using an Ethernet cable and join the router’s local area network (LAN).
To connect your computer to the router with an Ethernet cable:
- Make sure that the router is receiving power (its Power LED is lit).
- Connect an Ethernet cable to an Ethernet port on your computer.
- Connect the other end of the Ethernet cable to an Ethernet port on the router. Your computer connects to the local area network (LAN).
Connect to the router’s WiFi network
You can connect WiFi-enabled devices to the router WiFi network using the router WiFi network name and password.
To connect to the WiFi network:
- Make sure that the router is receiving power (its Power LED is lit).
- On your WiFi-enabled device, open your device’s WiFi network management settings.
- Find and select the router’s WiFi network name (SSID). The router WiFi network name (SSID) is on the router label.
- Enter the router network key (password). The router network key (password) is on the router label. Your device connects to the WiFi network.
WiFi Connection Using WPS
You can connect to the router’s WiFi network with Wi-Fi Protected Setup (WPS) or you can find and select the WiFi network.
To use WPS to connect to the WiFi network:
- Make sure that the router is receiving power (its Power LED is lit).
- Check the WPS instructions for your computer or mobile device.
- Press the WPS button on the router.
- Within two minutes, on your computer or mobile device, press its WPS button or follow its instructions for WPS connections. Your computer or mobile device connects to the WiFi network.
Types of Logins
Separate types of logins serve different purposes. It is important that you understand the difference so that you know which login to use and when.
Several types of logins are associated with the router:
- ISP login. The login that your ISP gave you logs you into your Internet service. Your service provider gave you this login information in a letter or some other way. If you cannot find this login information, contact your service provider.
- WiFi network key or password. Your router is preset with a unique WiFi network name (SSID) and password for WiFi access. This information is on the router label.
- Router login. This logs you into the router web interface from a web browser as admin.
Use a Web Browser to Access the Router
When you connect to the network (either with WiFi or with an Ethernet cable), you can use a web browser to access the router to view or change its settings. When you access the router, the software automatically checks to see if your router can connect to your Internet service.
Automatic Internet Setup
You can set up your router automatically, or you can use a web browser to access the router and set up your router manually. Before you start the setup process, get your ISP information and make sure that the computers and devices in the network are using the settings described here. When your Internet service starts, your Internet service provider (ISP) typically gives you all the information needed to connect to the Internet. For DSL service, you might need the following information to set up your router:
- The ISP configuration information for your DSL account
- ISP login name and password
- Fixed or static IP address setting (special deployment by ISP; this setting is rare)
If you cannot locate this information, ask your ISP to provide it. When your Internet connection is working, you no longer need to launch the ISP login program on your computer to access the Internet. When you start an Internet application, your router automatically logs you in.
Note: During the setup process with the installation assistant, after you are connected to the Internet, you are prompted to register your product with NETGEAR. If you already have a NETGEAR account, you can use your existing account. If you do not yet have a free NETGEAR account, you can create one. The NETGEAR installation assistant runs on any device with a web browser.
To automatically set up your router:
- Make sure that the router is powered on.
- Make sure that your computer or mobile device is connected to the router with an Ethernet cable (wired) or over WiFi with the preset security settings listed on the label.
Note: If you want to change the router’s WiFi settings, use a wired connection to avoid being disconnected when the new WiFi settings take effect. - Launch a web browser.
The page that displays depends on whether you accessed the router before:
- The first time you set up the Internet connection for your router, the browser goes to http://www.routerlogin.net, and the Configuring the Internet Connection page displays.
- If you already set up the Internet connection, enter http://www.routerlogin.net in the address field for your browser to start the installation process.
- Follow the instructions on the page. The router connects to the Internet.
Note: During the setup process, you are required to change the default router password. The ideal secure password contains no dictionary words from any language and contains uppercase and lowercase letters, numbers, and symbols. The password can be up to 30 characters. - If the browser does not display a router page, do the following:
- Make sure that the computer is connected to one of the LAN Ethernet ports or over WiFi to the router.
- Make sure that the router is receiving power and that its Power LED is lit.
- Close and reopen the browser or clear the browser cache.
- Browse to http://www.routerlogin.net.
- If the computer is set to a static or fixed IP address (this setting is uncommon), change it to obtain an IP address automatically from the router.
- If the router does not connect to the Internet, do the following:
- Review your settings. Make sure that you selected the correct options and typed everything correctly.
- Contact your ISP to verify that you are using the correct configuration information.
- Read You Cannot Access the Internet on page 221. If problems persist, register your NETGEAR product and contact NETGEAR Technical Support.
Troubleshoot Internet Browsing
If your router can obtain an IP address but your computer is unable to load any web pages from the Internet, it might be for the following reasons:
- The traffic meter is enabled, and the limit was reached.
By configuring the traffic meter not to block Internet access when the traffic limit is reached, you can resume Internet access. If your ISP sets a usage limit, they might charge you for the overage. See Unblock the Traffic Meter After the Traffic Limit Is Reached on page 162. - Your computer might not recognize any DNS server addresses. A DNS server is a host on the Internet that translates Internet names (such as www addresses) to numeric IP addresses.
Typically, your ISP provides the addresses of one or two DNS servers for your use. If you entered a DNS address during the router’s configuration, restart your computer. Alternatively, you can configure your computer manually with a DNS address, as explained in the documentation for your computer. - The router might not be configured as the default gateway on your computer. Reboot the computer and verify that the router address (www.routerlogin.net) is listed by your computer as the default gateway address.
- You might be running login software that is no longer needed. If your ISP provided a program to log you into the Internet (such as WinPoET), you no longer need to run that software after installing your router. If you use Internet Explorer select Tools > Internet Options, click the Connections tab, and select the Never dial a connection. Other browsers provide similar options.
FAQS – NETGEAR XR1000 Nighthawk Pro Gaming WiFi 6 Router User Manual
Q: What is the ETGEAR XR1000 Nighthawk Pro Gaming WiFi 6?
A: The ETGEAR XR1000 Nighthawk Pro Gaming WiFi 6 is a high-performance router designed specifically for gamers. It utilizes the latest WiFi 6 (802.11ax) technology to deliver faster and more reliable wireless connections, reducing lag and providing a smoother gaming experience.
Q: Does the XR1000 support wired connections?
A: Yes, the XR1000 Nighthawk Pro Gaming WiFi 6 router has multiple Gigabit Ethernet ports that allow you to connect your gaming devices or other wired devices directly to the router for a stable and high-speed connection.
Q: Can the XR1000 Nighthawk Pro Gaming router be used for non-gaming purposes?
A: Absolutely! While the XR1000 is specifically designed with gaming in mind, it can be used as a high-performance router for any internet-connected devices. Its advanced features, such as WiFi 6 support and QoS settings, can benefit other bandwidth-intensive activities like streaming, video conferencing, and large file transfers.
Q: Can I set up a VPN connection with the XR1000?
A: Yes, the XR1000 supports VPN (Virtual Private Network) connections. You can configure a VPN on the router to secure your internet traffic and maintain privacy while accessing the internet.
Q: Does the XR1000 support mesh networking?
A: No, the XR1000 Nighthawk Pro Gaming router does not support mesh networking. It is a standalone router designed to provide high-performance gaming and networking capabilities in a single device.
Q: Can I manage the XR1000 router remotely?
A: Yes, you can manage and monitor the XR1000 router remotely through the Nighthawk app. The app allows you to control various router settings, set up guest networks, enable parental controls, and perform firmware updates from your smartphone or tablet.
Q: Does the XR1000 support beamforming technology?
A: Yes, the XR1000 Nighthawk Pro Gaming router supports beamforming technology. Beamforming helps to improve wireless signal strength and range by focusing the WiFi signals directly towards connected devices, enhancing overall network performance.
Q: Is the XR1000 compatible with my existing WiFi devices?
A: Yes, the XR1000 supports backward compatibility with previous WiFi standards (802.11a/b/g/n/ac), meaning it can connect and provide optimal performance to devices that use older WiFi technologies. However, to take full advantage of the XR1000’s WiFi 6 capabilities, you will need WiFi 6-compatible devices.
Q: Can I use the XR1000 with my current internet service provider (ISP)?
A: Yes, the XR1000 can be used with any internet service provider. It has a WAN (Wide Area Network) port that allows you to connect it to your modem or directly to the internet source provided by your ISP.
Pdf for NETGEAR XR1000 Nighthawk Pro Gaming WiFi 6 Router User Manual
[embeddoc url=”https://manualsdock.com/wp-content/uploads/2023/07/NETGEAR-XR1000-Nighthawk-Pro-Gaming-WiFi-6-Router-User-Manual.pdf” download=”all”]
For More Manuals Visit: ManualsDock

