ViewSonic M1 Plus Portable LED Projector
About ViewSonic
ViewSonic is a global company that specializes in visual display solutions, including monitors, projectors, digital signage, and interactive displays. Founded in 1987, ViewSonic has established itself as a leading provider of innovative and high-quality display products for both consumer and professional markets.
The company offers a wide range of display solutions to cater to various needs and environments. Their product lineup includes computer monitors for gaming, business, and home entertainment purposes, interactive flat panel displays for education and collaboration, projectors for classrooms and conference rooms, and digital signage solutions for advertising and information displays.
Compliance Information
FCC Statement
This device complies with part 15 of FCC Rules. Operation is subject to the following two conditions:
- this device may not cause harmful interference, and
- this device must accept any interference received, including interference that may cause undesired operation.
This equipment has been tested and found to comply with the limits for a Class B digital device, under part 15 of the FCC Rules. These limits are designed to provide reasonable protection against harmful interference in a residential installation. This equipment generates, uses, and can radiate radio frequency energy, and if not installed and used by the instructions, may cause harmful interference to radio communications. However, there is no guarantee that interference will not occur in a particular installation. If this equipment does cause harmful interference to radio or television reception, which can be determined by turning the equipment off and on, the user is encouraged to try to correct the interference by one or more of the following measures:
- Reorient or relocate the receiving antenna.
- Increase the separation between the equipment and the receiver.
- Connect the equipment to an outlet on a circuit different from that to which the receiver is connected.
- Consult the dealer or an experienced radio/TV technician for help.
Warning: You are cautioned that changes or modifications not expressly approved by the party responsible for compliance could void your authority to operate the equipment. The device for the band 5150-5250 MHz is only for indoor usage to reduce the potential for harmful interference to co-channel mobile satellite systems.
For Canada’s RF regulatory statement
This device contains license-exempt transmitter(s)/receiver(s) that comply with Innovation, Science, and Economic Development Canada’s license-exempt RSS(s). Operation is subject to the following two conditions:
- This device may not cause interference.
- This device must accept any interference, including interference that may cause undesired operation of the device.
RF exposure statement:
IC Radiation Exposure Statement
This equipment complies with the IC RSS-102 radiation exposure limit set forth for an uncontrolled environment. This equipment should be installed and operated with a minimum distance of 20cm between the radiator and your body CAN ICES-3 (B)/NMB-3(B)
CE Conformity for European Countries
The device complies with the EMC Directive 2014/30/EU Low Voltage Directive 2014/35/EU. and Ecodesign Directive 2009/125 / EC.
Important Safety Instructions
- Read these instructions.
- Keep these instructions.
- Heed all warnings.
- Follow all instructions.
- Do not use this unit near water.
- Clean with a soft, dry cloth.
- Do not block any ventilation openings. Install the unit according to the manufacturer’s instructions.
- Do not install near any heat sources such as radiators, heat registers, stoves, or other devices (including amplifiers) that produce heat.
- Do not defeat the safety purpose of the polarized or grounding-type plug. A polarized plug has two blades one wider than the other. A grounding-type plug has two blades and a third grounding prong. The wide blade and the third prong are provided for your safety. If the provided plug does not fit into your outlet, consult an electrician for the replacement of the obsolete outlet.
- Protect the power cord from being walked on or pinched particularly at plugs. Convenience receptacles and the point where they exit from the unit. Be sure that the power outlet is located near the unit so that it is easily accessible.
- Only use attachments/accessories specified by the manufacturer.
- Use only with the cart, stand, tripod, bracket, or table specified by the manufacturer, or sold with the unit. When a cart is used, use caution when moving the cart/unit combination to avoid injury from tipping over.
- Unplug this unit when unused for long periods.
- Refer all servicing to qualified service personnel. Servicing is required when the unit has been damaged in any way, such as: if the power-supply cord or plug is damaged, if liquid is spilled onto or objects fall into the unit, if the unit is exposed to rain or moisture, or if the unit does not operate normally or has been dropped.
Introduction
Projector features
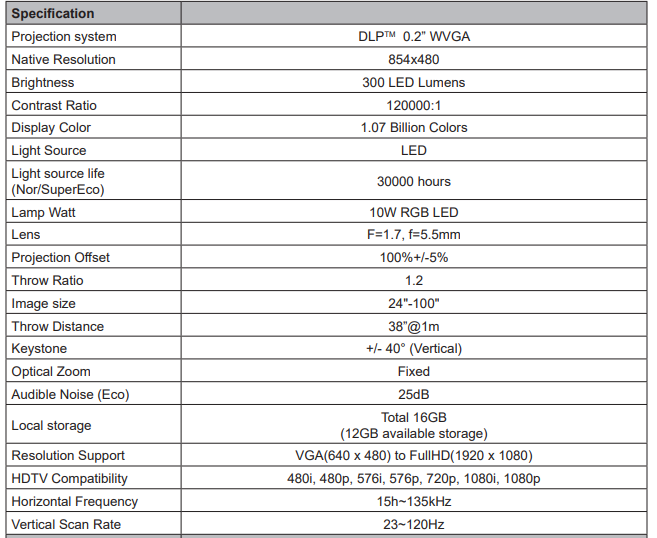
The Portable Cinema provides users with high-performance LED projection and a user-friendly design to deliver high reliability and ease of use. Some of the features may not be available on your projector. Actual performance may vary and is subject to model specifications.
- The 360-degree smart stand enables instant Power ON / OFF (with Lens cover function).
- Auto keystone to correct the distorted images automatically.
- The eye Protection function prevents objects from getting close to the direct light from the optical engine (30cm distance / 30 degrees).
- USB-C for video transmission and power supply.
- Embedded battery for easy outdoor projection (up to 6 hours).
- Switchable light source mode to extend your battery usage hours.
- 16GB internal storage ( Max. 12GB available storage for users).
- User-friendly UI design for easy navigation.
- Music mode enables users to enjoy music without a projection image.
- Short-throw lens design to allow 1.6m distance to project 60” screen size.
- LED light source with excellent light source life (30,000 hrs).
- Supports 3D display.
- Color modes provide choices for different projection purposes.
- Multi-language On-Screen Display (OSD) menus.
The apparent brightness of the projected image will vary depending on the ambient lighting conditions, and selected input signal contrast/brightness settings, and is directly proportional to projection distance.
Shipping contents
Package Overview
Carefully unpack and verify that you have all of the items shown below. If any of these items are missing, please contact your place of purchase.
- Projector

- AC Power Cord

- AC Power Adapter

- USB-C Cable (1M)

- Remote Control (with batteries)

- Soft Carrying Bag

- Quick Start Guide

Others
- Warranty Card (for specific regions ONLY)
NOTES
- Due to different applications in each Country, some regions may have different accessories.
- Make sure to properly discard the used batteries according to local regulations.
Product Overview
- Speaker

- Ventilation
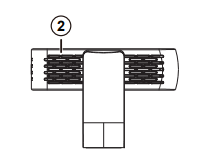
- Focus Ring
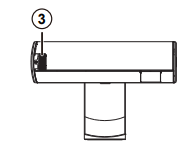
- Tripod hole
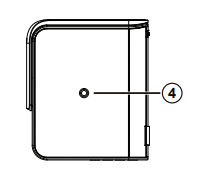
- IR receiver
- Eye Protection sensor

- Enter / Power button
- Volume – / Down
- Volume + / Up
- Return
- Battery indicator
- Speaker PR


- Micro SD
- DC in
- USB-C
- HDMI port
- Headphone
- USB Reader (5V1A out)
- Reset button**
- 360-degree smart stand
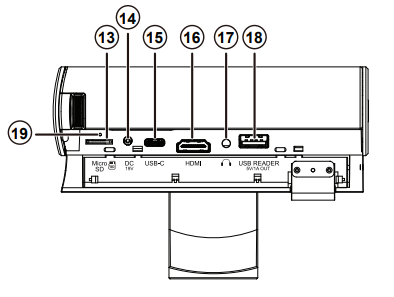
Insert a paper clip into the reset button to restart the projector if the system freezes.
Controls and functions
Projector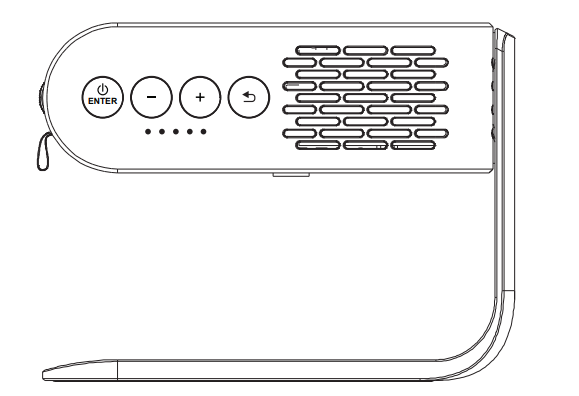

Remote Control
- Power button
- Settings
- Home
- Harman Kardon Settings
- Bluetooth Mode
- UP / KEYSTONE
- OK
- DOWN / KEYSTONE
- LEFT / BACKWARD
- RIGHT / FORWARD
- MUTE
- PLAY / PAUSE
- RETURN
- Volume Up
- Volume Down
Remote control effective range
Refer to the illustration about the location of the infrared (IR) remote control sensor(s). The remote control must be held at an angle within 30 degrees perpendicular to the projector’s IR remote control sensor(s) to function correctly. The distance between the remote control and the sensor(s) should not exceed 8 meters (~26 feet). Make sure that there are no obstacles between the remote control and the III sensor(s) on the projector that might obstruct the infrared beam.
Replacing the remote control battery
- To open the battery cover, turn the remote control over to view its back, and open the cover in the direction of the arrow as illustrated.
- Remove any existing batteries (if necessary) and install two AAA batteries observing the battery polarities as indicated in the base of the battery compartment. Positive (+) goes to positive and negative (-) goes to negative.
- Refit the cover by aligning it with the base and pushing it back down into position. Stop when it clicks into place.

Warning
- Avoid leaving the remote control and batteries in an excessive heat or humid environment like the kitchen, bathroom, sauna, sunroom, or a closed car.
- Replace only with the same or equivalent type recommended by the battery manufacturer.
- Dispose of the used batteries according to the manufacturer’s instructions and local environmental regulations for your region.
- Never throw the batteries into a fire. There may be a danger of an explosion.
- If the batteries are drained or if you will not be using the remote control for an extended period, remove the batteries to avoid damage to the remote control from possible battery leakage.
Setting up
Operating your projector
This portable projector allows you to plug and play your devices so you can easily open multimedia files and hear audio straight from its built-in Harman Kardon speakers. For your safety and to maintain the quality of this unit, refer to the following steps when operating your Projector.
Power On/Off
Using power cord
- Connect the power cord to the power adapter.
- Connect the AC power cord to a power source
- Connect the DC power connector to your projector.

Note Charge the projector for 4.5 hours before using it in battery mode for the first time.
IMPORTANT!
- Use only the bundled power adapter to change the battery pack and supply power to your LED projector.
- Ensure that your LED projector is connected to the power adapter before turning it on for the first time. We strongly recommend that you use a grounded wall socket while using your LED projector in power adapter mode.
- The socket outlet must be easily accessible and near your LED projector.
- To disconnect your LED projector from its main power supply, unplug your LED projector from the power socket.
Warning
Read the following precautions for your LED projector’s battery.
- The battery used in this device may present a risk of fire or chemical burn if removed or disassembled.
- Follow the warning labels for your safety. • Risk of explosion if the battery is replaced by an incorrect type.
- Do not dispose of it in the fire. • Never attempt to short-circuit your LED projector’s battery.
- Never attempt to disassemble and reassemble the battery.
- Discontinue usage if leakage is found. • The battery and its components must be recycled or disposed of properly.
- Keep the battery and other small components away from children,
Using The Battery
A warning message is displayed when the battery is running out. As your battery is low, the projector will be turned off in a minute. If the screen shows a low battery message, be sure to charge the battery.
Battery using time information
Note There will be a very low power consumption during standby mode, suggest fully charging the battery before usage every time.
Mount the Projector
Screw a standard tripod into the screw hole on the projector.
The tripod is not included.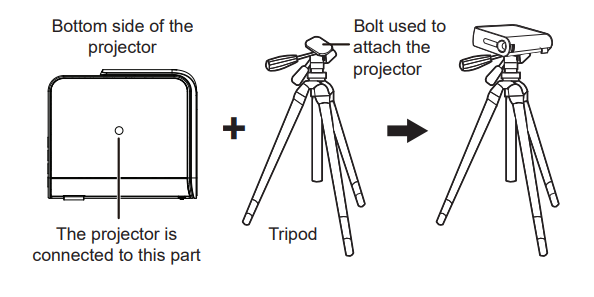
Open the smart stand and adjust the focus ring
- Open the smart stand by moving its lens cover down

- Adjust the image focus of the projection onscreen by moving the focus ring up and down.

Adjust Projected Image
The projector is equipped with a smart stand for adjusting the projected image
Using the menus
The projector is equipped with On-Screen Display (OSD) menus for making various adjustments and settings. The OSD screenshots below are for reference only and may differ from the actual design. Below is the overview of the OSD menu.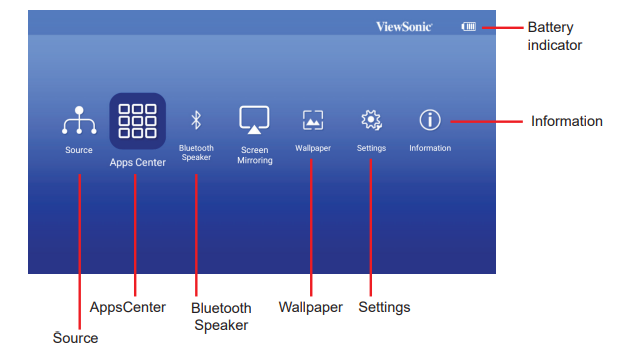
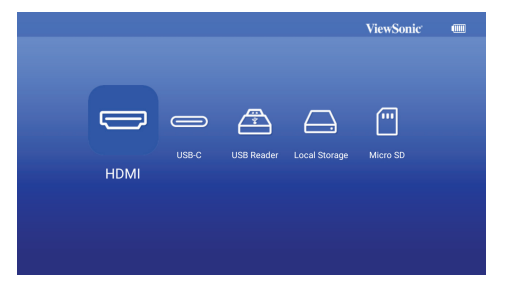
Launch the onscreen display by opening the smart stand of your projector OSD menus will be shown after the ViewSonic starts up screen.
To use the OSD menus, please select your language first.
- Press the Settings button on the remote to turn the OSD setting page on
- Use < / > to highlight the Settings menu.

- Press ▼ to highlight language and press to select a preferred Language.
- Press OK to save the settings
- Press the Return / Home button to leave or return to the Home page.

Adjusting your projector’s settings
Refer to the following steps when accessing the onscreen display menu options to adjust your projector settings:
- Launch the onscreen display menu
- Press< / >to select the menu option you would like to access
- Press < / > to adjust the settings according to your preference.
- Press OK to save the new settings.
- Press settings to go back to the settings page
- Press Home to go back to the home page

Connect the projector to your device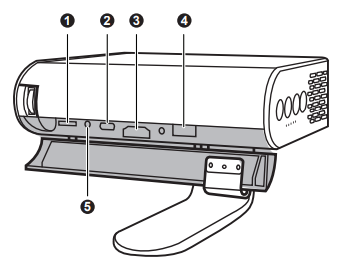
- Please use the supplied USB-C cable to ensure compatibility.
- Please make sure your USB-C device can support video transmission

Different menu options
Switching input signal
Different input signals can be used to connect with the projector.
- The different source is shown on the OSD homepage.
- Press < / > until your desired signal is selected and press OK.
Once detected, the selected source information will be displayed on the screen for seconds.
Tips for using a USB reader:
- Some USB storage devices may not work or may work incorrectly.
- If you use a USB extension cable, the USB device may not be recognized or may not work properly.
- Use only USB storage devices formatted with the Windows FAT32 or NTFS file system.
- If the file size is too large or users move too fast to the next page, it will take some time for the file to load.
- Data in a USB storage device can be damaged so be sure to back up important files. Data maintenance is the user’s responsibility and the manufacturer is not responsible for data loss.

Using the 3D function
This portable cinema features a 3D function that enables you to enjoy 3D movies, videos, and sporting events more realistically by presenting the depth of the images. You need to wear a pair of 3D glasses to view 3D images. If the 3D signal is input from an HDMI 1.4a compatible device, the portable cinema detects the signal for 3D Sync information, and once detected, it projects images in 3D format automatically.
To activate 3D functions:
- Press OK, video control bar will pop up when playing videos
- Select the 3D settings icon, the 3D Settings menu is displayed in the right bottom corner.
- Highlight 3D self-detect and change to Auto.
When the 3D Sync function is on:
- The brightness level of the projected image will decrease.
- The Color Mode cannot be adjusted.
If you discover the inversion of the 3D image depth, set the 3D Sync Invert function to ON to correct the problem.
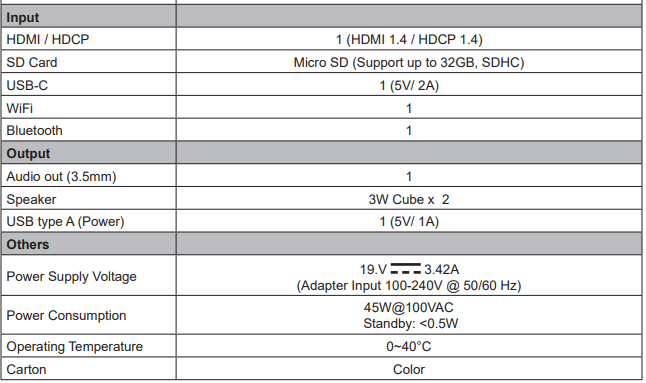
Specification sheet
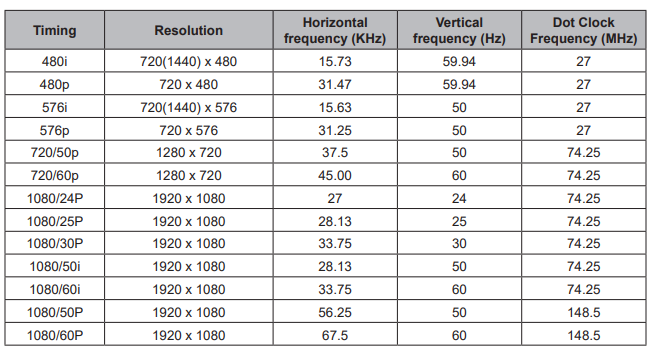
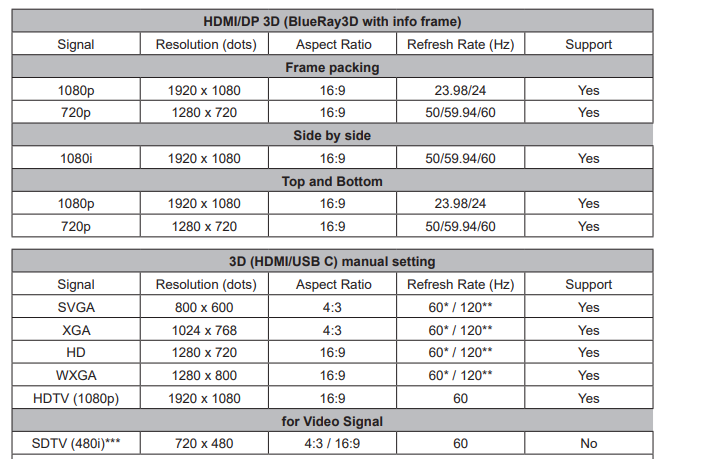
HDMI Support Video Timing
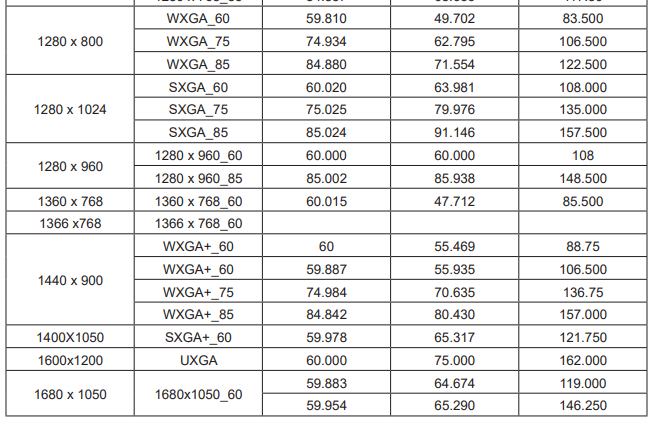
HDMI Support PC Timing
3D Support Timing
Note:
- 60Hz signals are supported for side-by-side, top, and bottom, frame sequential
- 120 Hz signals support for frame sequential only
- The video signal (SDTV 480i) is supported for frame sequential only
USB-C Support Timing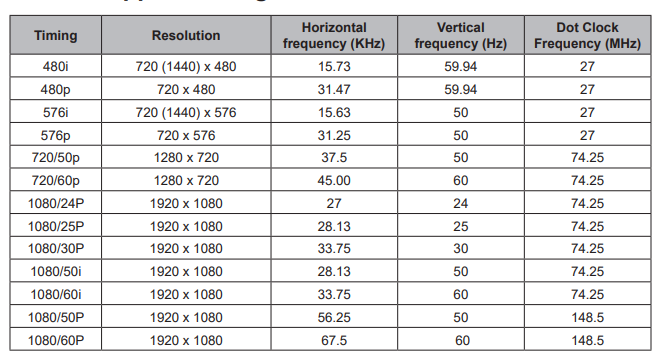
Customer Support
For technical support or product service, see the table below or contact your reseller.
Note: You will need the product serial number.
Limited Warranty ViewSonic® Projector
What the warranty covers
ViewSonic warrants its products to be free from defects in material and workmanship, under normal use, during the warranty period. If a product proves to be defective in material or workmanship during the warranty period, ViewSonic will, at its sole option, repair or replace the product with a like product. Replacement products or parts may include remanufactured or refurbished parts or components.
For warranty in North and South America, please visit the following website for warranty information, https://www.viewsonic.com/us/support/limited-warranties/ standard-warranty
For other regions
Limited One (1) year General Warranty
ViewSonic’s standard warranty period is one (1) year for any product model in any country unless a longer warranty period is specified and provided by ViewSonic. Please refer to the ViewSonic website in your country to check the local terms and model variants, and see if the product model in your country is eligible for a longer warranty period.
Limited One (1) year Heavy Usage Warranty
Under heavy usage settings, where a projector’s use includes more than fourteen (14) hours of average daily usage, North and South America: One (1) year warranty for all parts excluding the Light Source, one (1) year for labor, and ninety (90) days for the original Light Source from the date of the first consumer purchase; Europe: One (1) year warranty for all parts excluding the Light Source, one (1) year for labor, and ninety (90) days for the original Light Source from the date of the first consumer purchase.
Other regions or countries: Please check with your local dealer or local ViewSonic office for the warranty information.
Light Source warranty is subject to terms and conditions, verification, and approval. Applies to the manufacturer’s installed Light Source only. All accessory Light Source purchased separately are warranted for 90 days.
Who the warranty protects
This warranty is valid only for the first consumer purchaser.
What the warranty does not cover
- Any product on which the serial number has been defaced, modified, or removed.
- Damage, deterioration, failure, or malfunction resulting from:
- Accident, abuse, misuse, neglect, fire, water, lightning, or other acts of nature, improper maintenance, unauthorized product modification, or failure to follow instructions supplied with the product.
- Operation outside of product specifications.
- Operation of the product for other than the normal intended use or not under normal conditions.
- Repair or attempted repair by anyone not authorized by ViewSonic.
- Any damage to the product due to shipment.
- Removal or installation of the product.
- Causes external to the product, such as electric power fluctuations or failure.
- Use of supplies or parts not meeting ViewSonic’s specifications.
- Normal wear and tear.
- Any other cause which does not relate to a product defect.
- Removal, installation, and set-up service charges.
How to get service
- For information about receiving service under warranty, contact ViewSonic Customer Support (please refer to the “Customer Support” page). You will need to provide your product’s serial number.
- To obtain warranted service, you will be required to provide (a) the original dated sales slip, (b) your name, (c) your address, (d) a description of the problem, and (e) the serial number of the product.
- Take or ship the product freight prepaid in the original container to an authorized ViewSonic service center or ViewSonic.
- For additional information or the name of the nearest ViewSonic service center, contact ViewSonic.
Limitation of implied warranties
There are no warranties, express or implied, which extend beyond the description contained herein including the implied warranty of merchantability and fitness for a particular purpose.
Exclusion of damages
ViewSonic’s liability is limited to the cost of repair or replacement of the product.
ViewSonic shall not be liable for:
- Damage to other property caused by any defects in the product, damages based upon inconvenience, loss of use of the product, loss of time, loss of profits, loss of business opportunity, loss of goodwill, interference with business relationships, or other commercial loss, even if advised of the possibility of such damages.
- Any other damages, whether incidental, consequential, or otherwise.
- Any claim against the customer by any other party.
Effect of local law:
This warranty gives you specific legal rights, and you may also have other rights that vary from local authority. Some local governments do not allow limitations on implied warranties and/or do not allow the exclusion of incidental or consequential damages, so the above limitations and exclusions may not apply to you.
Sales outside the U.S.A. and Canada:
For warranty information and service on ViewSonic products sold outside of the U.S.A. and Canada, contact ViewSonic or your local ViewSonic dealer. The warranty period for this product in mainland China (Hong Kong, Macao, and Taiwan Excluded) is subject to the terms and conditions of the Maintenance Guarantee Card.
For users in Europe and Russia, full details of the warranty provided can be found at www.viewsoniceurope.com under Support/Warranty Information.
Projector Warranty Term Template In UG
VSC_TEMP_2005
FAQS About ViewSonic M1 Plus Portable LED Projector
How long is the lifespan of a ViewSonic projector?
30,000+ hours
How long does a ViewSonic projector take to charge?
roughly 3 hours
Why does my ViewSonic projector not have a light?
Verify the projector is turned on.
How big is the ViewSonic M1’s screen?
The M1 mini can project a roughly 40″ image.
How many hours a day are projectors usable?
As long as there is adequate ventilation to keep the projector cool.
How long is a projector light good for?
around 2,000 to 5,000 hours.
How is a Viewsonic projector cleaned?
To eliminate dust, use a compressed air canister.
How long does it take a projector to start up?
30–40 second
ViewSonic M1 is wireless, right?
a portable wireless projector with speakers from Harman Kardon
Has the ViewSonic M1 Bluetooth?
equipped with intelligent Bluetooth and Wi-Fi connectivity
Can the ViewSonic M1 throw a long distance?
The M1 small can project a nearly 40″ screen from 1.1 meters away because to its 1.2 throw ratio.
For more manuals by ViewSonic, Visit Manualsdock
[embeddoc url=”https://manualsdock.com/wp-content/uploads/2023/09/ViewSonic-M1-Plus-Portable-LED-Projector-User-Guide.pdf” download=”all”]


