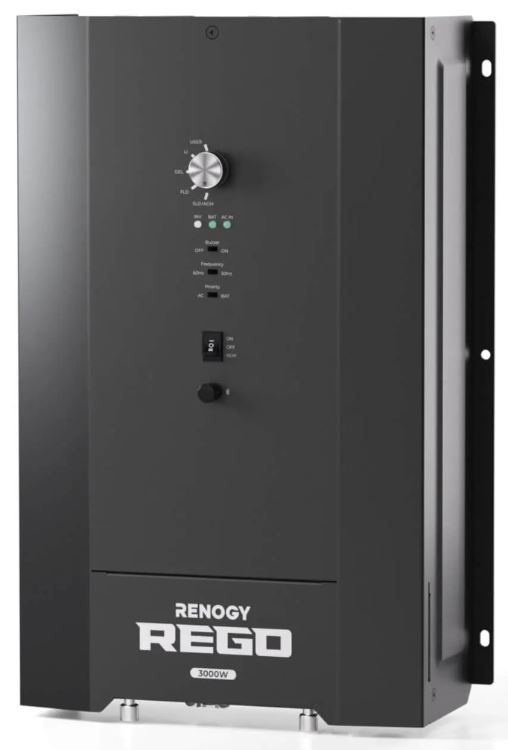
Renogy REGO 3000W 12V Pure Sine Wave HF Inverter Charger
About Renogy
Renogy is a provider of premium battery charging devices, LED lighting options, and solar panels. The company sells panels all around the world and is based in Chino, California.
Introduction
REGO 12V 3000W HF Inverter Charger is your off-grid smart living center that revolutionizes comfort when you live in your off-grid home or RV. The inverter charger can invert DC to AC directly supply power to the load, and charge the battery when it is connected to the utility power.
In addition, it supports different types of batteries such as lithium, GEL, flooded, SLD, and AGM batteries. The inverter charger can switch the power supply from the grid power to batteries within 10 milliseconds, ensuring a smooth mode switch without powering off the load. The lever-style connectors make AC IN/OUT connections simple and easy. They simplify installation and shorten the installation time.
The inverter charger can be connected to Renogy devices and smart accessories via Bluetooth or RVC. When the inverter charger works in association with the DC Home app or Renogy ONE, you will have the same system monitoring wherever you go on your smartphone. With advanced pure sine wave technology, the inverter charger can protect and extend the life of your electronic equipment and loads.
. Key Features
- Battery versatility and easy-to-configure settings
Compatible with four preset battery types and allows custom parameter settings. Provides a simple switch setup for battery type, output frequency, and input priority setting.
- Multi-stage battery charging and customizable charging
Offers up to three-stage charging for various battery types and supports adjustable charging current (up to 150A) to suit your daily power needs.
- Dual voltage support and high-current output
Compatible with single-phase 120V and split-phase 120V/240V.
Integrates a 50A AC Transfer Relay for continuous 50A current to AC output when connected to both the grid and battery.
- Built-in Bluetooth
Connects to the DC Home app for energy data monitoring, control, and configuration and supports OTA firmware upgrades.
- High conversion efficiency thanks to quality pure sine wave
Achieves peak conversion efficiency of over 90%, reducing energy loss thanks to the smooth AC power with minimal harmonic distortion, equivalent to grid power quality.
- Automatic generator start
Equipped with dry contacts for automatic generator start and stop function, facilitating battery charging.
- Multiple protections
Provides Undervoltage, overvoltage, overcurrent, overload, overtemperature, and short circuit protections for enhanced safety.
What’s In the Box?
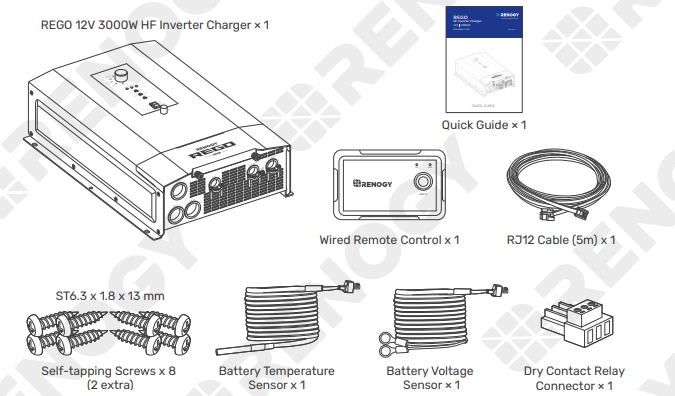
- Make sure that all accessories are complete and free of any signs of damage.
- The accessories and product manual listed are crucial for the installation, excluding warranty information and any additional items. Please note that the package contents may vary depending on the specific product model
Recommended Tools

Product Overview
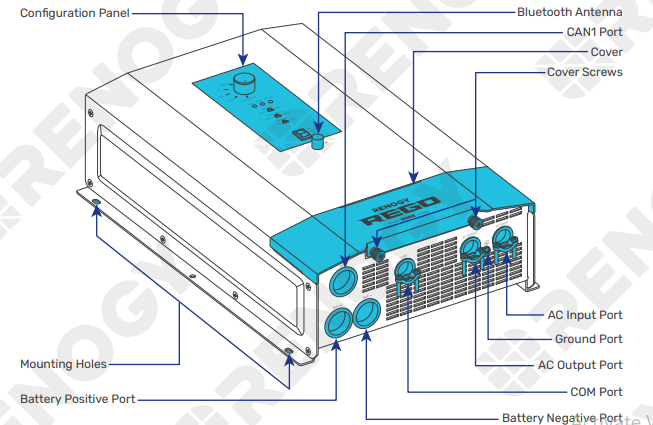
- Exterior
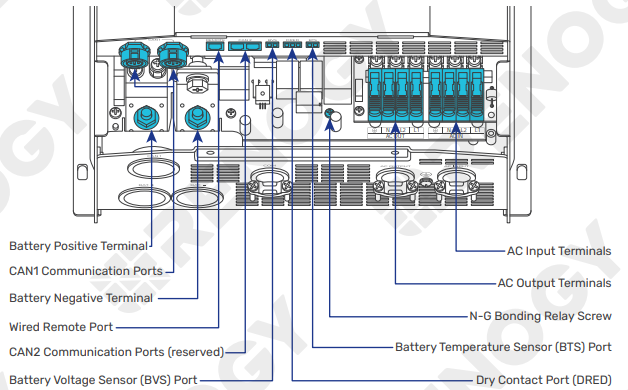
- Interior (with the cover removed)
System Setup 
- The wiring diagram only shows the key components in a typical DC-coupled off-grid energy storage system for illustrative purposes. The wiring might be different depending on the system configuration. Additional safety devices, including disconnect switches, emergency stops, and rapid shutdown devices, might be required. Wire the system according to the regulations at the installation site.
- The connection of AC IN ports varies depending on the connected grid systems. For single-phase 120V grid systems, only AC IN L1 and AC IN N ports are used for the input. For split-phase 120V/240V grid systems, AC IN L1, AC IN L2, and AC IN N ports are used for the input.
Preparation
Plan a Mounting Site
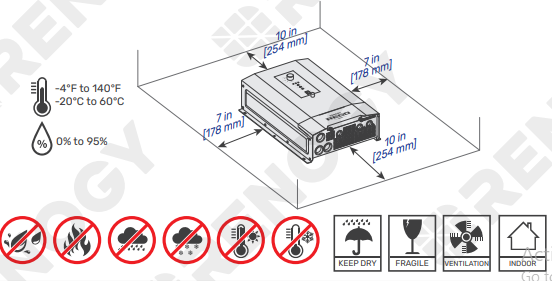
The inverter charger requires adequate clearance for installation, wiring, and ventilation. The minimum clearance is provided below. Ventilation is highly recommended if it is mounted in an enclosure. Select a proper mounting site to ensure the inverter charger can be safely connected to the battery and grid/AC generator with the relevant cables.
- Risk of explosion! Never install the inverter charger in a sealed enclosure with flooded batteries! Do not install the inverter charger in a confined area where battery gases can accumulate.
- The inverter charger should be installed on a vertical surface protected from direct sunlight.
- Keep the inverter charger out of the reach of children and animals.
- Do not expose the inverter charger to flammable or harsh chemicals or vapors.
- Make sure that the inverter charger is installed in a place at ambient temperature from -4°F to 140°F (-20°C to 60°C).
- Make sure that the inverter charger is installed in an environment with relative humidity between 0% and 95% and no condensation.
- If the inverter charger is installed improperly on a boat, it may cause damage to the components of the boat. Has the inverter been charged by a qualified electrician?
- The inverter charger cannot operate at full load in ambient temperatures above 113°F (45°C).
- The inverter charger should be as close to the battery as possible to avoid voltage drop due to long cables.
- It is recommended that all cables (except communication cables) should not exceed 10 meters (32.8 feet) because excessively long cables result in a voltage drop. The communication cables should be shorter than 6 m (19.6 feet).
- The cable specifications listed in the user manual account for critical, less than 3% voltage drop and may not account for all configurations.
- Ensure the inverter charger is firmly grounded to a building, vehicle, or earth grounded. Keep the inverter charger away from EMI receptors such as TVs, radios, and other audio/visual electronics to prevent damage/interference to the equipment.
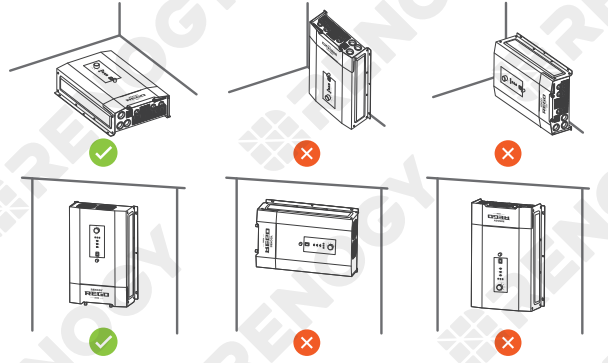
To ensure good ventilation and optimal system performance, we recommend mounting the inverter charger vertically (terminals down) on a wall or horizontally on the floor.
Check the Inverter Charger
- . Inspect the inverter charger for any visible damage including cracks, dents, deformation, and other visible abnormalities. All connector contacts shall be clean, free of dirt and corrosion, and dry.
-
- Do not use the inverter charger if there is any visible damage.
- Do not puncture, drop, crush, penetrate, shake, strike, or step on the inverter charger.
- There are no serviceable parts in the inverter charger. Do not open, dismantle, repair, tamper with, or modify the inverter charger.
- Confirm the polarities of the devices before connection. A reverse polarity contact can result in damage to the inverter charger and other connected devices, thus voiding the warranty.
- Do not touch the connector contacts while the inverter charger is in operation.
- Wear proper protective equipment and use insulated tools during installation and operation. Do not wear jewelry or other metal objects when working on or around the inverter charger.
- Do not dispose of the inverter charger as household waste. Comply with local, state, and federal laws and regulations and use recycling channels as required.
- Ensure the On/Off/Remote Power Switch is in the OFF position.
Check the Battery
- Battery Scenario A: REGO Battery Kit
- Battery Scenario B: Normal Battery Kit
 .
.
- Inspect the battery for any visible damage including cracks, dents, deformation, and other visible abnormalities. All terminals shall be clean, free of dirt and corrosion, and dry. The inverter charger can only be connected to deep-cycle gel-sealed lead-acid batteries (GEL), flooded lead-acid batteries (FLD), sealed lead-acid batteries (SLD/AGM), or lithium iron phosphate batteries (LI). The inverter charger provides overcurrent protection by detecting the DC input current from the battery in real-time. When the battery input reaches 400A, the inverter charger automatically shuts down the battery input to prevent damage caused by excessively high currents.
-
- Do not use the battery if there is any visible damage. Do not touch the exposed electrolyte or powder if the battery housing is damaged.
- When being charged, the battery may give off explosive gas. Make sure there is good ventilation.
- Take care to use a high-capacity lead-acid battery. Be sure to wear protective goggles. If carelessly getting electrolytes in your eyes, flush your eyes with clean water immediately.
- Combine batteries in parallel or series as needed. Before installing the inverter charger, ensure all battery groups are installed properly.
- Read the user manual of the battery in use carefully.
- Check battery system voltage. This inverter charger supports a maximum system voltage of 17V. Read the user manual of the specific battery for battery voltage parameters, and calculate the voltage of the battery or battery pack system according to the formula to ensure that it does not exceed 17V.
How to Properly Install Cable Clamps?
The AC Input Port, AC Output Port, and COM Port are equipped with cable clamps to ensure that the wiring connections remain secure and do not come loose due to vibrations.
- Step 1: Loosen the screws on a cable clamp with a Phillips Screwdriver.
- Step 2: Lift the clamp, and run the cables through the clamp.
- Step 3: Secure the clamp by fastening the screws
Installation
- Wear Insulating Gloves

- .Mount the Inverter Charger
Secure the inverter charger to the installation site by fixing self-tapping screws through the mounting holes. 
- Remove the Cover
- Step 1: Turn the two Cover Screws counterclockwise either by hand or by using a Phillips screwdriver.
- Step 2: Remove the Cover

- Ground the Inverter Charger
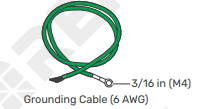 Step 1: Remove the screw on the Ground Port with a Phillips Screwdriver.
Step 2: Connect the Grounding Cable Ring Terminal to the grounding port of the inverter charger with the removed screw by using the Phillips Screwdriver.
Step 3: Connect the bare wire end of the grounding cable to a grounding rod (not included), if applicable.

- Install a Wired Remote Control
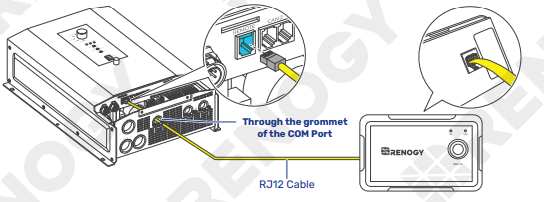
You can use a Wired Remote Control to power on or off the inverter charger remotely.- Step 1: Run the RJ12 Cable through the grommet of the COM Port.
- Step 2: Connect the RJ12 connector to the Wired Remote Port on the inverter charger.
- Step 3: Connect the other end of the cable to the Wired Remote Control.
Install a Battery Voltage Sensor
The Battery Voltage Sensor measures the battery voltage during discharging and compensates for any voltage drop across the cables at the battery terminal. This helps minimize the impact on the battery’s operational voltage.
Battery Scenario A: REGO Battery Kit
- Step 1: Run the Battery Voltage Sensor cable through the grommet of the COM Port.
- Step 2: Connect the terminal block to the Battery Voltage Sensor (BVS) Port on the inverter charger.
- Step 3: Connect the Negative Ring Terminal of the Battery Voltage Sensor to the Negative Insert Terminal on the REGO 4 Ports 400A System Combiner Box.
- Step 4: Connect the Positive Ring Terminal of the Battery Voltage Sensor to the Positive Insert Terminal on the REGO 4 Ports 400A System Combiner Box.

Battery Scenario B: Normal Battery Kit
- Step 1: Run the Battery Voltage Sensor cable through the grommet of the COM Port.
- Step 2: Connect the terminal block to the Battery Voltage Sensor (BVS) Port on the inverter charger.
- Step 3: Connect the Negative Ring Terminal of the Battery Voltage Sensor to the Negative Terminal on the 12V battery.
- Step 4: Connect the Positive Ring Terminal of the Battery Voltage Sensor to the Positive Terminal on the 12V battery.

Install a Battery Temperature Sensor
The temperature sensor measures the surrounding temperature of the battery and compensates for the floating charge voltage when the battery temperature is low. Do not use the temperature sensor on a LiFePO4 (LFP) battery which comes with a battery management system (BMS).
- Step 1: Run the Battery Temperature Sensor cable through the grommet of the COM Port.
- Step 2: Connect the terminal block to the Battery Temperature Sensor (BTS) Port on the inverter charger.
- Step 3: Mount the sensor securely at a suitable location near the battery.

Connect the Inverter Charger to a Battery
Battery Scenario A: REGO Battery Kit
- Step 1: Remove the retaining nut from the Battery Negative Terminal on the inverter charger by using a Socket Wrench. Run the negative lug (in black) of the Anderson Adapter Cable through the grommet of the Battery Negative Port, and connect the negative lug to the Battery Negative Terminal with the retaining nut.
- Step 2: Repeat the actions on the Battery Positive Terminal on the inverter charger to finish the connection on the positive end.
- Step 3: Lift the operating handle to open the cover of the REGO 4 Ports 400A System Combiner Box NH2 Fuse Switch Disconnector, press and hold the release tab on the inside of the cover, locate the slots on the inside of the cover, slide the gripping lugs of the NH2 Fuses into the slots, and release the release tab.
- Ensure the NH2 Fuse is installed tightly before closing the cover of the NH2 Fuse Switch Disconnector.
- Press the cover firmly to ensure that the NH2 Fuse is engaged.
- Step 4: Insert the Anderson SB350 connectors into the Anderson 350 Connector (Inverter) on the REGO 4 Ports 400A System Combiner Box.
Battery Scenario B: Normal Battery Kit
- Step 1: Remove the retaining nut from the Battery Negative Terminal on the inverter charger by using a Socket Wrench. Run the Negative Battery Adapter Cable through the grommet of the Battery Negative Port of the inverter charger, and connect the ring terminal of the Negative Battery Adapter Cable to the Battery Negative Terminal with the retaining nut.
- Step 2: Connect the other ring terminal of the Negative Battery Adapter Cable to the negative terminal of the battery.
- Step 3: Repeat the actions in Step 1 on the Battery Positive Terminal on the inverter charger to finish the connection on the positive end.
- Step 4: Remove the retaining nuts from the ANL Fuse, connect the Positive Battery Adapter Cable to one end of the ANL Fuse, and fix them with one retaining nut.
- Step 5: Connect the ANL Fuse to the positive terminal of the battery via the Fuse Cable, and fix the fuse cable on the ANL Fuse with the other retaining nut
Connect the Inverter Charger to the Grid
The connection of AC IN ports varies depending on the connected grid systems. For single-phase 120V grid systems, only AC IN L1 and N ports are used for the input. For split-phase 120V/240V grid systems, AC IN L1, L2, and N ports are used for the input.
Install the Cover
- Step 1: Install the cover of the inverter charger.
- Step 2: Install the two cover screws clockwise either by hand or by using a Phillips screwdriver.
Troubleshooting
A solid yellow or red LED indicates that the inverter charger is faulty. Please login to the DC Home app for troubleshooting details.

Dimensions & Specifications
- Dimensions

- Technical Specifications

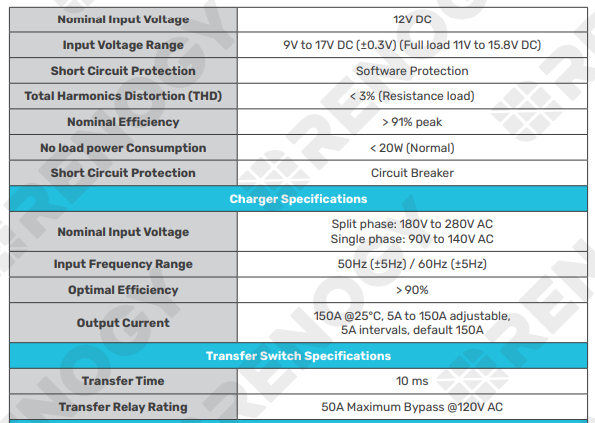

Maintenance
Inspection
For optimum performance, it is recommended to perform these tasks regularly. z Ensure the inverter charger is installed in a clean, dry, and ventilated area. z Ensure there is no damage or wear on the cables.
- Ensure the firmness of the connectors and check if there are any loose, damaged, or burnt connections.
- Make sure the indicators are in proper condition. z Ensure there is no corrosion, insulation damage, or discoloration marks of overheating or burning.
- If the inverter charger is dirty, use a damp cloth to clean the outside of the device to prevent dust and dirt from accumulating. Before the inverter charger is powered on, make sure it is completely dry after cleaning. z Make sure the ventilation holes are not blocked.
In some applications, corrosion may exist around the terminals. Corrosion can loosen springs and increase resistance, leading to premature connection failure. Apply dielectric grease to each terminal contact periodically. Dielectric grease repels moisture and protects the terminal contacts from corrosion.
Risk of electric shock! Make sure that all power supplies are turned off before touching terminals on the inverter charger.
Cleaning
Follow the steps below to clean the inverter charger regularly. z Disconnect all cables connected to the inverter charger.
- Wear proper protective equipment and use insulated tools during operation. Be careful when touching bare terminals of capacitors as they may retain high lethal voltages even after power is removed.
- Wipe the housing of the inverter charger and connector contacts with a dry cloth or nonmetallic brush. If it is still dirty, you can use household cleaners.
- Make sure the ventilation holes are not blocked.
- Dry the inverter charger with a clean cloth and keep the area around the inverter charger clean and dry.
- Make sure the inverter charger is completely dry before reconnecting it to the battery and AC input.
Storage
Follow the tips below to ensure that the inverter charger is stored well. z Disconnect all cables connected to the inverter charger.
- By applying dielectric grease to each terminal, the dielectric grease repels moisture and protects the connector contacts from corrosion.
- Store the inverter charger in a well-ventilated, dry, and clean environment with a temperature between -40°F to 158°F (-40°C to 70°C).
Emergency Responses
In the event of any threat to health or safety, always begin with the steps below before addressing other suggestions. z Immediately contact the fire department or other relevant emergency response team. z Notify all people who might be affected and ensure that they can evacuate the area.
Fire
- Disconnect all cables connected to the inverter charger.
- Put out the fire with a fire extinguisher. Acceptable fire extinguishers include water, CO₂, and ABC.
Flooding
- If the inverter charger is submerged in water, stay away from the water.
- Disconnect all cables connected to the inverter charger.
Smell
- Ventilate the room.
- Disconnect all cables connected to the inverter charger.
- Ensure that nothing is in contact with the inverter charger.
Noise
- Disconnect all cables connected to the inverter charger.
- Make sure no foreign objects are stuck in the fan of the inverter charger or the ring terminal.
The normal noise value of the inverter charger is less than 54dB during operation. If the noise is abnormal, contact our technical service through renogy.com/contact-us.
Renogy Support
To discuss inaccuracies or omissions in this quick guide or user manual, visit or contact us at:
FCC Statement
This device complies with Part 15 of the FCC Rules. Operation is subject to the following two conditions:
- This device may not cause harmful interference.
- This device must accept any interference received, including interference that may cause undesired operation.
Any Changes or modifications not expressly approved by the party responsible for compliance could void the user’s authority to operate the equipment.
This equipment has been tested and found to comply with the limits for a Class B digital device, under Part 15 of the FCC Rules. These limits are designed to provide reasonable protection against harmful interference in a residential installation. This equipment generates, uses, and can radiate radio frequency energy and, if not installed and used by the instructions, may cause harmful interference to radio communications. However, there is no guarantee that interference will not occur in a particular installation. If this equipment does cause harmful interference to radio or television reception, which can be determined by turning the equipment off and on, the user is encouraged to try to correct the interference by one or more of the following measures:
- Reorient or relocate the receiving antenna.
- Increase the separation between the equipment and the receiver.
- Connect the equipment to an outlet on a circuit different from that to which the receiver is connected.
- Consult the dealer or an experienced radio / TV technician for help.
FCC Radiation Exposure Statement
This equipment complies with FCC radiation exposure limits set forth for an uncontrolled environment. This equipment should be installed and operated with a minimum distance of 20 cm between the radiator & your body.
Renogy Empowered
- Renogy aims to empower people around the world through education and distribution of DIY-friendly renewable energy solutions.
- We intend to be a driving force for sustainable living and energy independence.
- In support of this effort, our range of solar products makes it possible for you to minimize your carbon footprint by reducing the need for grid power.
Live Sustainably with Renogy
Did you know? In a given month, a 1kW solar energy system will…
- Save 170 pounds of coal from being burned
- Save 300 pounds of CO2 from being released into the atmosphere
- Save 105 gallons of water from being consumed
Renogy Power
Renogy Power Plus allows you to stay in the loop with upcoming solar energy innovations, share your experiences with your solar energy journey, and connect with like-minded people who are changing the world in the Renogy Power Plus community
FAQS About Renogy REGO 3000W 12V Pure Sine Wave HF Inverter Charger
What is the Renogy REGO 3000W Inverter Charger?
The Renogy REGO 3000W Inverter Charger is a device that converts DC power (from a 12V battery system) into AC power. Additionally, it may have charging capabilities to recharge the connected batteries.
What type of wave does it produce?
The REGO 3000W is described as a “Pure Sine Wave” inverter, which means it produces a clean and smooth sine wave output similar to the power from the grid. This type of wave is ideal for sensitive electronics.
What is the input voltage requirement for charging?
Inverter chargers typically require a specific input voltage range for charging the batteries. Check the product specifications for the input voltage requirements of the REGO 3000W.
What is the charging current?
Inverter chargers have a charging current, which is the rate at which they can replenish energy into connected batteries. Check the product specifications for details on the charging current of the REGO 3000W.
Can it be used for off-grid solar installations?
Inverter chargers are often used in off-grid solar installations to convert and manage power. Check if the REGO 3000W is suitable for off-grid applications.
Does it have built-in protection features?
Inverter chargers usually come with built-in protection features such as overload protection, over-temperature protection, and short-circuit protection. Confirm the safety features of the REGO 3000W.
How noisy is the inverter during operation?
Some inverters produce noise during operation. Check the product specifications or user reviews for information on the noise level of the REGO 3000W.
Can it be used in a mobile application, like an RV or boat?
Inverter chargers are often used in mobile applications. Confirm whether the REGO 3000W is suitable for use in RVs, boats, or other mobile settings.
What is the efficiency rating?
Efficiency is an important factor to consider. Check the product specifications for the efficiency rating of the REGO 3000W to understand how much energy is lost during the conversion process.
What is the warranty period?
Check the warranty information provided by Renogy for the REGO 3000W Inverter Charger. Warranty periods can vary, and it’s important to understand the coverage offered.
For more manuals by Renogy ManualsDock

