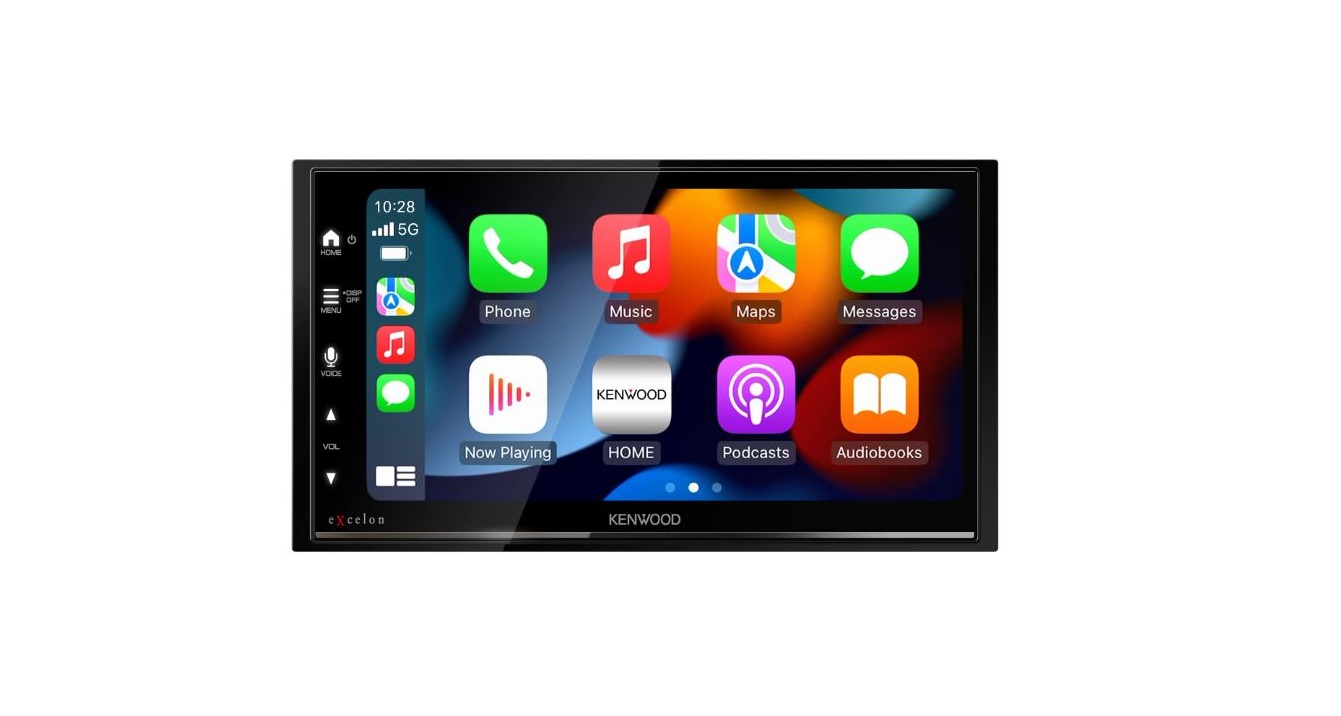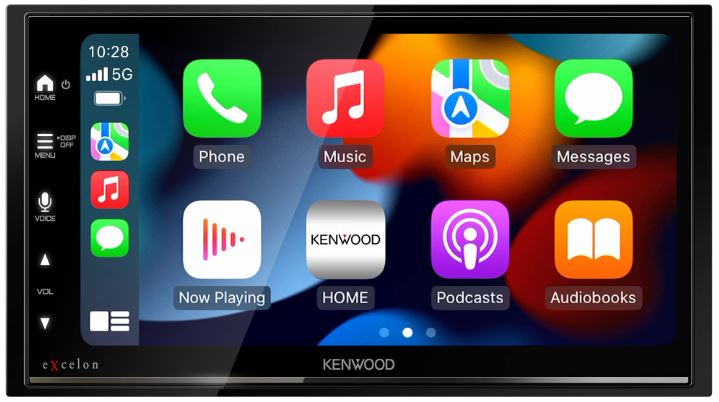
KENWOOD DMX709S eXcelon Capacitive Touch Screen Monitor
About KENWOOD
The leading creator and producer of communications and consumer electronics is JVCKENWOOD Corporation. JVCKENWOOD USA was established in 1961 and is the largest sales division of JVCKENWOOD Corporation of Japan. Its products are renowned for their quality, performance, and affordability, and both consumers and industry professionals have acknowledged this.
It’s well known that JVCKENWOOD USA introduces significant new products to the consumer electronics sector. In 1981, the business created the first home theater audio/video amplifier. Additionally, JVCKENWOOD invented the first cassette deck for cars that deters theft by sliding out of the dash, the first with 24 presets, the first with an automatic broadcast sensor system and automatic noise reduction, and the first with polypropylene speaker cones. Numerous novel technologies that were eventually imitated by others were created over the years by JVCKENWOOD engineers.
This instruction manual is used to describe the models listed above. Model availability and features (functions) may differ depending on the country and sales area. Take the time to read through this instruction manual. Familiarity with installation and operation procedures will help you obtain the best performance from your new receiver.
For your records
Record the serial number, found on the back of the unit, in the spaces designated on the warranty card, and in the space provided below. Refer to the model and serial numbers whenever you call your Kenwood dealer for information or service on the product. Model DMX709S/DMX7709S Serial number
US Residents Only
- Register your Kenwood product at https://www.kenwood.com/usa/
Important Notice
To ensure proper use, please read through this manual before using this product. You must read and observe WARNINGS and CAUTIONS in this manual. Please keep the manual in a safe and accessible place for future reference.
WARNINGS
To prevent accidents and damages
- DO NOT install any unit or wire any cable in a location where;
- it may obstruct the steering wheel and gearshift lever operations.
- it may obstruct the operation of safety devices such as airbags.
- it may obstruct visibility.
- DO NOT raise the volume level too much, as this will make driving dangerous by blocking outside sounds, and may cause hearing loss.
- DO NOT operate the unit while driving. If you need to operate the unit while driving, be sure to look around carefully.
- Stop the car before performing any complicated operations.
- The driver must not watch the monitor while driving.
CAUTIONS
To care for the unit
- If you have parked the car for a long time in hot or cold weather, wait until the temperature in the car becomes normal before operating the unit.
To care for the monitor
- The monitor built into this unit has been produced with high precision, but it may have some ineffective dots. This is inevitable and is not considered defective.
- Do not expose the monitor to direct sunlight.
- Do not operate the touch panel using a ball-point pen or similar tool with a sharp tip.
- Touch the keys on the touch panel with your finger directly (if you are wearing a glove, take it off).
- When the temperature is very cold or very hot…
- Chemical changes occur inside, causing malfunction.
- Pictures may not appear clearly or may move slowly. Pictures may not be synchronized with the sound or picture quality may decline in such environments.
On the volume setting
- Digital devices produce very little noise compared with other sources. Lower the volume before playing these digital sources to avoid damaging the speakers by a sudden increase of the output level.
FCC CAUTION
Changes or modifications not expressly approved by the party responsible for compliance could void the user’s authority to operate the equipment.
NOTE: This equipment has been tested and found to comply with the limits for a Class B digital device, under part 15 of the FCC Rules. These limits are designed to provide reasonable protection against harmful interference in a residential installation. This equipment generates, uses, and can radiate radio frequency energy and, if not installed and used by the instructions, may cause harmful interference to radio communications. However, there is no guarantee that interference will not occur in a particular installation. If this equipment does cause harmful interference to radio or television reception, which can be determined by turning the equipment off and on, the user is encouraged to try to correct the interference by one or more of the following measures:
- Reorient or relocate the receiving antenna.
- Increase the separation between the equipment and the receiver.
- Connect the equipment to an outlet on a circuit different from that to which the receiver is connected.
- Consult the dealer or an experienced radio/TV technician for help.
Supplier’s Declaration of Conformity
- Trade Name: KENWOOD
- Products: MONITOR WITH RECEIVER
- Model Name: DMX709S/DMX7709S
- Responsible Party: JVCKENWOOD USA CORPORATION 4001 Worsham Avenue, Long Beach, CA 90808, U.S.A.
- PHONE: 1-800-252-5722
THIS DEVICE COMPLIES WITH PART 15 OF THE FCC RULES. OPERATION IS SUBJECT TO THE FOLLOWING TWO CONDITIONS:
- THIS DEVICE MAY NOT CAUSE HARMFUL INTERFERENCE, AND
- THIS DEVICE MUST ACCEPT ANY INTERFERENCE RECEIVED, INCLUDING INTERFERENCE THAT MAY CAUSE UNDESIRED OPERATION.
- Contains Transmitter Module
- FCC ID: ZWY88112
ISED Caution
This device contains license-exempt transmitter(s)/ receiver(s) that comply with Innovation, Science, and Economic Development Canada’s license-exempt RSS(s). Operation is subject to the following two conditions:
- This device may not cause interference.
- This device must accept any interference, including interference that may cause undesired operation of the device.
This equipment complies with FCC/ISED radiation exposure limits set forth for an uncontrolled environment and meets the FCC radio frequency (RF) Exposure Guidelines and RSS-102 of the ISED radio frequency (RF) Exposure rules. This equipment should be installed and operated keeping the radiator at least 20 cm or more away from the person’s body.
- Contains Transmitter Module
- IC: 12033A-88112
This transmitter must not be co-located or operated in conjunction with any other antenna or transmitter.
Component Names and Basic Operations
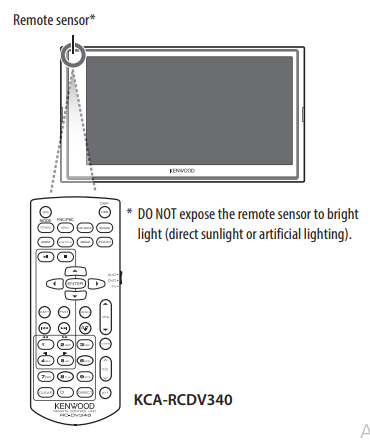
- Remote sensor the HOME
- Screen (touch panel)
- Monitor panel
- HOME button
- (Press): Turns on the power.
- (Hold): Turns off the power.
- HOME (Press): Displays the Home screen (see the following) while the power is on.
- MENU/DISP OFF button
- MENU (Press): Pops up the function menu (page 13).
- DISP OFF (Hold): Turns off the screen.
- VOICE button: (Press) Activates the voice recognition.
- When no device for Apple CarPlay, Android Auto, and Bluetooth phone is connected, pressing and holding this button displays a Bluetooth pairing waiting dialog (page 7).
- VOL J/K buttons
- USB terminal from the rear panel
Home screen
- You can customize the Home screen (page 47).
- To display the Home screen from other screens, press the HOME button.
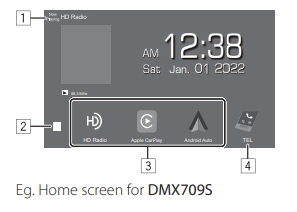
- Displays the control screen of the current source.
- Displays the source/option selection screen.
- Short-cut playback source icons
- Displays the Hands-Free screen when a Bluetooth phone is connected.
- When connected to Apple CarPlay or Android Auto, it works as a phone provided in Apple CarPlay or Android Auto.
Turning on the power
- When you turn on this unit for the first time, you must wait while the system acquires GPS signals from satellites. This process could take up to several minutes.
Turning off the power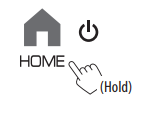
Putting the unit on standby
- Display the source/option selection screen.
From the Home screen (page 3), touch as follows:
- Put the unit on standby.
On the source/option selection screen (page 11):
Turning off the screen
Adjusting the volume
- You can adjust the volume (00 to 40) by pressing VOL J to increase and pressing VOL K to decrease.
- When the volume level is below 15, holding VOL J increases the volume continuously to level 15.
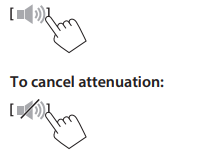
Attenuating the sound
USB connection
To operate your smartphone hands-free, and Apps of the smartphone (Apple CarPlay, Android Auto, and USB Mirroring), USB and/or Bluetooth® connections are required.
- For a Hands-Free Phone (page 37), and Bluetooth audio player (page 39), connect your device with Bluetooth.
- For Apple CarPlay (page 14), connect the iPhone to a USB.
- For Android Auto (page 15) and USB Mirroring (page 16), connect the Android device with both USB and Bluetooth.
Connect your smartphone (iPhone or Android device) to use Apps on the screen of this unit.
- You can also connect a USB mass storage class device such as a USB memory, digital audio player, etc. to the unit. But you cannot connect a PC, portable HDD, and USB hub.

Bluetooth® connection
Information for using Bluetooth devices Bluetooth is a short-range wireless radio communication technology for mobile devices such as mobile phones (smartphones), portable PCs, and other devices. Bluetooth devices can be connected without cables and communicate with each other.
- Some Bluetooth devices may not be used with this unit depending on the Bluetooth version of the device.
Pairing a Bluetooth device
When you connect a Bluetooth device to the unit for the first time, register the device to this unit (pairing). Pairing allows Bluetooth devices to communicate with each other.
- The pairing method differs depending on the Bluetooth version of the device.
- For devices with Bluetooth 2.1: You can pair the device and the unit using SSP (Secure Simple Pairing) which only requires confirmation.
-
- For devices with Bluetooth 2.0: You need to enter a PIN code both on the device and the unit for pairing.
- Once the connection is established, it is registered in the unit until you initialize the Bluetooth settings (page 50) or the unit itself (page 50). Up to five devices can be registered in total.
- To use the Bluetooth function, you need to turn on the Bluetooth function of the device.
Auto pairing
When <Auto Pairing> is set to [ON] (page 39), Android devices with Android Auto are automatically paired when connected via USB. (Not available depending on Android OS versions.)
Pairing a Bluetooth device using SSP (for Bluetooth 2.1)
- Display the Home screen.
- Display the <Device List> screen. From the Home screen (page 3), touch as follows: Then, on the <Setup> screen, touch as follows: [System] → <Connections SETUP> : [Enter] On the <Connections SETUP> screen, touch as follows: <Device List> : [Enter] You can also use the pop-up function menu to display the <Device List> screen (page 13). 3 Make the unit ready for pairing.
- Make the unit ready for pairing. On the <Device List> screen:
- Search for the unit (“DMX709S” or “DMX7709S”) from your Bluetooth device. 5 Confirm the request both on the device and the unit. On the device: The confirmation method varies for the device. On the unit: Pairing is complete. To reject the request: Touch [Cancel]. 6 Register the usage of the Bluetooth device.
- Register the usage of the Bluetooth device. See “Registering the usage of the devices” on page 8.
Various Screens and Operations

SiriusXM® Satellite Radio 
- Displays/hides the following operation keys
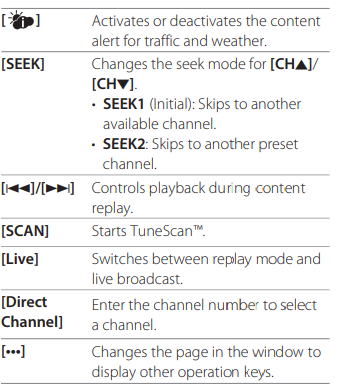
- Displays album artwork for most SiriusXM music channels (cache real-time images for current channel only)
- Station (channel) information area Channel name Touching [ ] changes the displayed contents in b, c, and d as follows. b Artist ←→ Category c Song title ←→ Channel description d Information ←→ Related channel Touching [<] scrolls the text if not all of the text is shown.
- Displays the preset channel window (page 29)
- To hide the window, touch [ > ].
- [P1] – [P5]
- (Touch) Select a preset channel.
- (Hold) Presets the current channel.
- Selects the band (SXM1/SXM2/SXM3/SXM4)
- The channel no. currently selected is displayed.
- Playback status and time code for the buffered data and replay mode
- The time code shows you the point in the replay buffer you are listening to. (Eg. “–5:00” means that you are listening to audio that is 5 minutes behind the current broadcast.)
- SiriusXM signal strength indicator9 Seek mode indicator p Replay time bar for replay mode
- Gray: The remaining capacity
- Blue: The amount of buffered contents
- Operation keys
Other External Components
Connecting external components See page 57.
Using the HDMI device
- Select [HDMI] as the source. From the Home screen (page 3), touch as follows:
- Turn on the connected HDMI device and start playing the source.
Using the AV-IN component
Preparation:
- Select [AV-IN] for the <AV Input> setting when connecting the external AV device to the AV-IN terminals (page 49).
- Select [AV-IN] as the source. From the Home screen (page 3), touch as follows:
-
- When selecting [Camera] for the <AV Input> setting (page 49), you cannot select [AV-IN].
- Turn on the connected component and start playing the source.
Video menu control
You can display the video menu control while watching the video from the external components.
Touch the upper portion of the screen.
Remote Controller
To use the remote controller, purchase an optional remote controller, KCA-RCDV340.
- When using the remote controller, refer also to the instruction manual supplied with the remote
CAUTION
- Do not leave the remote controller in hot places such as on the dashboard.
- Risk of the fire or explosion if the battery is replaced by an incorrect type. Ensure to replace only with the same type.
- Risk of fire, explosion, or the leakage of flammable liquid or gas if the battery is left in an extremely high temperature surrounding environment and/ or subjected to extremely low air pressure. The battery pack or batteries shall not be exposed to excessive heat such as sunshine, fire, or the like
- Risk of fire, explosion, or the leakage of flammable liquid or gas if the battery is disposed into fire or a hot oven, recharged, shorted, mechanically crushed, or cut off the battery.
- If spilled fluid comes in contact with your eyes or on clothing, immediately rinse with water and consult a physician.
Preparation
Battery installation
Use two “AAA”/“R03”-size batteries. Insert the batteries with the + and – poles aligned properly, following the illustration inside the case.
- Always insert batteries from – poles to avoid bending the springs.
- If the Remote Controller operates only over shorter distances or does not operate at all, the batteries may be depleted. In such instances, replace both batteries with new ones.
Remote Controller mode switch
The functions operated from the remote controller differ depending on the position of the mode switch.
- AUD mode: Switch to this mode when controlling a selected source or tuner source, etc.
- DVD mode: Not used.
- TV mode: Not used.
Basic operations for KCA-RCDV340


Installation and Connection
WARNINGS
- DO NOT connect the ignition wire (red) and the battery wire (yellow) to the car chassis (ground), you may cause a short circuit, that in turn may start a fire.
- DO NOT cut out the fuse from the ignition wire (red) and the battery wire (yellow). The power supply must be connected to the wires via the fuse.
- Always connect the ignition wire (red) and the battery wire (yellow) to the power source running through the fuse box.
CAUTIONS
- Install this unit in the console of your car.
- Do not touch the metal parts of this unit during and shortly after the use of the unit. Metal parts such as the heat sink and enclosure become hot.
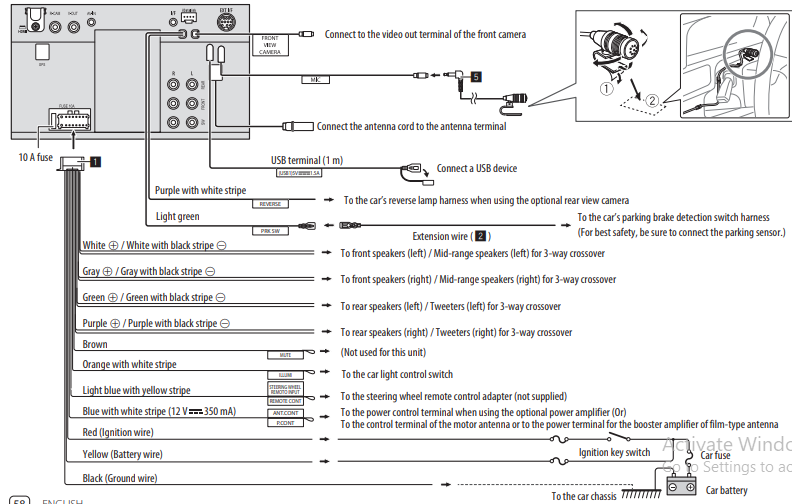
When parking at a low-ceiling area, turn off the unit to store the antenna. As when the unit is installed in the car with the function of the auto antenna; the radio antenna extends automatically when you turn on the unit with the antenna control wire (ANT. CONT) connected (page 58).
Before installation
Precautions on installation and connection
- Mounting and wiring this product requires skills and experience. For best safety, leave the mounting and wiring work to professionals.
- Mount the unit so that the mounting angle is 30° or less.
- Make sure to ground the unit to a negative 12 V DC power supply.
- Do not install the unit in a location exposed to direct sunlight, excessive heat, or humidity. Also, avoid places with too much dust or the possibility of water splashing.
- Do not use your screws. Use only the screws provided. If you use the wrong screws, you could damage the unit.
- After the unit is installed, check whether the brake lamps, blinkers, wipers, etc. on the car are working properly.
- Do not press hard on the panel surface when installing the unit to the car. Otherwise scratches, damage, or failure may result.
- If the power is not turned on (“Miswiring DC Offset Error”, “Warning DC Offset Error” is displayed), the speaker wire may have a short circuit or have touched the chassis of the car and the protection function may have been activated. In this case, the speaker wire should be checked.
- Keep all cables away from heat-dissipating metal parts.
- If your car’s ignition does not have an ACC position, connect the ignition wires to a power source that can be turned on and off with the ignition key. If you connect the ignition wire to a power source with a constant voltage supply, such as with battery wires, the battery may be drained.
- If the fuse blows, first make sure the wires are not touching to cause a short circuit, then replace the old fuse with one with the same rating.
- Insulate unconnected wires with vinyl tape or other similar material. To prevent a short circuit, do not remove the caps, and do not let the cable out at the ends of the unconnected wires or the terminals.
- Secure the wires with cable clamps and wrap vinyl tape around the wires that come into contact with metal parts to protect the wires and prevent short circuits.
- Connect the speaker wires correctly to the terminals to which they correspond. The unit may be damaged or fail to work if you share the wires or ground them to any metal part in the car.
- When only two speakers are being connected to the system, connect both connectors either to the front output terminals or to the rear output terminals (do
Parts list for installation
Note: This parts list does not include all the package contents
- Wiring harness (× 1)
- Extension wire, 2 m (× 1)
- Flat head screws, M5 × 8 mm (× 6)
- Round head screws, M5 x 8 mm (× 6)
- Microphone, 3 m (× 1)
- Trim plate (× 1)
- Mounting sleeve (× 1)
- Extraction keys (× 2)
- GPS antenna, 3.5 m (× 1)
- Metal plate (× 1)
Installation procedure
- Remove the key from the ignition and disconnect the · battery.
- Make the proper input and output wire connections for each unit.
- Connect the speaker wires of the wiring harness.
- Connect the wires of the wiring harness in the following order: ground, battery, and ignition.
- Connect the wiring harness to the unit.
- Install the unit in your car. Make sure that the unit is installed securely in place. If the unit is unstable, it may malfunction (eg., the sound may skip).
- Reconnect the · battery.
- Initialize the unit (page 50)
- Configure <Initial Setup> (page 4).
Installing the unit
- Installing the unit using the mounting bracket removed from the car
Note: Select the appropriate screws (supplied) for the mounting bracket.
- Installing the unit using the mounting sleeve
Bend the tabs of the mounting sleeve with a screwdriver or similar utensil and attach it in place.
- Installing the trim plate

Removing the unit
- Remove the trim plate (]) by inserting the two extraction keys (\) as illustrated.

- When the lower level is removed, remove from the upper two catches of the trim plate (]). The frame can be removed from the top side in the same manner.
- Insert the extraction keys (\) deeply into the slots on each side.
- Lower the extraction keys (\) toward the bottom, and pull out the unit halfway while pressing towards the inside. Be careful to avoid injury from the catch pins on the extraction key.
- Pull the unit all the way out with your hands, being careful not to drop it.
Installing the supplied GPS antenna
GPS antenna is installed inside of the car. It should be installed as horizontally as possible to allow easy reception of the GPS satellite signals.
- Clean your dashboard or other surface.
- Remove the separator of the metal plate (Å).
- Press the metal plate (Å) down firmly on your dashboard or other mounting surface. You can bend the metal plate (Å) to conform to a curved surface, if necessary.
- Remove the separator of the GPS antenna («), and stick the antenna to the metal plate (Å).
Notes on using the supplied GPS antenna («)
- Use the supplied GPS antenna («). Using the GPS antenna other than the supplied one may cause a drop in positioning accuracy.
- Depending on the type of car, reception of the GPS satellite signals might not be possible with an inside installation.
- Please install the supplied GPS antenna («) in an area away from any antennas that are used with CB radios or satellite televisions.
- The supplied GPS antenna («) should be installed at a position that is spaced at least 30 cm (12 inches) from a cellular phone or other transmitting antenna. Signals from the GPS satellite may be interfered with by these types of communication.
- Painting the supplied GPS antenna («) with (metallic) paint may cause a drop in performance.
Connecting external components
- GPS antenna input (GPS) (page 56)
- HDMI terminal
- Rearview camera input (R-CAM)
- Video output (V-OUT)
- Audio video input (AV-IN)
- iDatalink input for connecting an ADS adapter (commercially available)
- Expansion port for connecting SiriusXM Connect Vehicle Tuner (EXT I/F) (commercially available)
- Front view camera input
- Microphone input (MIC) (page 58)
- Antenna terminal
- USB terminal
- Output terminals*
- Left output (White)
- Right output (Red)

Wiring connection
Maintenance
Cleaning the unit
- Do not use any solvent (for example, thinner, benzine, etc.), detergent, or insecticide. This may damage the monitor or the unit.
- Gently wipe the panel with a soft, dry cloth.
About USB playback
Important
Make sure all important data has been backed up to avoid losing the data. We bear no responsibility for any loss of data stored in the devices while using this unit.
Notes on using a USB device
- Avoid using the USB device if it might affect driving safety.
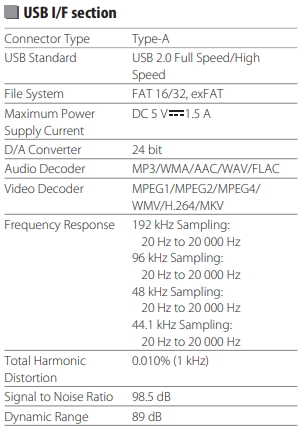
- When connecting with a USB cable, use a USB 2.0 cable.
- Electrostatic shock at connecting a USB device may cause abnormal playback of the device. In this case, disconnect the USB device, and turn off then on this unit.
- Do not pull out and connect the USB device repeatedly while “Reading” is shown on the screen.
- Operation and power supply may not work as intended for some USB devices.
- Do not leave a USB device in the car, or expose it to direct sunlight or high temperatures to prevent deformation or damage to the device.
Playable files
- This unit can play back the following files with the following codec and extension code:
- Audio files: MP3 (.mp3), WMA (.wma), WAV (.wav), AAC (.m4a), FLAC (.flac)
- Picture files: JPEG (.jpg, .jpeg)/PNG (.png)/BMP (.bmp)
- Video files: MPEG1, 2 (.mpg, .mpeg)/MPEG4 (.mp4)/H.264 (.h264)/MWV(.mwv)/MKV (.mkv)
Audio file conditions
- This unit can play back files that meet the conditions below:
– Bit rate:
-
- MP3: MPEG1 Audio Layer 3: 32 kbps – 448 kbps
- MPEG2 Audio LSF Layer: 32 kbps – 384 kbps
- WMA: Up to 320 kbps AAC: Max 288 kbps per channel/48 kHz – Bit number:
- WAV: 4 bit – 32 bit FLAC: 4 bit – 32 bit – Sampling frequency:
- MP3: MPEG1 Audio Layer 3: 32 kHz – 48 kHz
- MPEG2 Audio LSF Layer: 16 kHz – 24 kHz
- WMA: 8 kHz – 48 kHz
- AAC: 8 kHz – 96 kHz
- WAV: 44.1 kHz – 192 kHz
- FLAC: 8 kHz – 192 kHz
– Files recorded in VBR (variable bit rate), and have a discrepancy in elapsed time indication.
- This unit can show or display the following Tag:
- MP3: ID3 Tag (version 1.0/1.1/2.2/2.3/2.4)
- WMA Tag
- WAV Tag
- AAC Tag
- FLAC Tag
- – Jacket picture (artwork):
- Picture size: 32 × 32 to 1 232 × 672 resolution
- Data size: less than 500 KB
- File type: JPEG, PNG, BMP
- This unit cannot play back the following files:
- MP3 files encoded with MP3i and MP3 PRO format. – MP3 files encoded with Layer 1/2.
- WMA files are encoded in lossless, professional, and voice formats.
- WMA files which are not based upon Windows Media® Audio.
Troubleshooting
What appears to be trouble is not always serious. Check the following points before calling a service center.
- For operations with external components, refer also to the instructions supplied with the adapters used for connection (as well as the instructions supplied with the external components).
General
No sound comes out of the speakers.
→ Adjust the volume to the optimum level.
→ Check the cords and connections.
No picture is displayed on the screen.
→ Turn on the screen (page 4).
The unit does not work at all.
→ Initialize the unit (page 50).
The remote controller does not work.
→ Replace the battery.
“No Signal”/“No Video Signal” appears.
→ Start playback on the external component connected to this unit.
→ Check the cords and connections.
→ Signal input is too weak.
“Miswiring DC Offset Error”/“Warning DC Offset Error” appears.
→ A speaker cord has shorted or comes into contact with the car chassis. Wire or insulate the speaker cord as appropriate, and turn the ignition switch off and then on.
→ No playback picture is shown when the parking brake is not engaged.
Bluetooth connection
The Bluetooth device does not detect this unit.
→ Turn off, then turn on the Bluetooth device.
→ Turn off, then turn on this unit.
This unit does not pair with the Bluetooth device.
→ If the device is connected via a USB cable, disconnect it, and retry.
→ Turn off, then turn on the Bluetooth device.
The device is disconnected automatically or the device cannot be connected.
→ When an iPhone compatible with Apple CarPlay is connected to the USB terminal, it cannot be connected via Bluetooth. Use the phone and audio player function on the Apple CarPlay screen.
→ When an Android device compatible with Android Auto is connected to the USB terminal, the device is connected via Bluetooth automatically, and the Bluetooth mobile phone currently connected is disconnected.
The Bluetooth connection between the Bluetooth device and the unit is unstable.
→ Delete the unused registered Bluetooth device from the unit (page 10).
“Connection Error” appears.
→ The device is registered but the connection has failed. Connect the registered device using the <Device List> screen (page 8).
“Please Wait…” appears.
→ The unit is preparing to use the Bluetooth function. If the message does not disappear, turn off and turn on the unit, then connect the device again.
“Initialize Error” appears.
→ The unit has failed to initialize the Bluetooth module. Try the operation again.
Apps
Apple CarPlay:
[Apple CarPlay] is not highlighted on the source/ option selection screen.
→ Check the version of the connected iPhone– whether it is compatible with Apple CarPlay.
→ Check the iPhone is connected properly to Apple CarPlay. You can check the connection by referring to the <Device List> screen.
The sound is too loud or small while using Apple CarPlay.
→ Adjust <Guidance/Voice Recognition Volume>,
<Phone Incoming Volume>, <Phone Calling/ Talking Volume> or <Media Volume> for <Apple CarPlay> (page 11).
Android Auto:
[Android Auto] is not highlighted on the source/ option selection screen.
→ Check whether [Android Auto] is selected in the <Android Mode Select> (page 50). → Check the version of the connected Android device whether it is compatible with Android Auto.
→ Check the Android device is connected properly to Android Auto. You can check the connection by referring to the <Device List> screen.
Sound is too loud or small while using Android
Auto.
→ Adjust <Guidance/Voice Recognition Volume>, <Phone Incoming Volume>, <Phone Calling/ Talking Volume> or <Media Volume> for <Android Auto> (page 11).
USB Mirroring: [USB Mirroring] is not highlighted on the source/ option selection screen.
→ Check whether [Mirroring for Android] is selected in the <Android Mode Select> (page 50).
→ Check the version of the connected Android device–whether it is compatible with USB Mirroring.
→ Check the Android device is connected properly for USB Mirroring. You can check the connection by referring to the <Device List> screen.
→ Check KENWOOD’s Mirroring OA App is activated on Android devices.
USB Mirroring is deactivated.
→ When you start Apple CarPlay, USB Mirroring is deactivated.
No sounds from Android devices come out of the speakers.
→ Check the Android device is connected properly with Bluetooth.
USB
“No File” appears.
→ The loaded USB does not contain any file of the selected type (audio/video/photo). Select the correct file type or replace the USB.
“Reading” does not disappear from the screen.
→ Turn the power off and on again.
While playing a file, the sound is sometimes interrupted.
→ The tracks are not properly copied into the USB device. Copy the files again, and try again.
Files are not played back as you have intended them to play.
→ Playback order may differ from the one played back using other players.
The source does not change to [USB] when you connect a USB device while listening to another source or “USB Device Error” appears when you connect a USB device.
→ The USB port is drawing more power than the design limit.
→ Turn the power off and unplug the USB device. Then, turn on the power and reattach the USB device.
→ If the above does not solve the problem, turn the power off and on before replacing it with another USB device.
HD Radio (for DMX709S)
Sound quality changes when receiving HD Radio stations.
→ Fix the <Receive Mode> setting to either [Digital] or [Analog] (page 22).
No sound can be heard.
→ The <Receive Mode> setting is not appropriate. Select the appropriate mode – [Digital], [Analog]. or [Auto] (page 22).
Radio (for DMX7709S)
AME automatic presetting does not work.
→ Store stations manually (page 26).
Static noise while listening to the radio.
→ Connect the antenna firmly.
HDMI
No picture appears on the screen. While driving, no video is shown. You can only listen to the sounds.
→ Turn on the HDMI device if it is not on.
→ Connect the HDMI device correctly.
AV-IN
No picture appears on the screen. While driving, no video is shown. You can only listen to the sounds.
→ Select [AV-IN] for <AV Input> setting (page 49).
→ Turn on the external component if it is not on.
→ Connect the external component correctly.
Cameras
No picture appears on the screen.
→ Connect the camera correctly. Picture from the camera connected to the AV-IN terminal is not displayed on the screen.
→ Select [Camera] for <AV Input> setting (page 49).
SiriusXM Satellite Radio
“SXM No Signal” appears.
→ Make sure the antenna of the SiriusXM Connect Vehicle Tuner is mounted outside the car. Move the car to an area with a clear view of the sky.
“SXM Check Antenna” appears.
→ Check the antenna connection of the SiriusXM Connect Vehicle Tuner, and make sure the antenna is firmly attached to the tuner.
→ Check whether the antenna cable of the SiriusXM Connect Vehicle Tuner is bent or broken. If it is damaged, replace the whole antenna unit.
“SXM Check Tuner” appears.
→ Make sure the SiriusXM Connect Vehicle Tuner is connected to the unit.
“SXM Chan Unavailable” appears.
(Appears on the screen for about 5 seconds, then returns to the previous channel):
→ The selected channel is no longer available. Select another channel or continue listening to the previous channel.
“SXM Ch Unsubscribed” appears.
(Appears on the screen for about 5 seconds, then returns to the previous channel)
→ The selected channel is not part of your current subscription plan. Call 1-866-635-2349 (USA) or 1-888-539-7474 (Canada) to subscribe.
“SXM Subscription Updated – Press Return to Continue” appears.
→ Your subscription has been updated. Press the appropriate button to continue.
“SXM Channel Locked” appears.
→ The selected channel has been locked by the parental controls. Enter the parental lock code when you are asked.
“SXM Incorrect Lock Code” appears.
→ You have entered an incorrect lock code. Enter the correct parental lock code.
Bluetooth hands-free phone
The phone is disconnected.
→ When an iPhone for Apple CarPlay or Android Auto device is connected, the currently connected Bluetooth device is disconnected. Use Apple CarPlay or Android Auto screen for the phone.
The phone’s sound quality is poor. Echo or noise occurs.
→ Reduce the distance between the unit and the Bluetooth mobile phone.
→ Move the car to a place where you can get a better signal reception.
→ Adjust the sound quality using <Microphone Level>, <Echo Cancel Level>, <Noise Reduction Level> (page 11).
The unit does not respond when you try to copy the phone book to the unit.
→ You may have tried to copy the same entries (as stored) to the unit.
“No Data” appears.
→ No phone book data is contained in the connected Bluetooth phone.
“Dial Error” appears.
→ Dialing has failed. Try the operation again.
“Hung Up Error” appears.
→ The call has not ended yet. Park your car, and use the connected mobile phone to end the call.
“Pick Up Error” appears.
→ The unit has failed to receive a call.
Bluetooth audio
Bluetooth audio played is disconnected.
→ When an iPhone for Apple CarPlay or Android Auto device is connected, the currently connected Bluetooth device is disconnected.
The sound is interrupted or skipped while using a Bluetooth audio player.
→ Reduce the distance between the unit and the Bluetooth audio player. Disconnect the device connected to the Bluetooth phone if any.
→ Turn off, then turn on the unit. (When the sound is not yet restored) connect the player again.
The connected audio player cannot be controlled.
→ Check whether the connected audio player supports AVRCP (Audio/Video Remote Control Profile).
Specifications



Trademarks and Licenses
- Windows Media is a registered trademark or trademark of Microsoft Corporation in the United States and/or other countries. This product is protected by certain intellectual property rights of Microsoft. Use or distribution of such technology outside of this product is prohibited without a license from Microsoft.
- Use of the Made for Apple badge means that an accessory has been designed to connect specifically to the Apple product(s) identified in the badge and has been certified by the developer to meet Apple performance standards. Apple is not responsible for the operation of this device or its compliance with safety and regulatory standards. Please note that the use of this accessory with an Apple product may affect wireless performance.
- Apple, iPhone, and Lightning are trademarks of Apple Inc., registered in the U.S. and other countries.
- Apple, Siri, Apple CarPlay, and Apple CarPlay logo are trademarks of Apple Inc., registered in the U.S. and other countries.
- App Store is a service mark of Apple Inc., registered in the U.S. and other countries.
- IOS is a trademark or registered trademark of Cisco in the U.S. and other countries and is used under license.
- Google, Android, Android Auto, Google Maps, and other marks are trademarks of Google LLC.
- To use Android Auto on your car display, you’ll need an Android Auto-compatible vehicle or aftermarket stereo, an Android phone running Android 6.0 or higher, an active data plan, and the Android Auto app.
- The Bluetooth® word mark and logos are registered trademarks owned by Bluetooth SIG, Inc. and any use of such marks by JVCKENWOOD Corporation is under license. Other trademarks and trade names are those of their respective owners.
- SiriusXM and all related marks and logos are trademarks of Sirius XM Radio, Inc. All rights reserved.
- HD Radio Technology manufactured under license from iBiquity Digital Corporation. U.S. and Foreign Patents. For patents see http://dts.com/patents. HD Radio™ and the HD, HD Radio, and “ARC” logos are registered trademarks or trademarks of iBiquity Digital Corporation in the United States and/or other countries.
- The terms HDMI, HDMI High-Definition Multimedia Interface, and the HDMI Logo are trademarks or registered trademarks of HDMI Licensing Administrator, Inc.
- Font for the this product is RT Font designed and sold by Ricoh Industrial Solutions Inc.
- Linux® is the registered trademark of Linus Torvalds in the U.S. and other countries.
- THIS PRODUCT IS LICENSED UNDER THE AVC PATENT
Important Notice on Software
- The software embedded in this product comprises several independent software components, each of which is copyrighted by JVCKENWOOD Corporation or by a third party.
- This product uses software components that are based on an End-User License Agreement (hereinafter called “EULA”) stipulated by JVCKENWOOD Corporation and by third parties.
- The EULA dictates the availability of the source codes of free software components as a prerequisite to distributing them in executable form under the terms of the GNU General Public License or the Lesser General Public License (hereinafter called “GPL/LGPL”). To get information about the software components that are subject to the terms of the GPL/LGPL, please visit the following Website: Website URL https://www2.jvckenwood.com/gpl/
- Queries concerning the contents of the source code or the like will not be accepted. Please note that software components based on an EULA that is not subject to the terms of the GPL/LGPL or those that have been developed or created by JVCKENWOOD Corporation will be excluded from the scope of source code disclosure.
FAQS About KENWOOD DMX709S eXcelon Capacitive Touch Screen Monitor
What is the screen size of the KENWOOD DMX709S eXcelon?
Typically, users want to know the size of the display for compatibility and viewing experience.
Is the touch screen capacitive or resistive?
Capacitive touch screens are generally considered more responsive than resistive ones.
Does it support Apple CarPlay and Android Auto?
Many users are interested in smartphone integration features for seamless connectivity.
What audio sources are supported?
Users might want to know if the unit supports various audio sources like USB, Bluetooth, CD/DVD, etc.
How is the audio quality of the unit?
Questions about sound quality, built-in amplifiers, and compatibility with external audio components are common.
Can I customize the display and interface?
Users may inquire about the ability to personalize the unit’s interface and settings.
What video formats are supported for playback?
If the unit has video playback capabilities, users may want to know the supported formats.
Is there a built-in navigation system?
Some users prefer integrated navigation systems in car audio/video units.
What connectivity options are available?
Questions about Bluetooth capabilities, USB ports, auxiliary inputs, and other connectivity features are common.
How do I update the firmware?
Users may need information on how to keep the unit’s software up-to-date for improved performance and compatibility.
For more manuals by KENWOOD ManualsDock

