
Optoma HD28HDR 1080p Home Theater Projector
About Optoma
Optoma is a well-known manufacturer of audiovisual and projection equipment, primarily focusing on projectors and related products. The company, officially known as Optoma Corporation, was founded in 2002 and is headquartered in Taiwan. Over the years, Optoma has established a strong presence in the global projector market and is recognized for its diverse range of projectors, from home entertainment and business projectors to professional and installation-grade models.
INTRODUCTION
Package Overview
Carefully unpack and verify that you have the items listed below under standard accessories. Some of the items under optional accessories may not be available depending on the model, specification, and region of purchase. Please check with your place of purchase. Some accessories may vary from region to region.
The warranty card is only supplied in some specific regions. Please consult your dealer for detailed information.
Standard accessories
Note:
- The remote control is shipped with the battery.
- * For European warranty information please visit www.optomaeurope.com.
Optional accessories
Note: Optional accessories vary depending on model, specification, and region.
Product Overview
Note: Keep a minimum distance of 20 cm between the “inlet” and “outlet” labels.
- Lens
- IR Receiver
- Keypad
- Focus Ring
- Lens Cap
- Tilt-Adjustment Feet
- Ventilation (inlet)
- Zoom Lever
- Lamp Cover
- Ventilation (outlet)
- KensingtonTM Lock Port
- Power Socket
- Input / Output
Connections
- HDMI 1 Connector
- HDMI 2 Connector
- USB POWER OUT (5V 1.5A) / Service / Mouse Connector
- AUDIO OUT Connector
- KensingtonTM Lock Port
- Power Socket
Note:
- The remote mouse requires a special remote control.
- To ensure the best image quality and avoid connection errors, we recommend the use of High Speed or Premium Certified HDMI cables up to 5 meters.
- * HDM2 supports 4K 60HZ and HDR
- * HDMI1 supports 4K 30HZ, not support HDR
Keypad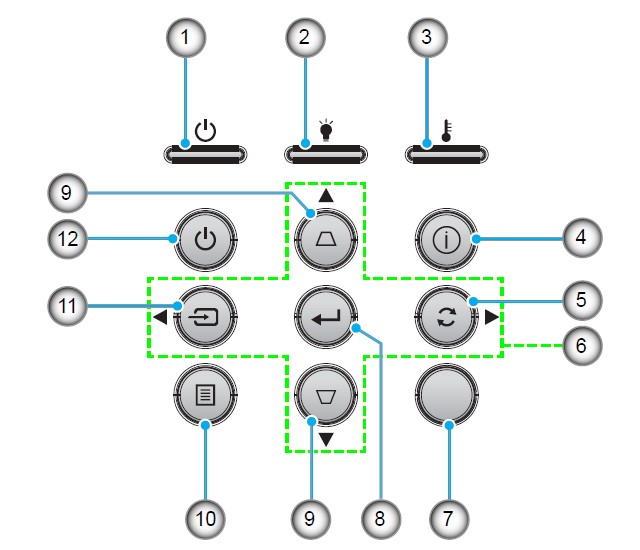
- On/Standby LED
- Lamp LED
- Temp LED
- Information
- Re-Sync
- Four Directional Select Keys
- IR Receiver
- Enter
- Keystone Correction
- Menu
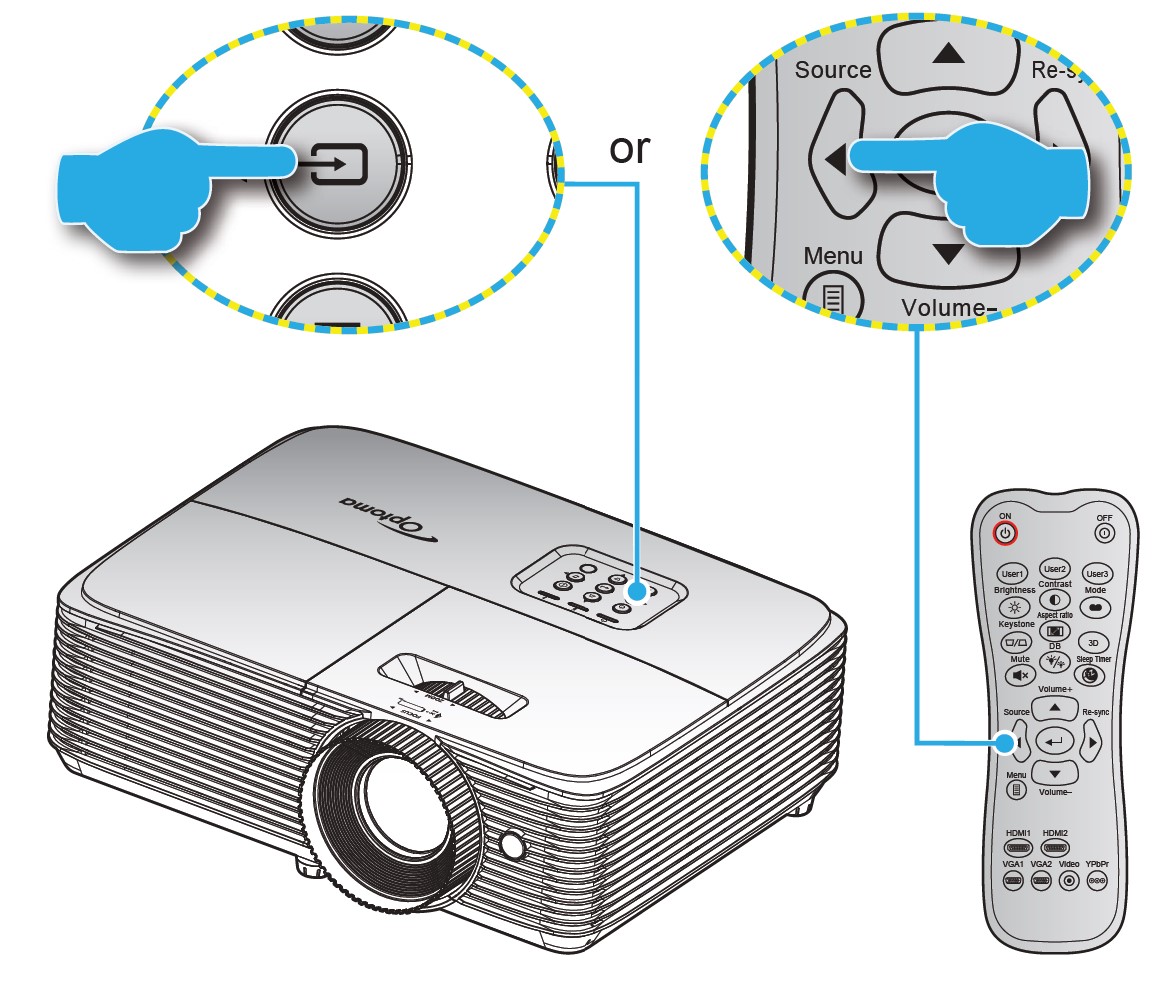
- Source
- Power
Remote control 1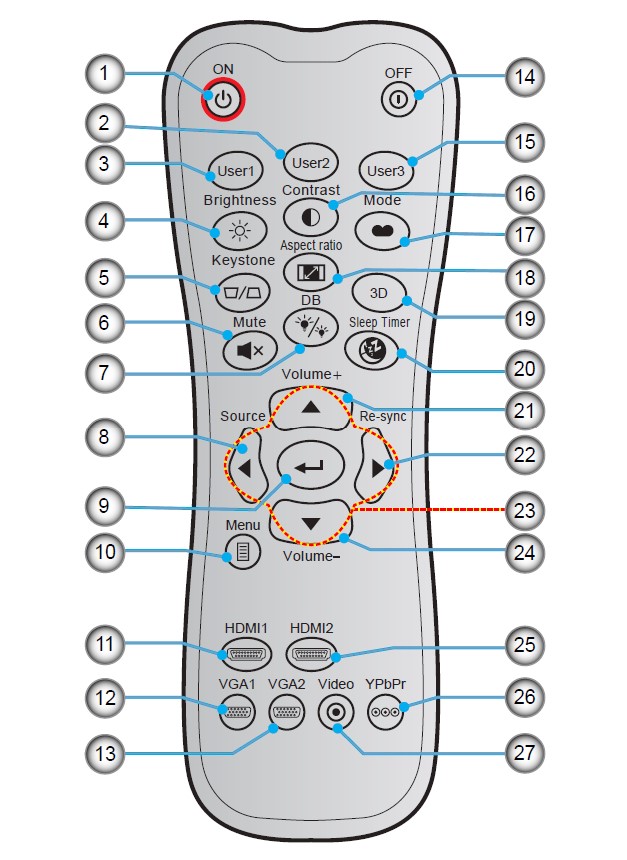
- Power On
- User 2
- User 1
- Brightness
- Keystone
- Mute
- DB (Dynamic Black)
- Source
- Enter
- Menu
- HDMI1
- VGA1 (not supported)
- VGA2 (not supported)
- Power Off
- User 3
- Contrast
- Display Mode
- Aspect Ratio
- 3D Menu On / Off
- Sleep Timer
- Volume +
- Re-Sync
- Four Directional Select Keys
- Volume –
- HDMI2
- YPbPr (not supported)
- Video (not supported)
Note:
- The actual remote control may vary depending on the region.
- Some keys may have no function for models that do not support these features.
Remote control 2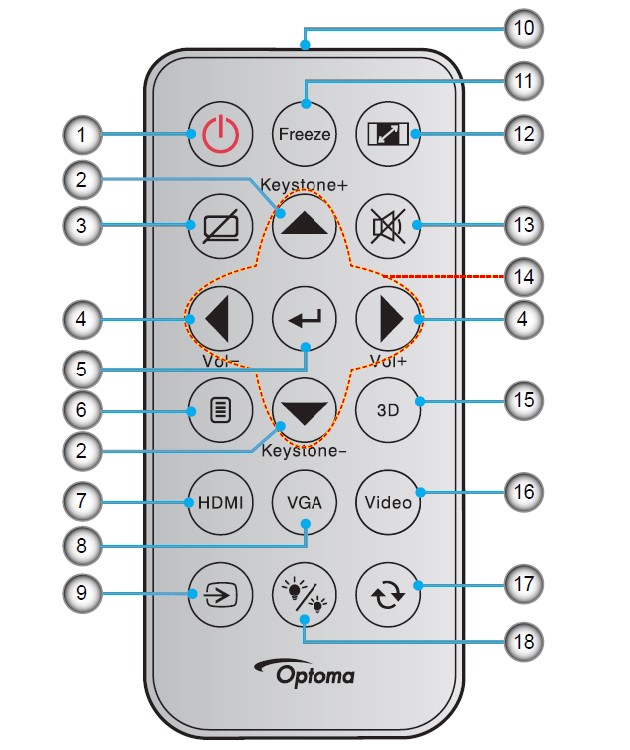
- Power On / Off
- Keystone + / –
- AV Mute
- Volume – / +
- Enter
- Menu
- HDMI
- VGA (not supported)
- Source
- IR LED Indicator
- Freeze
- Aspect Ratio
- Mute
- Four Directional Select Keys
- 3D
- Video (not supported)
- Resync
- Brightness Mode
Note:
- The actual remote control may vary depending on the region.
- Some keys may have no function for models that do not support these features.
- Before using the remote control for the first time, remove the transparent insulation tape. See page 20 for battery installation.
SETUP AND INSTALLATION
Installing the projector
Your projector is designed to be installed in one of four possible positions.
Your room layout or personal preference will dictate which installation location you select. Take into consideration the size and position of your screen, the location of a suitable power outlet, as well as the location and distance between the projector and the rest of your equipment.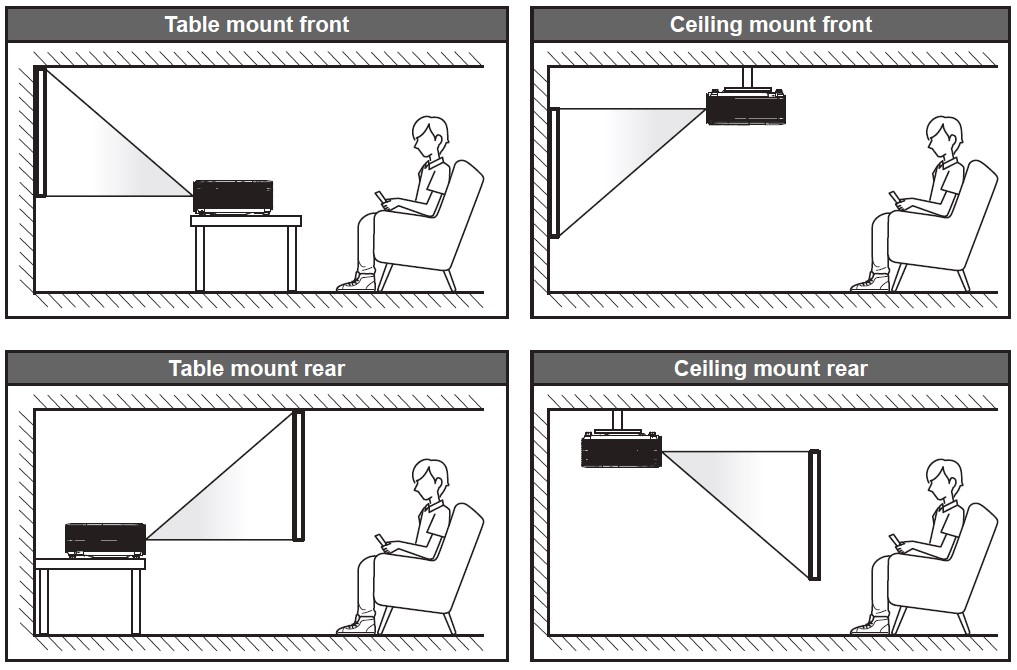
The projector should be placed flat on a surface and 90 degrees/perpendicular to the screen.
Note: The further away the projector is placed from the screen the projected image size increases and vertical offset also increases proportionally.
IMPORTANT! Do not operate the projector in any orientation other than a tabletop or ceiling mount. The projector should be horizontal and not tilted either forward/backward or left/right. Any other orientation will invalidate the warranty and may shorten the lifetime of the projector lamp or the projector itself. For non-standard installation advice please contact Optoma.
Projector installation notice
- Place the projector in a horizontal position.
The tilt angle of the projector should not exceed 15 degrees, nor should the projector be installed in any way other than the desktop and ceiling mount, otherwise lamp life could decrease dramatically, and may lead to other unpredictable damages.
- Allow at least 30 cm clearance around the exhaust vent.

- Ensure that the intake vents do not recycle hot air from the exhaust vent.
- When operating the projector in an enclosed space, ensure that the surrounding air temperature within the enclosure does not exceed the operation temperature while the projector is running and that the air intake and exhaust vents are unobstructed.
- All enclosures should pass a certified thermal evaluation to ensure that the projector does not recycle exhaust air, as this may cause the device to shut down even if the enclosure temperature is within the acceptable operation temperature range.
Connecting sources to the projector
- HDMI Cable
- HDMI Dongle
- USB Power Cable
- Audio Out Cable
- USB Cable
- Power Cord
Adjusting the projector image
Image height
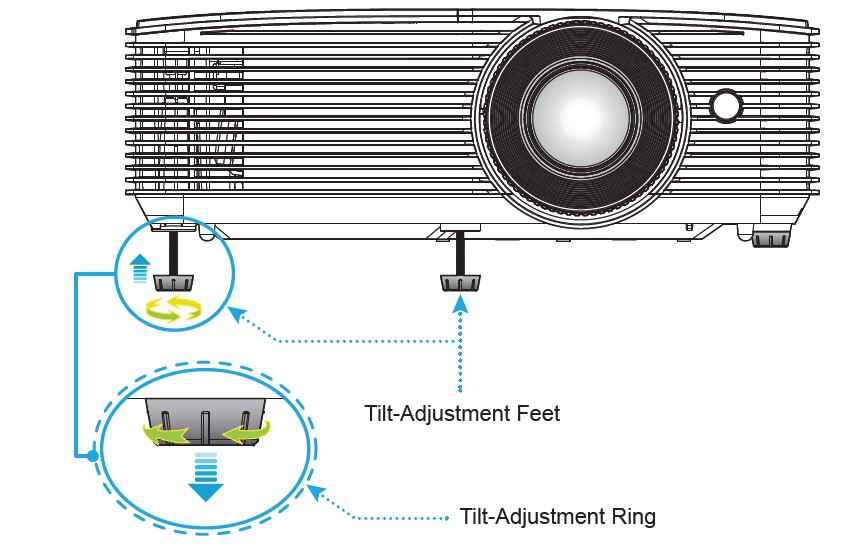
The projector is equipped with elevator feet for adjusting the image height.
- Locate the adjustable foot you wish to adjust on the underside of the projector.
- Rotate the adjustable foot clockwise or counterclockwise to raise or lower the projector.
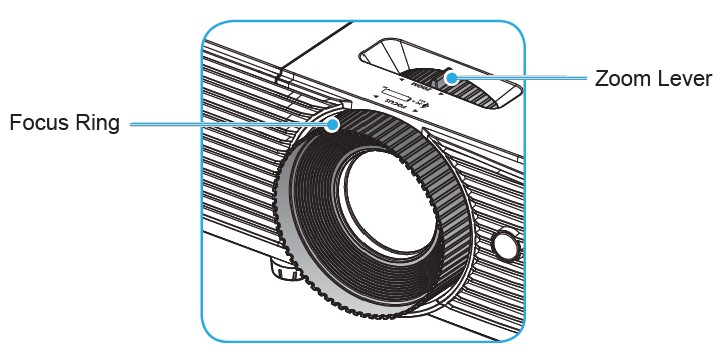
- To adjust the image size, turn the zoom lever clockwise or counterclockwise to increase or decrease the projected image size.
- To adjust the focus, turn the focus ring clockwise or counterclockwise until the image is sharp and legible.
Installing/replacing the batteries (for remote control 1) Two AAA-size batteries are supplied for the remote control.
- Remove the battery cover on the back of the remote control.
- Insert AAA batteries in the battery compartment as illustrated.
- Replace back cover on the remote control.

CAUTION! Improper use of batteries can result in chemical leakage or explosion. Be sure to follow the instructions below.
- Do not mix batteries of different types. Different types of batteries have different characteristics.
- Do not mix old and new batteries. Mixing old and new batteries can shorten the life of new batteries or cause chemical leakage in old batteries.
- Remove batteries as soon as they are depleted. Chemicals that leak from batteries that come in contact with skin can cause a rash. If you find any chemical leakage, wipe thoroughly with a cloth.
- The batteries supplied with this product may have a shorter life expectancy due to storage conditions. If you will not be using the remote control for an extended period of time, remove the batteries.
- When you dispose of the batteries, you must obey the law in the relative area or country.
Installing/replacing the battery (for remote control 2)
- Press firmly and slide the battery cover off.
- Install a new battery into the compartment. Remove the old battery and install a new one (CR2025). Ensure that the side with a “+” is facing up.
- Put the cover back.
CAUTION: To ensure safe operation, please observe the following precautions:
- Use CR2025-type battery.
- Avoid contact with water or liquid.
- Do not expose the remote control to moisture or heat.
- Do not drop the remote control.
- If the battery has leaked in the remote control, carefully wipe the case clean and install a new battery. Risk of an explosion if the battery is replaced by an incorrect type.
- Dispose of the used battery according to the instructions.
Effective range
The infrared (IR) remote control sensor is located on top of the projector. Ensure to hold the remote control at an angle within 30 degrees perpendicular to the projector’s top IR remote control sensor to function correctly. The distance between the remote control and the sensor should not be longer than 6 meters (~ 20 feet).
Note: When pointing the remote control directly (0 degrees angle) on the IR sensor, the distance between the remote control and the sensor should not be longer than 8 meters (~ 26 feet).
- Make sure that there are no obstacles between the remote control and the IR sensor on the projector that might obstruct the infrared beam.
- Make sure the IR transmitter of the remote control is not being shined by sunlight or fluorescent lamps directly.
- Please keep the remote controller away from fluorescent lamps for over 2 meters or the remote controller might become malfunction.
- If the remote control is close to Inverter-Type fluorescent lamps, it might become ineffective from time to time.
- If the remote control and the projector are within a very short distance, the remote control might become ineffective.
- When you aim at the screen, the effective distance is less than 6 meters from the remote control to the screen and reflecting the IR beams back to the projector. However, the effective range might change according to screens.
USING THE PROJECTOR
Powering on/off the projector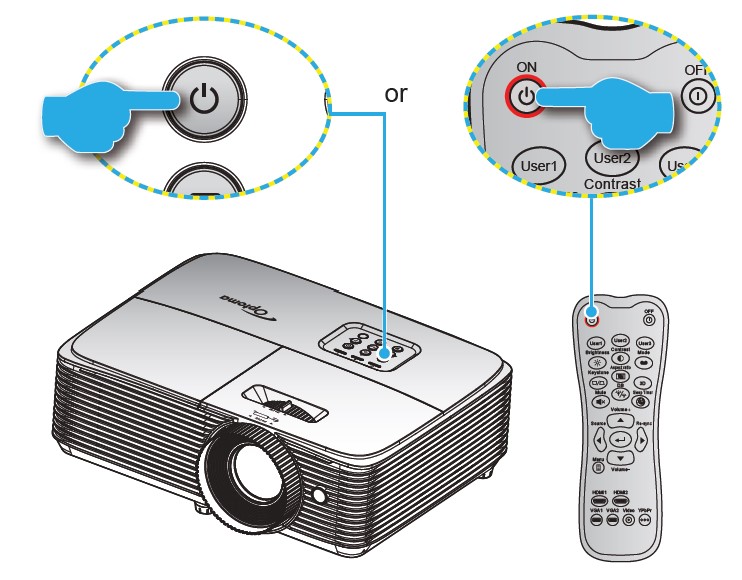
Powering on
- Securely connect the power lead and signal/source cable. When connected, the On/Standby LED will turn red.
- Turn on the projector by pressing the “power” either on the projector keypad or the remote control.
- A start-up screen will display in approximately 10 seconds and the On/Standby LED will be flashing blue and then steady blue.
Note: The first time the projector is turned on, you will be prompted to select the preferred language and projection orientation.
Powering off
- Turn off the projector by pressing the “power” either on the projector keypad or the remote control.
- The following message will be displayed:
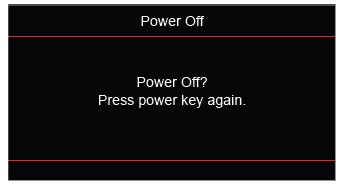
- Press the “power” again to confirm, otherwise, the message will disappear after 10 seconds. When you press the “power” button for the second time, the projector will shut down
- The cooling fans will continue to operate for about 10 seconds for the cooling cycle and the On/Standby LED will flash blue. When the On/Standby LED turns solid red, this indicates the projector has entered standby mode. If you wish to turn the projector back on, you must wait until the cooling cycle has finished and the projector has entered standby mode. When the projector is in standby mode, simply press the ” ” button again to turn on the projector.
- Disconnect the power lead from the electrical outlet and the projector.
Note: It is not recommended that the projector is turned on immediately, right after a power-off procedure.
Selecting an input source
Turn on the connected source that you want to display on the screen, such as a computer, notebook, video player, etc. The projector will automatically detect the source. If multiple sources are connected, press the ![]()
Menu navigation and features
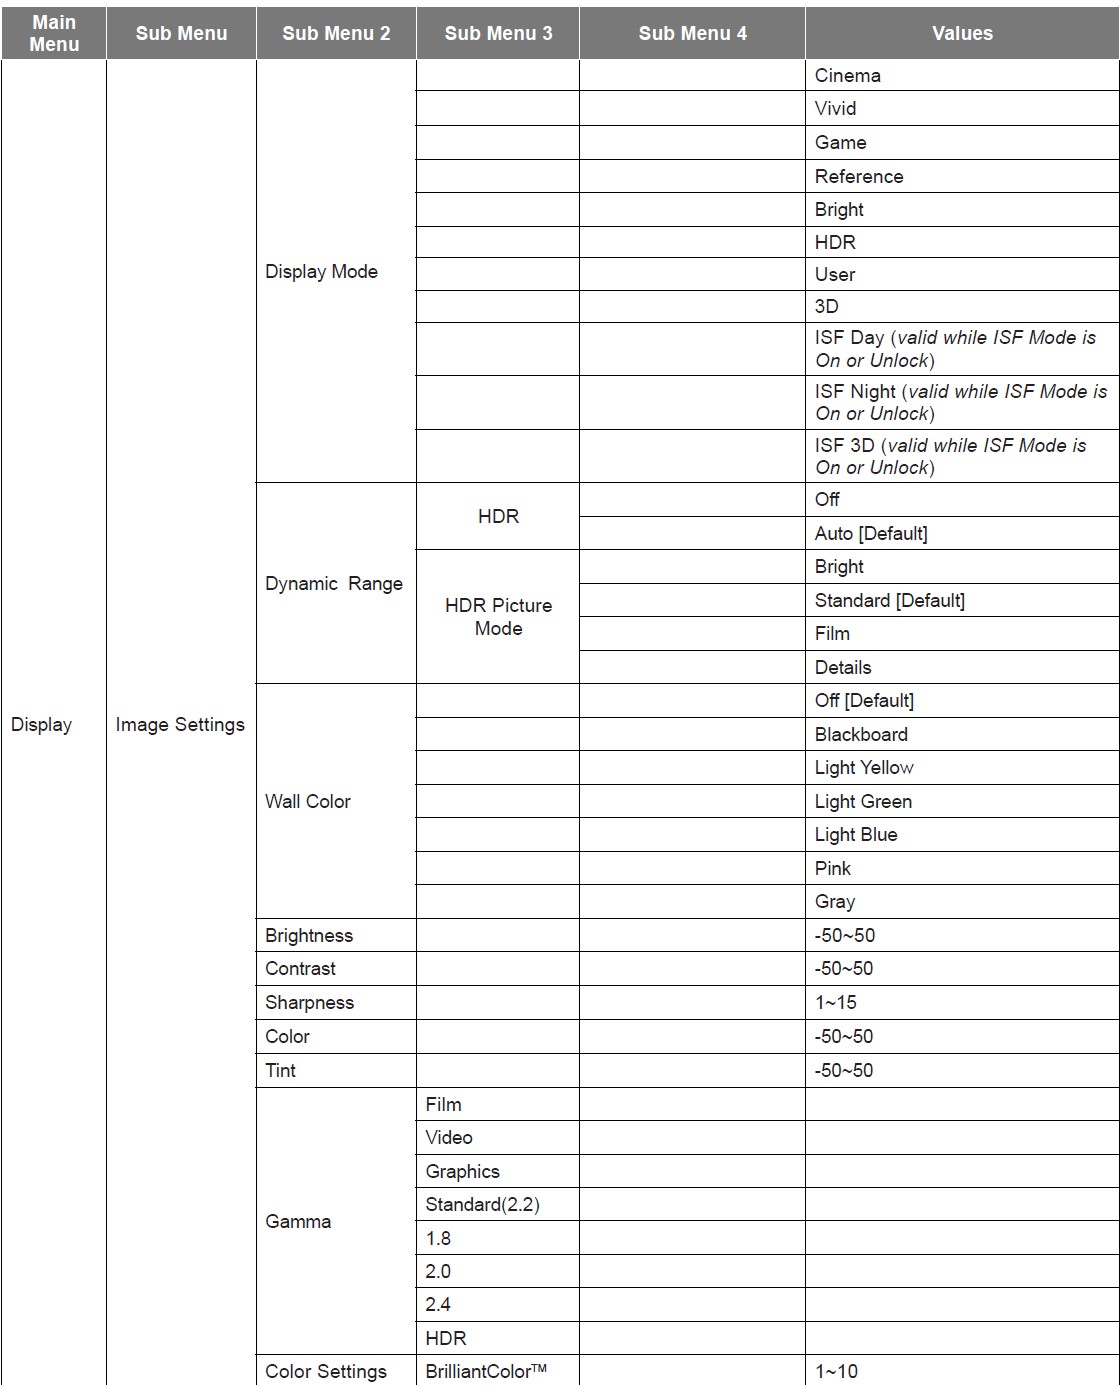
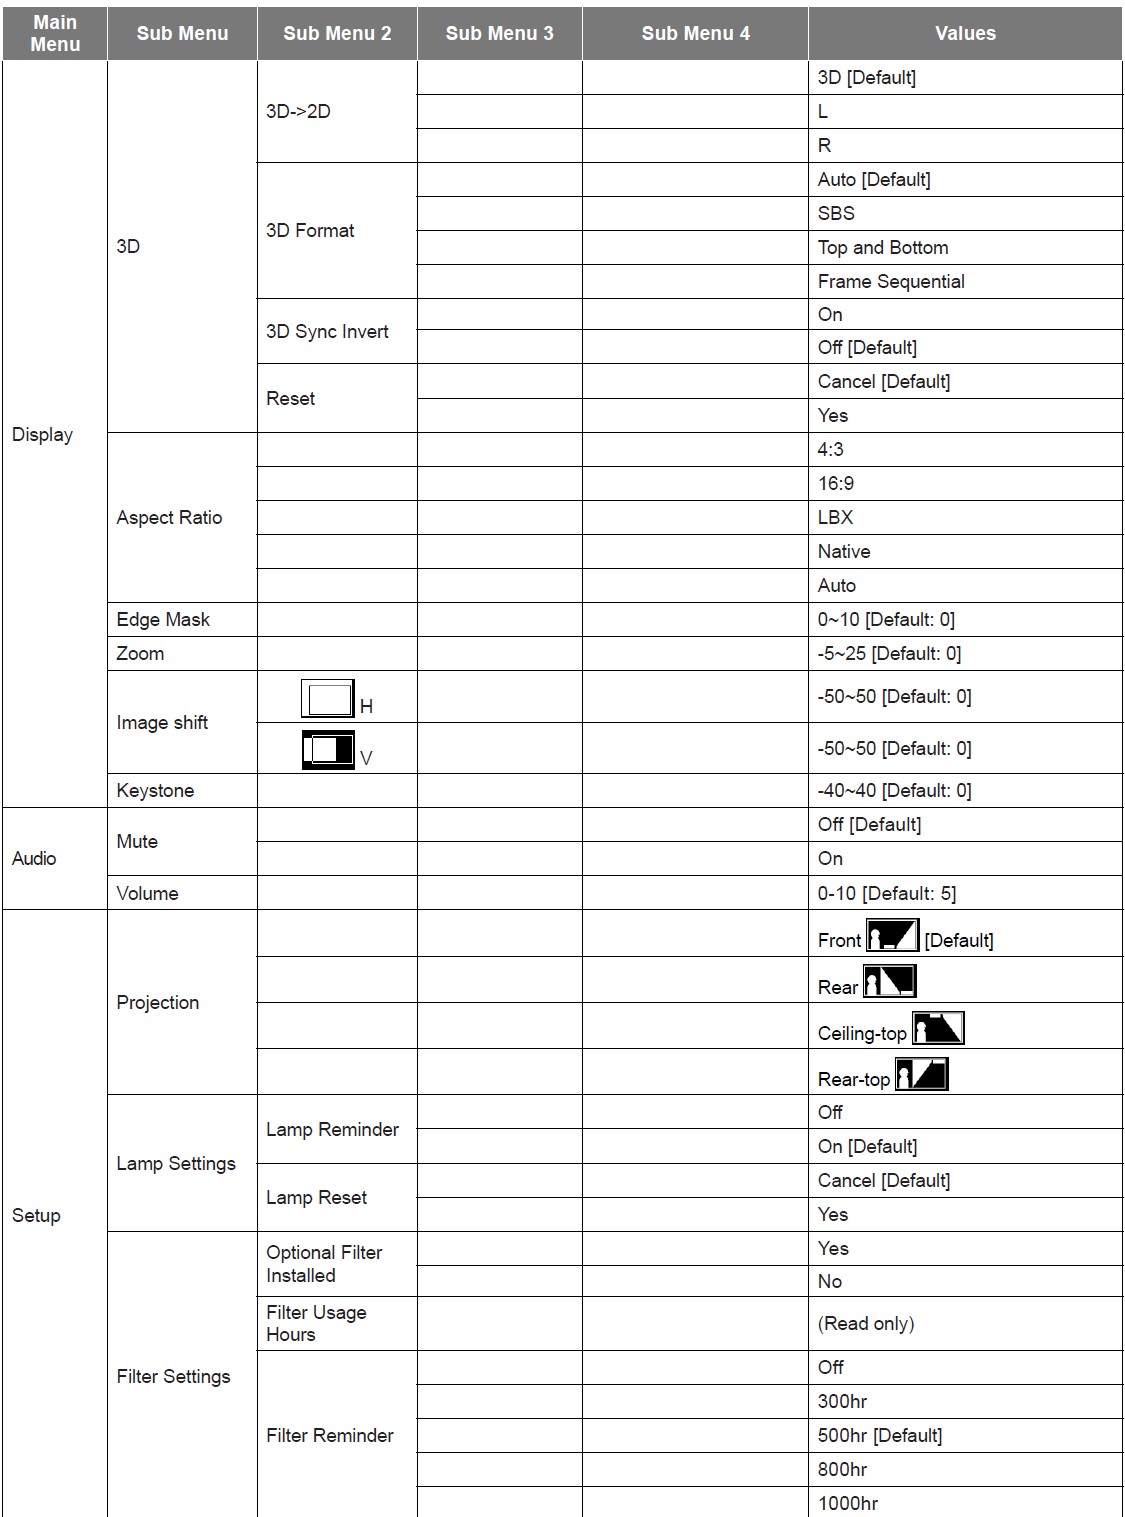
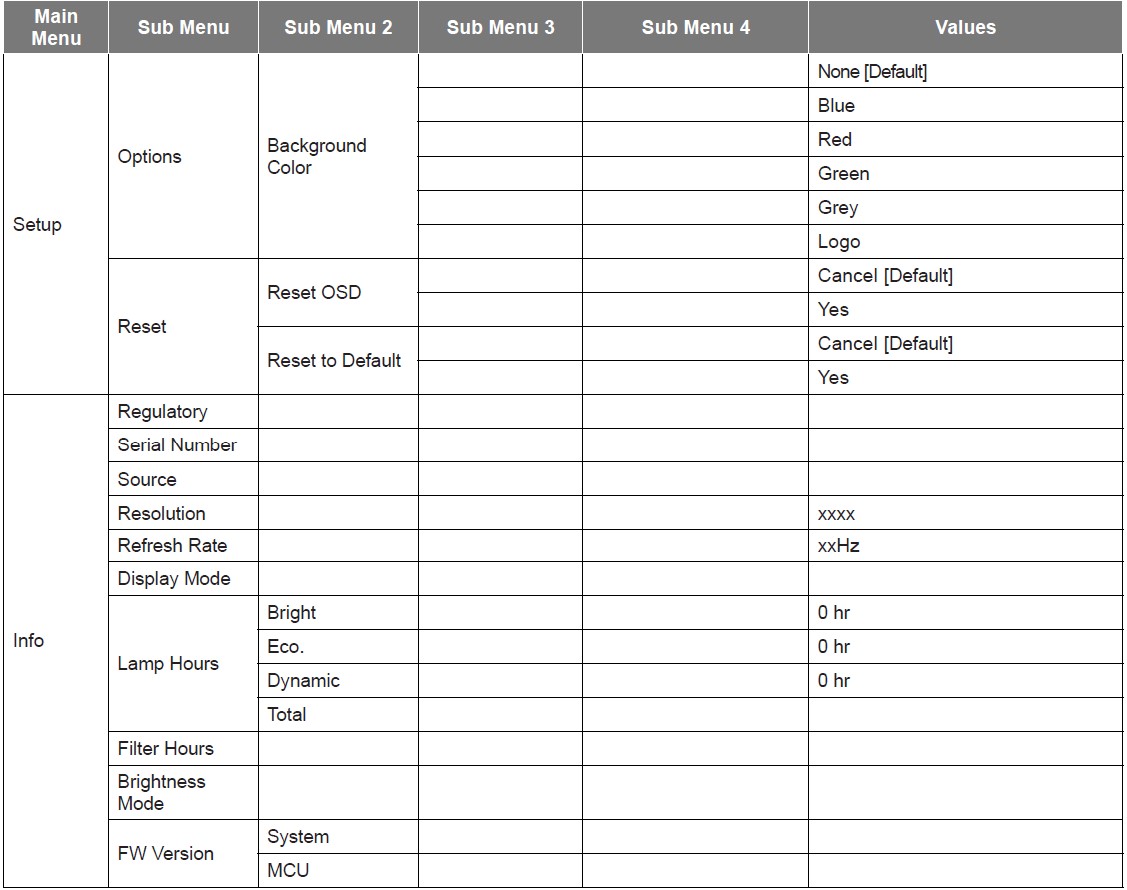
The projector has multilingual on-screen display menus that allow you to make image adjustments and change a variety of settings. The projector will automatically detect the source.
- To open the OSD menu, press
 on the remote control or the projector keyboard.
 - When OSD is displayed, use the up and down arrow keys to select any item in the main menu. While making a selection on a particular page, press
 or right arrow key to enter the sub-menu.
 - Use the right and left arrow keys to select the desired item in the sub menu and then press
 or right arrow key to view further settings. Adjust the settings by using left and right arrow keys.
 - Select the next item to be adjusted in the sub-menu and adjust as described above.
- Press the
 or right arrow key to confirm, and the screen will return to the main menu.
 - To exit, press the left arrow key or
 again. The OSD menu will close and the projector will automatically save the new settings.




MAINTENANCE
Replacing the lamp (Maintenance personnel only)
The projector automatically detects the lifespan of the light bulb and when the light bulb is at its end, a warning message will appear on the screen.
When this message appears, please contact your local dealer or service center to replace the light bulb as soon as possible. Before replacing the light bulb, make sure to turn off the projector, unplug the power cord, and make sure the projector has cooled off for at least 30 minutes and the light bulb has completely cooled off.
Warning: If the ceiling is mounted, please use caution when opening the lamp access panel. It is recommended to wear safety glasses if changing the bulb when the ceiling is mounted. Caution must be used to prevent any loose parts from falling out of the projector.
Warning: The lamp compartment is hot! Allow it to cool down before changing the lamp!
Warning: To reduce the risk of personal injury, do not drop the lamp module or touch the lamp bulb. The bulb may shatter and cause injury if it is dropped.
ADDITIONAL INFORMATION
Compatible resolutions
Digital compatibility
HDMI1.4 for HDMI 1
HDMI2.0 For HDMI 2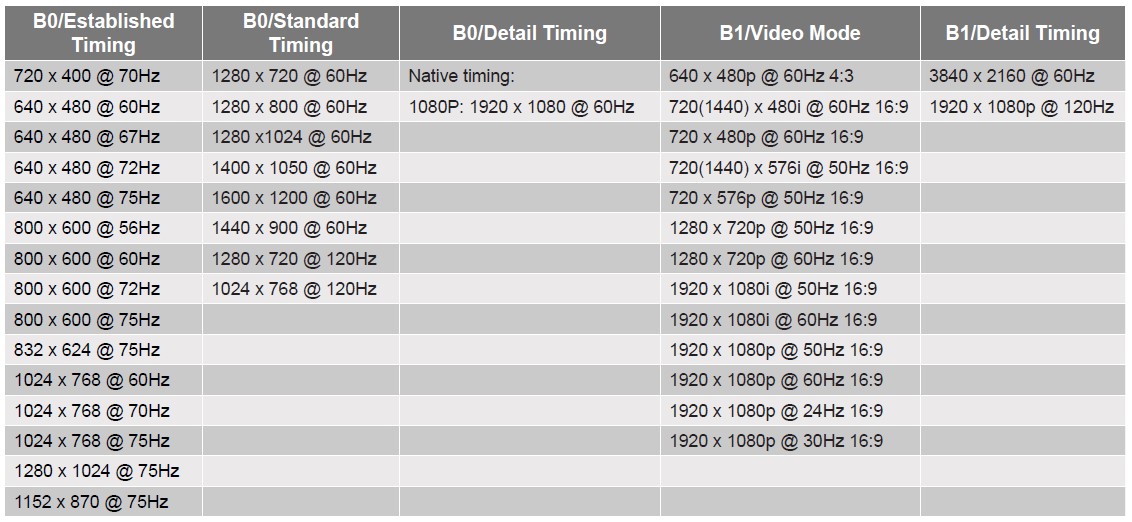
True 3D video compatibility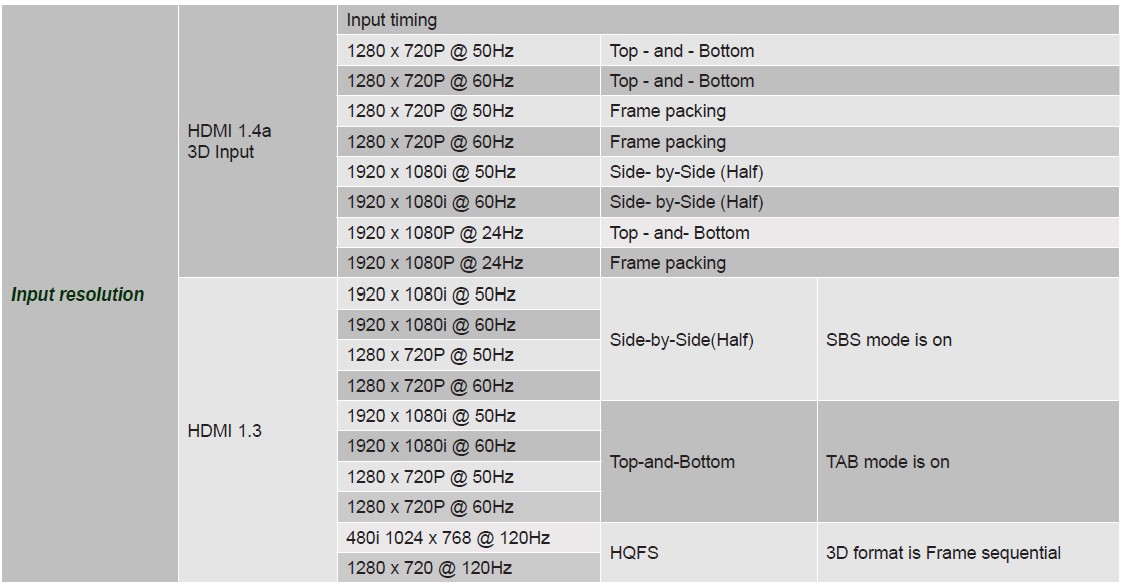
Note:
- If the 3D input is 1080p@24Hz, the DMD should replay with integral multiple with 3D mode.
- Support NVIDIA 3DTV Play if there is no patent fee from Optoma.
- 1080i@25Hz and 720p@50Hz will run in 100Hz; 1080p@24Hz will run in 144Hz; other 3D timing will run in 120Hz.
Specifications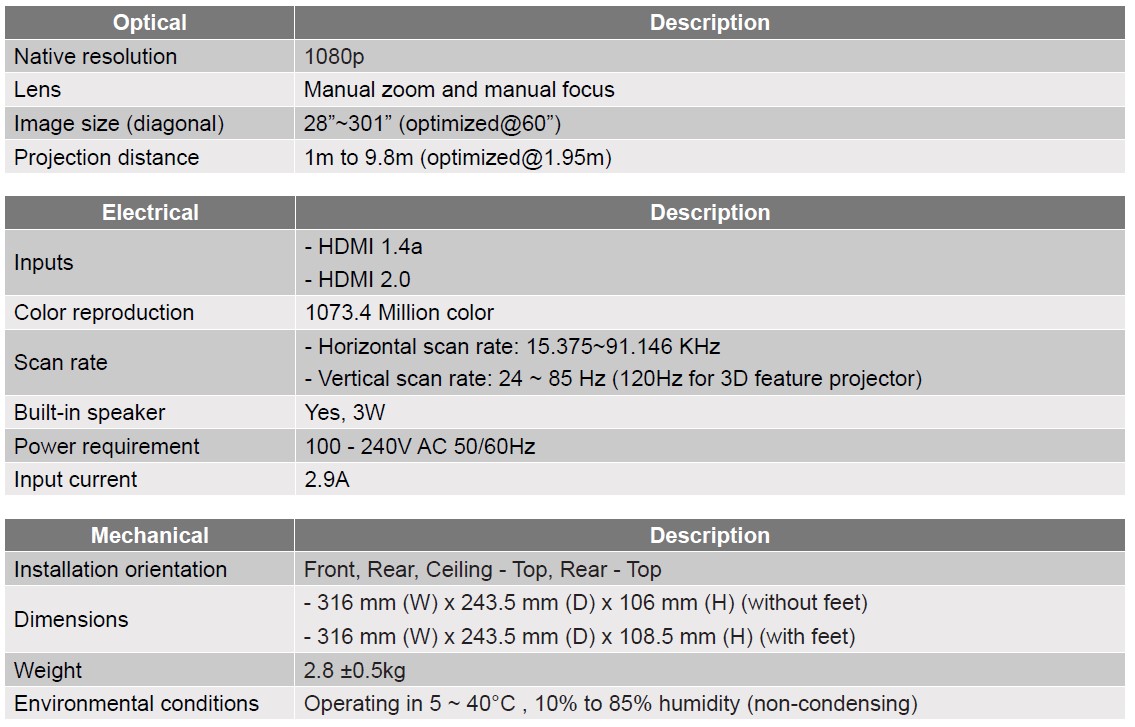
Note: All specifications are subject to change without notice.
FAQS About Optoma HD28HDR 1080p Home Theater Projector
What is the Optoma HD28HDR’s refresh rate?
120 hertz of refresh
What is the HD28HDR contrast ratio?
50,000:1
Is Optoma a reliable projector brand?
One of the top five best manufacturers of home theater projectors is BenQ, followed by Epson and Optoma.
How long does a projector bulb from Optoma last?
4,000/10,000/15,000 hours of lamp life
How long is the lifespan of an Optoma projector?
6000 Hours
What distinguishes brightness from contrast ratio?
While contrast modifies the contrast between the darkest and lightest colors, brightness improves the overall lightness of the image by, for instance, making dark colors lighter and light colors whiter.
What contrast ratio is ideal?
1000:1 to 3000:1
What color contrast ratio is ideal?
4.5:1
Lens shift is there in Optoma?
Utilize vertical lens shift to streamline installation
What nation produced the Optoma projector?
Taiwan
For more manuals by Optoma, Visit Manualsdock
[embeddoc url=”https://manualsdock.com/wp-content/uploads/2023/09/Optoma-HD28HDR-1080p-Home-Theater-Projector-User-Manual.pdf” download=”all”]


