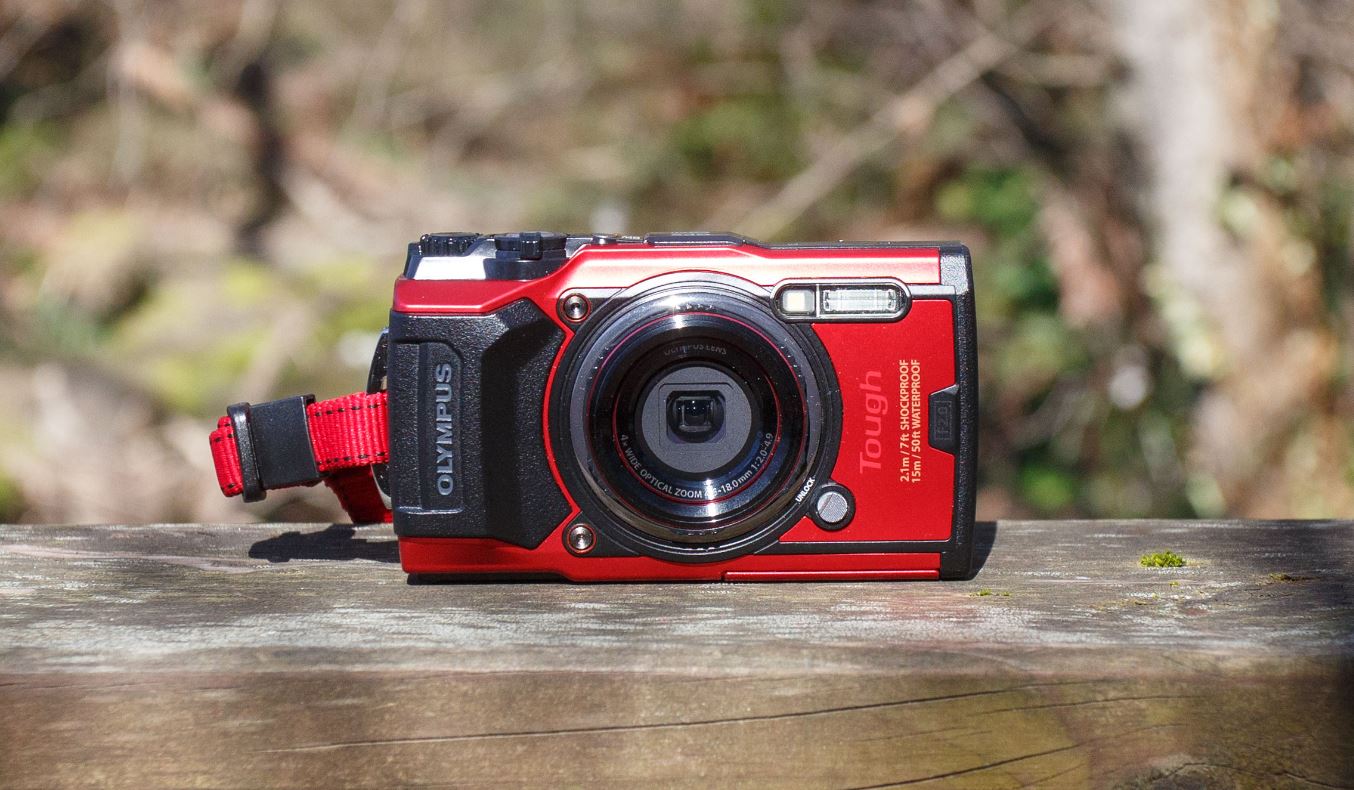
Olympus TG-6 Red Underwater Camera
About Olympus
Olympus Corporation is a Japanese multinational corporation specializing in manufacturing and selling optical and imaging products, medical equipment, and scientific equipment. The company has a long history and has significantly contributed to various fields, including photography, medical imaging, and scientific research.
Before You Begin
Read and Follow Safety Precautions
To prevent incorrect operation resulting in fire or other damage to property or harm to yourself or others, read “11. SAFETY PRECAUTIONS” (P. 148) in its entirety before using the camera. While using the camera, consult this manual to ensure safe and correct operation. Be sure to keep the manual in a safe place once it is read. Olympus will not be held liable for violations of local regulations arising from the use of this product outside the country or region of purchase.
The screen and camera illustrations shown in this manual were produced during the development stages and may differ from the actual product.
If there are additions and/or modifications of functions due to firmware updates for the camera, the contents will differ. For the latest information, please visit the Olympus website.
Wireless LAN and GPS
The camera features built-in wireless LAN and GPS. Use of these features outside the country or region of purchase may violate local wireless regulations; be sure to check with local authorities before use. Olympus will not be held liable for the user’s failure to comply with local regulations. Disable wireless LAN and GPS in areas where their use is prohibited. g “5. Connecting the camera to a smartphone” (P. 106), “6. Using Field Sensor Data” (P. 111)
User Registration
Visit the OLYMPUS website for information on registering your OLYMPUS products.
Product Manuals
In addition to the “Instruction Manual” (this pdf), the documentation available for this product includes “Maintaining Water Resistance” (supplied). Consult these manuals when using the product.
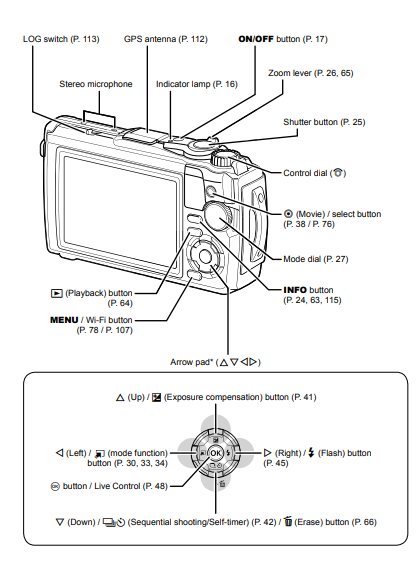
Names of parts

Preparation
Unpacking the Box Contents
The following items are included with the camera. If anything is missing or damaged, contact the dealer from whom you purchased the camera.
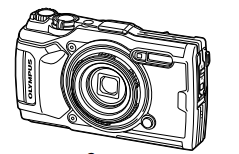
- Camera (with removable lens ring)
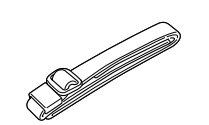
- Strap
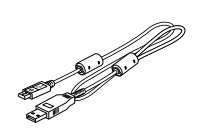
- USB cable CB-USB12
- Lithium-ion battery LI-92B

- USB-AC adapter F-5AC

- • Basic Manual
• Maintaining Water Resistance
• Warranty card
Attaching the strap 
- Lastly, pull the strap firmly, making sure that it is fastened securely
Inserting and Removing the Battery and Card
Turn off the camera before opening the battery/card compartment cover.
In this manual, all storage devices are referred to as “cards.” The following types of SD card (commercially available) can be used with this camera:
- SD, SDHC, and SDXC.
Cards must be formatted with this camera before first use or after being used with other cameras or computers. g “Formatting the Card” (P. 21)
- Opening the battery/card compartment cover.

- Loading the battery.
• Use only LI-92B batteries (P. 12, 147).
• Insert the battery as illustrated with the C mark toward the battery lock knob.
• If you insert the battery in the wrong direction, the camera is not turned on. Be sure to insert it in the correct direction.
- Loading the card.
• Slide the card in until it is locked into place. g “Usable cards” (P. 15)Do not forcibly insert a damaged or deformed card. Doing so may damage the card slot.  Closing the battery/card compartment cover.
• When using the camera, be sure to close the battery/card compartment cover.
Removing the battery
- To remove the battery, first, push the battery lock knob in the direction of the arrow and then remove it.

- Do not remove the battery while the card write indicator is displayed.

- Contact an authorized distributor or service center if you are unable to remove the battery. Do not use force
Notes
- It is recommended to set aside a backup battery for prolonged shooting in case the battery in use drains.
- Also read “Batteries” (P. 118).
Removing the card
- Press the inserted card lightly and it will be ejected. Pull out the card.
- Do not remove the card while the card write indicator is displayed (P. 14).

SD card write protect switch
The SD card body has a write-protect switch. Setting the switch to “LOCK” prevents data from being written to the card. Return the switch to the unlock position to enable writing.
- Cards must be formatted with this camera before first use or after being used with other cameras or computers. g “Formatting the Card” (P. 21)
- The data in the card will not be erased even after formatting the card or deleting the data. When discarding, destroy the card to prevent leakage of personal information.
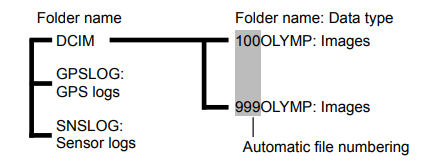
File storage locations
Data on the card are stored in the following folders:
Charging the Battery
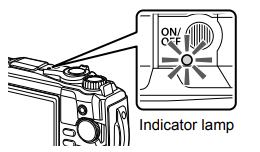
The battery is not fully charged at shipment. Charge the battery before use, not stopping until the indicator lamp has turned off to show that the battery is fully charged.
- Check that the battery is in the camera, and connect the USB cable and USB-AC adapter

- Highlight [Charge] using the FG buttons on the arrow pad and press the Q button.

- The indicator lamp will light and charging will begin.
- The indicator lamp turns off when charging is complete.
- Charging takes about 3 hours. Charging times may increase at high ambient temperatures. Indicator lamp
- Be sure to unplug the power plug of the USB-AC adapter from the wall outlet when the charging is complete.
- For charging the battery abroad, see “Using Your Charger Abroad” (P. 118).
- Never use any cable other than a supplied or Olympus-designated USB cable. This may cause smoking or burning.
- The included F-5AC USB-AC adapter (hereafter referred to as USB-AC adapter) differs depending on the region where you purchased the camera. If you received a plug-in type USB-AC adapter, plug it directly into the AC outlet.
- For details on the battery, see “SAFETY PRECAUTIONS” (P. 148). For details on the USB-AC adapter, see “SAFETY PRECAUTIONS” (P. 148).
- If the indicator lamp does not light, reconnect the USB cable and USB-AC adapter to the camera.
- If the message “No Connection” is displayed on the monitor, disconnect and reconnect the cable.
- A charger (UC-92: sold separately) can be used to charge the battery.
When to charge the batteries
If the camera displays the message shown in the illustration, charge the battery.
Turning the Camera On
1 Press the ON/OFF button to turn on the camera.
- The camera will turn on and the indicator lamp and monitor will light.

Camera sleep operation
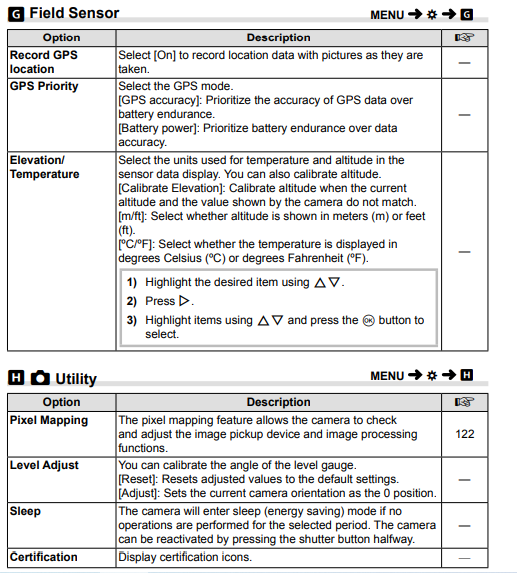
If no operations are performed for a minute, the camera enters “sleep” (standby) mode to turn off the monitor and cancel all actions. The camera activates again when you touch any button (the shutter button, q button, etc.). The camera will turn off automatically if left in sleep mode for 5 minutes. Turn the camera on again before use. You can select how long the camera remains idle before entering sleep mode. g [Sleep] (P. 100)
Shooting
Information Displays while Shooting
- Monitor display during still photography

- Monitor display during movie mode

- Card write indicator
- Wireless LAN connection status
- Date stamp
- AF fi ne-tuning guide
- Af target
- HDR
- Bracketing icon
- Handheld starlight
- Focus stacking
- Accessory
- Digital teleconverter*1
- Time-lapse shooting
- Face-priority
- Movie sound
- Wind noise reduction
- Level gauge (tilt)
- Optical zoom ratio/magnify cation*1
- Internal temperature warning
- Flash
(blinks: charging in progress, lights up:
charging completed) - AF confirmation mark
- Picture mode
- ISO sensitivity
- White balance
- AF mode
- Aspect ratio
- Image quality (still images)
- Record mode (movies)
- Available recording time
- Number of storable still pictures
- Level gauge (horizon)
- Top: Flash intensity control
Bottom: Exposure compensation - Exposure compensation value
- Aperture Value
- Shutter speed
- Histogram
- Grid guide
- Shooting mode
- Custom mode
- LOG icon/warning
- GPS icon
- Metering mode
- Sequential shooting/Self-time
Pro Capture shooting - Flash intensity control
- Flash mode
- Image stabilizer
- Battery level
- Recording level meter
Switching the information display
You can switch the information displayed on the monitor during shooting using the INFO button

- * Not displayed in n mode (movie mode) unless recording is in progress.
- You can change Custom1 and Custom2 settings. g [G/Info Settings] > [LV-Info] (P. 102)
- The information display screens can be switched in either direction by rotating the control dial while pressing the INFO
Types of shooting modes
For how to use the various shooting modes, see the following.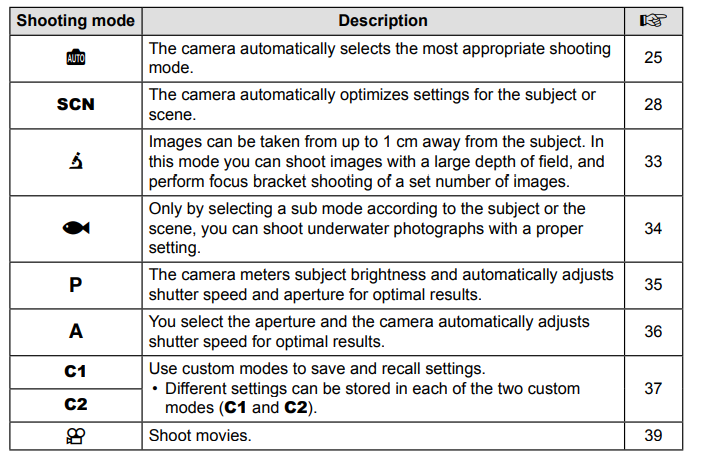
Functions that cannot be selected from menus
- Some items may not be selectable from the menus when using the arrow pad.
- Items that cannot be set with the current shooting mode. g “List of Settings Available in Each Shooting Mode” (P. 136)
- Items that cannot be set because of an item that has already been set: Settings such as picture mode are unavailable when the mode dial is rotated to
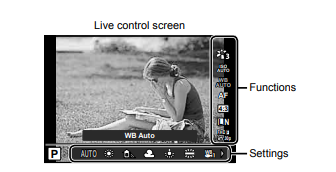
Settings Accessible via Live Controls
You can use live control to select the shooting function while checking the effect on the screen.
- The selected settings apply in all of the P, A, and N modes.
Playback
Information Displays during Playback
Playback image information
- Simplified display
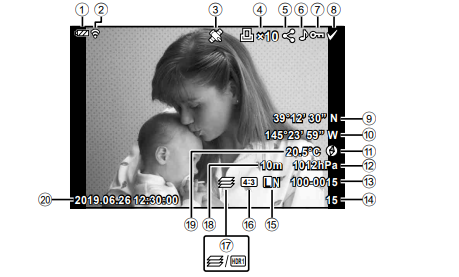
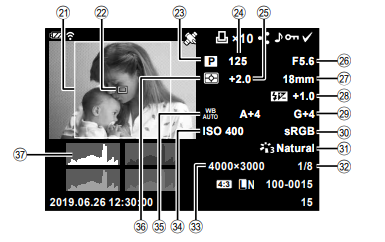
- Overall display
- Battery level
- Wireless LAN connection status
- Including GPS information
- Print order Number of prints
- Share order
- Sound record
- Protect
- Image selected
- Latitude
- Longitude
- Direction information
- Atmospheric
- File number
- Frame number
- Image quality
- Aspect ratio.
- Focus Stacking/HDR image
- Altitude/Water depth
- Temperature (water temperature).
- Date and time
- Aspect border *
- AF area pointer
- Shooting mode
- Shutter speed.
- Exposure compensation
- Aperture Value
- Focal length
- Flash intensity control
- White balance compensation
- Color space
- Picture mode.
- Compression rate
- Pixel count
- ISO sensitivity.
- White balance
- Metering mode
- Histogram
Switching the information display
You can switch the information displayed during playback by pressing the INFO button.

- You can add histogram and highlight & shadow to the information displayed during playback. g [q Info] (P. 102)
Menu Functions
Basic menu operations
The menus can be used to customize the camera for ease of use and include shooting and playback options not displayed on the live control screen or the like.
Functions that cannot be selected from menus
Some items may not be selectable from the menus when using the arrow pad.
- Items that cannot be set with the current shooting mode. g “List of Settings Available in Each Shooting Mode” (P. 136)
- Items that cannot be set because of an item that has already been set:
Settings such as picture mode are unavailable when the mode dial is rotated to B.
- Press the MENU button to display the menus.

- A guide is displayed in 2 seconds after you select an option.
- Press the INFO button to view or hide guides.
- Use FG to select a tab and press the Q
- The menu group tab appears when the G Custom Menu is selected. Use FG to select the menu group and press the Q

- The menu group tab appears when the G Custom Menu is selected. Use FG to select the menu group and press the Q
- Select an item using FG and press the Q button to display options for the selected item.

- Use FG to highlight an option and press the Q button to select.
- Press the MENU button repeatedly to exit the menu.
Notes For the default settings of each option, refer to “Default/Custom Settings” (P. 140).
Using the Custom Menus
Camera settings can be customized using the G Custom Menu.
Custom Menu
-
- AF/MF
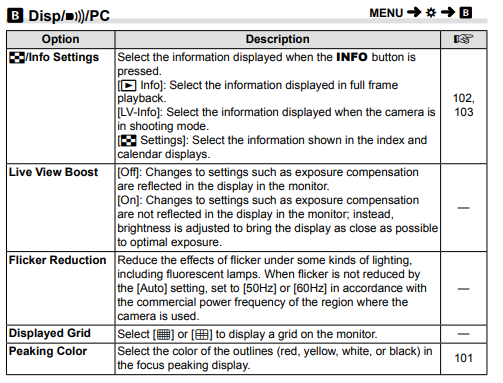
- Disp/8/PC
- Exp/ISO (P. 97)
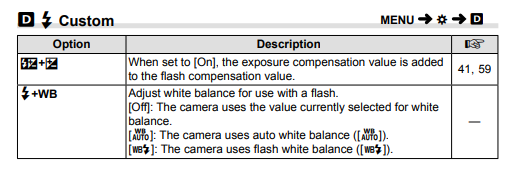
- # Custom (P. 98
- K/WB/Color (P. 98)
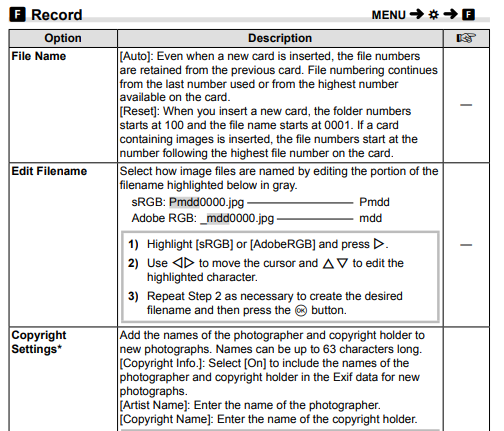
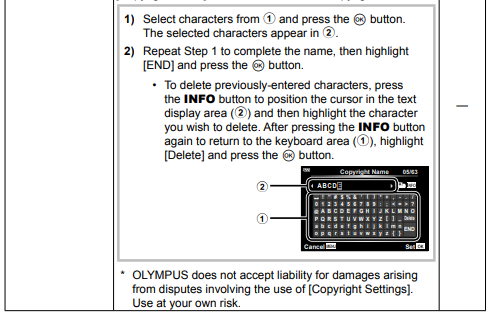
- Record (P. 99
- Field Sensor (P. 100)
- Utility (P. 100)





Improving focus in dark surroundings (A F Illuminator)
The AF illuminator (AF assist lamp) lights to assist the focus operation in dark environments. Select [Off] to disable the AF illuminator.
MF Assist
This feature is used to assist manual focus. If the focus position changes during focus lock or manual focus, the camera will enhance outlines or zoom the display in on an area of the frame.
- When Peaking is in use, the edges of small subjects tend to be enhanced more strongly. This is no guarantee of accurate focusing.
- Depending on the subject, outlines may be hard to see when [On] is selected for both [Magnify] and [Peaking].
Using Separately Sold Accessories
Attaching optional silicone jackets
Attach the jacket as shown. Reverse the steps to remove the jacket.
- Do not use excessive force. Failure to observe this precaution could damage the jacket.

Taking pictures with the Olympus Wireless RC Flash System
You can take pictures and underwater pictures with a wireless flash when using a flash compatible with the Olympus Wireless RC Flash System.
- The guideline of the setup range in wireless fl ash shooting is from 1 to 2 m, however, note that it varies depending on the ambient environment.
- The camera’s built-in flash is used for communication between the camera and the flash.
- To use a dedicated underwater strobe, prepare an underwater case, a fiber-optic cable, and so on.
- For details about the operation of a wireless fl ash and an underwater strobe, refer to the instruction manual for a special external fl ash or an underwater case.
- Turn on the dedicated strobe.
- Set the flash mode of the dedicated strobe to RC mode.
When you have to set a channel and a group, select CH1 for the channel, and A for the group. - Highlight fl ash settings in live controls and select [#RC] (remote control).
“Using a flash (Flash photography)” (P. 45) - Take a test shot to check the operation of the flash and the resulting image.
- Be sure to check the charge level of the camera and wireless flash before taking pictures.
- When the camera flash is set to [#RC], the camera’s built-in flash is used for communication with the wireless flash. It cannot used for taking pictures.
- To take pictures with a wireless flash, point the remote sensor of the special external flash toward the camera, and point the flash in the direction of the subject.
Optional Accessories
Optional accessories can expand your photographic horizons. Before mounting accessories on the camera, remove the supplied lens ring.
- Requires that a CLA-T01 converter adapter be mounted on the camera.
- When using optional accessories, select the corresponding accessory option via live controls. g “Using optional accessories (Accessory)” (P. 61)
- Rinse the product with fresh water after underwater use.
- For details, please visit the Olympus website for your local area.
Removing and attaching the lens ring
Removing the lens ring
Keeping the lens ring release button pressed, rotate the ring in the “remove” direction.
Attaching the lens ring
Align the mounting marks and rotate the ring in the “attach” direction until it clicks into place.
Attaching and removing LED light guides
Attaching light guides
Align the mounting marks and rotate the guide in the “attach” direction until it clicks into place.
Removing light guides
Keeping the lens ring release button pressed, rotate the guide in the “remove” direction.
Attaching and removing flash diffusers
Attaching flash diffusers
Align the mounting marks and rotate the diffuser in the “attach” direction until it clicks into place.
Removing flash diffusers
Keeping the lens ring release button pressed, rotate the diffuser in the “remove” direction.
Attaching and removing lens barriers
Attaching lens barriers
Align the mounting marks and rotate the barrier in the “attach” direction until it clicks into place.
-
The lens barrier mounting mark can be found on the back of the barrier.
Removing lens barriers
Keeping the lens ring release button pressed, rotate the barrier in the “remove” direction.
Attaching and removing converter lenses and protective filters
Attaching converter lenses and filters
- Attach a converter adapter.
- Align the mounting marks and rotate the adapter in the “attach” direction until it clicks into place.
- Rotate the lens or filter in the “attach” direction to screw it onto the adapter.
Removing converter lenses and filters
- Rotate the lens or filter in the “remove” direction.
- Remove the converter adapter.
- Keeping the lens ring release button pressed, rotate the adapter in the “remove” direction.
Troubleshooting
Some Common Issues and Their Solutions
The camera does not turn on even when a battery is loaded
The battery is not fully charged
- Charge the battery with the charger.
The battery is temporarily unable to function because of the cold
- Battery performance drops at low temperatures. Remove the battery and warm it by putting it in your pocket for a while.
A language-selection prompt is displayed
The dialog shown in the illustration will be displayed in the following circumstances:
- The camera is turned on for the first time
- You previously ended the initial setup without selecting a language
Select a language as described in “Initial Setup” (P. 18).
No picture is taken when the shutter button is pressed
The camera has turned off automatically
- The camera automatically enters sleep mode to reduce the drain on the battery if no operations are performed for a set period. g [Sleep] (P. 100) Press the shutter button halfway to exit the sleep mode. The camera will turn off automatically if left in sleep mode for 5 minutes.
The flash is charging
- On the monitor, the # mark blinks when charging is in progress. Wait for the blinking to stop, then press the shutter button.
The camera temperature is elevated
- The camera may shut down if its internal temperature rises after extended use. Remove the battery and wait until the internal temperature has dropped enough for the camera to be used again. The camera may also become warm to the touch during use, but this does not indicate a malfunction.
Unable to focus
- The camera cannot focus on subjects that are too close to the camera or that are not suited to autofocus (the AF confirmation mark will blink in the monitor). Increase the distance to the subject or focus on a high-contrast object at the same distance from the camera as your main subject, compose the shot, and shoot.
Subjects that are difficult to focus on
It may be difficult to focus with auto-focus in the following situations.
- 1 It is also effective to compose the shot by holding the camera vertically to focus and then returning to the horizontal position to take the picture.
Noise reduction is activated
- When shooting night scenes, shutter speeds are slower and noise tends to appear in images. The camera activates the noise-reduction process after shooting at slow shutter 9 speeds. During this, shooting is not allowed. You can set [Noise Reduct.] to [Off]. g [Noise Reduct.] (P. 97)
The date and time have not been set
The camera is used with the settings at the time of purchase
- The date and time of the camera is not set when purchased. Set the date and time before using the camera. g “Initial Setup” (P. 18)
The battery has been removed from the camera
- The date and time settings will be returned to the factory default settings if the camera is left without the battery for approximately 1 day. The settings will be canceled more quickly if the battery is only loaded in the camera for a short time before being removed. Before taking important pictures, check that the date and time settings are correct.
Set functions are restored to their factory default settings
When you rotate the mode dial or turn off the power in a shooting mode other than P, A, or n, any settings you have altered will be reset to default values.
Some settings are unavailable
Some features may be unavailable depending on the shooting mode and camera settings. g “List of Settings Available in Each Shooting Mode” (P. 136)
Pictures are grainy
Select a larger image size or set compression to SF or F. g “Selecting image quality (Still image quality)” (P. 56) Image “noise” mottling can sometimes be reduced by lowering ISO sensitivity. g “Changing ISO sensitivity (ISO)” (P. 52)
The image taken appears whitish
This may occur when the picture is taken in backlight or semi-backlight conditions. This is due to a phenomenon called flare or ghosting. As far as possible, consider a composition where the strong light source is not taken in the picture. Flare may occur even when a light source is not present in the picture. If this does not have the desired effect, try shading the lens with your hand or other objects.
The light is caught in the picture.
Shooting with flash in dark situations results in an image with many flash reflections on dust in the air.
Unknown bright dot(s) appear on the subject in the picture taken
This may be due to stuck pixel(s) on the image pickup device. Perform [Pixel Mapping]. If the problem persists, repeat pixel mapping a few times. g “Pixel Mapping – Checking the image processing functions” (P. 122)
The lens is cloudy or the monitor is hard to read
For rapid temperature change, lens fogging (condensation) may occur. Turn off the power, and wait for the camera body to become acclimated to the surrounding temperature and dry out before taking pictures.
Movies do not play back smoothly when viewed on a TV
The movie frame rate may not match the video standard used in the TV. View the movie on a computer instead. Before recording movies for display on a TV, select a frame rate that matches the video standard used in the device. g [Video Frame Rate] (P. 87)
The heading is not correct
The compass does not function as expected in the vicinity of strong electromagnetic fields, such as televisions, microwaves, large electric motors, radio transmitters, and high-voltage power lines. Normal function can sometimes be restored by moving the camera in Figure eight while rotating your wrist.
Warnings (error codes) are displayed on the monitor
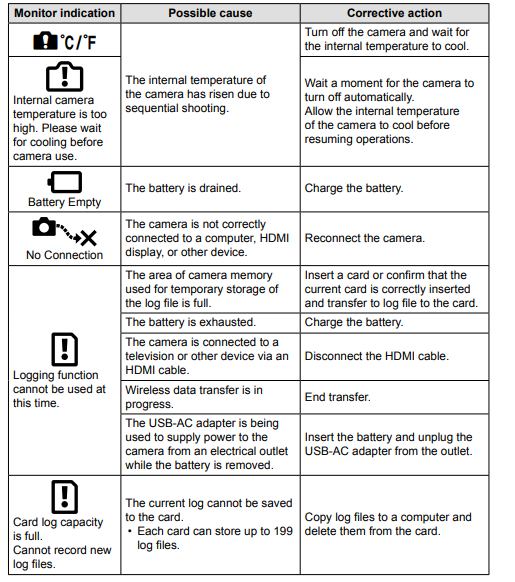
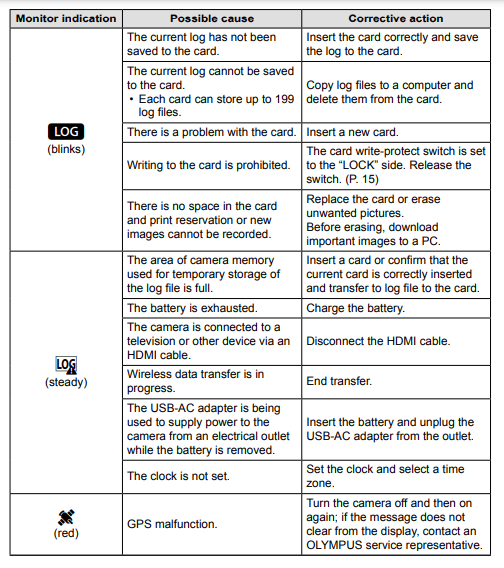
Specifications
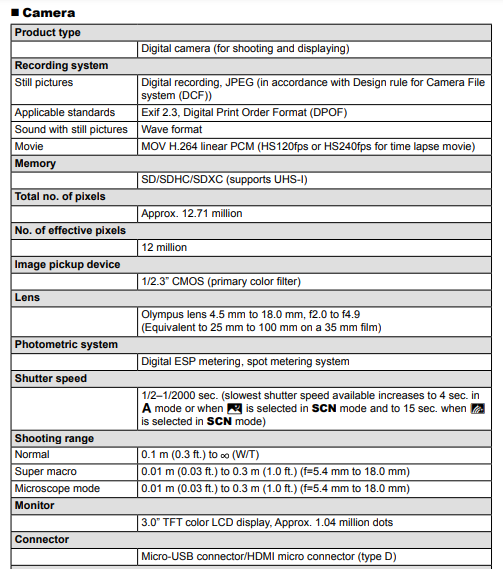

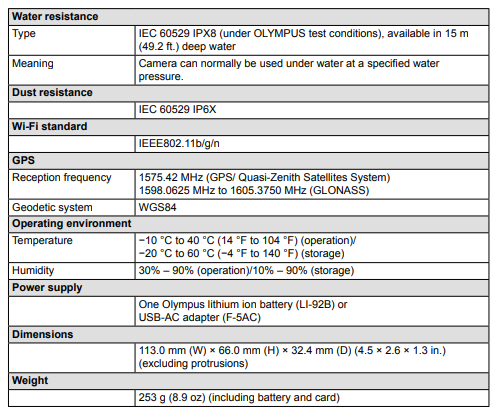

- SPECIFICATIONS ARE SUBJECT TO CHANGE WITHOUT ANY NOTICE OR OBLIGATION ON THE PART OF THE MANUFACTURER.
- Visit our website for the latest specifications.
The terms HDMI and HDMI High-Definition Multimedia Interface, and the HDMI Logo are trademarks or registered trademarks of HDMI Licensing Administrator, Inc. in the United States and other countries.
SAFETY PRECAUTIONS
- An exclamation mark enclosed in a triangle alerts you to important operating and maintenance instructions in the documentation provided with the product.
- If the product is used without observing the information given under this WARNING symbol, serious injury or death may result.
- If the product is used without observing the information given under this CAUTION symbol, injury may result.
- If the product is used without observing the information given under this NOTICE symbol, damage to the equipment may result.
WARNING!
- TO AVOID THE RISK OF FIRE OR ELECTRICAL SHOCK, NEVER DISASSEMBLE THIS PRODUCT.
General Precautions
- Read All Instructions — Before you use the product, read all operating instructions. Store all manuals and documentation for future reference.
- Water and Moisture — For precautions on products with weatherproof designs, read the weatherproofing sections.
- Power Source — Connect this product only to the power source described on the product label.
- Foreign Objects — To avoid personal injury, never insert a metal object into the product.
- Cleaning — Always unplug this product from the wall outlet before cleaning. Use only a damp cloth for cleaning. Never use any type of liquid or aerosol cleaner, or any type of organic solvent to clean this product.
- Heat — Never use or store this product near any heat source such as a radiator, heat register, stove, or any type of equipment or appliance that generates heat, including stereo amplifiers.
- Lightning — If a lightning storm occurs while using a USB-AC adapter, remove it from the wall outlet immediately.
- Attachments — For your safety, and to avoid damaging the product, use only accessories recommended by Olympus.
- Location — To avoid damage to the product, mount the product securely on a stable tripod, stand, or bracket.
CAUTION
- Regularly back up important data to a computer or other storage device to prevent accidental loss.
- OLYMPUS accepts no liability for any loss of data associated with this device.
- Be careful with the strap when you carry the camera. It could easily catch on stray objects and cause serious damage.
- Never drop the camera or subject it to severe shocks or vibrations.
- When attaching the camera to or removing it from a tripod, rotate the tripod screw, not the camera.
- Before transporting the camera, remove a tripod and all other non-OLYMPUS accessories.
- Do not touch electric contacts on cameras.
- Do not leave the camera pointed directly at the sun. This may cause lens or shutter curtain damage, color failure, ghosting on the image pickup device, or may cause fi res.
- Do not push or pull severely on the lens.
- Before storing the camera for a long period, remove the batteries. Select a cool, dry location for storage to prevent condensation or mold from forming inside the camera. After storage, test the camera by turning it on and pressing the shutter button to make sure that it is operating normally.
- The camera may malfunction if it is used in a location where it is subject to a magnetic/electromagnetic field, radio waves, or high voltage, such as near a TV set, microwave, video game, loudspeakers, large monitor unit, TV/radio tower, or transmission towers. In such cases, turn the camera off and on again before further operation.
- Always observe the operating environment restrictions described in the camera’s manual.
- Insert the battery carefully as described in the operating instructions.
- Before loading, always inspect the battery carefully for leaks, discoloration, warping, or any other abnormality.
- Always unload the battery from the camera before storing the camera for a long period.
- When storing the battery for a long period, select a cool location for storage.
- Power consumption by the camera varies depending on which functions are used.
- During the conditions described below, power is consumed continuously and the battery becomes exhausted quickly.
- Zoom is used repeatedly.
- The shutter button is pressed halfway repeatedly in shooting mode, activating the autofocus.
- A picture is displayed on the monitor for an extended period.
- GPS is used.
- Using an exhausted battery may cause the camera to turn off without displaying the battery level warning.
- If the battery’s terminals get wet or greasy, camera contact failure may result. Wipe the battery well with a dry cloth before use.
- Always charge a battery when using it for the first time, or if it has not been used for a long period.
- When operating the camera with battery power at low temperatures, try to keep the camera and spare battery as warm as possible. A battery that has run down at low temperatures may be restored after it is warmed at room temperature.
- Before going on a long trip, and especially before traveling abroad, purchase extra batteries. A recommended battery may be difficult to obtain while traveling.
- For plug-in type USB-AC adapter:
Using the wireless LAN function
- Turn off the camera in hospitals and other locations where medical equipment is present.
The radio waves from the camera may adversely affect medical equipment, causing a malfunction that results in an accident.
- Turn off the camera when onboard the aircraft.
Using wireless devices onboard may hinder the safe operation of the aircraft.
Legal and Other Notices
- Olympus makes no representations or warranties regarding any damages, or benefits t expected by using this unit lawfully, or any request from a third person, which are caused by the inappropriate use of this product.
- Olympus makes no representations or warranties regarding any damages or any benefit expected by using this unit lawfully which are caused by erasing picture data.
Disclaimer of Warranty
- Olympus makes no representations or warranties, either expressed or implied, by or concerning any content of these written materials or software, and in no event shall be liable for any implied warranty of merchantability or fitness for any particular purpose or for any consequential, incidental, or indirect damages (including but not limited to damages for loss of business profits, business interruption and loss of business information) arising from the use or inability to use these written materials or software or equipment. Some countries do not allow the exclusion or limitation of liability for consequential or incidental damages or of the implied warranty, so the above limitations may not apply to you.
- Olympus reserves all rights to this manual.
Warning
Unauthorized photographing or use of copyrighted material may violate applicable copyright laws. Olympus assumes no responsibility for unauthorized photographing, use, or other acts that infringe upon the rights of copyright owners.
FCC Notice
This equipment has been tested and found to comply with the limits for a Class B digital device, under part 15 of the FCC Rules. These limits are designed to provide reasonable protection against harmful interference in a residential installation. This equipment generates, uses, and can radiate radio frequency energy and, if not installed and used by the instructions, may cause harmful interference to radio communications. However, there is no guarantee that interference will not occur in a particular installation. If this equipment does cause harmful interference to radio or television reception, which can be determined by turning the equipment off and on, the user is encouraged to try to correct the interference by one or more of the following measures:
- Reorient or relocate the receiving antenna.
- Increase the separation between the equipment and the receiver.
- Connect the equipment to an outlet on a circuit different from that to which the receiver is connected.
- Consult the dealer or an experienced radio/TV technician for help.
- Only the OLYMPUS-supplied USB cable should be used to connect the camera to USB-enabled personal computers.
FCC/ISED Caution
Changes or modifications not expressly approved by the party responsible for compliance could void the user’s authority to operate the equipment. This transmitter must not be co-located or operated in conjunction with any other antenna or transmitter.
This equipment complies with FCC radiation exposure limits set forth for an uncontrolled environment and meets the FCC radio frequency (RF) Exposure Guidelines as this equipment has very low levels of RF energy. The available scientific evidence does not show that any health problems are associated with using low-power wireless devices. There is no proof, however, that these low-power wireless devices are safe. Low power Wireless devices emit low levels of radio frequency energy (RF) in the microwave range while being used. Whereas high levels of RF can produce health effects (by heating tissue), exposure to low-level RF that does not produce heating effects causes no known adverse health effects. Many studies of low-level RF exposures have not found any biological effects. Some studies have suggested that some biological effects might occur, but such findings have not been confirmed by additional research. IM015 has been tested and found to comply with ISED radiation exposure limits set forth for an uncontrolled environment and meets RSS-102 of the ISED radio frequency (RF) Exposure rules.
FAQS About Olympus TG-6 Red Underwater Camera
How far under the water can the TG-6 travel?
50 feet
The Olympus Tough TG-6 records for how long?
about 29 minutes
How long does Olympus TG-6 take to charge?
the equivalent of 2.5 hours
Has the Olympus TG-6’s image stabilization been activated?
Stylish, tough, and waterproof, the Olympus Tough TG-6 is a camera. It has a 25-100mm equivalent F2 lens, picture stabilization, and a 12MP (1/2.3″) sensor.
The Olympus tg6 battery’s lifespan.
340 shots
Olympus TG-6 has a manual mode, right?
The camera doesn’t have shutter priority or manual exposure settings.
Shoots the TG-6 in raw?
The TG-6 supports RAW photography.
Has the Olympus TG-6 flash?
Unsure of how to disable it. Press the lightning bolt next to “OK” to cycle through the many flashing options, including “on,” “off,” “auto,” and others.
Olympus Tough TG-6: Does it include GPS?
There are three options in total for GPS.
What is the best Olympus TG?
TG-6 Olympus Tough
Olympus TG-6: Does it feature Bluetooth?
At Crutchfield, find the 12-megapixel, waterproof, 4K, Wi-Fi, and Bluetooth® Olympus Tough TG-6 (Red) camera.
For more manuals by Olympus, Visit Manualsdock
[embeddoc url=”https://manualsdock.com/wp-content/uploads/2023/09/Olympus-TG-6-Red-Underwater-camera-Instruction-Manual.pdf” download=”all”]

