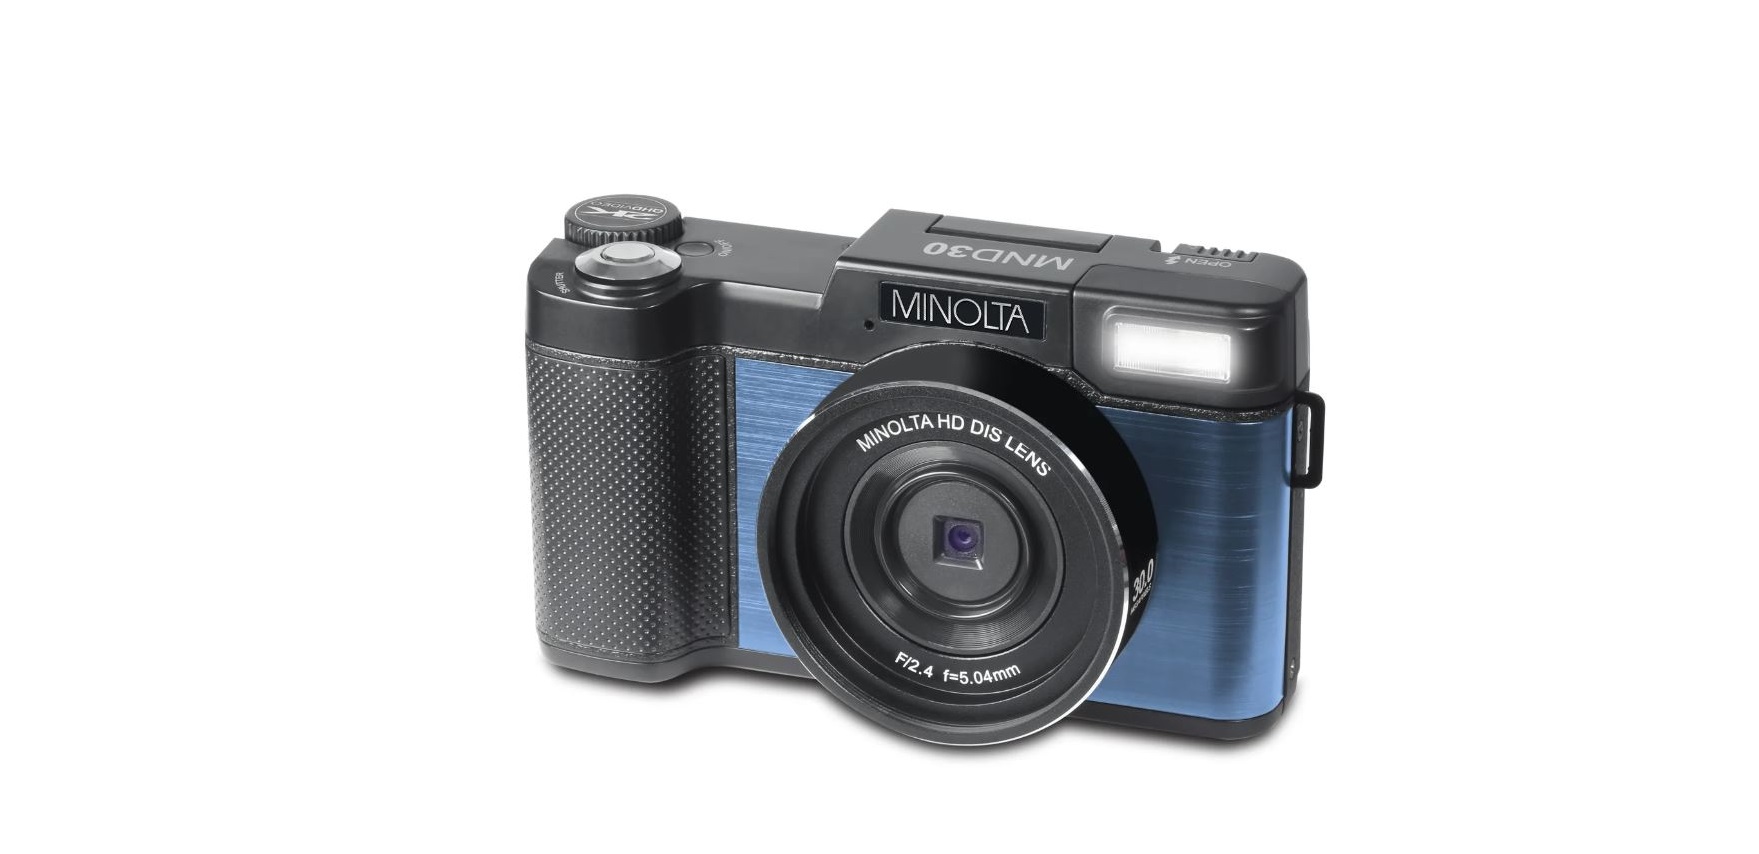
Minolta MND30 Ultra HD Digital Camera
About Minolta
Minolta Corporation was a Japanese manufacturer of cameras, camera accessories, photocopiers, and other optical and imaging equipment. The company has a rich history dating back to its founding in 1928 by Kazuo Tashima under the name “Nichidoku Shashinki Shōten” (Japan-Germany Camera Store). It later adopted the name Minolta, derived from “Mechanism, Instruments, Optics, and Lenses by Tashima.”
Camera Interface


Button Function Description

First Use
To Open the Battery Door
Unlock the battery door by sliding the battery door notch away from the opening. Use a fingernail or other pointy object when sliding the latch to get a better grip.

Installing the Battery
Insert the lithium-ion battery into the battery compartment with the metal contacts facing the inside of the camera. The battery can only be inserted one way.

Installing the Memory Card
Insert the included Micro SD memory card to record and store your videos and photos. When the battery is low, media stored on the memory card will not be erased. Please insert the SD memory card by following the steps below:
- Open the battery door by following the diagram above.
- Insert the memory card. Ensure that the metal contacts are inserted first. Push the memory card down until you hear an audible click.
The memory card can only be inserted in one way. Do not force the card in if it will not go in smoothly. - Close the battery door by pushing it down and sliding the lock back into place.
- To remove the memory card, simply push in and the card will eject back out.

NOTE:
- Please format the memory card before using the camera (Caution, this will erase all data on the card).
- Do not remove or insert the memory card when recording. It may damage the card or cause data loss.
- Memory card rating must be Class 6 or above.
Charging the Battery
Connect your camera to the included AC adaptor with the USB cable provided for charging. Insert the small end of the USB plug into the camera’s port under the battery door, and the larger end into the included AC adaptor. While charging the LED indicator light will light up solid red, when finished charging the light will turn off.

Powering the Camera On/Off
Press the POWER button to power the camera on. To power the camera off, press the POWER button again.
If the camera’s battery is low, a “Low Power” message will display on the screen and it will automatically shut down within a few seconds to prevent memory corruption or loss.
Switching Modes
Press the MODE/OK button to cycle between Photo, Video, and Playback Modes. The corresponding mode will be displayed in the top left corner of the screen.
Connecting to a Computer
Your camera can connect to a computer to transfer photo and video files for viewing and editing, you can also use the camera as a webcam. Once connected and powered on the camera’s screen will show “MSDS” and “PC Camera”. Use the UP or DOWN buttons to select your desired mode. Press the MODE/OK to select your desired mode. If no selection is made, the camera will automatically enter MSDS mode.
Using the Zoom Function
This camera has a digital zoom function. To operate the zoom function, press the ZOOM IN button to zoom in closer to the subject, and press the ZOOM OUT button to zoom away from the subject.
Photo Mode
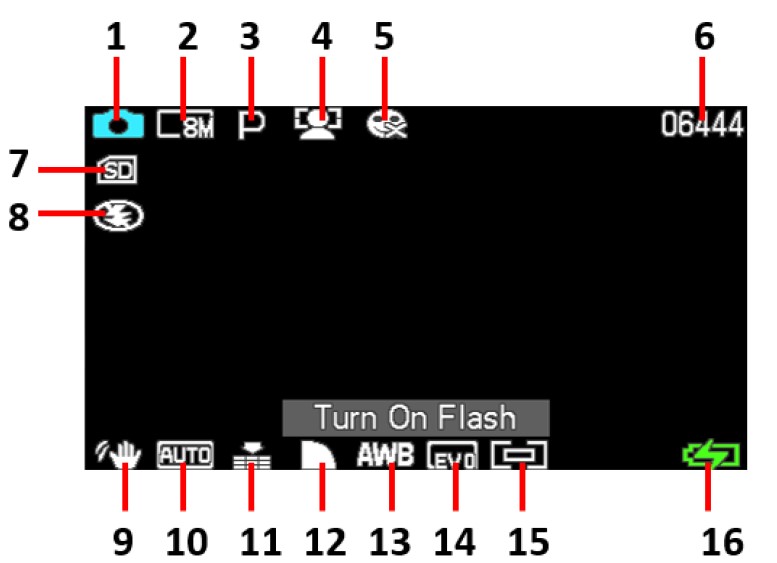
Press the MODE/OK button to switch to Photo Mode. The meaning of each icon within Photo Mode is explained in the table below:
- Photo Mode
- Image Size (Resolution)
- Scene
- Face Detect
- Smile Capture
- Pictures Remaining
- Memory Card Inserted
- Flash Status
- Anti-Shake
- ISO
- Image Quality
- Image Sharpness
- White Balance
- Light Exposure
- Metering
- Battery Level

Video Mode
Press the MODE/OK button to switch to Video Mode. The meaning of each icon within Video Mode is explained in the table below:
- Video Mode
- Video Size (Resolution)
- Video Time Remaining
- Video Quality
- Video Sharpness
- White Balance
- Light Exposure
- Battery Level
- Memory Card Inserted

Using the Camera
Photo Shooting
Power the camera on and it will be ready to take pictures right away. You may press the MODE/OK button to switch to another mode.
- Line up your shot by looking at the LCD screen to see what is in the shot.
- Hold the camera steady and press the SHUTTER button to capture a photo.
- The number of photos that can be captured at a particular resolution will be displayed in the top right corner of the screen.
- A “Memory Full” message will be displayed on the screen if there is no SD card inserted in the camera’s memory card slot. A “Memory Full” message will be shown on the screen when the SD card is full.
- The number of remaining photos is determined by the selected photo resolution. The higher the photo resolution, the lower the number of photos you can save to the memory card. Before capturing any photos, you can select a preferred photo resolution.
Shooting – Multi-Snapshot (Photo Burst)
This function allows to you capture 3 consecutive photos with one click of the PHOTO button.
- In Photo Mode press the MENU button.
- Select ‘Shooting’ using the LEFT or RIGHT buttons.
- Select ‘Multi-Snapshot’ using the UP or DOWN buttons and press MODE/OK to enter the Multi-Snapshot menu.
- Press the UP or DOWN buttons to navigate the menu, and press the MODE/OK button to confirm your selected option (On, Off).
- Press the MENU button to exit the settings menu without making a selection.
Face Detect
This function allows you to set your camera to detect faces in a scene and adjust your camera’s setting for the most optimal picture. You can also enable your camera to capture a photo once a smile is detected on the faces in a scene.
- In Photo Mode press the MENU button.
- Select ‘Face Detect’ using the LEFT or RIGHT buttons.
- Press the UP or DOWN buttons to navigate the menu, and press the MODE/OK button to confirm your selected option (On, Off).
- Press the MENU button to exit the settings menu without making a selection.
Exposure
This function adjusts the frame brightness in your photograph.
- In Photo Mode press the MENU button.
- Select ‘Exposure’ using the LEFT or RIGHT buttons.
- Press the UP or DOWN buttons to navigate the menu, and press the MODE/OK button to confirm your selected option (+3, +2, +1, 0, -1, -2, -3).
- Press the MENU button to exit the settings menu without making a selection.
Image Quality
The Photo Quality function determines the level of compression the camera uses when saving photos to a memory card.
- In Photo Mode press the MENU button.
- Select ‘Image Quality’ using the LEFT or RIGHT buttons.
- Press the UP or DOWN buttons to navigate the menu, and press the MODE/OK button to confirm your required quality option (Super Fine, Fine, Normal), Super Fine uses the least amount of compression for saving, and as a result, produces a higher photo quality.
- Press the MENU button to exit the settings menu without making a selection.
Saturation
This function adjusts the intensity of the color in the photo.
- In Photo Mode press the MENU button.
- Select ‘Saturation’ using the LEFT or RIGHT buttons.
- Press the UP or DOWN buttons to navigate the menu, and press the MODE/OK button to confirm your selected option (High, Normal, Low).
- Press the MENU button to exit the settings menu without making a selection.
Setup – Default Setting
Factory default settings can be restored in this menu. This function will not delete the media stored on the memory card, and will only restore all of the menu’s settings back to the factory default settings.
- In Photo Mode press the MENU button.
- Select ‘Setup’ using the LEFT or RIGHT buttons.
- Select ‘Default Setting’ using the UP or DOWN buttons and press the MODE/OK button to enter the Default Setting menu.
- Press the UP or DOWN buttons to navigate the menu, and press the MODE/OK button to confirm your selected option (OK, Cancel).
- Press the MENU button to exit the settings menu without making a selection.
Video Recording
Power the camera on and press the MODE/OK button to switch to Video mode. A camcorder icon will appear in the top left-hand corner of the screen when you are in Video mode.
- Line up your shot by looking at the LCD screen to see what is in view.
- Hold the camera steady and press the SHUTTER button to begin recording.
- When recording begins, a rolling timer will display in red in the top right-hand corner of the screen. This indicates the recorded video time elapsed.
- While recording, you can pause the recording by pressing the MODE/OK button, press the MODE/OK button again to resume the recording.
- Press the SHUTTER button to stop recording.
- The recorded video files will automatically save onto the inserted memory card.
Size (Video Resolution)
This function sets the video resolution. The higher the resolution, the greater the video quality and the larger the file size of the video.
- In Video Mode press the MENU button.
- Select ‘Size’ using the LEFT or RIGHT buttons.
- Press the UP or DOWN buttons to navigate the menu, and press the MODE/OK button to confirm your selected resolution (2.7K, 1080p FHD, 720p HD).
- Press the MENU button to exit the settings menu without making a selection.
Exposure
This function adjusts the frame brightness in your photograph.
- In Video Mode press the MENU button.
- Select ‘Exposure’ using the LEFT or RIGHT buttons.
- Press the UP or DOWN buttons to navigate the menu, and press the MODE/OK button to confirm your selected option (+3, +2, +1, 0, -1, -2, -3).
- Press the MENU button to exit the settings menu without making a selection.
Image Quality
The Image Quality function determines the level of compression the camera uses when saving photos to a memory card.
- In Video Mode press the MENU button.
- Select ‘Image Quality’ using the LEFT or RIGHT buttons.
- Press the UP or DOWN buttons to navigate the menu, and press the MODE/OK button to confirm your required quality option (Super Fine, Fine, Normal), Super Fine uses the least amount of compression for saving, and as a result produces a higher photo quality.
- Press the MENU button to exit the settings menu without making a selection.
Sharpness
This function adjusts the visible detail of a photograph.
- In Video Mode press the MENU button.
- Select ‘Sharpness’ using the LEFT or RIGHT buttons.
- Press the UP or DOWN buttons to navigate the menu, and press the MODE/OK button to confirm your selected option (Sharp, Normal, Soft).
- Press the MENU button to exit the settings menu without making a selection.
Setup – Default Setting
Factory default settings can be restored in this menu. This function will not delete the media stored on the memory card, and will only restore all of the menu’s settings back to the factory default settings.
- In Photo Mode press the MENU button.
- Select ‘Setup’ using the LEFT or RIGHT buttons.
- Select ‘Default Setting’ using the UP or DOWN buttons and press the MODE/OK button to enter the Default Setting menu.
- Press the UP or DOWN buttons to navigate the menu, and press the MODE/OK button to confirm your selected option (OK, Cancel).
- Press the MENU button to exit the settings menu without making a selection.
Rotate
This function allows you to rotate stored images.
- In Playback Mode press the MENU button.
- Select ‘Rotate’ using the LEFT or RIGHT buttons.
- Press the UP or DOWN buttons to navigate the menu, and press the MODE/OK button to confirm your selected option (90°, 180°, 270°, Cancel).
- Press the MENU button to exit the settings menu without making a selection.
Slide Show
Photographs can be viewed as a slideshow on the camera.
- In Playback Mode press the MENU button.
- Select ‘Slide Show’ using the LEFT or RIGHT buttons.
- Press the UP or DOWN buttons to navigate the menu, and press the MODE/OK button to confirm your selected option (3 Seconds, 5 Seconds, 10 Seconds).
- Press the SHUTTER button to exit the slideshow.
- Press the MENU button to exit the settings menu without making a selection.
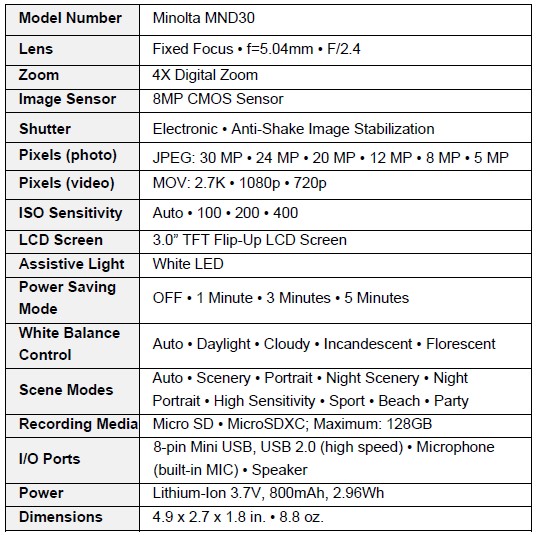
Technical Specifications

Visit Us
40 Wall Street, 61st Floor, New York, NY 10005 USA
Tel: 800-441-1100
Copyright © 2022 Elite Brands Inc.
FAQS About Minolta MND30 Ultra HD Digital Camera
How come Minolta stopped producing cameras?
the cameras did not sell as well as anticipated.
I have an ancient Minolta lens, can I use it on a digital camera?
Only Sony digital SLR cameras may use Old Minolta lenses.
How reliable are Minolta digital cameras?
Minolta cameras are renowned for being well-made and dependable.
Are Minolta film cameras reliable?
A fantastic film camera that is affordable.
Can a Minolta camera be used without a battery?
Without a battery, you won’t be able to shoot in automatic.
In what category does Minolta fall?
AF and MD.
How is the Minolta camera mounted?
SR-mount
Minolta is a brand of what?
Canon Minolta
What nation is Minolta a native of?
Japanese
Do Minolta cameras require batteries?
A battery is required for the camera to function.
For more manuals by Minolta, Visit Manualsdock
[embeddoc url=”https://manualsdock.com/wp-content/uploads/2023/10/Minolta-MND30-Ultra-HD-Digital-Camera-User-Manual.pdf” download=”all”]


