![]()
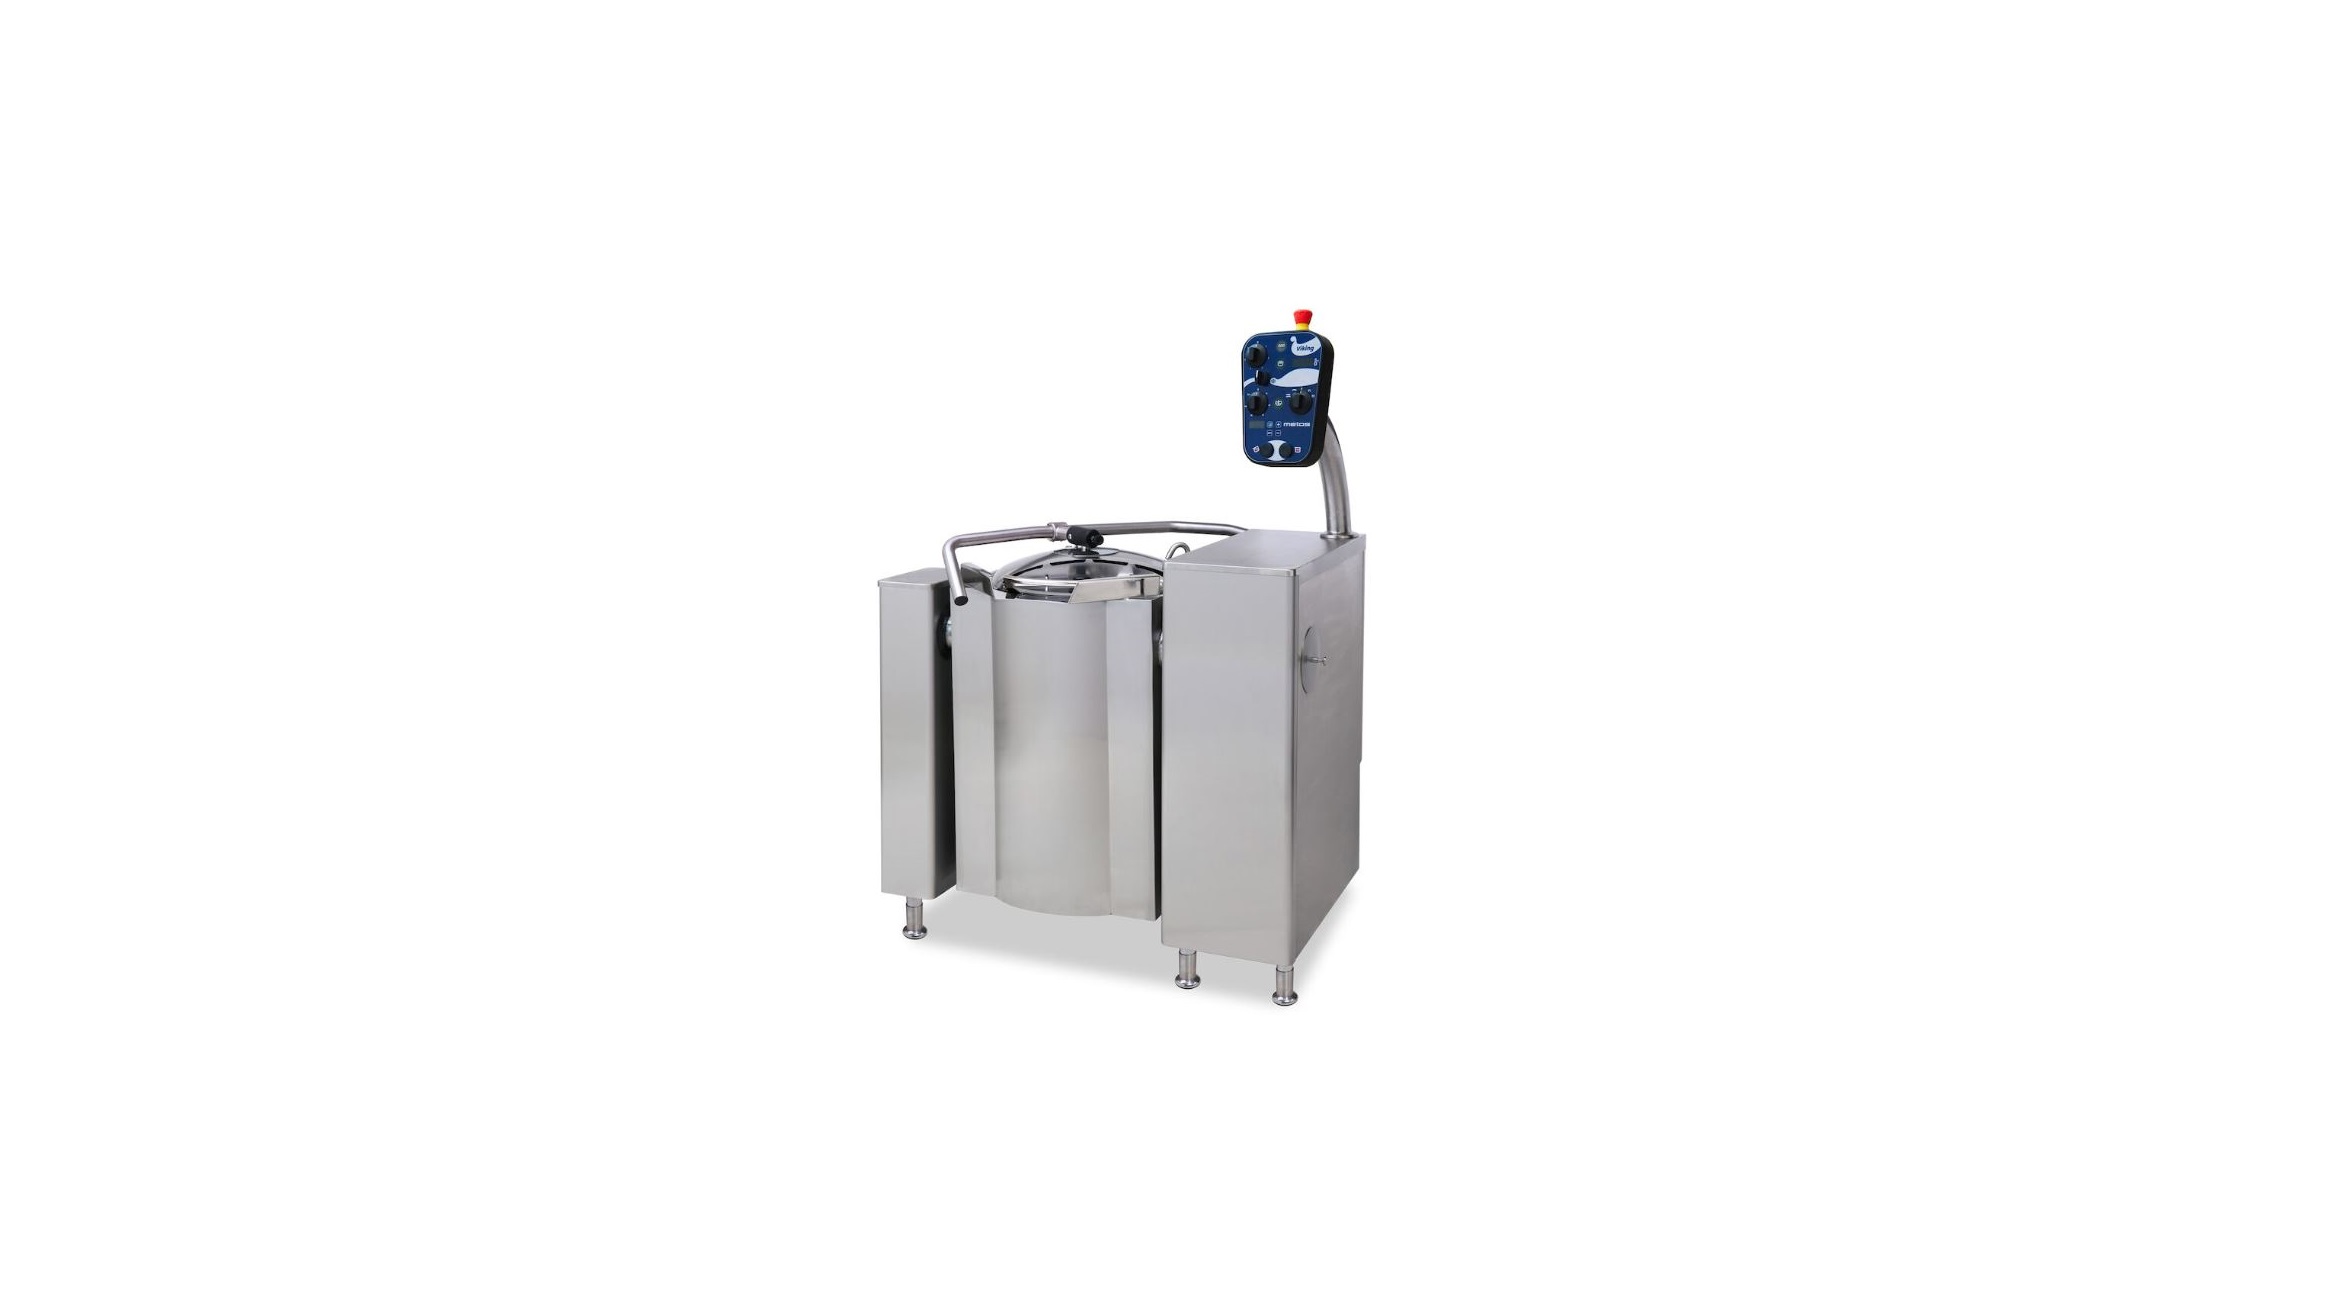
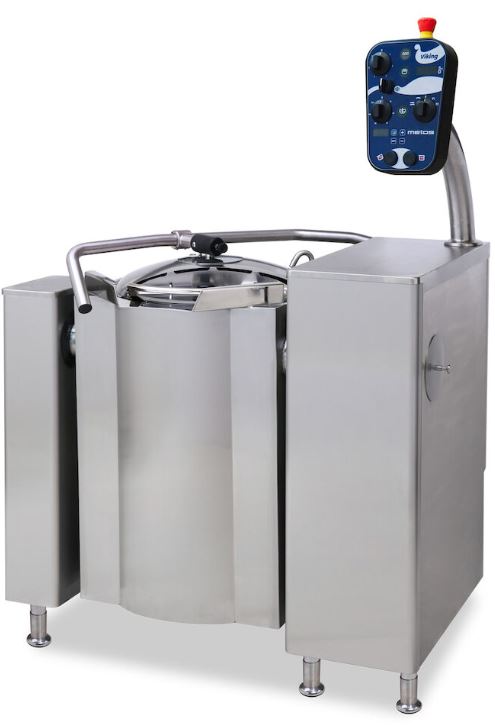
Metos Viking Combi 4G Kettle
About Metos
Experts in the area, Metos is the top producer and supplier of professional kitchen and distribution equipment as well as stainless steel furniture in the Nordic region. For a century and more, we have been developing professional kitchens and increasing their success and efficiency.
General
- Carefully read the instructions in this manual as they contain important information regarding proper, efficient, and safe installation, use, and maintenance of the appliance.
- Keep this manual in a safe place for eventual use by other operators of the appliance.
- The installation of this appliance must be carried out according to the manufacturer’s instructions and following local regulations. The connection of the appliance to the electric, steam, and water supply must be carried out by qualified persons only.
- Persons using this appliance should be specifically trained in its operation.
- Switch off the appliance in the case of failure or malfunction. The periodical function checks requested in the manual must be carried out according to the instructions. Have the appliance serviced by a technically qualified person authorized by the manufacturer and using original spare parts.
- Not complying with the above may put the safety of the appliance in danger.
Disposal of the appliance
Once the appliance has reached the end of its useful life, it must be disposed of in compliance with local rules and regulations. The appliance may contain substances/ materials that potentially hurt the environment as well as recyclable materials. The best way of dealing with such substances is to dispose of them through a proper waste company
Warnings
Please take careful note of the following instructions and warnings. Further on in this manual, some warnings are to be noted in special operation situations. To prevent damage and accidents, please read the whole manual before attempting to operate the appliance.
- Viking kettles are to be used only for food preparation. Interacting or corrosive substances are not to be prepared in the kettle. Note that also long-term effect of some food preparation substances, such as salt, acetic acid, lemon acid, and lactic acid, can be corrosive.
- To prevent burns, do not during the use touch the inner surface and the rim of the kettle, safety lid, and mixing tool. Do not put your hands, without appropriate protection, above the kettle while cooking.
- Beware of hot steam when removing the lid.
- Do not open the control valve of the steam generator, the safety valve, or the water inlet valve when there is pressure in the steam jacket. Releasing hot steam might cause burns.
- Do not stand behind the kettle during tilting.
- The mixer must be turned off before removing the mixing tool.
- Do not push utensils or your fingers through the openings in the safety lid into the kettle during mixing.
- Under all circumstances, it is forbidden to use the mixer without the safety lid.
- To prevent stress injuries do not lift the mixing tool from the kettle when it is in a vertical position. Tilt the kettle in a horizontal position and remove the mixing tool. We recommend the use of a trolley to help remove the mixing tool of larger kettles (200-400 l).
- After using the kettle, check that the shower gun and the water inlet tap are closed.
- After using the kettle, clean it according to the cleaning instructions given in this manual to keep a high hygiene level.
- It is forbidden to use the kettle without cover plates or if the cover plates are not properly fitted.
- The factory pre-set program parameters of the kettle and mixer may only be changed by authorized personnel according to the instructions given by the factory.
- Beware of sharp edges on the sheet construction inside the kettle pillars during installation and service work.
- The following danger of electrical shock mark is fitted on cover plates protecting electrical components from being touched which would cause danger to life.
Construction of the kettle
The main parts of the kettle / combi-kettle are illustrated in the following pictures: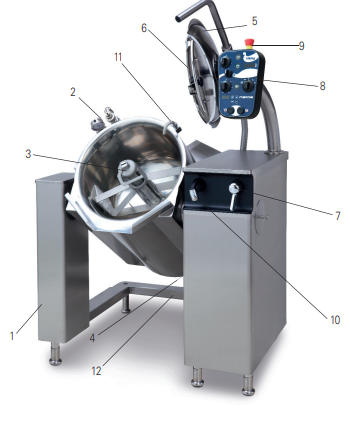
- Support pillar
- Safety block
- Mixer and mixing tool (only for Viking Combi)
- Emptying valve for steam generator/steam jacket
- Safety lid
- Safety grid for fill opening
- One-grip tap for hand shower
- Control panel
- Emergency/stop button
- Handshower
- Water fill to kettle
- The free-standing frame (option)
Lid

- Safety lid
- Lifting arm
- The locking lever of the lid
- Safety grid for fill opening
- Safety switch
- Cover for fill opening (not shown in picture)
Mains switch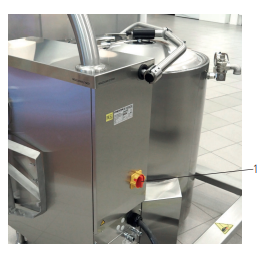
- Mains switch
Control panel
The control panel and the available functions on the kettle are different depending on what options are available. This manual covers all options. The functions and controls depend on selected features: The functions of the different versions are: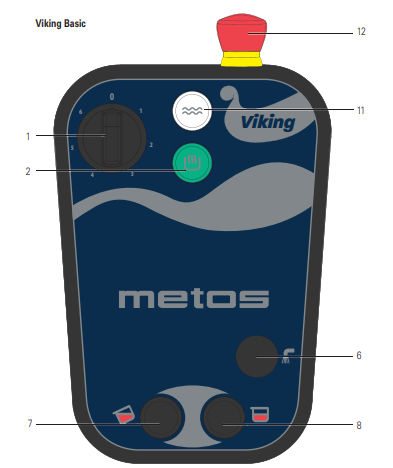
- Power regulator
- Heating on indicator
- Manual water filling
- Kettle bowl tilting
- Return the kettle bowl to an upright position
- ”Low water level” indicator (electrically heated models) ”Steam supply open” indicator (steam heated models)
- Emergency/stop button
Viking Combi with cooling and water automatics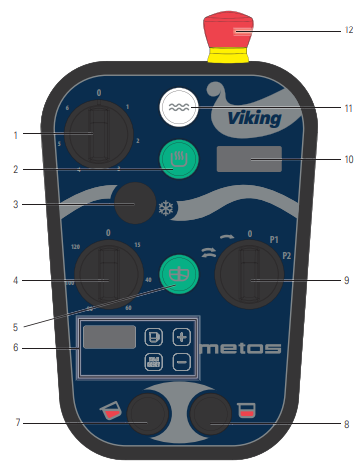
- Power regulator
- Heating on indicator
- Cooling
- Mixing speed regulator
- ”Mixer ON” indicator
- Automatic water filling
- Kettle bowl tilting
- Return the kettle bowl to an upright position
- Mixing program selector switch
- Food temperature display
- ”Low water level” indicator (electrically heated models) ”Steam supply open” indicator (steam heated models)
- Emergency/stop button
Operating instructions
All personnel using the appliance must be given training in how the appliance works by the person responsible for staff safety.
Before first use
Before using the kettle for the first time or if it has not been used for a long time
- Clean the pan throughout with a warm detergent solution, wiping to remove dust and contaminants from the kettle surfaces. Then dry the surfaces.
Electrically heated models:
- The kettle is in its upright and horizontal position. The kettle does not heat if it is tilted.
- The water supply (hot/cold) is open.
- No inappropriate objects in the kettle.
- Scrapers are correctly attached to the mixing tool. See ”Positioning the mixing tool and scraper”.
- The mixing tool has been locked in its place: locking part (one end of the handle) in the groove of the mixer axle, with the handle turned in a horizontal position. Secure fixing by trying to lift the tool out of the kettle by the upper blade.
- The steam generator has the right amount of water (white water level indicator light on the control panel of the Viking kettle, normally water must be refilled a few times per year).
Steam heated models:
- The kettle is in its upright and horizontal position. The kettle does not heat if it is tilted.
- The water supply (hot/cold) is open.
- No inappropriate objects in the kettle.
- Scrapers are correctly attached to the mixing tool. See ”Positioning the mixing tool and scraper”.
- The mixing tool has been locked in its place: locking part (one end of the handle) in the groove of the mixer axle, with the handle turned in a horizontal position. Secure fixing by trying to lift the tool out of the kettle by the upper blade.
- If necessary, any condensation that has accumulated in the steam jacket has been removed.
Cooking
The temperature of the steam jacket of the kettle is always at least the same as the room temperature or the same as the temperature of the cooling agent if the kettle is equipped with a cooling attachment (option).
Starting to cook
- Check that the emergency/stop button is not pressed down. The emergency/stop button can be released by turning it clockwise until it jumps up.
- Switch on the power by turning the power regulator (1) to the right (green signal lamp (2) illuminates).
- If the white water level indicator light (3) does not go off, add water to the steam generator according to instructions, see The white signal lamp (3) illuminates when the steam supply is open (steam heated models).
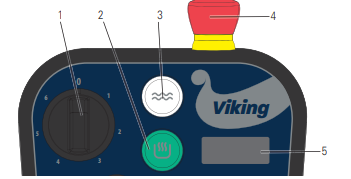
-
- Power regulator
- Indicator light “kettle ON”
- Indicator light for low water level (electrically heated models) Indicator light “steam supply open” (steam heated models)
- Emergency/stop button
- Food temperature display
Stopping the cooking
- Turn the power regulator counterclockwise to position 0. The green indicator light goes off and the kettle stops cooking.
The kettle tilts only if the kettle is switched on. Since the kettle chills slowly, you can stop cooking and begin the simmering by decreasing the temperature.
The cooking will automatically stop when the kettle is tilted. The cooking goes on automatically when the kettle is returned to an upright position.
Cooling system (optional)
The cooling system is based on chilling tap water which is circulating inside the steam jacket. Mixing and use of scrapers makes the chilling more effective. The needed chilling time depends on the quantity of the product, the temperature at the beginning and the end of the cooling, the flow of the chilling water and its temperature, and the mixing.
Manual cooling – C1 Starting the cooling
- Turn the power regulator to position 0.
- Close the faucet.
- . Remove the spray gun from the cleaning hose by pulling the connector away from the spray gun

- Connect the cleaning hose to the control valve (on the right side under the kettle.

- Open the control valve by turning the handle parallel to the valve
- Open the jacket emptying valve (in the middle under the kettle) by turning the handle downwards.
- Open the cold-water faucet.
Stopping the cooling
- Close the faucet.
- Remove the cleaning hose from the control valve.
- Let the extra water run out of the steam jacket through the control valve. Close the control valve when the kettle is in an upright position and water stops flowing out.
- Close the jacket emptying valve.
It takes a few minutes to let the extra water run out of the steam jacket. If you first want to empty the kettle, close the control valve before tilting it. If the control valve is open during the tilting, the steam generator may get drained of water, see “5.12.3. Filling the steam jacket” (electrically heated models).
Emptying the steam jacket (steam-heated kettles)
Open the drain valve of the steam jacket at the end of the working day so that the water that may condense in the kettle can drain into the drain. That way it won’t interfere with the next cooking event. Remember to close the drain valve the next morning before heating the kettle.
Detaching the lid parts
- Make sure the kettle is in an upright position.
- Place the lid on the kettle.
- Remove the cover of the safety grid and detach the safety grid.
- Detach the solid lid from the lifting arm by holding the lifting arm with one hand pulling the locking lever of the lid and then lifting the arm.
Refitting the lid parts
Place the solid lid on the kettle approximately in the correct position. Pull the lifting arm down over the lid. Turn the solid lid so that the guiding pin lines up with the hole in the lifting arm centerpiece
- Solid lid
- Lifting arm
- Guiding pin
- The locking lever of the lid
- Safety grid for lid opening
- Cover for fill opening (not shown in picture)
Troubleshooting
The kettle does not heat up
- The kettle is not in an upright (cooking) position. Return the kettle to an upright position.
- Steam supply problems on a steam-heated kettle. Check the steam supply and pressure.
The mixer does not start
- The kettle is not in an upright (cooking) position. Return the kettle to an upright position.
- The lid is open. Close the lid.
- The safety grid is not in the correct position. Check the safety lid.
The cooling does not work
- The kettle is not in an upright (cooking) position. Return the kettle to an upright position.
- Jacket filling problems. Check the water supply (tap water cooling).
Resetting the unit
- Turn the main power switch to position 0 and wait for about 1 minute. Turn the main power switch to 1 position.
Maintenance information
Keep a record of all service and repair measures carried out for the kettle during its life cycle. Service history may speed up future service measures, help in controlling costs, and in planning new investments. The safety valve must be periodically checked as instructed in this manual. Enter the check data in the ”Maintenance information” table.
Installation
General
Please observe the instructions given in this chapter concerning the installation and adjustments that must be done before taking the kettle into use. Strict observance of the instructions prevents malfunctions and damages potentially caused by defective installation.
- Do not switch the power on if the installation place is damp (building site conditions).
Operating conditions
The kettle can be used in a normal, air-conditioned professional kitchen. The room temperature of the installation place must not exceed +40°C and the relative humidity must be less than 80% (condensation on surfaces not allowed to occur). If the temperature of the facility in winter conditions is below 0°C, the steam generator of the kettle must be drained and the kettle must be emptied to avoid damage caused by freezing. The kettle’s pipes and solenoid valve bodies must be emptied at the same time.
Possible interference from the surroundings (to the surroundings)
The kettle fulfills the requirements of the EMC directive concerning emissions and immunity to electromagnetic disturbances. In case there are electronically controlled appliances and, in particular, devices fitted with a frequency converter in the installation place, it is recommended to ensure their conformity with the relevant regulations and that their cabling has been done according to instructions.
Storage
The kettle must be stored in a dry place, at a temperature between +10 and +40°C. The kettle should be kept in its transport package during storage. If the appliance is stored in construction site conditions, special care must be taken not to damage it through other operations on the site.
- Protect the exterior of the kettle from scratches and knocks.
- Protect the kettle from construction site dust.
- Protect the kettle from sparks produced by welding, grinding, and abrasive cutting wheels. This can later cause rust spots on the stainless steel surface of the appliance.
Unpacking the appliance
The kettle should be transported in its package as close as possible to the installation place before final unpacking. Do not remove the protective film until after installation, just before the first use of the kettle.
Warning
After removing from the transport pallet, the kettle is not stable until it has been bolted down to the installation frame. It is strictly forbidden to operate or tilt the kettle before it has been fixed to the floor or the free-standing frame according to the installation instructions. When the kettle is removed from its transport pallet, it must be supported to prevent it from falling before it is fitted to the floor. If the kettle falls, this may cause injury to people or property damage.
Disposal of the package
After unpacking all packing material must be sorted and disposed of by local recycling regulations.
Residual current device recommendation
It is recommended to use a residual current device in the installation of a kettle as follows:
- Kettles without mixer: Type A residual current device.
- Kettles with mixer and operating voltage 200V, 230V, or 400/230V: Type A residual current device with high-frequency filtering or a residual current device separately approved for use with frequency converters.
- Kettles with mixer and operating voltage 380 – 480V without neutral: Type B three-phase residual current device
Positioning of installation frames

Subsurface frame cast into the floor
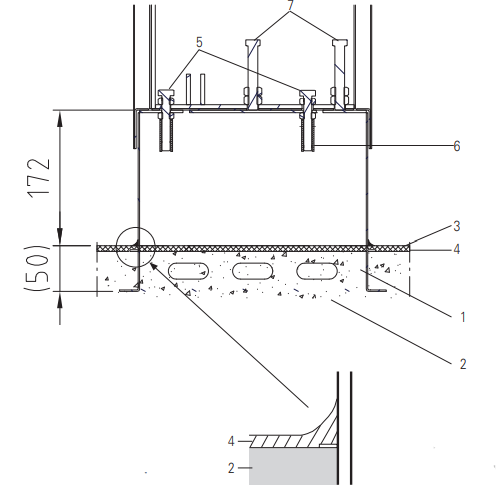
Installation frames are mounted according to the installation drawing, with the help of installation guides supplied with the delivery. The frames must be installed in a horizontal position and fixed so that they do not move during casting. The installation frames must be positioned so that their upper surface is 172 mm above the finished floor surface. The junction of the installation frame and floor is filled with flooring material. To achieve the best result regarding tightness, the installation frame should be filled up to the top level with concrete mass which is covered with floor coating after the installation. Make sure that the protective sleeves of the fixing bolts are in place before filling the installation frame. The main points concerning the installation of the subsurface frame are shown in the picture below.
- Installation frame
- Concrete casting
- Finished floor surface
- Floor coating
- Fixing bolt
- Protecting sleeve for fi xing bolt
- Adjusting bolt
Place the kettle on the installation frame and adjust it to a horizontal position with the adjusting bolts. When the kettle is in a horizontal position, it must be fixed to the installation frames with the help of the fixing bolts. The control pillar has 4 bolts and the support pillar has 2 bolts. Tighten the adjusting nuts carefully. Do not seal the space between the kettle pillars and installation frame as there must be enough change of air.
Surface installation frame fi xed to the floor
Surface frames are mounted according to the installation drawing, with the help of installation guides supplied with the delivery. If the inclination of the floor is very steep, it may be necessary to level the surface frame closer to the horizontal by placing stainless steel spacers between the frame and the floor. This will ensure that the adjustment range of the pillars is adequate.
- Surface frame
- Concrete casting
- Fixing bolt for surface frame
- Finished floor surface
- Floor coating
- Fixing bolt
- Adjusting bolt
Move the kettle to the installation frame as follows:
- Cut the longitudinal boards of the pallet and push the fork-lift trolley below the kettle

- Lift the forklift trolley so that it supports the kettle preventing it from tipping over when the transport brackets are removed.
- Remove the kettle from the transport brackets by loosening the bolts.
- Lift the kettle off the pallet.
- Move the kettle with the forklift onto the installation frame
- Start installing the kettle or kettle group by first positioning the left-hand support pillar in place. Lift the support pillar (1) on the installation frame (2) and adjust it using the adjusting bolts (3) to a horizontal position and a height of 900 mm measured from the top of the support pillar front edge to the floor. When the support pillar (1) is in place, fix it with two fi xing bolts (4) to the installation frame (2).

- Support pillar (from above)
- Installation frame
- Adjusting bolt
- Fixing bolt
- Next, the control pillar (1) is adjusted using the adjusting bolts (3), to a horizontal position and on the same level as the support pillar. When the control pillar (1) is in position, it is fi xed to the installation frame (2) with four fi xing bolts (4). Check that the space between the kettle section and the support and control pillars is the same, both at the top and at the bottom.

- Control pillar (front side)
- Control pillar (back side)
- Installation frame
- Adjusting bolt
- Fixing bolt
Mounting the kettle on a separately supplied free-standing frame:
- Cut the longitudinal boards of the pallet and push the forklift trolley below the kettle.
- Lift the forklift trolley so that it supports the kettle preventing it from tipping over when the transport brackets are removed.
- Remove the kettle from the transport brackets by loosening the bolts.
- Lift the kettle off the pallet.
- Move the kettle with the forklift onto the free-standing frame and lower it into place.
- Attach the kettle to the free-standing frame with M10 bolts.
- Check that it is horizontal. Adjust if needed using the adjustable feet on the free-standing frame.
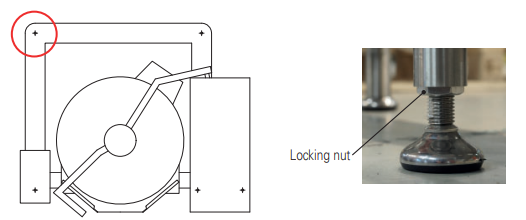
- Be sure to tighten the foot in the back corner of the support pillar side to the floor, otherwise, it may lift when using the mixer with heavy loads or when tipping the kettle.
- Tighten the locking nuts of the adjustable feet after the adjustment.
Technical specifications
Dimensions
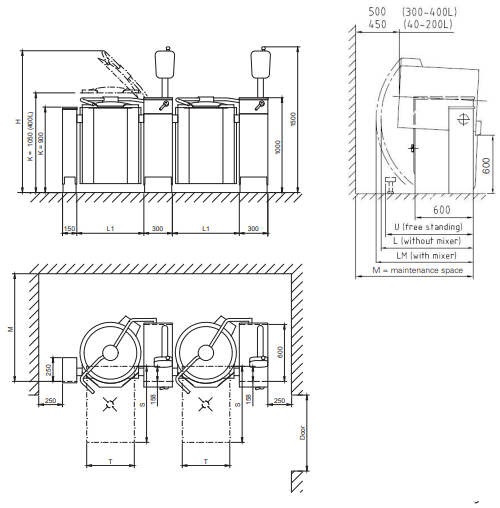
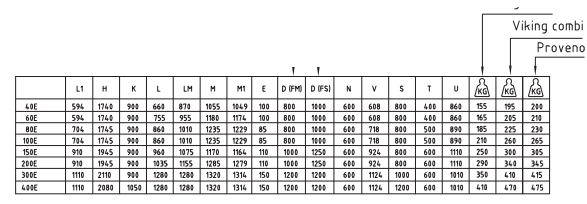
The minimum free distance to any structure behind the kettle needed for tilting the kettle is dimension L depending on the model. However, service access to the components under the kettle bowl requires the bigger dimension M. National and local regulations must be observed when installing the combi kettle
Floor drain and installation frame positioning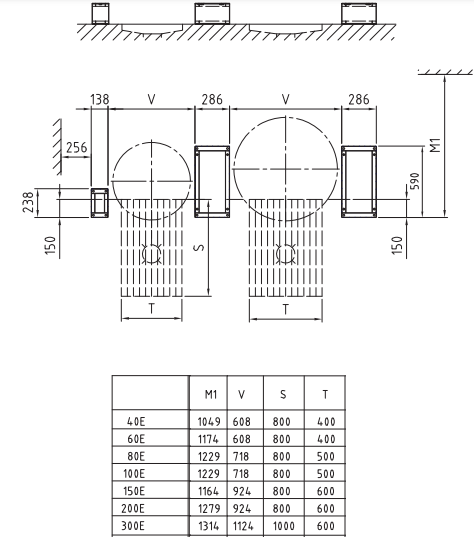
Steam connection
Water connection
- Cold water connection R1/2” ( ø15 ). Must be fitted with a one-way valve and shut-off valve.
- Hot water connection R1/2” ( ø15 ). Must be fitted with a one-way valve and shut-off valve. (option)
Electrical connections
- Electrically heated
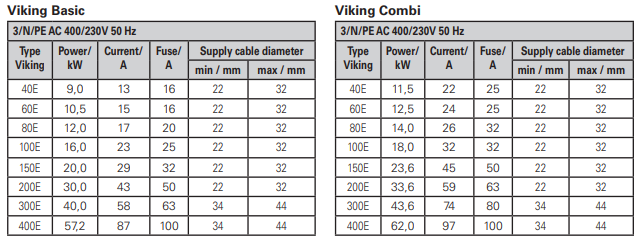
- Steam heated kettles

The values of the special voltages differ from the standard voltage values.
Spare parts not covered by warranty
Wearing parts are not covered by the warranty. Wearing parts include:
- Scrapers of the mixing tool
- Brush part of the washing tool
- Other similar parts
Faqs About Metos Viking Combi 4G Kettle
What is the capacity of the Metos Viking Combi 4G Kettle?
Check the product specifications or user manual for information on the kettle’s capacity, typically measured in liters.
What material is the kettle made of?
Determine the construction material of the kettle, such as stainless steel, glass, or plastic.
Does the kettle have an automatic shut-off feature?
Find out if the kettle is equipped with an automatic shut-off function for safety and energy efficiency.
How do I clean the Metos Viking Combi 4G Kettle?
Refer to the user manual for cleaning instructions and information about removable parts that are dishwasher safe.
Is the kettle cordless?
Check if the kettle has a detachable base, making it cordless and more convenient to use and pour.
What is the wattage of the Metos Viking Combi 4G Kettle?
Find out the power rating in watts to understand how quickly the kettle can boil water.
Does the kettle have variable temperature settings?
Determine if the kettle allows you to choose different temperature settings for various types of beverages.
What safety features does the Metos Viking Combi 4G Kettle have?
Check for safety features such as boil-dry protection and a cool-touch handle to prevent accidents.
Is there a warranty for the Metos Viking Combi 4G Kettle?
Verify the warranty period and terms provided by Metos or the retailer.
Can the kettle be used for boiling different types of beverages, such as coffee or tea?
Confirm if the Metos Viking Combi 4G Kettle is suitable for a variety of hot beverages.
For more manuals by Metos ManualsDock

