![]()
Frigidaire FNGB60JGR cooking range
About Frigidaire
Frigidaire is a brand of home appliances that is owned by the Electrolux Group. It was founded in the United States in 1918 and is now a global brand, offering a wide range of products including refrigerators, freezers, air conditioners, dishwashers, ranges, cooktops, wall ovens, washers and dryers, and more.
Frigidaire is known for its commitment to quality, innovation, and design, and offers products in a range of styles and price points to meet the needs of different consumers. If you’re in the market for a new appliance, Frigidaire is a reputable brand that offers a wide selection of high-quality products that can help make your home more comfortable and convenient.
SAFETY INFORMATION
Before the installation and use of the appliance, carefully read the supplied instructions. The manufacturer is not responsible for any injuries or damages that are the result of incorrect installation or usage. Always keep the instructions in a safe and accessible location for future reference.
Children and vulnerable people’s safety
- This appliance can be used by children aged 8 years and above and persons with reduced physical, sensory, or mental capabilities or lack of experience and knowledge if they have been given supervision or instruction concerning the use of the appliance in a safe way and understand the hazards involved.
- Do not let children play with the appliance.
- Keep all packaging away from children and dispose of it appropriately.
- Keep children and pets away from the appliance when it operates or when it cools down. Accessible parts are hot.
- Children shall not carry out cleaning and user maintenance of the appliance without supervision.
General Safety
- Only a qualified person must install this appliance and replace the cable.
- This appliance is intended for use up to an altitude of 2000 m above sea level.
- This appliance is not intended to be used on a ship, boats, or vessels.
- Do not install the appliance behind a decorative door to avoid overheating.
- Do not install the appliance on a platform.
SAFETY INFORMATION
- Do not operate the appliance using an external timer or a separate remote-control system.
- WARNING: Unattended cooking on a hob with fat or oil can be dangerous and may result in fire.
- NEVER try to extinguish a fire with water, but switch off the appliance and then cover the flame e.g. with a lid or a fire blanket.
- CAUTION: The cooking process has to be supervised. A short-term cooking process has to be supervised continuously.
- WARNING: Danger of fire: Do not store items on the cooking surfaces.
- Do not use a steam cleaner to clean the appliance.
- Do not use harsh abrasive cleaners or sharp metal scrapers to clean the glass door or the glass of the hinged lids of the hob since they can scratch the surface, which may result in the shattering of the glass.
- Metallic objects such as knives, forks, spoons, and lids should not be placed on the hob surface since they can get hot.
- Remove any spillage from the lid before opening. Let the hob surface cool down before closing the lid.
- WARNING: The appliance and its accessible parts become hot during use. Care should be taken to avoid touching heating elements. Children less than 8 years of age shall be kept away unless continuously supervised.
- Always use oven gloves to remove or put in accessories or ovenware.
- Before maintenance cut the power supply.
- Ensure that the appliance is switched off before replacing the lamp to avoid the possibility of electric shock.
- If the mains power supply cable is damaged, it must be replaced by the manufacturer, its Authorised Service Centre, or similarly qualified persons to avoid an electrical hazard.
SAFETY INFORMATION
- WARNING: Use only hob guards designed by the manufacturer of the cooking appliance or indicated by the manufacturer of the appliance in the instructions for use as suitable hob guards incorporated in the appliance. The use of inappropriate guards can cause accidents.
Installation
- Remove all the packaging.
- Do not install or use a damaged appliance.
- Follow the installation instructions supplied with the appliance.
- Always take care when moving the appliance as it is heavy. Always use safety gloves and enclosed footwear.
- Do not pull the appliance by the handle.
- The kitchen cabinet and the recess must have suitable dimensions.
- Keep the minimum distance from the other appliances and units.
- Make sure that the appliance is installed below and adjacent to safe structures.
- Parts of the appliance carry current. Close the appliance with furniture to prevent touching the dangerous parts.
- The sides of the appliance must stay adjacent to appliances or units with the same height.
- Do not install the appliance adjacent to a door or under a window. This prevents hot cookware from falling from the appliance when the door or the window is opened.
Electrical Connection
- A qualified electrician should make all electrical connections.
- The appliance must be earthed.
- Make sure that the electrical information on the rating plate agrees with the power supply. If not, contact an electrician.
- Always use a correctly installed shockproof socket.
SAFETY INSTRUCTIONS
- Do not use multi-plug adapters and extension cables.
- Do not let mains cables touch or come near the appliance door, especially when the door is hot.
- The shock protection of live and insulated parts must be fastened in such a way that it cannot be removed without tools.
- Connect the mains plug to the mains socket only at the end of the installation. Make sure that there is access to the mains plug after the installation.
- If the mains socket is loose, do not connect the mains plug.
- Do not pull the mains cable to disconnect the appliance. Always pull the mains plug.
- Use only correct isolation devices: line-protecting cut-outs, fuses (screw-type fuses removed from the holder), earth leakage trips, and contractors.
- The electrical installation must have an isolation device that lets you disconnect the appliance from the mains at all poles. The isolation device must have a contact opening width of a minimum of 3 mm.
- Fully close the appliance door, before you connect the mains plug to the mains socket.
Gas connection
- All gas connections should be made by a qualified person.
- Before installation, make sure that the local distribution conditions (nature of the gas and gas pressure) and the adjustment of the appliance are compatible.
- Make sure that there is air circulation around the appliance.
- The information about the gas supply is on the rating plate.
- This appliance is not connected to a device, which evacuates the products of combustion. Make sure to connect the appliance according to the current
Use
- This appliance is for household use only.
- Do not change the specification of this appliance.
- Make sure that the ventilation openings are not blocked.
- Do not let the appliance stay unattended during operation.
- Deactivate the appliance after each use.
- Be careful when you open the appliance door while the appliance is in operation. Hot air can be released.
- Do not operate the appliance with wet hands or when it has contact with water.
- Do not use the appliance as a work surface or as a storage surface.
- Fats and oil when heated can release flammable vapours. Keep flames or heated objects away from fats and oils when you cook with them.
- The vapors that very hot oil releases can cause spontaneous combustion.
- Used oil, that can contain food remnants, can cause fire at a lower temperature than oil used for the first time.
- Do not put flammable products or items that are wet with flammable products in, near, or on the appliance.
- Do not let sparks or open flames come in contact with the appliance when you open the door.
- Open the appliance door carefully. The use of ingredients with alcohol can cause a mixture of alcohol and air.
- To prevent damage or discoloration to the enamel:
- do not put ovenware or other objects in the appliance directly on the bottom.
- do not put water directly into the hot appliance.
- do not keep moist dishes and food in the appliance after you finish the cooking.
- be careful when you remove or install the accessories.
- Discoloration of the enamel does not affect the performance of the appliance.
- Use a deep pan for moist cakes. Fruit juices cause stains that can be permanent.
- Do not keep hot cookware on the control panel.
- Do not let cookware boil dry.
- Be careful not to let objects or cookware fall on the appliance. The surface can be damaged.
- Do not activate the cooking zones with empty cookware or without cookware.
- Do not put aluminum foil on the appliance or directly on the bottom of the appliance.
- Cookware made of cast iron, or aluminum or with a damaged bottom can cause scratches. Always lift these objects when you have to move them on the cooking surface.
- Provide good ventilation in the room where the appliance is installed.
- Use only stable cookware with the correct shape and diameter larger than the dimensions of the burners.
- Make sure the flame does not go out when you quickly turn the knob from the maximum to the minimum position.
- Use only the accessories supplied with the appliance.
- Do not install a flame diffuser on the burner.
- This appliance is for cooking purposes only. It must not be used for other purposes, for example, room heating.
Care and Cleaning
- Before maintenance, deactivate the appliance.
- Disconnect the mains plug from the mains socket.
- Make sure the appliance is cold. There is the risk that the glass panels can break.
- Replace immediately the door glass panels when they are damaged. Contact the Authorised Service Centre.
- Be careful when you remove the door from the appliance. The door is heavy!
- Fat and food remaining in the appliance can cause a fire.
- Clean the appliance regularly to prevent the deterioration of the surface material.
- Clean the appliance with a moist soft cloth. Only use neutral detergents. Do not use any abrasive products, abrasive cleaning pads, solvents, or metal objects.
- If you use an oven spray, obey the safety instructions on the packaging.
- Do not clean the catalytic enamel (if applicable) with any kind of detergent.
- Do not clean the burners in the dishwasher.
Lid
- Do not change the specification of the lid.
- Clean the lid regularly.
- Do not open the lid, when there are spills on the surface.
- Before you close the lid turn all burners off.
- Do not close the lid until the hob and oven are completely cold.
- The glass lid can shatter when heated (if applicable).
- Keep the lid glass open, while the oven is in operation (if applicable).
Internal lighting
- Concerning the lamp(s) inside this product and spare part lamps sold separately: These lamps are intended to withstand extreme physical conditions in household appliances, such as temperature, vibration, and humidity, or are intended to signal information about the operational status of the appliance. They are not intended to be used in other applications and are not suitable for household room illumination.
- Use only lamps with the same specifications.
Gas Grill
- Do not leave the appliance unattended during grilling. Accessible parts become hot.
- Keep children away when the grill is in use.
- Do not put the oven shelf with food on the highest shelf level.
Disposal
- Contact your municipal authority for information on how to discard the appliance correctly.
- Disconnect the appliance from the main supply.
- Cut off the main electrical cable close to the appliance and dispose of it.
- Remove the door catch to prevent children or pets from becoming trapped in the appliance.
- Flat the external gas pipes.
Service
- To repair the appliance contact an Authorised Service Centre.
- Use original spare parts only.
PRODUCT DESCRIPTION
Cooker specification
Check the table to see your appliance’s detailed specification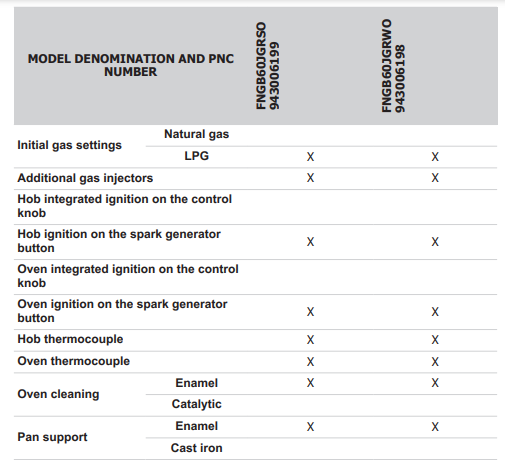
General overview
- Button for the turnspit
- Button for the spark generator
- Knob for the Minute Minder
- Knob for the grill
- Knob for the oven functions
- Button for the lamp
- Knobs for the hob
- Grill
- Lamp
- Turnspit hole
- Shelf positions
Cooking surface layout
- Auxiliary burner
- Steam outlet – number and position depending on the model
- Semi-rapid burner
- Semi-rapid burner
- Rapid burner
Accessories
- Wire shelf For cookware, cake tins, and roasts.
- Baking tray For cakes and biscuits.
- Turnspit For roasting larger joints of meat and poultry.
- Storage compartment
The storage compartment is below the oven cavity. To use the compartment, lift the lower front door then pull it down.
WARNING! The storage compartment can become hot when the appliance operates - Coffee pot (if applicable) For coffee makers and small pans
BEFORE FIRST USE
WARNING!
Refer to the Safety chapters.
Initial Cleaning
- Remove all accessories from the appliance.
Clean the appliance and the accessories before first use. Put the accessories back in their initial position.
Preheating
Preheat the empty appliance to burn off the remaining grease.
- Set the maximum temperature.
- Let the appliance operate for approximately 1 hour.
WARNING!
Accessories can become hotter than usual.
The appliance can emit an odor and smoke. This is normal. Make sure that the airflow is sufficient. Let the oven cool down. Dampen a soft cloth with warm water and a little mild washing-up liquid and use this to clean the oven cavity.
Burner overview
- Burner cap
- Burner crown
- Ignition candle
- Thermocouple (if applicable)
Turning the burner off
To put the flame out, turn the knob to the off position.
WARNING! Always turn the flame down or switch it off before you remove the pans from the burner.
CARE AND CLEANING
General information
- Clean the hob after each use.
- Always use cookware with a clean bottom.
- Scratches or dark stains on the surface do not affect how the hob operates.
- Use a special cleaner applicable to the surface of the hob.
- Wash stainless steel parts with water, and then dry them with a soft cloth.
Cleaning the hob
- Remove immediately: melted plastic, plastic foil, sugar, and food with sugar. If not, the dirt can cause damage to the hob. Take care to avoid burns.
- Remove when the hob is sufficiently cool: limescale rings, water rings, fat stains, shiny metallic discoloration. Clean the hob with a moist cloth and non-abrasive detergent. After cleaning, wipe the hob dry with a soft cloth.
- To clean the enameled parts, cap, and crown, wash them with warm soapy water and dry them carefully before you put them back on.
Cleaning the spark plug
This feature is obtained through a ceramic ignition candle with a metal electrode. Keep these components well clean to prevent difficult lighting and check that the burner crown holes are not obstructed.
Pan supports
- Remove the pan supports to easily clean the hob
- The enamel coating occasionally can have rough edges, so be careful when you wash the pan supports by hand and dry them. If necessary, remove stubborn stains with a paste cleaner.
- After you clean the pan supports, make sure that they are in the correct positions.
- For the burner to operate correctly, make sure that the arms of the pan supports are aligned with the center of the burner.
Periodic maintenance
Speak to your local Authorised Service Centre periodically to check the conditions of the gas supply pipe and the pressure adjuster, if fitted.
Oven Functions
Ignition of the oven gas burner
- Open the oven door.
- Ignite the oven gas burner.
- For ignition on the spark generator button push and hold the button. At the same time turn the knob for the oven functions counterclockwise
- At the same time push the knob for the oven functions and turn it counterclockwise to the maximum gas flow position.
After igniting the oven gas burner
- Release the knob for the oven functions.
- Close the oven door.
- Turn the knob for the oven functions to set the necessary heat setting. Control the flame through the holes in the bottom of the oven.
Turning off the oven burner
- To put out the flame, turn the knob to the off position.
Using the grill
- Open the oven door.
- Ignite the grill burner.
- For manual ignition hold a flame near the grill burner holes. Push and turn the knob for the grill to the flame position. Hold the knob pushed down.
- For ignition on the spark generator button push and hold the spark generator button. Push and turn the knob for the grill to the flame position. Hold the knob pushed. Release the spark generator button when the burner lights.
- Hold the knob for the grill pushed for approximately 15 seconds.
- Release the oven control knob.
The grill temperature can be adjusted. To lower the temperature turn the knob for the grill counterclockwise. If the grill does not come on or if it accidentally goes out release the knob for the oven functions and turn it to the Off position. Open the oven door. After one minute, try to light the grill again. - Preheat the grill for 5 to 10 minutes.
- Put the oven shelf with the meat on the shelf position 3.
- Put a baking tray or roasting pan below, on shelf position 2, to collect the juices.
USING THE ACCESSORIES
Inserting the accessories
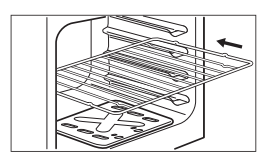
- Wire shelf: Put the shelf on the correct shelf position. Make sure it does not touch the back wall of the oven.

- Tray:
Using the turnspit
Put the tray or deep pan on the shelf position. Make sure it does not touch the back wall of the oven.
- Support hook
- Forks
- Spit
- Handle
Warning The support hook is installed in the top of the oven cavity. You can leave the support hook in the oven, when the turnspit is not active
- Open the oven door.
- Put the turnspit handle into the spit.
- Put the baking tray on the lowest shelf level.
- Snap out one end of the support hook from oven ceiling A and let it hang on the other end.
- Install the first fork on the spit, then put the meat on the turnspit and install the second fork. Make sure that the meat is in the middle of the spit.
CARE AND CLEANING
Notes on cleaning
- Clean the front of the appliance with a soft cloth with warm water and a cleaning agent.
- To clean metal surfaces, use a dedicated cleaning agent.
- Clean the appliance interior after each use. Fat accumulation or other food remains may result in a fire.
- Clean stubborn dirt with a special oven cleaner.
- Clean all accessories after each use and let them dry. Use a soft cloth with warm water and a cleaning agent.
- If you have nonstick accessories, do not clean them using aggressive agents, sharp-edged objects, or a dishwasher. It can cause damage to the nonstick coating.
Stainless steel or aluminum appliances
Clean the oven door with a damp cloth or sponge only. Dry it with a soft cloth. Do not use steel wool, acids, or abrasive materials as they can damage the oven surface. Clean the oven control panel with the same precautions.
Cleaning the oven door
The oven door has two panels of glass installed one behind the other. To make the cleaning easier remove the oven door
- Open the door fully and hold the two door hinges.
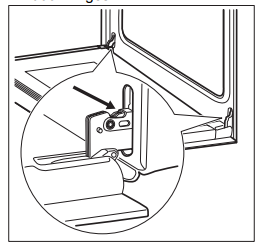
- Lift and turn the levers on the two hinges
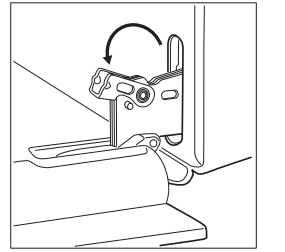
- Close the oven door to the first opening position (halfway). Then pull forward and remove the door from its seat
- Put the door on a soft cloth on a stable surface.
- Use a screwdriver to remove 2 screws from the bottom edge of the door.
- Use a spatula made of wood, plastic, or equivalent to open the inner door. Hold the outer door, and push the inner door against the top edge of the door. Lift the inner door.
- Clean the oven door with water and soap. Clean the inner side of the door. Dry the oven door carefully. When the cleaning is completed, install the glass panels and the oven door. To install the oven door, do the above steps in the opposite sequence.
Replacing the lamp
Put a cloth on the bottom of the interior of the appliance. It prevents damage to the lamp glass cover and the cavity.
- Deactivate the appliance.
- Remove the fuses from the fuse box or deactivate the circuit breaker.
The back lamp
- Turn the lamp glass cover counterclockwise to remove it.
- Clean the glass cover.
- Replace the lamp with a suitable 300 °C heat-resistant lamp.
- Install the glass cover.
TROUBLESHOOTING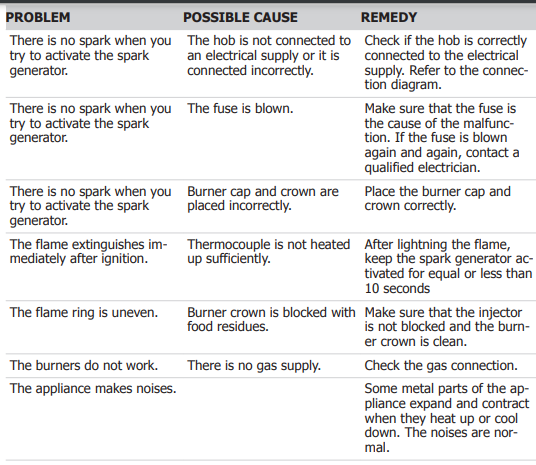


Service data
If you cannot find a solution to the problem yourself, contact your dealer or an Authorised Service Centre. The necessary data for the service center is on the rating plate. The rating plate is on the front frame of the appliance cavity. Do not remove the rating plate from the appliance cavity.
INSTALLATION
Location of the appliance
You can install your freestanding appliance with cabinets on one or two sides and in the corner. For minimal distances for fitting check the table.
Other technical data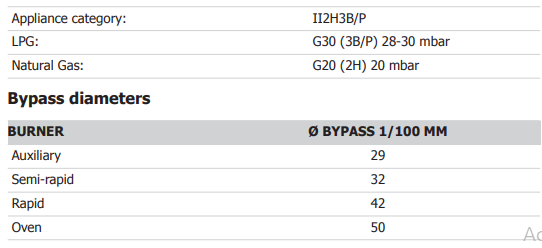

Minimum distances
Technical data 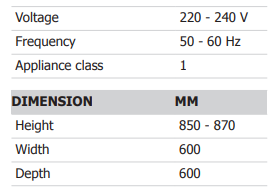
Gas connection
The gas pipe in the appliance has two endings. You can connect the gas supply to either one of them. The pipe that is not used must be clogged with the pipe closer, which is added to the appliance. Use a fixed connection or a flexible stainless steel pipe in compliance with the regulations in force. If you use flexible metallic pipes, make sure they do not come in touch with mobile parts and they are not squeezed.
Flexible nonmetal pipe connection
If you have easy access to the connection, you can use a flexible pipe. The flexible pipe must be tightly attached by clamps.
In installation always use the pipe holder and the gasket. The flexible pipe can be applied when:
- it can not get hotter than room temperature, higher than 30 °C,
- it is not longer than 1500 mm,
- it has no narrowing anywhere,
- it is not twisted or tightened,
- it does not come in touch with sharp edges or corners,
- its conditions can be easily checked.
When checking the flexible pipe make sure:
- it does not show cracks, cuts, or marks of burnings on the two ends, and on its full length,
- the material is not hardened, but shows its correct elasticity,
- the fastening clamps are not rusted,
- expired term is not due. If one or more defects are visible, do not repair the pipe, but replace it.
- Gas connection end
- Natural Gas pipe holder
- LPG pipe holder
Hob injectors replacement
Replace the injectors when you change the gas type.
- Remove the pan supports.
- Remove the caps and crowns of the burner.
- Remove the injectors with a socket spanner 7.
- Replace injectors with the ones necessary for the type of gas you use.
- Replace the rating plate (it is near the gas supply pipe) with the one for the new type of gas supply.
If the supply gas pressure is not constant or is different from the necessary pressure, install an applicable pressure adjuster on the gas supply pipe.
Adjusting the minimum gas level on the hob burner
- Disconnect the appliance from the electricity.
- Remove the knob for the hob. If there is no access to the bypass screw dismount the control panel before adjustment start.
- With a thin and flat screwdriver adjust the bypass screw A. The model determines the position of the bypass screw A.
Changing from natural gas to liquid gas
- Fully tighten the bypass screw.
- Put the knob back.
Changing from liquid gas to natural gas
- Unscrew approximately one turn the bypass screw position A.
- Put the knob for the hob back.
- Connect the appliance to the electricity.
WARNING! Put the mains plug into the mains socket only if all parts are back into their initial position. There is a risk of injury.
- Light the burner. Refer to the “Hob – Daily Use” chapter.
- Turn the knob for the hob to the minimum position.
- Remove the knob for the hob again.
- Screw on slowly the bypass screw till the flame becomes minimum and stable.
- Put the knob for the hob back on.
Oven injector replacement
- Remove the bottom plate of the oven cavity to get access to the oven burner.
- Carefully remove from the burner the thermocouple A. Next, remove the spark plug B.
- Unscrew the screw and slowly pull out the burner.
- Release the burner injector with a 7 mm socket spanner and replace it with the right one.
Assemble the burner in a reverse sequence. Replace the gas type sticker near the gas supply ramp with the one related to the new gas type.
Adjusting the minimum gas level on the oven burner
- Disconnect the appliance from the electricity.
- Remove the knob for the oven functions. If there is no access to the bypass screw dismount the control panel before adjustment start.
- With a thin and flat screwdriver adjust the bypass screw A. The model determines the position of the bypass screw A.
Changing from natural gas to liquid gas
- Fully tighten the bypass screw.
- Put the knob back.
- Connect the appliance to the electricity.
Changing from liquid gas to natural gas
- Unscrew approximately one turn the bypass screw position A.
- Put the knob for the oven functions back.
- Connect the appliance to the electricity.
- Light the burner. Refer to the “Oven – Daily Use” chapter.
- Turn the knob for the oven functions on the minimum position.
- Remove the knob for the oven functions again.
- Screw on slowly the bypass screw till the flame becomes minimum and stable.
- Put the knob for the oven functions back.
- Set the maximum gas flow position on the knob for the oven functions and let the oven heat for at least 10 minutes.
- Quickly turn the knob for the oven functions from the maximum to the minimum gas flow position. Control the flame. Make sure the flame does not go out when you turn the knob to the minimum gas flow position. There must be a small regular flame on the oven burner crown. If the flame goes out adjust the oven burner again.
Gas grill injector replacement
- Release the screws which keep the grill burner in position A.
- Release the burner injector with a 7 mm socket spanner and replace it with the right one.
- Assemble the burner in a reverse sequence. Before you fix the screw, make sure that the burner is pushed correctly to the back panel. Test the grill injectors.
Leveling
- Open the lid of the appliance and disassemble it.
- Disassemble the pan supports and all the burner assemblies.
- Put the appliance on the sidewall on a clean and smooth surface. Place each foot into a separate hole, in the plinth, and rotate it clockwise.
- If the floor is not equally flat, use the adjustable feet on the bottom of the appliance to set a stable position for the appliance.
To install all the accessories, do the first step in an opposite sequence.
Electrical installation
WARNING! The manufacturer is not responsible if you do not follow the safety precautions from the Safety chapters.
- This appliance is supplied with a main plug and a main cable.
WARNING! The power cable must not touch the part of the appliance shaded in the illustration.
ENVIRONMENTAL CONCERNS
Recycle materials with the symbol. Put the packaging in relevant containers to recycle it. Help protect the environment and
human health by recycling waste of electrical and electronic appliances. Do not dispose of appliances marked with the
symbol of household waste. Return the product to your local recycling facility or contact your municipal office.
FAQS About Frigidaire FNGB60JGR cooking range
How Do I Install My Cooking Range?
Check the user manual for step-by-step installation instructions, including safety precautions.
What Do I Do If There’s a Gas Leak?
The manual should provide guidelines on what to do if you suspect a gas leak. Safety is a top priority.
How Do I Clean My Cooking Range?
Look for information on cleaning and maintenance routines to keep your appliance in good condition.
Troubleshooting Ignition Issues
If you’re having trouble lighting the burners, the manual may offer troubleshooting tips.
Convection Oven Usage and Settings
If your model has a convection oven, the manual will likely have information on how to use it effectively.
Understanding Cooking Modes
Familiarize yourself with the different cooking modes and settings available on your range.
Adjusting Oven Temperature
Learn how to calibrate or adjust the oven temperature if you find any discrepancies.
What Cookware Can I Use?
Check for information on recommended cookware and any restrictions on certain materials.
Self-Cleaning Oven Instructions
If your range has a self-cleaning feature, the manual should provide instructions and safety precautions.
Warranty Information
Find details on the warranty coverage, what it includes, and how to contact customer support if needed.
For more manuals by Frigidaire ManualsDock
Click to visit more manuals of Frigidaire’s ice makers:


