
JVC 4K Memory Card Camera Recorder
About JVC
JVC (JVCKENWOOD Europe B.V.) is JVCKENWOOD Corporation’s wholly owned subsidiary. JVC is a renowned creator and manufacturer of sophisticated audio and video products that employ cutting-edge technologies to produce high-quality sound and visuals.
JVC provides high-definition displays and home theater projectors, digital video camcorders, home theater systems, audio components and systems, portable audio products, digital storage devices, audio and video accessories, and automobile audio/video products in its consumer products.
Operation Modes
This camera recorder has three operation modes – Camera mode, Media mode, and Remote Edit mode.

Names of Parts
- Shoe
- Tally Lamp
- Built-in Microphone
- Monitor Speaker
- Cross-Shaped Button (


 )/Set Button (
 )
) - Tripod Mounting Screw Hole
- [FIX/VAR/OFF] Zoom speed switch
- Accessory Mounting Screw Hole

- Wireless LAN Antenna Terminal
- Viewfinder
- Eyecup
- Visibility Adjustment Lever
- Headphone Jack (Φ3.5 mm)
- [TC IN/OUT] switch
- [TC] TC Input/Output Terminal
- [REC] Record Trigger Button
- [EXP.FOCUS/9] Expanded Focus Assist/User
- Zoom Lever at the Grip
- Hood Release Button
- External Microphone Cable Clamp
- [INPUT1/INPUT2] Audio Input Terminal 1, 2
- Shoulder Belt Mount (x2)
- [REC/HOLD] Record Trigger Button/Lock
- Zoom Lever on Handle
Side Control Panel
- [FOCUS AUTO/MANU] Focus Switch
- [ND FILTER] ND Filter Switch
- [PUSH AUTO/PUSH LOCK] Focus Push Auto/Push Lock Button
- [USER7] Button
- [USER8] Button
- [IRIS] Iris Auto/Manual Selection Button
- [PUSH AUTO] Iris Push Auto Button
- [GAIN] Gain Auto/Manual Selection Button / [L/M/H] Sensitivity Selection Switch
- [WHT BAL] White Balance Auto/Manual
- [
 ] One Push Auto White Balance Button
 - [SHUTTER] Shutter Speed Auto/ManualSelection Button
- [FULL AUTO ON/OFF] Full Auto Switch
- [MARKER/6] Marker/User 6 Button
- [KEYLOCK ON/OFF] Key Lock Switch
- [MODE] Camera/Media Mode Selection Button
- EXT.SLOT Lamp
- [POWER ON/OFF] Lock Power ON/OFF Switch
- POWER/CHARGE LED
- STATUS LED
- NETWORK LED
- [ZEBRA/5] Zebra/User 5 Button
- [AE LOCK/4] AE Lock/User 4 Button
- Cross-Shaped Button (JKHI)/Set Button (R)
- [ONLINE/3] Online/User 3 Button
- [OIS/2] Optical Image Stabilizer/User 2 Button
- [FOCUS ASSIST/1] Focus Assist/User 1 Button
- [MENU/THUMB] Menu/Thumbnail Button
- [CANCEL] Cancel Button
Rear Terminal
- SD Card Cover
- Card Slot A
- [SLOT SEL] Button
- [BATT.RELEASE] Button
- Card Slot B
- [EXT.SLOT]
- Battery
- [DC] Terminal
- [SDI OUT] Terminal
- [REMOTE] Terminal
- [LAN] Terminal
- [HOST] USB Host Terminal
- [HDMI] Terminal
- [AUX] Terminal (Φ3.5 mm)
- Access Lamp A/B
LCD Monitor
- LCD Monitor
- [CH1/CH2] CH1/CH2 Recording Level
- [LCD BRIGHT +/-] LCD Display BrightnessAdjustment Button
- [PEAKING +/-] LCD/VF Contour Adjustment Button
- [DISPLAY] Display Button
- [STATUS] Status Screen Display Button
- [MONITOR]/[+/-] Audio Monitor Selection Switch/Volume Adjustment Button
- [INPUT1/INPUT2] Audio Input Signal Selection Switch
- [CH2] CH2 Audio Input Signal Selection Switch
- [CH1] CH1 Audio Input Signal Selection Switch
- [CH1/CH2 AUTO/MANUAL] CH1/CH2 Audio
Lens Section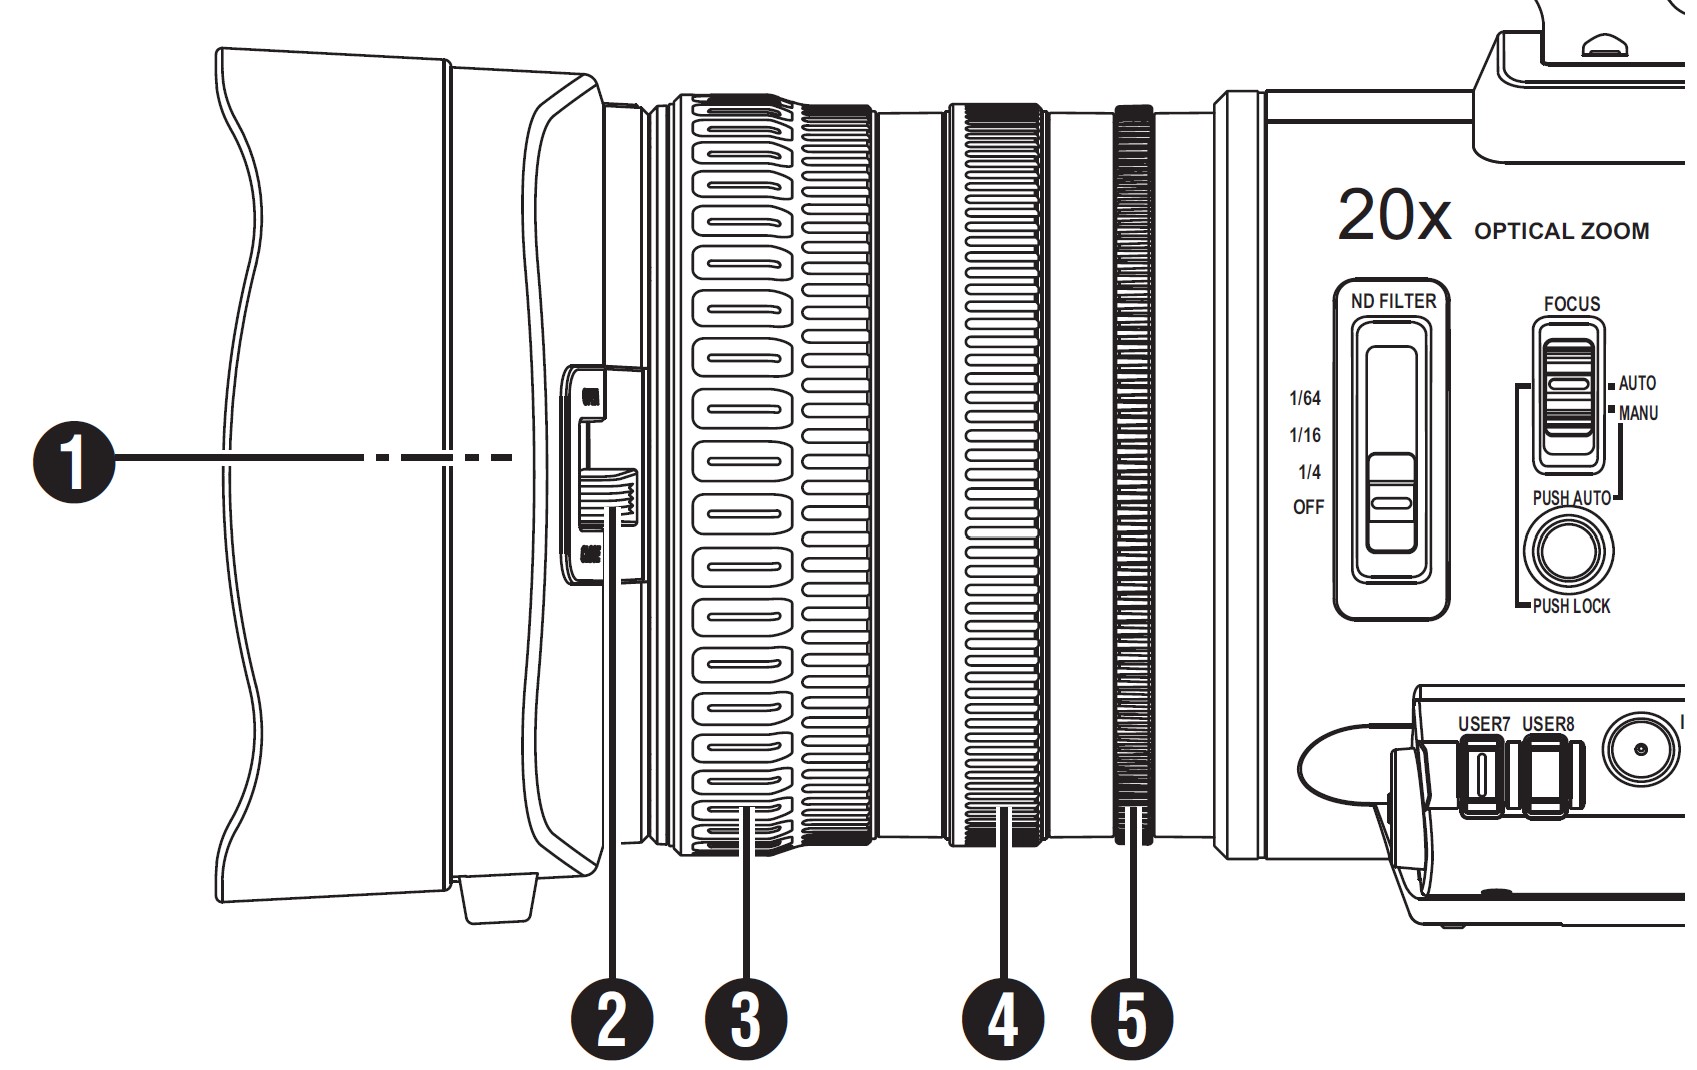
- Filter Built-In Screw
- Lens Cover Open/Close Switch
- Focus Ring
- Zoom Ring
- Iris Ring
Basic System Diagram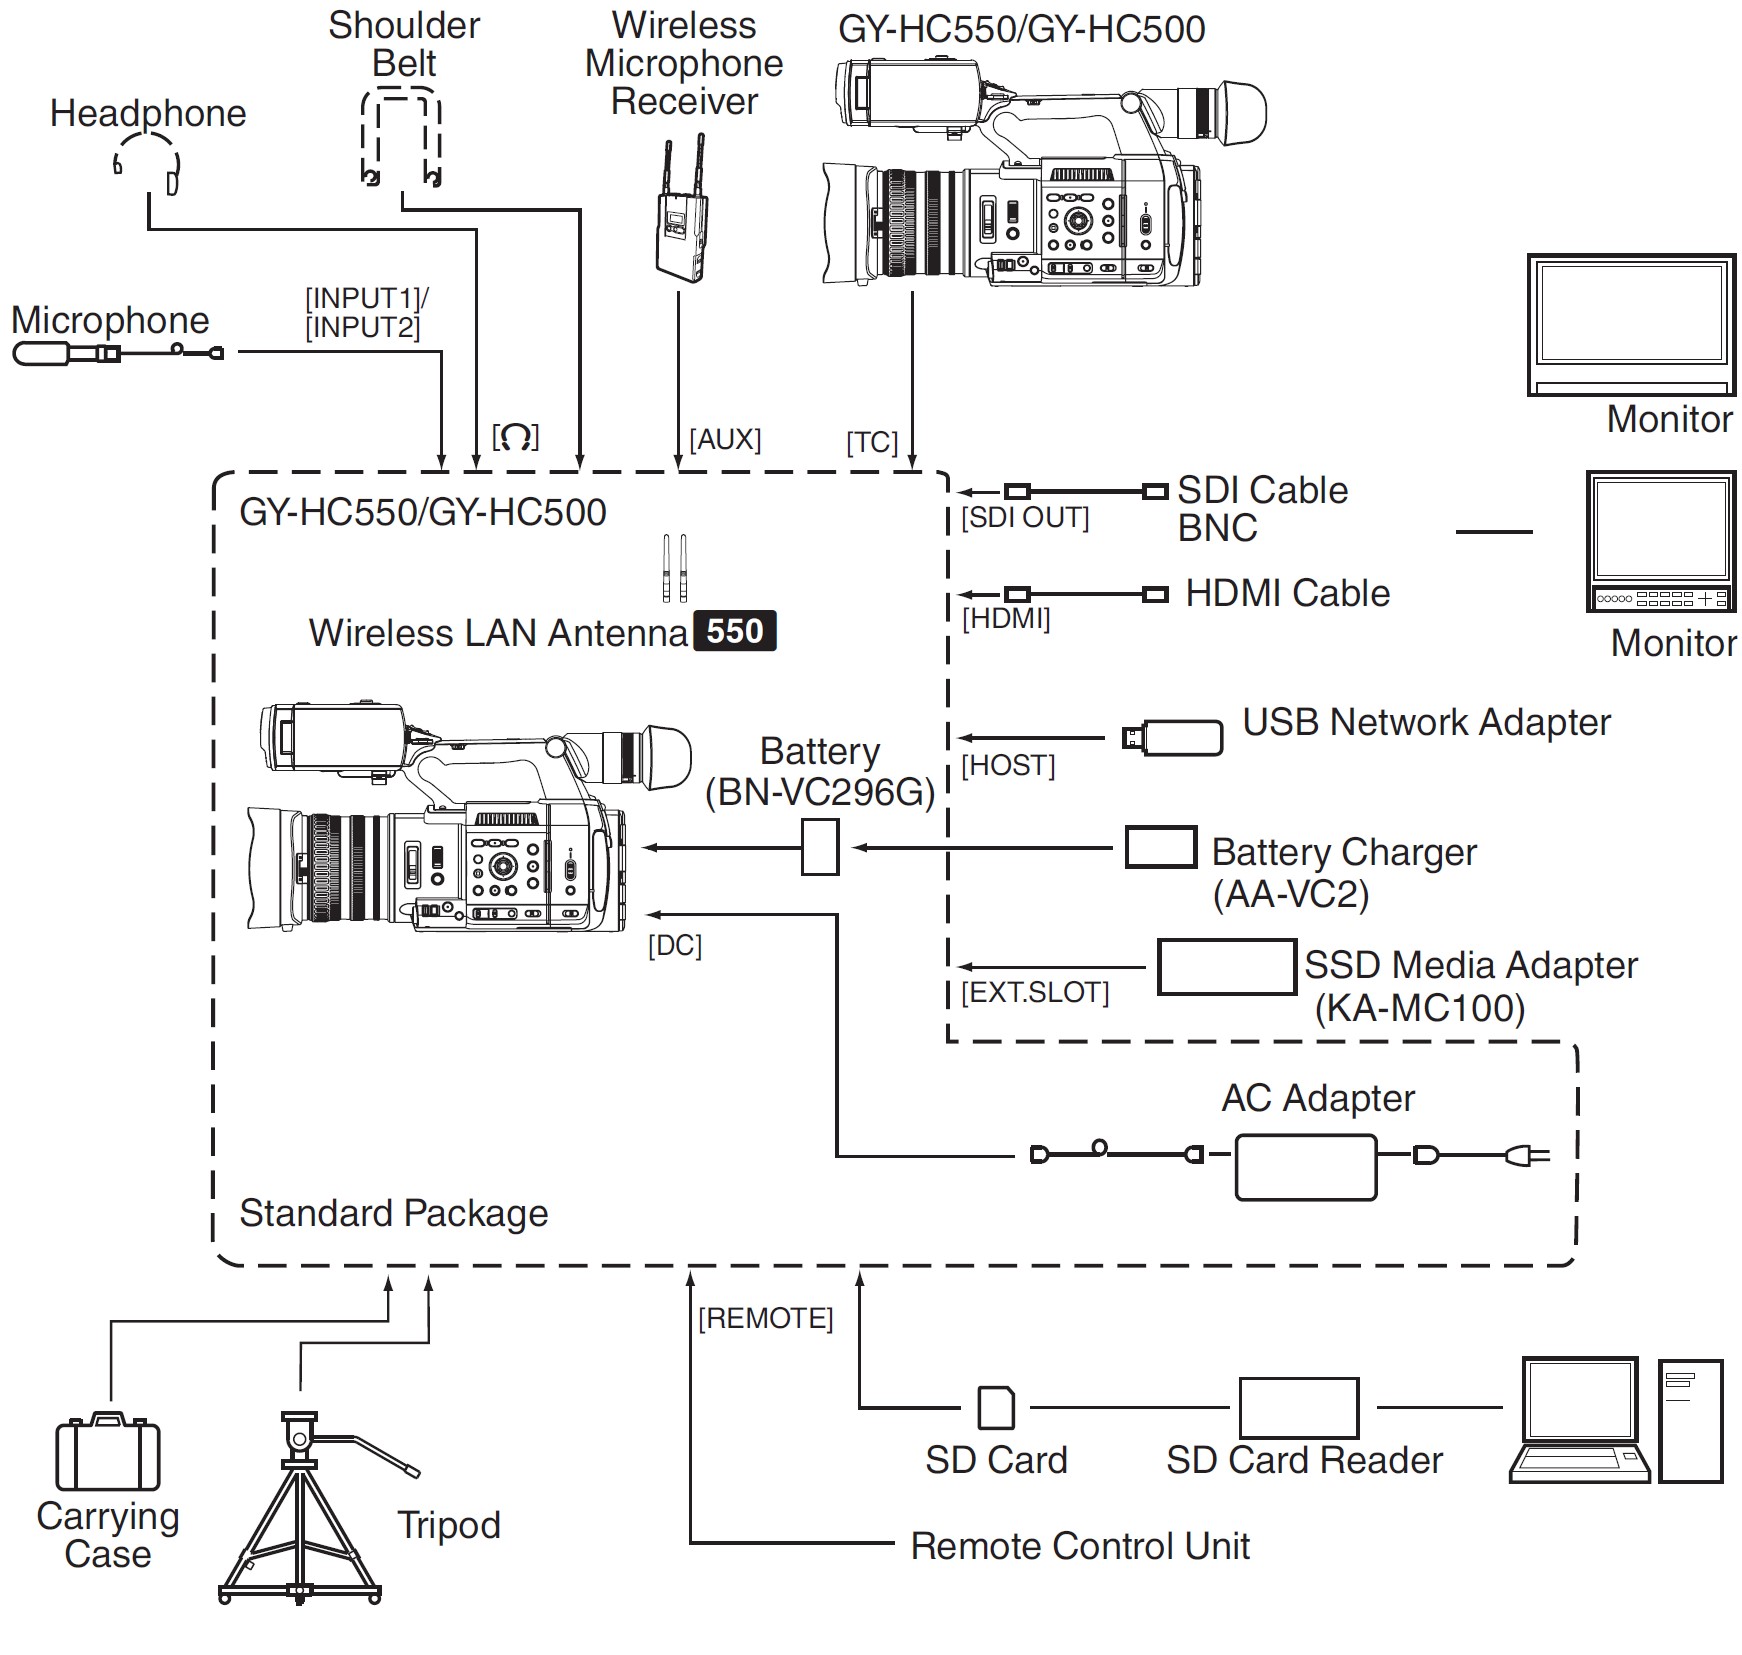
Settings and Adjustments Before Use
Adjusting the Grip Belt
Open the pad and adjust the position of the grip belt accordingly.
Caution: If the grip is loose, the camera recorder may fall off resulting in injuries or malfunction.
Attaching the External Microphone (Sold Separately)
You can attach a separately sold microphone to the microphone holder.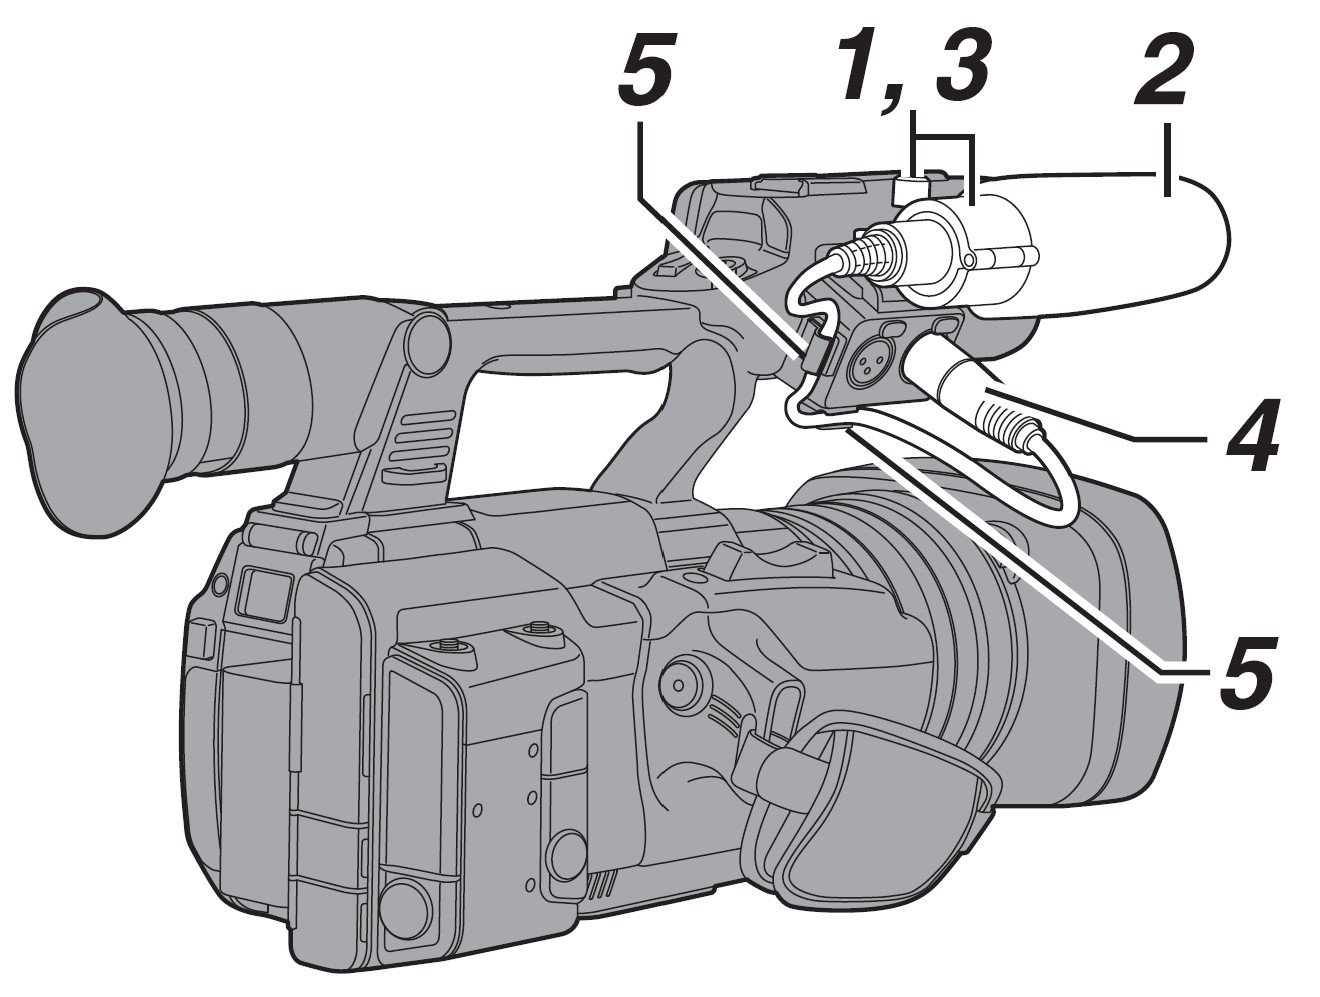
- Turn the knob on the microphone holder counterclockwise to loosen and open the microphone holder.
- Place the microphone in the microphone holder.
- Turn the knob on the microphone holder clockwise to secure the microphone.
- Connect the microphone cable to the [INPUT1] or [INPUT2] terminal.
- Pin the microphone cable to the clamp.
- Perform the settings for the microphone correctly.
Opening/Closing the Lens Cover
Use the lens cover open/close switch to open or close the lens cover.
Before shooting, open the lens cover.
When this camera recorder is not in use, close the lens cover to protect the lens.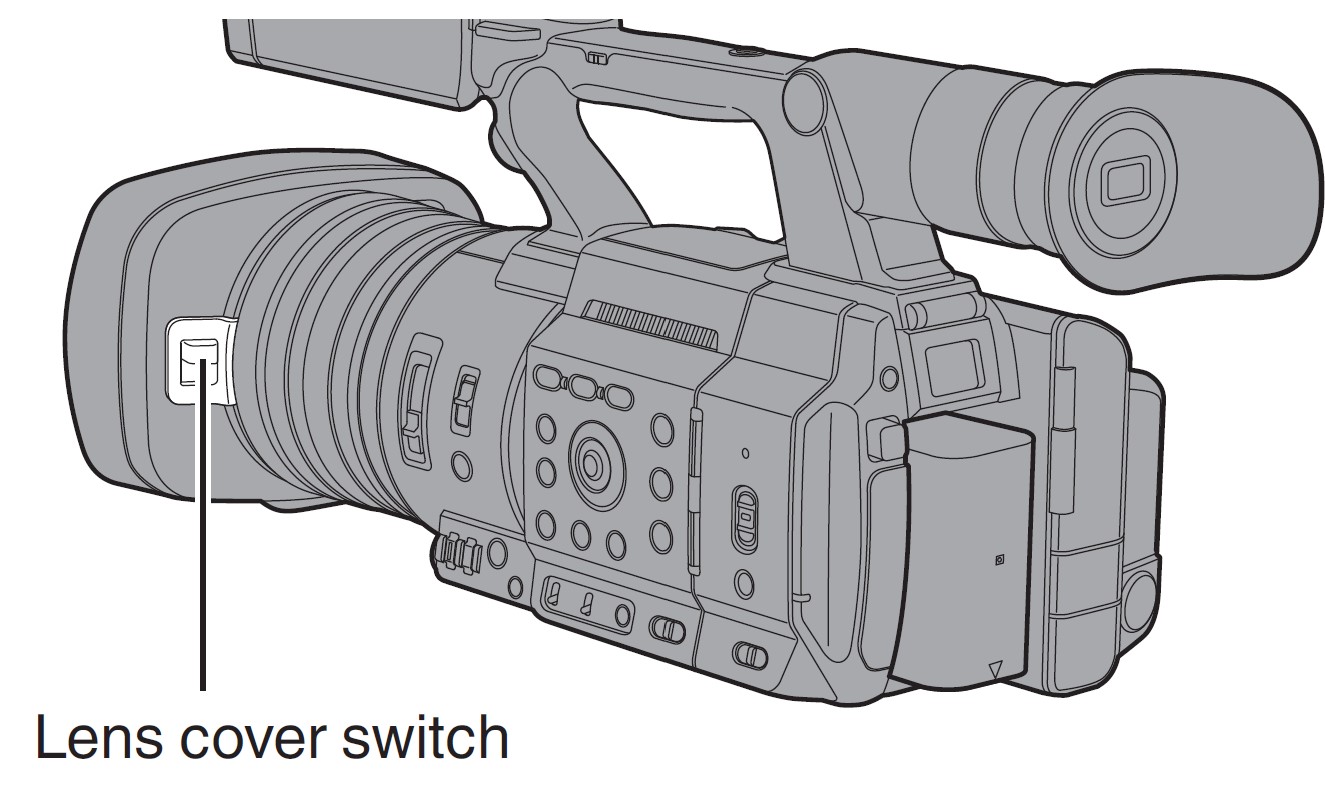
Caution: Do not press against the lens cover with force. Doing so may damage the lens or the cover.
Attaching the Tripod (Sold Separately)
Use the screw hole at the bottom of this camera recorder.
(3/8×16UNC, 1/4×20UNC)
Use the screw hole that suits the tripod.
To prevent the camera recorder from falling off, which may result in injuries or damage, read the “INSTRUCTIONS” of the tripod to be used and make sure that it is securely attached.
Caution :
- If the camera recorder exceeds the weight limit of the tripod, do not mount it on the tripod.
- Use the tripod on a stable surface.
- To prevent the camera recorder from falling, attach securely using the rotation prevention hole.
- Use screws with screw length 5 mm and below.
Attaching the Wireless LAN Antennas (Supplied)
Attach the wireless LAN antenna by turning it in the clockwise direction. Hold the base while attaching the antenna.
Caution :
- Applying force to the wireless LAN antenna or yanking it may damage the antenna so please use caution when using the antenna.
If it is damaged, replacement is chargeable even during the warranty period.
(Part number: T9A-0095-00) - Use the antenna holders without removing them.
Attaching/Detaching the Hood
Attaching the Hood
Align the markings on the camera recorder and hood; turn the hood in the direction of the arrow until it is locked.
Detaching the Hood
While pressing the hood release button, turn the hood in the direction of the arrow (anti-clockwise) to remove it.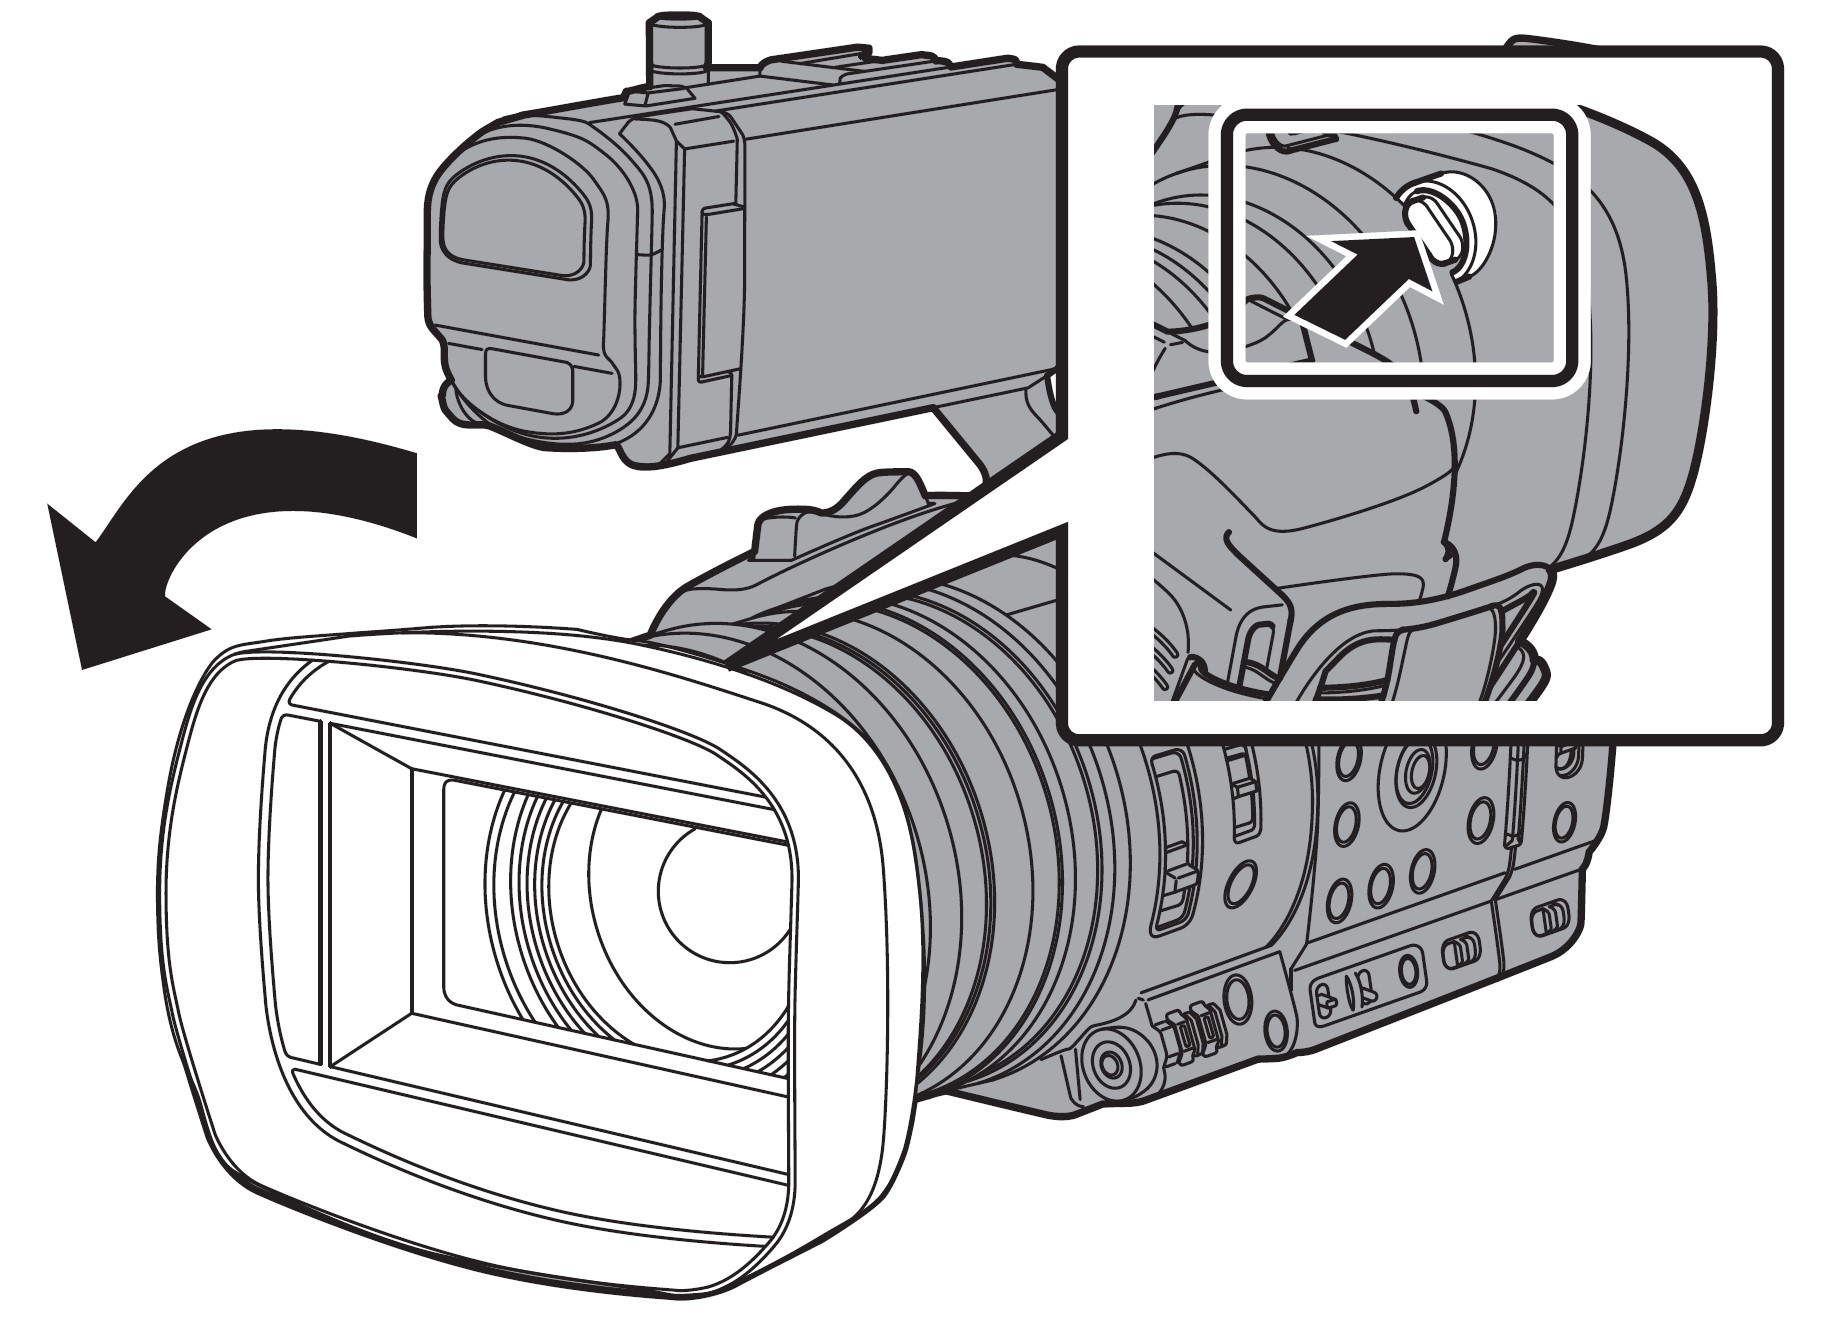
Caution: Remove the hood when attaching a filter, teleconverter, or wide converter to the front of the lens.
Power Supply
To use this camera recorder, you can attach a battery pack or connect an AC adapter to it.
(A P35 [Using a Battery Pack] )
(A P36 [Using AC Power (DC IN Power)] )
Caution :
- Set the [POWER ON/OFF] switch to “OFF” before changing the power supply that operates this camera recorder.
- To charge the battery using a battery charger, purchase a genuine charger that can charge the recommended battery.
Using a Battery Pack
Charging the Battery
Charge the battery immediately after purchase or when the battery power is running low.
* The battery is not charged when purchased.
- Hold down the lock button (blue) at the center of the [POWER ON/OFF] switch to set it to “OFF”.
- Attach the supplied battery. Slide it in until you hear a click.
- Connect the supplied AC adapter to the [DC] terminal.
Open the cover of the [DC] terminal and connect as shown in the diagram. - Connect the AC adapter to a power outlet.
- The [POWER/CHARGE] lamp blinks during charging and will go out after charging is complete.
- Remove the AC adapter after charging is complete.
Memo :
- The blinking of the [POWER/CHARGE] lamp during charging indicates the charge level.

- You can charge the battery even when operating the camera recorder using the AC adapter. The lamp lights up in green during “POWER.ON”.
Removing the Battery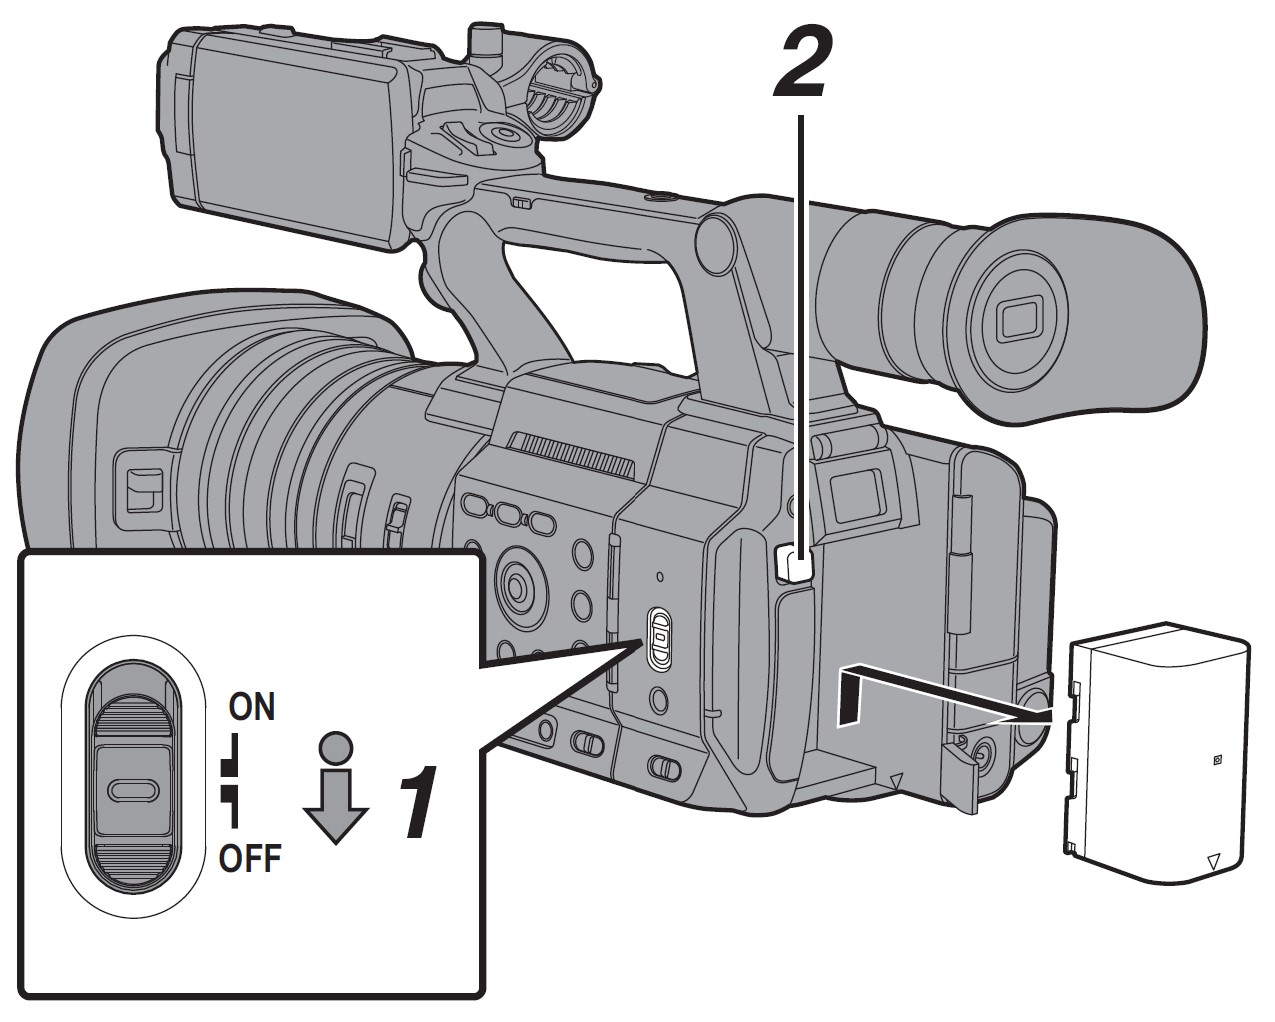
- Hold down the lock button (blue) at the center of the [POWER ON/OFF] switch to set it to “OFF”.
- While pressing and holding the [BATT. RELEASE] button, push up, and remove the battery in the direction of the arrow.
Caution :
- Do not remove the battery when the [POWER ON/OFF] switch is “ON”.
- Leaving the camera recorder unused with the battery attached will deplete the battery power even when you set the [POWER ON/OFF] switch to “OFF”. Remove the battery if you are not using the camera recorder.
Using AC Power (DC IN Power)
Use the supplied AC adapter to operate the camera recorder with AC power.
- Connect the DC cable of the AC adapter to the [DC] terminal of the camera recorder. 0 Check that the power switch of the camera
recorder is set to “OFF”.
- Open the cover of the [DC] terminal and connect as shown in the diagram.
- Hold down the lock button (blue) at the center of the [POWER ON/OFF] switch to set it to “ON”.
Power will be supplied to the camera recorder.
Caution :
- Do not insert or remove the DC cable during recording.
- Do not use the power supply of high voltage fluctuation, containing noise such as ripple, or with insufficient capacity.
Power Status Display
Viewfinder Screen and LCD Monitor
The power status is displayed on the display and menu screens.
Turning On/Off the Power
Turning On the Power
- Hold down the lock button (blue) at the center of the [POWER ON/OFF] switch to set it to “ON”.
The camera recorder starts up in Camera mode and is ready for shooting.
Turning Off the Power
Sets the camera recorder to the recording standby or stop mode.
- Hold down the lock button (blue) at the center of the [POWER ON/OFF] switch to set it to “OFF”.
- Remove the battery and the power to the [DC] terminal (when not in use for a long time).
Caution :
- Do not set the [POWER ON/OFF] switch to “OFF” during recording. Check that the operation mode display is “STBY” or “STOP” before you turn off the power.
- If you have mistakenly set the [POWER ON/OFF] switch to “OFF” during recording, wait for 5 seconds or more before you turn on the power again.
- When turning off the power, first set the [POWER ON/OFF] switch off the camera recorder to “OFF”. Do not remove the battery or turn off the AC power while the [POWER ON/OFF] switch is set to “ON”.
Initial Settings
When the power is first turned on, the Initial Setting screen for performing the initial settings in the camera recorder appears.
Set the date/time of the built-in clock in the [Date/Time] screen.
All operations are disabled until initial settings are complete.
- Hold down the lock button (blue) at the center of the [POWER ON/OFF] switch to set it to “ON”.
A language selection screen appears. - Select a language using the cross-shaped button (JK), and press the Set button (R). A self-diagnosis screen appears.
- Ensure that the lens cover is closed, and press the Set button (R).
- Self-diagnosis starts.
- A progress bar appears, and “Complete Diagnosis” appears when the diagnosis is complete.
- Press the Set button (R) after confirming the exit screen.
The [Date/Time] screen appears. - Set the time zone and date/time.
- Move the cursor with the cross-shaped button (HI) and select the setting item.
- Change the values with the cross-shaped button (JK).
- Press the Set button (R) after the setting is complete.
The clock is set to 0 seconds of the input date/time.
Displays on the LCD Monitor and Viewfinder
You can display the camera status, recording media information, zebra pattern, and various markers in the video image on the LCD monitor and viewfinder screen during shooting.
Memo: When [A/V Set] B [Video Set] B [SDI OUT] B
Display Screen
Display Screen (VF/LCD) in Camera Mode
- The display switches with every press of the [DISPLAY] button.
(Display off B Display on B Display off) - Press the [STATUS] button to switch to the status screen.
Display Screen (VF/LCD) in Media Mode
- This is the screen display during clip playback in Media Mode.
- The display switches with every press of the [DISPLAY] button.
(Display off B Display on B Display off)
Status Screen
- This screen allows you to check the current settings.
- To display the status screen, press the [STATUS] button on the normal screen.
- Press the [STATUS] button again to return to the normal screen.
- Press the [MENU/THUMB] button at each status screen (other than the [Camera] screen) to enter the settings screen.
- Use the cross-shaped button (HI) to switch between the screens.
Remote Edit Mode Screen
This is a mode for accessing the page for editing the metadata that is recorded in a clip via a web browser on devices such as a smartphone, tablet terminals, or PCs.
Warning Display
A warning display is displayed on the display screen (Camera mode, Media mode).
Adjusting the LCD Monitor and Viewfinder
You can monitor video images on this camera recorder using the viewfinder or LCD monitor.
Displays on the LCD Monitor and Viewfinder Screen (VF)
Adjusting the LCD Monitor
- Open the LCD cover.
- Incline the LCD monitor to a position that enables easy viewing.
Rotate the LCD monitor to adjust the angle.- While the LCD monitor is open, you can rotate it 180 degrees upward or 90 degrees downward.
- Rotating the LCD monitor 180 degrees upward enables you to see the screen from the lens side. To display the image when it is viewed from the opposite direction (mirror image), perform the setting as follows.
Set [LCD/VF] B [LCD Mirror] to “Mirror” B Set button
- Adjust the brightness, contour, and contrast of the LCD monitor.
You can change the angle and brightness of the LCD monitor according to your usage condition. Changing the brightness of the screen will not affect the recorded images.
Adjusting the Viewfinder
You can change the brightness and peaking of the viewfinder screen according to your usage conditions.
Changing the brightness of the screen will not affect the recorded images.
Caution: A high-definition viewfinder is used on this camera recorder in order to provide an accurate focusing environment. Due to the characteristics of the display device, colors may appear on the images when you blink your eyes. This is not a malfunction. It does not affect the recorded images, SDI output, or HDMI output.
- Incline the viewfinder vertically to a position that enables easy viewing.
- Turn the visibility adjustment lever to adjust the visibility.
Turn the visibility adjustment lever to sharpen the image on the viewfinder screen. - Adjust the brightness, contour, and contrast of the viewfinder screen.
Troubleshooting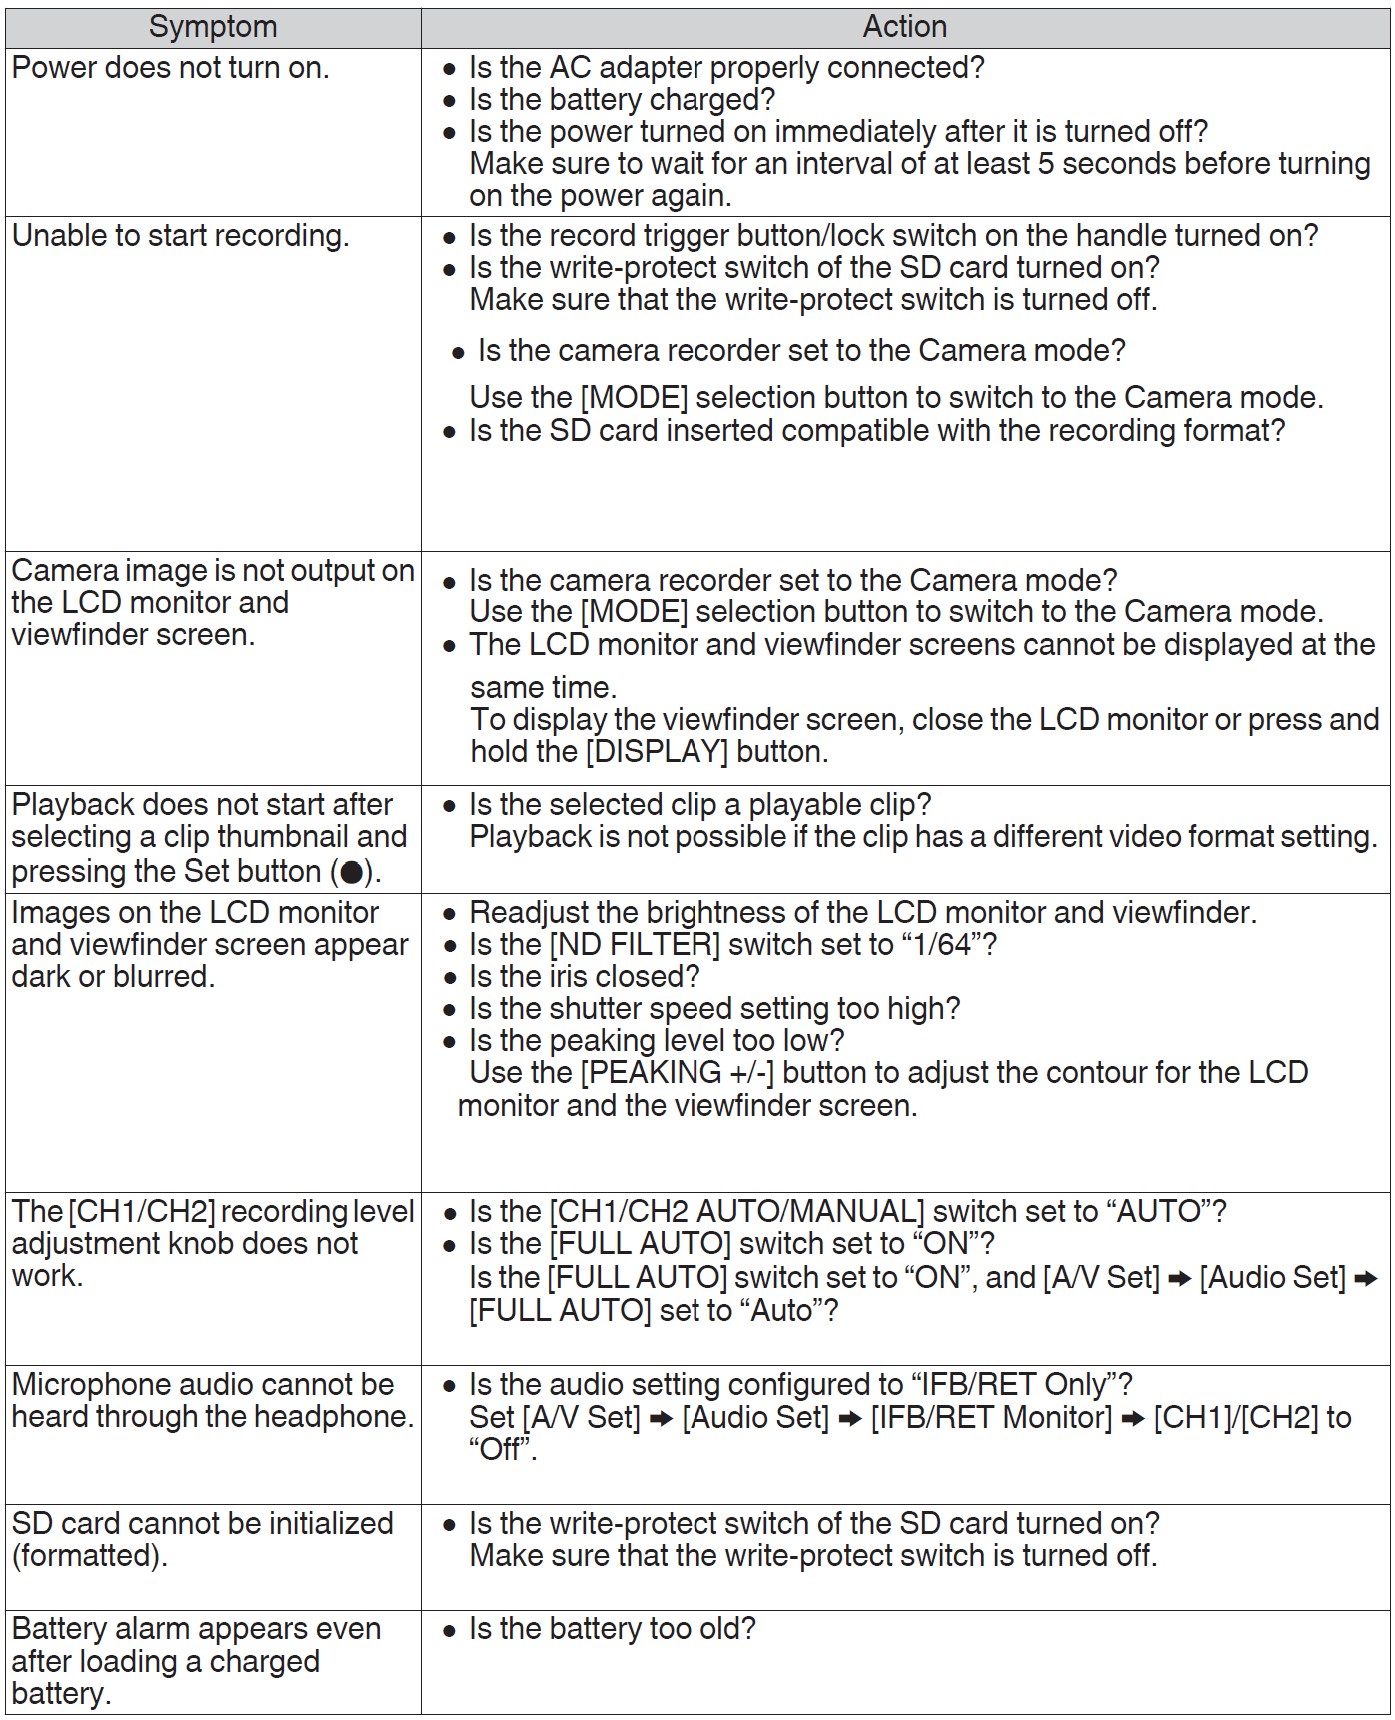

Specifications
General
Terminal Section
Video/Audio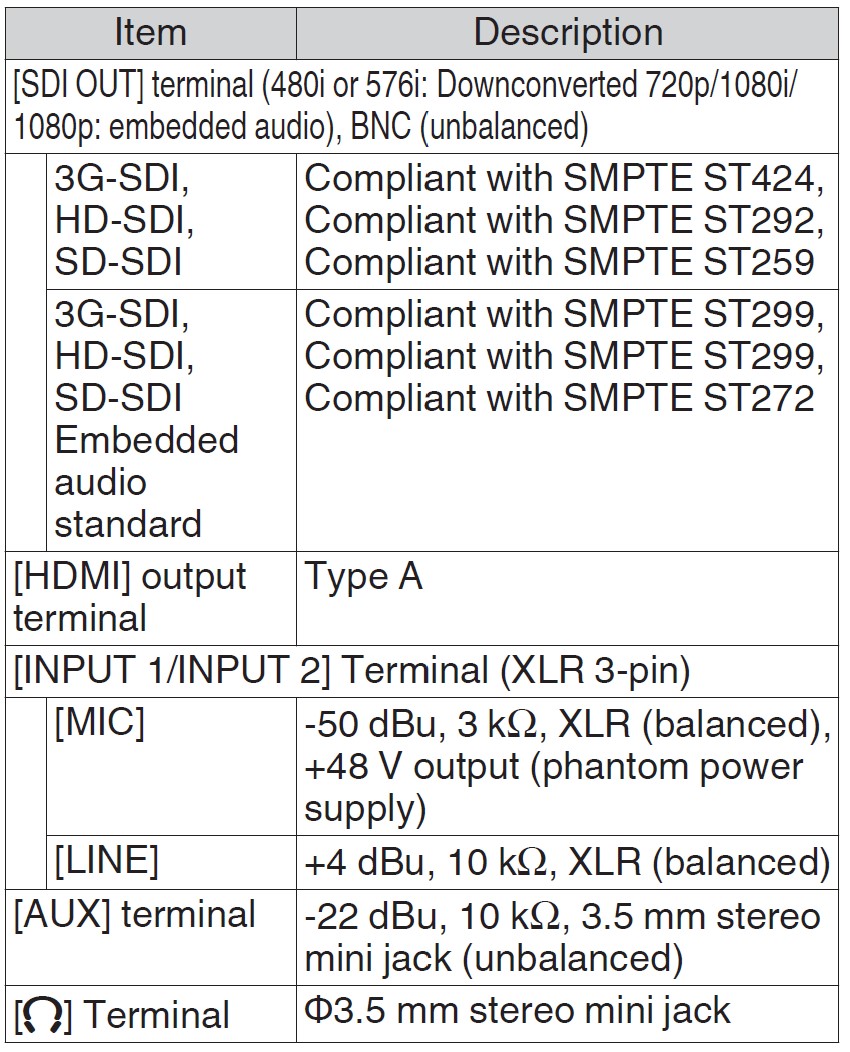
Others
Camera Section
Storage Section
Video/Audio


FAQS About JVC 4K Memory Card Camera Recorder
How much does a JVC 4K camera cost?
The starting price for the JVC GY 4K Compact Professional Camcorder in India is 1,15,640. As of August 9th, 2023, Flipkart in India has it for the lowest price. View the JVC GY 4K Compact Professional Camcorder’s complete features and specifications.
Is a 4K camera good?
Given that it captures four times as much information as Full HD, 4k looks superior to Full HD even when downscaled to 1080p. In contrast to 1080p video, 4k video can be cropped, zoomed in, or reframed without sacrificing quality.
What is more superior, HD or 4K CCTV?
When compared to a full 1080p HD video, a 4K quality video has four times as many pixels (detail). When compared to the identical image taken with a 1080p camera, 4K gives you a better ability to see features like faces at a greater distance.
HD or 4K cameras: Which is superior?
With around four times the pixel density of HD, 4K has emerged as the industry standard for crisp, clear video.
How good is a 4K recording?
High-definition (HD) video with a 4K resolution has four times the resolution of HD video at 1080p. For 4K video, there are two common resolutions. 4096×2160 pixels is the Digital Cinema Initiatives specification for 4K resolution in the film and video production sector.
A 4K camera is how many MB?
High-end cameras are capable of 400 Mb/s or more of 4K video encoding. Drones and action cameras can capture 4K footage at speeds between 100 Mb/s and 200 Mb/s. Cameras that were less advanced or older, including first-generation 4K cameras, recorded at a rate closer to 60 Mb/s.
What is the range of a 4K camera?
254 feet distant
What are the advantages of a 4K camera?
Enjoy stunning 3840 x 2160 visuals in 4K, which has four times the resolution of Full-HD. For this reason, images look realistic and crisp rather than pixelated, even on large-screen TVs. The clarity and resolution of photos that are downconverted from 4K to Full-HD are superior to those that are captured in Full-HD from the start.
How much 4K footage can fit in an hour?
around 45GB
For more manuals by JVC, Visit Manualsdock
[embeddoc url=”https://manualsdock.com/wp-content/uploads/2023/08/JVC-4K-Memory-Card-Camera-Recorder-Quick-Start-Guide.pdf” download=”all”]


