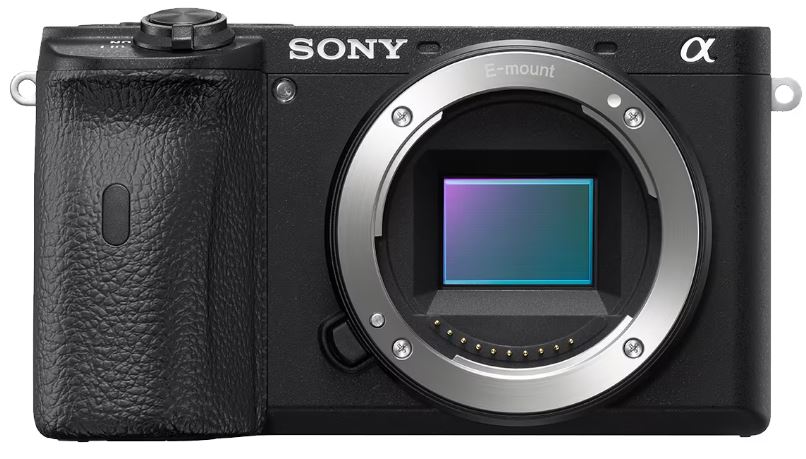
Sony Alpha A6600 Mirrorless Camera
About SONY
Sony was founded in 1946 by Masaru Ibuka and Akio Morita, originally as Tokyo Tsushin Kogyo. The company started with a focus on producing innovative consumer electronics, such as radios and tape recorders, and later expanded into various other areas, including televisions, audio equipment, cameras, video game consoles, and mobile devices.
Here are some key aspects and divisions of Sony:
- Electronics: Sony is widely recognized for its wide range of consumer electronics, including televisions, home audio systems, digital cameras, smartphones, tablets, laptops, and gaming consoles. The company has been at the forefront of technological advancements and has introduced many groundbreaking products over the years.
- Entertainment: Sony is also heavily involved in the entertainment industry. It owns and operates Sony Picture Entertainment, which produces and distributes movies and television shows globally. Additionally, Sony Music Entertainment is one of the largest music labels in the world, representing a wide array of artists across various genres.
- PlayStation: Sony’s PlayStation brand is a dominant force in the gaming industry. The PlayStation consoles, including the latest PlayStation 5, have gained immense popularity among gamers worldwide. Sony also develops and publishes a range of video games through its subsidiary, Sony Interactive Entertainment.
- Imaging: Sony is a major player in the digital imaging market, producing high-quality cameras, lenses, and other imaging equipment. Its Alpha series of mirrorless cameras has garnered critical acclaim and is favored by both amateur and professional photographers.
Sony continues to innovate and expand its presence in different sectors, including virtual reality, robotics, and artificial intelligence. The company is known for its commitment to technological advancements, design excellence, and delivering high-quality products and experiences to its customers.
Names of parts
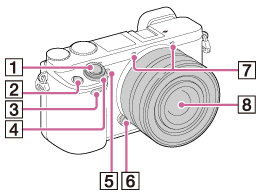
Identifying parts
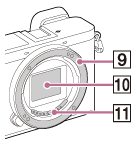
When the lens is removed
- Shutter button
- C1 (Custom 1) button
- Remote sensor
- ON/OFF (Power) switch
- Self-timer lamp/AF illuminator
- Lens release button
- Microphone*
- Lens
- Mount
- Image sensor*
- Lens contacts**
*Do not cover this part during the movie recording.
**Do not touch this part directly.
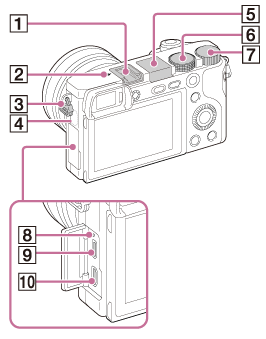
- Multi Interface Shoe*
- Image sensor position mark
- Hook for shoulder strap
- Wi-Fi sensor (built-in)
- Flash
• Press the Flash pop-up button to use the flash. The flash does not pop up automatically.
• When not using the flash, press it back into the camera body. - Mode dial
- Control dial
- Charge lamp
- Multi/Micro USB Terminal*
• Supports Micro USB compatible devices. - HDMI micro jack
*For details on compatible accessories for the Multi Interface Shoe and the Multi/Micro USB Terminal, visit the Sony website, or consult your Sony dealer or local authorized Sony service facility.
You can also use accessories that are compatible with the accessory shoe. Operations with other manufacturers’ accessories are not guaranteed.
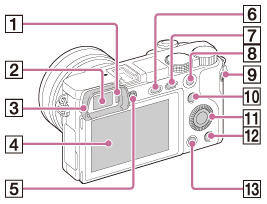
- Eye sensor
- Viewfinder
- Eyepiece cup
• Not attached to the camera at the factory. It is recommended that you attach the eyepiece cup when you intend to use the viewfinder.
Attaching/removing the eyepiece cupMatch the bottom side of the eyepiece cup to the viewfinder, and attach it by pushing the top side of the eyepiece cup in.
To remove the eyepiece cup, grasp it on the left and right sides and lift it up.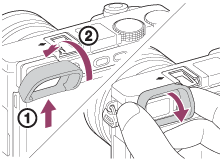
• Remove the eyepiece cup when you attach an accessory (sold separately) to the Multi Interface Shoe. - LCD screen
• You can adjust the screen to an easily viewable angle and shoot from any position.
• You may not be able to adjust the screen angle depending on the type of tripod you use. In such a case, release the tripod screw once to adjust the screen angle.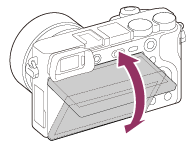
- Diopter-adjustment dial
If it is difficult to turn the diopter-adjustment dial, remove the eyepiece cup and then adjust the dial.
• Adjust the diopter-adjustment dial to your eyesight until the display appears clearly in the viewfinder. - Flash pop-up button
- MENU button
- For shooting: AEL button
For viewing: Playback zoom - MOVIE (Movie) button
- For shooting: Fn (Function) button
For viewing: Send to Smartphone button
• You can display the screen for [Send to Smartphone] by pressing the Send to Smartphone button. - Control wheel
- C2 (Custom 2) button/Delete button
- Playback button
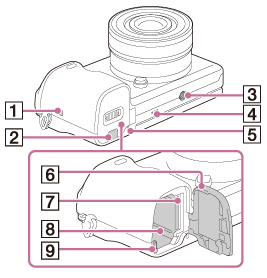
- N mark
• Touch the mark when you connect the camera to a smartphone equipped with the NFC function.
• NFC (Near Field Communication) is an international standard of short-range wireless communication technology. - Connection plate cover
• Use this when using an AC-PW20 AC Adaptor (sold separately). Insert the connection plate into the battery compartment, and then pass the cord through the connection plate cover as shown below.
• Make sure that the cord is not pinched when you close the cover.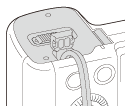
- Tripod socket hole
• Use a tripod with a screw less than 5.5 mm (7/32 inches) long. Otherwise, you cannot firmly secure the camera, and damage to the camera may occur. - Speaker
- Access lamp
- Battery/memory card cover
- Memory card slot
- Battery insertion slot
- Battery eject lever
Identifying parts Lens E PZ 16–50 mm F3.5–5.6 OSS (supplied with ILCE-6000L/ILCE-6000Y)
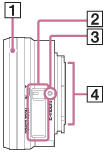
- Zooming/Focusing ring
- Zooming lever
- Mounting index
- Lens contacts*
*Do not touch this part directly.
Identifying parts Lens E 55-210 mm F4.5-6.3 OSS (supplied with ILCE-6000Y)
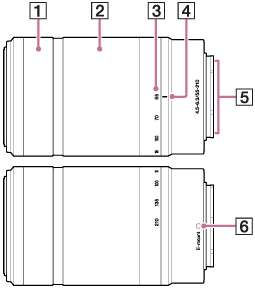
- Focusing ring
- Zooming ring
- Focal-length scale
- Focal-length index
- Lens contacts*
- Mounting index
*Do not touch this part directly.
Shooting still images/movies
Shooting still images
Shoots still images.
- Set the shooting mode to Intelligent Auto.
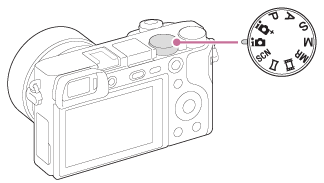
- Adjust the monitor angle, and hold the camera. Or look through the viewfinder and hold the camera.
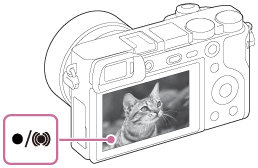
- Press the shutter button halfway down to focus.
When the image is in focus, a beep sounds, and the indicator lights.
- Press the shutter button fully down.
Hint
- When the product cannot focus automatically, the focus indicator flashes and the beep does not sound. Either recompose the shot or change the focus setting.
- Focusing may be difficult in the following situations:
• It is dark and the subject is distant.
• The contrast between the subject and the background is poor.
• The subject is seen through the glass.
• The subject is moving quickly.
• There is reflective light or shiny surfaces.
• There is a flashing light.
• The subject is backlit.
• Continuously repetitive patterns, such as the appearance of a building.
Shooting movies
You can record movies by pressing the MOVIE button.
- Press the MOVIE button to start recording.
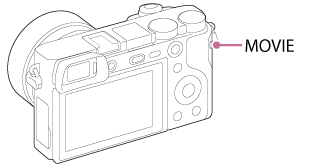
- Press the MOVIE button again to stop recording.
Note
- To adjust the shutter speed and aperture value to the desired settings, set the shooting mode to Movie.
- If you use a function such as Zoom while shooting a movie, the noise of the product operating will be recorded. The sound of the MOVIE button operating may also be recorded when you press the MOVIE button to stop recording.
- For the continuous shooting time of a movie recording, refer to “Recordable time of movies.” When the movie recording is finished, you can restart the recording by pressing the MOVIE button again. Recording may stop to protect the product depending on the ambient temperature.
The advantages of automatic shooting
In [Program Auto] mode, you can shoot after adjusting various functions, such as white balance, ISO, etc.
Select this mode when you want the camera to automatically recognize the scene.
Superior Auto:
Select this mode to shoot scenes under difficult circumstances, such as when it is dark or the subjects are backlit. Select this mode to shoot a higher-quality image than that provided by Intelligent Auto.
Program Auto:
Select this mode to shoot with various functions other than the exposure (shutter speed and aperture) adjusted.
Note
- In [Intelligent Auto] mode, you may not be able to shoot dark scenes or back-lit subjects clearly.
- In [Superior Auto] mode, the recording process takes longer, since the product creates a composite image.
Sweep Panorama
Allows you to create a single panoramic image from multiple images shot while panning the camera.

- Set the mode dial to Sweep Panorama.
- Point the camera at the subject for which you want to set the focus and brightness.
- While pressing the shutter button halfway down, aim the camera at one end of the desired panoramic composition.
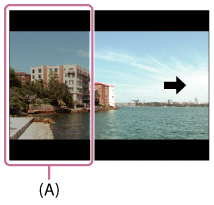
(A) This part will not be shot.
- Press the shutter button fully down.
- Pan the camera to the end of the guide in the direction of the arrow on the monitor.
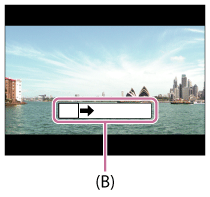
(B) Guidance bar
Note
- If the entire angle of the panoramic shot is not achieved within the set time, a gray area occurs in the composite image. If this happens, move the product faster to record the full panoramic image.
- When [Wide] is selected for [Panorama: Size], the entire angle of the panoramic shot may not be achieved within the given time. If this happens, try shooting after changing [Panorama: Size] to [Standard].
- Since several images are stitched together, the stitched part may not be recorded smoothly in some cases.
- The images may be blurred in dark scenes.
- When a light source such as a fluorescent light flickers, the brightness and color of a stitched image may not be consistent.
- When the whole angle of panoramic shooting and the AE/AF locked angle are very different in brightness and focus, the shooting may not be successful. If this happens, change the AE/AF locked angle and shoot again.
- The following situations are not suited for shooting Sweep Panorama:
• Moving subjects.
• Subjects that are too close to the product.
• Subjects with continuously similar patterns, such as the sky, beach, or lawn.
• Subjects with constant change such as waves or waterfalls.
• Subjects with brightness widely different from its surroundings such as the sun or a light bulb. - The Sweep Panorama shooting may be interrupted in the following situations.
• When the camera is panned too fast or too slow.
• The subject is too blurry.
Hint
- You can turn the control dial on the shooting screen to select the shooting direction.
Setup menu
- Monitor Brightness
You can adjust the brightness of the screen.
- Viewfinder Bright.
When using an electronic viewfinder, this product adjusts the brightness of the electronic viewfinder according to the surrounding environment.
- Finder Color Temp.
Adjusts the color temperature of the electronic viewfinder.
- Upload Settings(Eye-Fi)
Sets whether to use the upload function when using an Eye-Fi card (commercially available).
- Mode Dial Guide
You can display the description of a shooting mode when you turn the mode dial and change the settings available for that shooting mode.
- Delete confirm.
You can set whether [Delete] or [Cancel] is selected as the default setting on the delete confirmation screen.
- Cleaning Mode
Allows you to clean the image sensor.
- Remote Ctrl
You can operate this product and shoot images using the SHUTTER button, 2SEC button (2-second delay shutter), and START/STOP button (or Movie button (RMT-DSLR2 only)) on the RMT-DSLR1 Wireless Remote Commander (sold separately) and RMT-DSLR2 (sold separately).
- HDMI Resolution
When you connect the product to a high-definition (HD) TV with HDMI terminals using an HDMI cable (sold separately), you can select HDMI Resolution to output images to the TV.
- HDMI Info. Display
Selects whether to display the shooting information when this product and the TV are connected using an HDMI cable (sold separately).
- USB Connection
Select the appropriate USB connection method for each computer or USB device connected to this product.
- Date/Time Setup
Sets the date and time again.
- Format
Formats (initializes) the memory card.
- Select REC Folder
You can change the recording folder in which images are recorded.
- Recover Image DB
If image files were processed on a computer, problems may occur in the image database file. In such cases, the images on the memory card will not be played back on this product. If these problems happen, repair the file using [Recover Image DB].
- Display Media Info.
Displays the recordable time of movies and the number of recordable still images for the inserted memory card.
- Version
Displays the version of this product, lens, and Mount Adaptor.
- Setting Reset
Resets the product to the default settings.
Connecting this product and a Smartphone
PlayMemories Mobile
To use [Smart Remote Embedded] or [Send to Smartphone], etc., the application PlayMemories Mobile should be installed on your smartphone.
For details on PlayMemories Mobile, refer to the support page (http://www.sony.net/pmm/).
Connecting an Android smartphone to this product
- Launch PlayMemories Mobile on your smartphone.
- Select the model name of this product (DIRECT-xxxx: xxxx).

- Input the password that is displayed on this product.
The smartphone is connected to the product.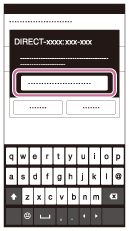
Viewing on computers
PlayMemories Home
With PlayMemories Home, you can do the following:
- You can import images shot with this product to your computer.
- You can play back the images imported to your computer.
- You can share your images using PlayMemories Online.
Also for Windows, you can do the following:
- You can organize images on the computer on a calendar by shooting dates to view them.
- You can edit and correct images, such as by trimming and resizing.
- You can create a Blu-ray Disc, AVCHD disc, or DVD-Video disc from AVCHD movies imported to a computer.
- You can upload images to a network service. (An internet connection is required.)
- For other details, please refer to the Help of PlayMemories Home.
- An Internet connection is required to use PlayMemories Online or other network services. PlayMemories Online or other network services may not be available in some countries or regions.
Installing PlayMemories Home
- Using the Internet browser on your computer, go to the following URL and install PlayMemories Home.
• Proceed with the installation by following the instructions on the screen.
• When the installation is completed, PlayMemories Home starts up.
• If PMB (Picture Motion Browser) supplied with a product that was purchased before 2011 has already been installed on the computer, PMB will be overwritten by PlayMemories Home. Please use PlayMemories Home. - Connect the product and your computer using the supplied micro USB cable.
• New functions may be added to PlayMemories Home. Even if PlayMemories Home has already been installed on your computer, connect this product and your computer again.
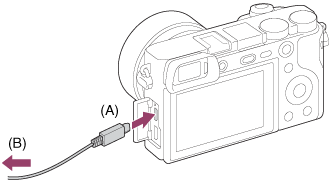
A: To the Multi/Micro USB Terminal
B: To the USB jack of the computer
Note
- Log on as Administrator.
- It may be necessary to restart your computer. When the restart confirmation message appears, restart the computer following the instructions on the screen.
- DirectX may be installed depending on your computer’s system environment.
Hint
- For details on PlayMemories Home, refer to the Help of PlayMemories Home or the PlayMemories Home support page (http://www.sony.co.jp/pmh-se/)
Troubleshooting
If you experience trouble with the product, try the following solutions.
- Check the items under “Troubleshooting”, then check the product.
- Remove the battery pack, wait for about one minute, re-insert the battery pack, and then turn on the power.
- Initialize the settings.
- Consult your dealer or local authorized service facility. Additional information on this product and answers to frequently asked questions can be found on our Customer Support Website.
http://www.sony.net/
Warning messages
Set Area/Date/Time.
- Set the area, date, and time. If you have not used the product for a long time, charge the internal rechargeable backup battery.
Unable to use a memory card. Format?
- The memory card was formatted on a computer and the file format was modified. Select [Enter], and then format the memory card. You can use the memory card again, however, all previous data in the memory card is erased. It may take some time to complete the format. If the message still appears, change the memory card.
Memory Card Error
- An incompatible memory card is inserted.
- Formatting has failed. Format the memory card again.
Unable to read the memory card. Reinsert the memory card.
- An incompatible memory card is inserted.
- The memory card is damaged.
- The terminal section of the memory card is dirty.
This memory card may not be capable of recording and playing normally.
- An incompatible memory card is inserted.
Processing…
- When performing noise reduction, the reduction process takes place. You cannot do any further shooting during this reduction process.
Unable to display.
- Images recorded with other products or images modified with a computer may not be displayed.
Cannot recognize lens. Attach it properly.
- The lens is not attached properly, or the lens is not attached. If the message appears when a lens is attached, reattach the lens. If the message appears frequently, check whether the contacts of the lens and product are clean or not.
- When attaching the product to an astronomical telescope or something similar, set [Release w/o Lens] to [Enable].
- The SteadyShot function does not work. You can continue to shoot but the SteadyShot function will not work. Turn the product off and on again. If this icon does not disappear, consult your Sony dealer or local authorized Sony service facility.
- The retractable lens with power zoom is retracted. Turn off the product and eject the battery pack, then reinsert the battery pack.
Unable to print.
- You tried to mark RAW images with a DPOF mark.
Internal temp. high. Allow it to cool.
- The product has become hot because you have been shooting continuously. Turn the power off. Cool the product and wait until the product is ready to shoot again.
The recording is unavailable in this movie format.
- Set File Format to [MP4].
- The number of images exceeds that for which date management in a database file by the product is possible.
- Unable to register to the database file. Import all the images to a computer and recover the memory card.
Image Database File error
- There is something wrong with the Image Database File. Select [Setup] → [Recover Image DB].
Camera Error. Turn power off then on.
- Remove the battery pack, and then re-insert it. If the message appears frequently, consult your Sony dealer or local authorized Sony service facility.
Unable to rotate the image.
- Images recorded with other products may not be enlarged or rotated.
FAQS About Sony Alpha A6600 Mirrorless Camera
Is there a video time limit on the Sony A6600?
no time limit on recording
What is the Sony A6600’s maximum shutter speed?
1/4000 sec
Is there image stabilization on the A6600?
There is in-body image stabilization (IBIS) on the Sony a6600.
Is the Sony A6600 weatherproof?
weather-sealed
A6600 has a silent shutter, right?
Both an electronic front-curtain shutter (EFCS) and a silent, totally electronic shutter are possibilities for the a6600.
What is the charging time for the Sony A6600?
The charging process takes about 285 minutes.
Is the A6600 a reliable camera?
Almost any photographer would benefit from the A6600.
The Sony A6600 can it record slow motion?
Slow-motion recording allows you to capture a moment that might otherwise be impossible to see.
Which ISO setting is ideal for Sony A6600 video?
Images captured at ISO settings of up to ISO3200 and ISO6400 display minimal noise.
What kind of sensor is in an A6600?
APS-C 24MP sensor
Possesses the Sony A6600 4K video?
HLG (Hybrid Log-Gamma) video capability and 4K/30p video recording are both available.
For more manuals by Sony, Visit Manualsdock
[embeddoc url=”https://manualsdock.com/wp-content/uploads/2023/09/Sony-Alpha-A6600-Mirrorless-Camera-Help-Guide.pdf” download=”all”]


