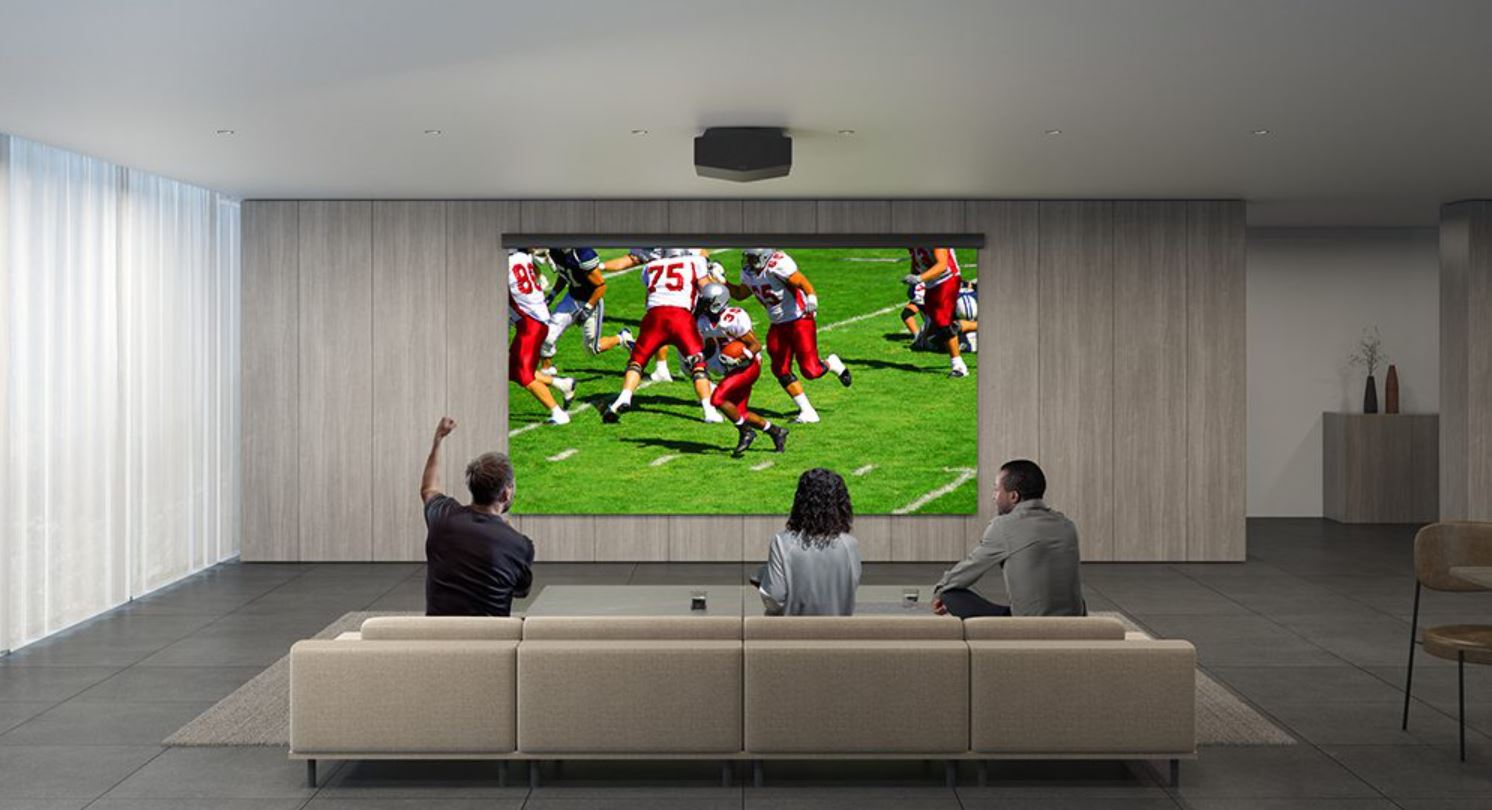
Sony VPL-XW5000ES 4K HDR Laser Home Theater Projector
About SONY
Sony was founded in 1946 by Masaru Ibuka and Akio Morita, originally as Tokyo Tsushin Kogyo. The company started with a focus on producing innovative consumer electronics, such as radios and tape recorders, and later expanded into various other areas, including televisions, audio equipment, cameras, video game consoles, and mobile devices.
Here are some key aspects and divisions of Sony:
- Electronics: Sony is widely recognized for its wide range of consumer electronics, including televisions, home audio systems, digital cameras, smartphones, tablets, laptops, and gaming consoles. The company has been at the forefront of technological advancements and has introduced many groundbreaking products over the years.
- Entertainment: Sony is also heavily involved in the entertainment industry. It owns and operates Sony Picture Entertainment, which produces and distributes movies and television shows globally. Additionally, Sony Music Entertainment is one of the largest music labels in the world, representing a wide array of artists across various genres.
- PlayStation: Sony’s PlayStation brand is a dominant force in the gaming industry. The PlayStation consoles, including the latest PlayStation 5, have gained immense popularity among gamers worldwide. Sony also develops and publishes a range of video games through its subsidiary, Sony Interactive Entertainment.
- Imaging: Sony is a major player in the digital imaging market, producing high-quality cameras, lenses, and other imaging equipment. Its Alpha series of mirrorless cameras has garnered critical acclaim and is favored by both amateur and professional photographers.
Sony continues to innovate and expand its presence in different sectors, including virtual reality, robotics, and artificial intelligence. The company is known for its commitment to technological advancements, design excellence, and delivering high-quality products and experiences to its customers.
Before Use
Checking the Supplied Accessories
Check that the following components are included. The () indicates the quantity of the component.
- Remote control
• VPL-XW7000/VPL-XW6000: RM-PJ24 (1)
• VPL-XW5000: RM-PJ28 (1) - Size AA (R6) batteries (2)
- Lens cap (1)
• When you purchase the projector, a lens cap is on the lens. - AC power cord (1)
- Setup Guide (1)
Inserting the Batteries into the Remote Control
Insert two size-AA (R6) batteries into the remote control as follows.
If you cannot operate the unit with the remote control, replace both batteries with new ones.
-
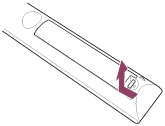
Open the lid by lifting it up while lightly pushing its claw at the bottom of the back of the remote control.
-
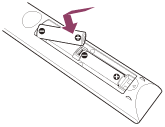
Insert the batteries from the negative side.
Caution when handling the remote control
- Handle the remote control with care. Do not drop it, and do not step on or spill liquids on it.
- Do not place the remote control in a location near a heat source, a place subject to direct sunlight, or a damp room.
Removing the Lens Cap
Remove the lens cap before you use the projector.
Notes on the lens cap (VPL-XW7000/VPL-XW6000)
When removing the lens cap
When removing the lens cap, hold the parts other than the catches and pull them toward you. If you pull while holding the catches, the lens may be damaged.
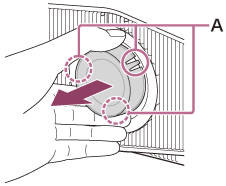
A: Catches
When attaching the lens cap
When attaching the lens cap, be sure to hook the catches of the lens cap on the notches of the lens to prevent it from falling out.
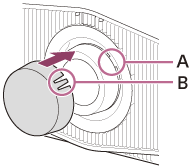
A: Notch
B: Catch
Note
- The positions of the notches on the lens may differ from the ones shown in the figure.
Parts and Controls (Main Unit) (VPL-XW5000)
Front/Right Side/Top
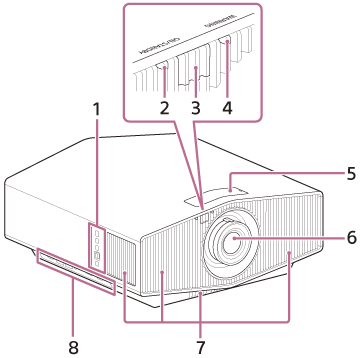
- Control panel
- ON/STANDBY indicator
- Remote control detector
- WARNING indicator
- Lens shift dials
- Projection lens
- Ventilation holes (intake)
- Terminals
Note
- If you look through the projection lens while the unit is projecting, the light may damage your eyes. Take special caution when using the unit around children.
Control panel and terminals
Control panel

- On/Standby button
- INPUT button
- MENU button
- Up/Down/Left/Right/ENTER button
- LENS button
Hint
- The buttons on the control panel of the main unit function in the same way as those on the remote control.
Terminals

- LAN terminal
- HDMI 1/HDMI 2 terminal
- TRIGGER terminal
- IR IN terminal
• Inputs signal to control the projector. When connecting to the terminal, the remote control detector does not work with the remote control. - REMOTE terminal
• Connects to a control system such as a computer for remote control. - USB terminal
• Terminal for software update.
Rear/Left Side
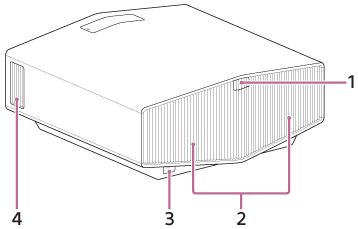
- Remote control detector
- Ventilation holes (exhaust)
- AC IN socket
- Ventilation holes (intake)
Bottom
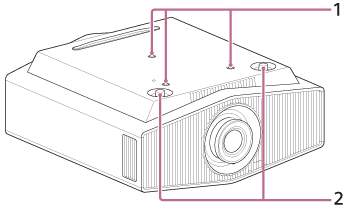
- Projector suspension support attaching hole
- Front feet (adjustable)
Installation
Installing the Projector
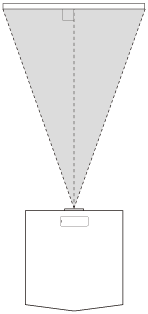
The installation distance between the projector and a screen varies depending on the screen size (projection size) and whether or not you use the lens shift feature. Install the projector according to the screen size.
-
Position the unit so that the lens is parallel to the screen.
-
After connecting the AC power cord to the unit, plug the AC power cord into a wall outlet.
• The ON/STANDBY indicator lights in red and the projector goes into standby.

-
Turn on the unit.
• Press the On/Standby button.
• The ON/STANDBY indicator flashes in green, then it lights in green.
-
Project an image on the screen to adjust the image position so that it fits the screen.
Note
- If using a screen with an uneven surface, stripe patterns may rarely appear on the screen depending on the distance between the projector and screen and/or the zoom magnification. This does not indicate a malfunction.
Adjusting the Position of the Projected Image (VPL-XW5000)
Hint
- Focus adjustment
The projection lens of the high-brightness projector is thermally affected by the light from the light source. Therefore, the focus is not stable immediately after turning on the power. To adjust the focus more precisely, it is recommended to adjust the focus after 30 minutes or more have elapsed since the projector has been turned on, and after the lens adjustment window (test pattern) has been displayed for 2 minutes or more.
Note
- Depending on the installation location of the projector, you may not be able to control it with the remote control. In that case, use the remote control by pointing it towards the remote control detector on the projector or towards the screen.
- Do not touch the lens when you adjust the image position. Your fingers may be pinched when the lens extends/retracts.
- When installing the unit on the ceiling and opening the lid of the shift dial, the lid may fall. Be careful when opening and closing the lid, and operating the dial.
- Note that if the unit is tilted up or down, the projected image will be distorted in a trapezoidal shape.
- Be careful not to pinch your fingers when rotating the front feet (adjustable).
-
Press the LENS button on the control panel or the PATTERN button on the remote control to display a test signal for performing adjustments.
-
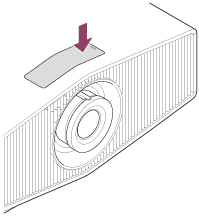
Push the lid on the top of the unit to open it, then move both lens shift dials to adjust the picture position.
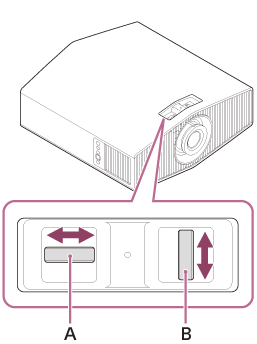
A: To adjust the vertical position
B: To adjust the horizontal position
After adjusting the picture position, attach the lid to its original position.
-
Adjust the picture size using the zoom lever.

A: Zoom lever
-
Adjust the focus using the focus ring.
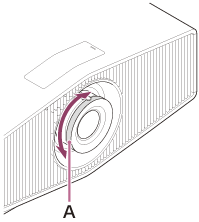
A: Focus ring
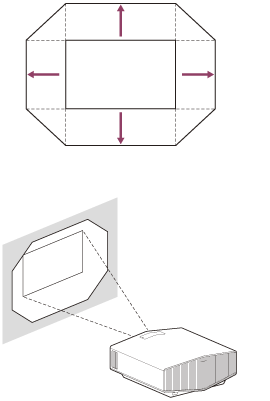
Range of movement on the projected image
You can move the projected image only within the octagon area shown in the figure below. The movable range depends on the lens or the aspect ratio of the projected image.
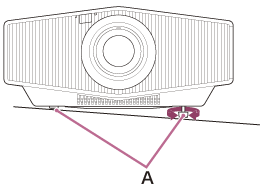
To adjust the tilt of the installation surface
If the unit is installed on an uneven surface, use the front feet (adjustable) (A) to keep the unit level.
Lens adjustment window (test pattern)
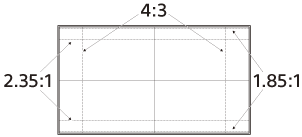
The dashed lines show the angle of view of each aspect ratio.
Precautions When Connecting
- Turn off all devices before making any connections.
- Use the proper cables for each connection.
- Insert the cable plugs firmly; Loose connections may reduce the performance of picture signals or cause a malfunction. When unplugging a cable, be sure to grip the plug, not the cable itself.
- For more information, refer also to the instruction manual of the device to be connected.
Connecting to a Computer
Connect the HDMI input on the projector to the monitor output on the computer with an HDMI cable (not supplied).
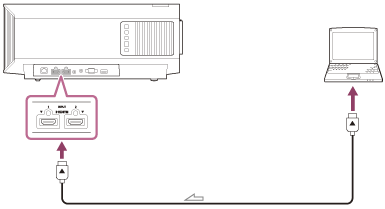
Icon: Signal flow
Note
- Use a “Premium High Speed” HDMI cable on which the cable type logo is specified. If using a cable other than a Premium High-Speed cable, 4K images may not be displayed correctly.
- When connecting an HDMI cable to the projector, make sure that the mark on the upper side of the HDMI terminal on the projector and the mark on the connector of the cable are facing each other.
- If an image from a device connected with an HDMI cable is not displayed correctly, check the settings of the connected device.
- If the signal is set to be output to both a computer display and an external monitor, an image may not be displayed correctly on the projector. Set your computer to output the signal to only the external monitor. For settings of the computer, consult with the manufacturer of the computer.
Projecting
Selecting an Aspect Ratio According to an Image
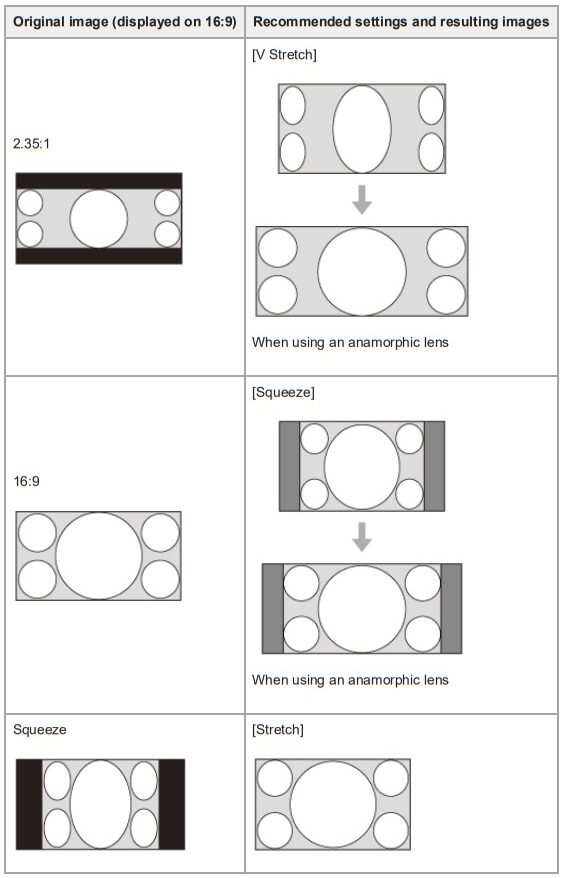
You can select an aspect ratio best suited for an image.
-
Press the ASPECT button.
Each time you press the button, you can select the [Aspect] setting.
You can also select it using [Aspect] in the [Screen].

Notes on selecting an aspect setting
- If you select an aspect setting different from the original one, such as a TV program, a projected image will be displayed differently from the original image. Pay attention when selecting the aspect setting.
- Note that if the unit is used for profit or for public viewing in a cafe or hotel, modifying the original image, such as dividing, shrinking, or stretching a display, by changing the aspect may constitute an infringement of the rights of authors or producers, which are legally protected.
Note
- Selectable aspect settings vary depending on an input signal.
- When a computer signal is input, you cannot select the aspect setting.
Selecting the Picture Viewing Mode
You can select the image quality that best suits the type of image source or room conditions.
You can save and use different preset settings for 2D and 3D respectively. (VPL-XW7000/VPL-XW6000)
-
Press the CALIBRATED PRESET button with the desired picture mode.
Settings
- CINEMA FILM 1 ([Cinema Film 1])
Image quality suited for reproducing the wide dynamic and clear images typical of master positive film. - CINEMA FILM 2 ([Cinema Film 2])
Image quality suited for reproducing the rich tone and color typical of a movie theater, based on [Cinema Film 1]. - REF ([Reference])
Image quality is suited for reproducing the original image quality faithfully, or to enjoy the image quality without any adjustment. - TV ([TV])
Image quality suited for watching TV programs, sports, concerts, and other video images. - PHOTO ([Photo])
Image quality is suited for viewing still images taken with a digital camera and other devices. - GAME ([Game])
Image quality suited for gaming, with well-modulated colors and fast response. - BRT CINE ([Bright Cinema])
Image quality suited for watching movies in a bright room. - BRT TV ([Bright TV])
Image quality suited for watching TV programs, sports, concerts, and other video images in a bright room. - [IMAX Enhanced]
Image quality suited for watching IMAX Enhanced content.
Press the MENU button and select a [Calib. Preset] in the [Picture] menu.
Setup Menu
Menu Operation: Menu Position
You can change the display position for the on-screen menu.
-
Press the MENU button.
-
Select [Setup] – [Menu Position] – the desired setting.
Settings
- [Bottom Left]
The menu is displayed on the bottom left of the screen.
- [Center]
The menu is displayed in the center of the screen.
Menu Operation: High Altitude Mode
You can set it according to the atmospheric pressure at the installation location.
-
Press the MENU button.
-
Select [Setup] – [High Altitude Mode] – the desired setting.
Settings
- [Level 2]
Select when using the projector in a location at an altitude of 1,800 m (approx. 5,900 ft) or higher.
- [Level 1]
Select when using the projector in a location at an altitude from 1,000 m (approx. 3,280 ft) to 1,800 m (approx. 5,900 ft).
- [Off]
Select when using the projector on level ground.
Hint
- When [Level 2] or [Level 1] is selected, fan noise becomes slightly louder since the fan rotation speed increases. In a high-temperature environment, the laser light is automatically adjusted according to the intake air temperature, and the brightness will be slightly reduced.
Menu Operation: Network Management
You can configure whether to enable the network function.
-
Press the MENU button.
-
Select [Setup] – [Network Management] – [On] or [Off].
When constantly communicating with the projector control device in a networked environment, select [On].
Hint
- When [Network Management] is set to [On], the time until an image is displayed after pressing the (On/Standby) button can be shortened.
Note
- When [Network Management] is set to [On], the network function is always enabled. Setting to [On] increases the power consumption.
Information Menu
Viewing the Projector Information
-
Press the MENU button.
-
Select [Information].
Available items
- [Model Name]
Displays the model name. - [Serial No.]
Displays the serial number. - Signal type
Displays the resolution of the input signal that you are selecting. When input signals with the 3D information are input, the resolution and 3D format type are displayed. (VPL-XW7000/VPL-XW6000) - [Color Format]
Displays the color format of the input signal that you are selecting. - [Color Space]
Displays the color space of the input signal that you are selecting ([BT.601], [BT.709], or [BT.2020]). - [HDR Format]
When the input signal is compatible with HDR, [HDR10] or [HLG] is displayed according to the input signal. - [Software Version]
Displays the software version. - [Light Timer]
Displays how long the light has been turned on (total usage). - [Intake Air Temp.]
Displays the intake air temperature of the projector.
About the Preset Memory
This projector has the default image data (preset memory) to display an image appropriately according to the projectable signals and formats. When the signal corresponding to the preset memory is input, the projector automatically detects the input signal and recalls the data from the preset memory to project an appropriate image.
The input signal type is displayed in the [Information] menu.
Note
- You cannot adjust or change these menu items.
- Depending on the input computer signal, some parts of the projection image may be hidden or displayed incorrectly.
Uses for Network Features
Connecting a projector to a network allows you to do the following.
Use the projector with only the necessary functions enabled.
- Check the current state of the projector using a web browser.
- Configure network settings for the projector.
- Control the projector with various types of network surveillance and control protocol (Advertisement, ADCP, PJ Talk, SNMP, AMX DP (Dynamic Device Discovery Protocol), Crestron Connected, Control4).
- Control the projector using a web browser.
- Control the projector remotely using a web browser.
Note
- When you connect the projector to a network, consult the network administrator. Use the projector in a network environment with security measures.
- When you use the projector by connecting to a network, access the Control window via a web browser to change the access limitation of the factory preset values. We recommend that you change your password periodically.
- When you have finished the configuration on a web browser, close the web browser to log out.
- The images used in the explanation are for reference only. Some images may differ depending on the model you are using. We appreciate your understanding.
- Supported web browsers
Microsoft Edge (Chromium), Google Chrome, Safari - Only English is available as a display language.
- If a web browser of your computer is set to “Use a proxy server” when you access the projector from your computer, click the check mark to set the web browser not to use a proxy server.
- SNMP, AMX DP, Crestron Connected, and Control4 are not compatible with IPv6.
- These network features are available while the projector is turned on.
Accessibility Features
This unit has functions that allow you to perform menu operations, turn the unit on/off, and change the projector’s input source via the Internet using a web browser on your smartphone/computer.
You can also use the text-to-speech function on your smartphone/computer to have documents read out loud.
-
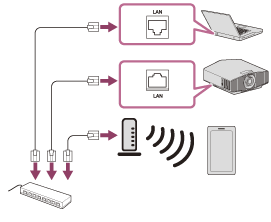
Connect the projector and smartphone/computer to a hub or router using LAN cables (straight) (not supplied) or Wi-Fi.
-
Press the MENU button.
-
Select [Setup], then set [Web Control UI] to [On].
-
Select [Setup], then set [Network Management] to [On].
-
Select [Installation], then configure the network settings under [Network Setting].
For details on the setting method, see the “Menu Operation: Network Setting ” page.
-
Start a web browser, enter the following into the address field, then press the Enter key.
http://xxx.xxx.xxx.xxx (xxx.xxx.xxx.xxx: IP address of the projector)
When connecting by the IPv6 address
The IP address of the projector can be confirmed from [Network Setting] in the [Installation] menu.
The authentication window is displayed in the browser.
When you access for the first time, enter “root” as the user name and “Projector” as the password in the authentication window.
When you log in for the first time, the window that prompts you to change the password is displayed. Follow the instructions on the screen to change the password.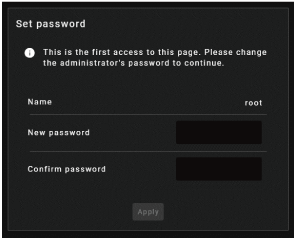
You can change the password from [Password] on the [Advanced Settings] page.
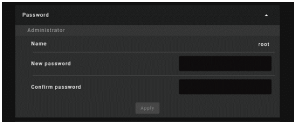
When you change the password, enter a new password.
The password should be 8 to 16 characters which includes both alphabet and numeric characters. Alphabets are case-sensitive.
The initial password “Projector” cannot be set as the new password. -
Enable the accessibility features on your smartphone/computer.
-
Operate the projector from web pages.
Hint
- Once the settings have been configured, it can be used only by performing Step 6 the next time.
Note
- Supported web browsers
Microsoft Edge (Chromium), Google Chrome, Safari - Recommended text-to-speech software
• Windows: NVDA
• Android: Talkback
• iOS: VoiceOver - For details on how to use text-to-speech software, refer to an instruction manual or website of each text-to-speech software.
- Only English is available as a display language.
- If you forget your password, contact qualified Sony personnel.
The password will be reconfigured with your permission.
Precautions
Notes on Security
- SONY WILL NOT BE LIABLE FOR DAMAGES OF ANY KIND RESULTING FROM A FAILURE TO IMPLEMENT PROPER SECURITY MEASURES ON TRANSMISSION DEVICES, UNAVOIDABLE DATA LEAKS RESULTING FROM TRANSMISSION SPECIFICATIONS, OR SECURITY PROBLEMS OF ANY KIND.
- Depending on the operating environment, unauthorized third parties on the network may be able to access the unit. When connecting the unit to the network, be sure to confirm that the network is protected securely.
- From a safety standpoint, when using the unit connected to the network, it is strongly recommended to access the Control window via a Web browser and change the access limitation settings from the factory preset values.
Also, it is recommended that you set a password with a sufficiently long character string that is hard to guess by others and that you store it safely. - Do not browse any other website in the Web browser while making settings or after making settings. Since the login status remains in the Web browser, close the Web browser when you complete the settings to prevent unauthorized third parties from using the unit or harmful programs from running.
- When connecting this product to a network, connect via a system that provides a protection function, such as a router or firewall. If connected without such protection, security issues may occur.
Do not place this product close to medical devices
This product (including accessories) has a magnet(s) that may interfere with pacemakers, programmable shunt valves for hydrocephalus treatment, or other medical devices. Do not place this product close to persons who use such medical devices. Consult your doctor before using this product if you use any such medical device.
Disclaimer
SONY WILL NOT BE LIABLE FOR DAMAGES OF ANY KIND RESULTING FROM THE USE OF THIS UNIT FOR PURPOSES OTHER THAN GENERAL HOME USE, EITHER DURING THE WARRANTY PERIOD OR AFTER EXPIRATION OF THE WARRANTY.
Specifications
VPL-XW5000
Projection System3 LCD system
Display device• Size of effective display area: SXRD 0.61-inch (15.4 mm) × 3
• Number of pixels: 3840 × 2160 × 3 pixels
1.6 times zoom lens (manual), F2.50 to F2.99
Projection image size60-inch to 300-inch (1,524 mm to 7,620 mm)
Light sourceLaser diode
Inputs/Outputs- HDMI terminal (HDCP 2.3): 2 system
- REMOTE terminal: RS-232C, D-sub 9-pin (male)
- LAN terminal: RJ45, 10BASE-T/100BASE-TX
- USB terminal: Type A, DC 5 V, Max. 500 mA
- IR IN terminal: 1 system, mini jack
- TRIGGER terminal: 1 system, mini jack, DC 12 V, Max. 100 mA
460 mm × 200 mm × 472 mm (18 1/8 inches × 7 7/8 inches × 18 19/32 inches)
Power requirementsAC 100 V to 240 V, 3.5 A to 1.5 A, 50/60 Hz
Standby power consumption (Standby mode)0.3 W (when [Remote Start] is set to [Off])
Standby power consumption (Network standby mode)• 0.5 W (LAN) (when [Remote Start] is set to [On])
• When a LAN terminal is not connected, it becomes a low power consumption mode (0.4 W).
5°C to 35°C (41°F to 95°F) (20% to 80% (no condensation))
Supplied accessories- Remote control (RM-PJ28) (1)
- Size AA (R6) batteries (2)
- Lens cap (1)
- AC power cord (1)
- Setup Guide (1)
Design, specifications, and optional accessories are subject to change without notice.
Note
- The values for mass and dimensions are approximated.
- Not all optional accessories are available in all countries and areas. Please check with your local Sony Authorized Dealer.
- Information on accessories in this manual is current as of April 2022.
About the Help Guide
- To use the latest features described in the Help Guide, you may need to update the projector’s software. For details about software updates, see the “Updating the Software” page.
- The setting item names described in the Help Guide may differ from those displayed on the projector depending on the release date of the projector.
- The images and illustrations used in the Help Guide may differ from your projector.
- Design and specifications are subject to change without notice for product improvement.
FAQS About Sony VPL-XW5000ES 4K HDR Laser Home Theater Projector
Is 3D supported by the Sony VPL-XW5000ES?
The XW5000ES does not support 3D anymore.
What model number does the Sony VPL-XW5000ES replace?
The VPL-XW6000ES ($11,000 SRP) is an upgrade from the XW5000ES that adds a higher-end motorized ACF lens with 2.1:1 zoom and picture position memory.
How much does a Sony 5000 ES projector cost?
Rs 650000
What is the Sony VPL-XW5000ES’s black level?
8,700:1 contrast and deep blacks
What is the Sony XW5000’s refresh rate?
The projector features a 120Hz refresh rate.
What is the VPL XW5000ES’s reaction time?
2K 120 Hz input signals with an input latency of 13 ms, as well as 4K 60 Hz input signals.
What are the Sony xw5000’s dimensions?
W 18 1/8 x H 7 7/8 x D 18 19/32 in = W 460 x H 200 x D 472 mm.
What is the Sony 5000es’ contrast ratio?
One: (dynamic) infinity
For more manuals by Sony, Visit Manualsdock
[embeddoc url=”https://manualsdock.com/wp-content/uploads/2023/09/Sony-VPL-XW5000ES-4K-HDR-Laser-Home-Theater-Projector-Help-Guide.pdf” download=”all”]

