
EPSON ET-2800 Color Printer
About EPSON
One of the biggest producers of computer printers and equipment for information and imaging is the Japanese multinational electronics corporation Seiko Epson Corporation, also known as Epson.
Product Basics
See these sections to learn about the basic features of your product.
- Product Parts Locations
- Using the Control Panel
- Using Power Saving Settings
- Using the Epson Smart Panel Mobile App
- Voice-activated Printing
- Epson Connect Solutions for Smartphones, Tablets, and More Using AirPrint
- Setting Up Printing on a Chromebook
- Android Printing Using the Epson Print Enabler
- Using Fire OS Printing
- Using Windows 10 Mobile Printing
- Using Epson Print and Scan App with Windows Tablets
- Using the Mopria Print Service
Product Parts Locations
See these sections to identify the parts on your product.
- Product Parts – Front
- Product Parts – Inside
- Product Parts – Back
- Parent topic: Product Basics
Product Parts – Front

- Rear paper feeder
- Paper support
- Edge guides
- Feeder guard
- Output tray
- Paper stopper
Parent topic: Product Parts Locations
Product Parts – Inside

- Document cover
- Scanner glass
- Control panel

- Scanner unit
- Ink tank cap
- Ink tank cover
- Ink tank unit
- Ink tanks
- Inner cover
- Scanner unit support
- Print head
Parent topic: Product Parts Locations
Product Parts – Back

- AC inlet
- USB port
Parent topic: Product Parts Locations
Using the Control Panel
See these sections to learn about the control panel and select control panel settings.
- Control Panel Buttons and Lights
- Entering Characters on the LCD Screen
- Changing LCD Screen Language
- Preventing PC Connection via USB
- Parent topic: Product Basics
Control Panel Buttons and Lights

- power button and light
- home button
- LCD screen
- help button
- Arrow buttons and OK button
- stop button
- start button
- reset button
- back button
Status Icon Information
Parent topic: Using the Control Panel
Your product displays status icons on the LCD screen for certain product status conditions.

Parent topic: Control Panel Buttons and Lights
Entering Characters on the LCD Screen
Follow these guidelines to enter characters for passwords and other settings.
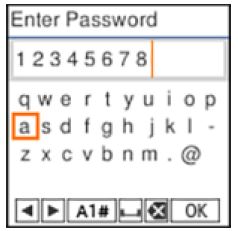
- To enter characters, press the buttons on the numeric keypad.
- To change the character case or type, select A1# or press the reset button.
- To move the cursor to the right or to add a space, press the right arrow button.
- To move the cursor to the left, press the left arrow button.
- To enter symbols, press 1 on the numeric keypad.
- To delete the previous character, select

- To delete all the characters, press the C clear button.
Parent topic: Using the Control Panel
Changing LCD Screen Language
You can change the language used on the LCD screen.
- Press the home button, if necessary.
- Press the arrow buttons to select Settings and press the OK button.
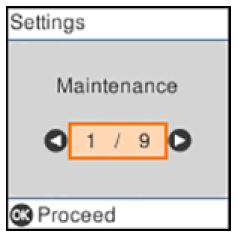
- Select Epson EcoTank Printer Setup and press the OK button.
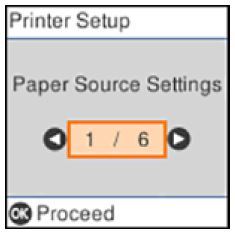
- Select Language and press the OK button.
- Select a language and press the OK button.
- Press the home button to exit.
Parent topic: Using the Control Panel
Preventing PC Connection via USB
You can disable access to your product from a USB-connected computer. This restricts non-network access to the product.
- Press the
 home button, if necessary.
 - Select Settings and press the OK button.
- Select Epson EcoTank Printer Setup and press the OK button.
- Select PC Connection via USB and press the OK button.
You see a screen like this:
- Select Disable and press the OK button.
- Do one of the following:
- Press the OK button to restart the product.
- Press the stop button to return to the Epson EcoTank Printer Setup screen without restarting the product. Note: The change will not take effect until the product is restarted.
Parent topic: Using the Control Panel
Using Power Saving Settings
Your product enters sleep mode automatically and turns off the LCD screen if it is not used for a period of time. You can make the time period shorter and select other options to save energy and resources.
- Changing the Sleep Timer Setting from the Control Panel
- Changing the Power Off Timer Setting from the Control Panel
- Parent topic: Product Basics
Changing the Sleep Timer Setting from the Control Panel
You can use the product’s control panel to change the time period before the product enters sleep mode.
- Press the
 home button, if necessary.
 - Press the arrow buttons to select Settings and press the OK button.
- Select Epson EcoTank Printer Setup and press the OK button.
You see this screen:
- Select Sleep Timer and press the OK button.
You see this screen:
- Use the arrow buttons to adjust the number of minutes of inactivity before the product enters sleep mode. Then press the OK button.
- Press the
 home button to exit.
Changing the Power Off Timer Setting from the Control Panel
You can use the product’s control panel to change the time period before the printer turns off automatically.
- Press the
 home button, if necessary.
 - Press the arrow buttons to select Settings and press the OK button.
- Select Printer Setup and press the OK button.
You see this screen:
- Select Power Off Timer and press the OK button.
You see this screen:
- Select the length of time after which you want the product to automatically turn off when it is not in use. Then press the OK button.
- Press the
 home button to exit.
Using the Epson Smart Panel Mobile App
Use this free Apple and Android app to set up your Epson product and then print, copy, or scan with your networked Epson product. Epson Smart Panel also lets you check ink levels and product status.
- Visit epson.com/connect (U.S) or epson.ca/connect (Canada) to learn more about Epson Smart Panel and check the compatibility of your mobile device.
- Download Epson Smart Panel from the Apple App Store or Google Play.
- Connect your mobile device to the wireless network that you want to connect your product to or to the same wireless network as your product (if your product is already set up).
- Do one of the following:
- If you haven’t set up your product, open Epson Smart Panel and follow the instructions to set up your product.
- If your product is already set up, open Epson Smart Panel and select your Epson product, if necessary.
Now you are ready to print, copy, or scan with your mobile device and your Epson product.
Voice-activated Printing
Take advantage of voice-activated, hands-free printing from your Epson product with Alexa, Siri, and Google Assistant. Depending on which voice assistant you use, you can ask your product to print photos, calendars, recipes, photo props, and more. Click here for more information.
- Connect your product to your network. See the link below.
- Set up your product’s email address for use with Epson Connect. See the link below to activate it from the product control panel.
- Click here for instructions on how to set up your product and voice assistant to use the voice-activated printing feature.
Now you are ready to print with your voice and your Epson product.
Epson Connect Solutions for Smartphones, Tablets, and More
Use your smartphone, tablet, or computer to print and scan documents, photos, emails, and web pages from your home, office, or even across the globe.
Note: If you are using your Epson product with the Windows 10 S operating system, you cannot use the software described in this section. You also cannot download and install any Epson product software from the Epson website for use with Windows 10 S; you must obtain software only from the Windows Store.
Print from anywhere with these Epson Connect solutions:
- Epson Email Print
- Epson Remote Print
Scan and send a file as an email or upload it to an online service directly from your Epson product with Epson Scan to Cloud.
- Setting Up Epson Connect Services
- Using Epson Email Print
- Using Epson Remote Print
- Using Epson Scan to Cloud
- Parent topic: Product Basics
- Related tasks
- Android Printing Using the Epson Print Enabler
- Using Fire OS Printing
- Using Windows 10 Mobile Printing
- Using Epson Print and Scan App with Windows Tablets Using the Mopria Print Service
Setting Up Epson Connect Services
If you did not activate your product’s email address for use with Epson Connect when you set up your product, you can activate it using the product control panel.
- Press the
 home button, if necessary.
 - Press the left or right arrow button to select Settings and press the OK button.
- Press the arrow buttons to select Epson Connect Services and press the OK button. You see this screen:
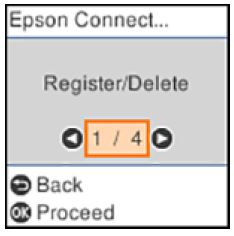
- Press the OK button to select Register/Delete.
- Press the OK button to select Yes.
- Follow the instructions on your screen to activate your product’s email address.
Using Epson Email Print
With Epson Email Print, you can print from any device that can send email, such as your smartphone, tablet, or laptop. Just activate your product’s unique email address. When you want to print, attach a PDF, Microsoft Office document, or photo to an email and send it to your product. Both the email and the attachments will print automatically.
- Connect your product to your network. See the link below.
- If you did not already set up Email Print when you installed your product software, see the link below to use your product control panel to activate your unique email address. Or visit epson.com/connect (U.S) or epson.ca/connect (Canada) to learn more about Email Print, create your Epson Connect account, and register your product to the Epson Connect service.
- Now you are ready to send and print emails to your product’s Email Print address.
Note: Go to epsonconnect.com and log into your Epson Connect account to personalize your product’s email, adjust print settings, and set up other Epson Connect services.
Using Epson Remote Print
With Epson Remote Print software, you can print from your laptop or desktop computer to an Epson Email-enabled product anywhere in the world.
- Connect your Epson product to your wireless network. See the link below.
- If you did not already set up an Epson Connect account when you installed your product software, visit epsonconnect.com to create your account and register your product to the Epson Connect service.
Note: Make a note of your product’s email address. - Visit epsonconnect.com to learn more about Remote Print and how to download the Remote Print Driver software.
- Download and install the Remote Print software.
- Enter the email address and optional access key of your Epson product during Remote Print setup.
- Now you are ready to print remotely. Select the print command in your laptop or desktop computer application and choose the Remote Print option for your Epson product.
Using Epson Scan to Cloud
The Epson Scan to Cloud service allows you to scan and send a file as an email or upload it to an online service directly from your Epson product. Register an email address or online services such as Box, DropBox, Evernote, or Google Drive with your Epson Connect account.
- Connect your Epson product to your network. See the link below.
- if you did not already set up an Epson Connect account when you installed your product software, visit epsonconnect.com to create your account and register your product to the Epson Connect service.
Note: Make a note of your product’s email address and password. - Visit epsonconnect.com to sign into your account with the email address and password you selected.
- Select your product, select Scan to Cloud, and select Destination List.
- Click Add, then follow the instructions on the screen to create your destination list.
- Now you are ready to use Scan to Cloud. Select the setting for scanning to Scan to Cloud on your Epson product control panel.
Using AirPrint
AirPrint enables instant wireless printing from iPhone, iPad, iPod touch, and Mac without the need to install drivers or download software.

Note: If you disabled paper configuration messages on your product control panel, you cannot use AirPrint. See the link below to enable the messages, if necessary.
- Load paper in your product.
- Set up your product for wireless printing. See the link below.
- Connect your Apple device to the same wireless network that your product is using.
- Print from your device to your product.
Note: For details, see the AirPrint page on the Apple website.
Setting Up Printing on a Chromebook
Your Epson inkjet printer supports native printing on Chromebook, allowing you to print from a Chromebook without drivers or cables.
For directions on setting up your printer, visit Setting Up Your Epson EcoTank Printer on Your Chromebook (U.S.) or Setting Up Your Epson Printer on Your Chromebook (Canada).
Android Printing Using the Epson Print Enabler
You can wirelessly print your documents, emails, photos, and web pages right from your Android phone or tablet (Android v4.4 or later). With a few taps, your Android device will discover your nearby Epson product and print.
- Connect your Epson product to your wireless network. See the link below.
- On your Android device, download the Epson Print Enabler plug-in from Google Play.
- Go to Settings on your Android device, select Printing, and enable the Epson plug-in, if necessary.
- Connect your Android device to the same wireless network as your product.
- Now you are ready to print. From an Android application such as Chrome or Gmail, tap the menu icon and print whatever is on the screen.
Note: If you do not see your product, tap All Printers and select your product.
Using Fire OS Printing
You can wirelessly print from Amazon Fire tablets and phones to your nearby networked Epson product. There is no software to download, no drivers to install, and no cables to connect. With just a few taps in Email, Calendar, Contacts, and WPS Office, you can send whatever is on the screen to an Epson product.
- Connect your Epson product to your wireless network. See the link below.
- Connect your Amazon device to the same wireless network as your product.
- Now you are ready to print. From your Amazon application, tap the print option and select your product to print whatever is on the screen.
Note: If you see a message telling you that a plug-in is required, tap OK and tap Download. If your Amazon Fire product uses Fire OS 5 and above, your device automatically uses the built-in Mopria Print Service app to print.
Using Windows 10 Mobile Printing
You can wirelessly print from Windows 10 Mobile tablets and phones to your nearby networked Epson product. There is no software to download, no drivers to install, and no cables to connect. Look for the print option in your Windows 10 application to send whatever is on the screen to an Epson product.
- Connect your Epson product to your wireless network. See the link below.
- Connect your Windows 10 Mobile device to the same wireless network as your product.
- Now you are ready to print. From your Windows 10 application, tap the print option and select your product to print whatever is on the screen.
Using Epson Print and Scan App with Windows Tablets
You can use this free app to print photos and scan from your Windows (Windows 8 or higher) Surface RT or Pro tablet with networked Epson products. The Epson Print and Scan app allows you to scan and capture images right to your tablet or to Microsoft OneDrive.
Note: The Epson Print and Scan app does not support Windows 10 Mobile printing and does not supply scanning functions for products without scanners.
- Connect your Epson product to your wireless network. See the link below.
- Download the Epson Print and Scan app from the Microsoft Windows Store.
- Connect your Windows tablet to the same wireless network as your product.
- Open the Epson Print and Scan app and select your Epson product. Now you are ready to print photos or scan.
Using the Mopria Print Service
You can use the Mopria Print Service to print from your Android phone or tablet (Android v4.4 or later) to your Epson product or any Mopria-certified product from other manufacturers. You can download the Mopria Print Service from Google Play.
Note: For details on the Mopria Print Service, click here (U.S.) or click here (Canada).
- Connect your Epson product to your wireless network. See the link below.
- On your Android device, download the Mopria Print Service app from Google Play.
Note: On some Samsung Galaxy devices, Mopria may come preinstalled. - Go to Settings on your Android device, select Printing, and enable the Mopria Print Service, if necessary.
- Connect your Android device to the same wireless network as your product.
- Now you are ready to print. From an Android application such as Chrome or Gmail, tap the menu icon and select Print. Then select All printers, select your Epson product, adjust your print settings, and print.
Wi-Fi Networking
See these sections to use your product on a Wi-Fi network.
- Network Security Recommendations
- Wi-Fi Infrastructure Mode Setup
- Wi-Fi Direct Mode Setup
- Wi-Fi Protected Setup (WPS)
- Printing a Network Status Sheet
- Printing a Network Connection Report
- Changing or Updating Network Connections
Network Security Recommendations
To help deter unauthorized access to your product over a network, you should protect your network environment using appropriate security measures. Security measures such as these can help deter threats such as loss of user data, use of telephone and fax lines, and other intrusions:
- Enable security on your wireless LAN
Enable the appropriate security on the wireless LAN you plan to use with your product. Network security such as a network password can deter interception of traffic over the wireless LAN. Your router may already have a default password enabled by your Internet service provider (ISP). See your ISP and router documentation for instructions on how to change the default password and better secure your network. - Connect your product only to a network protected by a firewall
Connecting your product directly to the Internet may leave it vulnerable to security threats. Instead, connect it to a router or other network connection protected by a firewall. Your router may already have a firewall set up by your Internet service provider; check with your ISP for confirmation. For best results, set up and use a private IP address for your network connection. - Change the default administrator password on your product
If your product has the option to set an administrator password, change the default administrator password to deter access by unauthorized users to personal data stored on your product, such as IDs, passwords, and contact lists.
Wi-Fi Infrastructure Mode Setup
You can set up your product to communicate with your computer using a wireless router or access point. The wireless router or access point can be connected to your computer over a wireless or wired network.

- Epson product
- Wireless router or access point
- Computer with a wireless interface
- Computer
- Internet
- Ethernet cable (used only for wired connection to the wireless router or access point)
Selecting Wireless Network Settings from the Control Panel
You can select or change wireless network settings using your product control panel.
To install your product on a wireless network, follow the instructions on the Start Here sheet and install the necessary software. The installer program guides you through network setup.
Note: Breakdown or repair of this product may cause loss of network data and settings. Epson is not responsible for backing up or recovering data and settings during or after the warranty period. We recommend that you make your own backup or print out your network data and settings.
- Press the
 home button, if necessary.
 - Press the arrow buttons to select Wi-Fi Setup and press the OK button. You see this screen:

- Press the arrow buttons to select Wi-Fi (Recommended) and press the OK button twice.
- Press the arrow buttons to select Wi-Fi Setup Wizard and press the OK button.
- Press the arrow buttons to select the name of your wireless network and press the OK button. If you do not see your wireless network’s name, you can enter it manually.
Note: To enter the wireless network name manually, select Other SSIDs and press the OK button. Enter your network name as described in the next step. - Enter your wireless password (or network name and then password).

- To enter characters, press the buttons on the numeric keypad.
- To change the character case or type, select A1# or press the reset button.
- To move the cursor to the right or add a space, press the right arrow button.
- To move the cursor to the left, press the left arrow button.
- To enter symbols, press 1 on the numeric keypad.
- To delete the previous character, select
 .
. - When you finish entering characters, select OK and press the OK button.
- If you want to print a network setup report, press the start button. (Otherwise, press the stop button.) Your product should now display a blue
 Wi-Fi icon on the LCD screen.
Note: If the![]() Wi-Fi icon is not displayed on the LCD screen as shown above, you may have selected the wrong network name or entered the password incorrectly. Repeat these steps to try again.
Wi-Fi icon is not displayed on the LCD screen as shown above, you may have selected the wrong network name or entered the password incorrectly. Repeat these steps to try again.
Wi-Fi Direct Mode Setup
You can set up your product to communicate directly with your computer or another device without requiring a wireless router or access point. In Wi-Fi Direct Mode, the product itself acts as a network access point for up to 8 devices.
- Epson product
- Computer with a wireless interface
- Other wireless devices
Enabling Wi-Fi Direct (Simple AP) Mode
You can enable Wi-Fi Direct mode to allow direct communication between your product and computer, mobile devices, or other devices (up to 8) without a wireless router or access point.
Note: Make sure the Epson Smart Panel app or another compatible Epson printing app is installed on your mobile device before connecting to the product.
- Press the home button, if necessary.
- Press the arrow buttons to select Wi-Fi Setup and press the OK button.
You see this screen: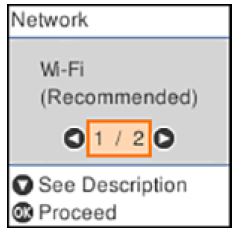
- Press the right arrow button to select Wi-Fi Direct and press the OK button.
- Press the OK button twice.
- Do one of the following:
- Open the Epson Smart Panel app on your device, then press the down arrow button on your product’s control panel to view the product information. Use the information on the product’s LCD screen to select your product in the Epson Smart Panel app. Skip to step 7.
- To connect without using the Epson Smart Panel app, press the left arrow button to select Other Methods and go to the next step.
- Do one of the following:
- For iOS devices, select iOS. Press the OK button, then scan the QR code with the camera app on your device and follow the instructions on your device.
- For other types of devices, select Other OS Devices. Press the down arrow button to display the product information, then use your device to select the Wi-Fi network name (SSID) displayed on the LCD screen and enter the password shown.
- Press the OK button to exit.
You see the![]() icon on the LCD screen and should be able to connect to your product directly from your computer or device, and then print.
icon on the LCD screen and should be able to connect to your product directly from your computer or device, and then print.
Note: If the![]() icon is displayed on the LCD screen, Wi-Fi Direct mode is not enabled. Repeat these steps to try again.
icon is displayed on the LCD screen, Wi-Fi Direct mode is not enabled. Repeat these steps to try again.
Wi-Fi Protected Setup (WPS)
If your network uses a WPS-enabled wireless router or access point, you can quickly connect your product to the network using Wi-Fi Protected Setup (WPS).
Note: To check if your router is WPS-enabled, look for a button labeled WPS on your router or access point. If there is no hardware button, there may be a virtual WPS button in the software for the device. Check your network product documentation for details.
Using WPS to Connect to a Network
If you have a WPS-enabled router or access point, you can use Wi-Fi Protected Setup (WPS) to connect your product to the network.
- Press the WPS button on your router.
- On the product, press the home button, if necessary.
- Press the arrow buttons to select Wi-Fi Setup then press the OK button.
You see this screen:
- Press the OK button twice.
You see this screen:
- Press the arrow buttons to select Push Button Setup (WPS) and press the OK button.
- Follow the instructions on the LCD screen to complete WPS setup.
If the network connection is successful, the blue Wi-Fi icon is displayed on the LCD screen. Note: If the Wi-Fi icon is not displayed on the LCD screen, repeat these steps to try again.
Changing a USB Connection to a Wi-Fi Connection
If you have already connected your product to your computer using a USB connection, you can change to a Wi-Fi connection.
- Disconnect the USB cable from your product.
- Uninstall your product software.
- Download and install your product software from the Epson website using the instructions on the Start Here sheet.
Connecting to a New Wi-Fi Router
If you change the wireless router you have been using on your network, you need to update your product’s Wi-Fi connection to the new router.
Note: If you switch to a 5 GHz wireless router, set the router to operate in dual band (2.4 GHz and
5 GHz) mode. If your router uses a single network name (SSID) for both the 2.4 GHz and 5 GHz bands, give each band its own network name (SSID) instead, such as Home Network 2.4 GHz and Home Network 5 GHz. See your router documentation for instructions.
- Do one of the following:
- Windows: Uninstall your product software.
- Mac: Go to the next step.
- Download and install your product software from the Epson website using the instructions on the Start Here sheet.
Disabling Wi-Fi Features
You may need to disable your product’s Wi-Fi features if you change your network connection type or need to solve a problem with your network connection.
Note: Before disabling Wi-Fi features, make a note of your product’s SSID (network name) and password, and any network settings selected for the Epson Connect services you may use.
- Press the home button, if necessary.
- Press the arrow buttons to select Wi-Fi Setup and press the OK button.
- Press the arrow buttons to select either Wi-Fi (Recommended) or Wi-Fi Direct and press the OK button.
- Do one of the following:
- If you selected Wi-Fi (Recommended), press the OK button, press the arrow buttons to select Others, and press the OK button again. Press the arrow buttons to select Disable Wi-Fi and press the OK button.
- If you selected Wi-Fi Direct, press the OK button twice. Press the down arrow button, press the arrow buttons to select Disable Wi-Fi Direct, and press the OK button again.
- Press the OK button to disable your product’s Wi-Fi features.
Loading Paper
Before you print, load paper for the type of printing you will do.
- Loading Paper in the Rear Paper Feeder
- Paper Loading Capacity
- Compatible Epson Papers
- Borderless Paper Type Compatibility
- Selecting the Paper Settings – Control Panel
- Paper or Media Type Settings – Printing Software
- Selecting the Default Paper Source Settings
FAQs EPSON ET-2800 Color Printer
What is the paper capacity of an Epson EcoTank-2800?
Overview of the Epson ET-2800 The ET-2800 has a four-color ink set and a print resolution of 5760 x 1440 dpi, which help it produce clear and vibrant documents. It also comes with enough ink for 4500 black prints and 7500 color prints.
Why are the colors on my Epson ET-2800 not printing correctly?
You might need to reload the ink because the levels are low. Check the ink levels visually. Run the Power Cleaning utility after filling the ink tanks to the upper lines if you printed while the ink levels were too low to be seen in the ink tank windows. After that, perform a nozzle inspection to determine if the print quality has improved.
Does the Epson ET-2800 support printing on both sides?
The ET-2800 prints significantly faster produces more black pages and offers duplex printing, but you have to manually flip the sheets over.
The Epson ET-2800 is able to scan multiple pages.
Hey Benz One sheet can be scanned at a time using the ET-2800. The software that is provided can be used to combine multiple scans into a single PDF. Alternatively, have a look at the EcoTank ET-3850, which is right now on sale at Bestbuy.com. A 30-sheet automatic document feeder is present.
Is an Epson EcoTank-2800 able to print photographs?
Epson EcoTank ET-2800 Wireless Color printer All-in-One Inkjet Printer, Print, Copy, and Scan, 1.44″ Color LCD Display, Cartridge-Free, Photo Printing, White, with Lanbertent color Printer Cable
Why is the color on my Epson inkjet printer fading even though it is full?
Try these fixes if your prints are smudged or have gaps: Check the print head nozzles with a nozzle check to see if any are obstructed. then, if required, clean the print head. The ink cartridges might need to be replaced if they’re worn out or low on ink.
How is printing color corrected?
The calibration of your monitor comes before the calibration of your printer. Use the appropriate printer driver for your printer after that. Controls for fine-tuning your printer’s overall color printer output can be found in the printer driver. This might be adequate to achieve the desired color for you, depending on your demands.
On my Epson EcoTank-2800, how do I alter the print quality?
modifying print options Click More Settings after selecting Advanced. The dialogue window shown below appears. You can adjust the Color printer setting to Color or Black. Select the Fast (300 dpi) or Fine printing resolution that you want (600 dpi).
When not in use, should I switch off my Epson EcoTank Inkjet printer?
However, it’s preferable to leave your inkjet printer on for healthier print heads and more effective ink utilization. Try to limit the amount of time your inkjet printer is turned on and off because doing so frequently will shorten its life.
What occurs when Epson inkjet’s ink runs out?
The ink that has gone bad might really cause an inkjet printer to become unstable. In many instances, the variation’s degree is apparent. Fresh ink and brand-new printers typically produce prints that are quite consistent, with only about 5% of the colors showing significant fluctuation. That variation can be increased by 10% to 20% with old ink.

You have hit the mark. In it something is also to me your idea is pleasant. I suggest to take out for the general discussion.