
DJI Mavic Air 2 Fly Drone
ABOUT DJI
DJI, or Da-Jiang Innovations Science and Technology Co., Ltd., is a Chinese technology company specializing in the manufacturing and development of unmanned aerial vehicles (UAVs), commonly known as drones. DJI is considered one of the world’s leading companies in the drone industry.
Founded in 2006 by Frank Wang, DJI is headquartered in Shenzhen, China, and has grown rapidly to become a global leader in consumer and professional-grade drones. The company’s products range from small consumer drones to advanced commercial and industrial drones used for various applications.
Product Profile
Introduction
DJI Mavic Air 2 features both an Infrared Sensing System and Forward, Backward, and Downward Vision Systems, allowing for hovering, and flying indoors as well as outdoors, and automatic Return to Home. Capturing complex shots is made effortless with DJI signature technologies such as Obstacle Sensing and Advanced Pilot Assistance System 3.0. Enjoy Intelligent Flight modes such as QuickShots, Panorama, and FocusTrack, which include ActiveTrack 3.0, Spotlight 2.0, and Point of Interest 3.0. With a fully stabilized 3-axis gimbal and 1/2” sensor camera, Mavic Air 2 shoots 4K/60 fps video and 48 MP photos. Meanwhile, the updated Hyperlapse feature supports 8K timelapse.
Built into the remote controller is DJI’s long-range transmission technology OCUSYNCTM 2.0, offering a maximum transmission range of 6 mi (10 km) and displaying video from the aircraft to the DJI Fly app on a mobile device at up to 1080p. The remote controller works at both 2.4 GHz and 5.8 GHz, and it can select the best transmission channel automatically without any latency. The aircraft and camera can easily be controlled using the onboard buttons.
Mavic Air 2 has a maximum flight speed of 42 mph (68 kph) and a maximum flight time of 34 minutes, while the maximum runtime of the remote controller is six hours.
- Maximum flight time was tested in an environment with no wind while flying at a consistent 11 mph (18 kph) and the maximum flight speed was tested at sea level altitude with no wind. These values are for reference only.
- The remote controller reaches its maximum transmission distance (FCC) in a wide-open area with no electromagnetic interference at an altitude of about 400 ft (120 m). The maximum runtime was tested in a laboratory environment and without charging the mobile device. This value is for reference only.
- 5.8 GHz is not supported in some regions. Observe the local laws and regulations.
Preparing the Aircraft
All aircraft arms are folded before the aircraft is packaged. Follow the steps below to unfold the aircraft.
- Remove the gimbal protector from the camera.
- Unfold the front arms, and then unfold the rear arms.

• Attach the gimbal protector when not in use. - Attaching the propellers.
Attach the propellers marked white to the motors with white marks. Press the propeller down onto the motors and turn until it is secure. Attach the other propellers to the unmarked motors. Unfold all the propeller blades.
- All Intelligent Flight Batteries are in hibernation mode before shipment to ensure safety. Use the provided charger to charge and activate the Intelligent Flight Batteries for the first time. It takes approximately 1 hour and 35 minutes to fully charge an Intelligent Flight Battery.

- Unfold the front arms before unfolding the rear arms.
- Make sure the gimbal protector is removed and all arms are unfolded before powering on the aircraft. Otherwise, it may affect the aircraft’s self-diagnostics.
Preparing the Remote Controller
- Remove the control sticks from their storage slots on the remote controller and screw them into place.
- Pull out the mobile device holder. Choose an appropriate remote controller cable based on the type of mobile device. A Lightning connector cable, Micro USB cable, and USB-C cable are included in the packaging. Connect the end of the cable with the phone logo to your mobile device. Make sure the mobile device is secured.

- If a USB connection prompt appears when using an Android mobile device, select the option to charge only. Otherwise, it may result in connection failure.
Aircraft Diagram
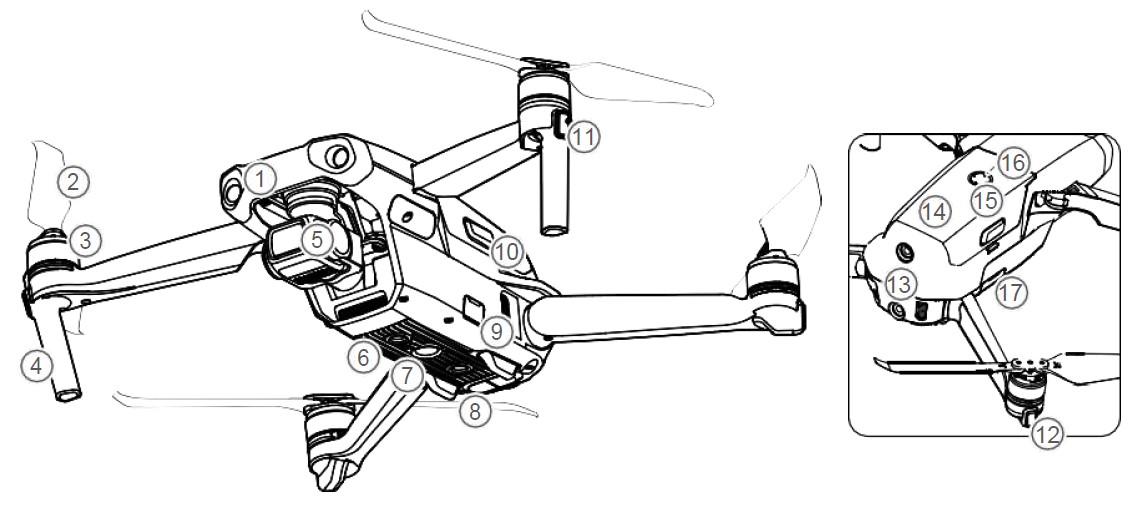
- Forward Vision System
- Propellers
- Motors
- Landing Gears (Built-in antennas)
- Gimbal and Camera
- Downward Vision System
- Auxiliary Bottom Light
- Infrared Sensing System
- USB-C Port
- Battery Buckles
- Front LEDs
- Aircraft Status Indicators
- Backward Vision System
- Intelligent Flight Battery
- Power Button
- Battery Level LEDs
- microSD Card Slot
Remote Controller Diagram

- Power Button
Press once to check the current battery level. Press once, then again, and hold to turn the remote controller on or off. - Flight Mode Switch
Switch between Sport mode, Normal mode, and Tripod (Cine) mode. - Flight Pause/Return to Home (RTH) Button Press once to make the aircraft brake and hover in place (only when GPS or Vision Systems are available). Press and hold the button to initiate RTH. The aircraft returns to the last recorded Home Point. Press again to cancel RTH.
- Battery Level LEDs
Displays the current battery level of the remote controller. - Control Sticks
Use the control sticks to control the aircraft movements. Set the flight control mode in DJI Fly. The control sticks are removable and easy to store. - Customizable Button
Press once to turn the Auxiliary Bottom Light on or off. Press twice to recenter the gimbal or tilt the gimbal downward (default settings). The button can be set in DJI Fly. - Photo/Video Toggle
Press once to switch between photo and video mode. - Remote Controller Cable
Connect to a mobile device for video linking via the remote controller cable. Select the cable according to the mobile device. - Mobile Device Holder
Used to securely mount the mobile device to the remote controller. - Antennas
Relay aircraft control and video wireless signals. - USB-C Port
For charging and connecting the remote controller to the computer. - Control Sticks Storage Slot
For storing the control sticks. - Gimbal Dial
Controls the tilt of the camera. - Shutter/Record Button
Press once to take photos or start or stop recording. - Mobile Device Slot
Used to secure the mobile device.
Activating Mavic Air 2
Mavic Air 2 requires activation before use for the first time. After powering on the aircraft and remote controller, follow the on-screen instructions to activate Mavic Air 2 using DJI Fly. An internet connection is required for activation.
Aircraft
Flight Modes
Mavic Air 2 has three flight modes, plus a fourth flight mode that the aircraft switches to in certain scenarios. Flight modes can be switched via the Flight Mode switch on the remote controller. Normal Mode: The aircraft utilizes GPS and the Forward, Backward, and Downward Vision Systems and Infrared Sensing System to locate itself and stabilize. When the GPS signal is strong, the aircraft uses GPS to locate itself and stabilize. When the GPS is weak and the lighting conditions are sufficient, the aircraft uses vision systems to locate itself and stabilize. When the Forward, Backward, and Downward Vision Systems are enabled and lighting conditions are sufficient, the maximum flight tilt angle is 20° and the maximum flight speed is 12 m/s.
Sport Mode: In Sport Mode, the aircraft uses GPS for positioning and the aircraft responses are optimized for agility and speed making it more responsive to control stick movements. The maximum flight speed is 19 m/s. Obstacle sensing is disabled in Sport mode.
Tripod Mode: Tripod mode is based on Normal mode and the flight speed is limited, making the aircraft more stable during shooting.
The aircraft automatically changes to Attitude (ATTI) mode when the Vision Systems are unavailable or disabled and when the GPS signal is weak or the compass experiences interference. In ATTI mode, the aircraft may be more easily affected by its surroundings. Environmental factors such as wind can result in horizontal shifting, which may present hazards, especially when flying in confined spaces.
- The Forward and Backward Vision Systems are disabled in Sport mode, which means the aircraft cannot sense obstacles on its route automatically.
- The maximum speed and braking distance of the aircraft significantly increase in Sport mode. A minimum braking distance of 30 m is required in windless conditions.
- Descent speed significantly increases in Sport mode. A minimum braking distance of 10 m is required in windless conditions.
- The aircraft’s responsiveness significantly increases in Sport mode, which means a small control stick movement on the remote controller translates into the aircraft moving a large distance. Make sure to maintain adequate maneuvering space during flight.
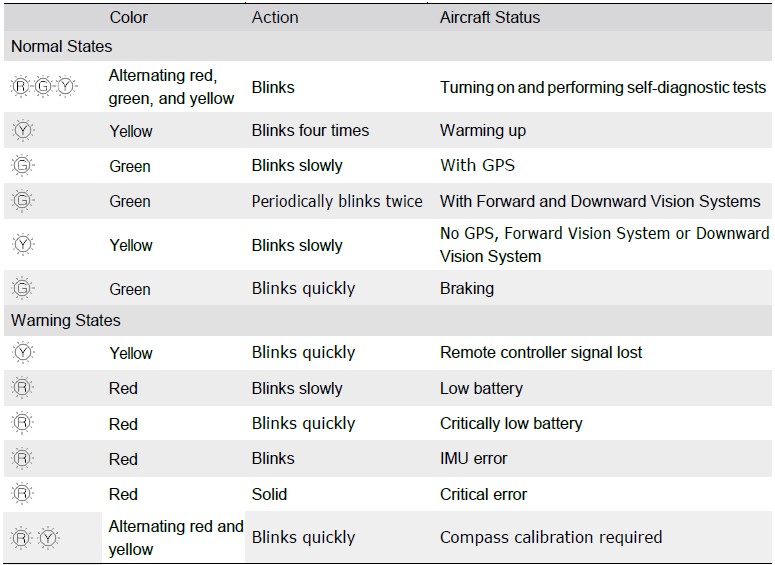
Aircraft Status Indicators
Mavic Air 2 has front LEDs and aircraft status indicators.

The front LEDs show the orientation of the aircraft and glow solid red when the aircraft is turned on to indicate the front of the aircraft.
The aircraft status indicators communicate the status of the aircraft’s flight control system. Refer to the table below for more information about the aircraft status indicators.
Aircraft Status Indicator States
Intelligent Flight Battery
The Mavic Air 2 Intelligent Flight Battery is an 11.55 V, 3500 mAh battery with smart charging and discharging functionality.

Battery Features
- Battery Level Display: The LED indicators display the current battery level.
- Auto-Discharging Function: To prevent swelling, the battery automatically discharges to 96% of the battery level when it is idle for one day, and automatically discharges to 60% of the battery level when it is idle for five days. It is normal to feel moderate heat being emitted from the battery during the discharging process.
- Balanced Charging: During charging, the voltages of the battery cells are automatically balanced.
- Overcharge Protection: The battery stops charging automatically once fully charged.
- Temperature Detection: In order to protect itself, the battery only charges when the temperature is between 41° and 104° F (5°and 40° C).
- Overcurrent Protection: The battery stops charging if an excess current is detected.
- Over-discharge protection: Discharging stops automatically to prevent excess discharge when the battery is not in use. Over-discharge protection is not enabled when the battery is in use.
- Short Circuit Protection: The power supply is automatically cut if a short circuit is detected.
- Battery Cell Damage Protection: DJI Fly displays a warning prompt when a damaged battery cell is detected.
- Hibernation Mode: The battery switches off after 20 minutes of inactivity to save power. If the battery level is less than 5%, the battery enters Hibernation mode to prevent over-discharge after being idle for six hours. In Hibernation mode, the battery level indicators do not illuminate. Charge the battery to wake it from hibernation.
- Communication: Information about the battery’s voltage, capacity, and current is transmitted to the aircraft.
- Refer to the Mavic Air 2 Disclaimer and Safety Guidelines and the battery sticker before use. Users take full responsibility for all operations and usage.
Using the Battery
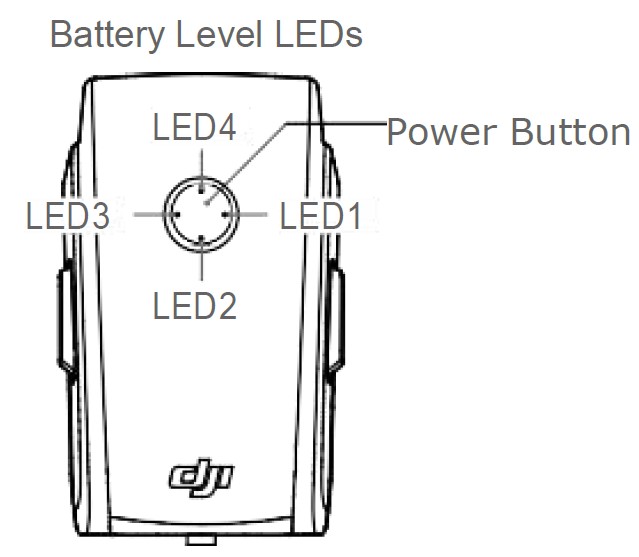
Checking Battery Level
Press the power button once to check the battery level.

Powering On/Off
Press the power button once, then press again, and hold for two seconds to power the battery on or off. The battery level LEDs display the battery level when the aircraft is powered on.
Low Temperature Notice
- Battery capacity is significantly reduced when flying in low-temperature environments of 14° to 41° F (-10° to 5° C). It is recommended to hover the aircraft in place for a while to heat the battery. Make sure to fully charge the battery before takeoff.
- Batteries cannot be used in extremely low-temperature environments of lower than 14° F (-10° C).
- When in low-temperature environments, end the flight as soon as DJI Fly displays the low battery level warning.
- To ensure the optimal performance of the battery, keep the battery temperature above 68° F (20° C).
- The reduced battery capacity in low-temperature environments reduces the wind speed resistance performance of the aircraft. Fly with caution.
- Fly with extra caution at high sea levels.
Charging the Battery
Fully charge the Intelligent Flight Battery before every flight using the provided DJI charger.
- Connect the AC power adapter to an AC power supply (100-240 V, 50/60 Hz).
- Attach the Intelligent Flight Battery to the AC power adapter using the battery charging cable with the battery powered off.
- The battery level LEDs display the current battery level during charging.
- The Intelligent Flight Battery is fully charged when all the battery-level LEDs are off. Detach the charger when the battery is fully charged

- DO NOT charge an Intelligent Flight Battery immediately after flight as the temperature may be too high. Wait until it cools down to room temperature before charging again.
- The charger stops charging the battery if the battery cell temperature is not within the operating range of 41° to 104° F (5° to 40° C). The ideal charging temperature is 71.6° to 82.4° F (22° to 28° C).
- The Battery Charging Hub (not included) can charge up to three batteries. Visit the official DJI Online Store to learn more.
- Fully charge the battery at least once every three months to maintain battery health.
- DJI does not take any responsibility for damage caused by third-party chargers.
- It is recommended to discharge the Intelligent Flight Batteries to 30% or lower before transportation. This can be done by flying the aircraft outdoors until there is less than 30% charge left.
The table below shows the battery level during charging.

Battery Protection Mechanisms
The battery LED indicator can display battery protection indications triggered by abnormal charging conditions.

If the battery protection mechanisms activate, in order to resume charging it is necessary to unplug the battery from the charger, and then plug it in again. If the charging temperature is abnormal, wait for the charging temperature to return to normal, and the battery will automatically resume charging without requiring you to unplug and plug in the charger again.
Inserting the Intelligent Flight Battery
Insert the Intelligent Flight Battery into the battery compartment of the aircraft. Make sure it is mounted securely and that the battery buckles are clicked into place.
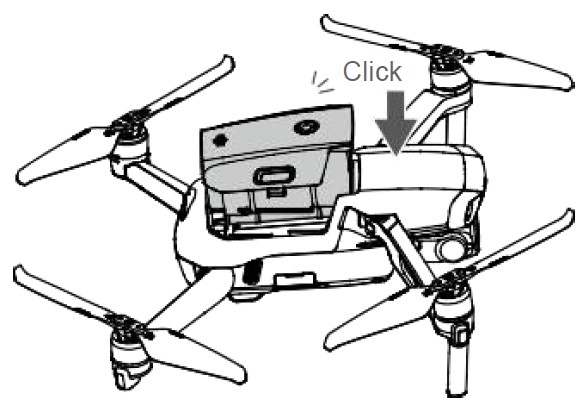
Removing the Intelligent Flight Battery
Press the battery buckles on the sides of the Intelligent Flight Battery to remove it from the compartment.
- DO NOT detach the battery when the aircraft is powering on.
- Make sure that the battery is mounted firmly.
Using the Remote Controller
Powering On/Off
Press the power button once to check the current battery level. Press once, then again, and hold to power the remote controller on or off. If the battery level is too low, recharge before use.

Charging the Battery
Use a USB-C cable to connect an AC power charger to the USB-C port of the remote controller. It takes approximately four hours to fully charge the remote controller.

Controlling the Gimbal and Camera
- Shutter/Record Button: Press once take a photo or start or stop recording.
- Photo/Video Toggle: Press once to switch between photo and video mode.
- Gimbal Dial: Use to control the tilt of the gimbal.

Controlling the Aircraft
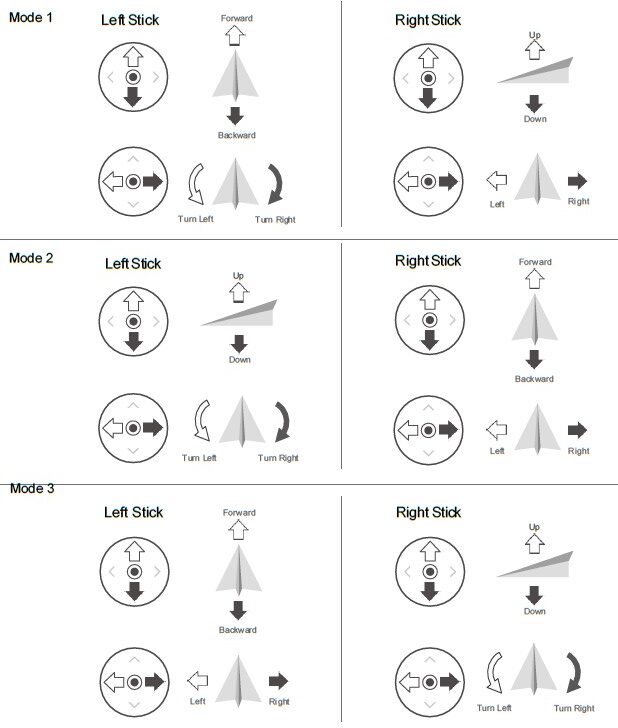
The control sticks control the aircraft’s orientation (pan), forward/ backward movement (pitch), altitude (throttle), and left/right movement (roll). The control stick mode determines the function of each control stick movement. Three preprogrammed modes (Mode 1, Mode 2, and Mode 3) are available and custom modes can be configured in DJI Fly. The default mode is Mode 2.
Flight Test
Takeoff/Landing Procedures
- Place the aircraft in an open, flat area with the aircraft status indicator facing towards you.
- Turn on the aircraft and the remote controller.
- Launch DJI Fly and enter the camera view.
- Wait until the aircraft status indicators blink green indicating that the Home Point has been recorded and it is now safe to fly.
- Gently push the throttle stick to take off or use auto-takeoff.
- Pull the throttle stick or use auto-landing to land the aircraft.
- After landing, push the throttle stick down and hold. The motors stop after three seconds.
- Turn off the aircraft and remote controller.
Video Suggestions and Tips
- The pre-flight checklist is designed to help you fly safely and to ensure that you can shoot video during flight. Go through the full pre-flight checklist before each flight.
- Select the desired gimbal operation mode in DJI Fly.
- Shoot video when flying in N-mode or T-mode.
- DO NOT fly in bad weather conditions such as when it is raining or windy.
- Choose the camera settings that best suit your needs.
- Perform flight tests to establish flight routes and to preview scenes.
- Push the control sticks gently to keep the aircraft movement smooth and stable.
- Make sure to place the aircraft on a flat and steady surface before takeoff. DO NOT take off from your palm or while holding the aircraft with your hand.
Appendix
Specifications
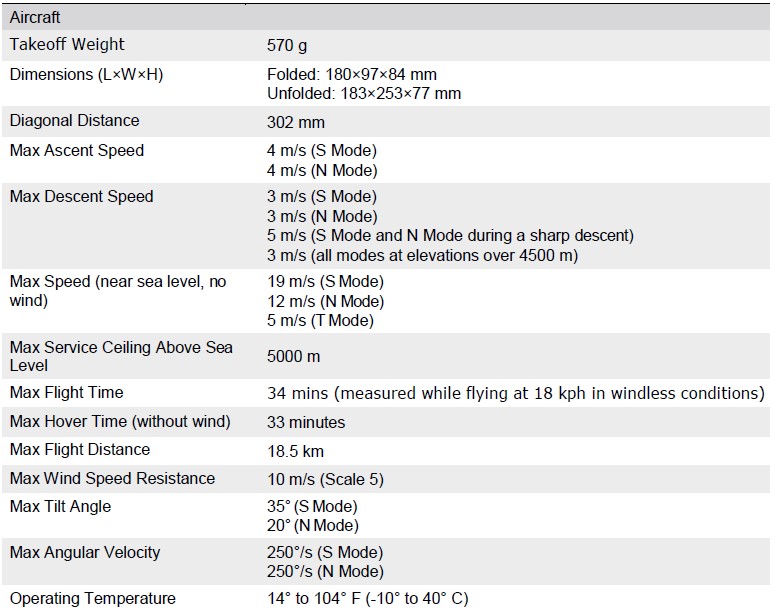
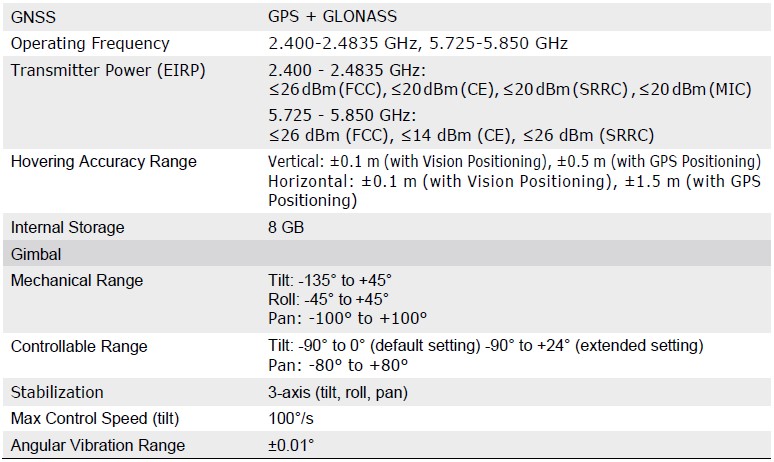
This content is subject to change.
Download the latest version from
http://www.dji.com/mavic-air-2
If you have any questions about this document, please contact DJI by sending a message to DocSupport@dji.com.
FAQS About DJI Mavic Air 2 Fly Drone
What is the range of the DJI Air 2?
6 mi (10 km)
What is the Mavic Air 2’s flight time?
around 34 minutes
What is the DJI Air 2’s battery life?
31 minutes
How much weight can a Mavic Air 2 transport?
500g
What is the DJI Mavic Air 2’s highest speed?
a speed of 42.5 mph
Can the DJI Air 2 be flown inside?
Yes, but there are restrictions.
How cold can you fly a Mavic Air 2?
32 to 104 degrees Fahrenheit
The DJI Air 2 is water resistant.
not watertight
Which grade is the DJI Mavic Air 2?
Legacy A2
Has the Mavic Air 2 4K?
60 fps in 4K.
For more manuals by DJI, Visit Manualsdock
[embeddoc url=”https://manualsdock.com/wp-content/uploads/2023/10/DJI-Mavic-Air-2-Fly-Drone-User-Manual.pdf” download=”all”]


