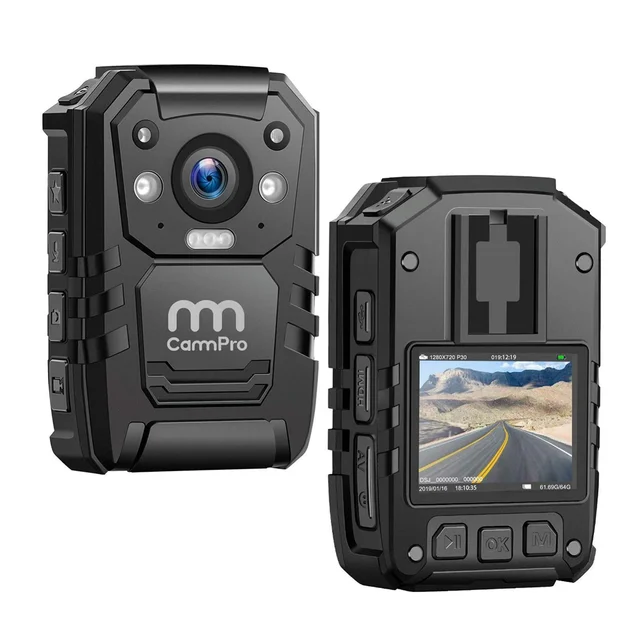
CAMMPRO I826 Premium Portable Body Camera
About CammPro
CammPro’s primary goal is to produce body cameras that are both reliable and affordable. To make our clients’ lives easier, we put much effort into incorporating the most recent technology into our products and software.
Thanks for choosing our police body-worn camera! This camera will help you in the work of law enforcement and bring you justice when in trouble.
Thanks for choosing our product!
Multiple functions in this body-worn camera suits for different workers in various industrial fields. For professional law enforcement, it brings policemen justice; For consumers in other fields, it can be used as a utility life recorder, meeting recorder car DVR, etc. We hope you enjoy all the benefits of our features!
Product Overview
Body Worn Camera is often utilized by law enforcement to record their interactions with the public or gather video evidence at crime scenes. Nowadays it’s also widely used in the military, public service, citizen surveillance, and personal life recording.
CammPro 1826 Body Camera is well designed with super Full HD 1296p video recording capabilities, and one-click recording and activation. When worn on the front of the clothing, an ultra-wide 140° field-of-view lens captures what happens in the field as accurate information for further analysis. Featuring a 32GB (64GB/128GB} internal memory, pre-record buffering, importance tagging, and integrated Infrared LEDS for night vision, 1826 is equipped to perform in any conditions.
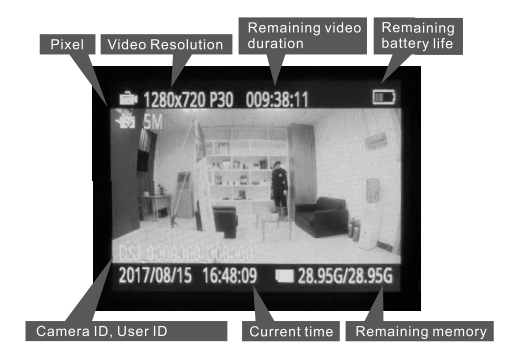
The footage can be viewed on 2 inch LCD color screen, PC, or an HDTV screen using a HDMI connector. Security protocols of the device are secure to prevent accidental deletion of evidence or modification of system settings. Video footage is also digitally watermarked with the user ID, time, and date, ensuring the authenticity of collected video of the event. The internal GPS receiver provides real-time location tagging of video and still-captures, offering irrefutable substantiation of where and when the audio and video were recorded.
Box contents
- Body Camera
- Charging Dock
- USB cable
- Charger
- 360 Degree Rotatable Clip
- User Manual
Product Features 


Quick Operation
- Long press U to power on/off, and short press it to turn the screen on/off.
- Short press to start voice recording, and short press again to stop recording.
- Short press to take a photo.
- Short press – to start video recording, and short press again to stop recording.
- Short press 4 to turn on the infrared light, and short press again to turn it off.
- Short press HI to playback the last photo, video, or audio files.
- Short press M to set the function and parameter.
- Press to return the last screen when the camera is in the menu setting or playback mode.
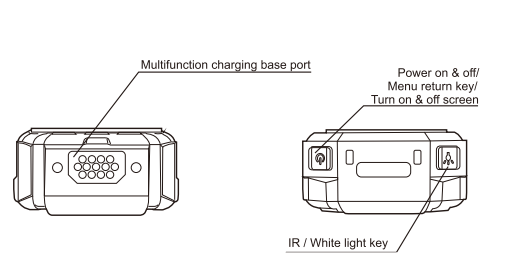
Appearance and Key Description 


 Display Screen Description
Basic Operation Description
- Boot
Press l!! J for 2 seconds, and the camera will beep on with a green LED, and the camera turn to standby mode with the screen light on. - Audio Recording
Short press O, and the camera will shake, then the LED flash to yellow, and the camera start audio recording. Press O again when you want to end the audio recording, and the camera shakes again, with the yellow LED light off and the recording stored automatically. - One-click Audio Recording
When the camera is off, long press key O for 4 seconds to start the audio recording directly. - One-click to Change Video Resolution
When the camera is in standby mode, long press key O for 4 seconds, the resolution can be changed between 1280*720 30pfs and 840*480 30pfs. - Photo Taking
Short press key m to take a photo when the camera is in standby mode. Long press key m for 4 seconds to turn on the LED flashlight, and the light will flash under a specific frequency. - Video Recording
When the camera is in standby mode, short press m, then the camera body will shake with voice Guide Law-enforcement, video recording starts, and afterwards, the red video light flashes on, which indicates the video recording started. Press key m again to stop recording, and the camera body will shake again, with the red video light off, and the recording is finished and saved. (Note: this function is closed by default) . - One-click Video Recording
When the camera is off, long press m for 4 seconds to start video recording directly.
Zoom In/Out
Long press Ill to £I zoom in/out when the camera is on standby. (Note: When the resolution is at 2304*1296 or 1920*1080, the zoom-in/out function is not available.) - Laser Pointer
Long press li3 for 4 seconds to open the laser point light. Do it again to turn it off. - Snapshot Under Video Recording
Short press key m to take a photo in video recording mode. - Switch Between IR Red Light and LED White Light
Short press D to turn on the IR red light. Press it again to shut down in video recording or standby mode. The IR red light can help to record video at night or in dark environments. Long press a to turn on the LED white light. Long press for 4 seconds again to turn the LED off. - One-click Playback
Under standby mode, short press m to playback the last photo, audio, or video. - Fast Forward and Fast Reverse
Short press m or II to fast forward or fast reverse at 2X, 4X, Bx, 16X, 32X,64X, 12BX under playback mode. - OK Confirm
Short press GI to get into the video, photo, and audio folder and select a file to play. Long press GI for 4 seconds to open the laser point light, and do it again to turn it off. - Menu Setting
Short press II to enter the menu setting. (When with the password function on, the user should enter a password before entering the menu, the default password is “000000”, which means pressing II six times.)
USB MODE–Access File Data
To cater to a variety of uses, the CammPro body-worn camera can be set to password protection mode, or password-free mode in the menu. (Password: ON, OFF) In both modes, videos can be managed without driver software. Driver software is needed only if the user’s computer doesn’t recognize the camera or when the user wants to change the password.
- Connect the camera with the PC by the original USB cable, then the camera will power on automatically.
® If the password set to be OFF: the camera screen will show a PC image, user can access to camera’s data directly. - If the password is set to be ON: once the password input interface shows up on the screen, press six times “OK” button (which stands for the password 000000) to access the camera’s data.
- Find the removable disk or generic USB drive in your computer, then you can copy or delete the footage.
- Method 2 Please refer to pages 19-24, “enter to LI-disk mode”.
Note: this method is only for the camera with Password ON.
Indicator Light
- Standby Indicator Light (GREEN)
The light turns to green when the camera is powered on. - Charge Indicator Light (RED)
The light turns red during charging and turns green when it is full. - Video Recording Indicator Light (RED)
The light turns red and flashes under video recording. - Audio Indicator Light (YELLOW)
The light turns yellow and flashes under the audio recording.
Key Function Description
- Reset Key
Reset it when the camera freezes because of some errors. - Combination Key
- One key play key In standby mode, press this key to playback the last audio or video file.
- Page up key Go to the menu, and press this key can select an object to up and left.
- Focus adjustment function Long press of this key can adjust BX focus change under standby or video recording mode. Press this key can fast reverse by 2X, 4X, BX, 16X, 32X, 64X , 12BX under video recording.(Note: Focus cannot be adjusted under HD 2304*1296 resolution )
- Combination Key
- OK confirm key Press this key into video, photo, or audio file browse mode and confirm it.
- Laser pointer key Long press Cl to open the Laser Point light for the best positioning, and do it again to turn it off.
- Combination Key
- Walkie-talkie After connecting with the walkie-talkie, press this key start to talking.
- Add * on important file Short press this key, then a • mark for important file can be marked on the top left corner of the screen.
- Video classification key Traffic control, criminal investigation, and public security can be selected when pressing this key for 4 seconds. Short press QI or D to select the mode, and short press GI to confirm.
- Combination Key
- Audio recording key Press this key to start audio recording, and press it again to stop it.
- One key audio recording key When the camera is under turn off status, 4 seconds long press this key to start an audio recording, and press it again to stop it.
- Video resolution change key When the camera is under standby mode, long press this key for 4 seconds, the video resolution can be changed to 480 or 720.
- Combination Key m
- Photograph key Short press this key to take a photo.
- LED flashlight key Long press to turn on the LED flashlight function.
- Combination Key m
- Video recording key When the camera is in standby mode, press this key to start video recording, and press it again to stop it.
- One key video recording key Under turn off status, long press m for 4 seconds to start video recording, and press it again to stop it.
- Combination Key D
- Menu key Press this key into the system setting interface.
- Page down key Also press this key to select files from up and left when browsing the files.
- Zoom lens key This key also has a focus adjust function. Long press this key can adjust BX focus change under standby or video recording status. Press this can fast reverse by 2X, 4X, BX, 16X, 32X, 64X , 128Xunder video recording.(Note: Cannot adjust focus under HD 2304*1296 resolution)
- Combination Key II
- No shadow IR night vision light key
Short press it to open the shadow IR night vision light and help calibrate the video object. Short Press it again to turn it off. - LED illumination light Long press this key for 4 seconds to open the LED illumination function, Long press it again to turn it off.
- No shadow IR night vision light key
- USB Port Use a cable and connect this port to the computer to get the file and charge the camera.
- HDMI Port High Definition Multimedia Interface (HDMI) port, use it to connect with HD TV.
- AVIN Port connects to an external camera. Picture and voice from the external camera will show on the screen.
- Power ON & OFF / Turn ON & OFF Screen Key/Return Key
Long press this key to turn on/off the camera. On the home page, short press it to lock the screen, short press it again to unlock. In the sub-page, short press it to return to the previous page. - Abnormal Alarm
- There are two kinds of abnormal alarms When the battery is weak, Battery life flashes on the screen, and at the same time the camera body shakes and alarm with an alert when the battery is full, the screen will alert that storage is full, and the camera body shakes with an Alert tone alarm.
- Power Saving Mode When no operation after 1 min, 3 min, or 5 min (optional in the menu), the LCD screen will close automatically to save power. Press any key to reopen the LCD. Short press key © at a time to turn off the LCD, short press any key LCD will reopen, and the camera return to normal. The device added with MCU function, it can switch to deep standby mode when there is no operation in 15mins, you can press any button to switch on the screen.
- Charging (Li-ion Rechargeable Battery )
The battery will be full after 4 hours of charging under the camera is turned off (Using a charger equipped). During the charging, the indicator light will turn red, and turn green when it is full. While using a multifunctional base charger, plug the camera into the base, and connect the power, the red power light on the charger turn on, and the camera boot automatically. You need to turn the camera off manually, and the red indicator light on the camera body will turn on, which will turn green when the battery is full. - Charging Ways
- Use a charger to connect with a 220V power supply.
- Use USB to connect with the PC system.
- The camera plugs into the docking station (another product).
Attention
- Two ways of charging. First one, charging in power off mode with 1A charging electricity, 4 hours to get full. The second one, charging in standby mode with 300mA charging electricity, 10 hours to get full. (This way is to protect the circuit board and battery life)
- If the camera will be out of use for a long time, please charge it full at first.
- Please don’t disassemble or repair the camera privately or by an unauthorized organization.
- Please use a pin to press the reset key i U to reboot the camera when running hangs or abnormal.
- If the camera prompts “Excess fragments! Please format memory on PC” or “Card fragment fails”, please connect it to the computer and delete all data from the camera.
Camera Management System
IMPORTANT NOTICE: A driver and Management System may not be needed for some users, because the data in the camera can be managed directly at USB MODE, and the camera menu already includes all settings on the software. They’re needed only if the user’s computer doesn’t recognize the camera or wants to change the password.
- Instruction Video of Data Management/Delete: https://youtu.be/Qf4r7V0EcDk
PLEASE NOTE THAT THIS SOFTWARE IS FOR WINDOWS OS ONLY.
Installation
Please download software from the CD or website. https://www.cammpro.com/download/
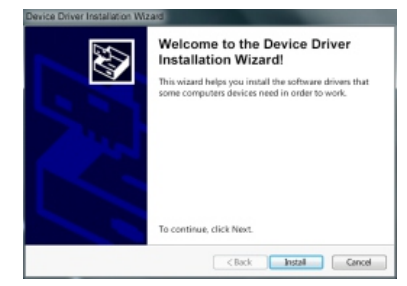
Before installing the software, you’d better close the firewall first. Double-click the software to install, then always go next step until finish them all.
- Choose the language.

- Click ‘Next’.

- Click ‘Install’.

- AmbaUSB installation, click ‘OK’.
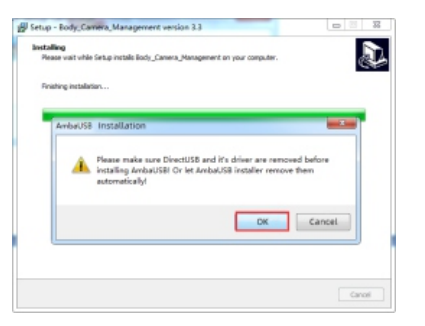
- Click ‘next’.

- Choose the disk that you want to save the drive, then click ‘Install’ to continue

- Click ‘Install’
- After installation, desktop shortcuts will be shown below: ‘AmbaUSB’ is the driver, you don’t need to open it.
‘Body_Camera_Managemnt’ is the management software.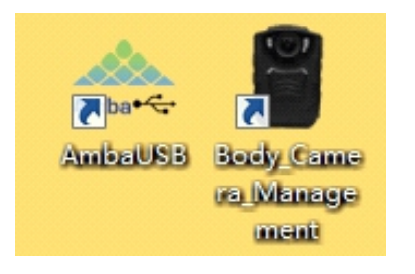
Notes: If the PC with firewall and trying to forbid the installation, please choose ‘allow this operation’ or ‘always allow installation of this driver software’.
Login to the Management Software
Connect the camera to the computer by the original USB cable, camera will turn on automatically and show password entering interface, remember DO NOT enter a password on the camera. (Before login the software, please make sure the camera’s password is on) There are Administrator and User roles for login. Users can read the camera information, calibrate time, and enter to camera disk. The administrator has the highest authority to manage the cameras and revise passwords.
- Login steps: Enter password on software – click ‘connect device’ – click ‘login’
- Default password: 000000
Settings
- Time setting Click ‘calibration time’, camera time will be synced with the computer.
- Parameter setting Click ‘read’, and you can check the camera’s current resolution and the remaining battery capacity.
- ID setting Click to read”, you can check the current camera ID, police ID, department, user name, and department name, if need to revise that information, type them directly to the corresponding columns, then click ‘setting’. (Camera ID must be 7 digits, user ID must be 6 digits)
Wi-Fi/ 4G Network Setting
The network function in the software is for other models, please ignore it.
- Password Setting The User can revise the common user login password only; the Admin can revise all passwords; Please do remember to click “Setting” after any revision to save all changes.
- Enter to U-disk mode Click ‘enter to U-disk’, and the connection of management software with the camera will be cut off, then the camera will enter U-disk, and data transfer or deletion will be allowed in this mode.
Page up/Exit Click ‘page up’, system will back to the login interface. Click ‘exit, it will cut off the connection and exit the system directly.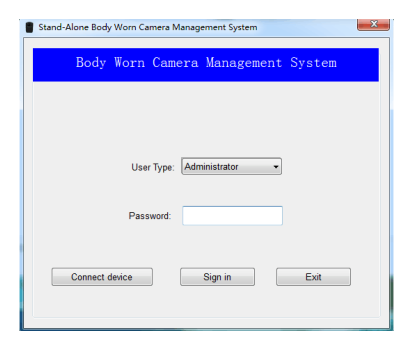

We provide a 1-year warranty and RMA service. In order to protect user’s rights and avoid some unnecessary problems, please read the details below :
- Please send back the warranty card with the order number, model, and the problem clearly together with returned products during RMA service.
- For any man-made damage such as water, moisture, improper use, or damage by no authorized organization as well as exceeding 1-year warranty, only paid service is available, and no guarantee to fix it up.
- For serious man-made damage (such as water or fall down), a repair contract is necessary to sign up.
- Non-man-made damage and still within 1 year’s warranty, the camera can be changed, but not for the accessories.
- As the product involves upgrading or improvement, the company reserves the right to change the specifications of the software and hardware described in this manual at any time without prior notice. The product specifications and information mentioned in this manual are for reference only, the actual delivered goods shall prevail.
Warranty Card 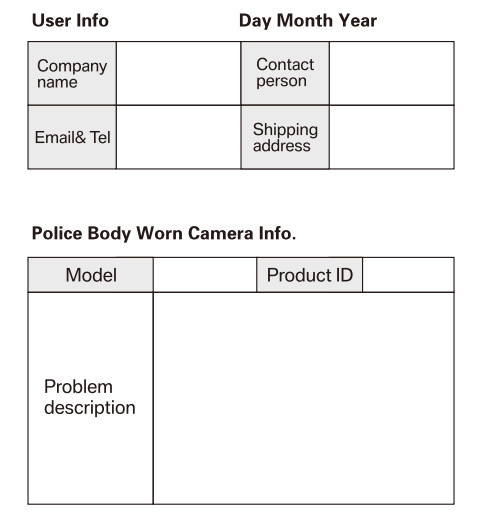
FAQS About CAMMPRO I826 Premium Portable Body Camera
What are the limitations of the CAMMPRO I826 Premium Portable Body Camera that are worn on the body?
The wearable CAMMPRO I826 Premium Portable Body Camera has a watertight case.
What characteristics does a body-worn camera have?
How well do body cams work?
How long does a body camera’s battery last?
What channel does body camera use?
What are the drawbacks of wearing a body camera?
Is image quality impacted by the camera body?
What advantages can body-worn cameras offer?
Why do people carry cameras on their bodies?
Do camera batteries ever go bad?


