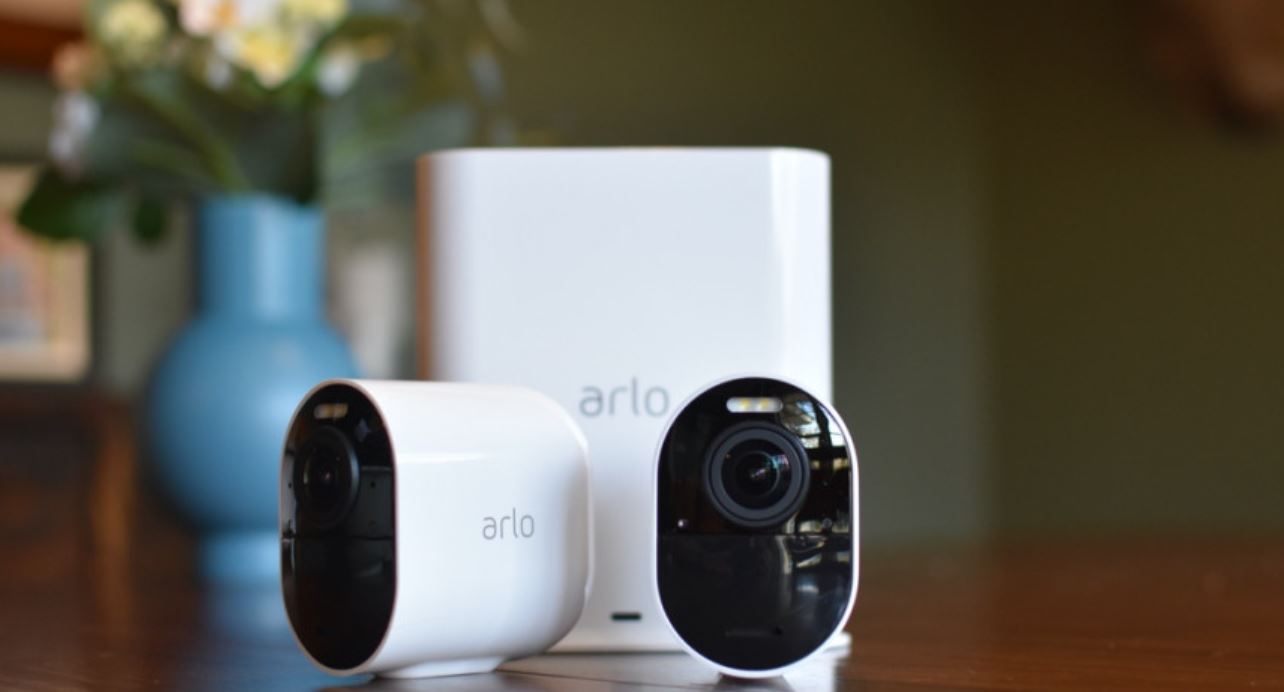
Arlo Ultra 2 Spotlight Camera
About Arlo
Arlo Technologies, Inc. is a leading company in the field of smart home security and surveillance solutions. Founded in 2014, Arlo is dedicated to creating innovative and user-friendly products that help protect and monitor homes and businesses.
Arlo offers a range of wire-free and wire-connected cameras, video doorbells, and security lighting systems. Their products are designed to provide high-quality video monitoring, motion detection, two-way audio communication, and remote access through mobile apps or web browsers.
Get Started
Use the Arlo app for installation and setup
You must use the Arlo app to install and set up your SmartHub and Arlo Ultra Camera. The Arlo app guides you through the setup:
- Create your Arlo account. You use the same account to manage all your Arlo devices.
- Connect the Arlo SmartHub to the Internet and add it to your account.
- Add each Arlo Ultra camera and pair it with the Arlo SmartHub.
Once you set up your Arlo account, you can access it by using the Arlo app on a smartphone or tablet, or from a computer using a web browser. If you’re using a computer, enter https://my.arlo.com/#/login in the address bar of the browser. After installation, you can use the Arlo app to view your camera feed, customize alerts and notifications, create schedules for your cameras, and more.

Connect your SmartHub to the Internet
Your Ultra Camera uses WiFi to connect to a SmartHub or Base Station with Siren. The SmartHub or base station uses an Ethernet cable to connect to your router.
Connect a SmartHub
The SmartHub connects to your home network and allows you to view your camera streams from anywhere.
- Connect the SmartHub to your router with an Ethernet cable.
- Connect the AC adapter to the SmartHub and plug it in.
The LED on the front of the SmartHub lights.

The SmartHub LED
The SmartHub LED located on the front panel indicates the status of the SmartHub.

The LED blinks once when the SmartHub is first powered on. The LED lights are as follows:
- Solid blue. The SmartHub is connected to the Internet.
- Slow blinking blue. The SmartHub is ready to sync and pair with a camera or is connecting with a camera.
- Fast blinking blue. The SmartHub is paired with a camera.
- Solid amber. An error occurred or something is wrong with the connection.
- Slow blinking amber. The SmartHub can’t connect to the camera. The camera can’t be found, is out of range, or another connection error occurred.
- Alternating blue and amber. A firmware update or a reset is in progress.
Connect a Base Station with Siren
Your Ultra Camera uses WiFi to connect to a SmartHub or Base Station with Siren. The SmartHub or base station uses an Ethernet cable to connect to your router.
The Arlo app guides you through the steps to install and set up your Ultra system.
To connect a Base Station with a Siren:
- Connect the base station to your router with an Ethernet cable.
- Connect the AC adapter to the base station and plug it in.
The LED on the front of the base station lights

Base Station LED (VMB4500)
The LED located on the front indicates the status of the base station.

The LED lights are as follows:
- Solid blue. The base station is connected to the Internet and to an Arlo camera.
- Slow blinking blue. The base station is ready to sync with a camera.
- Fast blinking blue. The base station is synching with a camera.
- Solid amber. The base station is booting.
- Slow blinking amber. The base station can’t connect to the camera. The camera can’t be found, is out of range, or another connection error occurred.
- Alternating blue and amber. A firmware update or a reset is in progress.
Base Station LEDs (VMB4000)
This base station has three LEDs located on the front.
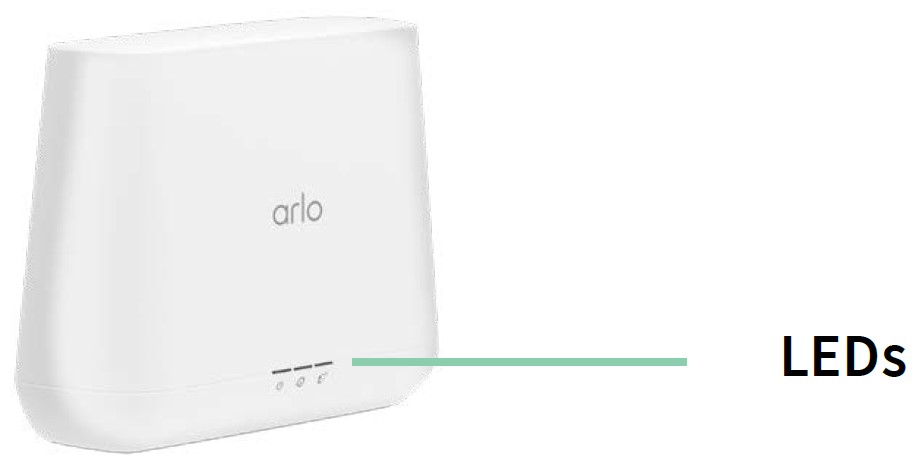
The LED light is described in this table.

Insert the battery into your camera
Your Arlo Ultra camera consists of two parts:
- The camera and battery.
- The camera housing.
Note: The battery comes partially charged. We recommend that you fully charge the battery before using your camera.
To insert the battery:
- Align the battery and insert it into the battery compartment. The battery only inserts one way. The LED on the Arlo Ultra camera blinks blue.
- Insert the camera into the camera housing by pushing down on both the left and right sides of the camera until it clicks into place.
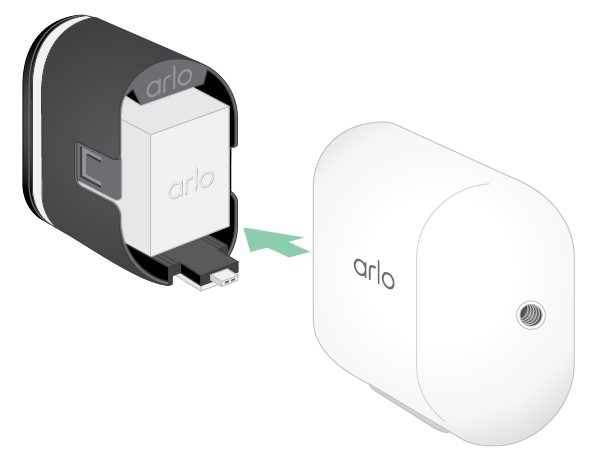
The camera battery
Your camera battery comes partially charged. We recommend that you fully charge the battery before using your camera. Plugging in the camera charges the battery.
Charge your camera battery
- Snap the magnetic power cable into the camera’s power input.
- Connect the AC adapter to the power cable and plug it in.
Note: You can buy spare rechargeable batteries and charge them in the Arlo Dual Charging Station (sold separately).

Charge batteries in the Arlo Ultra dual charging station (sold separately)
Your Arlo Dual Charging Station charges one or two batteries for your Arlo Ultra cameras.

To charge batteries in the charging station:
- Connect the power adapter to the charging station.
- Plug the power adapter into an indoor electrical outlet.
- Insert one or two Arlo rechargeable batteries.
Replace a camera battery
You can leave the camera housing in place so the camera position stays the same.
- Release the Arlo Ultra camera from the camera housing. Press the button on the charging port underneath the Arlo Ultra camera. The camera clicks as it disengages from the camera housing.
- Pull the camera all the way out of the camera housing.

- Remove the battery by pulling on it until it slides out of the camera.

- Align the battery and insert it into the battery compartment. The battery only inserts one way. The LED on the Arlo Ultra camera blinks blue.

- Insert the camera into the camera housing by pushing down on both the left and right sides of the camera until it clicks into place.
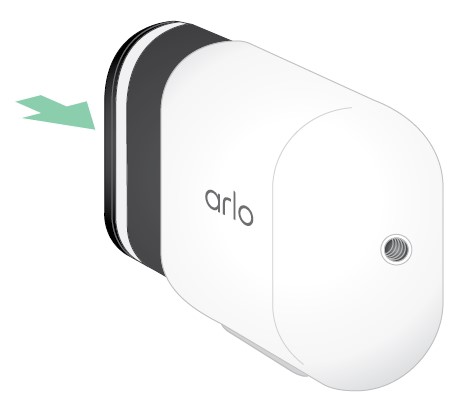
The Arlo Ultra Camera LED
The LED on the camera lights when the camera is powered on. The LED changes color and blinks depending on the battery charge and indicates the status of activities such as pairing the camera and updating the camera firmware.
- Slow blinking blue. The camera is in the process of pairing with the SmartHub.
- Fast blinking blue. The camera is paired with the SmartHub.
- Blinking amber. The camera is out of range, a connection error occurs during pairing, or the camera battery charge is low (15% or less).
- Alternating blue and amber. The camera failed to pair with the SmartHub, or a firmware update is in process, or a reset is in process.
Tips for optimal WiFi performance
Place your Arlo Ultra camera in a location with a good WiFi signal to the SmartHub. The distance between WiFi devices can affect the WiFi signal:
- Maximum recommended distance. Place your camera a maximum of 300 feet (90 meters) from the SmartHub. The maximum line-of-sight range of 300 feet is reduced by each wall, ceiling, or other major obstruction between the camera and SmartHub.
- Minimum recommended distance. To reduce WiFi interference, place the SmartHub 6 feet (1.8 meters) away from your WiFi router. Place your Arlo Ultra cameras 10 feet (3 meters) away from the SmartHub, and allow at least 6½ feet (2 meters) between cameras.
The following materials can reduce WiFi signal strength if they are located between WiFi devices such as your SmartHub and Arlo Ultra cameras:
- Unusually thick walls and ceilings
- Brick
- Concrete
- Stone
- Ceramic
- Glass, especially mirrors
- Metal
- Large quantities of water, such as the water in a fish tank or water heater
For information about optimizing 4K streaming with multiple Arlo Ultra cameras, see the Arlo support article https://kb.arlo.com/000062190/How-can-I-reduce-connectivity-issues-when-Ilive- stream-in-4K-on-multiple-cameras.
Magnetic mount
Your Arlo Ultra system comes with a magnetic-based camera mount that lets you mount your cameras anywhere. The mount has a built-in groove where you can hide your cable and provide strain relief if you want to keep the camera mounted and plugged into a wall source.
Install a magnetic mount
- Select a location for the mount up to 6.5 feet (1.9 meters) high.*
- Fasten the mouting screw into a wall. If you’re working with drywall, use the plastic drywall anchor that we provide.
Use the plastic stopper to help guide how far to screw it into the wall. - If you’re using your Ultra camera connected to a charging cable, wrap the excess charging cable around the back of the mount.
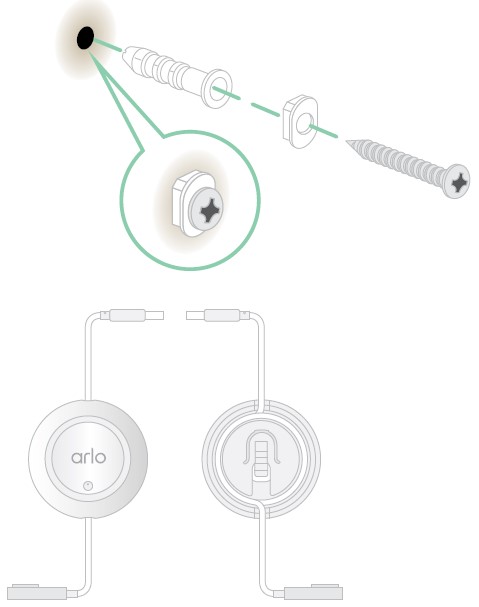
- Snap the magnetic mount onto the screw and the stopper. The mount clicks into place.
- Attach your Arlo Ultra camera to the wall mount. The magnet in the mount holds the camera onto the mount.
- Adjust the Arlo Ultra camera to your preferred viewing angle.

Note: You can replace the battery in Arlo Ultra cameras without removing the camera housing from the indoor wall mount.
*At 6.5 feet (2 meters) or higher, we recommend using the Arlo Outdoor Mount.
Install the Arlo Outdoor Mount
Some Arlo Ultra kits include an outdoor screw mount. Screw mounts are also sold separately.
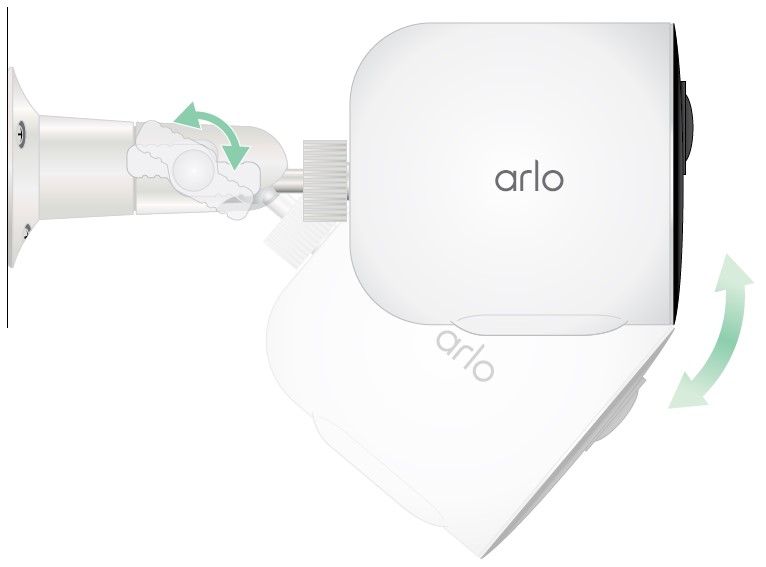
- Place the outdoor mount and secure it with screws. If you’re mounting the camera on drywall, use the drywall anchors we provide.

- Attach the camera to the mount.

- Adjust the camera angle.
Install an Anti-Theft Mount
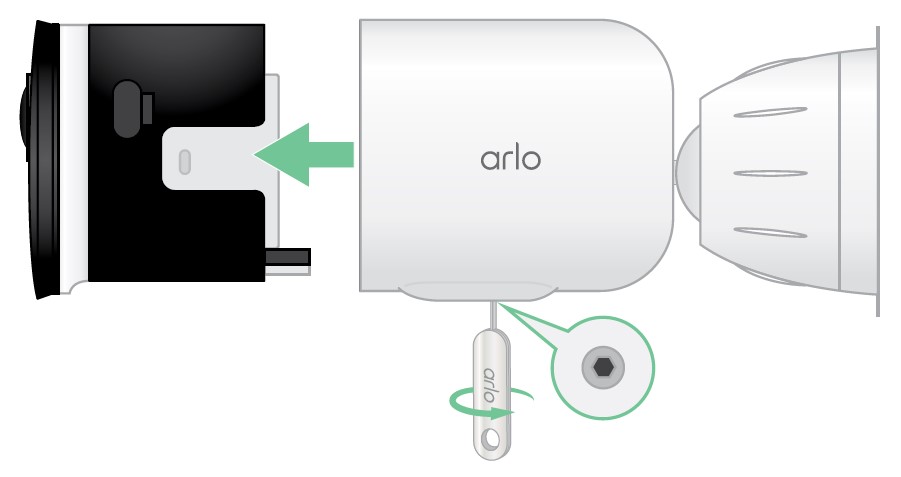
Some Arlo Ultra kits include an Anti-Theft Mount. Anti-theft mounts are also sold separately. To install your Anti-Theft Mount:

- Place the wall plate against the wall, with the arrow pointing up, and secure it with screws. Note: If you are mounting your Anti-Theft Mount on drywall, we recommend using the included wall anchors.
- Insert your camera with its battery into the Anti- anti-theft mount housing.
- To attach the housing to the wall plate:
• Align the small screw on the mount and the dot on the wall plate.
• Turn the housing clockwise, until it clicks in place.
• Use the security key to tighten the small screw.
Note: The security key came in the package with your Anti-Theft Mount. - Adjust your camera position, then finger-tighten the mount lock (clockwise) to lock the camera in position.
Note: To release your camera from the housing, insert the security key in the security keyhole and turn the key clockwise.
Connect your camera to the Arlo solar panel (sold separately)
The Arlo solar panel lets you harvest power from the sun to keep your Arlo Ultra camera battery charged. The solar panel with cable comes with a mount and mounting screws.
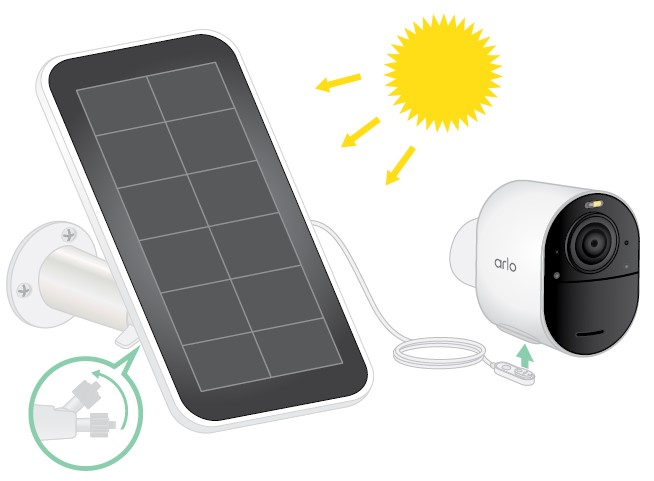
To connect a solar panel to your Arlo Ultra camera:
- Install the solar panel mount near your camera.
- Attach your solar panel to the mount.
- Connect your camera to the solar panel power cable.
Your Arlo Ultra camera’s field of view
The field of view is the area in which the camera can detect motion. You can set the field of view to Full (120 degrees), Wide (155 degrees), or Super wide (180 degrees).
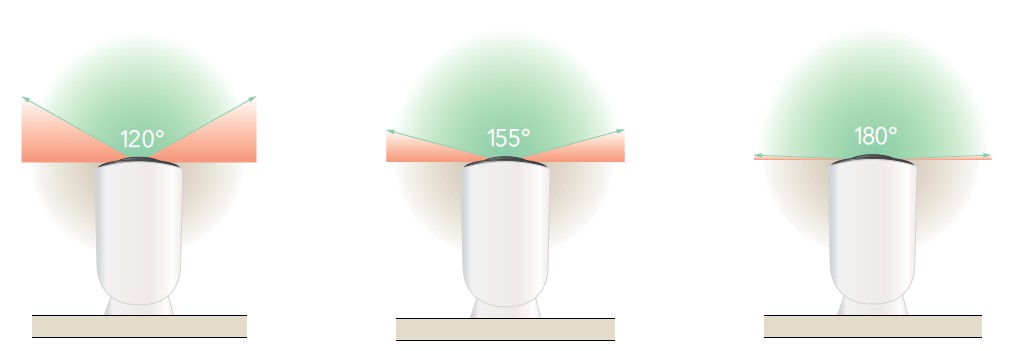
Each field of view setting auto-corrects the image to reduce the fisheye effect. The Full setting completely eliminates the fisheye effect.
Change the field of view
- Open the Arlo app.
- Tap Settings > My Devices.
- Select the camera.
- Tap Video Settings > Video Mode.
- Tap a field of view to automatically apply it to your camera.
Position your camera to detect motion in specific areas
You can mount and aim your Arlo Ultra camera in different ways to optimize the camera’s ability to detect motion in specific areas. The lower two-thirds of the camera’s field of view is the motion-sensitive part of the image. Aim the camera so that any motion you wish to detect appears within this part of the image.
If you want to monitor motion closer to the camera, such as visitors to your front door, mount the camera at least 6.5 feet (1.9 meters) high*.
This angle works well to avoid motion alerts for movement in the top third of the image, such as vehicles driving by.
To monitor motion occurring farther away, such as children playing on a lawn, aim the camera higher to frame the area within the lower two-thirds of the image.
It’s best to position the camera so that motion is moving from side to side across its field of view rather than directly toward or away from the camera. Also, though the camera can detect motion up to 25 feet (7.6 meters) away, the best
area for motion detection is 5 to 20 feet (1.5 to 6 meters) from the camera position.

*At 6.5 feet (2 meters) or higher, we recommend using the Arlo Outdoor Mount.
Use camera positioning to aim your camera
Camera positioning is available only when the camera is not streaming, recording motion, or using the Motion Detection test. During camera positioning, the camera streams video as fast as possible, without buffering. You can aim your camera while watching on your smartphone and make near real-time adjustments to the camera position. This means that you might see lower-quality video while you are positioning your camera.
- Open the Arlo app.
- Tap Settings > My Devices.
- Select the camera.
- Tap Device Utilities > Camera Positioning.
The camera starts streaming video. The signal strength bar indicates the WiFi signal that your Arlo Ultra camera is receiving at its current location.
Test motion detection
You can use the motion detection test to find the right motion sensitivity setting for each camera.
- Open the Arlo app.
- Tap Settings > My Devices.
- Select the camera.
- Tap Device Utilities > Motion Detection Test.
- Move in front of the camera. During this test, the camera LED blinks amber when motion is detected.
- Move the slider to adjust the motion sensitivity level as needed.
- Edit the rule for your camera to enter the motion sensitivity level that you want to use.
Arm your camera to detect motion
You control when your camera detects motion and the rules it uses to record and alert you by selecting a mode. The Arlo app comes with four modes, Armed, Disarmed, Schedule, and Geofending. You can customize each mode and you can also create custom modes.
Arlo Ultra Basics
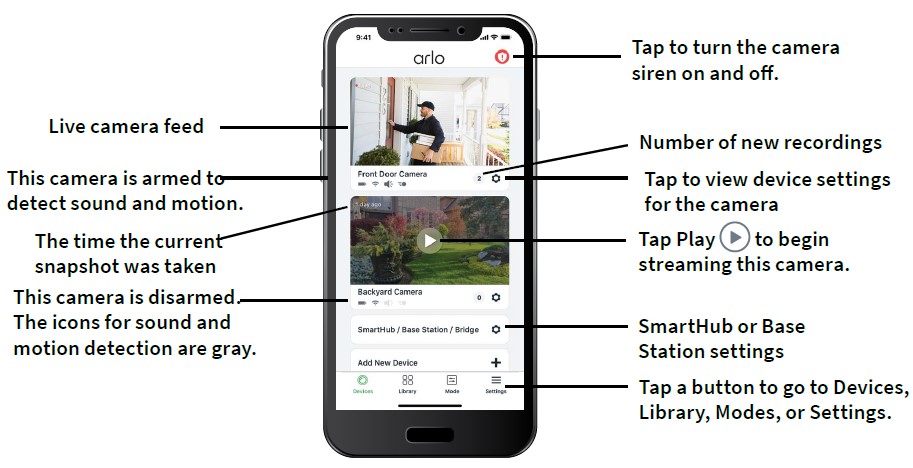

View your camera feeds
- Open the Arlo app.
- Tap the camera feed. The camera feed updates and camera feed icons display.
- To stop viewing and listening to the live feed, tap the Stop icon .
Local live 4K streaming
You can live stream in 4K from Arlo Ultra if you use the Arlo app on a mobile device that’s on the same local network as the Arlo SmartHub. If you enable 4K live streaming in your Arlo Ultra video settings, 4K live video streams when you tap Play on the camera stream in the Arlo app.
To enable local live 4K streaming:
- Open the Arlo app.
- Tap Settings > My Devices.
- Select the camera.
- Tap Video Settings.
- Tap Local 4K Live Streaming to toggle live streaming on and off.
Pan and Zoom video
Pan and Zoom video
You can pan and zoom your video feed.
- Open the Arlo app.
- Tap Play on the camera feed.
On a mobile device, use the pinch gesture to zoom, and touch and drag to move around the zoomed-in frame.
On a computer, double-click to zoom. Left-click hold and drag to move around the zoomed-in frame.
After zooming in, the image stops and buffers for about five seconds to improve the quality of the video. When the buffering stops, your zoomed-in video renders in high quality.
Foresight
When plugged in using the indoor or outdoor magnetic charging cable, your Ultra Camera records continuously, but discards the video after three seconds if no motion is detected. This is called Foresight and it means that your motion-triggered video recordings start before any motion happens; you don’t miss a thing.
To record and view video with foresight:
- Plug in your camera.
- Make sure the camera is using a motion-detection mode such as Armed.
Record clips from live video
- Open the Arlo app.
- Tap the camera feed image.
- Tap Record to begin recording.
This icon turns red to indicate that you are recording the live feed. - To stop recording, tap Record again.
Note: While you’re using 4K local live streaming, you can’t record or take snapshots.
Take a snapshot from a live video
- Open the Arlo app.
- Tap the camera feed image.
- Tap Snapshot.
The snapshot is saved in your library.
Note: While you’re using 4K local live streaming, you can’t record or take snapshots.
Talk and Listen
The Arlo Ultra camera includes microphones that allow you to talk and listen. The two microphones in the camera use beamforming for spatial filtering of sound. This lets your camera hone in on sound from a particular area or subject. The microphones also enable noise-cancelling and wind noise reduction.
Use Talk and Listen
- Open the Arlo app.
- Tap the camera feed image.
- Tap Talk and Listen .
- The first time you use Talk and Listen, allow Arlo to use your phone’s microphone.
- Tap the microphone button.
Two-way audio automatically opens, allowing you to use Talk and Listen.
Turn the camera spotlight on and off
You can use your Arlo Ultra camera spotlight at night for better video quality. When your camera is armed and detects motion at night the spotlight turns on automatically. You can also adjust the spotlight behavior and turn it on and off manually through the Arlo app.
Turn the spotlight on and off from the camera feed
- Open the Arlo app.
- Tap the camera feed.
- Tap Spotlight.
- To adjust the brightness, tap and hold the icon and adjust the slider.
- To turn off the spotlight, tap Spotlight.
Use SD Card Storage
You can insert a microSD card into your Arlo SmartHub VMB5000 and store your Arlo recordings both in the cloud and on the SD card. If the SmartHub isn’t connected to the Internet, recordings continue to be saved on the microSD card. If you have an active live stream connection between an Arlo Ultra camera and a SmartHub, you can record to a microSD card. Your Arlo app notifies you when the SD card is low on storage space or is full.
MicroSD card format
Your SmartHub accepts SDHC or SDXC microSD cards. We recommend using microSD cards with a minimum of 16 GB capacity, Speed Class 10, UHS-!, V10. Your Arlo SmartHub supports up to Class 10 UHS-3 V90.
If your microSD card isn’t formatted or is formatted with an incompatible file system, you can use your Arlo app to format the microSD card. See Format a microSD card on page 67.
Insert a microSD card
- Insert the microSD card into the slot on the bottom of the SmartHub.
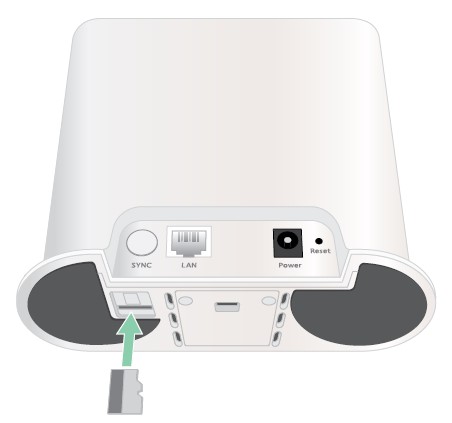
- Press the edge of the microSD card until it’s completely seated in the slot.
View the SD card status
- Open the Arlo app.
- Tap SmartHub/Base Station/Bridge.
- Check the SD card icon. When a microSD card is inserted into the SmartHub, this icon is amber .
- To view more information about the microSD card status, under LOCAL STORAGE, tap
Storage Settings.
The SD Card Status displays GOOD or indicates if the SD card needs to be formatted, or is full. The Arlo app also notifies you if this occurs.
View available SD card storage
The Arlo app notifies you if the SD card is getting full, but you can also view the available storage.
- Open the Arlo app.
- Tap SmartHub/Base Station/Bridge > Storage Settings.
The Available Storage field displays the amount of storage available on the SD card.
Turn SD card recording off and on
- Open the Arlo app.
- Tap SmartHub/Base Station/Bridge
- Select the SmartHub.
- Tap Storage Settings > SD Card Recording.
SD card recording toggles off and on.
Turn local 4K recording off and on
The SmartHub recordings saved onto the SD card are 1080p, but you can change this setting and save 4K recordings onto the SD card.
- Open the Arlo app.
- Tap SmartHub/Base Station/Bridge
- Select the SmartHub.
- Tap Storage Settings > Best Local Recording.
Local 4K recording toggles off and on.
The Best Local Recording setting turns on 4K recording for Ultra cameras. If your Arlo system includes other cameras, the Best Local Recording setting turns on the highest resolution your camera supports, such as 2K recording for Arlo Pro 3 cameras if you use a mix of different Arlo camera models.
Change the SD card overwrite setting
By default, if the SD card fills up, the oldest Arlo recording is erased to make room for new recordings. Files on the SD card that aren’t in the Arlo folder aren’t deleted to make room for Arlo recordings. You can change the setting so that no Arlo recordings are automatically erased.
- Open the Arlo app.
- Tap Base Station & Bridge > Storage Settings.
- Tap Overwrite Automatically.
The overwrite setting toggles off and on.
Format a microSD card
Your SmartHub accepts micro SD cards, SDHC or SDXC only, file format FAT32. The Arlo app displays a message to let you know if you need to format the SD card. The SmartHub can format the SD card.
- Open the Arlo app.
- Tap SmartHub/Base Station/Bridge > Local Storage.
- Tap the red Format SD Card button.
Safely eject an SD card
It’s important to safely remove the microSD card from your SmartHub. If you remove an SD card while information is being recorded on it, the SD card might become permanently unusable or the files on the card might be corrupted.
- Open the Arlo app.
- Tap SmartHub/Base Station/Bridge > Local Storage.
- Tap Safely Eject SD Card.
- Wait for the Unmounting SD Card progress message to close.
- Remove the SD card from your SmartHub by pressing on the edge of the card until it ejects.
Do not interrupt power to the SmartHub or remove the SD card while unmounting the SD card. - The SD card icon changes from amber to gray indicating that no microSD card is in the slot.
Arlo SD card recording is disabled until you insert another SD card.
View videos on a microSD card
To view Arlo videos saved on a microSD card, you must remove the microSD card from your SmartHub and use a microSD card reader.
The microSD card reader can be part of your computer or a memory card reader with a USB or micro USB connector. If you purchase an SD card reader, make sure that you choose one that can read microSD cards.
- Safely eject the microSD card.
- Insert the microSD card into the slot in your card reader.
- Wait for the microSD card to appear in the list of available drives on your computer, and then open the drive folder to view the files on your microSD card.
- Open the Arlo folder.
Recorded videos are saved in this folder in MP4 format. Video files are named according to this system: camera serial number_video number_date_video clip tag. Dates are in the format YYYYMMDD.
Note: If you’re unable to play MP4 files on your computer, update your media player software to the latest version and try again. You can also download a free universal multimedia player, such as VLC.
Rechargeable Battery Safety
Safe Handling and usage guidelines for rechargeable batteries
Batteries can EXPLODE, CATCH FIRE, and/or CAUSE BURNS if disassembled, punctured, cut, crushed, short-circuited, incinerated, recharged (disposable cells), or exposed to water, fire, or high temperatures.
To ensure optimal safety and performance:
- Only use Arlo-approved batteries. If you are unsure about whether a replacement battery or charger is compatible, contact Arlo.
- DO NOT use this battery for anything other than its intended purpose.
- DO NOT use the device if its battery case appears damaged, swollen, or compromised.
Examples include, but are not limited to, leaking, odors, dents, corrosion, rust, cracks, swelling, melting, and scratches. - DO NOT disassemble, crush, puncture, short external contacts, or dispose of in fire or water.
- DO NOT expose the device to fire or temperatures greater than 60°C (140°F). Do not place the device next to areas that may become hot. Examples include but are not limited to, on or near a space heater, cooking surface, cooking appliance, iron, radiator, or fireplace.
- DO NOT get the battery or device wet. Even though they might dry and appear to operate normally, the circuitry can slowly corrode and defeat its safety circuitry.
- DO NOT place the battery in a pocket, purse, or other receptacle containing metal objects, such as keys, jewelry, or tools.
- DO NOT store the battery with hazardous or combustible material. Store in a cool, dry, ventilated area.
- ALWAYS keep the battery away from children.
- DO NOT load the battery backward. MAKE SURE the battery compartment is empty and free of any moisture or loose debris before inserting the battery.
- AVOID dropping the battery or the Arlo device. Dropping it, especially on a hard surface, might cause damage to the battery or the Arlo device. If you suspect damage to the battery or the Arlo device, replace it.
- ALWAYS follow the directions in the Quick Start Guide and/or written in the Arlo Product User Manual.
- ALWAYS follow local waste & recycling laws & guidelines to dispose of used Arlo batteries.
Support
For product updates and web support, visit http://www.arlo.com/en-us/support/.
Arlo Technologies, Inc.
2200 Faraday Ave. Suite 150
Carlsbad, CA 92008 USA
Document publication date: May 2021
PN 202-11887-07
Trademarks
© Arlo Technologies, Inc. Arlo, Arlo logo, and Every Angle Covered are trademarks of Arlo Technologies, Inc. Apple is a trademark of Apple Inc., registered in the US and other countries. App Store is a service mark of Apple Inc. HomeKit is a trademark of Apple Inc. To control this HomeKit-enabled accessory, the latest version of iOS or iPadOS is recommended. Google Play and the Google Play logo are trademarks of Google LLC. Any other trademarks are for
reference purposes.
Use of the Works with Apple badge means that an accessory has been designed to work specifically with the technology identified in the badge and has been certified by the developer to meet Apple performance standards. Apple is not responsible for the operation of this device or its compliance with safety and regulatory standards.
Compliance
For regulatory compliance information including the EU Declaration of Conformity and where to find e-label information for US FCC & Industry Canada, visit www.arlo.com/about/regulatory/.
See the regulatory compliance document before connecting the power supply.
FAQS About Arlo Ultra 2 Spotlight Camera
How far away from the base station can Arlo Ultra 2 be?
300 feet
Is a base station required for Arlo Ultra 2?
Yes, an Arlo SmartHub is necessary for the Arlo Ultra 2 to function.
To how many Arlo Ultra 2 cameras can you add?
With or without an Arlo Secure package, your Arlo account can handle an infinite number of cameras.
The Arlo Ultra 2 camera requires how much power?
A lithium polymer battery with a 3.85V 4800mAh 18.48Wh capacity powers the new Arlo Ultra and Pro range cameras.
Is there local storage in Arlo Ultra 2?
4K videos can be directly saved to a microSD card or USB device.
Arlo can I use in two places at once?
You can add many locations using a single account thanks to Arlo Secure 4.0.
How many MHz is Arlo Ultra 2?
in the range of 2.4 and 5 GHz
Can Arlo Ultra 2 be WiFi connected?
The WiFi in your house is never connected.
Does Arlo Ultra 2 support subscription-free recording?
You won’t have access to more sophisticated Arlo features like Activity Zones, Cloud Recording, and Alarm Detection without a premium membership plan or trial.
For more manuals by Arlo, Visit Manualsdock
[embeddoc url=”https://manualsdock.com/wp-content/uploads/2023/09/Arlo-Ultra-2-Spotlight-Camera-User-Manual.pdf” download=”all”]

