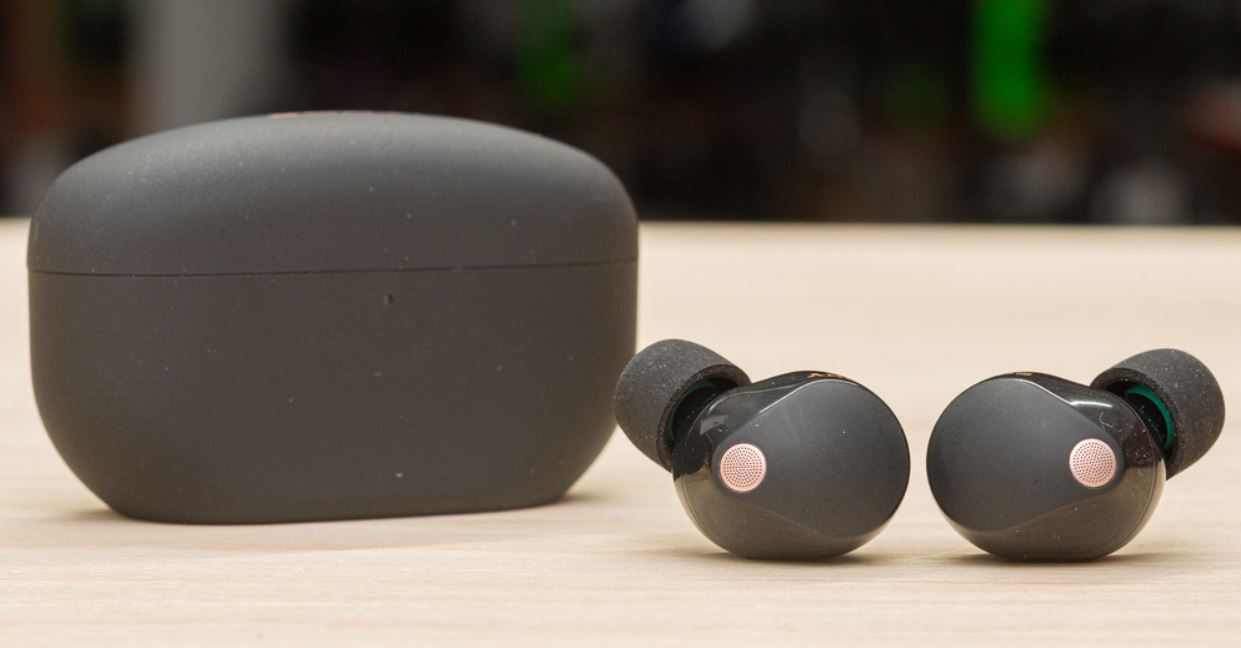
Sony WF-1000XM5 Wireless Noise Canceling Stereo Headset
About SONY
Sony was founded in 1946 by Masaru Ibuka and Akio Morita, originally as Tokyo Tsushin Kogyo. The company started with a focus on producing innovative consumer electronics, such as radios and tape recorders, and later expanded into various other areas, including televisions, audio equipment, cameras, video game consoles, and mobile devices.
Download the app, and set up the headset
To use all functions and improve performance, update the software of the headset and the “Sony | Headphones Connect” app to the latest version. For details, refer to the following: https://www.sony.net/elesupport/
Let’s start to use
What you can do with the Bluetooth function
The headset uses Bluetooth wireless technology, allowing you to do the following.
- Listening to music You can enjoy music wirelessly from a smartphone or music player, etc.

- Talking on the phone You can make and receive calls hands-free while leaving your smartphone or mobile phone in your bag or pocket.

About the voice guidance
In the factory settings, when the headset is worn in your ears, you will hear the English voice guidance via the headset. By using the “Sony | Headphones Connect” app, you can change the language of the voice guidance, turn on/off the voice guidance, and set the voice guidance volume. For more details, refer to the “Sony | Headphones Connect” app help guide. https://rd1.sony.net/help/mdr/hpc/h_zz/
- When entering pairing mode automatically by putting the headset units into your ears for the first time after purchase or after initializing the headset (when there is no pairing information on the headset) / When manually entering pairing mode and putting the headset units into your ears: “Pairing”
- When the remaining battery charge of the headset is low: “Low battery”
- When automatically turning off due to low battery of the headset: “Battery is empty” When setting the voice guidance volume: “Voice guidance test”
- When Google Assistant is not available on the smartphone connected to the headset even when operating the headset unit to which Google Assistant is assigned: “Google Assistant is not connected”
- When Amazon Alexa is not available on the smartphone connected to the headset even when operating the headset
- unit to which Amazon Alexa is assigned: “Either your mobile device isn’t connected, or you need to open the Alexa App and try again”
- When operating Voice Assistant while connected in LE Audio: “The [Voice Assistant] is not available. Please open the Headphones Connect and check the [Voice Assistant] settings.”
- When [Connect to 2 devices simultaneously] is turned on and [LE Audio connection setting for headphones] is set to [LE Audio Priority] in the “Sony | Headphones Connect” app and switching from Classic Audio connection to LE Audio connection: “Multipoint connection has been disabled. Please open the Headphones Connect and check the [Connect to 2 devices simultaneously] settings.”
- When Quick Access is not available because the Service Link is turned off: “Launch Headphones Connect to activate Service Link”
- When the corresponding app is not launched even if you operate the headset unit to which Quick Access is assigned: “App assigned to the Quick Access is not launched on the mobile device”
- When operating Quick Access while connected in LE Audio: “The Quick Access is not available. Please open the Headphones Connect and check the [Services] tab.”
- When Safe Volume Control starts: “The [Safe volume control] limits the volume.”
Checking the package contents
After opening the package, check that all of the items in the list are included. If any items are missing, contact your dealer. Numbers in ( ) indicate the item amount.
- Wireless Noise Canceling Stereo Headset (1)
- USB Type-C® cable (USB-A to USB-C®) (approx. 20 cm (7.88 in.)) (1)

- Noise isolation earbud tips (SS/S/M/L 2 each)
- M-sized earbud tips come attached to the left and right headset units at the time of purchase. The size of the earbud tips can be determined based on the color of the inside of the earbud tips.

- SS size: red
- S size: orange
- M size: green
- L size: light blue
- M-sized earbud tips come attached to the left and right headset units at the time of purchase. The size of the earbud tips can be determined based on the color of the inside of the earbud tips.
- Charging case (1)
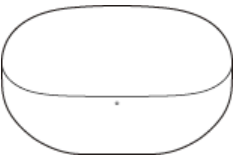
- Documents (1 set)
Note Earbud tips are consumables. If the earbud tips are damaged and need replacing, contact your nearest Sony dealer or purchase the EP-NI1010 series*, sold separately.
Replacing the earbud tips
M-sized earbud tips come attached to the left and right headset units at the time of purchase. If the size of the earbud tips does not match the size of your ear canals or the headset is not worn properly in your ears, tap operations or Speak-to-Chat speech detection may not work correctly, or you may not obtain the correct sound qualities, noise canceling effects, or call performance. If any of this is the case, try the following.
- Change the earbud tips to ones that fit more snugly in your ears. When changing the earbud tips, try the earbud tip sizes in order from the larger ones to the smaller ones. The most suitable size of the earbud tips for left and right ears may be different.
- The “Sony | Headphones Connect” app will help you to determine which earbud tips suit you best to achieve the optimal noise canceling effect, sound quality, etc.
- Check that you are wearing the headset properly in your ears. Wear the headset so that the earbud tip is comfortably situated as deep in the ear canal as possible.
Noise isolation earbud tips
The size of the earbud tips can be determined based on the color of the inside of the earbud tips.

- SS size: red
- S size: orange
- M size: green
- L size: light blue
-
- Remove the earbud tip. Hold the headset unit and twist the earbud tip while rotating it to pull it out. Do not pinch the end of the earbud tip when removing it.

- Attach the earbud tip. Push the earbud tip firmly onto the sound conduit (sound output tube) on the headset so that the earbud tip covers the inner end of the sound conduit. Do not attach the earbud tip in a loose or skewed manner.

If the earbud tip is not completely attached, the earbud tip may be removed from the headset and the sound quality, noise-canceling effects, and wearability may be impaired. - Check that the earbud tip is securely attached. Twist the earbud tip to one side and check that the stem of the earbud tip is completely covering the sound conduit on the headset unit.

- Remove the earbud tip. Hold the headset unit and twist the earbud tip while rotating it to pull it out. Do not pinch the end of the earbud tip when removing it.
Note
- Earbud tips are consumables.
- Avoid washing with water, wet wipes, and the use of organic solvents such as alcohol, as these can cause premature deterioration.
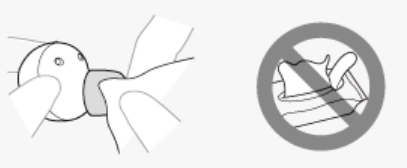
- The earbud tips deteriorate through long-term use and storage. When there are cracked, peeled, or chipped portions, refrain from using them.
- If the earbud tips deteriorate, they cannot achieve proper sound qualities or noise canceling effects and can cause injuries or diseases as the earbud tips may come off and remain in the ear.
- As the earbud tips fit more snugly in your ears, you may feel a strain on your ears. If you experience discomfort, discontinue use. Do not pull on the polyurethane foam portion of the earbud tip. If it is separated from the earbud tip, it will not function.
- Do not subject the polyurethane foam portion of the earbud tip to pressure for long periods. It may cause deformation and it may be difficult to return the earbud tip to the original shape.
- When the earbud tips become dirty, do not wash them in water, and wipe off the dirt using a dry cloth. Do not use alcohol, etc. Doing so may quicken the deterioration.
- When the earbud tips get soaked, drain the liquid well, and make sure that the earbud tips are dried before use or storage. The varying sizes of the holes on the polyurethane foam portion of the earbud tip do not affect the sound quality.
- You may hear a cracking noise in your ears when wearing the headset. However, this is not a malfunction.
- The foam materials may become firm at a low temperature. Warm the earbud tips a little with your hands before use.
- When the environmental temperature or usage temperature is high, the polyurethane foam may take time to return to its original shape.
- If you feel that the bass sound has become insufficient (or that the sound quality has deteriorated), exchange the earbud tips with new ones.
Location and function of parts
- Headset

- Touch sensors (left, right)
- Microphones (left, right) Pick up the sound of your voice (when talking on the phone or in the Speak-to-Chat mode) and noise (when using the noise canceling function/Ambient Sound Mode).
- Earbud tips (left, right)
- IR sensors (left, right)
- Charging ports (left, right)
- Air holes (left, right)
- Tactile dot There is a tactile dot on the left headset unit.
- (left) mark
- (right) mark
- Built-in antennas (left, right)
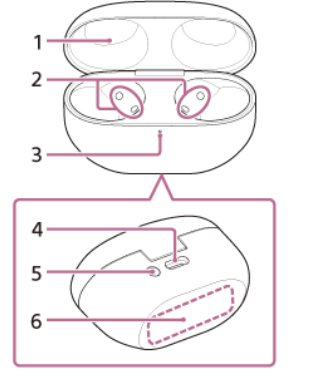
- Charging case
-
- Lid
- Charging ports (left, right)
- Indicator (green/orange/blue) Indicates the remaining battery life of the headset units and charging case, the charging status, or the status of the pairing mode.
- USB Type-C port Using the supplied USB Type-C cable, connect the charging case to a computer or an AC outlet via a commercially available USB AC adaptor to simultaneously charge both the headset and the charging case.
- Pairing/reset/initialize button Used when entering pairing mode, resetting, or initializing the headset.
- Contact surface for the Qi charging
Wearing the headset
- Lay the headset units on their sides and remove them from the charging case. The headset turns on automatically.
- Put the headset units into your ears. Put the headset unit with the (left) mark into your left ear and the headset unit with the (right) mark into your right ear. The left headset unit has a tactile dot. If you feel it is difficult to put the earbud tips into your ears, squeeze the earbud tips lightly before wearing the headset.
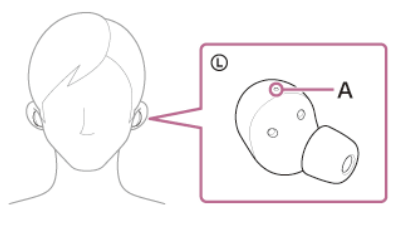
- A: Tactile dot Be careful not to come in contact with the touch sensor when you put the headset units into your ears.

- B: Touch sensors (left, right)
- A: Tactile dot Be careful not to come in contact with the touch sensor when you put the headset units into your ears.
- Adjust the fit of the headset units to your ears. Hold and rotate the headset unit with your thumb, index, and middle finger to adjust the headset to fit your ear.

After putting the headset unit into your ear, hold the side of the headset unit with your fingers and slowly push the earbud tip into your ear canal.
Note If you touch the touch sensor, the headset may operate.
Check if there is a gap between the earbud tip and your ear canal because the earbud tip is not inserted all the way or the earbud tip is the wrong size. - Use the video function on your smartphone to check the fit of your ears.
The noise-canceling effects may not be achieved depending on how the headset units are worn. - If you use the video function of your smartphone or other devices to record and check how the headset units are worn in your ears, you can understand its feel when worn and get closer to discovering the correct way to wear the headset
- Wait for about 10 seconds for the earbud tip shape to stabilize.
If you feel your ears are not sealed, the noise canceling function is not sufficient or the low-frequency sound performance is not sufficient, try larger-size earbud tips. If the headset units come off while you are wearing them, try smaller-size earbud tips.
For the proper sound quality, noise canceling function, and call sound quality to be effective
- If the size of the earbud tips does not match the size of your ear canals or the headset is not worn properly in your ears, tap operations or Speak-to-Chat speech detection may not work correctly, or you may not obtain the correct sound qualities, noise canceling effects, or call performance.
- If any of this is the case, try the following.
- Change the earbud tips to ones that fit more snugly in your ears. When changing the earbud tips, try the earbud tip sizes in order from the larger ones to the smaller ones. The most suitable size of the earbud tips for left and right ears may be different.
- The “Sony | Headphones Connect” app will help you to determine which earbud tips suit you best to achieve the optimal noise canceling effect, sound quality, etc.
- See steps and check that you are wearing the headset properly in your ears. Wear the headset so that the earbud
- the tip is comfortably situated as deep in the ear canal as possible.
About the touch sensor
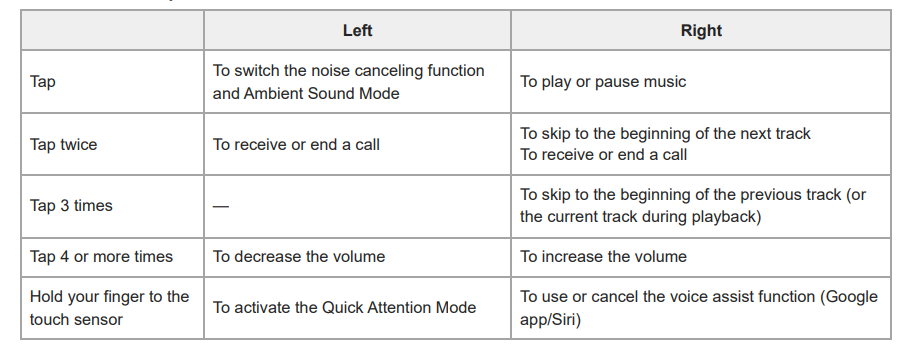
Tap the touch sensor for various operations, such as music playback, phone calls, or changing the setting of the noise canceling function.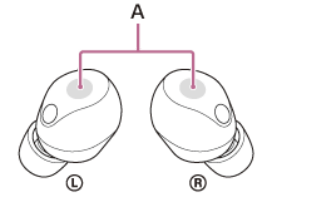
- A: Touch sensors (left, right)
- To operate the touch sensor, tap the center of the touch sensor with the pad of your index finger.

Some available operations
Charging
The headset and the charging case contain built-in lithium-ion rechargeable batteries. Use the supplied USB Type-C cable to charge the headset before use.
- Set the headset units into the charging case.
Put the left headset unit (the headset unit with the tactile dot) back into the left hole of the charging case, and put the right headset unit back into the right hole of the charging case. Each headset unit will be set to the correct position in the charging case by the built-in magnet.
When the rechargeable battery of the charging case still has power, the indicator (orange or green) on the charging case lights up for about 3 seconds. The charging starts on the headset. Close the charging case lid. - Connect the charging case to an AC outlet.
Use the supplied USB Type-C cable and a commercially available USB AC adaptor.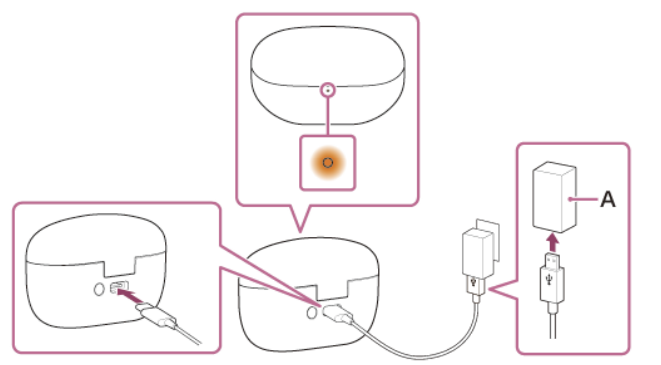
A: USB AC adaptor Charging starts on the headset and charging case. The indicator (orange) on the charging case lights up. After charging is complete, the indicator on the charging case turns off. Remove the USB Type-C cable
- About the charging time The required time for fully charging the headset and the charging case is about 2 hours*.
- Charging the headset when you are outside A rechargeable battery is built into the charging case. If you charge the charging case in advance, you can use it to charge the headset when you go out without a power supply. The required time for fully charging the left and right headset units is about 1.5 hours.
- System requirements for battery charge using USB
- USB AC adaptor
A commercially available USB AC adaptor capable of supplying an output current of 0.5 A (500 mA) or more - Personal computer
Personal computer with a standard USB port- We do not guarantee operation on all computers.
- Operations using a custom-built or homebuilt computer are not guaranteed.
- USB AC adaptor
Wireless charging
This headset is compatible with the wireless chargers that meet the Qi standard. Use a wireless charger that conforms to the Qi standard. Close the charging case lid and place it on the wireless charger with the SONY logo on the charging case facing upward to charge. See “Location and function of parts” for the location of the charging contact surface. When charging, refer to the operating instructions supplied with the wireless charger.
Checking the remaining battery charge
You can check the remaining battery charge of the rechargeable batteries of the headset and the charging case by the following operations.
If the remaining battery charge of the headset becomes low when you put the headset into your ears or while using the headset If a warning beep sounds and the voice guidance says, “Low battery”, charge the headset as soon as possible. When the battery becomes empty, a warning beep sounds, the voice guidance says, “Battery is empty”, and the headset automatically turns off.
When you are using an iPhone or iPod touch When the headset is connected to an iPhone or iPod touch over an HFP (Hands-free Profile) Bluetooth connection, it will show an icon that indicates the remaining battery charge of the headset on the screen of the iPhone or iPod touch.
The display position is an example.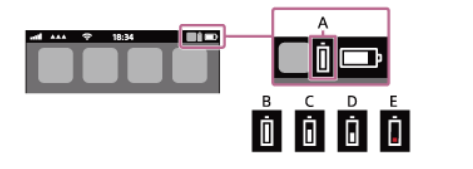
- A: Remaining battery charge of the headset
The approximate remaining charge is shown at 10 different levels. B through E are display examples. - B: 100%
- C: 70%
- D: 50%
- E: 10% or lower (requires charging)
Turning on the headset
When the headset is stored in the charging case
- Lay the headset units on their sides and remove them from the charging case.
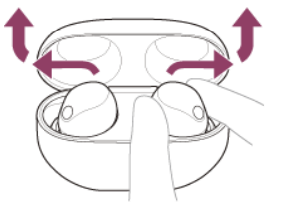
When the headset is not stored in the charging case When the headset is not worn in your ears for about 15 minutes after being removed from the charging case, the headset turns off automatically. In this case, turn the headset on by tapping the touch sensor of the headset or by putting the headset into your ears.
When the headset is turned on
When both headset units are removed from the charging case, the connection is established between the left and right headset units. When turning on the headset for the first time after purchase or just after initializing the headset, the headset goes into Bluetooth pairing mode.
Turning off the headset
- Set the headset units into the charging case. Put the left headset unit (the headset unit with the tactile dot) back into the left hole of the charging case, and put the right headset unit back into the right hole of the charging case. Each headset unit will be set to the correct position in the charging case by the built-in magnet.
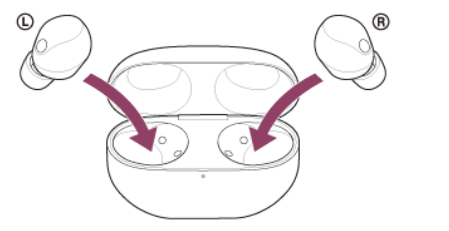
When the rechargeable battery of the charging case still has power, the indicator (orange or green) on the charging case lights up for about 3 seconds. The charging starts on the headset. Close the charging case lid.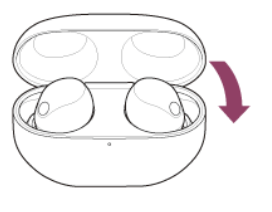
- The headset turns off.
When the headset is left removed
- When the headset is not worn in your ears for about 15 minutes after being removed from the charging case, the headset turns off automatically.
- To turn off the power before the headset turns off automatically, set the headset units into the charging case, and close the charging case lid.
How to make a wireless connection to Bluetooth devices
You can enjoy music and hands-free calling with the headset wirelessly by using your Bluetooth device’s Bluetooth function.
- Pairing To use the Bluetooth function, both of the connecting devices must be registered in advance. The operation to register a device is called “pairing”. Pair the headset and the device manually.
- Connecting to a paired device Once a device is paired, it is not necessary to pair it again. Connect to devices already paired with the headset using the methods necessary for each device.
What can I do to solve a problem?
Before asking for repair, check the following items again.
- Find the symptoms of the issue in this Help Guide, and try any corrective actions listed. Set the headset units into the charging case, and close the charging case lid.
- You may be able to resolve some issues by setting the headset units into the charging case. Charge the headset.
- You may be able to resolve some issues by charging the headset battery.
- Restart the device that is being connected to the headset.
- You may be able to resolve some issues by restarting the device being connected such as your computer or smartphone.
- Reset the headset. Initialize the headset.
- This operation resets volume settings, etc. to the factory settings, and deletes all pairing information. Look up information on the issue on the customer support website.
Unable to turn on the headset.
- Make sure the battery is fully charged.
- You cannot turn on the headset when the headset is stored and being charged in the charging case. Remove the headset from the charging case to turn on.
- Charge the charging case.
- Set the headset units into the charging case, and close the charging case lid.
- You may be able to resolve some issues by setting the headset units into the charging case.
- Clean the charging ports of the headset units and charging case, then set the headset units into the charging case and check the status of the indicator on the charging case. For details, see “Maintenance”.
- The headset cannot be used during an automatic headset software update. Set the headset into the charging case and close the charging case lid, then wait for about 5 minutes.
- Reset the headset.
- Initialize the headset, and pair the headset and the device again.
The headset cannot be charged or the charging time is too long.
Common
- Make sure the headset units are stored securely in the supplied charging case. If the headset units are floating in the charging case, the headset units may not be charged.
- Be sure to use the supplied USB Type-C cable and check that the cable is firmly connected to the charging case. When the charging ports of the headset units or the charging case get dirty, the headset units may not be charged. Clean the charging ports with a soft dry cloth. For details, see “Maintenance”.
- The left or right headset unit works as the main headset unit, so it consumes the rechargeable battery faster than the other unit. There is a difference in charging time between the left and right headset units, but this is not a malfunction. The left or the right headset unit can be the “main headset unit” depending on the usage environment.
- It is recommended to charge in a place with an ambient temperature between 15 °C and 30 °C (59 °F – 86 °F). Charging outside of this range may result in less efficient charging.
- While charging, be sure to keep the charging case lid closed to prevent the battery of the charging case from being wasted.
- Reset the headset.
- Initialize the headset, and pair the headset and the device again.
When charging with a USB AC adaptor
- Make sure that the USB AC adaptor is firmly connected to the AC outlet.
- When using a commercially available USB AC adaptor, use one capable of supplying an output current of 0.5 A (500 mA) or more.
When charging with a computer
- Check that the USB Type-C cable is firmly connected to the computer.
- Check that the computer is turned on. Wake the computer up if the computer is in standby (sleep) or hibernation mode.
- Check that the charging case and the computer are directly connected and not via a USB hub. Also, this may be improved by restarting the computer and trying the USB connection again.
- There may be a problem with the USB port of the connected computer. Try connecting to another USB port on the computer if one is available.
- Update the OS of the computer.
When performing wireless charging
- When charging wirelessly, charging may slow down or stop if the charging case becomes misaligned with the wireless charger.
- When charging wirelessly, charging may slow down or stop at high or low temperatures depending on the wireless charger you are using.
No sound, no sound from one side
Common
- Pair the headset and the Bluetooth device again.
- When playing music, check that the headset and the transmitting Bluetooth device are connected via an A2DP Bluetooth connection.
- Charge the charging case.
- Set the headset units into the charging case, and close the charging case lid.
- You may be able to resolve some issues by setting the headset units into the charging case.
- If foreign material such as earwax becomes attached to the mesh part of the earbud tip, the sound may become muffled or difficult to hear. See “Maintenance” and clean the earbud tips as described before use.
- Restart the smartphone or the computer you use.
- No sound can be heard from the headset units during an automatic headset software update. Set the headset into the charging case and close the charging case lid, then wait for about 5 minutes.
- Reset the headset.
- Initialize the headset, and pair the headset and the device again.
- When the Speak-to-Chat mode is activated, music playback will pause. In this case, operate the touch sensor of the headset to exit the Speak-to-Chat mode.
- You can use the “Sony | Headphones Connect” app to switch between enabling or disabling Speak-to-Chat.
- When the headset is simultaneously connected to 2 devices via a multipoint connection, depending on the connected device, the device may keep sending the silent signal even if the playback of the music or video is stopped. In this case, the headset remains connected to the device, and the connection may not be changed to another device. If the sound from the second device cannot be heard after the playback is stopped on the first device, operate in the following order and check whether the situation has improved.
When connecting to a computer
- If you are connecting a computer to the headset, make sure the audio output on the computer is set for a Bluetooth device.
- Restart the music app or video app.
- When using a video calling application on a computer, check that the headset and the computer are connected via an HFP or HSP Bluetooth connection.
- Depending on the video calling application you are using, microphone settings may not be available.
When there is no sound on only one side
- Depending on the smartphone app or computer application (which requires HFP (Hands-free Profile)/HSP (Headset Profile)), you may hear a voice from only one headset unit.
Low sound level
- If foreign material such as earwax becomes attached to the mesh part of the earbud tip, the sound may become muffled or difficult to hear. See “Maintenance” and clean the earbud tips as described before use.
- If the size of the earbud tips does not match the size of your ear canals or the headset is not worn properly in your ears, you may not obtain the correct sound qualities or volume.
- If any of this is the case, try the following.
- Change the earbud tips to ones that fit more snugly in your ears. When changing the earbud tips, try the earbud tip sizes in order from the larger ones to the smaller ones. The most suitable size of the earbud tips for left and right ears may be different.
- Check that you are wearing the headset properly in your ears. Wear the headset so that the earbud tip is comfortably situated as deep in the ear canal as possible.
- Adjust the volume on the connected device.
- The volume during music playback can be adjusted with the headset.
- The volume during calls cannot be adjusted with the headset. Adjust the volume on the connected device. Connect the Bluetooth device to the headset once again.
- The sound conduits (sound output tubes), air holes, and microphone part of the headset are not completely watertight. If any water droplets are left in the sound conduits, air holes, or microphone parts, the sound level becomes low temporarily. However, this is not a malfunction. See “When the headset units or the charging case gets wet” and clean them as described before use.
- Set the headset units into the charging case, and close the charging case lid.
- You may be able to resolve some issues by setting the headset units into the charging case. Reset the headset.
- Initialize the headset, and pair the headset and the device again.
Noise or unusual sounds can be heard.
- When using the headset, you may hear vibrations transmitted through your body while walking or running, and you may also hear biological sounds such as heartbeats and breathing sounds. This may occur due to the nature of the product and is not a malfunction.
- When the noise canceling function is turned on, you may hear a small amount of noise, but this is due to the
- characteristics of noise canceling.
- When putting on or adjusting the headset, the shape of the earbud tip may change and the internal bubbles may be crushed or restored. At this time, you may hear a popping sound in your ear, but this is not abnormal.
- When you push the headset units into your ears or tap the touch sensor strongly, you may hear a temporary sound caused by the noise canceling function, Ambient Sound Mode, and the headset’s tight sealing properties. This is not a malfunction.
- If you tap the touch sensor when the headset is not connected via a Bluetooth connection, you will hear a notification sound indicating that the headset is turned on.
- The sound conduits (sound output tubes), air holes, and microphone part of the headset are not completely watertight. If any water droplets are left in the sound conduits, air holes, or microphone parts, a beeping sound (feedback) may be heard temporarily. This is not a malfunction. See “When the headset units or the charging case gets wet” and clean them as described before use.
- If you cover the microphone part on the left or right headset unit with your hand, etc., or if you grasp the headset unit in your hand, a beeping sound (feedback) may be heard. This is not a malfunction. If any of this is the case, remove your hand, etc. from the left or right microphone part.
- If the Ambient Sound Mode is enabled in a rather noisy environment, a noise may be heard. This is not a malfunction.
- In this case, set the noise canceling function to ON or set the noise canceling function and the Ambient Sound Mode to OFF.
- Some devices that emit ultrasonic sound waves designed to repel rodents may occasionally be installed at the entrances of commercial facilities or subway stations. Near such devices, the ultrasonic sound waves may cause noise or unusual sounds to be heard from the headset. Leave the place where the noise or unusual sound is heard. Or turn off the noise canceling function/Ambient Sound Mode.
- When the Adaptive Sound Control is turned on, the headset detects the wearer’s actions and adjusts the noise canceling function automatically. When this setting is changed, music may pause momentarily and a notification sound may be heard. This sound notifies you that the setting has been changed.
- If you want to deactivate this notification sound, use the “Sony | Headphones Connect” app to turn the setting off.
If none of the above items apply, try the following steps in sequence to improve the situation.
- Charge the charging case.
- Set the headset units into the charging case, and close the charging case lid.
- You may be able to resolve some issues by setting the headset units into the charging case. Reset the headset.
- Initialize the headset, and pair the headset and the device again.
Sound skips frequently.
The following settings on the playback devices and headset may be affecting the sound quality.
-
- Set the headset to “Priority on stable connection”. For details, see “About the sound quality mode”.
- When the headset is simultaneously connected to 2 devices via a multipoint connection, it may be easier for the sound to skip.
- This issue can be improved by changing the wireless playback quality settings on the transmitting device. For
- details, refer to the operating instructions supplied with the transmitting device.
- When the Adaptive Sound Control is turned on, the headset detects the wearer’s actions and adjusts the noise canceling function automatically. When this setting is changed, music may pause momentarily. This is not a malfunction.
- Turning off the Service Link on the “Sony | Headphones Connect” app may reduce the amount of audio dropout. If Speak-to-Chat is enabled, the Speak-to-Chat mode starts automatically when you talk to someone.
- The headset pauses or mutes the music being played. It may sound like the sound skips when this occurs, but it is not a malfunction. If you wish to avoid this, disable Speak-to-Chat.
- Remove any obstacles between the antenna of the connecting Bluetooth device and the antennas built into the left and right headset units. The antenna of each left or right headset unit is built into the part shown in the dotted line below.
- A: Locations of the built-in antennas (left, right)
Low sound quality
- If the size of the earbud tips does not match the size of your ear canals or the headset is not worn properly in your ears, tap operations or Speak-to-Chat speech detection may not work correctly, or you may not obtain the correct sound qualities, noise canceling effects, or call performance. If any of this is the case, try the following.
- Change the earbud tips to ones that fit more snugly in your ears. When changing the earbud tips, try the earbud tip sizes in order from the larger ones to the smaller ones. The most suitable size of the earbud tips for left and right ears may be different.
- The “Sony | Headphones Connect” app will help you to determine which earbud tips suit you best to achieve the optimal noise canceling effect, sound quality, etc.
- Check that you are wearing the headset properly in your ears. Wear the headset so that the earbud tip is comfortably situated as deep in the ear canal as possible.
The noise-canceling effects are not sufficient.
- Make sure the noise canceling function is turned on.
- If the size of the earbud tips does not match the size of your ear canals or the headset is not worn properly in your ears, tap operations or Speak-to-Chat speech detection may not work correctly, or you may not obtain the correct sound qualities, noise canceling effects, or call performance. If any of this is the case, try the following.
- Hold and rotate the headset unit with your thumb, index, and middle finger to adjust the headset to fit your ear. After putting the headset unit into your ear, hold the side of the headset unit with your fingers and slowly push the earbud tip into your ear canal. If you touch the touch sensor, the headset may operate.
- If you feel it is difficult to put the earbud tips into your ears, squeeze the earbud tips lightly before wearing the headset.
- If there is a gap between your ears and the headset units, your ears may not be sealed properly. Try larger-size earbud tips first. The most suitable size of the earbud tips for left and right ears may be different.
- If you feel your ears are not sealed, try larger-size earbud tips.
- If the headset units come off while you are wearing them, try smaller-size earbud tips.
- Perform [Determines Optimal Earbud Tips] on the “Sony | Headphones Connect” app and confirm that [Earbud tips are air-tight.] is displayed.
The headset cannot be operated.
- You cannot operate the headset when you are not wearing the headset. Put the headset into your ears to operate. If the IR sensor of the headset cannot detect that the headset is being worn because the headset is not worn properly, the earbud tips are not attached properly to the headset, or the IR sensor is dirty, the automatic power-off function may activate, and automatically turn off the headset. Adjust the fit of the headset to your ears, and if the IR sensor is dirty, clean it with a soft dry cloth.
- When the automatic power-off function is set to [Do not turn off] on the [System] tab of the “Sony | Headphones Connect” app, wearing detection will continue to work and the symptom may be improved.
- Note the following when tapping the touch sensor.
- If you are wearing gloves, remove them before operating.
- If the surface of your index finger is wet, greasy, dirty, too dry, etc., the headset may not respond well to tapping. If the touch sensor is in the following states, it may not work or may react incorrectly.
- When you change the assignment of the functions to the touch sensors with the “Sony | Headphones Connect” app, confirm on the app that the correct functions are assigned to the touch sensor.
- Charge the charging case.
- Set the headset units into the charging case, and close the charging case lid.
- You may be able to resolve some issues by setting the headset units into the charging case. Reset the headset.
- Initialize the headset, and pair the headset and the device again.
Pairing with a Bluetooth device cannot be done.
- Bring the headset and the Bluetooth device within 1 m (3.2 ft) from each other.
- When pairing for the first time after purchasing, initializing, or repairing the headset, the headset enters pairing mode automatically if you remove the headset from the charging case. To pair a second or subsequent device, set the headset units into the charging case, leave the charging case lid open, and press and hold the pairing button on the back of the charging case for about 5 seconds or more to enter pairing mode.
- The headset cannot go into pairing mode if the headset is not set securely in the charging case, such as when the earbud tips are not properly attached to the headset. Make sure the headset is stored securely in the charging case. When pairing a device once again after initializing or repairing the headset, you may be unable to pair the device if it retains pairing information for the headset (iPhone or other devices). In this case, delete the pairing information of the headset registered on the connected device before pairing.
- If there is a device nearby that has been connected with the headset using LE Audio before, the device may be automatically connected with the headset when the headset enters pairing mode. Turn off the Bluetooth setting of the device with the connection history, and then pair the headset with a new device.
- Restart the connected device such as a smartphone or a computer you use, and pair the headset and the device again.
- Charge the charging case.
- Set the headset units into the charging case, close the charging case lid once, and then open it again. You may be able to resolve some issues by setting the headset units into the charging case.
- Reset the headset.
- Initialize the headset, and pair the headset and the device again.
Unable to make a Bluetooth connection.
- Check that the headset is turned on.
- Check that the Bluetooth device is turned on and the Bluetooth function is on.
- If the headset automatically connects to the last connected Bluetooth device, you may fail to connect the headset to other devices via a Bluetooth connection. If this is the case, operate the last connected Bluetooth device and disconnect the Bluetooth connection.
- Check if the Bluetooth device is in sleep mode. If the device is in sleep mode, cancel the sleep mode. Check if the Bluetooth connection has been terminated. If terminated, make the Bluetooth connection again.
- If the pairing information for the headset has been deleted on the Bluetooth device, pair the headset with the device again.
- Charge the charging case.
- Set the headset units into the charging case, and close the charging case lid.
- You may be able to resolve some issues by setting the headset units into the charging case. Reset the headset.
- Initialize the headset, and pair the headset and the device again.
The LE Audio connection cannot be established.
- The devices that support LE Audio are Android smartphones Xperia 1 Ⅳ / Xperia 5 Ⅳ / Xperia 1 V / Xperia 5 V (use the latest version of the smartphone software) (as of November 2023).
- For the latest information on the compatible devices, refer to the support website. Update the software of the headset to the latest version.
- To switch to the LE Audio connection, use the “Sony | Headphones Connect” app. For details, see “Pairing and connecting with an Android smartphone using LE Audio ”.
- When the headset is connected to the Android smartphone using Classic Audio, you need to change the setting of [LE Audio connection setting for headphones] to [LE Audio Priority] on the “Sony | Headphones Connect” app and pair the headset with the Android smartphone again. For details, see “Pairing and connecting with an Android smartphone using LE Audio
You cannot switch back to the Classic Audio connection.
- To switch to the Classic Audio connection, use the “Sony | Headphones Connect” app. For details, see “Pairing and connecting with an Android smartphone using LE Audio ”.
- If the connection is not successful after changing the connection settings, delete the pairing information and perform pairing again.
- If you cannot switch to [Classic Audio only (conventional connection method)] in the “Sony | Headphones Connect” app, initialize the headset.
Earbud tips are damaged or lost.
- Earbud tips are consumables. If the earbud tips are damaged and need replacing, contact your nearest Sony dealer or purchase the EP-NI1010 series*, sold separately.
To protect the earbud tips from quick deterioration, follow the precautions below to continue using them.
- Avoid washing with water, wet wipes, and the use of organic solvents such as alcohol, as these can cause premature deterioration.
- Rubbing with paper, using sharp metal objects, nails, adhesive tape, etc., may damage or deform the earbud tips.
- Do not pull on the polyurethane foam portion of the earbud tip. If it is separated from the earbud tip, it will not function. Do not subject the polyurethane foam portion of the earbud tip to pressure for long periods. It may cause deformation and it may be difficult to return the earbud tip to the original shape.
- When the earbud tips get soaked, drain the liquid well, and make sure that the earbud tips are dried before use or storage.
- When there are cracked, peeled, or chipped portions in the earbud tips, refrain from using them.
- If the earbud tips deteriorate, they cannot achieve proper sound qualities or noise canceling effects and can cause injuries or diseases as the earbud tips may come off and remain in the ear.
An earache occurs
- If you feel the size of the earbud tips does not fit your ears, change the earbud tips. When changing the earbud tips, try the earbud tip sizes in order from the larger ones to the smaller ones. The most suitable size of the earbud tips for left and right ears may be different.
- The “Sony | Headphones Connect” app will help you to determine which earbud tips suit you best to achieve the optimal noise canceling effect, sound quality, etc.
- Check that you are wearing the headset properly in your ears.
- If you wear the headset for a long time, your ears may start hurting. Use the headset while taking breaks periodically.
Resetting the headset
- Set the headset units into the charging case.
- Press and hold the reset button on the back of the charging case for about 20 seconds or more.
- Check that the indicator turns off and then release your finger.
About the instruction manual video
Watch the video to find out how to reset. https://rd1.sony.net/help/mdr/mov0060/h_zz/
Initializing the headset to restore factory settings
- Set the headset units into the charging case.
- Press and hold the initialize button on the back of the charging case for about 15 seconds or more.
- Release your finger within 5 seconds after the indicator (orange) on the charging case starts flashing.
Specifications
Headset
- Power source:
- DC 3.85 V: Built-in lithium-ion rechargeable battery
- DC 5 V: When charged using a USB
- Operating temperature:
- 0 °C to 40 °C (32 °F to 104 °F)
- Charging time:
- Approx. 1.5 hours (Headset)
- Approx. 2 hours (Charging case)
- Mass:
- Approx. 5.9 g × 2 (0.21 oz × 2) (Headset (including earbud tips (M)))
- Approx. 39 g (1.38 oz) (Charging case)
Communication specification
- Communication system:
- Bluetooth Specification version 5.3
- Output:
- Bluetooth Specification Power Class 1
- Maximum communication range:
- Line of sight approx. 10 m (32.8 ft) 1)
- Frequency band:
- 2.4 GHz band (2.400 0 GHz – 2.483 5 GHz)
- Compatible Bluetooth profiles 2):
- A2DP/AVRCP/HFP/HSP
- TMAP/CSIP/MCP/VCP/CCP
- Supported Codec 3):
- SBC
- AAC
- LDAC
- LC3
- Transmission range (A2DP):
- 20 Hz – 20 000 Hz (Sampling frequency 44.1 kHz)
- 20 Hz – 40 000 Hz (Sampling frequency LDAC 96 kHz, 990 kbps)
Design and specifications are subject to change without notice.
FAQS About Sony WF-1000XM5 Wireless Noise Canceling Stereo Headset
Does the Sony WH-1000XM5 have multi-device support?
Multipoint connection: When the “Sony | Headphones Connect” app is used to enable [Connect to 2 devices simultaneously], the headset can establish a simultaneous Bluetooth connection with two devices. This feature enables you to accomplish the following.
Is the Sony WH-1000XM5 waterproof?
The headgear isn’t water resistant.
Why is the Sony WF 1000xm5’s noise cancellation not functioning?
Verify that the headphones are worn correctly.
The Sony WF 1000XM5 can connect to how many devices?
2 gadgets
Does the iPhone pair with the Sony WF-1000XM5?
The WF-1000XM5 was designed by Sony to function similarly on both iOS and Android.
Does the Sony 1000XM5 sweat?
The IPX419 certification of the earphones ensures water resistance as well.
Does Siri function with the Sony WF 1000XM5?
You can talk to the headset’s microphone to control the iPhone by utilizing Siri, which is included with the device.
Can I use a Sony WH 1000XM5 with a Switch?
Version 13.0.0 of the Nintendo Switch software allows users to stream music straight from the Switch to a compatible pair of headphones or earbuds, such as the Sony WH-1000XM5 or XM4.
How do I make my Sony WF 1000XM5 louder?
Boost the loudness: As the music is playing, quickly tap the touch sensor four or more times, separating each tap with 0.4 seconds or less.
Is there a microphone on the Sony WF 1000XM5?
Four beamforming microphones are included.
For more manuals by Sony, Visit Manualsdock

