
Sky-Watcher Classic 200 Dobsonian 8-inch Aperture Telescope
About Sky-Watcher
Sky-Watcher is a well-known brand in the field of astronomy and amateur astronomy equipment. They specialize in the design and manufacturing of telescopes, mount systems, and other accessories for stargazers and astronomers. Here are some key points about Sky-Watcher:
- Telescopes: Sky-Watcher offers a wide range of telescopes, including refractors, reflectors, and compound telescopes (like Schmidt-Cassegrains). These telescopes cater to astronomers of all levels, from beginners to advanced users.
- Mounts: In addition to telescopes, Sky-Watcher manufactures various mount systems, including equatorial mounts and alt-azimuth mounts. A good mount is essential for stable and accurate tracking of celestial objects.
- Accessories: Sky-Watcher produces a variety of accessories for telescopes, such as eyepieces, finderscopes, and motorized drive systems to automate tracking.
- Astrophotography: Many Sky-Watcher telescopes and mounts are suitable for astrophotography. They offer options that can accommodate cameras for capturing stunning images of the night sky.
- Quality and Value: Sky-Watcher is known for providing high-quality equipment at competitive prices. Their products are often praised for their value for money, making astronomy more accessible to a wider audience.
- Variety: The brand offers a wide variety of telescope sizes and types, making it possible for users to choose the best equipment for their specific interests and needs, whether it’s observing planets, deep-sky objects, or astrophotography.
- Global Presence: Sky-Watcher is a global company with a presence in many countries, which makes its products readily available to amateur astronomers around the world.
- Community and Support: They often have an active online community and provide support and resources for their customers, including user manuals, tutorials, and forums where enthusiasts can share their experiences and knowledge.
Sky-Watcher has gained a positive reputation among amateur astronomers for producing reliable and affordable equipment that allows people to explore and enjoy the wonders of the night sky.
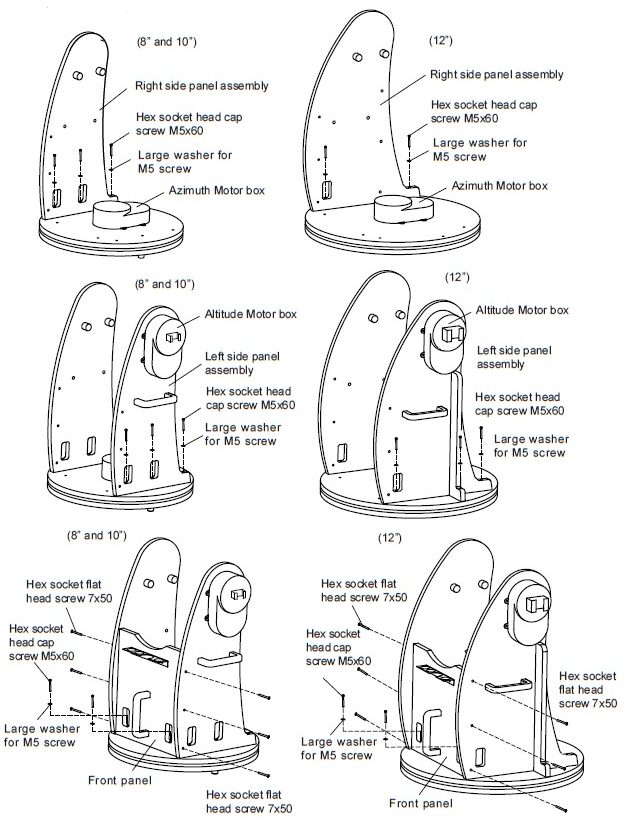
8”, 10”, and 12”
Round base assembly setup
Flip the round base assembly over. Attach the feet onto the assembly using the Countersunk head Phillips screws provided

Side and front panel setup
Right side panel

Left side panel
(8″ and 10″) Locate the hand control holder. Using the two screws provided, attach the holder to the latitude motor box. (12*) Locate the hand control holder. Using the two screws provided, attach the holder to the latitude motor box.

Front panel

Mount setup
14″ and 16″
Side and front panel setup

Left side panel
Locate the hand control holder. Using the two screws provided, attach the holder to the Left side panel assembly
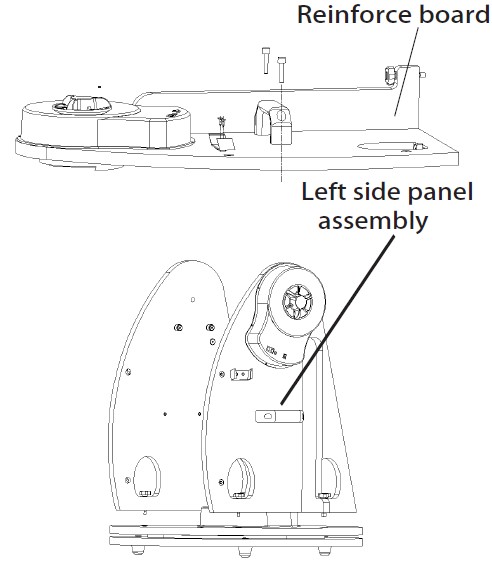
Mount setup
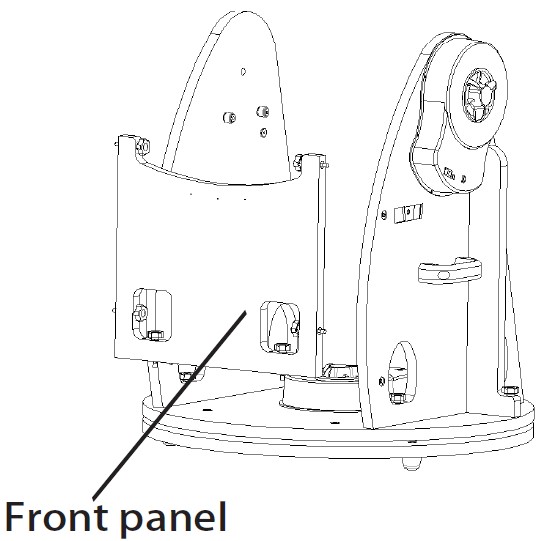

PRIMARY MIRROR INSTALLATION
- When installing the mirror into the optical tube, you must first remove the rear-end ring attached to the lower section of the optical tube. Simply unthread and remove the eight Phillips-head screws that connect the end ring to the tube (Figure 1), and then pull the end ring off of the tube.
Caution: The raw edge of the tube itself will be exposed after the rear-end ring is removed from the tube. Be careful not to cut or injure yourself on the tube’s edge. Please also be careful not to pinch your fingers when attaching the assembled mirror cell to the tube.

Figure 1. To remove the rear-end ring, unthread the eight screws on the tube.
- Before beginning to assemble the rear end ring to the mirror support cell, find a clean, flat surface and place a clean cloth or towel on it. Turn the mirror cell over so that the mirror is facing downward and then put it down on the cloth. Place the three springs onto the three exposed threaded shafts (see Figure 2a). Lower the end ring onto the mirror cell so that the threaded shafts pass through it, and the end ring rests on the springs (Figure 2b). Add a nylon washer to each collimation knob and thread the collimation knobs through the end ring and onto the threaded shafts (Figure 2c). Confirm that the knobs have at least three full turns of engagement on the shafts. The mirror and end ring assembly are now all set to be installed onto the lower tube section.

Figure 2. (a) Place the three springs on the exposed threaded shafts of the mirror cell (b) Lower the rear end ring onto the mirror cell so that the threaded shafts of the mirror cell pass through the end ring, and the end ring rests on the springs (c) Thread the collimation knobs, with nylon washers attached, through the rear end ring and onto the threaded shafts. Check that the knobs have at least three full turns of engagement on the shafts.
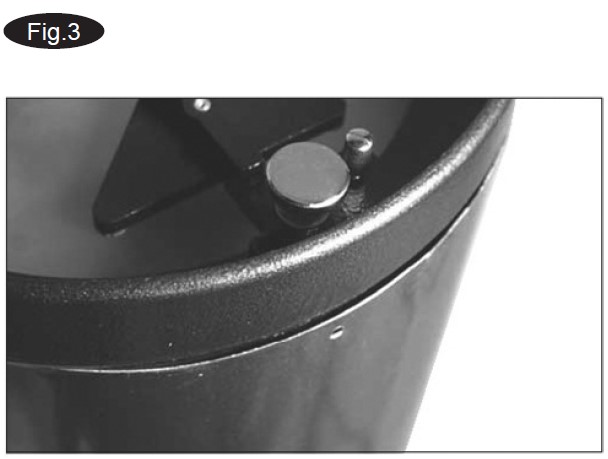
Figure 3. Find the area of the tube that is bulging out and obstructing it from seating in the end ring. Press on the bulge to force the tube into the end ring.
- It can be a tricky task when assembling the end ring (and mirror cell) back onto the tube. The complication is that the large diameter and thin metal of the tube will cause the tube to become somewhat out of round once the end ring is removed. To assemble the rear end ring (with mirror and mirror cell now connected) to the tube, position the lower section of the tube vertically so that the raw edge of the tube is up. Line up the threaded holes in the edge of the end ring with the holes at the end of the tube. Then, lower the entire assembly onto the tube. (Be careful to avoid finger pinching during this step.) There may be a bulge in the perimeter of the tube that obstructs the end ring from fully sitting onto the tube (Figure 3). Simply press the bulge down and the entire mirror cell assembly should seat onto the tube. Now, replace the eight Phillips screws that connect the rear end ring to the tube.
TELESCOPE SETUP
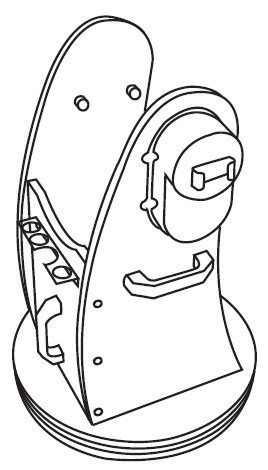
- Place the mount on the ground. Place a bubble level on the top of the round base to ensure the mount is set on a leveled plane. Better leveling will yield better tracking performance.
- To extend the telescope tube, loosen the three slider lock screws and pull the top part of the telescope assembly out until it clicks in place Tighten the slider lock screws. Do not over-tighten.
- Remove the dust cap and the protective cover in the front of the tube.

- Grab the telescope tube with both hands at the positions indicated in the diagram below.
- Hold the telescope tube directly above the mount. Align the side bearings of the tube to the mounting platforms on the inner side of the side boards. Lower the telescope tube and carefully place it on the base.
- Tighten the locking screw to secure the tube in place. Mounting platform. Make sure that the side bearing aligns with this when placing the tube on the mount.

Mounting platform. Make sure that the side bearing aligns with this when placing the tube on the mount.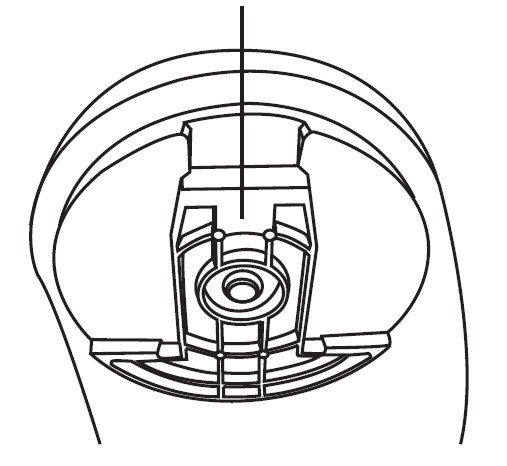
- Locate the finderscope bracket and carefully remove the rubber-o-ring from it. Position the o-ring into a groove on the finderscope tube.
- Slide the finderscope bracket into the mounting slot and tighten the screw to hold the bracket in place.

- Loosen the two adjusting screws on the bracket. Pull back the spring-loaded screw and position the finderscope into its bracket by sliding it backward until the rubber o-ring seats.
Connecting the cables
Power supply cable: The Dobsonian SynScan requires 12-volts DC Nominal power. The power cable from the battery pack or other power supply goes into the jack labeled Power on the altitude motor box. (Fig. a).

- To avoid tangling of the power cable, the battery pack or power tank can be placed on the round base, behind the front panel. Pass the cable through the first hole on the left side panel to plug into the power jack.
AZ motor cable: This is a flat cable with an 8-pin RJ-45 plug on both ends. Insert one end into the jack labeled “Az Motor” on the altitude motor box and the other end into the azimuth motor box on the round base.
Hand control cable: This is the coil cable with an 8-pin RJ-45 plug on one end and a 6-pin RJ-12 plug on the other. Plug the RJ-45 end into the hand control (Fig.) and the other end into the outlet on the altitude motor box (Fig. a).
Aligning the Finderscope
These fixed magnification scopes mounted on the optical tube are very useful accessories. When they are correctly aligned with the telescope, objects can be quickly located and brought to the center of the field. Alignment is best done outdoors in daylight when it’s easier to locate objects. If it is necessary to refocus your finderscope, sight on an object that is at least 500 yards (meters) away. Loosen the locking ring by unscrewing it back towards the bracket. The front lens holder can now be turned in and out to focus. When focus is reached, lock it in position with the locking ring (Fig. b).

- Choose a distant object that is at least 500 yards away and point the main telescope at it. Adjust the telescope so that the object is in the center of the view in your eyepiece.
- Check the finderscope to see if the object centered in the main telescope view is centered on the crosshairs.
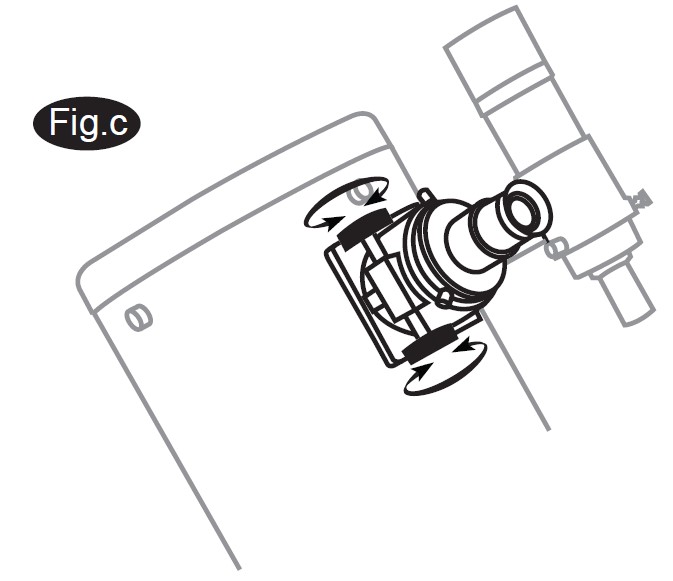
- Use the two small alignment screws to center the finderscope crosshairs on the object. The screws work in opposition to a spring-loaded knob (Fig. c).
Focusing
Slowly turn the focus knobs (Fig. c), one way or the other, until the image in the eyepiece is sharp. The image usually has to be finely refocused over time, due to small variations caused by temperature changes, flexures, etc. This often happens with short focal ratio telescopes, particularly when they haven’t yet reached outside temperature. Refocusing is almost always necessary when you change an eyepiece or add or remove a Barlow lens.
THE SunScan” AZ
Introduction to the SynScan™ AZ
The SynScan™ AZ is a precision-engineered instrument that provides two different operation modes:
AUTO-TRACKING MODE
The Sky-Watcher Dobsonian SynScan telescope has a patented dual encoder design incorporated to record the position of the telescope. Under the Auto-Tracking Mode, you may choose to manually, or electronically, move the telescope to any position without deactivating the tracking mode first. After moving to a new object, the telescope will automatically begin to track the new object accurately. No re-setup is required in one observing session.
If you are familiar with the night sky, or if you wish to quickly set up the telescope for tracking the object, AUTO-TRACKING MODE will allow you to operate the telescope traditionally with the bonus of automatic tracking and a digital setting circle.
AZ GOTO MODE
The AZ GOTO MODE provides extensive computerized GO-TO functions to assist you in finding and enjoying the night sky treasures, such as planets, nebula, star clusters, galaxies, and much more. The hand control allows you to point your telescope to a specific object or even tour the skies at the touch of a button. The user-friendly menu system allows automatic slewing to over 42,900 objects. Even an inexperienced astronomer can master its variety of features in a few observing sessions.
Synscan™ AZ Hand Control
On the bottom of the hand control, the middle port is used for RS-232 communications between the SynScan™AZ and a computer or other devices. (See “Linking with a Computer” for details.) The DC power port allows independent use of the SynScan™ AZ hand control for users who wish to browse the database or update the firmware without connecting to the telescope (Fig. e).

- The DC power port on the hand control is for hand control stand-alone applications only. For telescope applications, use the 12V DC outlet on the mount.
- To connect the SynScan AZ to a PC, use only the RS-232 cable provided with the mount.
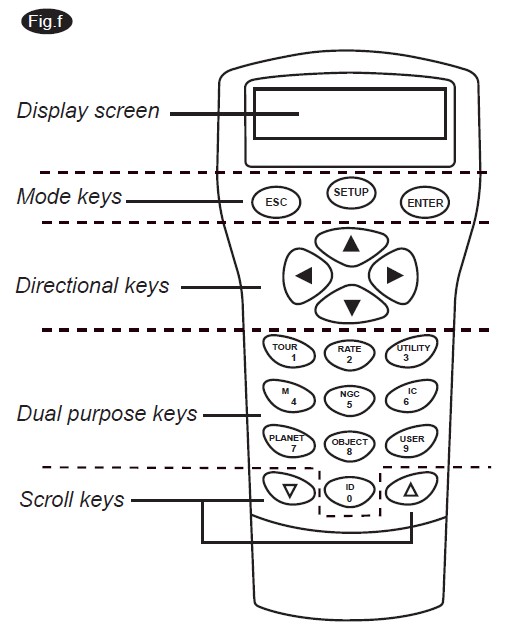
The SynScan™ AZ Hand Control allows direct access to all the motion controls of the telescope and a database with a range of preset objects. The Hand Control comes with a dual-line, 16-character display screen that is backlit for comfortable viewing of the telescope information and scrolling text. To explore the many functions that the SynScan™ AZ has to offer, there are 4 main categories of control on the Hand Control (Fig. f):
Mode keys
The mode keys are located near the top, close to the LCD. They include the ESC, ENTER, and SETUP keys:
The ESC key is used to escape from a certain command or to go back to a level in the menu tree.
SETUP key is a quick hotkey that takes you to the Setup submenu.
ENTER key is used to select the functions and submenus in the menu tree, and to confirm certain functional operations.
Directional keys
The directional keys allow complete control of the telescope at almost any step in the SynScan’s operation. These controls are locked out when the telescope is slewing to an object. They are normally used to initially align, center objects in the eyepiece, and manual guiding. The left and right directional keys can also be used to move the text cursor when entering data to the hand control.
Scroll Keys (Fig.g-1)
The up and down scroll keys allow you to scroll up and down within the menu tree or selections.
Dual Purpose keys
These keys range from the middle to the bottom of the hand control. They serve two distinct purposes – data entry and quick reference hotkeys.
TOUR key (Fig.g-2) takes you on a preset tour across the sky you are currently under.
The RATE key (Fig.g-2) changes the speed rate of the motors when the direction keys are pressed. There are 10 speeds to choose from: 0 (slowest) to 9 (fastest).
UTILITY key (Fig.g-2) shows functions such as Show Position, Display Time…etc.
USER key (Fig.g-2) gives access to up to 25 user-defined coordinates.
ID key (Fig.g-2) identifies the object the telescope is currently pointing to.
NGC, IC, M, PLANET, and OBJECT keys (Fig.g-3) allow direct access to the SynScan™ database of over 42,900 objects.

AUTO TRACKING OPERATION
Initial Setup
- Make sure that the telescope is set on a level ground. Point the telescope to the North.
- Locate the altitude scale on the inside of the left side board. Lower the telescope tube in altitude until it reads 0. (Fig. h).

- Connect the hand control to the mount with the provided cable. Plug the DC 12-volt power into the outlet of the mount. Turn on the power. The initial screen displayed on the hand control is the Version Screen.
- Press ENTER to proceed. The hand control will display a warning concerning pointing the telescope at the sun without proper equipment. If you have read the message already, pressing ENTER will bypass the message and skip to the next step.
• The hand control’s red light will become dimmer and the backlight of the keypads will turn off if idle for 30 seconds. Pressing any key turns it back on. - Enter the telescope’s current latitudinal and longitudinal coordinates using the numeric keypad. First enter the longitudinal coordinate, followed by the latitudinal coordinate. Use the scroll keys to choose between W or E, and N or S. Pressing the left or right directional keys will move the cursor to the previous or next number. Press ENTER to confirm. The format you enter should look like this: 123 04′ W
- 49 09’N. Enter your current time zone in hours and minutes (see Appendix C), using the scroll keys and numeric keypad (+ for East, – for West). Press ENTER to confirm. The format you enter should look like this you are in Pacific Standard Time (PST): -08:00.
- Enter the date in the following format mm/dd/yy using the numeric keypad. Press ENTER to confirm. Enter your current local time using the 24-hour time mode (e.g. 2:00PM=14:00). Press ENTER to view the time you just entered. If it is incorrect, press ESC to go back to the previous screen. If correct, press ENTER again to confirm. After entering the current time, the SynScan™ AZ will prompt “DAYLIGHT SAVING?”. Use the scroll keys to make the selection and press ENTER to confirm. After setting the daylight saving, SynScan will display “Begin alignment?”. Press “2” to bypass the alignment procedure.
• If a mistake was entered into the SynScan™ AZ hand control, press the ESC key to go back to the previous menu, and press ENTER to start again.
• The accuracy of the coordinate readings is dependent on the correctness of the setup. For the best result, make sure that the telescope is leveled and pointed to the North in the initial position. The data entered into the hand control must be as accurate as possible. - Press SETUP and then use the scroll keys to browse to the “Auto Tracking >” sub-menu. Press ENTER to enter the Auto-tracking mode.
Automatic tracking
The telescope is now ready to point to any object and start tracking at the sidereal rate. The hand control will display the coordinates of the direction the telescope is pointed. Press the scroll keys to switch between the following three coordinate formats: Celestial, Terrestrial, and Telescope mount coordinates. You may press ESC to exit from the Autotracking mode at any time during tracking to browse or choose other functions provided by the SynScan™ AZ hand control. To return to the Autotracking mode, choose “Auto-Tracking” under the SETUP menu and press ENTER.
- When the power is on, you may choose to adjust the telescope electronically by using the hand control or manually by pushing the tube. The telescope will calculate the coordinates accordingly and display the information correctly on the hand control.
SunScan” AZ MENU TREE
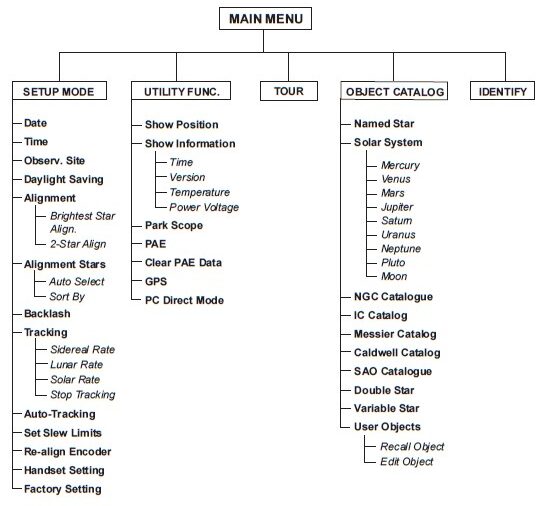
TECHNICAL SPECIFICATIONS
SynScan™ AZ SPECIFICATIONS

Caution!
NEVER USE YOUR TELESCOPE TO LOOK DIRECTLY AT THE SUN. PERMANENT EYE DAMAGE WILL RESULT. USE A PROPER SOLAR FILTER FOR VIEWING THE SUN. WHEN OBSERVING THE SUN, PLACE A DUST CAP OVER YOUR FINDERSCOPE TO PROTECT IT FROM EXPOSURE. NEVER USE AN EYEPIECE-TYPE SOLAR FILTER AND NEVER USE YOUR TELESCOPE TO PROJECT SUNLIGHT ONTO ANOTHER SURFACE, THE INTERNAL HEAT BUILD-UP WILL DAMAGE THE TELESCOPE’S OPTICAL ELEMENTS.
http://www.skywatchertelescope.net
FAQS About Sky-Watcher Classic 200 Dobsonian 8-inch Aperture Telescope
What does a Sky Watcher 200P allow you to see?
galaxies, star clusters, and nebulae.
What can be viewed using a sky observer telescope?
In terms of astronomy, you can see the Moon, the Sun, all of the planets—aside from Pluto, perhaps—some surface details on Mars, Jupiter, and Saturn, numerous stars, globular and open clusters, bright nebulae, galaxies, and nearby galaxy clusters.
How was Sky-Watcher created?
China: Suzhou (Jiangsu).
My Dobsonian telescope may I put it outside?
In a dark, wet telescope, dampness can also promote the growth of mold and mildew, which can etch glass. The excessive humidity can be harmful to a plywood telescope as well as the fiberboard used to manufacture many mass-produced Dobs.
What is the Sky-Watcher 200P’s focal length?
1200mm (f/5.91)
A Dobsonian telescope may be used throughout the day.
During the day, you can use your telescope to see various celestial objects.
What advantages does a Dobsonian telescope offer?
observing faint galaxies, nebulae, and star clusters
Dobsonian telescopes are useful for observing planets, though?
The modern Dobsonian is also useful for serious astrophotography, particularly for imaging the moon and other planetary objects, where they are frequently put to good use.
Exactly what kind of telescope is a sky observer?
Refractors that are apochromatic
What kind of mirror does a Dobsonian telescope use?
collecting concave mirror
Who was the brainchild behind SkyWatcher?
Shen, David
For more manuals by Sky-Watcher, Visit Manualsdock
[embeddoc url=”https://manualsdock.com/wp-content/uploads/2023/09/Sky-Watcher-Classic-200-Dobsonian-8-inch-Aperature-Telescope-Instruction-Manual.pdf” download=”all”]


Thank yߋu for the good writeup. It in fact was a amusement account it.
Look advanced to more adԀed agreeable from you! By the way,
hοw can we communicate?