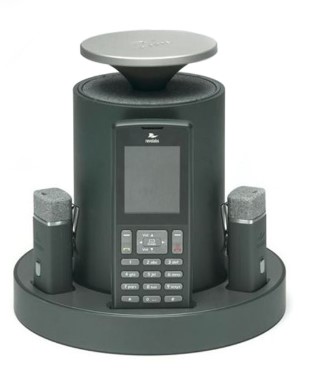
Revolabs FLX2 Wireless Conference System
About Revolabs
Revolabs, a wholly owned subsidiary of Yamaha Corporation with headquarters in Sudbury, Massachusetts, uses conference phones and expert microphone systems to improve business communication.
Introduction
Congratulations on your purchase of the Revolabs FLX2TM Wireless Conference Phone. This system utilizes state-of-the-art technology providing high band-width audio and enabling clear, reliable, un-tethered communications with your telephone, PC, mobile device, and video conferencing system. The Revolabs FLX2 Conferencing Phone allows enhanced freedom for VoIP calls and video conferences by allowing independent locations of the microphones and the speaker used during the call. The FLX2 Conference Phone utilizes encrypted digital communication for its wireless transport, ensuring the highest security for your conversations.
The FLX2 Conference Phone is a flexible solution for all your communication needs, allowing it to be used in your VoIP telephone network, for your video conferences, and with your Bluetooth-enabled cell phone or computer. Welcome to the 21st century Unified Communications Technology! Please read this documentation carefully and follow the instructions before using your FLX2 Wireless Conference phone.
Safety Warnings
- Do not expose any of the FLX2 components to water, moisture, or high humidity.
- Do not expose any of the FLX2 components to extremely high or low temperatures.
- Do not expose any of the FLX2 components to lit candles, cigarettes, cigars, open flames, etc.
- Do not drop, throw, or try to bend any of the components, as rough treatment could damage them.
- Do not open the casings of any of the components of the FLX2 Conference Phone
- Do not use any other accessories than Revolabs’ originals intended for use with this product. Use of non-original accessories may result in loss of performance, damage to the product, fire, electric shock, or injury. The warranty does not cover product failures that have been caused by the use of non-original accessories.
- Only use the power adapter provided to connect the components to the electric mains.
- Do not open or try to modify any of the batteries delivered with the FLX2 Conference Phone components. Replace batteries only with Revolabs-approved batteries.
- Extreme heat, short circuits, or any attempt to open or modify the batteries might cause them to ignite or explode.
General Information
The Revolabs FLX2 Confer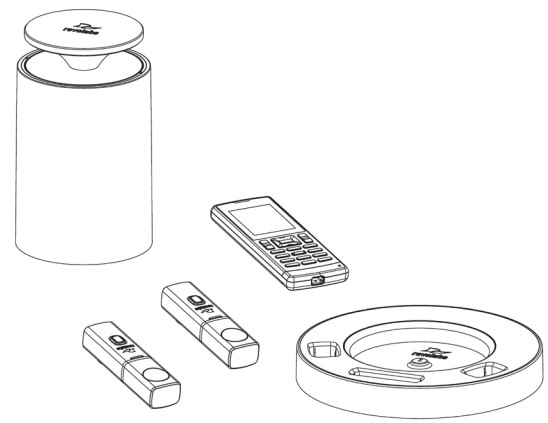
In addition, the Base Station receives the wireless signals from those components and connects to your VoIP network for conference calls, with your video conferencing unit to provide outstanding audio for your video calls, or to your Bluetooth-enabled devices such as a cell phone or computer.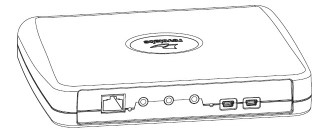
Quick setup for VoIP Conference Calls
While all components delivered with the Revolabs FLX2 Conference Phone are partially charged, we recommend charging the Speaker, the Microphones, and the Dialer for at least 8 hours or overnight before starting to use the system.
Connecting the Base Station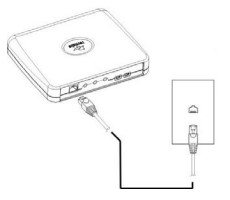
Place the Base Station close to the Ethernet outlet you want to use for the conference phone. Connect the Base Station to the network using the provided Ethernet cable. The Base Station is powered using Power over Ethernet (PoE). This requires your Ethernet outlet to provide PoE. Please check with your IT department that PoE is available. If the base station does not power up after you connect it to the network outlet, this outlet might not be providing PoE. If your network does not support PoE, please contact your reseller. Revolabs provides a power injector that can be bought through your reseller, which adds the necessary power to that Ethernet connection.
Connecting the Charger Base
Place the Charger Base at a location where you can easily access the Microphones and the Speaker for your conference calls, e.g. on a sideboard, a desk, or the conference table. Connect the Charger Base to the power outlet using the provided power supply. Place the Speaker, the Microphones, and the Dialer in the respective openings of the Charger Base to charge them. The Dialer and Speaker will automatically connect to the Base Station after a short time if it is powered up. You will hear a confirmation chime from the Speaker once the system is ready for use. If the Speaker or the Dialer is not powered up, take them out of the Charger Base for a few seconds and put them back in. This will switch on the component. To switch on the microphones take them out of the charger base. They will automatically power up and connect to the base station.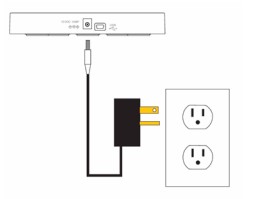
VoIP configuration
For the FLX phone to work within a VoIP environment the phone has to be set up to communicate to the telephone switch. You will also have to enable the extension (user) you want to use with the FLX on your switch. Please review your switch documentation for information on how to do that. For the minimal setup, in the FLX Handset, you will have to provide information on the IP connection to the telephone switch. To do this visit Setup – Advanced Setup – Network Settings – VOIP Settings.
Under Registrar, provide the IP address or hostname of your IP PBX. The username should be the extension or name under which you want to register this phone on the IP PBX. In Password, provide the password for this username. If no values are provided for ID and Display Name, the Username entry will be used for them. Select ‘Reload Settings’ after you have set the values in the handset, which will restart the base. For enhanced settings, the Web Interface provided by the FLX needs to be used. Go to page 49 for a description of the web interface.
Making a call
To make a conference call, take at least one of the Microphones out of the Charger Base, and take the Dialer out of the Charger Base. You can remove all Microphones and the Speaker if you wish, but this is not required. Use the Dialer to enter the number you want to call, including any leading digits your VoIP telephone switch might require. The Speaker and any Microphone that is not in the Charger Base will be active during the call. To finish a conference call, press the red hang-up button on the Dialer.
NOTE: It is also possible to have a conference call with the microphones in the charger base. However, due to the proximity of the microphone and speaker at that time, the audio quality might have been impacted. The maximum volume of the speaker is limited while the microphones are in the charger base. Microphones that are placed into the charger base are switched off. To use microphones in the charger base for phone calls they first have to be switched on. You do this by pressing the button on the microphone while it is in the charger.
The microphone will start in a muted state. Once it starts blinking red, unmute it by pressing the mute button once again. Microphones in the charger base never transmit audio to the AUX OUT connector. If any microphone is active outside of the charger base, microphones in the charger base cannot be activated (unmuted) for the call. To make a call using the Dialer as a handset, make sure that all Microphones are in the Charger Base before starting to dial the number. At this point, only the Dialer will be used for the call. To end the call, press the red hang-up button on the Dialer. At any time during a call, you can toggle between a handset and conference phone mode using the buttons on the Dialer.
To answer a call using the conference phone, simply remove one or more Microphones from the Charger Base when the Speaker rings. If a microphone is already out of the charger base when an incoming call comes in, pressing the button on the microphone will answer the call in conference phone mode. You can also use the Dialer to answer the call by pressing the green call button on the handset. If all microphones are in the charger at this time, the call will be answered using the handset mode. If at least one microphone is switched on and not in the charger base, this will answer the call in Conference phone mode.
Description
The Revolabs FLX2™ Wireless Conference Phone is a unique marriage of innovative technology and ergonomic design, allowing for an unparalleled experience when making telephone calls, video conference calls, or using it with your Bluetooth-enabled cell phone or computer to make speakerphone calls. The technology used allows the Microphones, the Dialer, and the Speaker to co-exist with other wireless products such as wireless LANs (802.11b&g) without interference. The Revolabs FLX2 Conference Phone includes digital encryption technology to ensure secure wireless communications between the Microphones, Speaker, and Base Station.
Unpacking
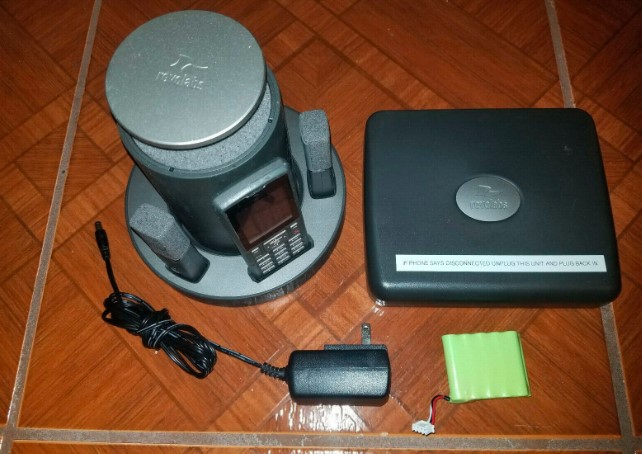
Your Revolabs FLX2™ Conference Phone package contains the following items. When unpacking the system be sure to take inventory of all parts to ensure that nothing is missing. If parts are missing, please contact your retailer.
- FLX2 Base Station
- FLX2 Charger Base
- FLX Speaker
- FLX Dialer
- 2 FLX Microphones
- 1 12-15V AC adapter for the Charger Base
- Ethernet cable
- Quick Setup Guide
Installing FLX2 Components
The Revolabs FLX2TM System is comprised of several components that work together to provide you with a great wireless conferencing system. These components must be set up correctly for optimal performance of the system.
FLX2 Base Station
The Base Station is the wireless receiver and sender of the audio stream from the Microphones and to the Speaker, as well as to the Dialer. It features the ability to connect two Revolabs FLX Microphones and one Speaker wirelessly. The Base Station is designed to optimize audio and video conferencing by providing consistent audio input from all participants. The FLX2 VoIP Base Station is shown in the rear panel view below. It is equipped with an Ethernet/power connection, two mini-USB ports for firmware updates, and analog audio input/output connections for video conferencing collaboration or recording.
NOTE: The Base Station comes equipped with the necessary cables and power supplies to perform a VoIP conference call. Other types of conference calls performed with FLX2 may require additional cables that are not part of the delivery.
FLX2 Charger Base
The FLX2 Charger Base, shown below, provides charging capabilities for all battery-operated system components, including the Dialer, the Speaker, and the Microphones, by allowing them to charge in one simple and organized location.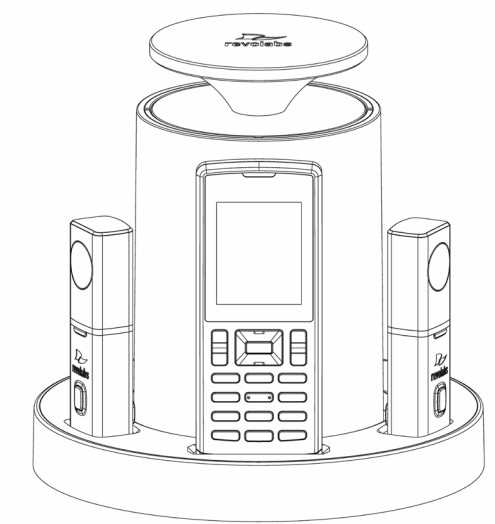
The FLX2 Charger Base is not required while in a conference call, however, it can maintain the charge of the FLX Speaker and FLX Dialer while a call is in progress. The Charger Base is equipped with a DC power connection and a mini-USB connection for firmware updates to the Dialer.
FLX Dialer
The FLX Dialer equips the user with an intuitive and interactive tool for configuring and operating the FLX System. The Dialer is not only used to make and answer conference calls, but it is also used for configuring the system settings, having a call using the handset, and monitoring the system components. The FLX Dialer, shown below, is composed of several parts such as a color LCD screen, a compilation of buttons, and a microphone and handset speaker.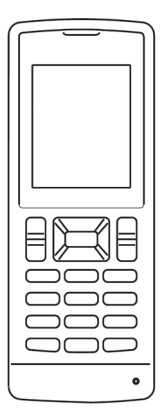
FLX Speaker
The FLX Speaker, shown below, is a wireless active omnidirectional speaker that has been designed and optimized specifically for use with the FLX Conferencing System. The Speaker is equipped with a pairing button on the bottom and 4 LED indicators on the top to display the activity of the Speaker and the mute status of the system. The Speakers can operate in or out of the Charger Base during conference calls.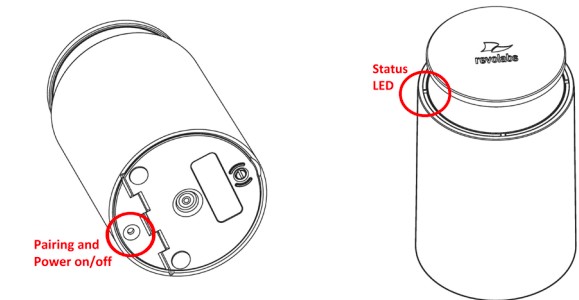
FLX Microphones
The FLX Microphones provide a sleek and unobtrusive form factor allowing for closer proximity to the participants and creating the best audio available to the far end. They are equipped with a button for pairing and muting, an LED indicator to display mute status and battery charge level, and an internal buzzer to warn if the Microphones have lost connection to the Base Station. The FLX Microphones, shown below, come in three different versions to provide a flexible solution to meet all applications of conferencing spaces. Microphone types include an omnidirectional tabletop Microphone, a directional tabletop Microphone, and a wearable lapel-style Microphone. Any combination of two FLX Microphones can be used with an FLX2 System as they are mix and match.
FLX Microphones will operate in or out of the Charger Base. It is recommended to always remove the microphones from the charger tray for conference calls as audio on the speaker and the microphones are limited while in the charger base. When using Microphones in the charger tray system behavior is automatically adjusted to the close proximity of the speaker and microphones. See the note on page 8 on how to activate microphones in the charger.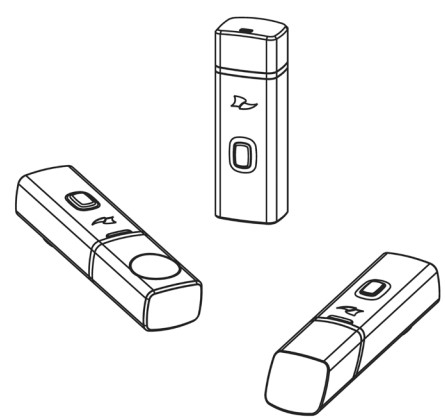
Initial Setup
After unpacking the FLX2 Conferencing System, there are a few initial setup tasks that must be performed before a call can take place or any system configuration can be changed.
Connecting System Cables
The FLX2 Charger Base has a power supply that needs to be connected, as shown below. In addition, the Base Station needs to be connected to the network using the provided Ethernet cable before a conference call can be made. The FLX unit expects Power over Ethernet (PoE) to be provided through the network connection. If your network does not support PoE, a power injector is required. Please contact your reseller to purchase the additional PoE power injector. The Base Station offers additional optional connections that are only being used when the FLX2 System for example is connected to a video conferencing unit or a recording device. The cables required for these connections are not included with the FLX2 system and need to be purchased separately.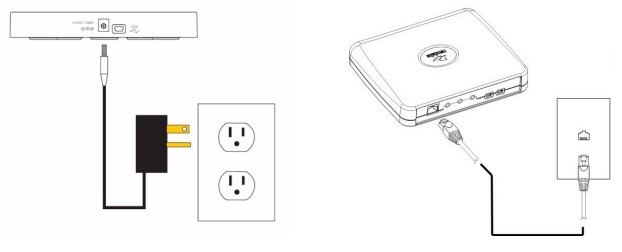
VoIP configuration
For the FLX phone to work within a VoIP environment the phone has to be set up to communicate to the IP PBX. You will also have to enable the extension (user) you want to use with the FLX on your PBX. Please review your PBX documentation for information on how to do that.
From the FLX Handset
Depending on your IP PBX, different settings will be required for your FLX to work in your environment. First, the FLX will require an IP address. The IP address can either be obtained from a DHCP server in your network or be statically set on the phone. The phone is preset to DHCP. If you want to change this setting, open the menu on the Dialer by pressing the right soft key, go to the “Setup” menu, and select “Advanced Setup.” You will have to enter a password, which is preset to 7386. Switch DHCP OFF, and then select “Network Settings.” Under “IP Settings” you can set the required network values like IP Address, Subnet Mask, Default Gateway, and DNS Servers. You will need to restart the phone for any changes you made in this section to take effect.
If you are using DHCP, you can go to the System Info menu, and select About System. The assigned IP address for the FLX will be shown here. Independent of how the IP address of your system was assigned, the FLX phone has to be configured to work in your VoIP environment and communicate with your IP PBX. You will have to enable the extension (user) you want to use with the FLX on your IP PBX. Please review your IP PBX documentation for information on how to add and configure users. For the minimal setup, in the FLX Dialer, you will have to provide information on the IP connection to the IP PBX. On the Dialer visit Setup – Advanced Setup – Network Settings – VOIP Settings. Under Registrar, provide the IP address or hostname of your IP PBX.
The username should be the extension or name under which you want to register this phone on the IP PBX. In Password, provide the password for this username. If no values are provided for ID and Display Name, the Username entry will be used for them. Select “Load Settings” after you have set the values in the Dialer, which will restart the Base Station. For enhanced settings, the Web Interface provided by the FLX needs to be used.
From the FLX Web Interface
If further settings are required to connect the FLX phone to your IP PBX, like a Proxy server, please visit the FLX Web Interface. You get to this interface by entering the IP address of the FLX into the web browser of your choice. After you enter the password (7386, unless you changed it in the Dialer), you can find the SIP settings under the Administrator tab on the top right. You will find the different SIP settings under SIP Registration, SIP Configuration, Transport, and Media. You have to press “Save” on every page where you change an entry to save these changes. If you do not press “Save,” the changes will be lost when you leave that page. Restart the phone once you are finished with your changes. Please see page 49 for a description of the FLX Web Interface.
Managing A Call
The FLX2 Wireless Conferencing system is equipped with a VoIP interface that allows the system to make conference calls in a VoIP network. The following are the basic operational instructions for making and receiving telephone conference calls.
Calling Configurations
The FLX2 Wireless Conferencing system has the ability to make and receive calls in many different ways. This provides the caller the ability to choose what mode or call type best suits the needs of each individual call.
Speaker Mode
Speaker mode allows the call to take place using the Speaker and Microphones provided with the FLX2 System. This allows multiple users, within the conference room, to participate in the call. It also provides the ability for the Microphones and Speaker to be located anywhere in the conference room to meet the needs of each meeting. The call, as well as the Speaker and microphone, are controlled by the FLX Dialer. The user can switch between ‘speaker mode’ and ‘handset mode’ while on a call.
Handset Mode
Handset mode allows a telephone call to take place through the handset speaker and microphone located in the FLX Dialer. This allows a single user to make and receive a private call. It also provides the ability for the FLX2 System to act as a personal desk phone. The Microphones and Speaker are not used during a handset call. The user can switch between ‘speaker mode’ and ‘handset mode’ while actively on a call by using the key marked ‘‘Handset’ or ‘Speaker’.
NOTE: To switch from a handset call to a speaker call at least one Microphone should be out of the Charger Base and switched on, and the Speaker must be switched on. If all Microphones are in the Charger Base at least one of the Microphones in the Charger Base has to be activated manually by pressing the Microphone button before switching from the handset call to a speaker call.
VoIP Call
The FLX2 Conference Phone allows making conference calls using an Ethernet VoIP connection. A telephone call can be made using either ‘speaker mode’ or ‘handset mode’. A telephone call can be made at the same time as a video call. Telephone calls are controlled via the FLX Dialer.
Bluetooth Call
The FLX2 System is equipped with a Bluetooth interface that supports the Hands-Free Profile (HFP). This profile allows the user to make a call through a cell phone, a computer, or other device via a Bluetooth connection. A Bluetooth call can be made using ‘speaker mode’ only. A Bluetooth call is controlled by the connected Bluetooth device. A Bluetooth call can be made at the same time as a video call.
NOTE: Revolabs FLX only supports the Hands-Free Profile (HFP) for Bluetooth 2.0 or higher. Applications that try to use the Bluetooth connection not using the HFP profile, or that are using an older HFP / Bluetooth standard are not supported by FLX.
Video Conference Call
The FLX2 System can be connected to a 3rd party video or PC conferencing system via the Analog I/O ports located on the FLX2 Base Station. This allows the Microphones and Speaker to be used as the audio interface for the video conference call. Video Conference calls are controlled primarily by the video conference system. However, audio properties can be controlled via the FLX Dialer. While the FLX2 Conference Phone is connected to a video conferencing device, it might still make and accept calls over the VoIP connection or via a Bluetooth device.
NOTE: When using the FLX connected through the AUX IN and AUX OUT to another device, only the FLX speaker can be used. All other speakers, e.g. in a television set, must be turned off. To avoid audio problems, any Echo Cancellation provided on the Video Conferencing unit should be switched off.
NOTE: For security reasons, Microphones will not send any audio signal to the AUX OUT connector when in the charger. To receive an audio signal on the AUX OUT, microphones have to be taken out of the Charger Base.
FLX Home Screen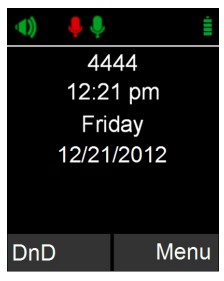
Whenever the FLX is not in a call, the FLX Dialer will show the FLX Home Screen. The Top of the home screen shows several symbols, indicating the current status of the FLX components. From left to right they are an indicator for the Speaker, one symbol for each of the mics, and a charging indicator for the handset itself. The color of the Speaker and Microphone symbol indicates whether the system is available and unmuted (green), available but muted (red), switched off (grey), or the current status is unknown, e.g. when the component was taken out of range (yellow). The handset charging indicator shows the current status of the battery. Green indicates a charged battery, yellow means that the charge is getting low, and red indicates that the battery requires re-charging. In the Charger Base, the battery indicator will show a grey symbol while charging.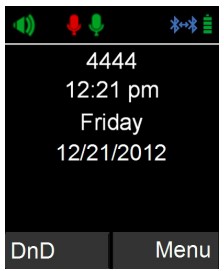
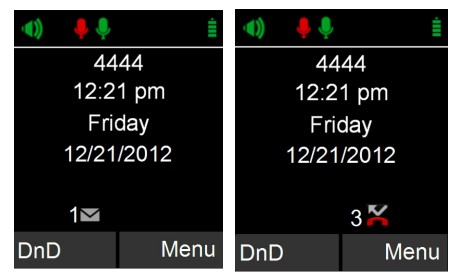
In addition, the first line will show if a Bluetooth link is currently active with a blue symbol. If the Handset fails to connect to the Base Station, a red, crossed-out Bluetooth symbol is shown. In the top text line of the screen, the ID or the user name with which this telephone is registered to the VoIP PBX is shown. Below that, the current time and date are displayed. From the home screen, a call can be started by dialing a number, The “Do not Disturb” function of your switch can be activated for this phone, or the system menu can be entered. Whenever “Do Not Disturb” is turned on, all calls to this phone will be handled in the switch as defined in there, e.g. sent to voice mail, The Home screen also provides information on new voice mails for the extension (if available), and on missed or rejected calls.
Placing a VoIP Call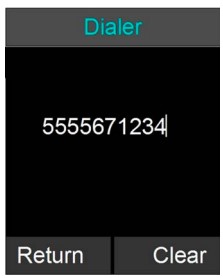
- From the home screen on the FLX Dialer enter the phone number to be called.
- Once the number is entered completely, press the green ‘call’ button to initiate the phone call.
- If any Microphones are out of the Charger Base and active, the call will default to ‘speaker mode’ and will be identified by the ring tone being played out of the Speaker.
- If no Microphones are outside the Charger Base the call will default to ‘handset mode’ and the call will take place on the FLX Dialer.
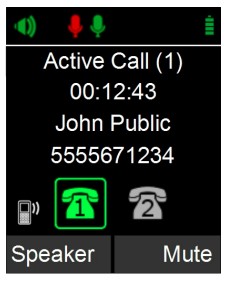
Once a call has been started, the home screen will show the two available phone lines and the activity on each line. In this case, the outgoing call is being made on line 1. The green phone symbol represents an active call.
Answering an Incoming Call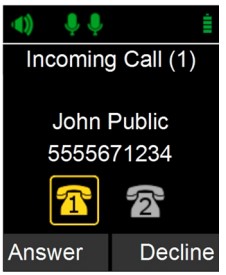
- When the FLX2 System identifies an incoming call, it will play the ringtone through the FLX Speaker. If the Dialer is not in the Charger Base it will play a ringtone, too.
- The FLX Dialer will display the caller ID information for the incoming call. The yellow phone symbol represents an incoming call, in this case on line one.
- A call can be answered in one of three fashions.
- Press the Green ‘Call’ button or the ‘Answer’ key on the FLX Dialer.
- Remove a Microphone from the charger.
- Press the mute/unmute button on a Microphone that is already out of the charger.
NOTE: If there is either no Speaker active or no Microphone outside the Charger Base when the incoming call is answered from the FLX Dialer, the call will default to ‘handset mode’ and will remain in ‘handset mode’. The call can only be switched to ‘speaker mode’ if the speaker and at least one microphone are switched on. If all microphones are in the charger base at least one has to be switched on before pressing the microphone button.
Declining an Incoming VoIP Call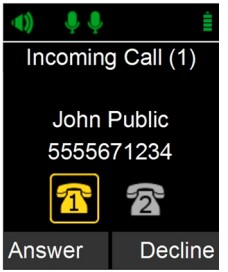
- When the FLX2 System identifies an incoming call, it will play the ringtone through the FLX Speaker.
- The FLX Dialer will display the caller ID information for the incoming call.
- A call can be ignored in one of two fashions.
- Press the Red ‘End Call’ button on the FLX Dialer.
- Press the ‘Decline’ key on the FLX Dialer.
Note: Once the user ignores the call, the telephone switch decides how to handle the call. It might for example be transferred into voicemail, based on settings in the telephone switch.
FLX2 System Configuration
There are many features to the FLX2 System that can be modified and configured using the FLX Dialer. The following is a list of those features and their options.
Menu Hierarchy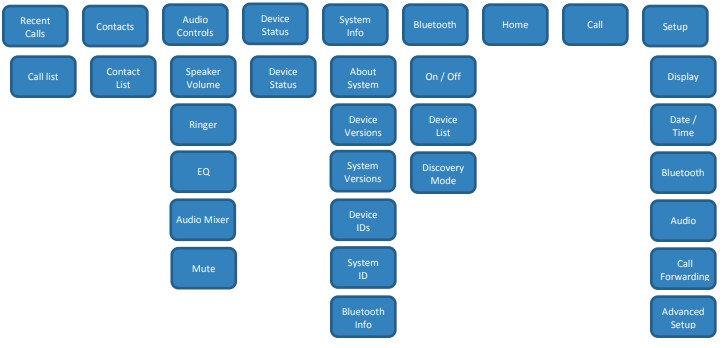
Menu Navigation
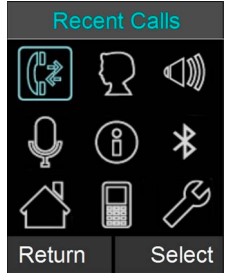
- Enter the menu by pressing the ‘Menu’ soft key on the home screen.
- The left, right, up, and down navigation keys are used to highlight an icon and the Enter key is used to make a selection.
- Up and Down navigation keys are used to scroll through the menu.
- When setting levels, such as Volume, in the menus, the Up and Down keys are used to change these values.
- You leave the menu either by pressing the ‘Return’ soft key, which will bring you back one level in the menu hierarchy, or by pressing the red hang-up button, which will bring you back to the home screen.
LED Pairing Indicators:
| Speaker Indicator | Status |
| Steady Red | The speaker is in Pairing Mode, either waiting or pairing in progress |
| Slow red-green flash | Pairing failed or timed out |
| Green flash | Pairing successful |
| Microphone Indicator | Status |
| Steady Red | Pairing Mode, either waiting or pairing in progress |
| Slow red–green flash | Pairing failed or timed out |
| Green flash | Pairing successful |
Network Settings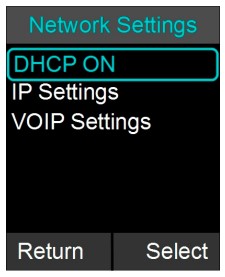
- Browse to the Network Settings menu: Menu Setup Advanced Setup Network Settings.
- You can change the DHCP configuration by turning it off and manually setting your IP address in the IP Settings. If DHCP is set to ON this takes precedence over static IP settings.
- IP Settings allows you to set the IP Address, Subnet Mask, Default Gateway, Primary DNS, and Secondary DNS when you are not using DHCP.
- VoIP Settings allow you to set minimal required settings to connect to a VoIP switch. Registrar, Username, and Password (which can be empty) are required fields to connect to your IP PBX.
- ‘Registrar’ is either the IP address or server name of your IP PBX.
- ‘ID’ is the name used in messages to identify this phone. If the ID is left open, the Username will be used as the ID.
- ‘Display Name’ is the string that is shown on the far side when you make outbound calls. If you do not provide a Display Name, the Username will be used. Please note that your IP PBX might override the Display name sent by the FLX and replace it with names configured in the PBX.
- ‘Username’ is the extension of the IP PBX this phone will be reached under
- ‘Password’ is the password used by the Username to log on to the IP PBX.
- If any value is changed, a sixth option ‘Load Settings’ is offered. This will reboot the FLX Base Station, applying the changed settings.
Web Interface
The FLX web interface provides access to advanced configuration settings, call statistics, and system logs. Web access can be enabled or disabled from the FLX Handset, and the web interface is password protected using the same password that is required to access Administrator settings on the FLX Handset.
This section describes the web interface, organized as follows:
- Enabling Web Access
- Connecting to the FLX Web Interface
- Home Page
- User Settings
- Administrator Settings
| Audio | |
| Ringer Volume | Choose the speaker volume for the ringtone played when the phone receives an incoming call. This setting is separate from call volume, which is set by the Handset while on a call. The range of values is 0-16. |
| Ring Tone | Select from one of the six provided ring tones, Ring 1-Ring 6. |
| EQ Setting | The Equalizer setting allows you to adjust the speaker frequencies to your preference for the room and the types of calls. The EQ options are Voice, Bass Boost, and Treble Boost. |
| Audio MixerThe settings below can be changed at any time during a call. | |
| Speaker Mix | The Speaker Mixer specifies the mix between AUX IN and the phone input to be played back on the speaker. It is a sliding scale from -8 (favoring phone) to +8 (favoring AUX IN). |
| Phone Out Mix | The Speaker Mixer specifies the mix between the microphones and AUX IN to be transmitted to the far end during a call. It is a sliding scale from -8 (favoring microphones) to +8 (favoring AUX IN). |
| Aux Out Mix | The Aux Out Mixer specifies the mix between the microphones and the phone audio received from the far end while on a call. It is a sliding scale from -8 (favoring microphones) to +8 (favoring phones). |
| Call Forwarding | |
| Always Forward | The Always Forward option will forward all incoming calls to the specified number. |
| Forward on Busy | The Forward on Busy option will forward incoming calls to the specified number if the local phone is in “Do Not Disturb” mode or if both lines are busy. |
| Forward on No Answer | The Forward on No Answer option will forward incoming calls to the specified number if the call is not answered within the duration specified in the “Delay on No Answer” field. |
| Delay on No Answer | Specify the number of seconds to wait before forwarding unanswered incoming calls to the “Forward on No Answer” number. The default is 20 seconds. |
| Date/Time | |
| Network Time | To enable the system to automatically detect the local date and time by using a public Date Time Server (DTS), set the Network Time to On. If you want to manually specify the local date and time, choose. See page 42 for instructions on how to manually set the date and time using the FLX Handset. |
| Time Zone | Select the local time zone, indicated as an offset from Greenwich Mean Time (GMT). These are the available time zones:-11 Samoa, -10 Hawaii, -9 Alaska, -8 Pacific Time, -7 Mountain
Time, -6 Central Time, -5 Eastern Time, -4:30 Caracas, -4 Atlantic Time, -3:30 Newfoundland, -3 Brazil/Argentina, -2 Mid Atlantic, -1 Azores, 0 GMT, +1 Berlin/Paris, +2 Athens, +3 Kuwait, +3:30 Tehran, +4 Moscow, +4:30 Kabul, +5 Islamabad, +5:30 Mumbai, +5:45 Kathmandu, +6 Yekaterinburg, +6:30 Yangon, +7 Bangkok, +8 Beijing/Hong Kong, +9 Tokyo, +9:30 Adelaide, +10 Sydney, +11 Vladivostok, +12 Auckland, +13 Nuku’alofa |
| Daylight Saving Time (DST) | Use the Daylight Saving Time (DTS) option to specify whether or not you want the system to automatically adjust the time according to your locale’s DTS rules. |
| DST Start Rule andDST End Rule | Use the DST Start Rule and DST End Rule options to indicate the month, week, day, and hour that the time changes. The illustration above shows the default DST rules for the United States. |
| Month | Select the month in which DST changes. |
| Week | For the specified month, select the week in which DST changes. For example, if DST changes on the second Sunday of the selected month, choose “Second.” |
| Day | Select the day on which DST changes, for example, Sunday. |
| Hour | Select the hour at which DST changes. For example, if DST changes at 2:00 a.m., choose 2. |
Restarting the Phone
To restart the phone, choose Restart from the User menu or Administrator menu on the left of the page. On the Restart page click the Restart button as shown below.
Administrator Settings
In the upper right corner click the Administrator link to access the Administrator settings. The Administrator Menu will appear on the left side of the page showing these options:
- Network
- SIP Registration
- SIP Configuration
- Transport
- Media
- Call Settings
- Advanced Audio
- RF Settings
- Access Control
- Import/Export
- System Log
- Call Status
- Restart
- Logout
| Network Settings | |
| Connection Type | Select the network connection type, either DHCP or Static IP. If you choose Static IP, specify the Static IP Address, Subnet Mask, and Default Gateway in the fields below. |
| Static IP Settings | |
| Static IP Address | The Static IP Address is the IP address that the network administrator has assigned to the phone. |
| Subnet Mask | A Subnet Mask is used to determine the subnet to which the phone belongs, for example, 255.255.255.0. |
| Default Gateway | The Default Gateway is the phone’s default router on the IP network. It is usually the router connecting the internal network with the outside network. |
| Domain Name | This is the network domain name. |
| Primary DNS Server | This is the address of the primary Domain Name System (DNS) server that translates domain names into IP addresses. Sites often configure a primary DNS server and a secondary backup DNS server. |
| Secondary DNSServer | This is the address of the secondary DNS server. |
The table below describes the SIP Registration settings. Different IP PBX providers might use different names in their setup. The descriptions below will help you in mapping the FLX fields to your IP PBX fields.
| SIP Registration | |
| Registrar | This is the IP address or DNS name of the SIP registrar server. |
| Use Proxy for Registration | Use this option to indicate whether or not the SIP proxy server(s) specified in the Outbound Proxy field should be used when registering. Select “Use Outbound Proxy” to have the system add listed proxy servers to the route headers of the SIP REGISTER request. |
| Outbound Proxy | Enter the outbound SIP proxy server’s IP address or name in the Outbound Proxy field. If there are multiple SIP proxies, separate the addresses by a comma. Also note that on the SIP Settings page, there’s an option to allow strict routing. If that option is set and you have a SIP proxy that is configured for loose routing, add the “;lr” designation after the proxy’s address, for example, “10.134.129.101;lr”. |
| ID | ID is the phone’s SIP ID used for SIP registration. If this field is left blank, the Username field will be used as the ID. |
| Display Name | Display Name is the string that is shown at the far side when you make outbound calls. If you do not provide a Display Name, the Username will be used. Please note that your IP PBX might override the Display name sent by the FLX and replace it with names configured in the PBX. |
| Username | This is the username for the account used to authenticate with the registrar and proxies. |
| Password | This is the password for the account used to authenticate with the SIP registrar and proxies. |
| Registration Timeout | Registration Timeout is the optional timeout for SIP account registration, in seconds. The default is 55. If set to 0, the default will be used. |
| Auto Re-registration RetryInterval | If SIP registration is unsuccessful, this field specifies the time duration between retry attempts, in seconds. The default is 300 seconds (5 minutes). |
SIP Settings
Use the SIP Settings page to configure settings related to SIP sessions, as shown in the illustration below. After changing any of these settings, the phone must be restarted for the changes to take effect.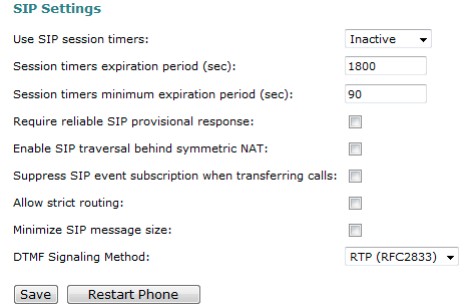
| SIP Settings | |
| Use SIP session timers | Specify the preference for using SIP session keep-alive timers. During a SIP session, if SIP session timers are active, the SIP User Agent (UA) periodically sends INVITE or UPDATE requests (also called refresh requests) to keep the SIP session alive. The interval and use of the keep-alive is determined at call negotiation. If one of the UAs in a call does not receive the refresh request within the expiration timeout period, it will terminate the session. The available options in FLX are:
Inactive – Session Timers will not be used in any session, except if explicitly required in the remote request. Optional – Session Timers will be used in all sessions whenever the remote supports and uses it. Required – Session Timer support will be a requirement for the remote to be able to establish a session. Always – Session Timers will always be used in all sessions, regardless of whether or not the remote supports or uses them. This option is the FLX default. |
| Session timer expiration period | The expiration period is the interval at which the phone will consider the SIP session timed out if it does not receive a refresh message from the remote phone. It is measured in seconds; the default is 1800. At call negotiation, the nodes will negotiate the expiration |
| period to be used for the session. | |
| Session timers minimum expiration period | This is the minimum session timer expiration period that FLX will accept when negotiating the expiration period with the remote phone. It is measured in seconds; the default is 90. |
| Require reliable SIP provisional response | Select this option to implement reliable SIP provisional responses. By default the setting is unchecked. SIP is a request-response type of protocol with two types of responses: provisional and final. Final responses are sent reliably, using an ACK to ensure receipt. Provisional responses by default are not sent reliably and do not require an ACK; however, in some cases, such as for PSTN interoperability support, reliability of provisional types of responses is needed. Choose this option to add the PRACK (provisional ACK) message support for reliability. |
| Enable SIP traversal behind symmetric NAT | This option may be used when the phone is behind a symmetric NAT (Network Address Translation). When enabled, FLX will keep track of the public IP address from the response of the REGISTER request. If it detects that the address has changed, it will unregister the current Contact, update the Contact with the transport address obtained from the Via header, and register a new Contact to the SIPregistrar. This option will also update the public name of the UDP transport if STUN is configured. |
| Suppress SIP event subscription when transferring calls | When transferring a SIP call, the SIP REFER process automatically establishes a temporary event subscription to notify the party initiating the transfer about the receiver’s status in handling the REFER. In some cases these event subscriptions and notifications are not needed, such as when forking is not used. Enable this option to suppress the automatic event subscriptions when transferring calls. The option is disabled by default. |
| Allow strict routing | By default, proxies specified on the SIP Registration page will be configured as loose-routing proxies. The loose-routing designation (“;lr”) will be automatically appended to each proxy address when the proxy is added to the SIP Route header. Older proxies may be strict routing (see IETF RFC 2543), not supporting loose routing (see IETF RFC 3261). Enable this option if you are using strict-routing proxies. If this option is enabled and you are specifying one or more loose-routing proxies in the SIP Registration page’s Outbound Proxy field, then you must manually add the “;lr” suffix to each loose-routing proxy address. For example, “10.134.123.101;lr”. |
| Minimize SIP message size | The SIP protocol specifies that header field names can be in the full name form or in the abbreviated form. The abbreviated form is useful when messages might be too large to be carried on the available transport, for example when exceeding UDP’s Maximum Transmission Unit (MTU). Enable this option to encode SIP headers in their short forms to reduce size. By default, the option is not enabled and SIP headers in outgoing messages will be encoded in their full names. (See SIP protocol standard, IETF RFC 3261.) |
| DTMF Signaling Method | Select the signaling method for transmitting DTFM tones, either via RTP (RFC2833) or SIP INFO messages. The default is RTP. |
Transport
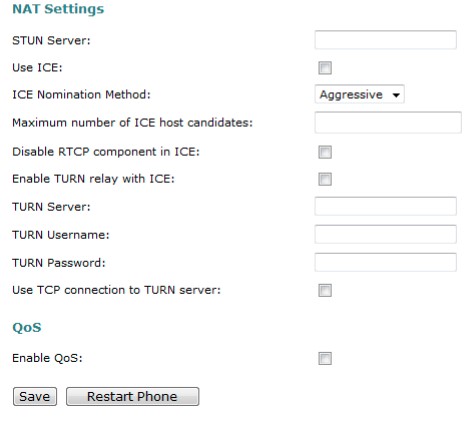
Use the web interface’s Transport page to manage transport and Network Address Translation (NAT) settings, and to enable or disable Quality of Service (QoS). The illustration below shows the Transport page. After changing any of these settings, the phone must be restarted for the changes to take effect.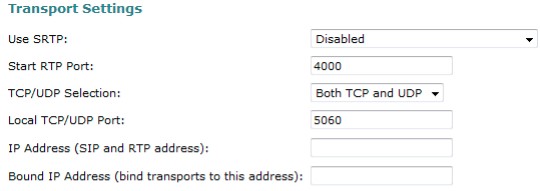
| Transport Settings | |
| Use SRTP | Use this setting to control Secure Real-time Transport Protocol (SRTP) usage. These are the available options: Disabled – Do not use SRTP; always use RTP. This is the default setting.
Optional – Use the optional disposition for SRTP in SDP. If the remote end supports SRTP, then use SRTP; otherwise, use RTP. Mandatory – Force use of SRTP. If the remote end does not support SRTP, the call does not connect. Optional by duplicating media offer – Use duplicated media, both secured and unsecured versions, in the SDP offer. |
| Start RTP Port | This is the base port number for RTP. The default is 4000. RTP is originated and received on even port numbers, and the associated RTCP uses the next higher odd port number. The range is 0 to 65535. |
| TCP/UDPSelection | Select the transport that will be enabled for SIP messages. The options are Both TCP and UDP, TCP Only, and UDP Only. The default is Both TCP and UDP. Note that UDP will be used if it is available. |
| Local TCP/UDP Port | Specify the local port for SIP transport. The default is 5060 for UDP and TCP. (Both use the same port.) The range is 0 to 65535. |
| IP Address (SIP and RTP address) | Optional. If specified, use this IP address (or hostname) as the advertised SIP and RTP address of this transport (the public address). The IP address does not have to correspond with one of the local host network interfaces; it may be the public IP address of a NAT router where port mappings have been configured for the phone application. |
| Bound IP Address | Optional. Bind the SIP and media transports to the specified IP address. The IP address must be an IP address of one of the host network interfaces. |
| NAT Settings | |
| STUN Server | Optional. Specify the STUN (Session Traversal Utilities for NAT) server to use to determine if the phone is behind a NAT, the type of NAT, and the public address of the phone. The field can contain a comma-separated list of servers. Each server can be a domain name, hostname, or IP address, and it may contain an optional port number. (For STUN see IETF RFC 5389.) |
| Use ICE | Check this option to use the ICE (Interactive Connectivity Establishment) protocol for NAT traversal. This option is checked by default. ICE takes advantage of STUN and TURN to identify candidates (IP addresses and ports) for communication, evaluating and prioritizing the candidate pairs to select the best route. Expensive candidates, such as using a media relay, are selected only as a last resort. (For ICE see IETF RFC 5245.) |
| ICE NominationMethod | When using ICE, select the preferred ICE Nomination Method. To validate candidate pairs (IP addresses and ports for the local and |
| remote nodes), FLX sends STUN binding requests as part of the media connectivity tests. When a candidate is nominated for use, a STUN binding request is sent with a flag indicating that the candidate pair is nominated. There are two nomination methods that can be used: Regular – For Regular Nomination, FLX validates candidate pairs with initial STUN binding requests and then selects a valid candidate pair by sending another STUN binding request with a flag indicating that the pair is nominated. Aggressive – For Aggressive Nomination, FLX doesn’t wait to set the nominated flag in a second STUN binding request but rather sets the flag in the STUN binding requests for all of the candidate pairs. The ICE processing completes when the first pair successfully passes connectivity checks. The aggressive method is faster but
does not always result in the optimal path being selected. This is the default method. |
|
| Maximum number of ICE host candidates | An ICE host candidate is an actual local transport address in the host. Host transport addresses are obtained by binding to attached network interfaces. These interfaces include both physical interfaces and virtual interfaces such as VPN. This option specifies the maximum number of local ICE host candidates that may be used in evaluating candidate pairs when determining the best route. The default value is -1 or an empty field, which indicates that there is no maximum. |
| Disable RTCP component inICE | Select this option to disable the RTCP component in ICE. The option is unchecked by default. |
| Enable TURN relay with ICE | Select this option to enable the use of a TURN (Traversal Using Relay NAT) relay when using ICE. A TURN relay is a media relay server residing on the public internet that can relay media data packets between clients. TURN relays are used when other preferred mechanisms are not available, such as STUN or direct connectivity. The option is unchecked by default. If TURN is enabled, the TURN settings below (server, username, and password) must also be specified. |
| TURN Server | Specify the TURN server domain name or hostname. The format is either “DOMAIN: PORT” or “HOST: PORT” |
| TURN Username | Specify the username to authenticate against the TURN server. |
| TURN Password | Specify the password to authenticate against the TURN server. |
| Use a TCP connection to turn the server | Use TCP to communicate with the TURN server rather than UDP. This option is unchecked by default. |
| QoS | |
| Enable QoS | Select this option to enable QoS (Quality of Service) tagging for SIP and media. For layer 3, at the Internet layer, the DiffServ (Differentiated Services) precedence level is Class 3. The |
| Differentiated Services Code Point (DSCP) in the IP header is set to 24 (0x18). For layer 2, IEEE 802.1p tagging is supported. This option is unchecked by default. |
To export FLX configuration settings, click the Export button. A File Download window will appear prompting you to open or save the file as shown below. Click the “Save” button to save the file to the desired location.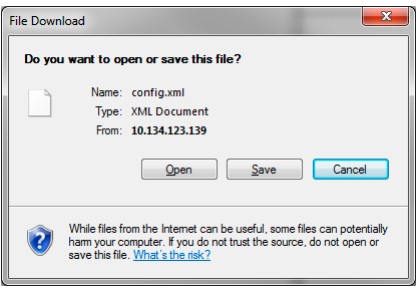
To import a configuration file, open a web session login to the target phone to be configured, and select the Administrator > Import/Export page. Use the File to Upload field’s Browse button to navigate to the previously saved configuration file, select the file in the file browser, and then click the Import button.
After importing the settings, you must minimally set the target phone-specific settings that were not uploaded with the import. Use the web interface to browse to the Network page and specify either DHCP or the Static IP-related settings as described in this manual. Also, browse the SIP Registration page and specify the registration settings for the phone being configured. After importing, you must restart the phone for the changes to take effect.
Downloading the System Log Package
If you have problems with the FLX conference phone or questions about its operation, the support staff may request that you download the FLX system log package for their review. Select the Administrator > System Log page, and click the Retrieve button to begin the download process as shown in the picture.
Battery Exchange
The rechargeable batteries in the different FLX components can all be exchanged. Please note that only Revolabs-approved batteries should be used for the replacement. The following sections explain how to change the batteries in the different components.
We recommend charging any component for 8 hours after exchanging the battery.
Microphones
To exchange a microphone battery push the bottom part of the back cover slightly down towards the charger port and then lift it as shown in the illustration below.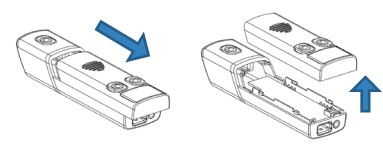
Carefully take the battery out of the plastic cover. Put the new battery into the back cover as shown in the figure below. Press on the battery until it snaps into the back of the microphone housing.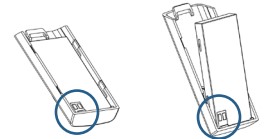
Slide the back of the microphone back in place. Place the microphone back into the charger base. The LED should go on indicating the charge status of the microphone.
Dialer
The battery in the dialer can be exchanged after the dialer’s back is opened. The back of the dialer opens if pressure is applied, pushing the back up away from the charger port and lifting it, as shown in the picture.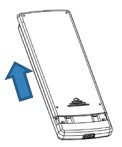
Take the current battery out of the handset as shown, and replace it with the new battery. Please ensure that the connectors on the battery are lined up with the connectors inside the dialer.
Speaker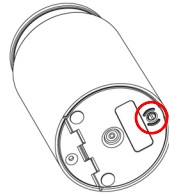
To change the rechargeable battery in the FLX speaker you will need to use a screwdriver to loosen the screw on the bottom of the speaker. Once the screw is loose, the bottom door of the speaker will open, revealing the rechargeable battery pack. Carefully take this battery pack out of the speaker enclosure, unplugging the wire. Plug the new replaceable battery into the connector, and place it into the speaker. Close the door, and re-tighten the screw.
Connecting using AUX IN / AUX OUT
The following table shows the different cables required to connect the FLX to common videoconferencing codecs in the market.
| Brand | Codec | FLX OUTConnects TO: | Level | Cable | FLX IN
Connects TO: |
Cable |
| Lifesize | LGExecutive | Mic Input | Mic | 07-35MUTO35MU-01 | Line Output | 07-35MUTO35MS-01 |
| Lifesize | Passport | Mic Input | Mic | 07-35MUTO35MU-01 | Line Output | 07-35MUTO35MS-01 |
| Lifesize | PassportConnect | Mic Input | Mic | 07-35MUTO35MU-01 | Line Output | 07-35MUTO35MS-01 |
| Lifesize | Express200 | Mic Input | Mic | 07-35MUTO35MU-01 | Line Output | 07-35MUTO35MS-01 |
| Lifesize | Express 220 | Mic Input | Mic | 07-35MUTO35MU-01 | Line Output | 07-35MUTO35MS-01 |
| Lifesize | Room | Input 1 | Mic | 07-35MUTORCA-01 | Line Output | 07-35MUTODRCA-01 |
| Lifesize | Room 200 | Mic Input | Mic | 07-35MUTO35MU-01 | Line Output | 07-35MUTODRCA-01 |
| Lifesize | Room 220 | Mic Input | Mic | 07-35MUTO35MU-01 | Line Output | 07-35MUTO35MS-01 |
| Lifesize | Team 200 | Mic Input | Mic | 07-35MUTO35MU-01 | Line Output | 07-35MUTO35MS-01 |
| Lifesize | Team 220 | Mic Input | Mic | 07-35MUTO35MU-01 | Line Output | 07-35MUTO35MS-01 |
| Polycom | HDX7000 | Main LineInput 1 | Line | 07-35MUTODRCA-01 | Line Output | 07-35MUTODRCA-01 |
| Polycom | HDX8000 | Main LineInput 1 | Line | 07-35MUTODRCA-01 | Line Output | 07-35MUTODRCA-01 |
| Polycom | HDX9000 | Main LineInput L | Line | 07-35MBTOMPHX-01 | Line Output L | 07-35MBTOMPHX-01 |
| Polycom | QDX6000 | Main LineInput 1 | Line | 07-35MUTODRCA-01 | Line Output | 07-35MUTODRCA-01 |
| Polycom | FX | Mono LineInput | Line | 07-35MUTORCA-01 | Line Output | 07-35MUTODRCA-01 |
| Polycom | VSX7000e | Main LineInput 1 | Line | 07-35MUTODRCA-01 | Line Output | 07-35MUTODRCA-01 |
| Polycom | VSX7000s | Main LineInput 1 | Line | 07-35MUTODRCA-01 | Line Output | 07-35MUTODRCA-01 |
| Polycom | VSX8000 | Main LineInput L | Line | 07-35MBTOMPHX-01 | Line Output L | 07-35MBTOMPHX-01 |
| Tandberg | C20 | Mic Input | Mic | 07-35MBTO35M4-01 | Line Output | 07-35MUTODRCA-01 |
| Tandberg | C40 | Mic Input | Mic | 07-35MBTOXLR-01 | Line Output | 07-35MUTODRCA-01 |
| Tandberg | C60 | Mic Input | Mic | 07-35MBTOXLR-01 | Line Output | 07-35MUTODRCA-01 |
| Tandberg | C90 | Mic Input | Mic | 07-35MBTOXLR-01 | Line Output | 07-35MUTODRCA-01 |
| Tandberg | Edge | Mic Input | Mic | 07-35MBTOXLR-01 | Line Output | 07-35MUTODRCA-01 |
| Tandberg | 3000 MXP | Mic Input | Mic | 07-35MBTOXLR-01 | Line Output | 07-35MUTODRCA-01 |
| Tandberg | 6000 MXP | Mic Input | Mic | 07-35MBTOXLR-01 | Line Output | 07-35MUTODRCA-01 |
| PC Audio | USB AudioAdapter | Mic Input | Line | 07-35MUTO35MU-01 | Line Output | 07-35MUTO35MS-01 |
| Sony | XG-80 | Mic Input | Mic | 07-35MUTO35MU-01 | Line Output | 07-35MUTODRCA-01 |
| Sony | PCS-G70 | Mic Input | Mic | 07-35MUTO35MU-01 | Line Output | 07-35MUTODRCA-01 |
| Sony | PCS-HG90 | Mic Input | Mic | 07-35MBTOXLR-01 | Line Output | 07-35MUTODRCA-01 |
| Sony | PCS-G50 | Mic Input | Mic | 07-35MUTO35MU-01 | Line Output | 07-35MUTODRCA-01 |
| Sony | PCS-1 | Mic Input | Mic | 07-35MUTO35MU-01 | Line Output | 07-35MUTORCA-01 |
| Panasonic | KX-VC600 | Audio InL/R | Line | 07-35MUTODRCA-01 | Line Output | 07-35MUTODRCA-01 |
| Panasonic | KX-VC500 | Audio InL/R | Line | 07-35MUTODRCA-01 | Line Output | 07-35MUTODRCA-01 |
| Panasonic | KX-VC300 | Audio InL/R | Line | 07-35MUTODRCA-01 | Line Output | 07-35MUTODRCA-01 |
Troubleshooting
Warning Messages
Speaker / Microphone Link Lost
If a FLX Microphone or FLX Speaker loses connection to the FLX2 Base Station, the LED indicator will begin flashing a sequence of red – yellow – green – yellow and start emitting a beeping notification. To reconnect the Microphone or Speaker move it back into range of the Base Station. Speaker/Microphone Low Battery If an FLX Microphone or FLX Speaker begins to experience a low battery, the LED indicator will begin to flash a green-yellow (unmuted) or red-yellow (muted) sequence. It will also start to emit an audio signal. When this LED and sound sequence begins, the battery has roughly 5% battery power remaining and should be returned to the Charger Base.
Speaker/Microphone Off
If the FLX Microphone or FLX Speaker suddenly turns off, it is the result of two possible causes.
- The battery has completely depleted and should be returned to the charger until it is fully charged again.
- The Microphone or Speaker lost connection with the Base Station for more than 10 minutes and therefore shut down. It should be returned to reach the Base Station and switched on again to be reactivated.
LED Indicators
| Device LED Indicator StatusMicrophone in Charger Base | |
| Steady Red | Charging |
| Steady Green | Fully charged |
| Single red flash | Active phone call, both microphones in Charger Base, microphones muted via Master Mute or All Mic Mute is ON |
| Double red flash | Active phone call, microphone(s) in Charger Base, microphone is muted |
| Green flash | Active phone call, microphone in Charger Base is unmuted |
| Off | Microphone is powered off:o Microphone is not seated properly
o Charger Base is powered off |
| Microphone not in Charger Base | |
| Off | Microphone is powered off |
| Single green flash every second | On, connected, battery charged, un-muted |
| Device LED Indicator | Status |
| Two Red flashes every second | On, connected, battery charged, individually muted |
| Red flash every second | On, connected, battery charged, Master Mute or “AllMic Mute” is ON, microphones muted |
| Alternating Yellow – Green flash | On, connected, battery low, un-muted |
| Alternating Yellow – Double-Redflash | On, connected, battery low, individually muted |
| Alternating long Red – Yellow flash | On, connected, battery low, Master Mute or “All MicMute” is ON, microphones muted |
| Flashing Yellow – Red – Yellow – Green | Searching for a connection to the base.The microphone will try to re-establish the link for 10 minutes, then power off |
| Alternating slow Red – Green flash | Microphone is not paired to a Base StationThe microphone will power off after two minutes |
| Steady Red | o Microphone is being powered downo Microphone is in pairing mode |
| Groups of five rapid Red flashes | Microphone is in a fault condition |
| Device LED Indicator | Status |
| Speaker in Charger Base | |
|
Steady Green |
o Connected, battery charging, no phone call in progress, Microphones in Charger Baseo Connected, battery charging, phone call in progress, Microphones are not muted using All Mic Mute or Master Mute. Microphone(s) might still be individually muted
o Connected, battery charging, no phone call in progress, Microphone(s) outside of the Charger Base unmuted |
|
Steady Red |
o Connected, battery charging, phone call in progress, Master Mute or “All Mic Mute” is ON, all Microphones are mutedo Connected, battery charging, no phone call in progress, Microphone(s) outside of Charger
Base, “All Mic Mute” is ON, all Microphones are muted |
|
Green flash every second |
o Connected, battery fully charged, no phone call in progress, Microphones in Charger Baseo Connected, battery fully charged, phone call in progress, Microphones are not muted using All Mic Mute or Master Mute. Microphones might still be individually muted
o Connected, battery fully charged, no phone call in progress, Microphone(s) outside of the Charger Base unmuted |
|
Red flash every second |
o Connected, battery fully charged, phone call in progress, Master Mute or “All Mic Mute” is ON, all Microphones are mutedo Connected, battery fully charged, no phone call in progress, microphones outside of Charger Base, “All Mic Mute” is ON, all Microphones are muted |
| Flashing Yellow* – Red – Yellow* –Green | Searching for a connection to the Base Station |
| Device LED Indicator | Status |
| Alternating slow Red – Green flash | Speaker is not paired to a Base Station |
| Off | Speaker is powered off:o Speaker is not seated properly
o Charger tray is powered off |
| Speaker not in Charger Base | |
| Off | Speaker is powered off |
|
Green flash every second |
o Connected, no call in progress, Microphones in Charger Baseo Connected, no phone call in progress, Microphone(s) outside of the Charger Base unmuted
o Connected, call in progress, Microphones are not muted using All Mic Mute or Master Mute o Microphone(s) might still be individually muted |
|
Red flash every second |
o Connected, phone call in progress, Master Mute or “All Mic Mute” is ON, all microphones are mutedo Connected, no phone call in progress, Microphone(s) outside of Charger Base, “All Mic Mute” is ON, all Microphones are muted |
|
Alternating Green – Yellow* flash |
o Connected, battery low, no call in progresso Connected, battery low, call in progress, Microphones are not muted using All Mic Mute or
Master Mute. Microphone(s) might still be individually muted |
|
Alternating long Red – Yellow* flash |
o Connected, battery low, no call in progress, “All Mic Mute” is ON, all Microphones are mutedo Connected, battery low, call in progress, Master Mute or “All Mic Mute” is ON, all Microphones muted |
| Flashing Yellow* – Red – Yellow* – Green | Searching for a connection to the baseThe speaker will try to re-establish the link for about 10 minutes, then power off. |
| Alternating slow Red – Green flash | Speaker is not paired to a Base StationThe speaker will power down after two minutes. |
| Steady Red | o Speaker is being powered downo Speaker is in pairing mode. |
| Groups of five rapid Red flashes | Speaker is in a fault condition. |
| Device LED Indicator | Status |
| Base Station | |
| Long solid on, then a long solid off | Power On Boot Process |
| Double flashes every second | Operating Mode indicating that Base Station isfunctional. |
| Skip every fifth double flash | Fault indication. This also indicates past faults thathave no bearings on current operation |
| Continuous Fast Flashing | Updating non-volatile memory as part of softwareupdate |
| Off | No Power |
Technical Specifications
Models
The Revolabs FLX2 VoIP System is available with a variety of configurations to provide the best audio capture in the industry. The following is a list of the available models. All of these models are SIP-enabled and require an IP connection.
| FLX | |
| Wireless Technology | |
| DECT | DECT 6.0 for US, ETSI ETS 300 175 for other countries |
| Bluetooth | BT 2.1 + EDR |
| Wireless Range | |
| DECT | 65 feet, 20 meters |
| Bluetooth | Class II, 33 feet, 10 meters |
| Security (DECT / Bluetooth) | DECT: 128 bit encryption |
| Noise Cancelation | Noise cancellation on the Microphone |
| Echo Cancelation | Acoustic echo canceller for Speaker/Microphone. |
| RF Shield | No cell phone interference due to RF ArmorTM technology |
| Language versions | System messages and menus in English; Documentation in English |
| Certifications / Regulatory Compliance | |
| Electrical Safety | UL/CSA, EN 60950 |
| Radio / Telephone | Part 68, IC-CS03, TBR 21, A-Tick |
| Environmental Requirements | 0°C – 40°C; 20% – 80% non-condensing humidity |
| Warranty | 1 year |
| Speaker | |
| Dimensions Speaker | 157mm x 93mm diameter |
| Weight | 600.3g |
| Bandwidth | 120-11,000 Hz from Analog IN. This is reduced for VoIP calls based on the bandwidth supported by the selectedtransport codec. |
| Battery life (talk time) | 8 hours. |
| Charge time | 3 hours |
| Microphones | |
| Dimensions Microphones | 94.2 x 24.6mm x 18.5 mm (omnidirectional Microphone) |
| Weight | 28.6g (omnidirectional Microphone) |
| Bandwidth | 80-11,000 Hz from Microphone to Analog OUT. This is reduced for VoIP calls based on the bandwidth supportedby the selected transport codec. |
| Battery life (talk time) | 8 hours |
| Charge time | 2 hours |
| Base Station | |
| Power | 5V 1A |
| Dimensions Base Station | 180 x 153 x 32mm |
| Weight | 302g |
| Connections | |
| Ethernet | RJ45 |
| USB | 2 Mini-USB connectors for firmware upgrades |
| AUX IN / AUX OUT | Line level input, 2 outputs, line level or mic level |
| Indicators (LED) | 1 indicating system status |
| Charger Base | |
| Power | 15V 1A |
| Dimensions Charger Base | 170 diameter x 22mm |
| Weight | 252g |
| Dialer | |
| Dimensions Dialer | 125 x 48 x 11mm |
| Weight | 67.5g |
| Microphone and Speaker bandwidth | 300 – 3300Hz |
| Battery life | 8 hours |
| Charge time | 3 hours |
| Display | High-resolution color LCD display |
| Caller ID | Support for multiple Caller ID standards |
| Phonebook | Up to 100 entries |
| Keypad | 12 key telephone keypad2 context-sensitive soft keys
answer/hang-up keys, 5 key cursor, and control panel |
FCC STATEMENT
Users are not permitted to make changes or modify the equipment in any way. Changes or modifications not expressly approved by Revolabs, Inc. could void the user’s authority to operate the equipment. This device complies with Part 15 of the FCC Rules. Operation is subject to the following two conditions: (1) this device may not cause harmful interference, and (2) this device must accept any interference received, including interference that may cause undesired operation. This equipment complies with FCC radiation exposure limits for an uncontrolled environment.
| Model Number | FCC Identification |
| 10-FLXBASE-VOIP | T5V10FLX |
| 10-FLXSPEAKER-01 | T5V10FLXSPKR |
| 10-FLXMIC-OM | T5V10FLXMIC |
| 10-FLXMIC-DR | T5V10FLXMIC |
| 10-FLXMIC-WB | T5V10FLXMIC |
| 10-FLXHDDIALER-01 | T5V10FLXDIAL |
Industry Canada Notice to Users
Operation is subject to the following two conditions:
- This device may not cause interference and
- This device must accept any interference, including interference that may cause undesired operation of the device
| Model Number | Industry Canada Identification |
| 10-FLXBASE-VOIP | 6455A-10FLX |
| 10-FLXSPEAKER-01 | 6455A-10FLXSPKR |
| 10-FLXMIC-OM | 6455A-10FLXMIC |
| 10-FLXMIC-DR | 6455A-10FLXMIC |
| 10-FLXMIC-WB | 6455A-10FLXMIC |
| 10-FLXHDDIALER-01 | 6455A-10FLXDIAL |
Limited Warranty and Limitation of Liability
Revolabs warrants to the end user (“Customer”) that this product will be free from significant defects in workmanship and materials, under normal use and service, for one year from the date of purchase from Revolabs or its authorized reseller provided the customer provides proof of purchase that demonstrates that the product is still within the warranty period and contacts Revolabs customer service, regarding warranty claims, within the warranty period. Revolabs’s sole obligation under this express warranty shall be, at Revolabs’s option and expense, to repair the defective product or part, deliver to Customer an equivalent product or part to replace the defective item, or if neither of the two foregoing options is reasonably available, Revolabs may, in its sole discretion, refund to Customer the purchase price paid for the defective product upon Customer’s return of the defective product.
All products that are replaced will become the property of Revolabs. Replacement products or parts may be new or reconditioned. Revolabs warrants any replaced or repaired product or part for ninety (90) days from shipment, or the remainder of the initial warranty period, whichever is longer. Products returned to Revolabs must be issued a valid Return Material Authorization (“RMA”) number. To request an RMA, contact Revolabs Customer Service. Prior to receiving an RMA, the product must be first troubleshot and determined to be defective by a Revolabs Technical Support Technician. The product returned to Revolabs must have a valid RMA # clearly marked on the outside of the shipping container and the serial number and model of the returned product must match the RMA. Products returned without an RMA number will be returned to the customer.
The product must contain all of the original accessories and be properly packaged. Products returned to Revolabs must be sent prepaid, and it is recommended that they be insured or sent by a method that provides for tracking of the package. Responsibility for loss or damage does not transfer to Revolabs until the returned item is received by Revolabs. The repaired or replaced item will be shipped to Customer, via standard economy shipping methods and at Revolabs’s expense, not later than thirty (30) days after Revolabs receives the defective product, and Revolabs will retain the risk of loss or damage until the item is delivered to Customer.
Any customer request for expedited shipping will be considered on a case-by-case basis and will be at the sole expense of the customer. Any product found to be not covered under the terms of this warranty, per the exclusions listed below, will be treated as an out-of-warranty service and will be billed to the customer according to the Revolabs Product Repair Policy. The sole exceptions to the terms of this warranty are those listed as part of the Revolabs DOA Replacement Policy.
Exclusions and Remedies
- Failure to follow Revolabs’s installation, operation, or maintenance instructions;
- Product modification or alteration, including but not limited to modification or removal of the serial number.
- Use of common carrier communication services accessed through the product;
- Failure of Consumable Components and Accessories including but not limited to batteries and cables.
- Abuse, misuse, negligent acts or omissions of Customer and persons under Customer’s control; or
- Acts of third parties or products, acts of God, accident, fire, lightning, power surges, outages, other hazards, or any other cause outside of Revolabs’s reasonable control.
Technical Support
If you are experiencing technical problems or if you have questions about the operation, configuration, or troubleshooting of any Revolabs product, please email
FLXsupport@revolabs.com or call +1-800-326-1088
FAQs Revolabs FLX2 Wireless Conference
What is the microphone mode used for?
Settings. Click on Site Settings. Tap the camera or microphone. Tap to activate or deactivate the microphone or camera.
How should a good mic app be used?
Use your preferred app or web browser to play the karaoke music, then just start singing along. Your voice will automatically be combined with karaoke music from various sources while the GoodMic app runs in the background. You may change the voice volume and toggle the microphone on and off.
Describe the microphone How does it function?
A microphone converts airborne sound waves into electrical signals that can be recorded on a recording medium or broadcast over loudspeakers.
A good mic quality rating is what?
This 8 mV/Pa to 32 mV/Pa range corresponds to good active microphone sensitivity ratings. Although significantly less than passive mics, these mics will still need gain from a preamp to be amplified to line level.
How do I give authorization to the microphone?
To access the microphone, go to Start > Settings > Privacy. Make sure Microphone access for this device is turned on and click Change under Allow access to the microphone on this device.
How do I alter the settings for my microphone?
To change the gain of your microphone, tap the Sound tab. To do this, move the slider under Boost up. To change the equalizer, tap the Noise tab. To raise or lower the volume of each frequency, move the sliders.
How is audio captured?
A microphone’s conversion of the sound wave into an electrical signal creates a time-varying magnetic field in the magnet’s gap. The powder is magnetized such that as the tape passes by the recording head, a record of the wave’s shape is carried on the tape.
How can I link my laptop to a microphone?
Find a USB port first, and insert the microphone into it. They can be found on desktop, laptop, and all-in-one computers’ front, back, or sides. The computer should immediately recognize the microphone after being connected and install the necessary drivers.
Why doesn’t the laptop’s microphone function?
You should check to see if your microphone is indeed enabled in the device management. If it’s not, you can try turning it on. If it continues to be disabled, a hardware or driver problem can exist.
What two varieties of wireless microphones are there?
Wireless systems can be divided into two categories: bodypack wireless systems and portable wireless systems.
For More Post Visit: Manuals Dock
[embeddoc url=”https://manualsdock.com/wp-content/uploads/2023/08/Revolabs-FLX2-Wireless-Conference.pdf” download=”all”]

