Pioneer DMH-T450EX Digital Multimedia Receiver
About Pioneer
Pioneer Corporation, sometimes known simply as Pioneer, is a worldwide company with headquarters in Tokyo that focuses on creating digital entertainment goods. Nozomu Matsumoto established the business on January 1st, 1938 in Tokyo as a radio and speaker repair shop. Shiro Yahara is the country’s current leader.
Precaution Important safety information
WARNING
- Do not attempt to install or service this product by yourself. Installation or servicing of this product by persons without training and experience in electronic equipment and automotive accessories may be dangerous and could expose you to the risk of electric shock, injury, or other hazards.
- Do not allow this product to come into contact with liquids. Electrical shock could result. Also, damage to the product, smoke, and overheating could result from contact with liquids.
- If the liquid or foreign matter should get inside this product, park your vehicle in a safe place, turn the ignition switch off (ACC OFF) immediately, and consult your dealer or the nearest authorized Pioneer Service Station. Do not use this product in this condition because doing so may result in a fire, electric shock, or other failure.
- If you notice smoke, a strange noise or odor from this product, or any other abnormal signs on the LCD screen, turn off the power immediately and consult your dealer or the nearest authorized Pioneer Service Station. Using this product in this condition may result in permanent damage to the system.
- Do not disassemble or modify this product, as high-voltage components may cause an electric shock. Be sure to consult your dealer or the nearest authorized Pioneer Service Station for internal inspection, adjustments, or repairs.
- Do not ingest the battery, Chemical Burn Hazard.
Before using this product, be sure to read and fully understand the following safety information:
- Do not operate this product, any applications, or the rearview camera option (if purchased) if doing so will divert your attention in any way from the safe operation of your vehicle. Always observe safe driving rules and follow all existing traffic regulations. If you experience difficulty in operating this product, pull over, park your vehicle in a safe location, and apply the parking brake before making the necessary adjustments.
- Never set the volume of this product so high that you cannot hear outside traffic and emergency vehicles.
- To promote safety, certain functions are disabled unless the vehicle is stopped and the parking brake is applied.
- Keep this manual handy as a reference for operating procedures and safety information.
- Do not install this product where it may (i) obstruct the driver’s vision, (ii) impair the performance of any of the vehicle’s operating systems or safety features, including airbags or hazard lamp buttons or (iii) impair the driver’s ability to safely operate the vehicle.
- Please remember to fasten your seat belt at all times while operating your vehicle. If you are ever in an accident, your injuries can be considerably more severe if your seat belt is not properly buckled.
- Never use headphones while driving.
- Rear visibility systems (backup cameras) are required in certain new vehicles sold in the U.S. and Canada. U.S. regulations began according to a two-year phase-in on May 1, 2016, and both the U.S. and Canada require that all such vehicles manufactured on or after May 1, 2018, have rear visibility systems. Owners of vehicles equipped with compliant rear visibility systems should not install or use this product in a way that alters or disables that system’s compliance with applicable regulations. If you are unsure whether your vehicle has a rear visibility system subject to U.S. or Canadian regulations, please contact the vehicle manufacturer or dealer.
If your vehicle has a compliant backup camera that displays the backup view through the factory receiver, do not use the Pioneer receiver unless it is connected to and displays the same view as the factory backup camera. Connection to the factory backup camera will require an adaptor, sold separately. Not all vehicles may be able to connect. Please check with a qualified professional installer for installation options specific to your vehicle.
To ensure safe driving
WARNING
- LIGHT GREEN LEAD AT THE POWER CONNECTOR IS DESIGNED TO DETECT PARKED STATUS AND MUST BE CONNECTED TO THE POWER SUPPLY SIDE OF THE PARKING BRAKE SWITCH. IMPROPER CONNECTION OR USE OF THIS LEAD MAY VIOLATE APPLICABLE LAW AND MAY RESULT IN SERIOUS INJURY OR DAMAGE.
- Do not take any steps to tamper with or disable the parking brake interlock system which is in place for your protection. Tampering with or disabling the parking brake interlock system could result in serious injury or death.
- To avoid the risk of damage and injury and the potential violation of applicable laws, this product is not for use with a video image that is visible to the driver.
- In some countries, the viewing of video images on a display inside a vehicle even by persons other than the driver may be illegal. Where such regulations apply, they must be obeyed.
If you attempt to watch a video image while driving, the warning “Viewing of front seat video source while driving is strictly prohibited.” will appear on the screen. To watch the video image on this display, stop the vehicle in a safe place and apply the parking brake. Please keep the brake pedal pushed down before releasing the parking brake.
When using a display connected to the video output terminal
The video output terminal (V OUT) is for the connection of a display to enable passengers in the rear seats to watch video images.
WARNING
NEVER install the rear display in a location that enables the driver to watch video images while driving.
To avoid battery exhaustion
Be sure to run the vehicle engine while using this product. Using this product without running the engine can drain the battery.
WARNING Do not install this product in a vehicle that does not have an ACC wire or circuitry available.
Rearview camera
With an optional rearview camera, you can use this product as an aid to keep an eye on trailers, or backing into a tight parking spot.
WARNING
- SCREEN IMAGE MAY APPEAR REVERSED.
- USE INPUT ONLY FOR REVERSE OR MIRROR IMAGE REAR VIEW CAMERA. OTHER USE MAY RESULT IN INJURY OR DAMAGE.
CAUTION The rear view mode is to use this product as an aid to keep an eye on the trailers, or while backing up. Do not use this function for entertainment purposes.
Handling the USB connector
CAUTION
- To prevent data loss and damage to the storage device, never remove it from this product while data is being transferred.
- Pioneer cannot guarantee compatibility with all USB mass storage devices and assumes no responsibility for any loss of data on media players, iPhones, smartphones, or other devices while using this product.
- It may not be recognized properly by this product if a USB device that had been incorrectly disconnected from the computer is connected.
Failure to operate
After-sales service for Pioneer products
- Please contact the dealer or distributor from which you purchased the product for after-sales service (including warranty conditions) or any other information. In case the necessary information is not available, please contact the companies listed below.
- Please do not ship your product to the companies at the addresses listed below for repair without making advance contact.
- –USA&CANADA Pioneer Electronics (USA) Inc. CUSTOMER SUPPORT DIVISION
- P.O. Box 1760 Long Beach, CA 90801-1760, U.S.A 800-421-1404
- For warranty information, please see the Limited Warranty sheet included with your product.
Visit our website
Visit us at the following site:
- Register your product.
- Receive updates on the latest products and technologies.
- Download owner’s manuals, order product catalogs, research new products, and much more.
- Receive notices of software upgrades and software updates.
About this manual
- This manual uses diagrams of actual screens to describe operations. However, the screens on some units may not match those shown in this manual depending on the model used.
- When an iPhone is connected to the unit, the source name on the unit appears as [iPod]. Please note that this unit only supports iPhones regardless of the source name. For details on iPhone compatibility, refer to Compatible iPhone models (page 38).
Meanings of symbols used in this manual

Parts and controls
Main unit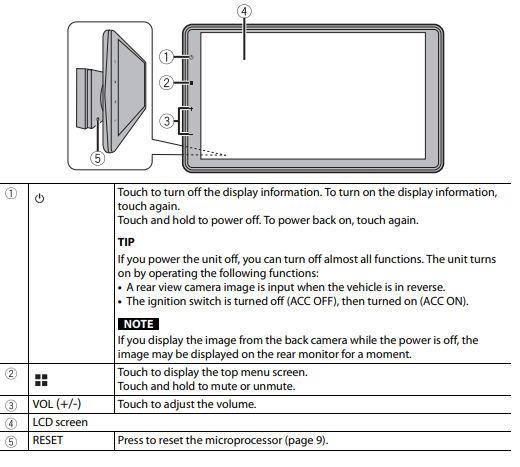
Basic operation
Resetting the microprocessor
CAUTION
- Pressing the RESET button resets settings and records contents to the factory settings.
- – Do not perform this operation when a device is connected to this product.
- – Some of the settings and recorded contents will not be reset.
- The microprocessor must be reset under the following conditions:
- Before using this product for the first time after installation.
- If this product fails to operate properly.
- If there appear to be problems with the operation of the system.
- Turn the ignition switch OFF.
- Grab the display at each side and tilt it rightward until you can see RESET.
- Press RESET with a pen tip or other pointed tools.
Settings and recorded contents are reset to the factory settings.
Using the touch panel
You can operate this product by touching the keys on the screen directly with your fingers.
NOTE To protect the LCD screen from damage, be sure to touch the screen only with your finger gently.
Operating list screens

Operating the time bar
Top menu screen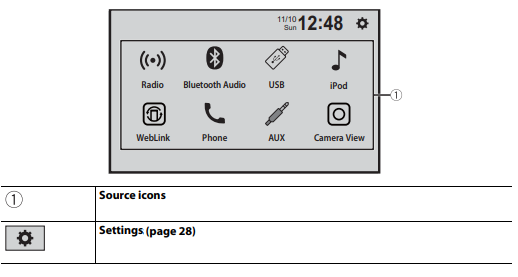
Bluetooth connection
- Bluetooth connection Turn on the Bluetooth function on the device. .
- Touch.
- Touch [Phone] or [Bluetooth Audio]. The unit name is shown on the display only when the parking brake is applied.
- Select the unit name shown in the mobile device display.
- Perform the pairing operation by operating the device. After the device is successfully registered, a Bluetooth connection is established by the system. Once the connection is established, the device name is displayed on the list.
Bluetooth Audio
Before using the Bluetooth audio player, register and connect the device to this product (page 12).
NOTES
- Depending on the Bluetooth audio player connected to this product, the available operations with this product may be limited to the following two levels:
- A2DP (Advanced Audio Distribution Profile): Only playing back songs on your audio player is possible.
- A2DP and AVRCP (Audio/Video Remote Control Profile): Playing back, pausing, selecting songs, etc., are possible.
- Depending on the Bluetooth device connected to this product, the available operations with this product may be limited or differ from the descriptions in this manual.
- While you are listening to songs on your Bluetooth device, refrain from operating the phone function as much as possible. If you try operating, the signal may cause noise for song playback.
When you are talking on the Bluetooth device connected to this product via Bluetooth, it may pause playback.
- Touch.
- Touch then [Bluetooth Settings].
Basic operation
AV source
Supported AV source
- You can play or use the following sources with this product.
- Radio
- USB
- The following sources can be played back or used by connecting an auxiliary device.
- iPhone
- Bluetooth® audio
- SiriusXM® Satellite Radio
- Camera
- AUX
Selecting a source
- Touch.
- Touch the source icon.
Radio
Starting procedure
- Touch.
- Touch [Radio]. The Radio screen appears.
Basic operation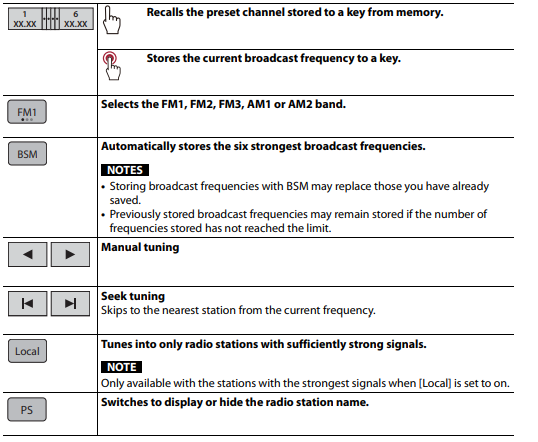
Plugging/unplugging a USB storage device
- You can play compressed audio, compressed video, or still image files stored in an external storage device.
Plugging a USB storage device
- Pull out the plug from the USB port of the USB cable.
- Plug a USB storage device into the USB cable.
NOTES
- This product may not achieve optimum performance with some USB storage devices.
- Connection via a USB hub is not possible.
- A USB cable is required for connection.
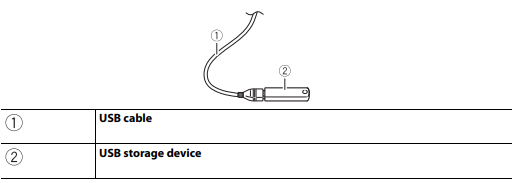
Unplugging a USB storage device
- Pull out the USB storage device from the USB cable.
NOTES
- Check that no data is being accessed before pulling out the USB storage device.
- Turn off (ACC OFF) the ignition switch before unplugging the USB storage device.
Basic Operation
Audio source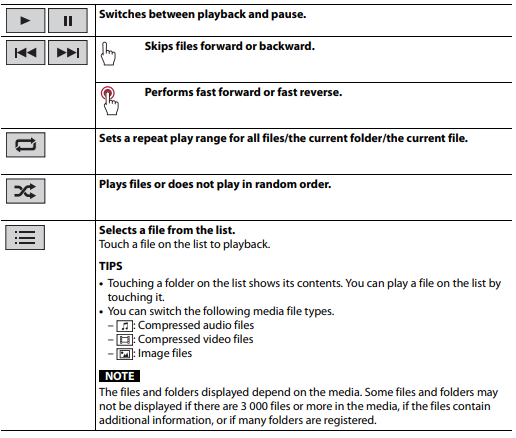
video source
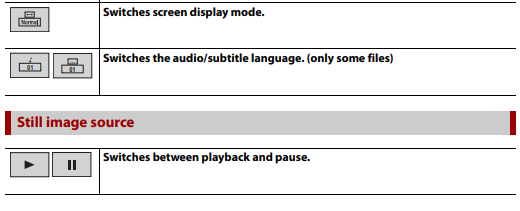
WebLink™
You can operate WebLink-compatible applications with finger gestures such as tapping, dragging, scrolling, or flicking on the screen of this product.
NOTES
- The supported finger gestures may vary depending on the WebLink-compatible application.
- To use WebLink, you must first install the WebLink Host app on your iPhone or smartphone. For details about the WebLink Host app, visit the following site: https://www.abaltatech.com/weblink/ Be sure to read Using app-based connected content (page 63) before you perform this operation.
- Copyright-protected files such as DRM cannot be played.
WARNING
Certain uses of the iPhone or smartphone may not be legal while driving in your jurisdiction, so you must be aware of and obey any such restrictions. If in doubt as to a particular function, only perform it while the car is parked. No feature should be used unless it is safe to do so under the driving conditions you are experiencing.
Using WebLink
Important
- Pioneer is not responsible for content or functions accessed via WebLink, which is the responsibility of the application and content providers.
- Availability of non-Pioneer content and services, including apps and connectivity, may change or discontinue without notice.
- When using WebLink with the Pioneer product, available content and functions will be limited while driving.
- WebLink allows access to applications other than those listed, subject to limitations while driving.
Starting procedure
For iPhone users
- Unlock your iPhone and connect it to this product via USB.
TIP You can start this source by touching, swiping left on the screen, and touching [WebLink] if the screen except for WebLink appears after the USB connection.
NOTE For USB connection, refer to the Installation Manual.
AUX
You can display the video image output by the device connected to the AUX input.
CAUTION For safety reasons, video images cannot be viewed while your vehicle is in motion. To view video images, stop in a safe place and apply the parking brake.
NOTE A Mini-jack AV cable (sold separately) is required for connection. For details, refer to the Installation Manual.
Starting procedure
- Touch.
- Touch [AUX]. The AUX screen appears.
Camera View
You can display the video image output by the device connected to the camera input. For details, refer to the Installation Manual.
Camera for Camera View mode Camera View can be displayed at all times. Note that with this setting, the camera image is not resized to fit and that a portion of what is seen by the camera is not viewable.
CAUTION Pioneer recommends the use of a camera that outputs mirror-reversed images, otherwise, the screen image may appear reversed.
- Immediately verify whether the display changes to the rearview camera image when the shift lever is moved to REVERSE (R) from another position.
Troubleshooting
If you have problems operating this product, refer to this section. The most common problems are listed below, along with likely causes and solutions. If a solution to your problem cannot be found here, contact your dealer or the nearest authorized Pioneer service facility.
Common problems
A black screen is displayed, and operation is not possible using the touch panel keys.
- → Power off mode is on.
- –Touch any button on this product to release the mode.
Problems with the AV screen
The screen is covered by a caution message and the video cannot be shown.
- → The parking brake lead is not connected or the parking brake is not applied.
- –Connect the parking brake lead correctly, and apply the parking brake.
- → The parking brake interlock is activated.
- –Park your vehicle in a safe place and apply the parking brake.
The audio or video skips.
- → This product is not firmly secured. –Secure this product firmly.
No sounds are produced. The volume level will not rise.
- → Cables are not connected correctly.
- –Connect the cables correctly.
iPhone cannot be operated.
- → The iPhone is frozen.
- –Reconnect the iPhone with the USB interface cable for iPhone.
- –Update the iPhone software version. → An error has occurred.
- –Reconnect the iPhone with the USB interface cable for iPhone.
- –Park your vehicle in a safe place, and then turn off the ignition switch (ACC OFF). Subsequently, turn the ignition switch on (ACC ON) again.
- –Update the iPhone software version.
- → Cables are not connected correctly.
- –Connect the cables correctly.
Sound from the iPhone cannot be heard.
- → The audio output direction may switch automatically when the Bluetooth and USB connections are used at the same time.
- –Use the iPhone to change the audio output direction.
No back camera image when the vehicle is in reverse.
- → The back camera input setting on the receiver is set to Off.
- –Change the back camera setting to On in the settings menu. (Refer to the System Settings section of this manual to adjust.)
- → The camera input may be loose or not connected.
- –Check the connection and make sure the male end of the camera is connected to the brown input on the back of the receiver. (Refer to the installation manual.)
- → The reverse lead on the receiver may not be connected to the proper wire at the reverse lamp.
- –Check the connection and make sure that the violet/white lead of the receiver is connected to the lead whose voltage changes when the shift lever is put in reverse. (Refer to the installation manual.)
A black screen is displayed when the vehicle is in reverse, with no camera installed.
- → Back camera input is set to On.
- –Turn the setting to Off in the settings menu. (Refer to the System Settings section of this manual to adjust.)
Problems with the phone screen
Dialing is impossible because the touch panel keys for dialing are inactive.
- → Your phone is out of range for service.
- –Retry after re-entering the range for service.
- → The connection between the cellular phone and this product cannot be established.
- –Perform the connection process.
Problems with the Application screen
A black screen is displayed.
- → While operating an application, the application ended on the smartphone side.
- –Touch to display the top menu screen.
- → The smartphone OS may be awaiting screen operation.
- –Stop the vehicle in a safe place and check the screen on the smartphone.
The screen is displayed, but the operation does not work at all.
- → An error has occurred.
- –Park your vehicle in a safe place, and then turn off the ignition switch (ACC OFF). Subsequently, turn the ignition switch on (ACC ON) again.
The smartphone was not charged.
- → Charging stopped because the temperature of the smartphone rose due to prolonged use of the smartphone during charging.
- –Disconnect the smartphone from the cable, and wait until the smartphone cools down.
- → More battery power was consumed than was gained from charging.
- –This problem may be resolved by stopping any unnecessary services on the smartphone.
Error messages
When problems occur with this product, an error message appears on the display. Refer to the table below to identify the problem, then take the suggested corrective action. If the error persists, record the error message and contact your dealer or your nearest Pioneer service center.
USB storage device
Unsupported USB hub device
- → The connected USB hub is not supported by this product.
- –Directly connect the USB storage device to this product.
This content cannot be played.
- → There is no playable file in the USB storage device.
- –Check that the files in the USB storage device are compatible with this product.
- → Security for the connected USB storage device is enabled.
- –Follow the USB storage device instructions to disable security.
- → This product cannot recognize the connected USB storage device.
- –Disconnect the device and replace it with another USB storage device.
Audio Format not supported
- → This type of file is not supported on this product.
- –Select a file that can be played.
No Data
- → There is no playable file in the USB storage device.
- –Check that the files in the USB storage device are compatible with this product.
- → Security for the connected USB storage device is enabled.
- –Follow the USB storage device instructions to disable security.
Detailed information for playable media
Compatibility
Common notes about the USB storage device
- Do not leave the USB storage device in any location with high temperatures.
- Depending on the kind of USB storage device you use, this product may not recognize the storage device or files may not be played back properly.
- The text information of some audio and video files may not be correctly displayed.
- File extensions must be used properly.
- There may be a slight delay when starting playback of files on a USB storage device with complex folder hierarchies.
- Operations may vary depending on the kind of USB storage device.
- It may not be possible to play some music files from USB because of file characteristics, file format, recorded application, playback environment, storage conditions, and so on.
USB storage device compatibility
- For details about USB storage device compatibility with this product, refer to Specifications (page 60).
- Protocol: bulk
- You cannot connect a USB storage device to this product via a USB hub.
- The partitioned USB storage device is not compatible with this product.
- Firmly secure the USB storage device when driving. Do not let the USB storage device fall onto the floor, where it may become jammed under the brake or gas pedal.
- There may be a slight delay when playing audio files encoded with image data.
- Some USB storage devices connected to this product may generate noise on the radio.
- Do not connect anything other than the USB storage device.
Specifications
General
- Rated power source: 14.4 V DC (10.8 V to 15.1 V allowable)
- Grounding system: Negative type
- Maximum current consumption: 10.0 A
- Dimensions (W × H × D):
- Chassis (D):
- 178 mm × 100 mm × 164 mm (7 in. × 3- 7/8 in. × 6-1/2 in.)
- Note:
- 171 mm × 97 mm × 3 mm (6-3/4 in. × 3-7/8 in. × 1/8 in.)
- Chassis (D):
- Weight: 1.1 kg (2.4 lbs)
Display
- Screen size/aspect ratio:6.78 inch wide/16:9 (effective display area: 152.4 mm × 80.208 mm) (6 in. × 3-1/ 8 in.)
- Pixels: 1 152 000 (2 400 × 480)
- Display method: TFT Active matrix driving
- Color system: PAL/NTSC/PAL-M/PAL-N/SECAM compatible
- Temperature range: -10 ˚C to +60 ˚C (+14 ˚F to +140 ˚F)
Audio
- Maximum power output:
- 50 W × 4
- 50 W × 2 ch/4 Ω + 70 W × 1 ch/2 Ω (for subwoofer)
- Continuous power output: 22 W × 4 (50 Hz to 15 kHz, 5 %THD, 4 Ω LOAD, Both Channels Driven)
- Load impedance: 4 Ω (4 Ω to 8 Ω [2 Ω for 1 ch] allowable)
- Preout output level (max): 4.0 V
- Equalizer (13-Band Graphic Equalizer):
- Frequency: 50 Hz/80 Hz/125 Hz/200 Hz/315 Hz/ 500 Hz/800 Hz/1.25 kHz/2 kHz/3.15 kHz/5 kHz/8 kHz/12.5 kHz
- Gain: ±12 dB (2 dB/step)
- HPF:
- Frequency: 25 Hz/31.5 Hz/40 Hz/50 Hz/63 Hz/80 Hz/100 Hz/125 Hz/160 Hz/200 Hz/250 Hz
- Slope: -6 dB/oct, -12 dB/oct, -18 dB/oct, -24 dB/oct, OFF
- Subwoofer/LPF:
- Frequency: 25 Hz/31.5 Hz/40 Hz/50 Hz/63 Hz/80 Hz/100 Hz/125 Hz/160 Hz/200 Hz/250 Hz
- Slope: -6 dB/oct, -12 dB/oct, -18 dB/oct, -24 dB/oct, -30 dB/oct, -36 dB/oct, OFF
- Phase: Normal/Reverse
- Time alignment: 0 to 140 steps (1 inch/step)
- Bass boost:
- Gain: +12 dB to 0 dB (2 dB/step)
- Speaker level: +10 dB to -24 dB (1 dB/step)
USB
- USB standard spec: 1.1, USB 2.0 full speed, USB 2.0 high speed
- Max current supply: 1.5 A
- USB Class: MSC (Mass Storage Class), MTP (Media Transfer Protocol)
- File system: FAT16, FAT32, NTFS
- <USB audio>
- MP3 decoding format: MPEG-1 & 2 & 2.5 Audio Layer 3
- WMA decoding format: Ver. 7, 8, 9, 9.1, 9.2 (2 ch audio)
- AAC decoding format: MPEG-4 AAC (iTunes encoded only) (Ver. 12.5 and earlier)
- FLAC decoding format: Ver. 1.3.0 (Free Lossless Audio Codec) WAV
- signal format (MSC Mode only): Linear PCM
- Sampling frequency:
- Linear PCM: 16 kHz/22.05 kHz/24 kHz/32 kHz/44.1 kHz/48 kHz
- <USB image>
- JPEG decoding format (MSC Mode only): .jpeg, .jpg, .jpe
- Pixel Sampling: 4:2:2, 4:2:0
- Decode Size:
- MAX: 8 192 (H) × 7 680 (W)
- MIN: 32 (H) × 32 (W)
- PNG decoding format (MSC Mode only): .png
- Decode Size:
- MAX: 720 (H) × 576 (W)
- MIN: 32 (H) × 32 (W)
- BMP decoding format (MSC Mode only): .bmp
- Decode Size:
- MAX: 1 920 (H) × 936 (W)
- MIN: 32 (H) × 32 (W)
- <USB video>
- H.264 video decoding format: Base Line Profile, Main Profile, High Profile
- H.263 video decoding format: Base Line Profile 0/3
- VC-1 video decoding format: Simple Profile, Main Profile, Advanced Profile
- AVI video decoding format
- MPEG4 video decoding format: Simple Profile, Advanced Simple Profile
- MPEG1, 2 video decoding format
- Main Profile
- Quick Time video decoding format
- Matroska video decoding format
- TS Stream video decoding format
- Main Profile
Bluetooth
- Version: Bluetooth 4.2 certified
- Output power: +4 dBm Max. (Power class 2)
- Frequency band(s): 2 400 MHz to 2 483.5 MHz
FM tuner
- Frequency range: 87.9 MHz to 107.9 MHz
- Usable sensitivity: 13 dBf (1.1 μV/75 Ω, mono, S/N: 30 dB)
- Signal-to-noise ratio:
- 50 dB (analog broadcasting) (IHF-A network)
AM tuner
- Frequency range: 530 kHz to 1 710 kHz
- Usable sensitivity: 28 μV (S/N: 20 dB)
- Signal-to-noise ratio:
- 45 dB (analog broadcasting) (IHF-A network)
NOTE
- Specifications and design are subject to possible modifications without notice due to improvements.
Register your product at
- PIONEER CORPORATION
28-8, Honkomagome 2-chrome, Bunkyo-ku, Tokyo 113-0021, Japan - PIONEER ELECTRONICS (USA) INC.
- P.O. Box 1540, Long Beach, CA 90801-1540, U.S.A.
- TEL: (800) 421-1404
- PIONEER EUROPE NV
- Haven 1087, Keetberglaan 1, B-9120 Melsele, Belgium/Belgique
- TEL: (0) 3/570.05.11
- PIONEER ELECTRONICS ASIACENTRE PTE. LTD.
- No. 2 Jalan Kilang Barat, #04-02, Singapore 159346
- TEL: 65-6378-7888
- PIONEER ELECTRONICS AUSTRALIA PTY. LTD.
- Unit 13, 153-155 Rooks Road, Vermont, Victoria, 3133 Australia
- TEL: (03) 9586-6300
FAQs about Pioneer DMH-T450EX Digital Multimedia Receiver
Q: What is the Pioneer DMH-T450EX Digital Multimedia Receiver?
Q: What size is the touchscreen display on the DMH-T450EX?
Q: What media sources can I play on the DMH-T450EX?
Q: Does the DMH-T450EX support hands-free calling?
Q: Can I customize the appearance of the DMH-T450EX interface?
Q: Does the DMH-T450EX have a built-in amplifier?
Q: Is the DMH-T450EX compatible with steering wheel controls?
Q: Can I connect a backup camera to the DMH-T450EX?
Q: What audio tuning features does the DMH-T450EX offer?
Q: How do I perform firmware updates on the DMH-T450EX?
For more manuals by Pioneer, Visit Manualsdock

