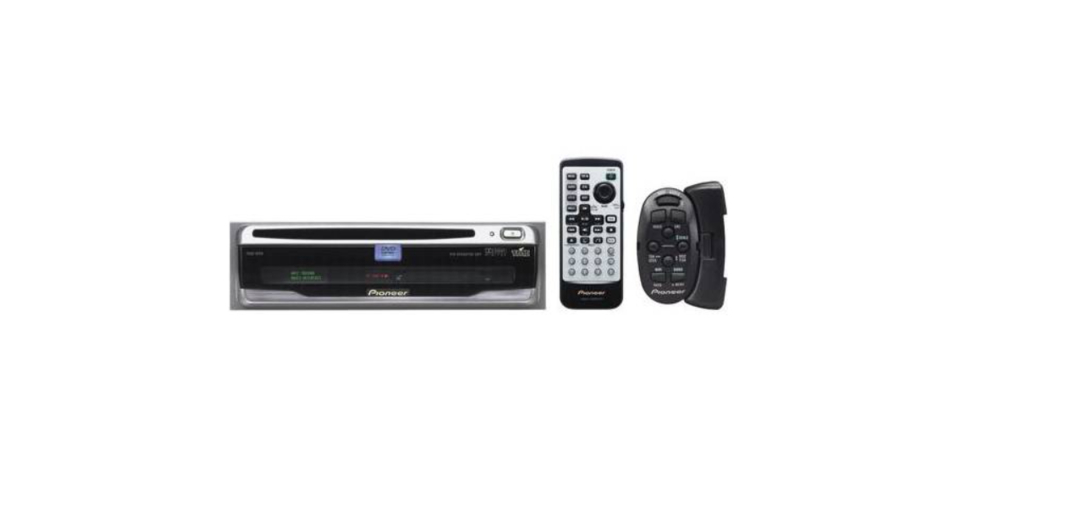
Pioneer AVIC-80DVD

Information to User Alteration or modifications carried out without appropriate authorization may invalidate the user’s right to operate the equipment.
Important The serial number of this amplifier is written on the bottom of the unit. For your security and convenience, write it down on the enclosed warranty card. Keep the card handy for future reference.
DEAR CUSTOMER
Selecting fine audio equipment such as the unit you’ve just purchased is only the start of your musical enjoyment. Now it’s time to consider how you can maximize the fun and excitement your equipment offers. This manufacturer and the Electronic Industries Association’s Consumer Electronics Group want you to get the most out of your equipment by playing it at a safe level.
One that lets the sound come through loud and clear without annoying blaring or distortion—and, most importantly, without affecting your sensitive hearing. Sound can be deceiving. Over time your hearing “comfort level” adapts to higher volumes of sound. So what sounds “normal” can be loud and harmful to your hearing. Guard against this by setting your equipment at a safe level BEFORE your hearing adapts.
To establish a safe level:
- Start your volume control at a low setting.
- Slowly increase the sound until you can hear it comfortably and clearly, and without distortion.
Once you have established a comfortable sound level:
- Set the dial and leave it there.
Taking a minute to do this now will help to prevent hearing damage or loss in the future. After all, we want you to listen for a lifetime.
How To Read This Manual This manual mainly describes hardware-related information such as the part names of the Navigation System or precautions for use. Please read this manual before using your Navigation System.
The following issues are described in each chapter: How to use this manual
INTRODUCTION
This chapter describes precautions for the use of the Navigation System.
How to Use Remote Control and Names of Parts This section describes the functions of the Steering Remote Control used to operate the Navigation System. In addition, this chapter describes matters that are important to know before using the Navigation System, such as the names of each part, inserting/ejecting discs, or how to set a PC card.
Terminology Before moving on, take a few minutes to read the following information about the conventions used in this manual. Familiarity with these conventions will help you greatly as you learn how to use your new equipment.
- Buttons on your Remote Control or display are referred to as Ex.) NAVI button, NAVI MENU button.
- Items in various menus or touch keys displayed on the screen are referred to like this: Ex.) “Destination”, “Settings”.
- Extra information, alternative use, and other notes are presented like this:
Important Safety Information
Before using your Navigation System, be sure to read and fully understand the following safety information:
- Read the manual before operating this Navigation System.
- This Navigation System is intended solely as an aid to you in the operation of your car. It is not a substitute for your attentiveness, judgment, and care when driving.
- Do not operate this Navigation System if doing so in any way will divert your attention from the safe operation of your car. Always observe safe driving rules and follow all existing traffic regulations.
- Never allow others to use the system unless they have read and understood the operating instructions.
- Never use this Navigation System to route to hospitals, police stations, or similar facilities in an emergency. The map data may not include a comprehensive list of emergency service facilities.
- Route and guidance information displayed by this equipment is for reference purposes only. It may not accurately reflect the latest permissible routes, road conditions, or traffic restrictions.
- Traffic restrictions and advisories currently in force should always take precedence over guidance given by this product. Always obey current traffic restrictions, even if this product provides contrary advice.
- Failure to input correct information about the local time may result in the product providing improper routing and guidance instructions.
- Never set the volume of your Navigation System so high that you cannot hear outside traffic and emergency cars.
- To promote safety, certain functions are disabled unless the parking brake is on.
- The data encoded in the disc for this product is the intellectual property of the provider, and the provider is responsible for such content.
- As with any accessory in your car’s interior, you should not allow this Navigation System to divert your attention from the safe operation of your car. If you experience difficulty in operating the system or reading the display, please make adjustments while safely parked.
Notes Before Using the System
Information to User Alteration or modifications carried out without appropriate authorization may invalidate the user’s right to operate the equipment.
Important The serial number of this device is located on the bottom of this product. For your security and convenience, be sure to record this number on the enclosed warranty card.
How to Use Remote Control and Names of Parts
Preparing the Remote Control Some navigation operations can be performed with the Steering Remote Control provided. Before using the remote control, refer to the following to install the battery. If you are not combining with a touch panel display, you will need a separately sold remote control (CD-R11) to perform all navigation operations. For information on operating with the CDR11➞ “Operation Manual (For remote controlled types)” and the CD-R11 “Owner’s manual”. Inserting the battery for the Remote Control The following battery is used with the remote control.
- Steering Remote : CR2032 (3V)
Steering Remote Remove the cover on the back of the remote control and insert the lithium battery with the positive side (+) up. When changing the battery, use a probe with a fine non-metallic tip to remove the lithium battery.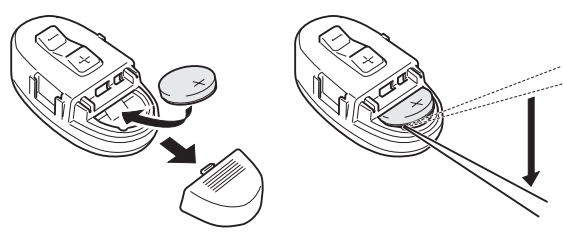
- Keep the lithium battery out of reach of children. Should the battery be swallowed, immediately consult a doctor.
Caution
- Do not recharge, disassemble, heat, or dispose of the battery in fire.
- Use a CR2032 (3V) lithium battery only. Never use other types of battery with this unit.
- Do not handle the battery with metallic tools.
- Do not store the lithium battery with metallic materials.
- When disposing of used batteries, please comply with governmental regulations or environmental public institution rules that apply in your country/area.
Getting to Know the Components and What They Do Before using this unit, get to know the name of each component and how it is used.
The Steering Remote Control
- Operation mode By switching the Operation mode (Main mode, DIN mode, Navigation mode) you can use one remote control to operate different equipment.
- Main mode: Operates Pioneer AV Head Unit (e.g. AVHP7500DVD, AVH-P6500DVD, AVH-P6400CD, AVH-P6400)
- DIN mode: Other Pioneer Head Unit operation
- Navigation mode: Navigation operation
First of all, set the Operation mode switching method. The Operation mode switching changes by the settings below. 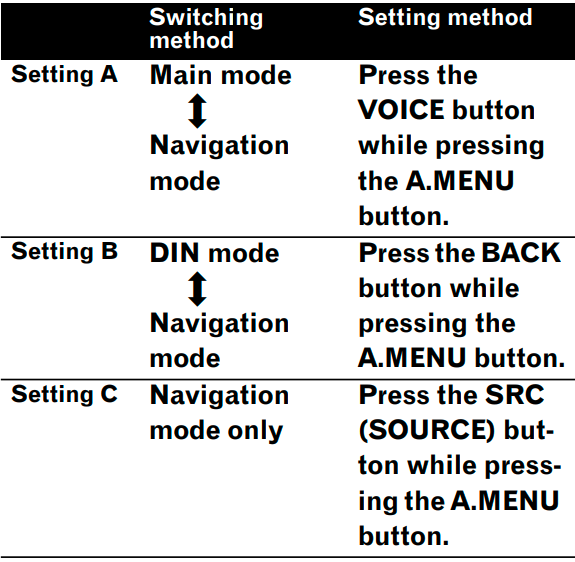
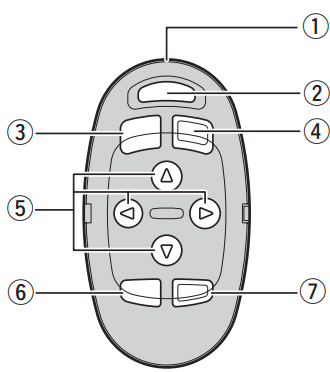
- Transmitter This transmits the remote control signals.
- NAVI/AUDIO button Pressing this button switches the Operation mode.
- VOICE button You can use the VOICE button to start voice recognition, allowing you to operate the Navigation System by speech.
- The SRC (SOURCE) button Switches between sources and switches power ON/OFF.
- button Operates the same as the Head Unit’s 5, ∞, 2, and 3 buttons or the Joystick.
- BACK button
- Main mode: BACK button Return to the previous screen.
- MENU button
- Main mode: AUDIO MENU button Display the menu.
- +/– button
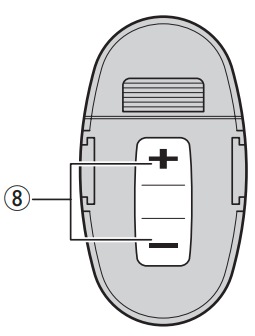 The Pioneer Head Unit’s sound volume can be adjusted.
Microphone 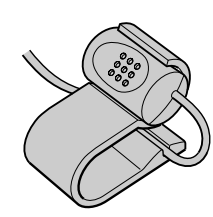
- Microphone After pressing the VOICE button to start voice operation, this microphone hears your commands.
Main unit
- Disc loading slot
- Reset button If the system malfunctions, reset it by pressing this recessed button with a ballpoint pen or similar pointed object. ➲ “Resetting the System” ➞ Page 11
- Disc eject button
- PC card slot
- The PC card eject button Remove the PC card by pressing this button.
- PC card lock lever This lever is used to remove the PC card.
- PC card lock lamp The red light goes on when the PC card is inserted and a proper connection is made.
Setting the PC card Open the cover at the front of the main unit. Hold the PC card label-side up: the arrow shows the direction of insertion. Insert the card firmly until the PC card ejects the button pops out. If the main unit power is on, the PC card lock lamp changes from green to red, showing that the PC card is inserted correctly and ready for use.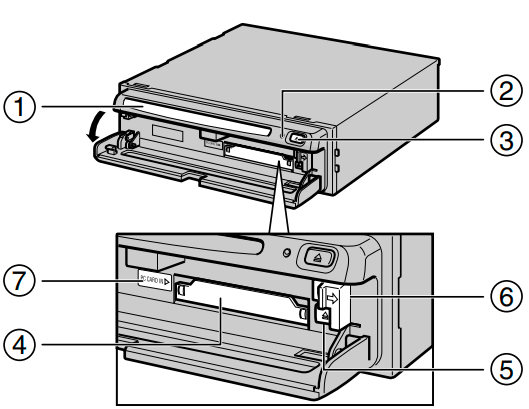
Removing the PC Card
Caution
- Do not remove the PC card while the PC card lock lamp is red. It may damage the main unit of the Navigation System or the PC card.
Open the cover on the front of the main unit. Slide the PC card lock lever to the right (1), and hold it there. Check that the PC card lock lamp has changed to green, and then press the PC card eject button (2). (Keep holding the PC card lock lever to the right until the PC card is removed completely.)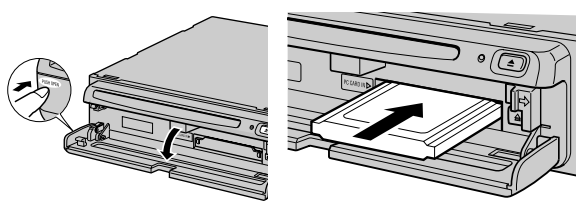
- PC card can be set or removed regardless of the power ON/OFF of the main unit (ON/OFF of the engine).
- You can only use a card that conforms to the PCMCIA Type II (5V) standard. If you attempt to use a card complying with a different standard, the card slot may be damaged, or a malfunction may occur.
- Do not remove the card while editing the data on the PC card. The data stored on the Navigation unit and data on the PC card could be corrupted.
Appendix
Handling and Care of the Disc Some basic precautions are necessary when handling your discs.
Discs you can use
- Do not use discs other than those intended for this product. Use only discs approved by Pioneer.
DVD-ROM drive and care
- Use only normal, round discs, if you insert irregular, non-round, shaped discs they may jam in the DVD player or not play properly.

- Check all discs for cracks, scratches, or warping before playing. Discs that have cracks, scratches, or are warping may not play properly. Do not use such discs.
- Avoid touching the recorded (non-printed side) surface when handling the disc.
- Store discs in their cases when not in use.
- Keep discs out of direct sunlight and do not expose the discs to high temperatures.
- Do not attach labels, write on, or apply chemicals to the surface of the discs.
- To clean dirt from a disc, wipe the disc with a soft cloth outward from the center of the disc.
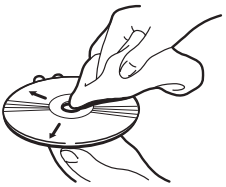
- If the heater is used in cold weather, moisture may form on components inside the DVD-ROM drive. Condensation may cause the DVD-ROM drive to not operate properly. If you think that condensation is a problem turn off the DVD-ROM drive for an hour or so to allow the DVD-ROM drive to dry out and wipe any damp discs with a soft cloth to remove the moisture.
- Road shocks may interrupt disc playback.
Resetting the System On occasion, you may need to reset your Navigation System.
When a reset is necessary You should reset the system in the following situations:
- After installation of this unit in your car.
- If there appear to be problems with the operation of the system.
- If there are problems with the display.
- When changing the combination of the equipment.
Using the reset button The reset button is recessed in the front of the main unit to prevent it from being pressed accidentally. Look for it at the top right-hand corner of the front panel. Insert a pointed implement such as a ballpoint pen into the small hole and push.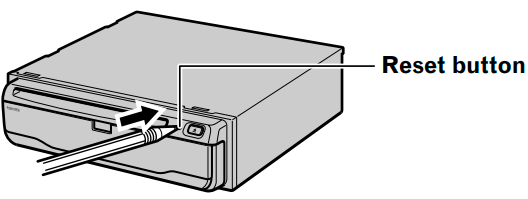
Specifications
Main unit
- System ……………………………. L1, C/Acode GPS SPS (Standard Positioning Service)
- Reception system ……………. 8-channel multi-channel reception system
- Reception frequency ……….. 1,575.42 MHz
- Sensitivity ……………………….. -130 dbm
Position update frequency. Approx. once per second (Common)
- Max. output impedance …… 1 Vp-p, 75 Ω
- Maximum current consumption ……………………………………….. 2 A
- Power source ………………….. DC 14.4 V (10.8 – 15.1 V allowed)
- Ground type…………………….. Negative type
GPS antenna
- Antenna………………………….. Microstrip flat antenna/ right-handed helical polarization
- Antenna cable…………………. 5.0 m (16 ft. 5 in.)
Dimensions
- Main unit……………………………..178(W) ✕ 50(H) ✕ 178(D) mm (7 ✕ 2 ✕ 7 in.)
- GPS antenna …………………… 34(W) ✕ 13(H) ✕ 36(D) mm (1-3/8 ✕ 1/2 ✕ 1-3/8 in.)
- Steering remote control …… 35(W) ✕ 65(H) ✕ 24(D) mm (1-3/8 ✕ 2-1/2 ✕ 1 in.)
Weight
- Main unit ………………………… 1.5 kg (3.3 lbs)
- GPS antenna …………………… 105 g (0.23 lbs)
- Steering remote control …… 51 g (including holder and battery) (0.2 lbs)
Note:
- The specifications and design are subject to change without prior notice. The product purchased may differ in detail from the illustrations in this manual.
After-sales service for Pioneer products Please contact the dealer or distributor from where you purchased the product for its aftersales service (including warranty conditions) or any other information. In case the necessary information is not available, please contact the companies listed below: Please do not ship your product to the companies at the addresses listed below for repair without making advance contact.
Product Registration
Visit us at the following site: http://www.pioneerelectronics.com
- Register your product. We will keep the details of your purchase on file to help you refer to this information in the event of an insurance claim such as loss or theft.
- Receive updates on the latest products and technologies.
- Download owner’s manuals, order product catalogs, research new products, and much more.
PIONEER CORPORATION 4-1, MEGURO 1-CHOME, MEGURO-KU, TOKYO 153-8654, JAPAN
PIONEER ELECTRONICS (USA) INC. P.O. Box 1540, Long Beach, California 90801-1540, U.S.A.
TEL: (800) 421-1404
PIONEER EUROPE NV Haven 1087, Keetberglaan 1, B-9120 Melsele, Belgium
TEL: (0) 3/570.05.11
PIONEER ELECTRONICS ASIACENTRE PTE. LTD. 253 Alexandra Road, #04-01, Singapore 159936
TEL: 65-6472-1111
PIONEER ELECTRONICS AUSTRALIA PTY. LTD. 178-184 Boundary Road, Braeside, Victoria 3195, Australia
TEL: (03) 9586-6300
PIONEER ELECTRONICS OF CANADA, INC. 300 Allstate Parkway, Markham, Ontario L3R OP2, Canada
TEL: (905) 479-4411
FAQs About Pioneer AVIC-80DVD
What is the Pioneer AVD-W6010?
The Pioneer AVD-W6010 is a widescreen overhead flip-down monitor designed for in-car entertainment systems. It is commonly used to provide rear-seat passengers with a visual display for movies, music videos, and other media content.
What is the screen size of the Pioneer AVD-W6010?
The screen size of the Pioneer AVD-W6010 is typically [insert size here] inches, providing a large and immersive viewing experience for passengers in the rear seats of a vehicle.
What types of media can be played on the Pioneer AVD-W6010?
The Pioneer AVD-W6010 is designed to play various media types, including DVDs, CDs, and possibly other formats such as USB or SD card playback. It is important to refer to the product specifications or user manual for specific details on supported media formats.
How is the Pioneer AVD-W6010 installed in a vehicle?
Installation of the Pioneer AVD-W6010 involves mounting the flip-down monitor on the ceiling of the vehicle and connecting it to a compatible in-car entertainment system. This typically includes power, ground, and audio/video connections. Installation should be performed by a professional or following the manufacturer’s guidelines.
Can the Pioneer AVD-W6010 connect to other devices such as gaming consoles or external players?
Depending on the model and features, the Pioneer AVD-W6010 may offer additional input options, such as HDMI or AV inputs, allowing connection to external devices like gaming consoles, media players, or smartphones. Check the product specifications for compatibility and available input options.
Does the Pioneer AVD-W6010 come with a remote control?
Many models of overhead monitors, including the Pioneer AVD-W6010, often come with a remote control for convenient operation. This allows passengers to control various functions, such as playback, volume, and settings, without needing to reach the monitor directly.
What are the resolution and display quality of the Pioneer AVD-W6010?
The resolution and display quality of the Pioneer AVD-W6010 will depend on the specific model. Generally, these monitors offer decent resolution and image quality suitable for in-car entertainment purposes. Refer to the product specifications for detailed information.
Where can I purchase the Pioneer AVD-W6010?
The Pioneer AVD-W6010 may be available for purchase from authorized Pioneer dealers, car audio retailers, and online stores specializing in car audio and video equipment. It is advisable to buy from reputable sources to ensure product authenticity and warranty coverage.
What are the key features of the Pioneer AVD-W6010?
The Pioneer AVD-W6010 may include features such as a large LCD screen, built-in DVD player, support for various multimedia formats, wireless remote control, and multiple inputs for connecting external devices.
What screen size does the Pioneer AVD-W6010 have?
The screen size of the Pioneer AVD-W6010 varies depending on the model, but it typically ranges from around 10.1 inches to 13.3 inches diagonally.
For more manuals by Pioneer, visit Manualsdock

