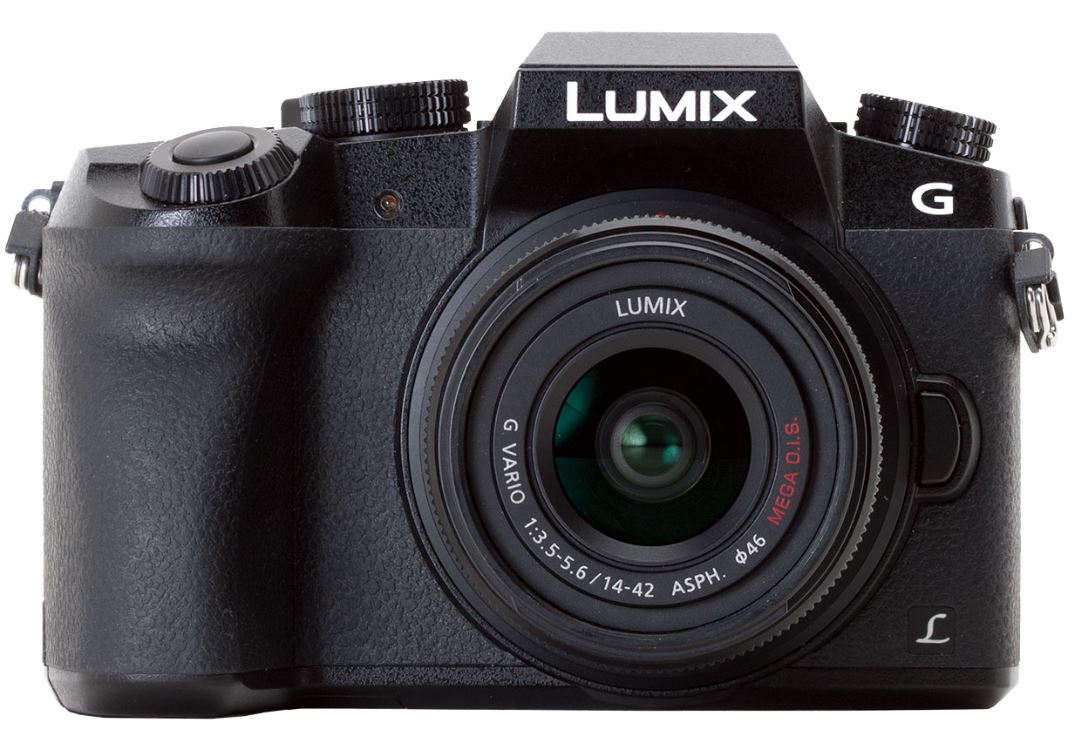
Panasonic DMC-G7K LUMIX G7 4K Digital Camera
ABOUT Panasonic
Panasonic Corporation is a multinational electronics company headquartered in Osaka, Japan. It was founded in 1918 by Konosuke Matsushita and originally started as a vendor of duplex lamp sockets. Over the years, Panasonic has grown into one of the largest electronics manufacturers in the world, offering a wide range of products and services.
Panasonic‘s business operations span various sectors, including consumer electronics, home appliances, automotive, industrial solutions, and B2B solutions. The company is known for its innovation and has a strong focus on research and development.
Information for Your Safety
WARNING:
- To reduce the risk of fire, electric shock, or product damage,
- Do not expose this unit to rain, moisture, dripping, or splashing.
- Use only the recommended accessories.
- Do not remove covers.
- Do not repair this unit by yourself. Refer servicing to qualified service personnel.
THE FOLLOWING APPLIES ONLY IN THE U.S.A.
Certification and Compliance See Camera for the certification and compliance mark specific to that device.
- Select [Wi-Fi] in the [Setup] menu
- Select [Wi-Fi Setup] in the [Wi-Fi]
- Press to select [Approved Regulations], and press [MENU/SET]
FCC Note This equipment has been tested and found to comply with the limits for a Class B digital device, under Part 15 of the FCC Rules. These limits are designed to provide reasonable protection against harmful interference in a residential installation. This equipment generates, uses, and can radiate radio frequency energy and, if not installed and used by the instructions, may cause harmful interference to radio communications. However, there is no guarantee that interference will not occur in a particular installation. If this equipment does cause harmful interference to radio or television reception, which can be determined by turning the equipment off and on, the user is encouraged to try to correct the interference by one or more of the following measures:
- Reorient or relocate the receiving antenna.
- Increase the separation between the equipment and the receiver.
- Connect the equipment to an outlet on a circuit different from that to which the receiver is connected.
- Consult the dealer or an experienced radio/TV technician for help.
FCC Caution: To assure continued compliance, follow the attached installation instructions and use only shielded interface cables with ferrite core when connecting to computer or peripheral devices. Any changes or modifications not expressly approved by the party responsible for compliance could void the user’s authority to operate this equipment. This device complies with Part 15 of the FCC Rules. Operation is subject to the following two conditions:
- This device may not cause harmful interference, and
- his device must accept any interference received, including interference that may cause undesired operation.
Declaration of Conformity
- Trade Name: Panasonic
- Model No.: DMC-G7
- Responsible Party: Panasonic Corporation of North America Two Riverfront Plaza, Newark, NJ 07102-5490
- Support Contact: http://shop.panasonic.com/support
Warning
Risk of fire, explosion, and burns. Do not disassemble, heat above 60 °C (140 °F), or incinerate.
Cautions for Use
- Do not use any other USB connection cables except the supplied one.
- Use a “High-Speed HDMI micro cable” with the HDMI logo. Cables that do not comply with the HDMI standards will not work. “High-Speed HDMI micro cable” (Type D-Type A plug, up to 2 m (6.6 feet) long)
Keep this unit as far away as possible from electromagnetic equipment (such as microwave ovens, TVs, video games, etc.).
- If you use this unit on top of or near a TV, the pictures and/or sound on this unit may be disrupted by electromagnetic wave radiation.
- Do not use this unit near cell phones because doing so may result in noise adversely affecting the pictures and/or sound.
- Recorded data may be damaged, or pictures may be distorted, by strong magnetic fields created by speakers or large motors.
- Electromagnetic wave radiation may adversely affect this unit, disturbing the pictures and/or sound.
- If this unit is adversely affected by electromagnetic equipment and stops functioning properly, turn this unit off and remove the battery or disconnect the AC adaptor (supplied)/AC adaptor (DMW-AC10PP: optional). Then reinsert the
battery or reconnect the AC adaptor and turn this unit on.
Do not use this unit near radio transmitters or high-voltage lines.
- If you record near radio transmitters or high-voltage lines, the recorded pictures and/or sound may be adversely affected.
Care of the camera
Do not subject to strong vibration, shock, or pressure.
- The lens, monitor, or external case may be damaged if used in the following conditions. It may also malfunction or the image may not be recorded if you:
- Drop or hit the camera.
- Press hard on the lens or the monitor.
This camera is not dust/drip/waterproof. Avoid using the camera in places with a lot of dust, water, sand, etc.
- Liquid, sand, and other foreign materials may get into the space around the lens, buttons, etc. Be particularly careful since it may not just cause malfunctions, but it may also become irreparable. – Places with a lot of sand or dust.
- Places where water can come into contact with this unit, such as when using it on a rainy day or at the beach.
Do not place your hands inside the mount of the digital camera body. Since the sensor unit is a precision apparatus, it may cause a malfunction or damage.
About Condensation (When the lens, the viewfinder, or the monitor is fogged up)
- Condensation occurs when the ambient temperature or humidity changes. Be careful of condensation since it causes lens, viewfinder, and monitor stains, fungus, and camera malfunction.
- If condensation occurs, turn the camera off and leave it for about 2 hours. The fog will disappear naturally when the temperature of the camera becomes close to the ambient temperature.
About the firmware of your interchangeable lens
For smoother recording, we recommend updating the firmware of the interchangeable lens to the latest version.
- To view the latest information on the firmware or to download the firmware, visit the support site below:
http://panasonic.jp/support/global/cs/dsc/ (This Site is English only.)
- To check the firmware version of the interchangeable lens, attach it to the camera body and select [Version Disp.] in the [Setup] menu.
Standard Accessories
Check that all the accessories are supplied before using the camera. Product numbers are correct as of May 2015. These may be subject to change Digital Camera Body (This is referred to as camera body in this owner’s manual.)
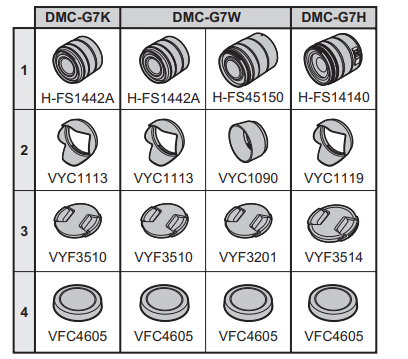

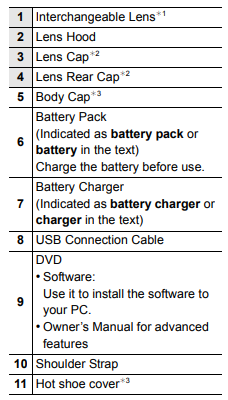
- This is referred to as a lens in this owner’s manual.
- This is attached to the interchangeable lens at the time of purchase.
- This is attached to the camera body at the time of purchase.
- SD Memory Card, SDHC Memory Card, and SDXC Memory Card are indicated as cards in the text.
- The card is optional.
- The description in this owner’s manual is based on the interchangeable lens (H-FS1442A).
(For U.S.A. only)
- If accessories are lost, customers can visit us at panasonic.com/support for further information about obtaining replacement parts.
(For Canada only)
- If any accessories are lost, customers in Canada should visit our support page at panasonic.ca/english/support for further information about obtaining replacement parts.
Names and Functions of Components
- Camera body

- Focus distance reference mark
- Status indicator (P18)/ Wi-Fi® connection lamp
The lamp lights green when the camera is turned on, and lights blue when it is connected to Wi-Fi. - Camera ON/OFF switch (P18)
- Motion picture button (P34)
- [ ] (Exposure Compensation) button/ [Fn1] button (P24)
- Function button (Fn11) (P24)
- Rear dial (P21)
- Shutter button (P19)
- Front dial (P21)
- Self-timer indicator/ AF Assist Lamp
- Mode dial (P20)
• Rotate the mode dial to switch the Recording Mode. - Flash
- Hot shoe (Hot shoe cover)
• Keep the Hot Shoe Cover out of reach of children to prevent swallowing. - Stereo microphone
• Be careful not to cover the microphone with your finger. Doing so may make the sound difficult to record. - Diopter adjustment dial (P18)
- Drive mode dial
Single (P31):
Burst:
4K Photo (P32):
Auto Bracket:
Self-timer:
Time Lapse/Animation: - [MIC] socket (P67)
• An external microphone (optional) can record higher-quality audio than the built-in microphone. - Shoulder strap eyelet (P13)
- Lens release button (P17)
- Lens lock pin
- Mount
- Sensor
- Lens fitting mark (P17)

- Touch screen (P22)/monitor (P48)
- [LVF] button (P22)/[Fn5] button (P24)
- Flash open button
• The flash opens, and recording with the flash becomes possible. - Eye sensor (P22)
- Viewfinder (P22)
- Eye Cup
- [Q.MENU] button (P24)/[Fn2] button (P24)
- [(] (Playback) button (P38)
- Speaker (P53)
• Be careful not to cover the speaker with your finger. Doing so may make the sound difficult to hear. - [DISP.] button
• Each time this is pressed, the display on the monitor is switched. - [AF/AE LOCK] button
- Focus mode lever (P30)
- [REMOTE] socket
- [HDMI] socket
- [AV OUT/DIGITAL] socket
- Cursor 3/[ 1/[2/[ 4/[Fn3]
- [MENU/SET] button (P20, 23)
- [] (Delete/Cancel) button (P39)/ [Fn4] button (P24)
- DC coupler cover (P67)
• When using an AC adaptor, ensure that the Panasonic DC coupler (DMW-DCC8: optional) and AC adaptor (DMW-AC10PP: optional) are used.
• Always use a genuine Panasonic AC adaptor (DMW-AC10PP: optional).
• When using an AC adaptor, use the AC cable lead supplied with the AC adaptor. - Release lever (P15)
- Card/Battery door (P15)
- Tripod mount
• It may not be possible to attach and securely fasten a tripod with a screw length of 5.5 mm (0.22 inch) or more to the camera. Doing so may also damage the camera.
Lens
- H-FS1442A
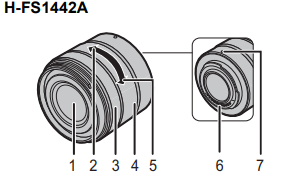
- H-FS45150

- H-FS14140
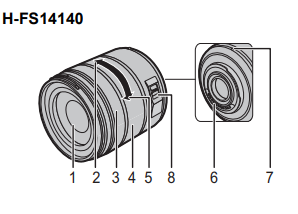
- Lens surface
- Tele
- Focus ring (P30)
- Zoom ring
- Wide
- Contact point
- Lens fitting mark (P17)
- [O.I.S.] switch
Preparation
- Check that the camera is turned off.
Attaching the Shoulder Strap
- We recommend attaching the shoulder strap when using the camera to prevent it from dropping.

- Perform steps 1 to 8 and then attach the other side of the shoulder strap.
- Use the shoulder strap around your shoulder.
- – Do not wrap the strap around your neck.
- – It may result in injury or accident.
- Do not leave the shoulder strap where an infant can reach it.
- – It may result in an accident by mistakenly wrapping around the neck.
Charging the Battery
The battery that can be used with this unit is DMW-BLC12PP.
- Attach the battery paying attention to the direction of the battery.
- Connect the charger to the electrical outlet.
- The [CHARGE] indicator A lights up and charging begins.

- The [CHARGE] indicator A lights up and charging begins.
∫ About the [CHARGE] indicator
On: Charging.
Off: Charging has been completed. (Disconnect the charger from the electrical socket and detach the battery after charging is completed.)
- When the [CHARGE] indicator flashes
- The battery temperature is too high or too low. It is recommended to charge the battery again at an ambient temperature of between 10 C and 30 C (50 oF and 86 oF).
- The terminals of the charger or the battery are dirty. In this case, wipe them with a dry cloth.
∫ Charging time
- Charging time Approx. 140 min
- The indicated charging time is for when the battery has been discharged completely. The charging time may vary depending on how the battery has been used.
- The charging time for the battery in hot/cold environments or a battery that has not been used for a long time may be longer than normal.
Inserting/Removing the Battery
- Always use genuine Panasonic batteries (DMW-BLC12PP).
- If you use other batteries, we cannot guarantee the quality of this product.

- Being careful about the battery orientation, insert until you hear a locking sound, and then check that it is locked by lever A.
Pull the lever A in the direction of the arrow to remove the battery.
Inserting/Removing the Card (Optional)
- Push it securely until you hear a “click” while being careful about the direction in which you insert it.
- To remove the card, push the card until it clicks, then pull the card out upright.
∫ About cards that can be used with this unit
UHS-I/UHS-II is a high-speed interface standard for SD memory cards. UHS-II supports a theoretical transfer rate approximately three times faster than that of UHS-I.
∫ About motion picture/4K photo recording and speed class ratings
According to the [Rec Format] (P36) and [Rec Quality] (P36) of a motion picture, the required card differs. To record 4K photos, you need a card with a speed class rating that supports 4K photo recording. Use a card that meets the following ratings of the SD Speed Class or UHS Speed Class.
- SD Speed Class and UHS Speed Class are the speed standards regarding continuous writing. To check the class, see the labeled side, etc. of the card.

- Please confirm the latest information on the following website. http://panasonic.jp/support/global/cs/dsc/ (This Site is English only.)
Formatting the card (initialization)
Format the card before recording a picture with this unit.
- Since data cannot be recovered after formatting, make sure to back up necessary data in advance.
- Select the menu. (P23)
- MENU > [Setup] > [Format]
- A confirmation screen is displayed. It is executed when [Yes] is selected.
Attaching/Removing the Lens
- Change lenses where there is not a lot of dirt or dust.

Detaching the lens
- Attach the lens cap.
- While pressing on the lens release button B, rotate the lens toward the arrow until it stops, and then remove it.

Opening the Monitor/Adjusting the Monitor
At the time when this camera is purchased, the monitor is stowed in the camera body. Bring out the monitor as shown below.
- Open the monitor. (Maximum 180o)
- It can be rotated 180o
- Return the monitor to its original position.
- Only rotate the monitor after opening it wide enough, and be careful not to use excessive force as it may be damaged.
- When not using the monitor it is recommended that you close it with the screen facing inward to prevent dirt and scratches.
Setting Date/Time (Clock Set)
The clock is not set when the camera is shipped.
- Turn the camera on.
When the camera is turned on, the status indicator 1 lights up green.
- Press [MENU/SET].
- Press 3/4 to select the language, and press [MENU/ SET].
- Press [MENU/SET].
- Press 2/1 to select the items (year, month, day, hour, minute), and press 3/4 to set.
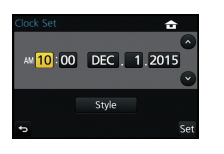
- Press [MENU/SET] to set.
- When [The clock setting has been completed.] is displayed, press [MENU/SET].
- When [Please set the home area] is displayed, press [MENU/SET].
- Press 2/1 to select the home area, and then press [MENU/SET].
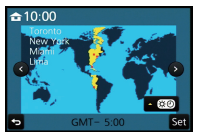
Diopter adjustment
Adjust the diopter to suit your vision so that you can see the characters displayed in the viewfinder.
Monitor Display/Viewfinder Display
- The following images are examples of when the display screen is set to [] (monitor style) in the monitor.
In recording

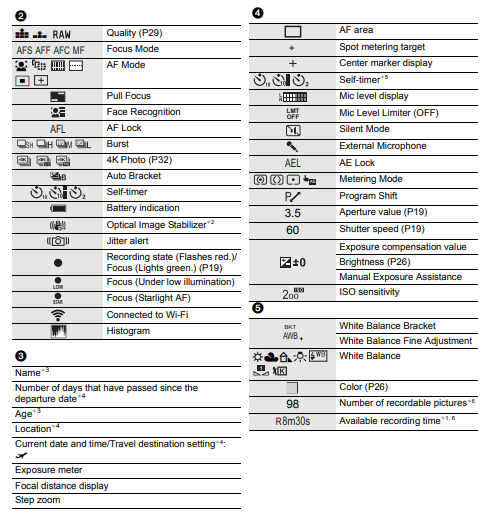
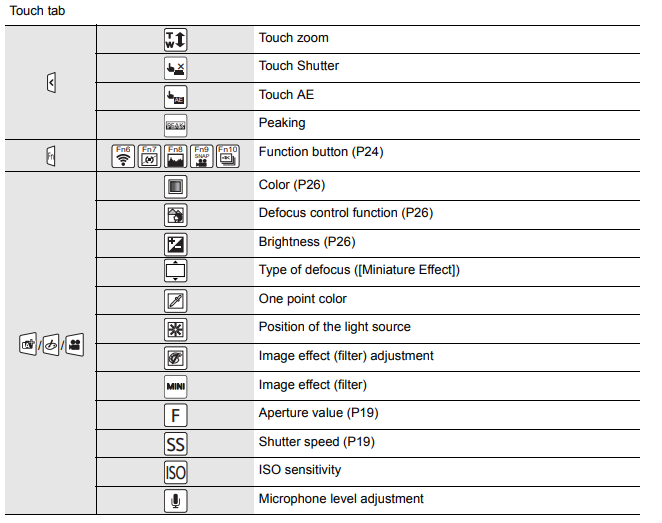
- h: hour, m: minute, s: second
- Only available when a lens that supports the Stabilizer function is attached.
- This is displayed for about 5 seconds when the camera is turned on if the [Profile Setup] setting is set.
- This is displayed for about 5 seconds when the camera is turned on, after setting the clock, and after switching from Playback Mode to Recording Mode.
- This is displayed during the countdown.
- It is possible to switch the display between the number of recordable pictures and available recording time with the [Remaining Disp.] setting in the [Custom] menu.
On-monitor recording information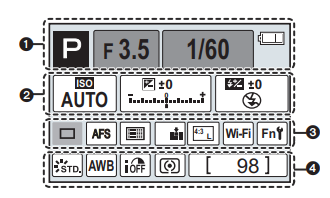


Troubleshooting
First, try out the following procedures.
If the problem is not resolved, it may be improved by selecting [Reset] on the [Setup] menu.
- Please also refer to the “Owner’s Manual for Advanced Features (PDF format)”, which describes more detailed information.
The camera cannot be operated even when it is turned on. The camera turns off immediately after it is turned on.
- The battery is exhausted.
- Charge the battery.
- If you leave the camera on, the battery will be exhausted.
- Turn the camera off frequently by using the [Economy] etc.
The battery becomes flat too quickly.
- Is the drive mode set to 4K Photo and [4K PHOTO] set to [ ] ([4K Pre-Burst])? When [ ] ([4K Pre-Burst]) is selected, the battery drains faster.
- Select [ ] ([4K Pre-Burst]) only when recording.
Taking pictures is not possible. The shutter will not operate immediately when the shutter button is pressed.
- When the drive mode is set to 4K Photo and [4K PHOTO] in the [Rec] menu is set to [] ([4K Pre-Burst]), the camera temperature rises. In some cases, the camera may display [], switch to [ ] ([4K Burst]) and stop the recording to protect itself. Wait until the camera cools down.
The subject is not focused properly.
- The subject is beyond the focus range of the camera.
- There is a camera shake (jitter) or the subject is moving slightly.
- Is [Focus/Release Priority] in the [Custom] menu set to [RELEASE]?
- Is [Shutter AF] in the [Custom] menu set to [OFF]?
- Is the AF Lock applied incorrectly?
The recorded picture is blurred. The Optical Image Stabilizer is not effective.
- The shutter speed will become slower and the Optical Image Stabilizer function may not work properly when taking pictures, especially in dark places.
- > We recommend holding the camera firmly with both hands when taking pictures.
- > We recommend using a tripod and the self-timer when taking pictures with a slow shutter speed.
- Are you using a lens that supports the Stabilizer function?
- When a moving subject is recorded with the electronic shutter, the subject may appear distorted in the picture.
Striping or flicker may appear under lighting such as fluorescent lighting and LED lighting fixtures.
- This is characteristic of MOS sensors which serve as the camera’s pickup sensors.
This is not a malfunction.
- Are you taking pictures with the electronic shutter?
When using the electronic shutter, lowering the shutter speed may reduce the effect of the horizontal stripes.
The brightness or the hue of the recorded picture is different from the actual scene.
- When recording under fluorescent or LED lighting fixtures, etc., increasing the shutter speed may introduce slight changes to brightness and color. These are a result of the characteristics of the light source and do not indicate a malfunction.
- When recording subjects in extremely bright locations or recording under fluorescent lighting, LED lighting fixtures, mercury lamps, sodium lighting, etc., the colors and screen brightness may change or horizontal striping may appear on the screen.
4K photo recording stops before finishing.
- When the ambient temperature is high or recording with [ ] ([4K Burst]) or [ ] ([4K Burst(S/S)]) of the 4K Photo function is performed continuously, the camera may display [] and stop the recording to protect itself. Wait until the camera cools down.
Recording motion pictures is not possible.
- You may not be able to record for a short while after turning this unit on when using a large-capacity card.
Motion picture recording stops in the middle.
- When the ambient temperature is high or the motion picture is recorded continuously, the camera may display [] and stop the recording to protect itself. Wait until the camera cools down.
The screen may be blacked out momentarily, or the unit may record noise.
- Depending on the environment at the time of motion picture recording, the screen may be blacked out momentarily or the unit may record noise due to static electricity or powerful electromagnetic waves (radio towers, high voltage power lines, etc.).
Sometimes it is difficult to focus with Auto Focus when recording 4K motion pictures.
- This phenomenon occurs when the camera is trying to record with highly accurate focus at a reduced Auto Focus speed, and is not a malfunction.
The flash is not activated.
- Is the flash closed?
- Open the flash.
- When the electronic shutter is used, the flash is not activated.
- Set [Electronic Shutter] to [OFF].
- When [Silent Mode] is set to [ON], the flash is not activated.
- Set [Silent Mode] to [OFF].
The flash is activated 2 times.
- (Except for when [Firing Mode] in [Flash] is set to [MANUAL]) The flash is activated 2 times. The interval between the first and second flash is longer when Red-Eye Reduction is set so the subject should not move until the second flash is activated.
The picture is not played back. There are no recorded pictures.
- Is the card inserted?
- Is there a picture on the card?
- Is this a folder or picture that was processed on the PC?
If it is, it cannot be played back by this unit. - It is recommended to use the “PHOTOfunSTUDIO” software in the DVD (supplied) to write pictures from PC to card.
- Has [Playback Mode] been set for playback?
- Change to [Normal Play].
The folder number and the file number are displayed as [—] and the screen turns black.
- Is this a non-standard picture, a picture that has been edited using a PC, or a picture that was taken by another make of a digital camera?
- Did you remove the battery immediately after picture-taking or did you take the picture using a battery with a low remaining charge?
[Thumbnail is displayed] appears on the screen.
- Is it a picture that has been recorded with other equipment?
In such cases, these pictures may be displayed with a deteriorated picture quality.
Motion pictures recorded with this model cannot be played back on other equipment.
- The picture quality or sound quality of recorded motion pictures may deteriorate even when these are played back with compatible devices. Also, recording information may not be displayed correctly.
A Wi-Fi connection cannot be established. Radio waves get disconnected. The wireless access point is not displayed.
∫ General tips for using a Wi-Fi connection
- Use within the communication range of the device to be connected.
- Is any device, such as a microwave oven, cordless phone, etc., that uses 2.4 GHz frequency operated nearby?
- Radio waves may get interrupted when used simultaneously. Use them sufficiently away from the device.
- When the battery indicator is flashing red, the connection with other equipment may not start or the connection may be disrupted.
(A message such as [Communication error] is displayed.)
- If you place the camera on a metal table or shelf, the radio waves may be adversely affected. In such cases, you may not be able to establish a connection. Move the camera away from the metal surface.
∫ About a wireless access point
- Check if the wireless access point to connect is operating.
- The camera may not display or connect to a wireless access point depending on the radio wave condition.
- > Move this unit closer to the wireless access point.
- > Remove the obstacles between this unit and the wireless access point.
- > Change the direction of this unit.
- > Change the location and orientation of the wireless access point. > Perform the [Manual Input].
- It may not display even if the radio waves exist depending on the setting of the wireless access point.
- > Check the settings of the wireless access point.
- > When the network SSID of the wireless access point is set not to broadcast, the wireless access point may not be detected. Enter the network SSID to start the connection or enable the SSID broadcast of the wireless access point.
- Connection types and security setting methods are different depending on the wireless access point. (Refer to the operating instructions of the wireless access point.)
- Is the 5 GHz/2.4 GHz switchable wireless access point connected to other equipment using the 5 GHz band?
- > The use of a wireless access point that can use 5 GHz/2.4 GHz simultaneously is recommended. It cannot be used simultaneously with this camera if it is not compatible.
Images cannot be transmitted to a PC.
- When the firewall of the OS, security software, etc. is enabled, connecting to the PC may not be possible.
When I try to set up a Wi-Fi connection with a Windows 8 PC, my username and password are not recognized, so I cannot connect to the PC.
- Some OS versions, including Windows 8, use two types of accounts: a local account and a Microsoft account.
- > Be sure to use the username and password for the local account. If you haven’t set up a local account, please create one.
The PC is not recognized when I use a Wi-Fi connection. The camera cannot be connected to a PC via a Wi-Fi connection.
- The default workgroup name is set to “WORKGROUP”. If you change the workgroup name, the PC will not be recognized.
In [Change Workgroup Name] in [PC Connection] of the [Wi-Fi Setup] menu, change the workgroup name to that of the PC you are connecting to.
- Please confirm login name and password are correctly typed.
- When the system time of a Mac computer or Windows PC connected to a camera differs severely from that of the camera, the camera cannot be connected to the computer or PC in some OSs.
- > Please confirm that [Clock Set] and [World Time] of the camera match with the time, date, and time zone on a Windows PC or Mac computer. When both settings do not match severely, please match them.
Transmission of the image fails midway. Some images cannot be transmitted.
- The image cannot be transmitted when the battery indicator is flashing red.
- Is the size of the image too large?
- > Reduce the image size at [Size], and then send.
- > Transmit after dividing the motion picture with [Video Divide].
- The file format of the motion picture that can be sent differs depending on the destination.
- The capacity or number of images in the web service is full.
- > Login to “LUMIX CLUB”, and check the status of the destination on the web service link settings.
Motion pictures cannot be played back on a TV.
- Are you trying to play back the motion pictures by directly inserting the card in the card slot of the TV?
- > Connect the camera to the TV with the AV cable (optional), or with the HDMI micro cable, and then play back the motion pictures on the camera.
VIERA Link does not work.
- Is it connected properly with the HDMI micro cable?
- Is the [VIERA Link] on this unit set to [ON]?
- > If the input channel does not switch automatically, use the remote control for the TV to switch it.
- > Check the VIERA Link setting on the connected device.
- > Turn this unit off and on.
- > Set [HDAVI Control] to [Off] on the TV and then turn it back to [On].
(Refer to the operating instructions of the TV for details.)
There is a sound from the lens unit.
- It is a sound of lens movement or aperture operation when this unit is turned on or off, and it is not a malfunction.
- The sound, which is caused by the automatic adjustment of the aperture, is heard when the brightness has changed due to, for example, zooming or the movement of the camera. This is not a malfunction.
The camera becomes warm.
- The surface of the camera and the reverse side of the monitor may become warm during use.
This does not affect the performance or quality of the camera.
The clock is reset.
- If you do not use the camera for a long time, the clock may be reset.
- [Please set the clock] message will be displayed; please reset the clock. (P18)
Specifications
Specifications are subject to change without notice.
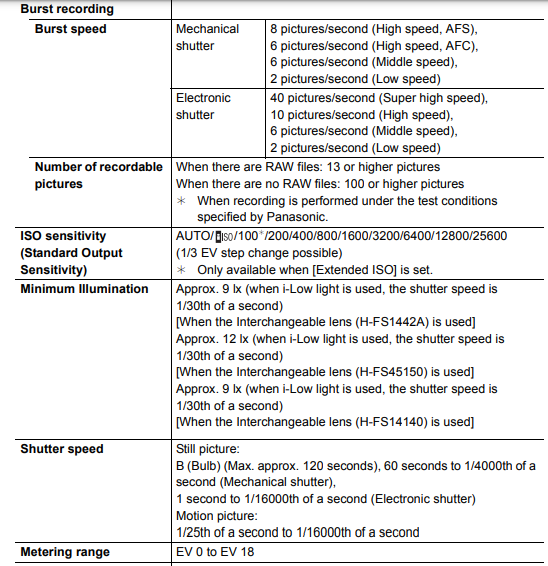
Digital Camera Body (DMC-G7): Information for your safety




Battery Charger (Panasonic DE-A79B): Information for your safety

Equipment mobility: Movable
Battery Pack (lithium-ion) (Panasonic DMW-BLC12PP): Information for your safety
![]()


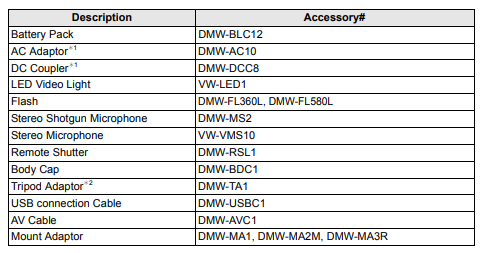
Digital Camera Accessory System
- The AC Adaptor (optional) can only be used with the designated Panasonic DC Coupler (optional). The AC adaptor (optional) cannot be used by itself.
- Use if the attached lens is in contact with the tripod pedestal.
- Product numbers are correct as of May 2015. These may be subject to change.
- Some optional accessories may not be available in some countries.
- NOTE: Accessories and/or model numbers may vary between countries. Consult your local dealer.
- For lens-related optional accessories such as compatible lenses and filters, refer to catalogs/ Web pages, etc.
Limited Warranty (ONLY FOR U.S.A.)
Panasonic Products Limited Warranty
Limited Warranty Coverage (For USA Only)
If your product does not work properly because of a defect in materials or workmanship, Panasonic Corporation of North America (referred to as “the warrantor”) will, for the length of the period indicated on the chart below, which starts with the date of original purchase (“warranty period”), at its option either (a) repair your product with new or refurbished parts, (b) replace it with a new or a refurbished equivalent value product, or (c) refund your purchase price. The decision to repair, replace or refund will be made by the warrantor
During the “Labor” warranty period there will be no charge for labor. During the “Parts” warranty period, there will be no charge for parts. This Limited Warranty excludes both parts and labor for non-rechargeable batteries, antennas, and cosmetic parts (cabinet). This warranty only applies to products purchased and serviced in the United States. This warranty is extended only to the original purchaser of a new product that was not sold “as is”.
Mail-In Service–Online Repair Request
Online Repair Request
To submit a new repair request and for quick repair status visit our Web Site at http://shop.panasonic.com/support. When shipping the unit, carefully pack, include all supplied accessories listed in the Owner’s Manual, and send it prepaid, adequately insured, and packed well in a carton box. When shipping Lithium Ion batteries please visit our Web Site at http://shop.panasonic.com/support as Panasonic is committed to providing the most up-to-date information. Include a letter detailing the complaint, a return address and provide a daytime phone number where you can be reached. A valid registered receipt is required under the Limited Warranty.
This warranty ONLY COVERS failures due to defects in materials or workmanship and DOES NOT COVER normal wear and tear or cosmetic damage. The warranty ALSO DOES NOT COVER damages which occurred in shipment, or failures which are caused by products not supplied by the warrantor, or failures which result from accidents, misuse, abuse, neglect, mishandling, misapplication, alteration, faulty installation, set-up adjustments, misadjustment of consumer controls, improper maintenance, power line surge, lightning damage, modification, introduction of sand, humidity or liquids, commercial use such as hotel, office, restaurant, or other business or rental use of the product, or service by anyone other than a Factory Service Center or other Authorized Servicer, or damage that is attributable to acts of God.
Some states do not allow the exclusion or limitation of incidental or consequential damages, or limitations on how long an implied warranty lasts, so the exclusions may not apply to you.
This warranty gives you specific legal rights and you may also have other rights which vary from state to state. If a problem with this product develops during or after the warranty period, you may contact your dealer or Service Center. If the problem is not handled to your satisfaction, then write to:
Customer Services Directory
F or Product Information, Operating Assistance, Parts, Owner’s Manuals, Dealer and Service info go to http://shop.panasonic.com/support For the hearing or speech impaired TTY: 1- 877-833-8855
FAQS About Panasonic DMC-G7K LUMIX G7 4K Digital Camera
How much time can the LUMIX G7 record?
one hour
How long does the battery on the Panasonic G7 last?
360-shot capacity
How much time can the LUMIX G7 record 4K?
one hour
What is the Panasonic Lumix G7 4K’s sensor size?
The Four Thirds sensor in the Panasonic Lumix DMC-G7 measures 17.3 x 13 mm and has a 224.90 mm2 sensor area.
Can I shoot images with the Lumix G7?
The LUMIX G7 has a 4K camera.
What is the maximum frame rate that the Panasonic Lumix G7 can capture?
40 fps
What is the Lumix G7’s shutter speed?
around 1/4000 to 60 seconds
What amount of RAM does 4K use?
About 45GB of storage are required for one hour of 4K video.
Can I take nice street photos with the Lumix G7?
For street photography, the Panasonic G7 received a score of 66.
What is the Panasonic G7 4K’s bitrate?
100Mbps
For more manuals by Panasonic, Visit Manualsdock
[embeddoc url=”https://manualsdock.com/wp-content/uploads/2023/09/Panasonic-DMC-G7K-LUMIX-G7-4K-Digital-Camera-Owner-Manual.pdf” download=”all”]


