
Optoma UHD55 4K Ultra HD DLP Projector
About Optoma
Optoma is a well-known manufacturer of audiovisual and projection equipment, primarily focusing on projectors and related products. The company, officially known as Optoma Corporation, was founded in 2002 and is headquartered in Taiwan. Over the years, Optoma has established a strong presence in the global projector market and is recognized for its diverse range of projectors, from home entertainment and business projectors to professional and installation-grade models.
INTRODUCTION
Thank you for purchasing an Optoma 4K UHD projector. For full list of features please visit the product page on our website, where you will also find additional information and documentation such as voice control setup and FAQs.
Package Overview
Carefully unpack and verify that you have the items listed below under standard accessories. Some of the items under optional accessories may not be available depending on the model, specification and your region of purchase. Please check with your place of purchase. Some accessories may vary from region to region.
The warranty card is only supplied in some specific regions. Please consult your dealer for detailed information.
Standard accessories
Note:
- The actual remote control may vary depending on the region.
- The remote control is shipped with battery.
- * For warranty Information, please visit https://www.optoma.com/support/download.
Optional accessories

Note: Accessories vary depending on model, specification and region. Some optional accessories may be available to purchase in select regions.
Please visit our website to see more details regarding the accessories included.
Product Overview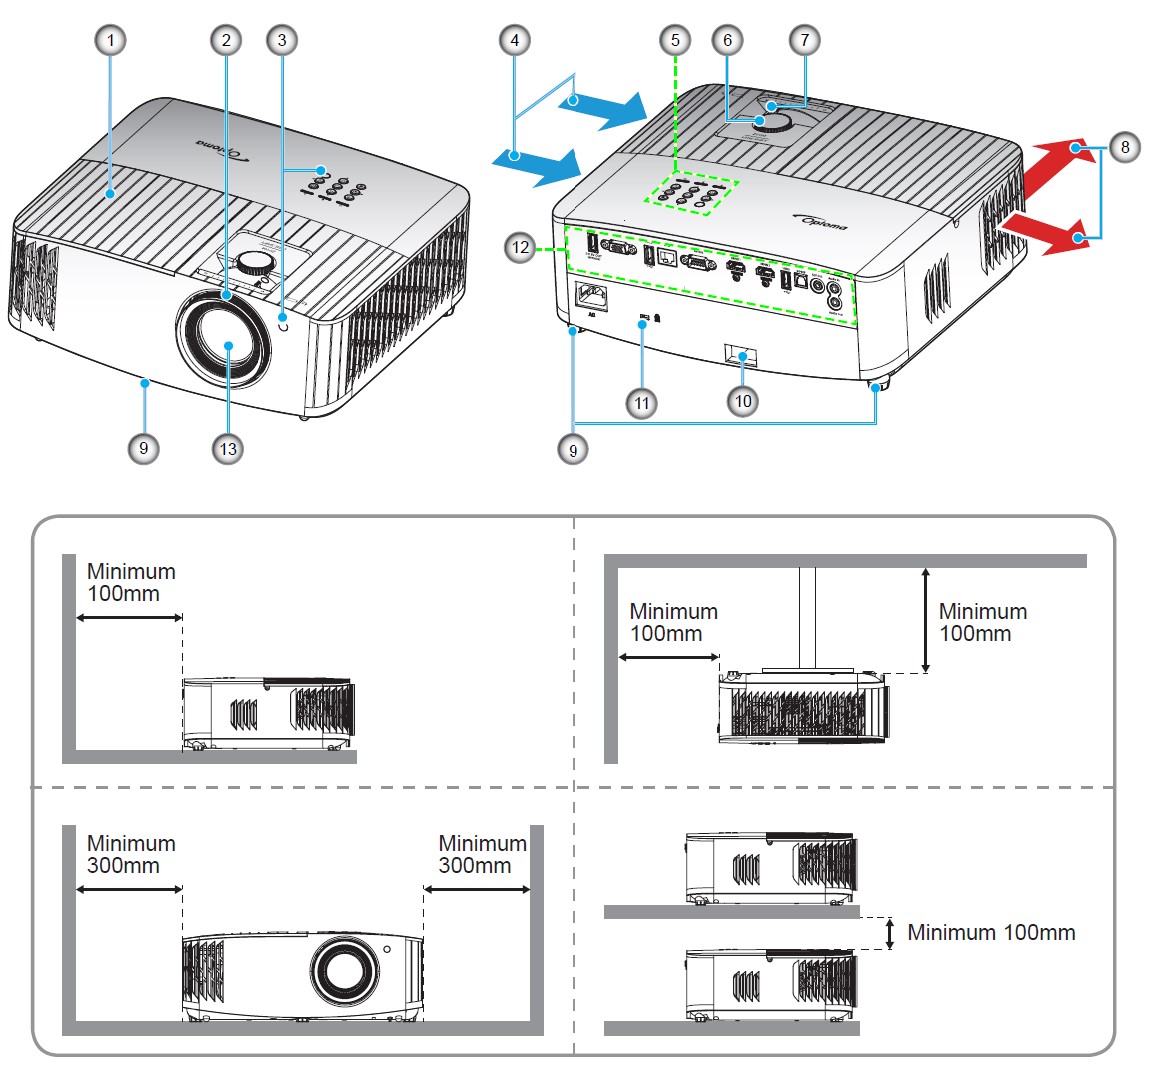
Note:
- Do not block projector intake and exhaust vents.
- When operating the projector in an enclosed space, allow at least 30 cm clearance around the intake and exhaust vents.
- Lamp Cover
- Focus Ring
- IR Receiver (front and top)
- Ventilation (inlet)
- Keypad
- Lens Shift Dial
- Zoom Lever
- Ventilation (outlet)
- Tilt-Adjustment Feet
- Security Bar
- Kensington™ Lock Port
- Input / Output
- Lens
Connections
- USB Power OUT (5V 1.5A) Connector
- VGA In Connector
- USB Port (WiFi dongle/Media Player)
- RJ-45 Connector
- RS-232 Connector
- HDMI 1 Connector (4K 60Hz; for low latency gaming)
- HDMI 2 Connector (4K 60Hz; for PureMotion)
- USB Port (WiFi dongle/Media Player)
- S/PDIF Connector (only 2ch PCM supported)
- 12V Out Connector
- Audio In Connector
- Audio Out Connector
- Security Bar
- KensingtonTM Lock Port
- Power Socket
Keypad
- On/Standby LED
- Lamp LED
- Temp LED
- Information
- Enter
- Re-Sync
- IR Receiver
- Four Directional Select Keys
- Menu
- Source
- Power
- Keystone Correction
Note: The keypad does not control the home screen. Please use the remote control to navigate.
Remote control
- Power On / Off
- Home
- Four Directional Select Keys
- Mute
- Volume –
- Menu
- Source
- Return
- Enter
- Display Mode
- Option
- Volume +
Note:
- Some keys may have no function for models that do not support these features.
- Before using the remote control for the first time, remove the transparent insulation tape. See page 17 for battery installation.
SETUP AND INSTALLATION
Installing the projector
Your projector is designed to be installed in one of four possible positions.
Your room layout or personal preference will dictate which installation location you select. Take into consideration the size and position of your screen, the location of a suitable power outlet, as well as the location and distance between the projector and the rest of your equipment.
Projector should be placed flat on a surface and 90 degrees / perpendicular to the screen.
Note: The further away the projector is placed from the screen the projected image size increases and vertical offset also increases proportionally.
IMPORTANT! Do not operate the projector in any orientation other that table top or ceiling mount. The projector should be horizontal and not tilted either forwards/backwards or left/right. Any other orientation will invalidate the warranty and may shorten the lifetime of the projector lamp or the projector itself.
For none standard installation advise please contact Optoma.
Connecting sources to the projector
- USB Cable
- VGA In Cable
- RCA Component Cable
- RJ-45 Cable
- RS-232 Cable
- Audio In Cable
- Audio Out Cable
- 12V DC Jack
- S/PDIF Out Cable
- USB Disk Drive
- HDMI Cable
- HDMI Dongle
- USB Power Cable
- Power Cord
Note: To ensure the best image quality and avoid connection errors, we recommend the use of Premium HDMI cables. For the cable lengths longer than 20-25 feet, we strongly recommend using Active Fiber HDMI cables.
Adjusting the projector image
Image height
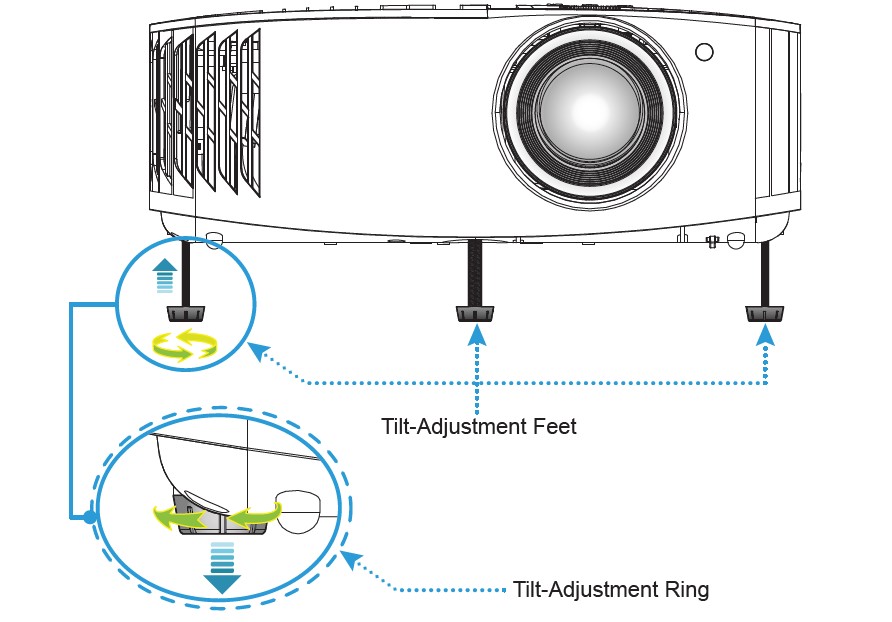
The projector is equipped with elevator feet for adjusting the image height.
- Locate the adjustable foot you wish to adjust on the underside of the projector.
- Rotate the adjustable foot clockwise or counterclockwise to raise or lower the projector.
- To adjust the image size and position, do the following:
- To adjust the image size, turn the zoom lever clockwise or counterclockwise to increase or decrease he projected image size.
- To adjust the image position, turn the lens shift dial clockwise or counterclockwise to adjust the position of the projected image vertically
- To adjust the focus, turn the focus ring clockwise or counterclockwise until the image is sharp and legible.

Remote setup
Installing / replacing the battery
- Use a coin to turn the battery cover counterclockwise until the cover opens.
- Install new battery into the compartment.
Remove the old battery and install new one (CR2032). Ensure that the side with a “+” is facing up. - Put the cover back. Then use a coin to turn the battery cover clockwise to lock it in place.
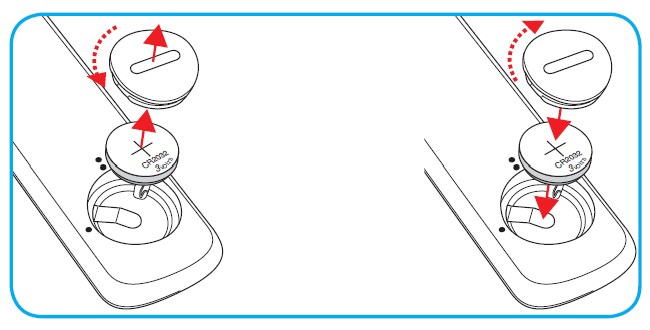
To ensure safe operation, please observe the following precautions:
- Use CR2032 type battery.
- Avoid contact with water or liquid.
- Do not expose the remote control to moisture or heat.
- Do not drop the remote control.
- If the battery has leaked in the remote control, carefully wipe the case clean and install new battery. Risk of an explosion if battery is replaced by an incorrect type.
- Dispose of used battery according to the instructions.
Effective range
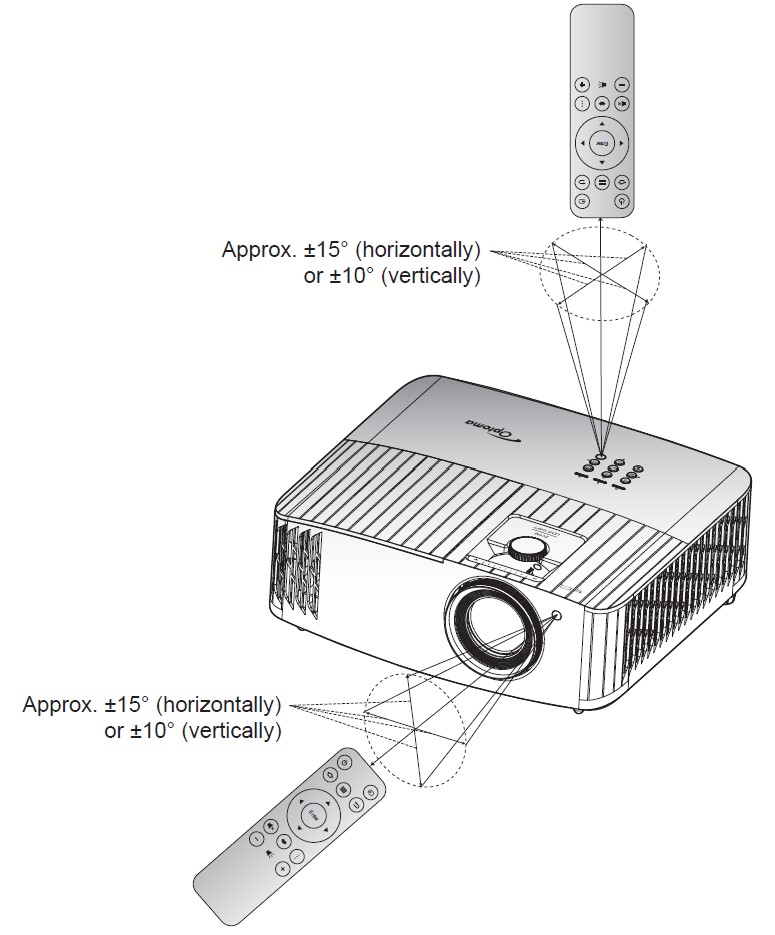
Infra-Red (IR) remote control sensor is located on top of the projector. Ensure to hold the remote control at an angle within 30° (horizontally) or 20° (vertically) perpendicular to the projector’s IR remote control sensor to function correctly. The distance between the remote control and the sensor should not be longer than 7 meters (~22 feet).
Note: When pointing the remote control directly (0 degrees angle) on the IR sensor, the distance between the remote control and the sensor should not be longer than 10 meters (~32 feet).
- Make sure that there are no obstacles between the remote control and the IR sensor on the projector that might obstruct the infra-red beam.
- Make sure the IR transmitter of the remote control is not being shined by sunlight or fluorescent lamps directly.
- Please keep the remote controller away from fluorescent lamps for over 2 meters or the remote controller might become malfunction.
- If the remote control is close to Inverter-Type fluorescent lamps, it might become ineffective from time to time.
- If the remote control and the projector are within a very short distance, the remote control might become ineffective.
- When you aim at the screen, the effective distance is less than 7 meters from the remote control to the screen and reflecting the IR beams back to the projector. However, the effective range might change according to screens.
 USING THE PROJECTOR
Powering on / off the projector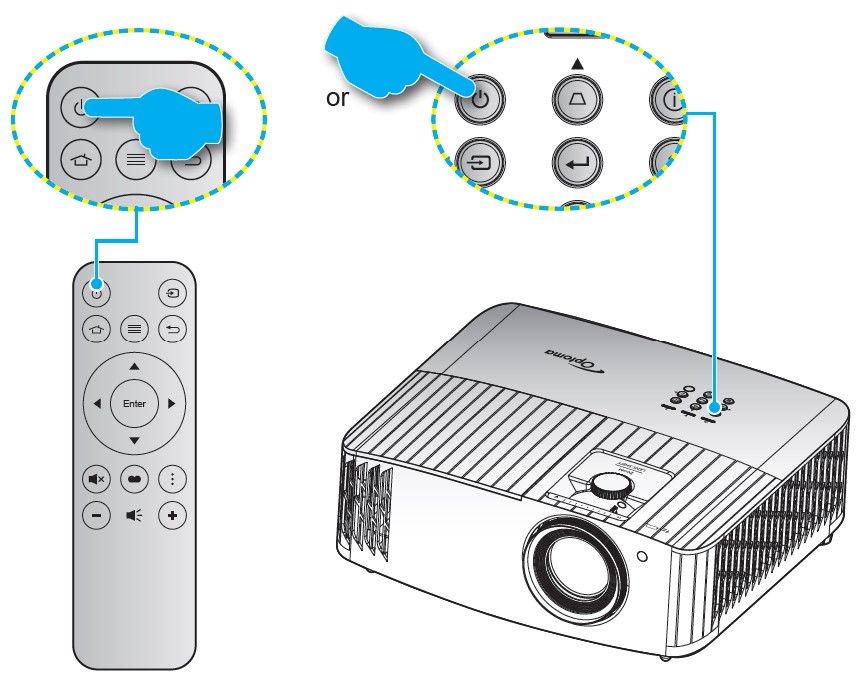
Powering on
- Securely connect the power lead and signal/source cable. When connected, the On/Standby LED will turn red.
- Turn on the projector by pressing the “power” button on the projector keypad or the remote control.
- A start up screen will display in approximately 10 seconds and the On/Standby LED will be flashing blue.
Note:The first time the projector is turned on, you will be prompted to select the preferred language, projection orientation, and other settings.
The first time the projector is turned on, you will be prompted to do the initial setup including selecting the projection orientation, preferred language, configuring network settings, and more. Once the Setup Complete! screen appears, it indicates the projector is ready to use.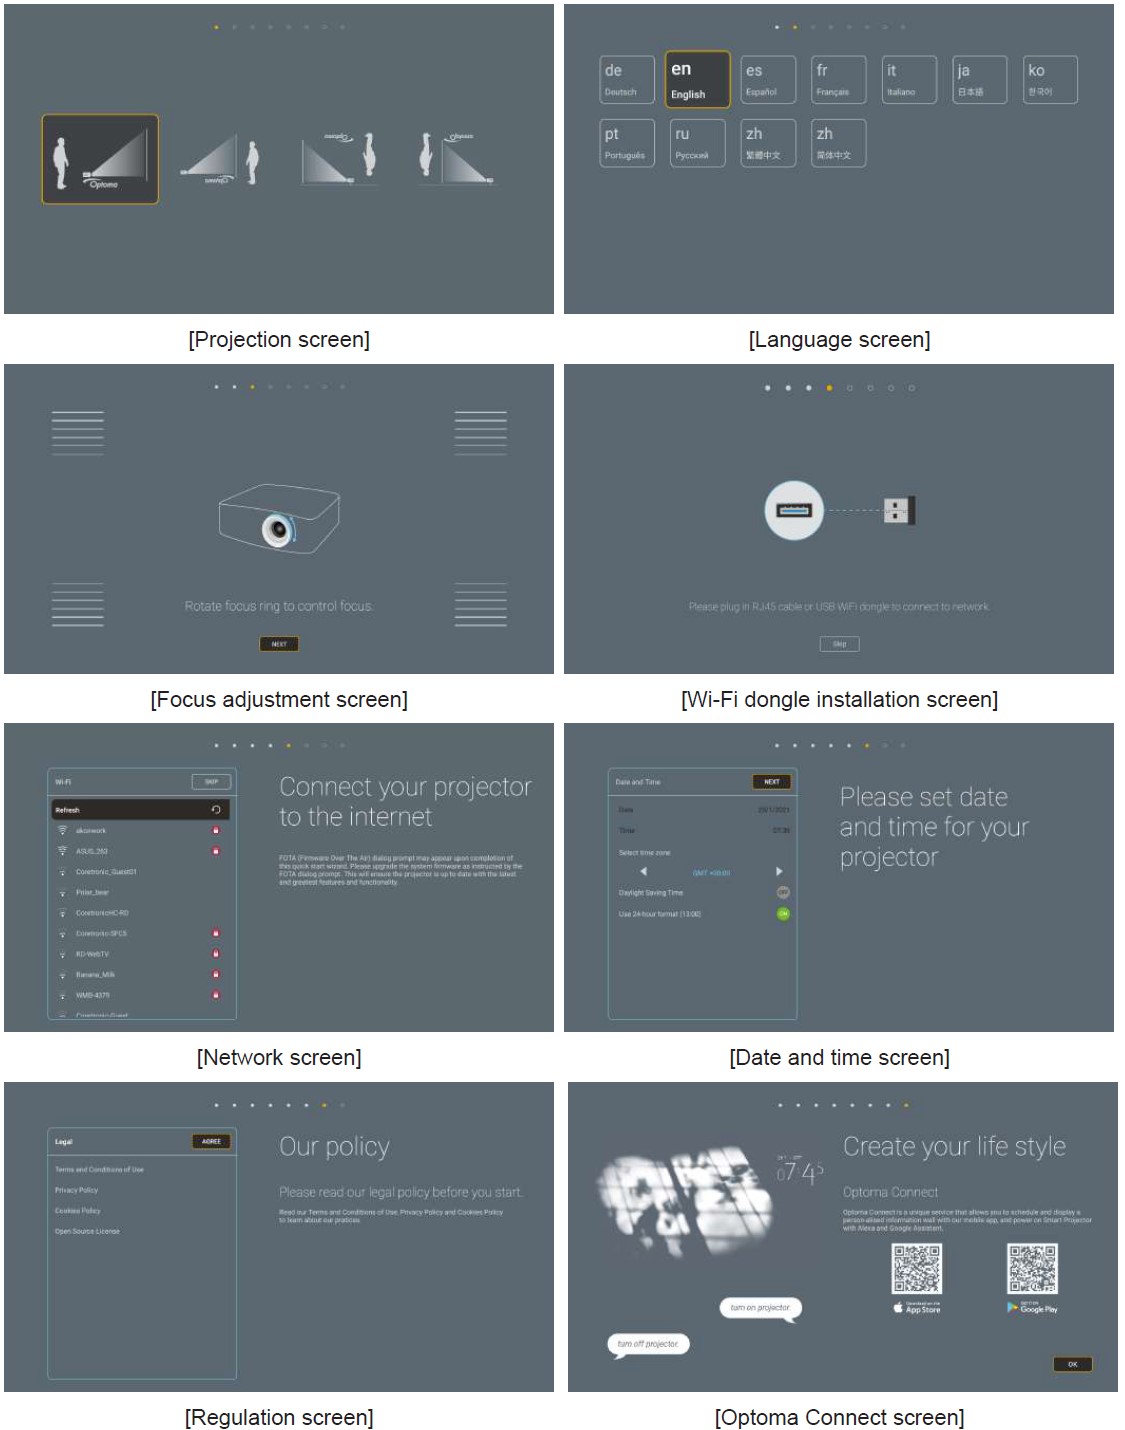
Powering off
- Turn off the projector by pressing the “power” button on the projector keypad or the remote control.
- The following message will be displayed:
- Press the “power” button again to confirm, otherwise the message will disappear after 15 seconds. When you press the “power” button for the second time, the projector will shut down.
- The cooling fans will continue to operate for about 10 seconds for the cooling cycle and the On/Standby LED will flash blue. When the On/Standby LED turns solid red, this indicates the projector has entered standby mode. If you wish to turn the projector back on, you must wait until the cooling cycle has finished and the projector has entered standby mode. When the projector is in standby mode, simply press the “power” button again to turn on the projector.
5. Disconnect the power lead from the electrical outlet and the projector.
Note:It is not recommended that the projector is turned on immediately, right after a power off procedure.
Selecting an input source
Turn on the connected source that you want to display on the screen, such as computer, notebook, video player, etc. The projector will automatically detect the source. If multiple sources are connected, press the button on the projector keypad or the remote control to select the desired input.
Home screen overview
The Home screen is displayed every time you start the projector. It contains system date and time, system status, icons to access OSD menu, projector settings menu, apps, input sources, and more.
To navigate the Home screen, simply use the buttons on the remote control.
You can return to the Home screen at any time by pressing “Home” on the remote control, regardless of your position in the user interface.
Note:The selected menu or item is highlighted in orange color, for example “Apps” on the image above.
System date and time
Date and time is displayed on the Home screen if the projector is connected to the network.The default setting is 10:00am, 2019/01/01. AM/PM will appear only if the 24-hour format is off.
To modify date and time parameters, select the respective field on the screen. The Date and Time settings page opens automatically. Then perform the modifications.
Projector settings menu (OSD)
Press “ ![]()
General menu navigation to review projector information
- When OSD is displayed, use the up and down navigation buttons to select any item in the main menu. While making a selection on a particular page, press “OK” to enter submenu.
- Press the “Left” and “Right” button to select the desired menu item. Then press “OK” to open its sub menu.
- Press the “Up” and “Down” button to select the desired item in the sub menu.
- Press the “OK” button to enable or disable a setting or press the “Left” and “Right” button to adjust a value.
- Select the next item to be adjusted in the sub menu and modify as described above.
- To exit, press
 (repeatedly if necessary). The OSD menu will close and the projector will automatically save the new settings.
OSD Menu tree
Note: The OSD menu tree items and features are subject to models and region. Optoma reserve the right to add or remove items to improve product performance without notice.

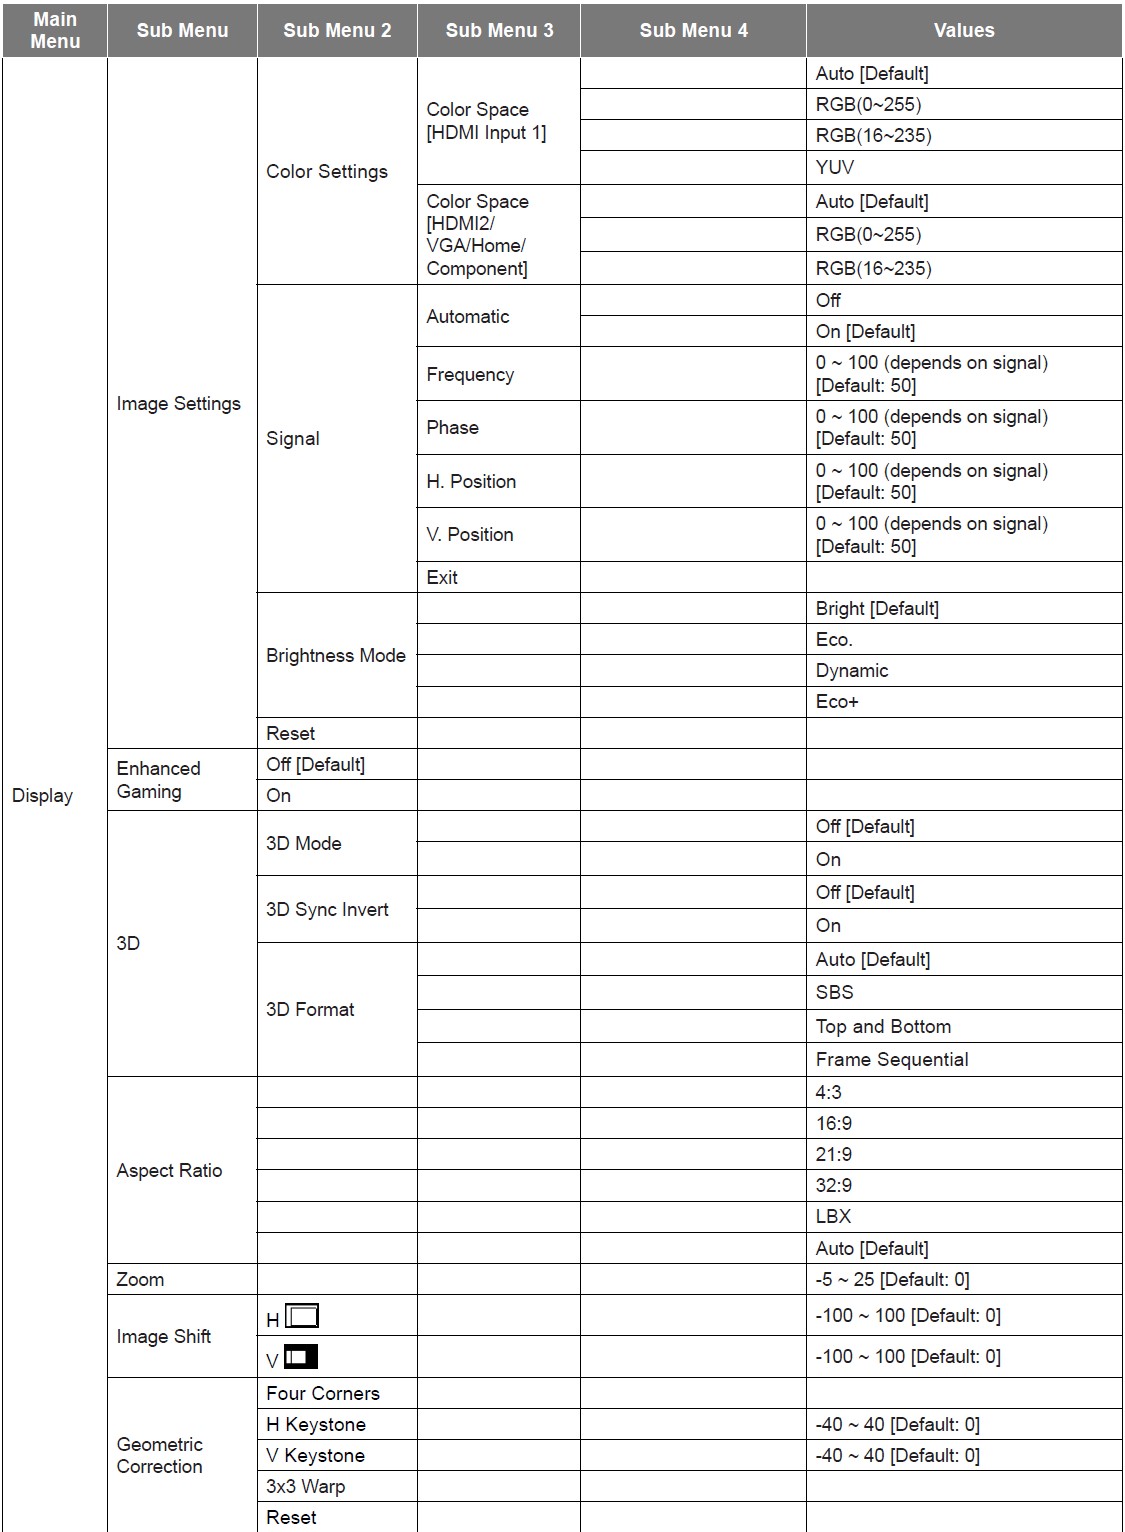


Display menu
Image settings menu
Display Mode
There are several predefined display modes that you can choose from to suit your viewing preference. Each mode has been fine-tuned by our expert colour team to ensure superior colour performance for wide range of content.
- Cinema: Provides the best balance of detail and colors for watching movies.
- HDR: Delivers color that is highly accurate, exceeding the color performance of the other display modes. This mode decodes and displays High Dynamic Range (HDR) content for the deepest blacks, brightest whites, and vivid cinematic color using REC.2020 color gamut.
Note:This mode will be automatically enabled if HDR is set to On (and HDR content is sent to projector – 4K UHD Blu-ray, 1080p/4K UHD HDR games, 4K UHD streaming video). While HDR mode is active, all other display modes will be greyed out except for WCG_HDR@HDMI2. - HLG: Delivers color that is highly accurate, exceeding the color performance of the other display modes. This mode decodes and displays Hybrid Log content (HLG) content for the deepest blacks, brightest whites, and vivid cinematic color using REC.2020 color gamut.
Note:This mode will be automatically enabled if HDR is set to On (and HLG content is sent to projector). While HLG mode is active, all other display modes will be greyed out except for WCG_HLG@HDMI2. - HDR SIM.: Enhances non-HDR content with simulated High Dynamic Range (HDR). Choose this mode to enhance gamma, contrast, and color saturation for non-HDR content (720p and 1080p Broadcast/Cable TV, 1080p Blu-ray, non-HDR Games, etc).
Note:This mode can ONLY be used with non-HDR content. - Game: Optimises your projector for maximum contrast and vivid colours allowing you to see shadow detail when playing video game.
Note:This display mode cannot be used when viewing HDR video content or playing HDR games. To enable low input lag, please ensure the PC or console is connected to HDMI1 and enable Enhanced Game Mode. - Reference: This mode reproduces colours as close as possible the image the way the movie director intended. Color, color temperature, brightness, contrast and gamma settings are all configured to Rec.709 color gamut. Select this mode for the most accurate colour reproduction when watching movies.
- Bright: This mode is suitable for environments where extra-high brightness is required, such as using the projector in well-lit rooms.
- 3D: Optimized settings for watching 3D content.
Note: To experience the 3D effect, you will need to have compatible DLP Link 3D glasses. See 3D section for more information. - WCG_SDR: This mode reproduces colours to wide color gamut providing more accurate and true to life color performance.
Note: When enabled, this mode will activate the shutter which will reduce the brightness. This mode is not available when viewing content with HDR or HLG metadata. And it is not available when input source @ HDMI1. - WCG_HDR: This mode enables the wide colour gamut for HDR content providing more accurate and true to life color performance.
Note: When enabled, this mode will activate the shutter which will reduce the brightness. This mode is only available when viewing content with HDR metadata. And it is not available when input source @ HDMI1. - WCG_HLG: This mode enables the wide colour gamut for HLG content providing more accurate and true to life color performance.
Note: When enabled, this mode will activate the shutter which will reduce the brightness. This mode is only available when viewing content with HLG metadata. And it is not available when input source @ HDMI1. - ISF Day: Save professionally calibrated picture settings optimized for day time viewing.
- ISF Night: Save professionally calibrated picture settings optimized for night time viewing.
- ISF 3D: Save professionally calibrated picture settings optimized for 3D viewing. Note: ISF modes need to be professionally calibrated. To unlock and access ISF modes, you will need to enter the following code using the remote or keypad: Power > Up > Down > Up > Up.
Wall Color
Designed to adjust the colors of the projected image when projecting on to a wall without a screen. Each mode has been fine-tuned by our expert colour team to ensure superior color performance. There are several predefined modes that you can choose from to suit the colour of your wall. Select between off, blackboard, light yellow, light green, light blue, pink, and gray.
Note: For accurate color reproduction, we recommend using a screen.
Dynamic Range
Configure the High Dynamic Range (HDR) setting and its effect when displaying video from 4K Blu-ray players and streaming devices.
Note: VGA does not support Dynamic Range.
- HDR/HLG
- Off: Turn off HDR or HLG processing. When set to Off, the projector will NOT decode HDR or HLG content.
- Auto: Auto detect HDR signal.
- HDR Picture Mode
- Brighte: Choose this mode for brighter more saturated colors.
- Standarde: Choose this mode for natural looking colors with a balance of warm and cool tones. Filme: Choose this mode for improved detail and image sharpness.
- Detaile: The signal comes from OETF conversion to achieve the best color matching.
- HLG Picture Mode
- Brighte: Choose this mode for brighter more saturated colors.
- Standarde: Choose this mode for natural looking colors with a balance of warm and cool tones. Filme: Choose this mode for improved detail and image sharpness.
- Detaile: The signal comes from OETF conversion to achieve the best color matching.
- HDR Brightness
- Adjust the brightness level of HDR.
Brightness
Adjust the brightness of the image.
Contrast
The contrast controls the degree of difference between the lightest and darkest parts of the picture.
Sharpness
Adjust the sharpness of the image.
Color
Adjust a video image from black and white to fully saturated color.
Tint
Adjust the color balance of red and green.
Gamma
Set up gamma curve type. After the initial setup and fine tuning is completed, utilize the Gamma Adjustment steps to optimize your image output.
- Film: For home theater.
- Video: For video or TV source.
- Graphics: For PC / Photo source.
- Standard(2.2): For standardized setting.
- 1.8 / 2.0 / 2.4 / 2.6: For specific PC / Photo source. 2.4 and 2.6 can also be used for video content and games to enable deeper contrast.
- 3D: To experience the 3D effect, you need to have 3D glasses. Make sure your PC/portable device has a 120 Hz signal output quad buffered graphics card and a 3D Player installed.
Note: These options are only available if the 3D mode function is disabled. In 3D mode, user can only select “3D” for Gamma setting.
Color Settings
Configure the color settings.
- BrilliantColorTM: This adjustable item utilizes a new color-processing algorithm and enhancements to enable higher brightness while providing true, more vibrant colors in picture.
- Color Temperature: Select a color temperature from D55, D65, D75, D83, D93, or Native.
- Color Matching: Select the following options:
- Color: Adjust the red (R), green (G), blue (B), cyan (C), yellow (Y), magenta (M), and white (W) level of the image.
- Hue: Adjust the color balance of red and green.
- Saturation: Adjust a video image from black and white to fully saturated color.
- Gain: Adjust the image brightness.
- Reset: Return the factory default settings for color matching.
- Exit: Exit the “Color Matching” menu.
- RGB Gain/Biase: This settings allows to configure the brightness (gain) and contrast (bias) of an image.
- Reset: Return the factory default settings for RGB gain/bias.
- Exit: Exit the “RGB Gain/Bias” menu.
- Color Space (HDMI Input 1 only): Select an appropriate color matrix type from the following: Auto, RGB(0-255), RGB(16-235), and YUV.
- Color Space (HDMI2/VGA/Home/Component only): Select an appropriate color matrix type from the following: Auto, RGB(0-255), and RGB(16-235).
Signal
Adjust the signal options.
- Automatic: Configure automatically the signal (the frequency and phase items are grayed out). If automatic is disabled, the frequency and phase items will appear for tuning and saving the settings.
- Frequency: Change the display data frequency to match the frequency of your computer’s graphic card. Use this function only if the image appears to flicker vertically.
- Phase: Synchronize the signal timing of the display with the graphic card. If the image appears to be unstable or flickers, use this function to correct it.
- H. Position: Adjust the horizontal positioning of the image.
- V. Position: Adjust the vertical positioning of the image.
- Exit: Exit the “Signal” menu.
Note: This menu is only available if the input source is RGB/Component.
Brightness Mode
Adjust the brightness mode settings.
- Bright: Choose “Bright” to increase the brightness.
- Eco: Choose “Eco” to dim the projector lamp which will lower power consumption and extend the lamp life.
- Dynamic: Choose “Dynamic” to dim the lamp power which will be based on brightness level of the content and adjust lamp power consumption between 100% and 30% dynamically. The lamp life will be extended.
- Eco+: When “Eco+” mode is activated, the brightness level of the content is automatically detected to significantly reduced lamp power consumption (up to 70%) during periods of inactivity.
Reset
Return the factory default settings for color settings.
Enhanced Gaming menu
Enable this feature to reduce response times (input latency) during gaming to 4.5ms*.
Note:
- Only support to HDMI1.
- *Only for 1080p 240Hz signals.
- The input lag by signals is described in the following table:
 The values in the table can vary slightly.
 - Please note that if “Enhanced Gaming” mode is enabled, the 3D, Aspect Ratio, Zoom, Image Shift, and Geometric Correction functions are disabled auotomatically. These functions will be enabled again if you disable “Enhanced Gaming” mode.
3D menu
3D Mode
Use this option to enable/disable the 3D mode function.
3D Sync Invert
Use this option to enable/disable the 3D sync invert function.
3D Format
Use this option to select the appropriate 3D format content.
- Auto: When a 3D identification signal is detected, the 3D format is selected automatically.
- SBS: Display 3D signal in “Side-by-Side” format.
- Top and Bottom: Display 3D signal in “Top and Bottom” format.
- Frame Sequential: Display 3D signal in “Frame Sequential” format.
Note: This menu is only available if the input source is HDMI2/VGA.
Aspect Ratio menu
Select the aspect ratio of the displayed image between the following options:
- 4e:3: This format is for 4:3 input sources.
- 16e:9/21e:9/32e:9: These formats are for 16:9/21:9/32:9 input sources, like HDTV and DVD enhanced for Wide screen TV.
- LBX: This format is for non-16×9, letterbox source and if you use external 16×9 lens to display 2.35:1 aspect ratio in full resolution.
- Auto: Automatically selects the appropriate display format.
Note:
- Detailed informations about LBX mode:
- Some Letter-Box Format DVDs are not enhanced for 16×9 TVs. In this situation, the image will not look right when displaying image in 16:9 mode. In this situation, please try to use the 4:3 mode to view the DVD. If the content is not 4:3, there will be black bars around the image in 16:9 display. For this type of content, you can use LBX mode to fill the image on the 16:9 display.
- If you use an external anamorphic lens, this LBX mode also allows you to watch a 2.35:1 content (include Anamorphic DVD and HDTV film source) that supports anamorphic wide is enhanced for 16×9 Display in a wide 2.35:1 image. In this case, there are no black bars. Lamp power and vertical resolution are fully utilized.
4K UHD scaling table:
Auto mapping rule:
Zoom menu
Use to reduce or magnify an image on the projection screen.
Note: Zoom settings are retained on power cycle of the projector.
Image Shift menu
Adjust the projected image position horizontally (H) or vertically (V).
Note:The image size will reduce slightly when adjusting the horizontal and vertical keystone.
Geometric Correction menu
- Four Corners: This setting allows the projected image to be adjusted from each corner to make a square image when the projection surface is not level.
Note:While adjusting the Four Corners, the Zoom, Aspect Ratio, and Image Shift menus are disabled. To enable Zoom, Aspect Ratio, and Image Shift, reset the Four Corners settings to the factory defaults. - H Keystone: Adjust image distortion horizontally and make a squarer image. Horizontal keystone is used to correct a keystoned image shape in which the left and right borders of the image are unequal in length. This is intended for use with horizontally on-axis applications.
- V Keystone: Adjust image distortion vertically and make a squarer image. Vertical keystone is used to correct a keystoned image shape in which the top and bottom are slanted to one of the sides. This is intended when for use with vertically on-axis applications.
- 3×3 Warpe: Adjust the image distortion by 9 points correction.

- Reset: Return the factory default settings for geometric connection.
Note: When using Enhanced Game Mode, 4 Corner, Horizontal Keystone, Vertical Keystone, and 3×3 warping will be disabled as the settings impact input lag. If you plan to use Enhanced Game Mode for low input lag, we strongly recommend setting up the projector without the use for 4 Corner, Horizontal Keystone, Vertical Keystone, and 3×3 warping.
PureMotion menu
Using sophisticated frame-interpolation technology, PureMotion eliminates motion blurring or image judder, even in high-speed action sequences. Select between Off, 1, 2, 3 for the varying levels on motion smoothing.
Audio menu
Internal Speaker
Use this option to turn on or off the internal speaker.
- Off: Choose “Off” to turn off the internal speaker.
- On: Choose “On” to turn on the internal speaker.
Mute
Use this option to temporarily turn off the sound.
- Off: Choose “Off” to turn mute off.
- One: Choose “On” to turn mute on.
Note: “Mute” function affects both internal and external speaker volume.
Volume
Adjust the volume level.
Setup menu
Projection
Select the preferred projection between front, rear, ceiling-top, and rear-top.
Lamp Settings menu
Lamp Reminder
Choose this function to show or to hide the warning message when the changing lamp message is displayed. The message will appear 30 hours before suggested replacement of lamp.
Lamp Reset
Resets the lamp hour counter after replacing the lamp.
Filter Settings menu
Filter Usage Hours
Display the filter time.
Optional Filter Installed
Set the warning message setting.
- Yes: Display warning message after 500 hours of use.
Note: “Filter Usage Hours / Filter Reminder / Filter Reset” will only appear when “Optional Filter Installed” is “Yes”. - No: Turn off warning message.
Filter Reminder
Choose this function to show or hide the warning message when the changing filter message is displayed. The available options include 300hr, 500hr, 800hr, and 1000hr.
Filter Reset
Reset the dust filter counter after replacing or cleaning the dust filter.
Power Settings menu
Direct Power On
Choose “On” to activate Direct Power mode. The projector will automatically power on when AC power is supplied, without pressing the “Power” key on the projector keypad or on the remote control.
Auto Power Off (min.)
Sets the countdown timer interval. The countdown timer will start, when there is no signal being sent to the projector. The projector will automatically power off when the countdown has finished (in minutes).
Sleep Timer (min.)
Configure the sleep timer.
- Sleep Timer (min.): Sets the countdown timer interval. The countdown timer will start, with or without a signal being sent to the projector. The projector will automatically power off when the countdown has finished (in minutes).
Note: The Sleep Timer is reset every time when the projector is powered off. - Always On: Check to set the sleep timer always on.
Security menu
Security
Enable this function to prompt for a password before using the projector.
- Off: Choose “Off” to be able to switch on the projector without password verification.
- On: Choose “On” to use security verification when the turning on the projector.
Note:The default password is 1234.
Security Timer
Can be select the time (Month/Day/Hour) function to set the number of hours the projector can be used. Once this time has elapsed you will be requested to enter your password again.
Change Password
Use to set or modify the password that is prompted when turning the projector on.
HDMI Link Settings menu
Note: When you connect HDMI CEC-compatible devices to the projector with HDMI cables, you can control them on the same power on or power off status using the HDMI Link control feature in the projector’s OSD. This lets one device or multiple devices in a group power on or power off via HDMI Link Feature in a typical configuration, your DVD player may be connected to the projector through an amplifier or home theater system.

Enable/disable the HDMI Link function. The inclusive TV, power on link, and power off link options will only available if the setting is set to “On”.
Power On Link
CEC power on command.
- Mutual: Both projector and CEC device will be turned on simultaneously.
- PJ to Devicee: The CEC device will be turned on only after the projector is switched on.
- Device to PJ: The projector will be switched on only after the CEC device is turned on.
Power Off Link
Enable this function to let both HDMI Link and projector to be automatically turned off at the same time.
Test Pattern menu
Select the test pattern from green grid, magenta grid, white grid, white, or disable this function (off).
Remote Settings menu
IR Function
Set the IR function setting.
- On: Choose “On”, the projector can be operated by the remote control from top and front IR receivers.
- Off: Choose “Off”, the projector can’t be operated by the remote control. By selecting “Off”, you will be able to use the Keypad keys.
Projector ID menu
ID definition can be set up by menu (range 0-99), and allow user control an individual projector by using RS232 command.
12V Trigger menu
Use this function to enable or disable the trigger.
Note: 3.5mm mini jack that outputs 12V 500mA (max.) for relay system control.
- On: Choose “On” to enable the trigger.
- Off: Choose “Off” to disable the trigger.
Options menu
Language
Select the multilingual OSD menu between English, German, French, Italian, Spanish, Portuguese,
Simplified Chinese, Traditional Chinese, Japanese, Korean, and Russian.
Menu Settings
Set the menu location on the screen and configure menu timer settings.
- Menu Location: Select the menu location on the display screen.
- Menu Timer: Set the duration where the OSD menu stays visible on the screen.
Auto Source
Choose this option to let the projector automatically find an available input source.
Input Source
Select the input source between HDMI 1, HDMI 2, and VGA.
High Altitude
When “On” is selected, the fans will spin faster. This feature is useful in high altitude areas where the air is thin. Display Mode Lock
Choose “On” or “Off” to lock or unlock adjusting display mode settings.
Keypad Lock
When the keypad lock function is “On”, the Keypad will be locked. However, the projector can be operated by the remote control. By selecting “Off”, you will be able to reuse the Keypad.
Information Hide
Enable this function to hide the information message.
- Off: Choose “Off” to show the “searching” message.
- On: Choose “On” to hide the info message.
Logo
Use this function to set the desired startup screen. If changes are made, they will take effect the next time the projector is powered on.
- Default: The default startup screen.
- Neutral: Logo is not displayed on startup screen.
Background Color
Use this function to display a blue, red, green, gray color, or none when no signal is available.
Reset menu
Reset OSD
Return the factory default settings for OSD menu settings.
Reset to Default
Return the factory default settings for all settings.
Info menu
View the projector information as listed below:
Regulatory Serial Number MAC Address Source Resolution Refresh Rate Display Mode Lamp Hours Projector ID Filter Usage Hours Brightness Mode FW Version
System settings menu
On the Home screen, select the system settings menu “![]()
General menu navigation
- When system settings menu is displayed, use the up and down navigation buttons to select any item in the main menu. While making a selection on a particular page, press the “OK” or the “Right” button on the remote control to enter the submenu.
- Press the “Left” and “Right” button to select the desired menu item. Then press “OK” to open its sub menu.
- Press the “Up” and “Down” button to select the desired item in the sub menu.
- Press the “OK” or “Right” button to access the selected sub menu item settings.
- Press the “Up”, “Down”, “Left”, or “Right” button to select the setting or press the “Left” and “Right” button to adjust the value (if necessary).
- Press “OK” to confirm the setting.
- Select the next item to be adjusted in the sub menu and modify as described above.
- To exit, press “
 ” (repeatedly if necessary). The settings menu will close and the projector will automatically save the new settings.
System settings menu tree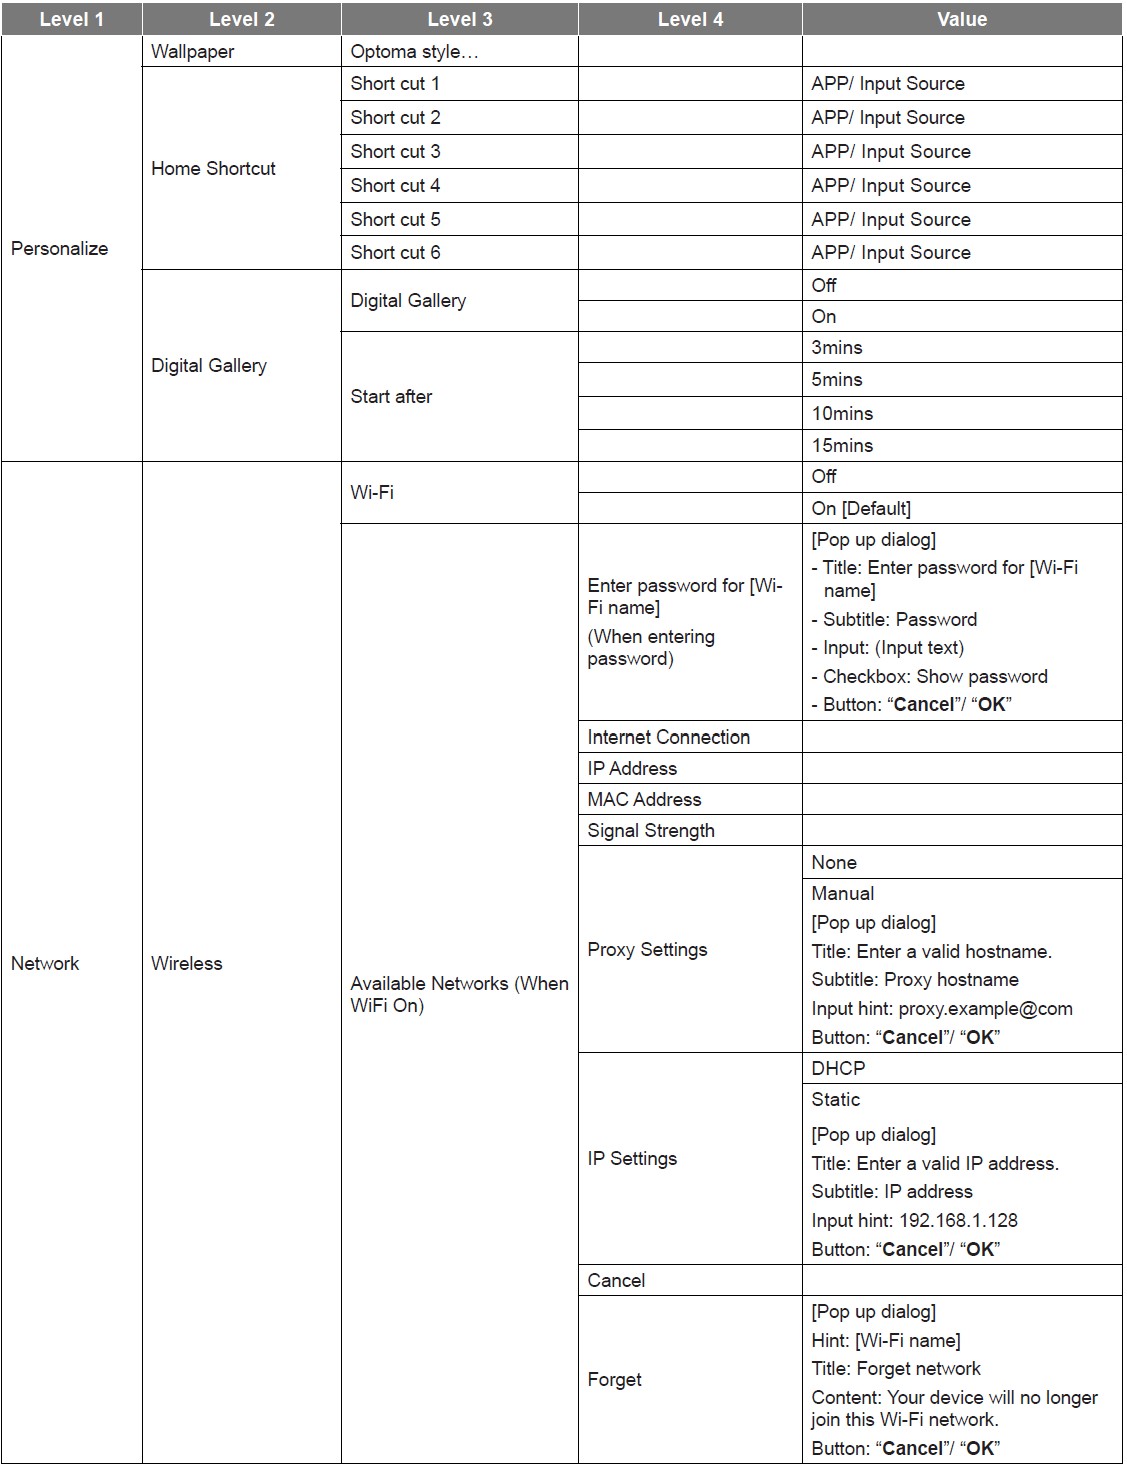

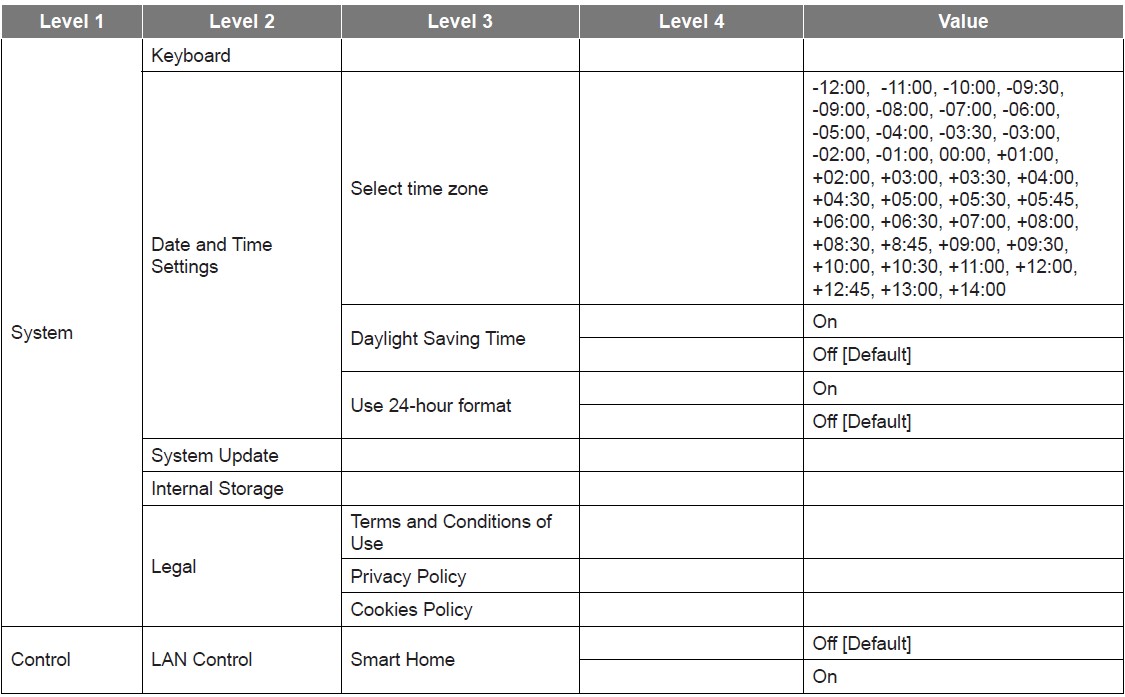
Note:
Functions vary depending on model definition.
Disabling Smart Home will disable the ability to power on the projector using Alexa Smart Home or Google Action “power on” command (Example: Alexa, turn on projector).
Personalize menu
Home Shortcut
Review Home screen shortcuts of all opened apps in each input source. The items cannot repeat except for “Automatic” option which means the system will remember up to six latest apps that have been opened and then will replace app shortcuts so that the latest app will be the first app in the apps list while other apps in the list are shifted by one position.
Digital Gallery
Blanks the screen when the projector has been idle for a long time.
- Digital Gallery: Choose “On” to enable the Digital Gallery function.
- Start after: Set the wait time before activating the Digital Gallery function.
Network menu
Wireless
Configure wireless network settings.
- Wi-Fi: Set the Wi-Fi option to “On” to enable wireless network feature.
- Available Network SSID: Select your desired wireless access point and enter or configure the necessary connection parameters (if required), for example password, proxy settings, and IP address. For information, you can review the signal strength.
Choose “Cancel” to return to the Network menu without saving settings. Choose “Forget” to delete the wireless network profile.
Note: Whenever you need to input symbols, the system will automatically pop-up an onscreen
keyboard. - Other Options: Configure advanced wireless network settings, such as “Connect via WPS”, “Connect via WPS (Enter PIN)”, “Add New Network” (manually enter network name), and “Portable Hotspot” (configure the projector to behave as a wireless access point for other devices).
Ethernet
Configure wired network settings.
Note: Make sure you have connected the projector to local area network (LAN). Please refer to page 15.
- Network Status: Display the network connection status (read-only).
- MAC Address: Display the MAC address (read-only).
- Proxy Settings: Provide proxy hostname, connection port and bypass proxy domains information manually if requested.
- IP Settings: Enable DHCP if you want the projector to obtain IP address and other connection parameters automatically from your network. Disable DHCP if you want to assign IP address, gateway, network prefix length, and DNS parameters manually.
- Reset: Return the factory default settings for network settings.
System menu
Keyboard
Select the keyboard language.
Date and Time
Configure date and time settings.
- Select time zone: Select the time zone in your location.
- Use 24-hour format: Set to “On” to display time in 24-hour format. Set to “Off” to display time in 12-hour format (AM/PM).
- Choose date format: Choose your preferred date format.
System Update
System will look for updates automatically every time the projector is connected to the Internet (OTA).
Internal Storage
View the internal storage usage.
Legal
Review legal documents including “Terms and Conditions of Use”, “Privacy Policy”, and “Cookies Policy”.
Note: You can review legal documents online as well. Please refer to the following web addresses:
- Terms and Conditions of Use: https://www.optoma.com/terms-conditions/ .
- Cookies Policy: https://www.optoma.com/cookies-policy/ .
- Privacy Policy: https://www.optoma.com/software-privacy-policy/ .
Control menu
LAN Control
- SmartHome: Set to “Off” to turn off all control via “IoT”, including “InfoWall”.
Selecting an input source
You can select any input source directly on the Home screen using an input shortcut.
Note: You can personalize shortcut settings in “System Settings menu to Personalize to Home Shortcut”. You can also modify the shortcut order on the Home screen.
If the desired input source is not visible on the Home screen, select “ ” to view all input options. Then select your input source or select “HOME” to return to the Home screen.
Selecting an app
You can select any app directly on the Home screen using an app shortcut.
Note: You can personalize shortcut settings in “System Settings menu to Personalize to Home Shortcut”.
If the desired app is not visible on the Home screen, select “ ” to view all installed apps. Then select your desired app.
Creative Cast
To get the App, you can do either of the following:
- if you are using the mobile device, scan the QR code on the screen.
- if you are using the computer, simply go to the link.
Then install the Creative Cast app in your computer or mobile device.
Before you get started, make sure to connect your computer or mobile device to the same Wi-Fi as the projector. Then follow the on-screen instructions to operate the App.
Note: For initial activation of the iOS screen mirroring function, please ensure the projector is connected to the internet, then launch the Creative Cast app. You are only required to perform this initial step once and after the initial connection is established, the Creative Cast app does not need to be open for future use of the iOS screen mirroring function.
Optoma Marketplace
With the Optoma Marketplace app, you can search and install any App.
File Manager
With the File Manager app, you can manage the files stored in the internal storage, external storage, and cloud storage.
Media
With the Media app, you can play the multimedia files by connecting a USB storage with multimedia content to the projector. Then open the multimedia player app and select the desired files to play.
Supported multimedia formats
If you want to play multimedia files, connect a USB storage with multimedia content to the projector. Then open the multimedia player app and select the desired files to play.
The projector supports the following multimedia formats: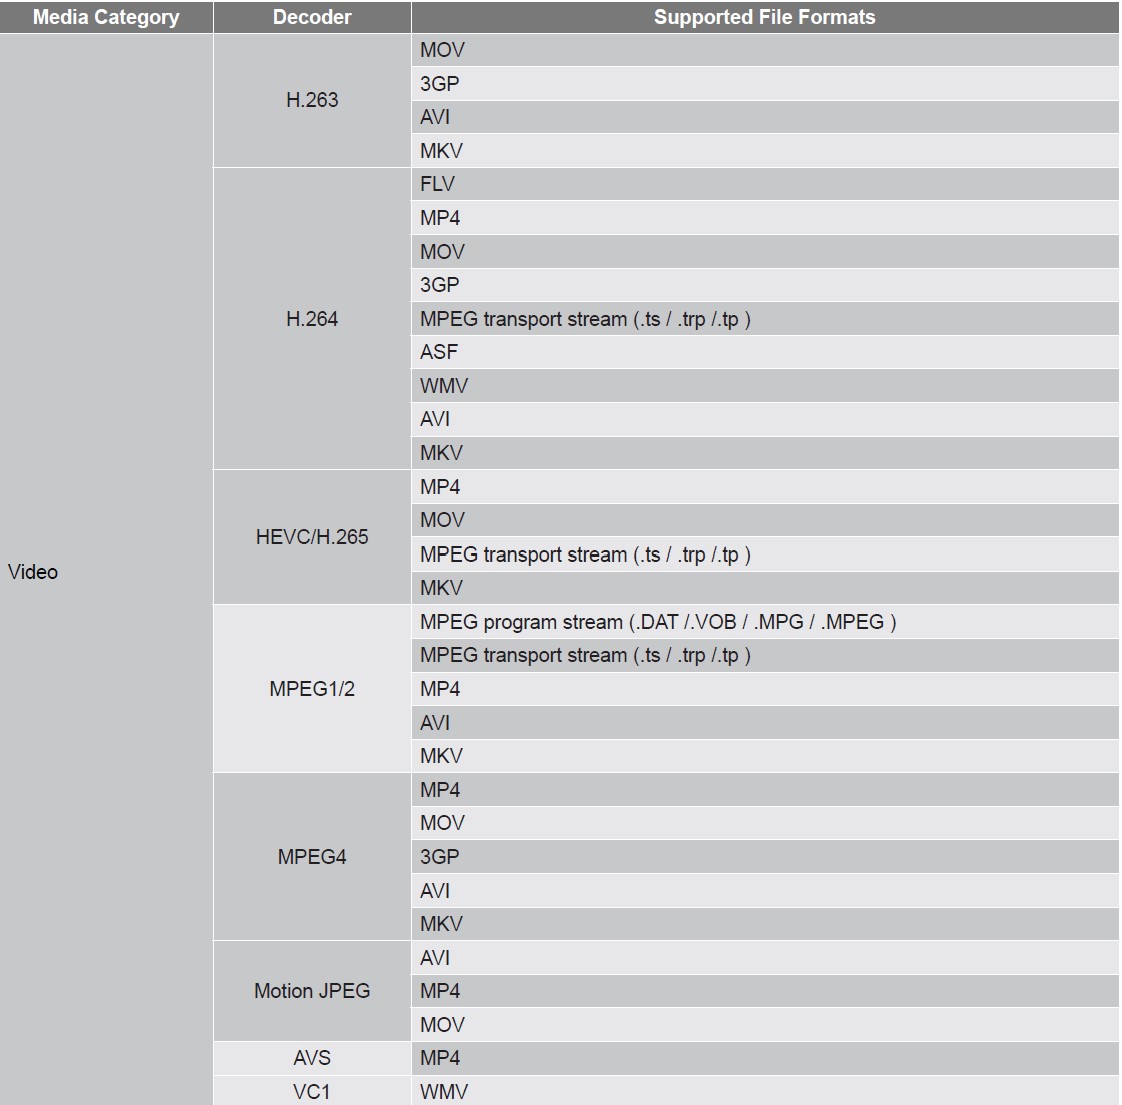

Note:
- All multimedia files listed above.
- This system no support Dolby, it means there is no sound output when audio format included the Dolby streaming.
Picture
Doc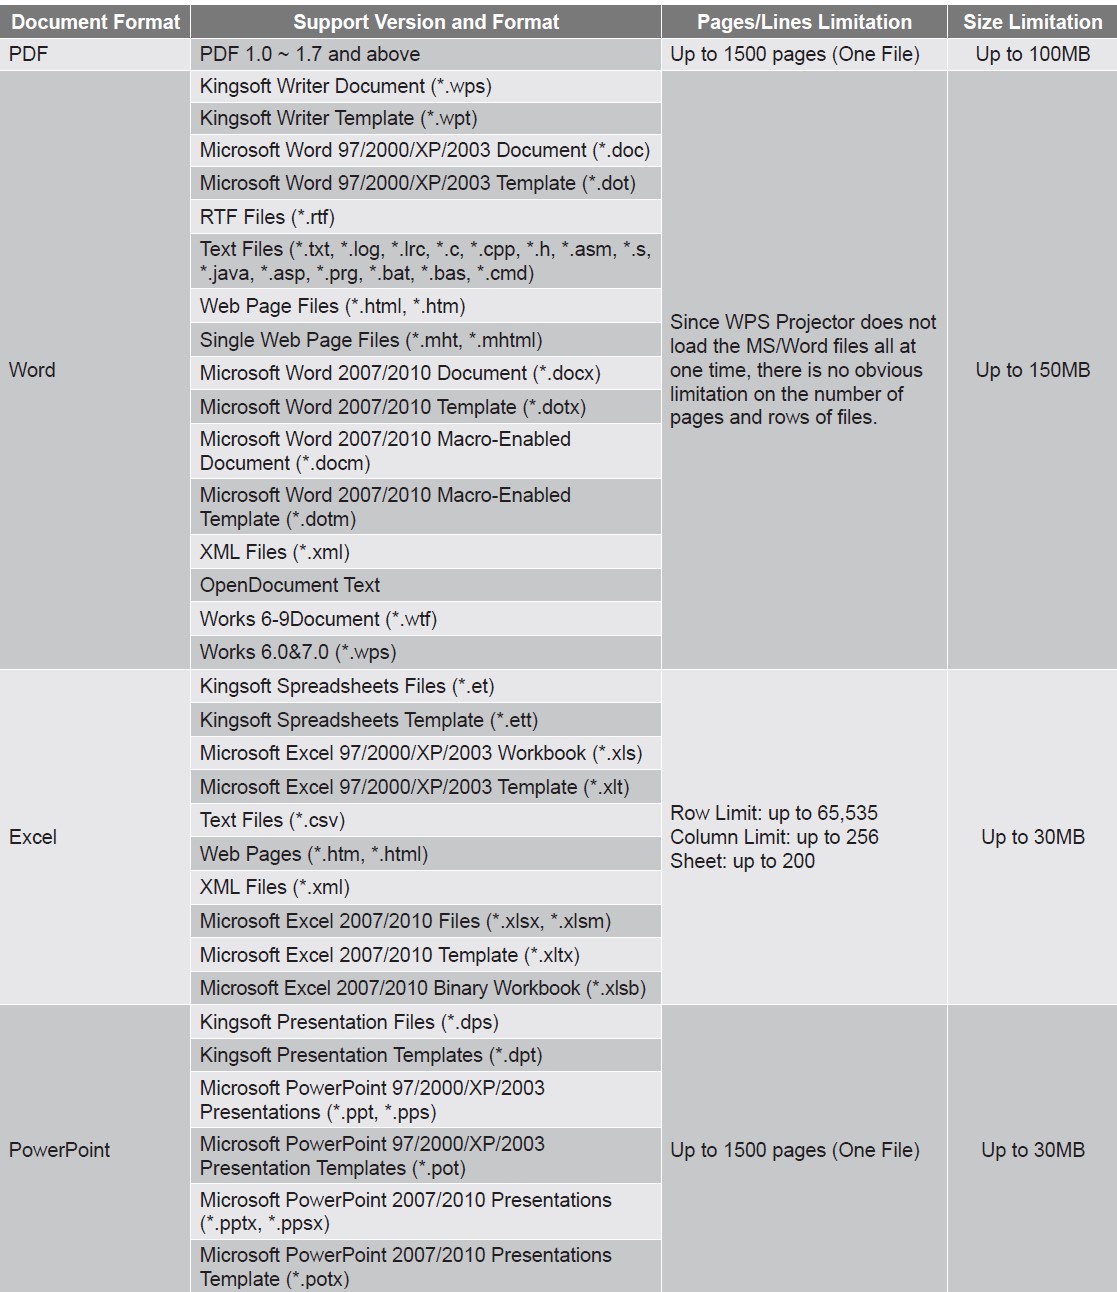
Note:
- Decoding may take a while for large files with complex contents.
- Objects embedded in files cannot be activated or viewed.
- For Microsoft Word
- No support for advanced settings, such as drawing plug-in or table background settings.
- Contents outside the defined borders in Microsoft Word will not be displayed.
- Not support Bold Text in Simplified Chinese font.
- For Microsoft PowerPoint
- Slide effects not supported.
- Password-protected sheets are not protected.
- Powerpoint animation is not supported.
- For Microsoft Excel
- Worksheets are displayed individually and sequentially when the workbook has multiple worksheets.
- Page layout and numbering may be changed during decoding.
Viewing the status bar
By default, the Status Bar on the Home screen contains icons indicating connection status regarding wired network, USB, and wireless network. You can select any of the icons to open the associated menu. Selecting wired or wireless status icon results in opening the network configuration menu, while selecting the USB status icon results in opening the browser and displaying the content of the connected USB device.
MAINTENANCE
Replacing the lamp (Maintenance personnel only)
The projector automatically detects the lifespan of the light bulb and when the light bulb is at its end, a warning message will appear on the screen.
When this message appears, please contact your local dealer or service center to replace the light bulb as soon as possible. Before replacing the light bulb, make sure to turn off the projector, unplug the power cord, and make sure the projector has cooled off for at least 30 minutes and the light bulb has completely cooled off.
Warning: If ceiling mounted, please use caution when opening the lamp access panel. It is recommended to wear safety glasses if changing the bulb when ceiling mounted. Caution must be used to prevent any loose parts from falling out of projector.
Warning: Lamp compartment is hot! Allow it to cool down before changing lamp!
Warning: To reduce the risk of personal injury, do not drop the lamp module or touch the lamp bulb. The bulb may shatter and cause injury if it is dropped.
Replacing the lamp (continued)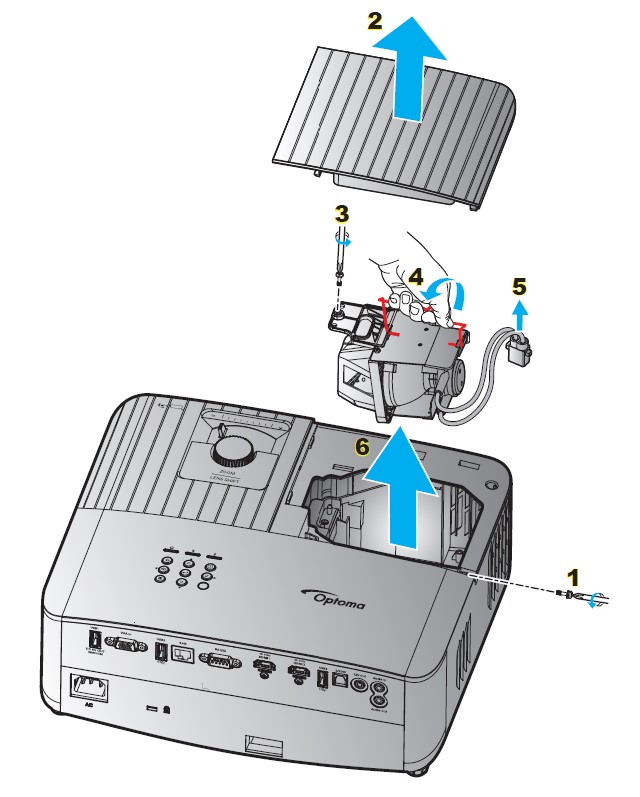
Procedure:
- Switch off the power to the projector by pressing the “power” button on the projector keypad or the “i” button on the remote control.
- Allow the projector to cool down for at least 30 minutes.
- Disconnect the power cord.
- Remove the screw securing the top cover. 1
- Remove the lamp cover. 2
- Remove the screw on the lamp module. 3
- Lift up the lamp handle. 4
- Remove the lamp cord. 5
- Remove the lamp module carefully. 6
- To replace the lamp module, reverse the previous steps.
- Turn on the projector and reset the lamp timer.
- Lamp Reset:
- Press “Menu”
- Select “Setup”
- Select “Lamp Settings”
- Select “Lamp Reset”
- Select “Yes”.
The projector cannot be turned on if the lamp cover has not been placed back on the projector.
Do not touch the glass area of the lamp. Hand oil can cause the lamp shatter. Use a dry cloth to clean the lamp module if it was accidentally touched.
Specifications
Note: All specifications are subject to change without notice.
FAQS About Optoma UHD55 4K Ultra HD DLP Projector
Can the Optoma UHD55 be put on the ceiling?
The UHD55 is simple to put up on a table, or you may purchase a bracket and install it to the ceiling.
What is the Optoma UHD55’s refresh rate?
PC gamers have the option of a refresh rate up to 240 Hz and a refresh rate of 120 Hz at 1080p.
What Optoma UHD55 settings work best?
The most balanced image was produced by choosing Standard gamma, which is 2.2 in the gamma menu, or 2.4 in conjunction with Eco+ or Dynamic Brightness Mode with Brilliant Color set to 1 for SDR and 9 for HDR.
What is the Optoma UHD55’s contrast ratio?
1.2million:1
How long does a projector bulb from Optoma last?
4,000/10,000/15,000 hours
Can a projector be wall-mounted?
By installing your projector, you not only maximize the space in your room but also create the ideal viewing angle.
Is Optoma a reliable name?
One of the top five best manufacturers of home theater projectors is BenQ, followed by Epson and Optoma.
True 4K projectors from Optoma?
Optoma DLP projectors offer True 4K UHD resolution that has been certified by the Consumer Technology Association (CTA)®.
Lens shift is there in Optoma?
horizontal lens shift
Describe the Optoma projector.
A worldwide corporation called Optoma focuses on the promotion and selling of large-format display products and services.
For more manuals by Optoma, Visit Manualsdock
[embeddoc url=”https://manualsdock.com/wp-content/uploads/2023/09/Optoma-UHD55-4K-Ultra-HD-DLP-Projector-User-Manual.pdf” download=”all”]


