![]()
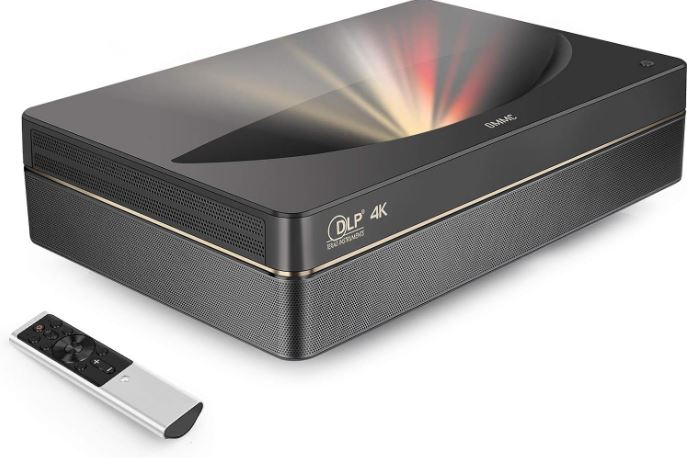
OMMC 4K UHD Laser TV Home Theatre Projector
Packaging Overview
The packing box of this machine contains the following items. Please check carefully whether the following items are complete. If there are any missing items, please contact your local distributor.

Product Introduction
Product Specification 
Appearance
- Main Unit Structure
Figs. 1 to 4 Structure

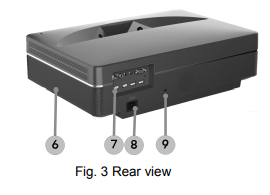
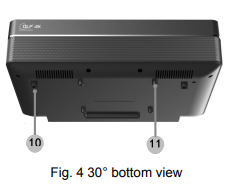

- Ports


Note
As the starting current of the USB mobile hard disk is big, when the file in the USB mobile hard disk is playing in the device, please do not plug another USB mobile hard disk into/out other USB interfaces, to avoid damaging the device or causing other malfunctions.
- Remote Control


Matching of remote control
Bluetooth remote control is adopted in this device, the remote control can be used after being matched with the device. When starting up the device for the first time and the main unit is not matched with the remote control, please match by following the steps as below.
- a. Press the “ON/OFF” key of the main unit to start up the device;
- b. Carry the remote control towards the device and hold it within 50 cm right ahead of the main unit, press the “Menu” key and “Volume -” key at the same time and hold for more than three seconds;
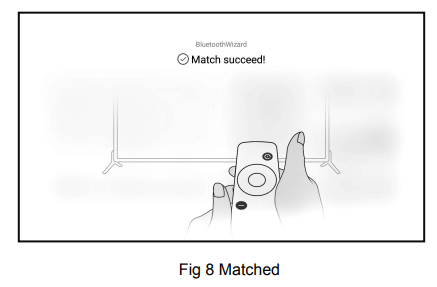
- c. Remote control indicator will flash quickly and the remote control will enter the matching mode; d. When the remote control indicator lights up for a long and the screen will display as Fig 7, loosen the keys and wait for a connection;
- e. The indicator of remoter control will go out, and the tip of “Match succeed” is displayed on the screen, which means the matching is completed;
- f. The remote control can be used to control the device only when the matching is completed. In case the matching is failed, it is required to make the matching again.

Installation and Commissioning
Installation
According to different application scenarios, the machine supports four installation methods: desktop front projection, desktop back projection, lifting front projection, and lifting back projection.
- Installation Method
The display mode (front desktop, rear lifting, front lifting, and rear desktop) needs to be changed and set from the OSD menu due to different applications.


- Screen Size and Installation Distance
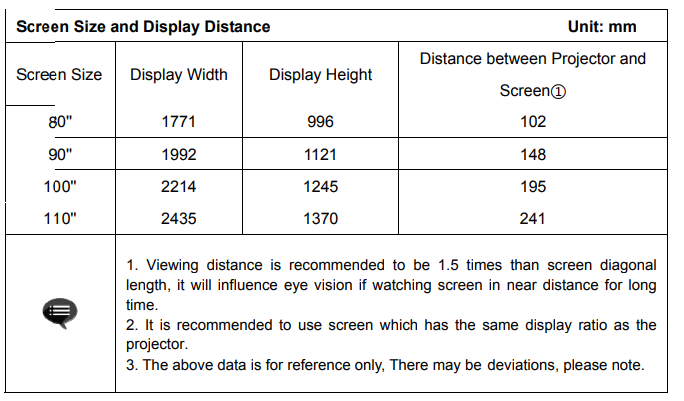
The distance between the projector and the screen is proportionate to the display size, the closer the projector and the screen, the smaller the display size. Conversely, the bigger the display size. Please read the screen user manual carefully before installing, Laser Theater is a precise optical device, and it is recommended to be installed by authorized professional technicians. Please follow the below steps to install.
- Confirm display size and projector position: confirm display size and projector position according to screen size and installation environment.
- Image position: put projector onto TV bench, adjust focus to make the image, and move the projector to confirm image size(same as screen display area) and position.
- Projector position: Mark projector position, easy to recover if projector moving is required.
- Screen position: keep the image stable, mark the screen position with the help of the screen user manual, and move away from the projector. Screen installation: install the screen according to the screen user manual.
- Projector position: put the projector back in the place that we marked.
- Adjust the image: start the projector, adjust focusing, move the projector position, and make sure the image covers all screen surfaces.

Picture Adjustment
- Adjust Image Position
This section takes the installation method of desktop front projection as an example to explain the picture adjustment for users’ reference.
- Connect the power supply and start the main unit;
- According to the picture display, adjust the size and position of the picture by moving the main unit forward, backward, left, and right or rotating the height adjustment kickstand.
- Focus Adjustment
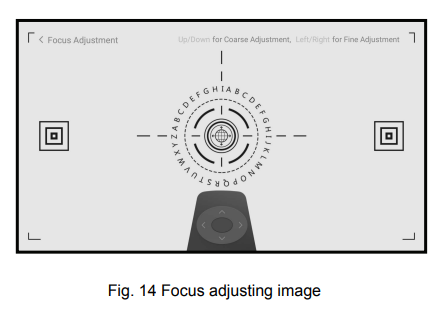
- Call up the electric focusing screen through the user menu: long press the “Menu” key of the remote control → select Display Setting → select the Electric Focusing;
- Use the Up arrow and Down arrow to make rough adjustments: Use the “Up/Down” key in the remote control to select the “Up/Down” arrow→press the “OK” key time after time to adjust the image into approximately clear (judging by observing the definition in the center of the image);
- Afterwards, use the Left arrow and Right arrow to make fine adjustments: Use the “Left/Right” key in the remote control to select the “Left/Right” arrow→press the “OK” key time after time to adjust the image definition into the optimum;
- In case the definition still cannot reach the ideal status, it is required to repeat steps b and c.
Operating Instructions
Prompt Information
- Some options in the user’s operation interface are not selectable, displayed, or hidden automatically in different models, signal sources, or states
- The user operation interface can be updated through software upgrades. If there is any difference between the user manual and the final product, the actual display shall prevail
Basic Settings Menu
- Under the program source and local media, press the “Menu” key to open the “Settings” menu, and press the “Up/Down” key to cycle through the adjustment items of the first-level menu, and press the “OK” key or the “Right” key to enter the next-level menu. When any parameter adjustment option is selected, press the “OK” key to confirm the selection or enter for adjustment, and then use the arrow key and the “OK” key to adjust;
- Under any scene, long press the “Menu” key to call up the “All Settings” menu, press the “Up/Down” key to select various menus, and then press the “OK” key to enter;
- The parameters such as sound, image, network, system, etc. can be set in the “Settings” and “All Settings” menus;
- After completing the required operations, press the “return” key to return to the previous menu interface step by step, or press the “Menu” key to exit the menu directly.
System Home Page
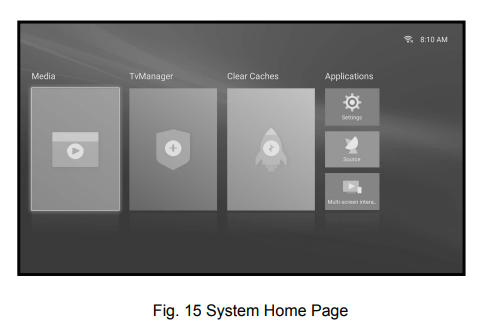
- Press the “Home” key to enter the “Main Scene” interface;
- There are icons such as Media, TVManager, Clear Caches, Applications, etc. The home menu can be configured according to specific requirements.
Safety Precautions
This machine contains a laser module. For your safety, please follow the following tips.

Precautions
- As with any bright light source, do not stare into the beam, R2 IC 62471-5:2015
- When the machine is moved from a low-temperature environment to a high-temperature environment, condensation may occur inside the machine Please do mat use it immediate
- In case of any abnormality or malfunction, such as no image, no sound, smoking, or unusual odor, please disconnect the power supply immediately, unplug and contact our after-sales service personnel to open the machine for inspection
- Do not block the air vent and install the machine in a well-ventilated place to prevent the machine from overheating
- Do not use flammable materials such as books and cardboard to block the light beam emitted by the machine. Flammable materials may melt or ignite objects or even cause fire when exposed to the light beam for a long time
- Do not place the machine directly in areas with poor ventilation such as carpets, cushions, bookshelves, or closets.
- To facilitate ventilation, please ensure that the distance between the ventilation opening of the machine and the wall is greater than 30cm
- Do not place flammable spray or other flammable substances beside this machine
- If there is a gas leak, please do not touch or switch the wall socket. Open the window immediately for ventilation
- Do not touch or wipe the lens with your hands or an ordinary cleaning cloth. To remove dust from the lens. please use an ear syringe ball
- When installing the machine by hoisting, professional technicians shall use corresponding professional tools for installation Improper installation may cause the machine to fall, thus causing personal injury or damage to the machine
- Please contact your dealer for inspection, adustment, or maintenance. The non-professional operation may cause electric shock o damage to the machine
Recycling
- It indicates that packaging materials can be recycled, please do not discard them at will
- It indicates that the environmental protection service life of the product is 10 years under normal working and using conditions, and the product can be used safely within the environmental protection service life
- To protect the environment, used batteries and products can be recycled by regular dealers or manufacturers. Please do not discard them at will
Warranty Service
If the product fails during use, or if you have any comments or suggestions, please contact an authorized dealer or seller. Regarding the after-sales service including installation, service, and maintenance, please refer to the local country (region) laws and the local authorized dealer’s policy.
FAQS About OMMC 4K UHD Laser TV Home Theatre Projector
Are separate screens necessary for laser projectors?
Some Laser TVs have their own screens built in, while others need you to purchase a screen separately.
How long is the lifespan of a laser projector?
around 20 000 to 30 000 hours
How long does a 4K projector last?
The 4K laser projector has a light source life of 20,000 hours, or four hours every day for thirteen years.
What advantages can 4K projectors offer?
Users can modify the size to suit the requirements of the space and the situation.
Can laser TV be used without a screen?
Technically, an ultra-short-throw laser projector can be used without a screen.
Are laser projects safe for the eyes?
The Eyes Are Safer With A Laser Projector Than A TV
Do laser projectors require upkeep?
On the other side, laser projectors require very little or no maintenance.
Are new bulbs required for laser projectors?
Due to the absence of bulbs, laser projectors require little maintenance.
How is a laser projector maintained?
To avoid the projector overheating because of obstructed airflow, you might need to clean the lens from time to time in addition to the air filter and air vents.
Can the bulbs in laser projectors be changed?
There are no upkeep or lamp replacement charges with laser projectors.
For more manuals by OMMC, Visit Manualsdock
[embeddoc url=”https://manualsdock.com/wp-content/uploads/2023/10/OMMC-4K-UHD-Laser-TV-Home-Theatre-Projector-User-Manual.pdf” download=”all”]


