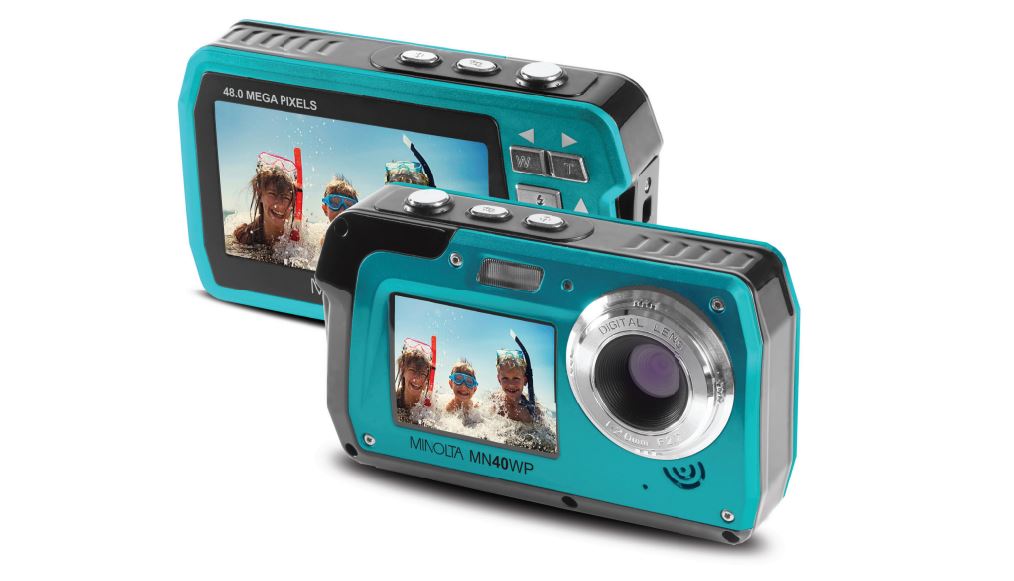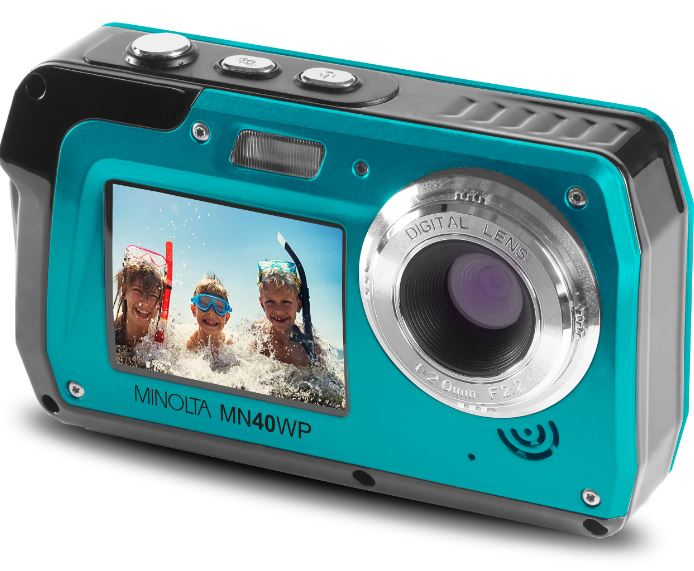
Minolta MN40WP 48 MP Dual Screen Digital Camera
About Minolta
Minolta Corporation was a Japanese manufacturer of cameras, camera accessories, photocopiers, and other optical and imaging equipment. The company has a rich history dating back to its founding in 1928 by Kazuo Tashima under the name “Nichidoku Shashinki Shōten” (Japan-Germany Camera Store). It later adopted the name Minolta, derived from “Mechanism, Instruments, Optics, and Lenses by Tashima.”
1. About Your Camera
About this Manual
Congratulations on purchasing the Minolta MN40WP Waterproof Camera! The contents of this manual are subject to change without notice. Note that the example screens and product illustrations shown in this User’s Guide may differ somewhat from the screens and configuration of the actual camera.
FEDERAL COMMUNICATIONS COMMISSION INTERFERENCE STATEMENT
This equipment has been tested and found to comply with the limits for a Class B digital device, under Part 15 of the FCC Rules. These limits are designed to provide reasonable protection against harmful interference in a residential installation. This equipment generates, uses, and can radiate radio frequency energy and, if not installed and used by the instructions, may cause harmful interference to radio communications. However, there is no guarantee that interference will not occur in a particular installation. If this equipment does cause harmful interference to radio or television reception, which can be determined by turning the equipment off and on, the user is encouraged to try to correct the interference by one or more of the following measures:
- Reorient or relocate the receiving antenna.
- Increase the separation between the equipment and the receiver.
- Connect the equipment to an outlet on a circuit different from that to which the receiver is connected.
- Consult the dealer or an experienced radio/TV technician for help.
CAUTION
Any changes or modifications not expressly approved by the party responsible for compliance could void the user’s authority to operate the equipment. This device complies with Part 15 of the FCC Rules. Operation is subject to the following two conditions:
- This device may not cause harmful interference and
- This device must accept any interference received, including interference that may cause undesired operation.
RF Exposure Warning
This equipment complies with FCC RF radiation exposure limits set forth for an uncontrolled environment. This equipment must be installed and operated according to the provided instructions and must not be co-located or operated in conjunction with any other antenna or transmitter. End-users and installers must be provided with antenna installation instructions and transmitter operating conditions for satisfying RF exposure compliance.
- FCC: SAR
- standard Value: 1.6 W/Kg,
- Maximal Measure: 0.4 W/kg
CE Mark Warning
This is a Class B product, in a domestic environment, this product may cause radio interference, in which case the user may be required to take adequate measures.
Safety and Handling Precautions
Camera Information
- Do not disassemble or attempt to service the camera yourself.
- Do not expose the camera to moisture, or extreme temperatures.
- Allow the camera to warm up when moving from cold to warm temperatures.
- Do not touch or put pressure on the camera lens.
- Do not expose the lens to direct sunlight for extended periods.
- Do not use abrasive chemicals, cleaning solvents, or strong detergents to clean the product. Wipe the product with a slightly damp soft cloth.
- Do not use the flash or LED Light near a person’s eyes to prevent possible eye injury.
- To prevent you from falling over or resulting in a traffic accident, please do not use the camera while you are walking, driving, or riding a vehicle.
- Please handle the camera strap with care, and never place the strap around the neck of an infant or child. Wrapping the strap around a neck may cause suffocation.
- Do not subject the LCD screen to impact.
- To prevent the risk of fire or electric shock, do not expose the inside of this product to rain or moisture.
Battery Information
- Turn off the camera before installing or removing the battery.
- Use only the provided batteries or the type of battery and charger that came with your camera. Using other types of battery or charger may damage the device and invalidate the warranty.
- Inserting the battery upside down can cause damage to the product and possibly cause an explosion.
- When the camera is used for an extended period, it is normal for the camera body to feel warm.
- Download all pictures and remove the battery from the camera if you are going to store the camera for a long period.
- Risk of explosion if the battery is replaced by an incorrect type. Dispose of used batteries according to the instructions.
- Please keep the batteries out of the reach of children to prevent them from swallowing the batteries, which might cause poisoning.
- If the battery’s color or shape changes in any way, stop using the battery immediately.
USB Adaptor Information
- Do not expose the adapter to high temperatures or moisture places. Otherwise, it may cause fire or electric shock.
- Do not attempt to repair, disassemble, change, or transform the adapter.
- Avoid sudden temperature changes, which may cause condensation on the adapter’s internal surfaces. Please do not use it immediately in this situation.
- Do not touch the plug with wet hands. Otherwise, it may cause electric shock.
- Do not use the travel voltage converter or AC/DC power inverter. Otherwise, it may cause damage, overheating, malfunction, or fire to the camera.
The camera can shoot images underwater at a depth of 3m (10ft) for up to 60 minutes.
- Do not drop the camera, strike it against a hard object such as a rock, or throw it against a water surface.
- Do not subject the camera to shock when using it underwater. x Do not expose to depths greater than 3m (10ft) underwater.
- Do not continuously use the camera underwater for 60 minutes or more.
- Do not insert a wet memory card or battery in the camera.
- Do not open the battery cover when the camera or your hands are wet. Doing so may cause water to seep inside the camera or result in camera malfunction.
- Do not open the battery cover underwater.
Notes about Opening and Closing the Battery Door
- Make sure the camera and your hands are not wet.
- Make sure that there is no debris inside the battery chamber or memory card slot.
- Make sure that the battery cover is firmly closed and the security lock is in the lock position.
To Unlock the Battery Door
Unlock the battery door by sliding the battery door notch away from the opening. Use a fingernail or other pointy object when sliding the latch to get a better grip.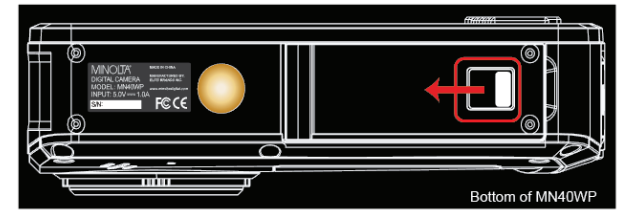
To Lock the Battery Door
- Press the battery door down firmly until it is completely flat.
- While the battery door is pressed down, slide the door latch into the locked position as shown in the figure below. Use a fingernail or other pointy object when sliding the latch to get a better grip. The battery door is fully locked once the latch clicks into place.

Precautions When Cleaning
- Do not puncture the microphone or speaker openings with a sharp implement.
- If the inside of the camera is damaged, the waterproof performance will deteriorate.
- Do not use soap, natural detergents, or chemicals such as benzene for cleaning.
Do Not Apply a Strong Impact to the Camera
The product may malfunction if subjected to strong shock or vibration. In addition, do not touch or apply force to the lens.
Avoid Sudden Changes in Temperature
Sudden temperature changes, such as when entering or leaving a heated building on a cold day, can cause condensation to form inside the device. To prevent condensation, place the device in a carrying case or a plastic bag before exposing it to sudden changes in temperature.
Do Not Point the Lens at Strong Light Sources for Extended Periods
Avoid pointing the lens at the sun or other strong light source light sources for extended periods when using or storing the camera. Intense light may cause the image sensor to deteriorate or produce a white blur effect in photographs.
The Battery
Precautions for Use
- Note that the battery may become hot after use.
- Do not use the battery at ambient temperatures below 0°C (32°F) or above 40°C (104°F) as this could cause damage or malfunction.
- If you notice any abnormalities such as excessive heat, smoke, or an unusual smell coming from the battery, immediately discontinue use and consult your retailer.
- After removing the battery from the camera or optional battery charger, put the battery in a plastic bag, etc. to insulate it.
Charging the Battery
Check the battery level before using the camera and replace or charge the battery if necessary.
- Charge the battery indoors with an ambient temperature of 5°C (41°F) to 35°C (95°F) before use
- A high battery temperature may prevent the battery from charging properly or completely and may reduce battery performance. Note that the battery may become hot after use; wait for the battery to cool before charging. When charging the battery inserted into this camera using the Charging AC Adapter or a computer, the battery is not charged at battery temperature below 5°C (41°F) or above 55°C (131°F).
- When the battery is between 45°C (113°F) – 55°C (131°F), the chargeable capacity may decrease. x Do not continue charging once the battery is fully charged as this will result in reduced battery performance.
- The battery temperature may increase during charging. However, this is not a malfunction.
Cleaning After Using the Camera Underwater
Follow the procedure below to rinse the camera with fresh water within 30 minutes after using it under saltwater or at the beach.
- Keep the battery cover closed and wash off the camera with fresh water. Immerse the camera in a shallow basin filled with fresh water for 10 minutes.
- Immerse the camera in fresh water and shake it sufficiently in the water to remove any foreign substances from the camera.
- When the camera is immersed in the water, a few air bubbles may come out from the water drain holes of the camera such as openings in the microphone or speakers. This is not a malfunction.
- Wipe off water droplets with a soft cloth and dry the camera in a well-ventilated and shady place.
- Place the camera on a dry cloth to dry it.
- Do not dry the camera with hot air from a hair dryer or clothes dryer.
- After making sure that there are no water droplets on the camera, open the battery cover and use a soft dry cloth to gently wipe off any water or sand remaining on the waterproof packing or inside the camera.
Storage
If you do not intend to use the camera for an extended period, remove the battery and avoid storing the camera in any of the following types of locations:
- Places that are poorly ventilated or subject to humidity of over 60%
- Place exposed to temperatures above 50°C (122°F) or below -10°C (14°F).
- Place next to equipment that produces a strong electromagnetic field, such as television or radios.
To prevent mold or mildew, take the camera out of storage at least once a month, and turn it on, and release the shutter a few times before putting it away again.
Camera Interface
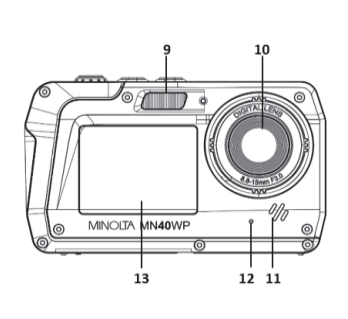

- Zoom Out / Left
- Zoom In / Right
- Flash / Up
- Delete / Down
- Mode
- Settings / OK
- Indicator light
- Main LCD Screen
- LED Flash
- Lens
- Speaker
- Microphone
- Front LCD Screen
- Power
- Switch Screen
- Shutter
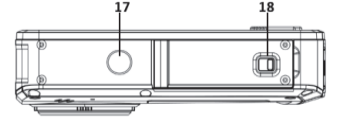
- Tripod Mount
- Battery Cover/Lock
Button Function Description

2. First Use
To Open the Battery Door
Unlock the battery door by sliding the battery door notch away from the opening. Use a fingernail or other pointy object when sliding the latch to get a better grip.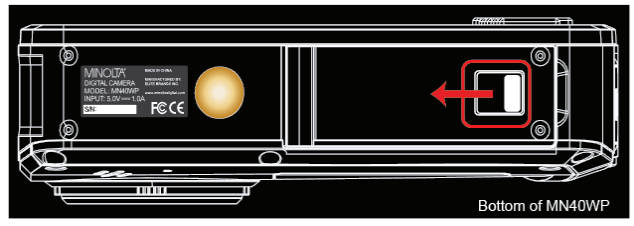
Installing the Battery
Insert the lithium-ion battery into the battery compartment with the metal contacts facing the inside of the camera. The battery can only inserted one way.
Installing the Memory Card
Insert the included Micro SD memory card to record and store your videos and photos. When the battery is low, media stored on the memory card will not be erased. Please insert the SD memory card by following the steps below:
- Open the battery door by following the diagram above.
- Insert the memory card. Ensure that the metal contacts are inserted first. Push the memory card down until you hear an audible click.
The memory card can only be inserted in one way. Do not force the card in if it will not go in smoothly. - Close the memory card door by pushing it down and sliding the lock back into place.
- To remove the memory card, simply push in and the card will eject back out.

NOTE: After closing the battery door, make sure that the door is closed securely and the lock engaged. Failure to do this can allow water to enter the camera and damage it.
To Lock the Battery Door
- Press the battery door down firmly until it is completely flat.
- While the battery door is pressed down, slide the door latch into the locked position as shown in the figure below. Use a fingernail or other pointy object when sliding the latch to get a better grip. The battery door is fully locked once the latch clicks into place.

Charging the Battery
Connect your camera to the included AC adaptor with the USB cable provided for charging. Insert the small end of the USB plug into the camera’s port under the battery door, and the larger end into the included AC adaptor. While charging the LED indicator light will light up solid red, when finished charging the light will turn off.
Hold the POWER button for 3 seconds to power the camera on. To power the camera off, press and hold the POWER button for a further 3 seconds. If the camera’s battery is low, a “Low Power” message will display on the screen and it will automatically shut down within a few seconds to prevent memory corruption or loss.
Switching Modes
Press the MODE button to cycle between Photo, Video, and Playback Modes. The corresponding mode will be displayed in the top left corner of the screen.
Connecting to a Computer
Your camera can connect to a computer to transfer photo and video files for viewing and editing, as shown below. Once connected and powered on, the camera’s screen will enter “Mass Storage” mode automatically.
Using the Zoom Function
This camera has a digital zoom function. To operate the zoom function, press the ZOOM-IN button to zoom in closer to the subject, and press the ZOOM-OUT button to zoom away from the subject.
Photo Mode
Press the MODE button to switch to Photo Mode. The meaning of each icon within Photo Mode is explained in the table below: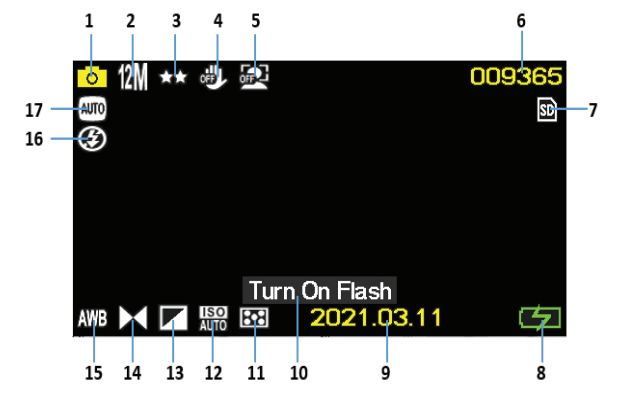
- Photo Mode
- Image Size (Resolution)
- Image Quality
- Anti-Shake
- Face Detect
- Pictures Remaining
- Memory Card Inserted
- Battery Level
- Current Date
- Flash Needed
- Metering
- ISO
- Light Exposure
- Image Sharpness
- White Balance
- Flash Status
- Scene
Video Mode
Press the MODE button to switch to Video Mode. The meaning of each icon within Video Mode is explained in the table below:
- Video Mode
- Video Size (Resolution)
- Video Quality
- Video Time Remaining
- Memory Card Inserted
- Battery Level
- Current Date
- Metering
- ISO
- Light Exposure
- Image Sharpness
- White Balance
- Scene
3. Using the Camera
Photo Shooting
Power the camera on and it will be ready to take pictures right away. You may press the MODE button to switch to another mode.
- Line up your shot by looking at the LCD screen to see what is in the shot.
- Hold the camera steady and press the SHUTTER button to capture a photo.
- The number of photos that can be captured at a particular resolution will be displayed in the top right corner of the screen.
- A “Memory Full” message will be displayed on the screen if there is no SD card inserted in the camera’s memory card slot. A “Memory Full” message will be shown on the screen when the SD card is full.
- The number of remaining photos is determined by the selected photo resolution. The higher the photo resolution, the lower the number of photos you can save to the memory card. Before capturing any photos, you can select a preferred photo resolution.
Scene
This function adjusts the camera’s settings to predetermined values that will produce the best image for that selected scene.
- In Photo Mode press the SETTINGS button.
- Select ‘Scene’ using the LEFT or RIGHT buttons.
- Press the UP or DOWN buttons to navigate the menu, and press the OK button to confirm your selected option (Auto, Scenery, Portrait, Night Scenery, Night Portrait, High Sensitivity, Sport, Beach, Party).
- Press the MODE button to exit the settings menu.
Color Effect
This function sets the color filter effect of a photograph.
- In Photo Mode press the SETTINGS button.
- Select ‘Color Effect’ using the LEFT or RIGHT buttons.
- Press the UP or DOWN buttons to navigate the menu, and press the OK button to confirm your selected option (Standard, Sepia, Monochrome, Vivid).
- Press the MODE button to exit the settings menu.
Language
This function allows you to set the camera’s interface language.
- In Photo Mode press the SETTINGS button.
- Select ‘Language’ using the LEFT or RIGHT buttons.
- Press the UP or DOWN buttons to navigate the menu, and press the OK button to confirm your selected language.
- Press the MODE button to exit the settings menu.
Date/Time
This function allows you to set the current Date and Time on your recorded video clips and captured photos.
- In Photo Mode press the SETTINGS button.
- Select ‘Date/Time’ using the LEFT or RIGHT buttons.
- Press the UP or DOWN buttons to navigate the menu, and press the OK button to confirm your selected option (On, Off, Date Setup).
- Press the MODE button to exit the settings menu.
- To set the current date and time use the UP or DOWN buttons to select Date Setup, and press the OK button to enter the date setup menu.
- Use the UP or DOWN buttons to change the highlighted field.
- Use the LEFT or RIGHT buttons to change the selected field.
- Press the OK button to save the entered date and time and to exit the menu.
Silent Mode
This function allows you to turn off the sounds of the camera.
- In Photo Mode press the SETTINGS button.
- Select ‘Silent Mode’ using the LEFT or RIGHT buttons.
- Press the UP or DOWN buttons to navigate the menu, and press the OK button to confirm your selected option (On, Off).
- Press the MODE button to exit the settings menu
Frequency
This function sets the frequency of the camera from 50Hz to 60Hz. Please check the frequency of your location and set it accordingly.
- In Photo Mode press the SETTINGS button.
- Select ‘Frequency’ using the LEFT or RIGHT buttons.
- Press the UP or DOWN buttons to navigate the menu, and press the OK button to confirm your selected option (50 Hz, 60 Hz) the default frequency for the United States is 60Hz.
- Press the MODE button to exit the settings menu.
Format Memory Card
The format setting erases all photos, videos, and data stored on your memory card.
- In Photo Mode press the SETTINGS button.
- Select ‘Format Memory Card’ using the LEFT or RIGHT buttons.
- Press the UP or DOWN buttons to navigate the menu, and press the OK button to confirm your selected option (Yes, No).
- Press the MODE button to exit the settings menu
Delete
This function is used to delete photos and videos. Photos and videos can be deleted singly or all at once.
- In Playback Mode press the SETTINGS button.
- Select ‘Delete’ using the LEFT or RIGHT buttons.
- Press the UP or DOWN buttons to navigate the menu, and press the OK button to confirm your selected option (Delete This Image?, Delete All Images?, Cancel).
- Press the MODE button to exit the settings menu.
Slideshow
Photographs can be viewed as a slideshow on the camera.
- In Playback Mode press the SETTINGS button.
- Select ‘Slide Show’ using the LEFT or RIGHT buttons.
- Press the UP or DOWN buttons to navigate the menu, and press the OK button to confirm your selected option (3 Seconds, 5 Seconds, 10 Seconds).
- Press the OK button to exit the slideshow.
- Press the MODE button to exit the settings menu.
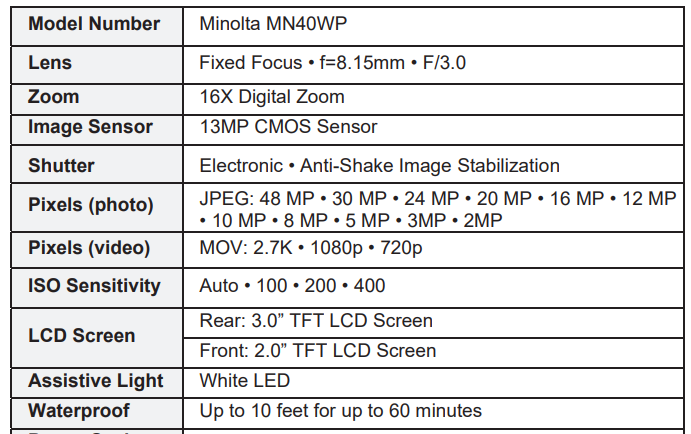
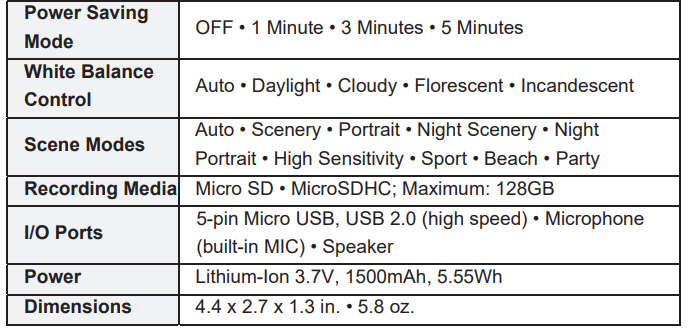
4. Technical Specifications
FAQS About Minolta MN40WP 48 MP Dual Screen Digital Camera
Do Minolta digital cameras exist?
Digital Camera Minolta MN30WP, 21 MP, 1080p HD, Waterproof.
Can a Minolta camera record?
Create 4K Ultra HD videos to capture every moment in stunning clarity.
Why do Minolta cameras work so well?
To in-body image stabilization, Shutter Priority mode, and autofocus
Can a Minolta camera be used without a battery?
Without a battery, you won’t be able to shoot in automatic.
How is the Minolta camera mounted?
SR-mount
What is a trademark of Minolta?
As a leading producer of digital and film cameras, camera equipment, photocopiers, fax machines, laser printers, industrial radiometric instruments, planetarium projection equipment, some of the first 3D scanners in the market, and other optical instruments and gadgets, Minolta is well-known throughout the world.
Which nation produced Minolta cameras?
Japan
Can a camera battery be recharged?
Anytime is a good time to refresh camera batteries.
Minolta is a brand of what?
Konica Minolta succeeded Minolta.
In what category does Minolta fall?
MD and AF are two of Minolta’s common mounts.
For more manuals by Minolta, Visit Manualsdock
[embeddoc url=”https://manualsdock.com/wp-content/uploads/2023/09/Minolta-MN40WP-48-MP-Dual-Screen-Digital-Camera-User-Manua.pdf” download=”all”]

