
Master Kitchen MKDW FI60514 ESL E Dishwasher
About Master Kitchen
Master Kitchen’s electric appliances combine cutting-edge technology with sleek design for a seamless and efficient culinary experience. From precise stovetops to smart ovens and versatile grills, these appliances cater to both novice cooks and seasoned chefs, ensuring optimal results with ease. Elevate your cooking experience with Master Kitchen’s commitment to quality and innovation.
Please read this manual carefully before using the dishwasher Keep this manual for future reference.
Thank you for purchasing a Master Kitchen appliance. By purchasing a Master Kitchen dishwasher, you have chosen a product designed in Italy and designed to clean your dishes with quality, reducing the time of housework.
CUSTOMER SERVICE AND MAINTENANCE
We remind you that to contact assistance you must dial the number 02 9624665 and you will need the following information: Model, serial number (S/N), date of purchase, and name of the dealer from which you purchased the appliance. Product information can be found on the data plate.
NOTE
- Reviewing the “troubleshooting tips” section will help you solve some problems on your own.
- If you can’t solve problems by yourself, please ask a professional technician for help.
- The manufacturer, following a policy of constant product development and updating, may make changes without prior notice.
- If the manual gets lost or is outdated, you may receive a new user manual from the manufacturer or the supplier.
SAFETY INFORMATION
Read carefully the instructions provided before installing and using the equipment. This is the only way to use the appliance safely and efficiently. The manufacturers are not liable for any injury or damage resulting from improper installation or use. Always keep the instructions in a safe and accessible place for future reference.
- Check the appliance after unpacking. Do not connect the appliance if it has been damaged during transport.
- This equipment may only be used by children from the age of 8 years and adults with limited physical, sensory, or mental capabilities or with little experience or knowledge of using the equipment if they are supervised and have understood the risks involved.
- Children under 8 years of age and people with widespread and complex disabilities should be kept away from the equipment.
- Do not allow children to play with the equipment.
- Keep the detergent out of the reach of children.
- Keep children away from the open appliance. The water inside the wash tank is not drinkable. It may contain detergent and rinse aid residues.
- Keep children and pets away from the equipment when the door is open.
- Children must not carry out cleaning and maintenance work on the appliance.
- Make sure that children do not play with the product packaging materials. They are dangerous and could cause suffocation.
- This appliance is intended for domestic use only in private houses and closed spaces and not for professional use.
- Do not change the technical specifications of the appliance.
- The water working pressure (minimum and maximum) must be between 0.04 /1.00 bar (MPa)
- Observe the maximum number of 14 place settings.
- If the power cord is damaged, it must be replaced by the manufacturer, the authorized Service Centre, or a qualified person to avoid dangerous situations.
- Place the cutlery inside the cutlery basket with the sharp ends pointing downwards, or place it in the cutlery drawer in a horizontal position with the sharp ends pointing downwards.
- If you open the appliance door while it is in operation, hot water can be sprayed out of the appliance. Carefully open the door of the appliance while the program is running.
- If overloaded, dish racks can cause the appliance to tip over. Never overload dish racks in free-standing appliances.
- Do not leave the equipment with the door open unattended to prevent anybody from tripping and falling.
- Before performing any maintenance work, turn off the equipment and pull the plug out of the socket.
- Do not use high-pressure water spray or steam to clean the appliance.
- If the equipment has ventilation openings in the base, these should not be covered by objects such as a carpet.
- The equipment must be correctly connected to the water system with the new pipes supplied. Used pipes must not be reused.
- In case of built-in installation, do not use the equipment before installation is completed, because of the safety measures.
- Follow the instructions supplied with the appliance.
- Always be careful when moving the equipment, since it’s heavy. Always wear safety gloves and appropriate footwear.
- Do not place or use the equipment in a place where the temperature may fall below 0 °C.
- Install the equipment in a safe and suitable place that meets the installation requirements.
- For disused devices, disconnect the power cord plug, then cut the power cord and destroy the door locking system of the appliance so that the door may not be closed again.
- For the installation and connection of the appliance, follow the instructions given in the operating and installation instructions. Incorrect installation may cause injury.
Power and grounding instructions
- The equipment must be grounded.
- Do not use multiple sockets and extensions.
- Make sure not to damage the plug and cable. If the electrical cable needs to be replaced, the work must be carried out by qualified and experienced personnel.
- Insert the power plug into the socket only after the installation is completed. Check that the power plug remains accessible after installation.
- Do not pull the power cord to disconnect the equipment. Always pull the plug.
WARNING – Electrical Shock Hazard and Injuries
- Connect and use the appliance only by the data on the rating plate.
- Connect the appliance to an AC mains power supply only with an earthed socket installed by standards.
- The protective conductor system of the domestic electrical system must be installed by the applicable standards.
- Never power the appliance from an external switch, e.g. an external timer or remote control.
- Incorrect installation of the appliance may cause burns.
- – In case of built-in installation, the power plug of the mains connection cable must be freely accessible, or if it is not possible to access the plug freely, an all-pole separator must be installed in the fixed electrical system by the installation regulations. The distance between the contacts must be at least 3 mm.
- When installing the appliance, make sure that the power cord does not get stuck and is not damaged.
- It is dangerous to use a power cord with an extension cord and an adapter which is not allowed. Do not use extension cables or multiple sockets. If the power cord is too short, contact a technician.
- It is dangerous to disconnect the inlet hose or immerse the Aquastop valve in water (if present).
- Never immerse the plastic housing in water. The plastic housing on the inlet hose contains an electric valve.
- Never disconnect the inlet hose. Power connection lines run through the inlet hose.
- The hinges move when opening and closing the appliance door and can cause injury.
- If under the countertop or built-in appliances are not installed in a special housing but one side of the appliance is accessible, the hinge area must be covered laterally. Covers are available from specialist dealers.
- Incorrect installation may cause the appliance to tip over.
- Only install the dishwasher under a seamless countertop, which is permanently connected to adjacent furniture.
- For free-standing appliances, make sure that the rear of the appliance rests against a wall.
Disposal
- Please go to a recycling center for the disposal of the packaging and the appliance. Then cut the power cord and make the door-locking device unusable.
- Cardboard packaging is made from recycled materials and paper and must be disposed of in the paper collection bin.
- By ensuring that this product is disposed of properly, you will help prevent potential negative consequences for the environment and human health, which could otherwise be caused by inappropriate waste management such as this product.
- For more detailed information about recycling this product, please contact your local city office and your household waste disposal service.
DISPOSAL: Do not dispose of this product as unsorted municipal waste. The collection of such waste must take place separately and with special treatment.
PRODUCT OVERVIEW
IMPORTANT To get the best performance from your dishwasher, read all the instructions carefully before using it for the first time.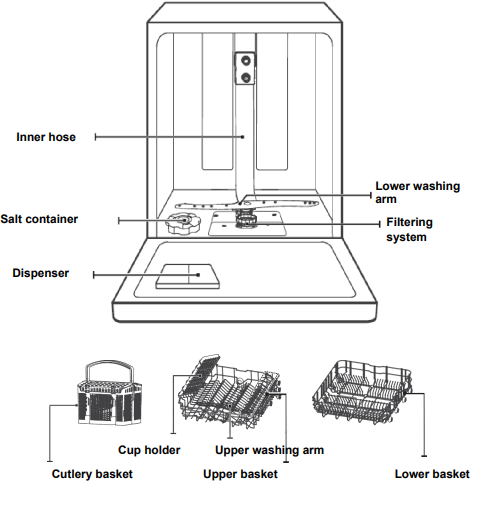
USING THE DISHWASHER
Before using the dishwasher:
- Setting the water softener
- Salt insertion
- Loading the rack
- Filling the dispenser
Salt insertion
NOTE If your model doesn’t have water softeners, you can skip this section. Always use dishwasher salt.
IMPORTANT Use only dishwasher-specific salt!
- Any other type of salt not specifically designed for use in dishwashers, particularly kitchen salt, will damage the water softener. In case of damage caused by the use of unsuitable salt, the manufacturer does not provide any warranty and is not liable for any damage caused.
- Fill the salt container first and perform a short washing cycle. This will prevent any grain of salt or salt water, which may have been spilled, from remaining at the bottom of the machine for an extended period causing corrosion.
The salt container is located under the lower basket and must be filled as explained below:
- Remove the lower basket and unscrew the tank cap.
- Insert the end of the funnel (supplied) into the hole and pour about 1.5 kg of dishwasher salt.
- Fill the salt container up to the maximum limit with water, it is normal for a small amount of water to come out of the salt container.
- After filling the container, tighten the cap firmly.
- The salt light will go out after the salt container is filled.
- Immediately after filling the salt container, a washing program should be started (we recommend using a short cycle). Otherwise, the filter system, pump, or other important parts of the machine may be damaged by salt residues. In this case, the damage caused is not covered by the warranty.
NOTE
- The salt container must only be filled when the salt control light ( ) is lit on the control panel. Depending on how the salt dissolves, the light may still be on even if the salt container is full. If there is no salt control light on the control panel (for some models), you can estimate when to fill the salt in the softener based on the cycles the dishwasher has made.
- If some salt escapes from the container, perform soaking or a quick program to remove it.
TIPS FOR ADJUSTING THE UPPER BASKET
Type 1: The height of the upper basket can be easily adjusted to accommodate taller dishes or pans. To adjust the height of the upper basket, follow the procedure below:
- Pull out the upper basket.
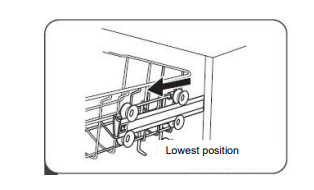
- Remove the upper basket.

- Reattach the upper basket to the upper or lower rollers.
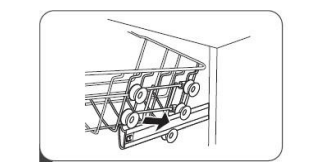
- Push the upper basket inwards.
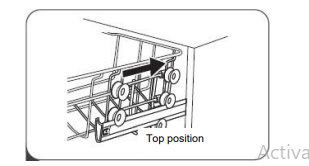
Type 2:
- To lift the basket to the top position, height. The basket will lock into place.

- To lower the basket, press lift it until both sides are at the same down and release.

MAINTENANCE AND CLEANING
External cleaning
Door and door seal
Clean the door seals regularly with a soft, damp cloth to remove food deposits. When loading the dishwasher, food, and drink residues can drip on the outside of the dishwasher door and should be removed before closing the door.
Control panel
If cleaning is necessary, use only a soft, damp cloth to clean the control panel.
IMPORTANT To prevent water from penetrating the door lock and electrical control panel, do not use spray cleaners of any kind. Never use abrasive cleaners or abrasive pads on external surfaces because they can scratch; even some paper towels can scratch or leave marks on the surface.
Internal cleaning
Filtering system
The filter system at the base of the sink retains coarse debris from the washing cycle. Coarse debris collected may cause filter clogging. Check the condition of the filters regularly and clean them under running water if necessary. Follow the steps below to clean the filters.
NOTE The images are for reference only, depending on the model purchased the filtering system and the lower wash arm may be different. The images are intended only as an example.
- Hold filter 1 and turn it counterclockwise to unlock. Lift the filter and pull it out of the dishwasher.
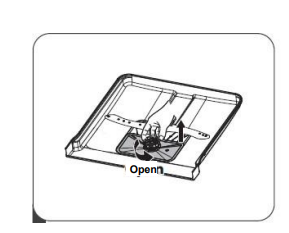
- Filter 3 can be removed from the bottom of the filter assembly. Filter 1 can be removed from filter 2 gently by pressing and turning it counterclockwise and pulling it upwards

- Larger food residues can be cleaned by rinsing the filter under running water. For more thorough cleaning, use a soft brush suitable for cleaning.

- Refit the filters on the back in disassembly order, replace and insert the filter, and turn clockwise as shown by the arrow.

IMPORTANT
Don’t overtighten the filters. Put the filters back in sequence safely, otherwise coarse debris could enter the system and cause a blockage. NEVER use the dishwasher without filters. Improper filter replacement can reduce the performance level of the appliance and create damage to dishes and tools that will not be covered under warranty.
Washing arms
The washing arms must be cleaned regularly to prevent hard water chemicals from clogging the washing arm jets and bearings. To clean the spray arms, follow the instructions below:
- To remove the upper washing arm, hold the nut in the center and turn the washing arm counterclockwise to remove it.
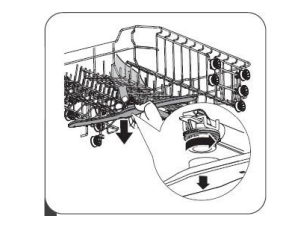
- To remove the lower washing arm, pull it upwards.

- Wash your arms with soap and warm water and use a soft brush to clean the jets. Dry them after rinsing them thoroughly.

Folding the shelves
To make room for taller objects in the dishwasher basket, lift the grill upwards. It will then be possible to place the tall glasses against it. You can even remove it when you don’t need to use it.
Folding the racks
Racks are used to hold trays and dishes. They can be lowered to create more space for large objects.
INSTALLATION INSTRUCTIONS Water supply and drainage
CONNECTION TO THE DRINKING WATER SYSTEM
NOTE If the appliance is replaced, a new water-filling hose must be used.
- Connect the appliance to a drinking water system using the components provided. Make sure that the drinking water connection is not bent, crushed, or wrapped around itself.
- Connect the cold water supply hose to a 3/4 (inch) threaded connector and make sure it is tightened correctly.
- If the water pipes are new or have not been used for a long period, let the water run to make sure it is clear. This precaution is necessary to avoid the risk of water blocking or damaging the appliance.
Information on the safety supply pipe
The safety water supply pipe consists of double walls. The hose system guarantees a preventive intervention by blocking the water flow in case of breakage and when the air space between the water supply hose itself and the external corrugated hose is full of water.
IMPORTANT A hose attached to a sink can burst if installed on the same water line as the dishwasher.
How to connect the safety water supply pipe
- Pull the safety supply pipes completely out of the storage compartment located behind the dishwasher.
- Tighten the screws of the safety supply pipe to the tap with the 3/4-inch thread.
- Run the water completely before starting the dishwasher.
How to disconnect the safety water supply pipe
- Turn off the water.
- Unscrew the safety supply pipe from the tap.
DRAINING CONNECTION
- Connect the appliance to a water-draining connection so that dirty water from the washing cycle can drain off.
- Connect the draining pipe with a diameter of 4 cm to the siphon drain sleeve.
- Make sure that the draining pipe is not bent, crushed, or wrapped around itself.
- Make sure that no plug in the drain prevents water from draining.
- The height of the draining pipe must be less than 1000 mm. The end of the pipe must not be immersed in water to prevent backflow.
- Fasten the draining pipe firmly in either position A or B
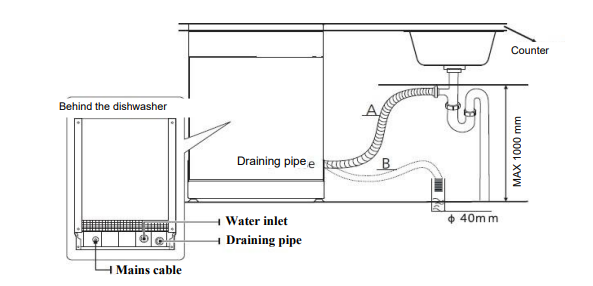
How to drain excess water from pipes
If the sink is higher than 1000 mm from the floor, excess water in the pipes cannot be discharged directly into the sink. You will need to drain excess water from the pipes into a suitable bowl or container that is held outside and lower than the sink.
Water outlet
Connect the water-draining pipe. The draining pipe must be installed correctly to prevent water leaks. Make sure that the water-draining pipe is not bent or crushed.
Extension tube
- If a draining pipe extension is required, be sure to use a similar draining pipe.
- It must be no longer than 4 meters; otherwise, the cleaning effect of the dishwasher may be reduced.
Siphon connection
The connection to the siphon trap must be 100 cm below the bottom of the dish. The water-draining pipe must be secured.
CORRECT POSITIONING OF THE DISHWASHER
Place the appliance in the desired position. The rear should rest on the wall, and on the sides, along adjacent furniture or walls. The dishwasher is equipped with a water supply and the drainpipes can be positioned on the right or left side to facilitate correct installation.
Leveling the appliance
Once the appliance has been positioned for leveling, the height of the dishwasher can be changed by adjusting the level of screwing in the feet.
NOTE Apply only on free-standing dishwashers.
Free-standing machine installation
The height of the dishwasher, 845 mm, has been designed to allow the machine to be installed between existing furniture in modern and modular kitchens. The feet can be adjusted so that the correct height is reached. The laminate top of the machine does not require special attention as it is heat-resistant, scratch-proof, and stain-resistant.
Under the existing countertop
(in case of installation under a countertop) In most modern modular kitchens there is only a single countertop under which cabinets and electrical appliances are mounted. In this case, remove the dishwasher countertop by unscrewing the screws under the rear edge of the dishwasher top (a).
Built-in machine installation
Step 1. Selecting the best installation position for the dishwasher
The installation position of the dishwasher must be close to the existing inlet and outlet pipes and the power cord. Please refer to the figures for the cabinet dimensions and installation position of the dishwasher.
- There must be a distance of less than 5 mm between the top of the dishwasher, and the cabinet, and the outside door must be aligned with the cabinet.

- If the dishwasher is installed in the corner of the cabinet, there should be some space when the door is open.
NOTE Depending on where your electrical outlet is, you might need to cut a hole in the side opposite of the cabinet.
Step 2. Dimensions and installation of the external panel
The external wooden panel could be realized according to the installation drawings.
Built-in model
Install the hook on the aesthetic wooden panel (see Figure 4) and put the hook into the slot of the outer door of the dishwasher (see Figure 4). After positioning the panel, press the top of the aesthetic wooden panel to make sure that the plastic hooks are fastened.
Step 3. Adjusting the door spring tension
- The door springs are factory-set to the correct tension for the outer door. When installing the decorative panel, adjust the door spring tension. Turn the adjusting screw to guide the regulator to stretch or relax the steel cable.
- The spring tension of the door is correct when the door remains in the fully open horizontal position, but is raised with the slight pressure of a finger.
Step 4. Dishwasher installation steps Refer to the installation steps specified in the installation drawings.
- Fix the condensation strip under the countertop of the cabinet. Make sure the strip is leveled with the edge of the countertop. (Step 2)
- Connect the supply hose to the cold water source.
- Connect the draining pipe.
- Connect the power cord.
- Place the dishwasher in the right position. (Step 4)
- Level the dishwasher. The back can be adjusted from the front of the dishwasher by turning the screw in the middle of the dishwasher base using a screwdriver. To adjust the front feet, use a flat screwdriver and turn the front feet until the dishwasher is leveled. (Step 5 to Step 6)
- Install the cabinet door on the outer door of the dishwasher. (Step 7 to step 10)
- Adjust the tension of the door springs using an Allen key that turns clockwise to tighten the left and right door springs. Failure to do so may cause damage to the dishwasher. (Step 11)
- The dishwasher must be fixed in place. There are two ways to do it:
- Normal countertop: Insert the installation hook into the slot on the side and fasten it to the countertop with the wood screws.
- Marble or granite countertop: fix the side with the screw.
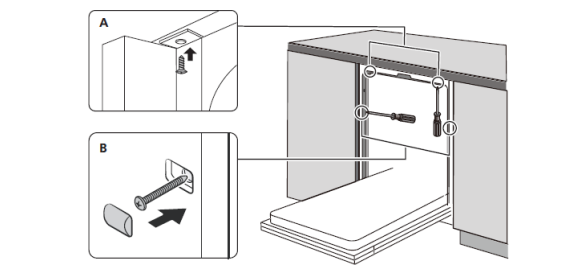
Step 5. Dishwasher leveling
The dishwasher must be leveled for proper operation and washing performance.
- Place a bubble level on the door and rack guide inside the dishwasher as shown to check that the dishwasher is leveled.
- Level the dishwasher by individually adjusting the three leveling legs.
- When leveling the dishwasher, be careful not to tip the dishwasher over.

NOTE The maximum adjustment height of the feet is 50 mm.
TROUBLESHOOTING TIPS
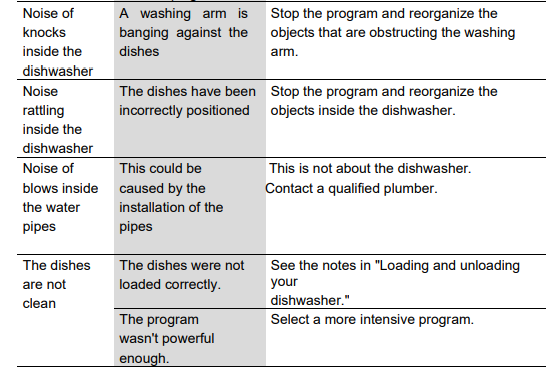
Before calling customer service please consult the table below



LOADING THE BASKETS ACCORDING TO STANDARD EN60436
- UPPER BASKET
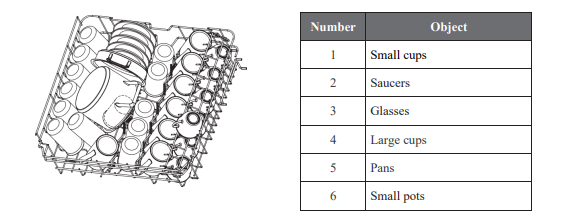
- LOWER BASKET

- CUTLERY BASKET

WARNING: Please place only light objects on the top basket shelf, as the total weight is less than 1.5 kg.

- Spoon
- Fork
- Knife
- Teaspoon
- Dessert spoon
- Serving spoon
- Service fork
- Ladle
Information for comparability tests according to standard EN 60436
- Capacity: 14 place settings
- Upper basket position: lower position
- Program: ECO
- Setting the rinse aid: Max
- Setting the softener: H3
FAQS About Master Kitchen MKDW FI60514 ESL E Dishwasher Instruction Manual
How do I install my Master Kitchen MKDW FI60514 ESL E Dishwasher?
Follow the step-by-step instructions provided in the installation section of the manual. Ensure proper connections to plumbing and power sources.
What detergents are recommended for use in this dishwasher?
Refer to the detergent guidelines outlined in the manual. Typically, use only dishwasher-specific detergents to avoid damage and ensure optimal performance.
How do I load dishes for the best cleaning results?
Find detailed loading instructions in the manual, including recommendations for arranging dishes, utensils, and cookware to maximize cleaning efficiency.
What should I do if my dishwasher is not draining properly?
Troubleshoot drainage issues by consulting the troubleshooting section of the manual. Ensure proper installation and check for any blockages in the drainage system.
Is it safe to wash delicate items in this dishwasher?
Review the manual for information on washing delicate items. Some dishwashers have specific settings for delicate or fragile dishes.
Can I use rinse aid, and how do I fill the dispenser?
The manual will guide you on using rinse aid to enhance drying performance. It should also provide instructions on locating and filling the rinse aid dispenser.
How can I optimize energy efficiency with my dishwasher?
Learn about energy-saving features and tips in the manual, including recommended settings and practices for conserving water and energy.
What do error codes mean, and how do I troubleshoot them?
Find a list of error codes in the manual, along with corresponding troubleshooting steps to identify and resolve any issues.
How often should I clean the dishwasher filter?
The manual will specify the recommended frequency for cleaning the dishwasher filter. Regular maintenance helps ensure optimal performance.
Is the warranty transferable, and what does it cover?
Check the warranty section of the manual for details on warranty coverage and whether it is transferable. Understand the terms and conditions to make the most of your warranty.
For more manuals by Master Kitchen ManualsDock


