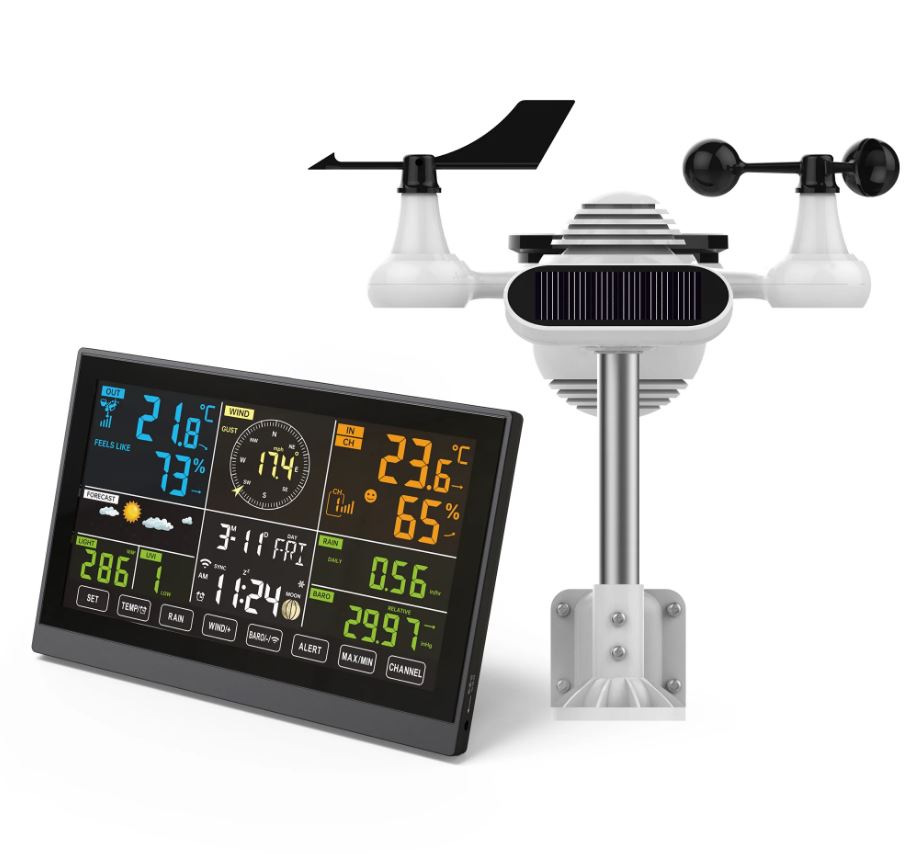
Levenhuk LP150 Wezzer PLUS Weather Station
Base station
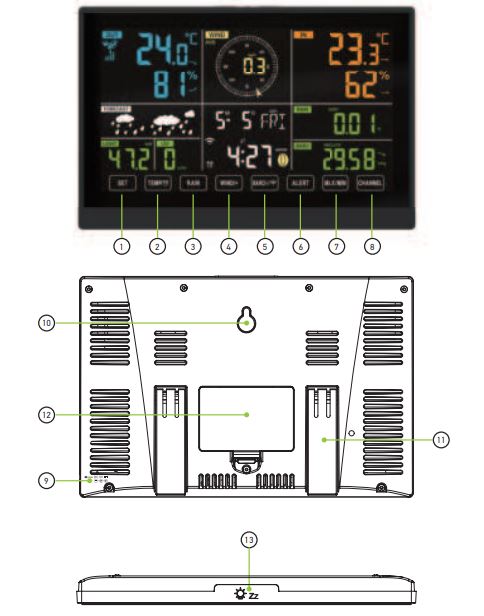
- SET button (Setup)
- TEMP/ button (Temperature/ Alarm)
- RAIN button (Rain)
- WIND/+ button (Wind/+)
- BARO/–/ button (Pressure/–/Wi-Fi)
- ALERT button (Signal)
- MAX/MIN button (Max/min values)
- CHANNEL button (Channel)
- Power input
- Wall mount hole
- Table stand (foldout)
- Battery compartment cover
- button (Backlight/Snooze)
Multisensor
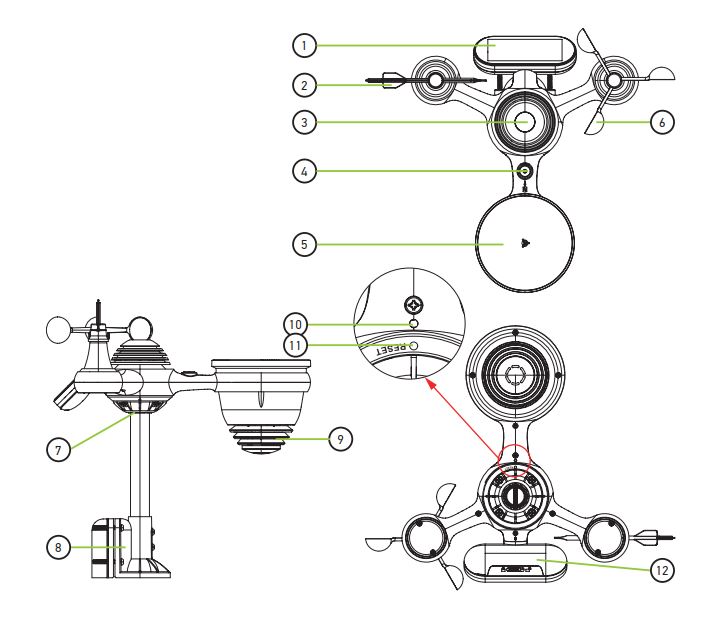
- Solar panel
- Wind direction vane
- UV/Light sensor
- Bubble level
- Rain funnel
- Wind speed cups
- Mounting pole
- Mounting brackets
- Thermohygrometer
- LED indicator
- RESET button
- Battery compartment cover
Levenhuk Wezzer PLUS LP150 Weather Station
The kit includes a display console, DC adapter, wireless 7-in-1 outdoor sensor with a rain funnel, and wind direction vane.
- screw, wind speed cups with 1 screw, mounting pole with 4 screws, mounting brackets with 6 screws, 2 rubber pads,
- screwdrivers, user manual, and warranty card.
Setting up Wi-Fi and weather server connection
- An active 2.4GHz Wi-Fi network is required.
- Press and hold the BARO/–/ button for 3 seconds. The station’s LCD screen will show the AP icon to signify it has entered the Access Point mode (AP) and is ready to set up a Wi-Fi connection.
- Use your smartphone, tablet, or computer to complete the following steps:
- Open the Wi-Fi settings on your PC or Android/iOS device. To do so, go to settings and select Wi-Fi settings.
- Locate the weather station SSID from the list. It should appear as WWS-XXXXXX (where all the X’s are integers) in the list. Tap on the SSID to connect.
- Once you are connected to the weather station, open up your internet or mobile web browser, and enter the following address into the address bar: http://192.168.1.1 to access the weather station web interface. (Make sure to include the http:// or else the web browser may interpret the address as a search query.)
- In the web interface, fill out the required information in the SETUP tab. Make sure all information is entered correctly before saving. If you do not plan to use Wunderground.com and/or Weathercloud.net, remove the corresponding checks.
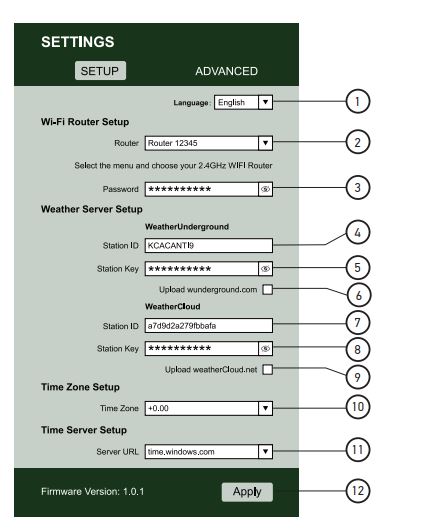
Weather station web interface (SETUP tab)
- UI language select
- Select from a list of available Wi-Fi networks (SSID)
- Your Wi-Fi network password
- WeatherUnderground server station ID
- WeatherUnderground server station key/password
- WeatherUnderground upload confirmation
- Weather cloudy server station ID
- Weather cloudy server station key/password
- Weather cloudy upload confirmation
- Time zone selection
- Time sync server selection
- APPLY button
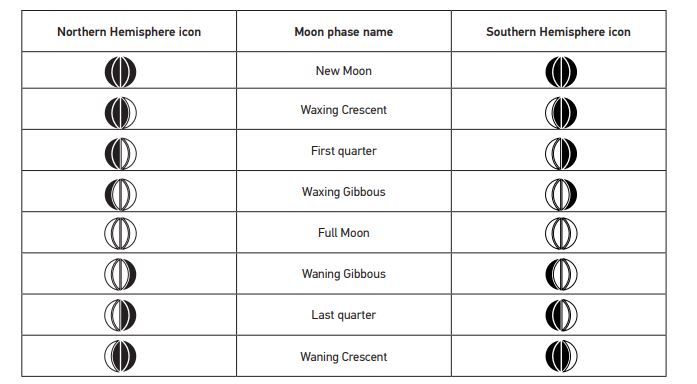
Moon phase
Moon phases are calculated by the weather station according to your time zone, time, and date. The table shows phase symbols for the Northern and Southern hemispheres.
Specifications
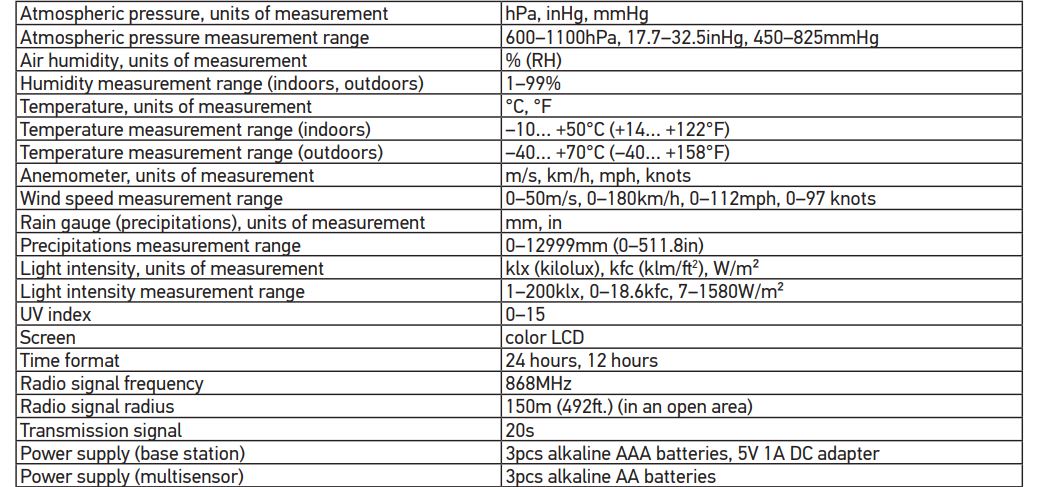
The manufacturer reserves the right to make changes to the product range and specifications without prior notice.
Care and maintenance
- Take the necessary precautions when using the device with children or others who have not read or who do not fully understand these instructions.
- Do not try to disassemble the device on your own for any reason. For repairs and cleaning of any kind, please contact your local specialized service center.
- Protect the device from sudden impact and excessive mechanical force.
- Store the device in a dry, cool place away from hazardous acids and other chemicals, away from heaters, open fires, and other sources of high temperatures.
- Operate the device only in a completely dry environment and do not touch the device with wet body parts.
- Only use accessories and spare parts for this device that comply with the technical specifications.
- Check this device and its cables and connections for any possible damage before use.
- Never attempt to operate a damaged device or a device with damaged electrical parts! Damaged parts must be replaced immediately by an authorized service agent.
- If a part of the device or battery is swallowed, seek medical attention immediately.
- Children should use the device under adult supervision only.
Battery safety instructions
Always purchase the correct size and grade of battery most suitable for the intended use. Always replace the whole set of batteries at one time; taking care not to mix old and new ones or batteries of different types. Clean the battery contacts and also those of the device before battery installation. Make sure the batteries are installed correctly about polarity (+ and –). Remove batteries from equipment that is not to be used for an extended period.
Remove used batteries promptly. Never short-circuit batteries as this may lead to high temperatures, leakage, or explosion. Never heat batteries to revive them. Do not disassemble batteries. Remember to switch off devices after use. Keep batteries out of the reach of children, to avoid the risk of ingestion, suffocation, or poisoning. Utilize used batteries as prescribed by your country’s laws.
Levenhuk International Lifetime Warranty
All Levenhuk telescopes, microscopes, binoculars, and other optical products, except for their accessories, carry a lifetime warranty against defects in materials and workmanship. A lifetime warranty is a guarantee of the lifetime of the product on the market. All Levenhuk accessories are warranted to be free of defects in materials and workmanship for six months from the purchase date. The warranty entitles you to the free repair or replacement of the Levenhuk product in any country where a Levenhuk office is located if all the warranty conditions are met. For further details, please visit: levenhuk.com/warranty If warranty problems arise, or if you need assistance in using your product, contact the local Levenhuk branch.
FOR MORE MANUALS BY LEVENHUK, VISIT MANUALSDOCK

