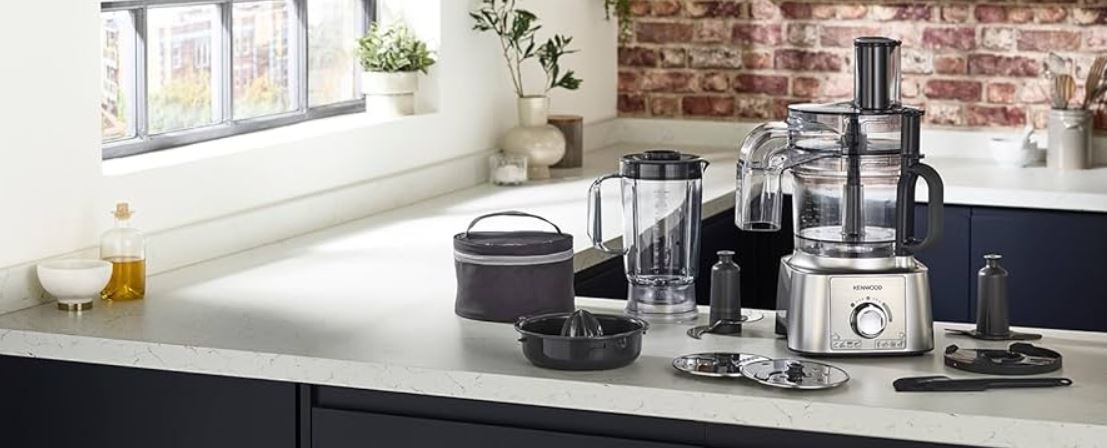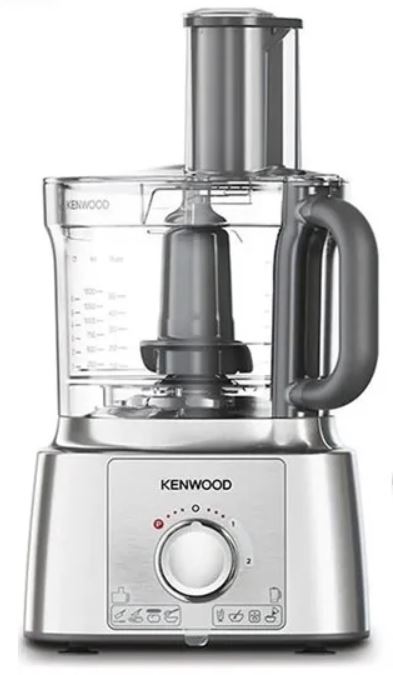
Kenwood FDP65 Multipro Express Food Processor
About KENWOOD
The leading creator and producer of communications and consumer electronics is JVCKENWOOD Corporation. JVCKENWOOD USA was established in 1961 and is the largest sales division of JVCKENWOOD Corporation of Japan. Its products are renowned for their quality, performance, and affordability, and both consumers and industry professionals have acknowledged this.
It’s well known that JVCKENWOOD USA introduces significant new products to the consumer electronics sector. In 1981, the business created the first home theater audio/video amplifier. Additionally, JVCKENWOOD invented the first cassette deck for cars that deters theft by sliding out of the dash, the first with 24 presets, the first with an automatic broadcast sensor system and automatic noise reduction, and the first with polypropylene speaker cones. Numerous novel technologies that were eventually imitated by others were created over the years by JVCKENWOOD engineers.







- Before using your appliance refer to the separate safety warning leaflet and read the instructions for usage contained in this manual carefully. Retain for future reference.
- Before plugging in
- Make sure your electricity supply is the same as the one shown on the underside of your appliance.
- This appliance conforms to EC Regulation 1935/2004 on materials and articles intended to come into contact with food.
Before using it for the first time
- Remove the plastic blade covers from the knife blade. Take care the blades are very sharp. These covers should be discarded as they are to protect the blade during manufacture and transit only.
- Wash the parts see ‘Care and Cleaning’.
Key Processor – Express Prep
- Pushers
- Feed tube
- Lid
- Bowl
- Detachable drive shaft
- Power unit
- Speed/pulse control
- Safety interlocks
- Cord storage (at back)
- Plastic Blender
- Goblet with fixed blade
- Lid with drip feed
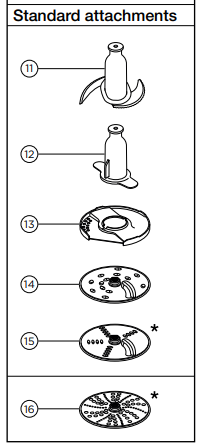
A Standard Attachments
- Knife blade
- Dough tool
- Emulsifying disc
- 4mm slicing/grating disc
- 2mm slicing/grating disc
Not all of the attachments listed below may be included with your food processor. Attachments are dependent upon the model variant. Visit www.kenwoodworld.com for information on how
To Use Your Food Processor
Illustrations – 1– 3
- Fit the detachable drive shaft onto the power unit.
- Then fit the bowl to the power unit and turn clockwise until it locks into position.
- Fit an attachment over the bowl drive shaft.
- Always fit the bowl and attachment onto the processor before adding ingredients.
- Fit the lid – ensuring the top of the drive shaft/tool is located in the center of the lid.
- Do not use the lid to operate the processor, always use the on/off speed control.
- Plug in, switch on, and select a speed. (Refer to the recommended usage chart)will operate for as long as the control is held in position.
- Reverse the above procedure to remove the lid, attachments, and bowl.
-
- Always switch off and unplug before removing the lid.
Important
- Your processor is not suitable for crushingYour processor is not suitable for crushing or grinding coffee beans, or converting granulated sugar to caster sugar.
- When adding almond essence or flavoring to mixtures avoid contact with the plastic as this may result in permanent marking.
B Optional Attachments
- Extra fine grating disc (if supplied)
- Citrus juicer (if supplied)
- Mini chopper/mill (if supplied)
- Grinding mill (if supplied)
- Blend-Xtract 2GO (if supplied)
- Juice extractor (if supplied)
- Express Dice (if supplied)
- Express Serve (if supplied)
- Storage bag (if supplied)
- Spatula
Using The Attachments
Refer to the usage chart, illustrations, and relevant section for each attachment.
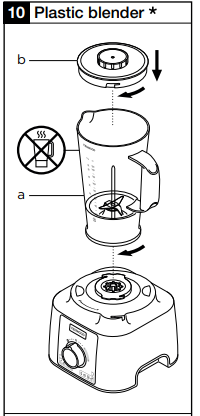
Plastic Blender (if supplied)
- To assemble and use – refer to the Blender illustrations and the Recommended Usage Chart.
- Put your ingredients into the goblet.
- Fit the lid onto the goblet and turn clockwise until it clicks.
- Fit the blender to the power unit and turn it clockwise to lock in position.
- The appliance will not operate if the blender is incorrectly fitted to the interlock.
Hints and Tips
- When making mayonnaise, put all the ingredients, except the oil, into the blender. With the appliance running, pour the oil slowly through the drip feed hole in the lid.
- Thick mixtures, e.g. pâtés and dips, may need scraping down. If the mixture is difficult to process, add more liquid.
- The processing of spices is not recommended as they may damage the plastic parts.
Knife Blade
Follow the instructions under ‘To Use Your Food Processor’.
Hints and Tips
- For coarser textures use the pulse control.
- Cut food such as meat, bread, and vegetables into cubes approximately 2cm.
- Biscuits should be broken into pieces and added down the feed tube whilst the appliance is running.
- Take care not to over-process.
- When making pastry use fat straight from the fridge cut into 2cm cubes.
- For best results when processing sticky fruit/ingredients such as dates, use ‘Pulse’ first to break down the ingredients and then continue processing at maximum speed.
Dough Tool
- Use for yeasted dough mixes.
- Follow the instructions under ‘To Use Your Food Processor’.
Hints and Tips
- Do not process for longer than 60 seconds.
- Place the dry ingredients in the bowl and add the liquid down the feed tube whilst the appliance is running. Process until a smooth elastic ball of dough is formed.
- Re-knead by hand only. Re-kneading in the bowl is not recommended as it may cause the processor to become unstable.
13 Emulsifying Disc
(use in conjunction with Dough Tool 12 )
- Fit the emulsifying disc over the dough tool – align the fins on the dough tool with the slots in the disc.
- Turn the dough tool anti-clockwise to lock it in place.
- To separate the parts turn clockwise and lift the disc off the dough tool shaft.
Hints and Tips
- Ensure the bowl and tool are clean and free from grease before use.
- Mayonnaise – Place the egg and seasonings into the bowl and mix for a few seconds. With the machine running gradually add the oil down the feed tube in a steady stream.
14 – 15 – 16 Discs
- Fit the drive shaft and bowl onto the power unit.
- Holding by the center grip, place the disc onto the drive shaft with the appropriate side uppermost.
- Fit the lid.
- Put the food in the feed tube. Choose which size feed tube you want to use. To use the small feed tube – first put the large pusher inside the feed tube. Use for individual thin ingredients. Do not use the small pusher without the larger pusher fitted, otherwise you may damage the bottom of the pusher. To use the large feed tube – use both pushers together.
- Switch on and push down evenly with the pusher 1 – never put your fingers in the feed tube.
Hints and Tips
- Use fresh ingredients
- Do not cut food too small. Fill the width of the feed tube fairly fully. This prevents the food from slipping sideways during processing.
- When slicing or grating: food placed upright comes out shorter than food placed horizontally.
- There will always be a small amount of waste on the disc or in the bowl after processing.
Citrus Juicer (if supplied)
- a Cone
- b Sieve
To use the citrus juicer
- Fit the drive shaft and bowl onto the power unit.
- Fit the sieve into the bowl – ensuring the sieve handle is locked into position directly over the bowl handle.
- Place the cone over the drive shaft turning until it drops down.
- Cut the fruit in half. Then switch on and press the fruit onto the cone.
- The citrus juicer will not operate if the sieve is not locked correctly.
Hints and Tips
- For best results store and juice the fruit at room temperature and hand roll on a worktop before juicing.
- To help with juice extraction move the fruit from side to side when juicing.
- When juicing large quantities, empty the sieve regularly to prevent the build-up of pulp and seeds.
Mini Chopper/Mill (if supplied)
- Jar
- Sealing ring c Blade assembly
- Put the ingredients into the jar.
- Fit the sealing ring into the blade assembly.
- Turn the blade assembly upside down. Lower it into the jar, blades down.
- Screw the blade assembly onto the jar until the finger is tight. Refer to the graphics on the underside of the blade assembly as follows:
- Unlocked position
- Locked position
- Place the mill onto the power unit and turn clockwise to lock in position.
- Select Maximum speed or use the pulse (P).
Grinding Mill (if supplied)
- a Mill lid
- b Grinding mill blade assembly
- Place your ingredients into the blade assembly.
- Fit the lid and turn clockwise to lock.
- Place the mill onto the power unit and turn clockwise to lock.
- Select maximum speed or use the pulse (P).
Hints and Tips
- For optimum performance when processing spices do not process more than 50g at a time.
- Whole spices retain their flavor for a much longer time than ground spices so it is best to grind a small quantity fresh at a time to retain the flavor.
- To release the maximum flavour and essential oils whole spices are best roasted before milling.
- Do not process dried turmeric root in the mill as it is too hard and may damage the blades.
- Cut ginger and coconut into small pieces before processing.
- For best results, the main bowl is recommended when chopping herbs.
Blend-Xtract 2GO (if supplied)
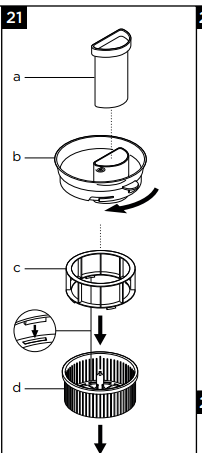
- a Dispensing lid
- b Bottle
- c Sealing ring
- d Blade assembly
-
- Add ingredients to the bottle up to the 400ml level mark.
-
- For best blending performance always add ice/frozen ingredients to the bottle first.
- When adding frozen ingredients (i.e. frozen fruit, yoghurt, ice cream, or ice) do not blend more than 60g or 3 ice cubes.
- Do not blend frozen ingredients without liquid.
- Fit the sealing ring to the blade unit, ensuring the seal is located correctly in the grooved area.
- Leaking will occur if the seal is damaged or incorrectly fitted.
- Hold the underside of the blade unit and lower it onto the bottle, blades down.
- Screw the blade holder onto the bottle – turn clockwise to lock.
-
- Shake to disperse the ingredients.
- Place the blender onto the power unit and turn clockwise to lock.
- Select maximum speed. Allow the ingredients to blend until smooth.
-
- Once your drink has reached the desired consistency, you can use the pulse (P) to ensure all ingredients are thoroughly blended.
Using the drinking lid
- Fit and lock the lid by turning it clockwise.
- When you want to drink, simply flip open the lid cover. The drink can be consumed straight from the bottle.
Juice Extractor (if supplied)
- Pusher
- Juicer lid
- Pulp remover
- Filter drum
- Bowl
- Juicing spout
To use the juice extractor
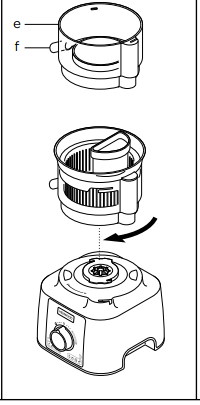
- Fit the juicer bowl to the power unit, and turn clockwise until it locks – the spout should be situated to the left side when the bowl is fitted correctly.
- Place the pulp remover into the filter drum – ensuring the tabs are located with the slots in the bottom of the drum.
- Fit the filter drum
- Fit the attachment lid – turn clockwise until it locks. Your juicer will not operate if the bowl or lid is not fitted correctly into the interlock.
- Place a suitable glass or jug under the juice outlet.
- Cut the food to fit the feed tube.
- Switch on and push down evenly with the pusher – never put your fingers in the feed tube. Process fully before adding more.
-
- After adding the last piece, let the juicer run for a further 30 seconds to extract all the juice from the filter drum.
important
- If the juicer starts to vibrate, switch off and empty the pulp from the drum. The juicer vibrates if the pulp becomes unevenly distributed.
- Some very hard foods may make your juicer slow down or stop. If this happens switch off and unblock the filter.
- Switch off and clear the pulp collector regularly during use.
Express Dice (if supplied)
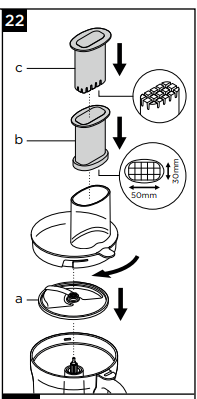
- Dicing disc
- Dicing grid
- Dicing pusher
Important
- The dicing disc is designed only to be used with the dicing attachment.
- The dicing pusher should only be used with the dicing grid. Using it without the dicing grid fitted will result in damage to the bottom of the pusher.
To use the Express Dice
- Fit the drive shaft and bowl onto the power unit.
- Add the dicing disc and fit the lid.
- Fit the dicing grid into the feed tube.
- Use the dicing pusher to process food items through the dicing grid.
- If the food is too hard to push through the grid cook for approximately 10-15 minutes, then allow to cool in a refrigerator before processing.
- Always remove hard skins, stones, pips seeds, etc., from food before processing.
Note:
- Due to the various sizes and shapes of foods, the diced results will contain some misshapen pieces, this is normal.
- Foods such as cheese, ham, and chorizo will clog in the grid so are not recommended for use with this attachment.
22A The Express dice can also be used to produce French fries, crudités and batons.
- Fit the dicing grid without the dicing disc.
- Then manually push the food through the grid without switching the appliance on.
Cleaning the grid
Use the end of the pusher to dislodge any food that may become trapped in the dicing grid.
Express Serve (if supplied)
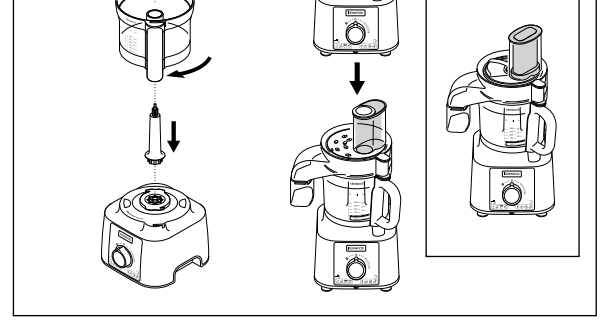
- Express serve drive shaft
- Extension chute
- Base
- Slinger plate
- Fit the drive shaft and bowl onto the power unit.
- Fit the small drive shaft to the main shaft – the Express serve will not operate unless fitted.
- Fit the required attachment/disc – do not apply excessive force. Refer to the Discs and Express Dice sections for further information, hints, and tips.
- Fit the lid.
Use in conjunction with the following:
Service and Customer Care
- If you experience any problems with the operation of your appliance, before requesting assistance refer to the ‘Troubleshooting Guide’ section in this manual or visit www.kenwoodworld.com.
- For service or warranty information please refer to the separate safety warning leaflet or visit
www.kenwoodworld.com. - Designed and engineered by Kenwood in the UK.
- Made in China.
Important – Dicer and Discs
- If the food is not exiting the food outlet, switch it off and check that the food is not clogging under the disc and that the slinger plate is fitted. Clear any trapped food before continuing to process.
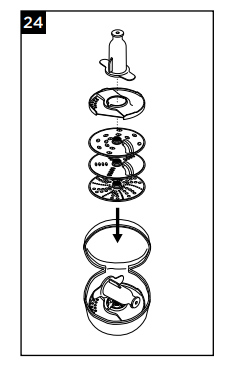
24 Storage Bag
Store your discs, emulsifying discs, and dough tools in the bag supplied. For safety reasons, the knife blade should be stored in the main bowl instead of the storage bag when not in use.
Care and Cleaning
- Always switch off and unplug before cleaning.
- Handle the blade and cutting discs with care – they are extremely sharp.
- Some foods may discolor the plastic. This is perfectly normal and will not harm the plastic or affect the flavor of your food. Rub with a cloth dipped in vegetable oil to remove the discoloration.
Power Unit
- Wipe with a damp cloth, then dry. Ensure that the interlock area is clear of food debris.
- Do not immerse the power unit in water.
- Push any excess cord into the storage area at the back of the power unit.
Cleaning Instructions – Refer to the relevant Illustration 25.
Troubleshooting Guide
FAQS About Kenwood FDP65 Multipro Express Food Processor
How do I assemble my Kenwood FDP65 Multipro Express Food Processor?
Refer to the user manual for detailed instructions on assembling the different components of the food processor.
What attachments come with the food processor?
Check the product documentation or the packaging for a list of included attachments. Common attachments include blades, slicing discs, and grating discs.
How do I use the different speed settings on the food processor?
The user manual should provide information on the various speed settings and how to use them for different tasks. Typically, a food processor has multiple speed options for various functions.
Can I use the food processor to knead dough?
Some food processors come with a dough blade or attachment for kneading dough. Check the user manual to see if your model supports this function.
How do I clean the food processor?
Most food processors have removable parts that are dishwasher safe. Refer to the user manual for specific cleaning instructions, including which parts are dishwasher safe and which should be hand-washed.
What safety features does the food processor have?
Food processors often come with safety features such as interlocking mechanisms and overload protection. Review the user manual to understand the safety features and how to use them.
Can I process hot liquids in the food processor?
Some food processors are designed to handle hot liquids, but it’s essential to check the user manual to ensure that your specific model can do so safely.
How do I troubleshoot if the food processor is not working correctly?
The user manual should include a troubleshooting section that helps you identify and solve common issues. It might cover topics such as motor problems, blade issues, or assembly errors.
What is the capacity of the food processor?
Check the product specifications in the user manual or on the Kenwood website to find information about the food processor’s capacity, including bowl size and maximum quantities.
How do I contact Kenwood customer support for assistance?
Find the customer support contact information in the user manual or on the Kenwood website. Customer support should be able to provide specific assistance for any issues you encounter.
For more manuals by KENWOOD ManualsDock

