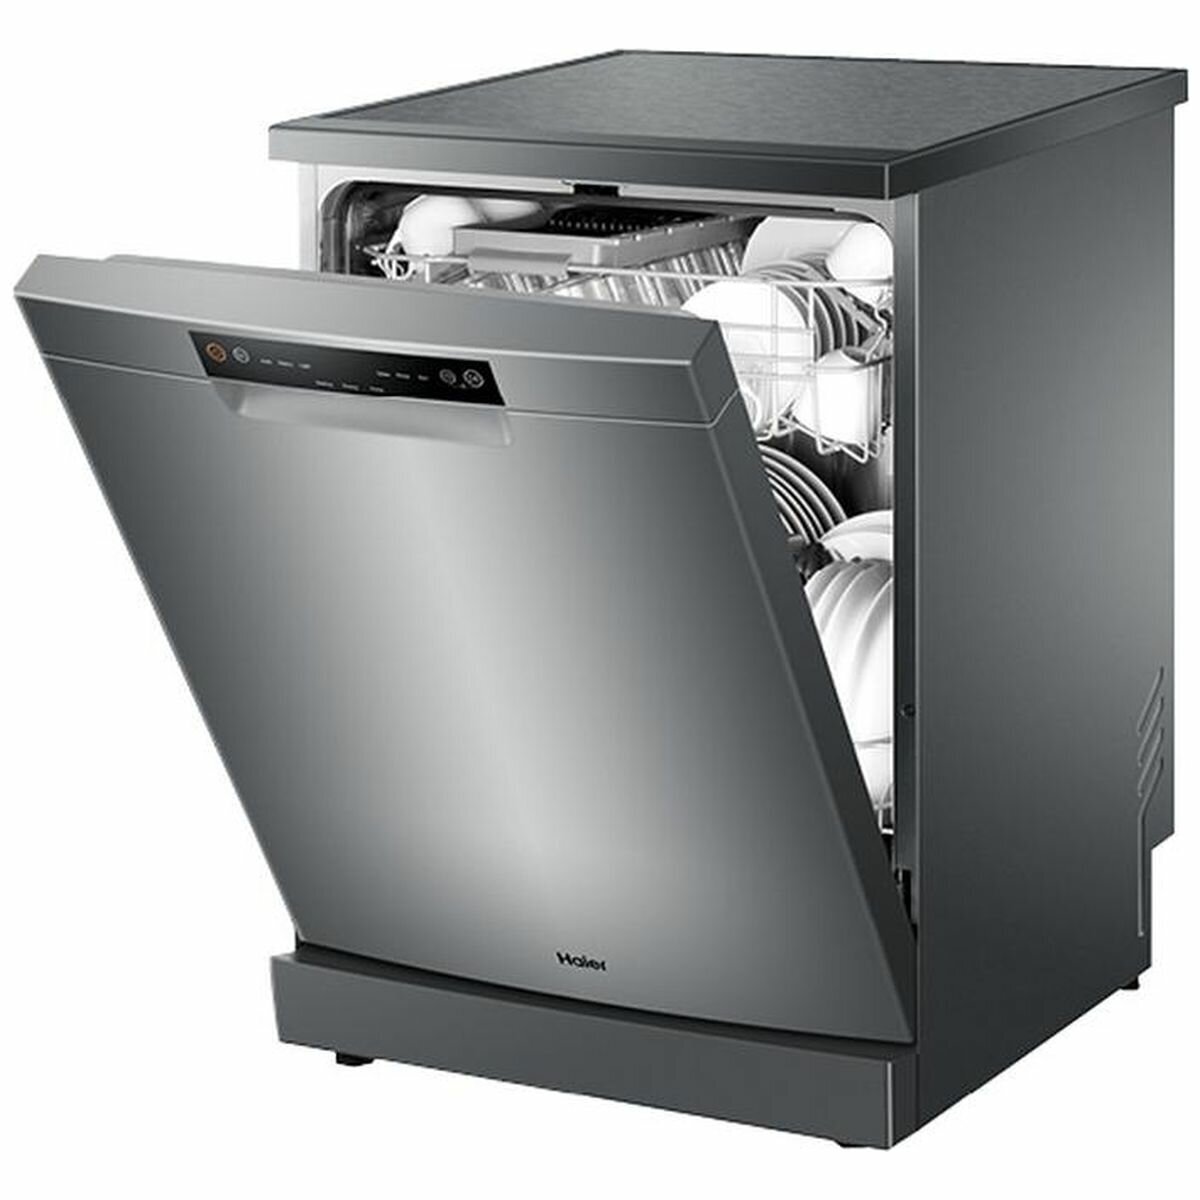
Haier HDW15V2 Dishwasher
About Haier
Haier, based in Qingdao, China, is a global leader in innovative and energy-efficient home appliances, including refrigerators and washing machines. Renowned for quality, Haier is recognized for its commitment to smart technology and sustainability.
Thank you for purchasing a Haier product
Please read these instructions carefully before using this appliance. The instructions contain important information that will help you get the best out of the appliance and ensure safe and proper installation, use, and maintenance.
Keep this manual in a convenient place so you can always refer to it for the safe and proper use of the appliance.
If you sell the appliance, give it away, or leave it behind when you move house, make sure you also pass on this manual so that the new owner can become familiar with the appliance and safety warnings.
Legend
- General information and tips
- Warning – Important Safety information
- Environmental information
Disposal
Help protect the environment and human health. Put the packaging in applicable containers to recycle it. Help to recycle waste of electrical and electronic appliances. Do not dispose of appliances marked with this symbol with the household waste. Return the product to
WARNING!
Risk of injury or suffocation! Disconnect the appliance from the main supply. Cut off the main cable and dispose of it. Remove the door catch to prevent children and pets from closing the appliance.
Safety
Intended Use
The appliance is designed for domestic use inside the house. It is not intended for commercial or industrial use. Do not use it for purposes other than that for which it was designed. may cause hazards and loss of warranty claims.
Standards and Directives
This product meets the requirements of all applicable EC directives with the corresponding harmonized standards, which provide for CE marking.
Before Switching on the Appliance for the First Time
Do…
- make sure all packaging is removed and is kept out of children’s reach.
- make sure that the electrical information on the rating plate agrees with the power supply. If it does not, contact an electrician.
- use a separate earthed socket for the power supply. The appliance must be earthed.
- make sure the plug is easily accessible.
- make sure only the delivered electric cable and hose set are used.
- hold the plug and not the electric cable when unplugging the power supply.
- make sure not to damage the electric cable and the plug. If damaged, have it replaced by an electrician.
leakage.
Do not…
- install or use the appliance where the temperature is below 5 °C.
- use multi-plug adapters and extension cables.
- let persons, children included, with reduced physical sensory, reduced mental functions or lack of experience and knowledge use the appliance if not supervised by a person responsible for their safety.
- products in, near, or on the appliance.
During Daily Use
Do…
- ▶ supervise children to prevent them from playing with the appliance.
- ▶ put sharp pointed objects (e.g. knives) in a way that there is no danger of injury.
Do not…
- open the door while a program operates. The appliance can release hot steam.
- keep the appliance door open without supervision to prevent tripping and falling.
- let children or pets come close to the appliance when the door is open.
- sit or place heavy items on the open door.
- remove the dishes from the appliance until the program is completed. There can still be detergent on the dishes.
drink the water in the appliance. The water may be contaminated with detergent residues. - cover any ventilation openings in the base with a carpet or similar object.
- use water spray or steam to clean the appliance.
- let the children do the cleaning and user maintenance without supervision.
WARNING:
Some dishwasher detergents are strongly alkaline. They can be extremely dangerous if swallowed. Avoid contact with the skin and eyes and keep children away from the dishwasher when the door is open. Check that the detergent receptacle is empty after completion of the wash cycle.
Product Description
- Thermo dry
- Top spry
- Upper spray arm
- Lower spray arm
- Filters
- Rinse aid dispenser
- Detergent dispenser
- Rating label
- Cutlery basket
- Lower basket
- Upper basket
- Knife rack
- The third basket
Accessories
Check the accessories and literature by this list:
- Applicable to models HDW15V2.
- Applicable to models HDW15V3
Control Panel
HDW15V2W1/S1 :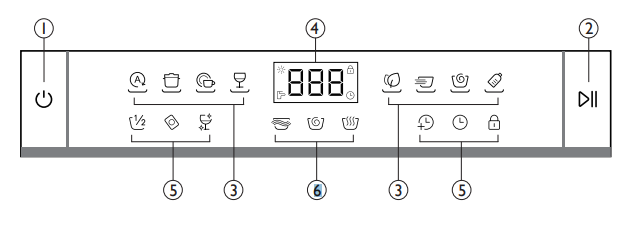
- ON / OFF button
- START / PAUSE button
- PROGRAMME Touch button
- Time & Info Display/Indicator Icon
- Option Indication
- Status Indication
HDW15V3W1/S1 :
- ON / OFF button
- START / PAUSE button
- PROGRAMME Touch button
- Time & Info Display/Indicator Icon
- Option Indication
- Status Indication
Time & Info display
- ► Programme cycle time
- ► Programme start delay time
- ► Error codes and service information
- ► Remaining time in hours of a delayed program starts, e.g.
- ► Remaining program cycle time in hours + minutes, e.g.. While running it may vary due to local conditions and daily working load.
Indicator Icon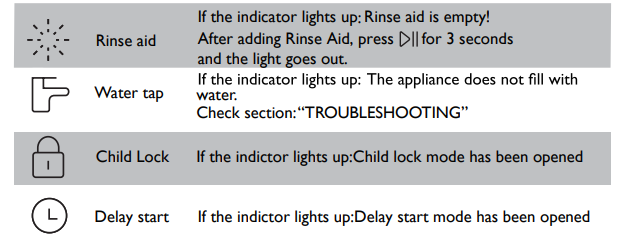
Status Indicators
Option Indication
Before First Use
First Steps
Remove all packaging materials, keep them out of children’s reach, and dispose of them in an environmentally friendly manner. There could be water residue inside the appliance due to quality checks in the factory. Perform the following steps:
- Install the appliance.
▶ Refer to section INSTALLATION. - Only for use of Multitabs: Adjust the rinse aid setting.
▶ Refer to section DIFFERENT SETTINGS FOR RINSE AID. - Fill the rinse aid dispenser.
▶ Refer to the section HOW TO FILL THE RINSE AID DISPENSER. - Open the water tap.
- Start any wash program (apart from the Rinse program) with detergent but no load to remove possible manufacturing residues.
Activate / De-Activate the Buzzer
An acoustic signal informs about the end of a program. This signal can be switched off.
Refer to the section HOWTO ADJUST SETTINGS and select the -setting:
- ▶ If the display shows the signal is switched off.
- ▶ If the display shows the signal is switched on.
Daily Use
Please note that not all sales models come with identical features and options. So pictures of that chapter are sometimes different from your dishwasher model. Explanations try only to point out basic model variants.
- Load the baskets.
- Press the ON/OFF button to activate the appliance.
- Add the detergent; refer to section DETERGENT.
- Close the door.
- Set the program according to the type of load and how dirty the dishes, cups, and cutlery are.
- Maybe select a start delay time.
- Press the START / PAUSE button to start the program.
- After the program ends the appliance changes to auto-off. Unload the baskets.
HDW15V2 and HDW15V3:
The lower basket has folding spikes. Fold down these spikes to improve the arrangement of pots, pans, and bowls.
Cutlery Basket
- ▶ Mix spoons with other cutlery to prevent them from bonding together.
- ▶ Use the grid element to separate the cutlery.
- ▶ Place cutlery with the handles down for better washing results.
- ▶ If long items may block spray the upper basket.
Upper Basket and utensil tray
- The upper basket is designed to hold items like glasses, cups, saucers, plates, small bowls, and shallow pans.
- Use the utensil tray to securely hold long or sharp items like knives, chopsticks, or ladles. Ensure that knife blades are facing down.
- Slide or remove the utensil tray if you need the space for other items below.
- You can adjust the height of the upper basket to create more space for tall items in the lower basket.
- For best washing results place the table knives in the knife rack.
Multitabs
These Multitabs detergent tablets could include two different agents for water softening, rinse aid, and other functions. The softener and rinse aid settings must be adjusted according to the section BEFORE FIRST USE. Usually, the default setting performs well. If there are streaks, stains, shimmer, etc.; refer to section TROUBLESHOOTING and BEFORE FIRST USE.
Warning
Detergent tablets do not fully dissolve with short programs. That may cause bad washing results and detergent residues.
If detergent without multifunction should be used again:
- Save 3 to 5 tablets
- Adjust the softener and rinse aid setting according to section BEFORE FIRST USE.
- Use Multitabs detergent tablets for the next 3 to 5 wash cycles.
Care and Cleaning
Inspect and clean your appliance at regular intervals. Any detergent and food residue may cause diverse problems. But especially dirty filters, and clogged or blocked spray arms significantly decrease the washing results.
Care and Cleaning the Filters
There are three filters (Al.A2. B) to be checked and cleaned.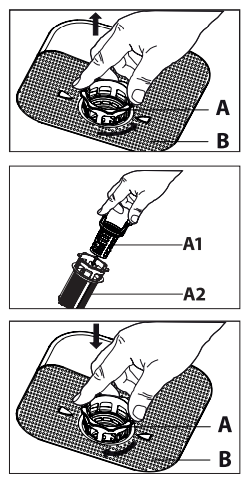
- Turn the filter A anticlockwise and remove it.
- To disassemble the filter A press the latches and unplug Al from A2.
- Remove the filter B.
- Clean the filters with water.
- Put filter B in its initial position. Assemble the filter A and put it into position in filter B.
- Turn it clockwise until it locks.
Care and Cleaning of the Spray Arms
Spray arms should be regularly inspected for dirt. If needed the spray arms could be removed.
Upper spray arm
- Turn the bayonet socket to the left to remove the spray arm.
- Remove the remaining parts of food remnants with a thin pointed object.
- Flush with water and check all the holes are clear.
- Turn the bayonet socket clockwise to fasten the spray arm.
Lower spray arm
- Pull at the center to remove the spray arm.
- Remove the remaining parts of food remnants with a thin pointed object.
- Flush with water and check all the holes are clear.
- Place the spray arm at the center with a light push.
CAUTION!
Never clean the appliance with a steam cleaner. Never use bleach or other chlorinated detergents.
- ▶ Clean the appliance with a damp soft cloth.
- ▶ Only use neutral detergents. Do not use abrasive products, abrasive cleaning pads, or solvents.
- ▶ Clean the door seal with a damp soft cloth.
Troubleshooting
Many occurring problems could be solved by yourself without specific expertise. In case of a problem please check all shown possibilities and follow the below instructions before you contact an after-sales service
The appliance does not start, or it stops during operation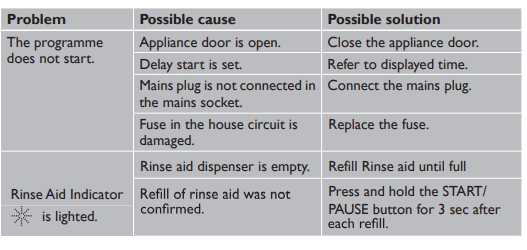
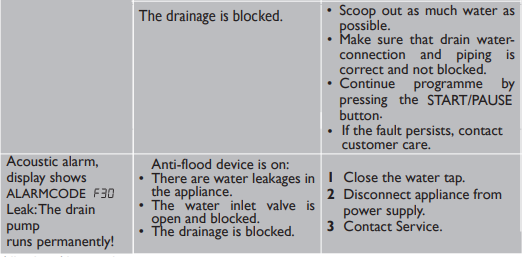
Error codes on the display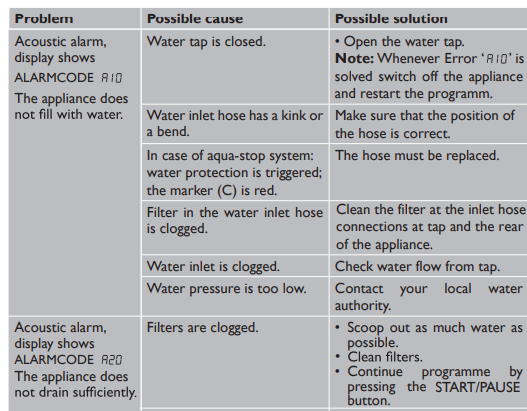
Washing Results are not satisfactory


Economic and Environmental Use
- ▶ It is not recommended to pre-rinse the dishes under running water.
- ▶ Select the washing programs by type and degree of contamination of the dishes.
- ▶ Select the economy mode program ECO for normally soiled items.
- ▶ The most economical use you will have with full loading.
- ▶ Only use the manufacturer’s recommended detergent or rinse aid dosages.
Anti-Flooding protection
The dishwasher is equipped with a system that stops the supply of water in the event of a problem with the water supply hose, or leaks within the unit, to prevent damage to your home. If for any reason the box containing the electrical components happens to get damaged, turn off the power supply and remove the plug for the appliance from the socket immediately. To guarantee that the anti-flooding feature operates properly, the “A” box with the water supply hose must be attached to the water supply tap as shown in Fig. B. No other type of connection is acceptable. The water supply hose must not, under any circumstances, be cut, as it contains live electrical parts. If the length of the hose is not adequate to make a proper connection, the hose must be replaced with one which is long enough. This hose is available upon request from specialized retailers and Authorised Service Centers.
Technical Data
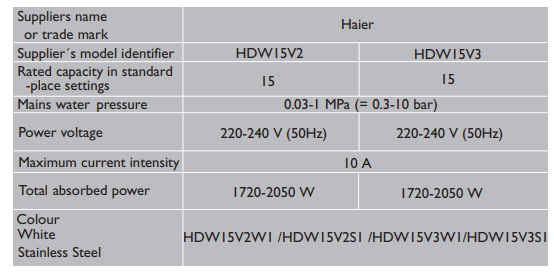
Check the electrical data on the rating label (located on the left-hand side of the dishwasher’s stainless steel inner door). Should the data on the rating label be different from those specified below, consider those on the rating label as correct.
Faqs About Haier HDW15V2 Dishwasher User Manual
How do I pair my LIVALL C20 helmet with my smartphone?
To pair your helmet with your smartphone, turn on the helmet’s Bluetooth, open the LIVALL Riding app, and follow the on-screen instructions for pairing.
What features does the LIVALL C20 helmet offer for safety?
The LIVALL C20 helmet features built-in LED lights, turn signals, and automatic brake warning lights for enhanced visibility and safety.
Can I use the helmet without connecting it to the LIVALL Riding app?
While basic functions like helmet usage and protection are independent of the app, connecting to the app enhances the helmet’s smart features such as turn signals and LED lights.
How do I charge the helmet and how long does the battery last?
The LIVALL C20 helmet can be charged using the provided USB cable. The battery life varies based on usage but typically lasts for several hours of continuous use.
Is the LIVALL C20 helmet waterproof?
The helmet is designed to be water-resistant, but it’s not fully waterproof. It can withstand light rain and splashes, but it’s advisable to avoid submerging it in water.
Can I customize the LED light patterns on the helmet?
Yes, the LIVALL Riding app allows you to customize the LED light patterns on the helmet, including choosing different light colors and flashing modes.
How do I activate the turn signals on the LIVALL C20 helmet?
To activate turn signals, use the remote control provided with the helmet. Press the corresponding button to indicate your intended direction, and the helmet will display the appropriate turn signal.
Is the LIVALL C20 helmet suitable for night riding?
Yes, the helmet is equipped with bright LED lights that enhance visibility during night rides. Make sure to charge the helmet before riding in low-light conditions.
What is the warranty period for the LIVALL C20 helmet?
Warranty periods may vary, so it’s recommended to check the product documentation or contact LIVALL customer support for specific warranty information.
Can I use the LIVALL C20 helmet for other activities besides cycling?
The helmet is primarily designed for cycling, but it can be used for other similar activities where head protection is required. However, certain smart features may be optimized for cycling.
For more manuals by Haier ManualsDock

