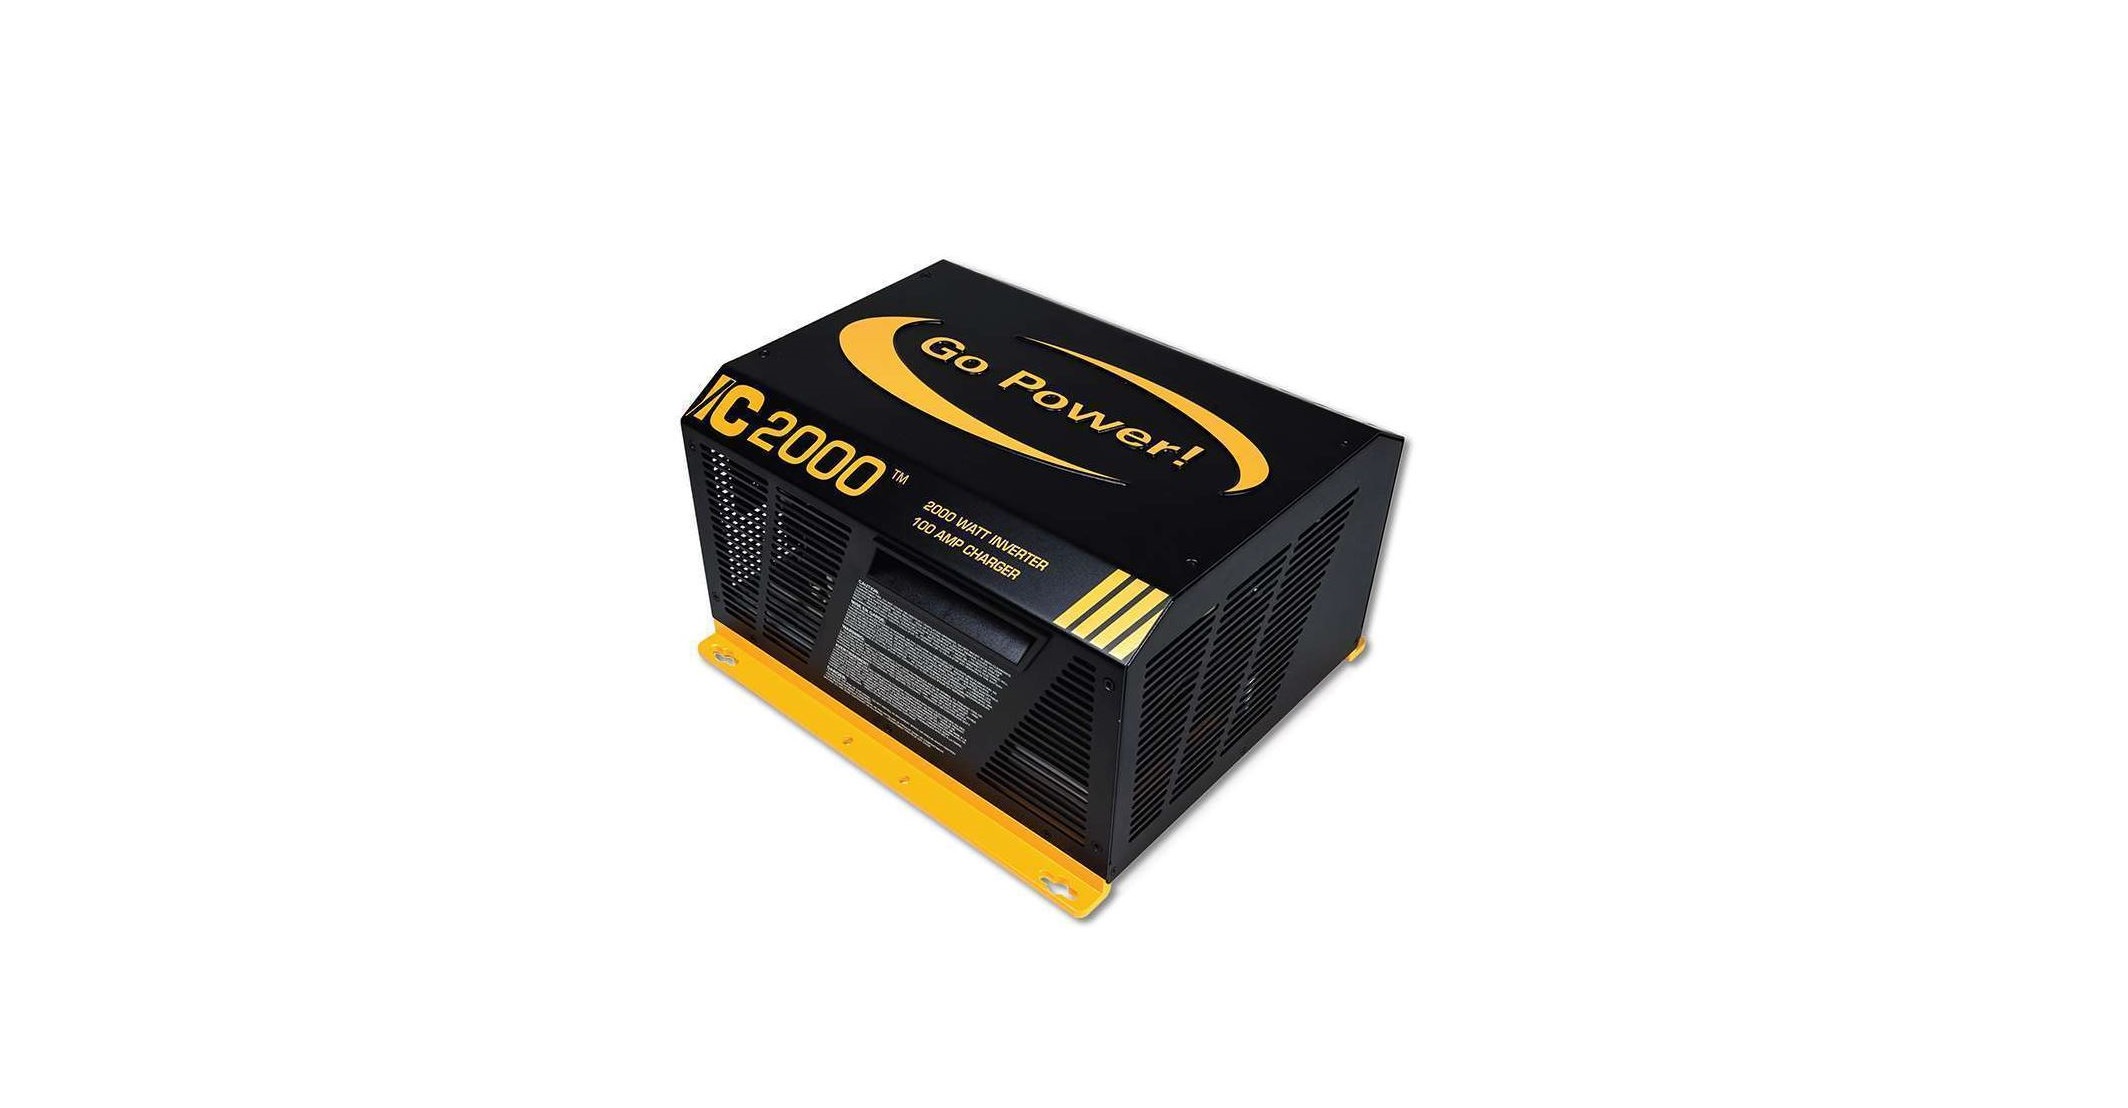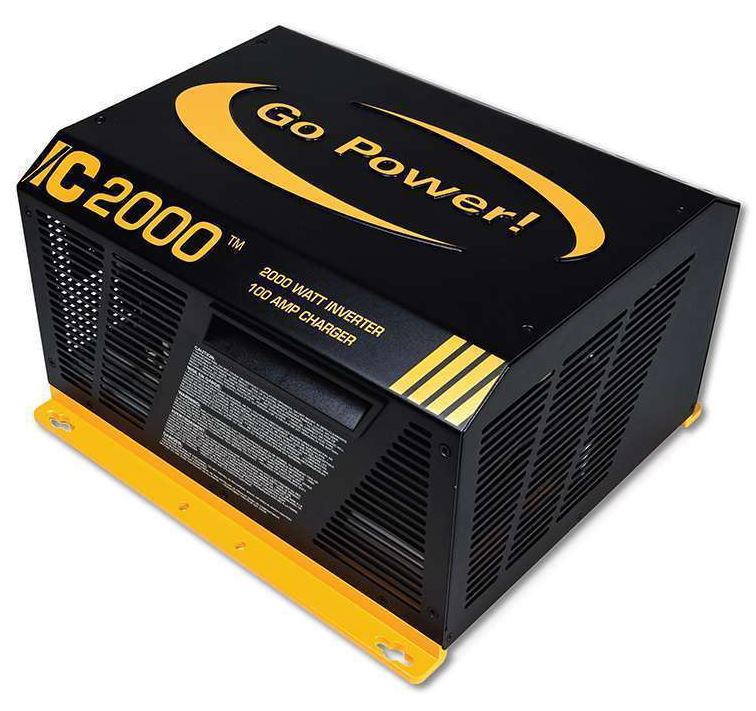
Go Power GP-IC2000 Pure Sine Wave Inverter
About Go Power
Go Power! started as a modest Canadian distributor of solar energy supplies and has since expanded to become one of North America’s top providers of solar solutions for businesses and recreational use. You can rely on us when you need green, transportable electricity.
Congratulations on purchasing your Go Power! GP-IC-2000 Inverter / Charger. The GP-IC-2000 Inverter / Charger combines the functions of a pure sine wave inverter, battery charger, and AC transfer switch into one unit – saving space, installation time, and system complexity. The GP-IC-2000 is designed for mobile and home power applications.
- Pure Sine Wave Inverter Output – assures the AC output voltage is perfectly reliable even when limited external AC power is available
- 50-amp a leg AC pass-through capability (Neutral rated to 50A)
- Multi-stage battery charging
- Inverter mounted ON/OFF switch with LED indicator
- Built-in handles for easy installation
- BTS (Battery Temperature Sensor) provides automatic battery temperature compensation for optimum charging even during extreme temperature changes
Combined with the numerous DC power systems Go Power! manufactures and sells, the GP-IC-2000 allows you to enjoy the luxuries that electricity provides, with or without a campsite hookup. This manual will aid in the process of installing the Go Power! GP-IC-2000 Inverter / Charger. Please read and understand this manual before installing the Go Power! GP-IC-2000 Inverter/Charger. Please retain this manual for future reference.
Record the unit’s model and serial number below, it is much easier and quicker to record this information now at the pre – installation stage.
CAUTIONS / WARNINGS
This document contains important safety instructions for the products produced by Carmanah Technologies. Read all instructions and cautionary markings on the product and any accessories or additional equipment included in the installation. Failure to follow these instructions could result in severe shock or possible electrocution. Use extreme caution at all times to prevent accidents. All electrical work must be performed by local and national electrical codes. These instructions are for use by qualified personnel who meet all local and governmental code requirements for licensing and training for the installation of electrical power systems with AC and DC voltage up to 600 volts. Installation, maintenance, and connection of inverters must be performed by qualified personnel, in compliance with local electrical standards, wiring rules, and the requirements of local power authorities and/or companies. Safety regulations relevant to the location shall be followed during installation, operation, and maintenance. Improper operation may have a risk of electric shock or damage to equipment and property.
- WARNING! Hazard to Human Life
This type of notation indicates that the hazard could be harmful to human life. - WARNING! Shock Hazard Danger of Shock or Electrocution.
- WARNING! Burn / Fire Hazard Danger of hot surface and/or fire.
- CAUTION! Hazard to Equipment
This type of notation indicates that the hazard may cause damage to the equipment. - IMPORTANT This type of notation indicates that the information provided is important to the installation, operation, and/or maintenance of the equipment. Failure to follow the recommendations in such an I notation could result in the annulment of the equipment warranty
WARNING! Personal Injury
- Use safe lifting techniques when lifting this equipment as recommended by the Occupational Safety and Health Association (OSHA) or other local codes.
- Use standard safety equipment when working on this equipment, such as safety glasses, ear protection, steel-toed safety boots, safety hard hats, etc.
- Use standard safety practices when working with electrical equipment. (Remove all jewelry, use insulated tools, wear cotton clothing, etc.)
- Never work alone when installing or servicing this equipment. Have someone nearby who can assist if necessary.
- Do not touch the Inverter / Charger during operation. The temperature of some parts of the inverter may exceed 60° during operation. Let it cool for at least 5 minutes after shutdown before touching it.
- Ensure that children, pets, and other animals are kept away from the inverter, solar arrays, battery bank, and utility grid components.
- If the equipment is used in a manner not specified by the manufacturer, the protection provided by the equipment may be impaired.
WARNING! Lethal Voltage
- Review the system configuration to identify all possible sources of energy. Ensure ALL sources of power are disconnected before performing any installation or maintenance on this equipment. Confirm that the terminals are de-energized using a validated voltmeter (rated for a minimum of 1000 VAC and 1000 VDC) to verify the de-energized condition.
- Do not perform any servicing other than that specified in the installation instructions unless qualified to do so, or have been instructed to do so by Carmanah Technologies Technical Support personnel.
- To avoid electric shock, disconnect the DC input and AC input of the inverter at least 5 minutes before performing any installation or maintenance.
- Do not tighten the AC and DC terminals or pull on the AC and DC wiring when the inverter is running.
WARNING! Fire Hazard
- Do not keep combustible or flammable materials in the same room with the equipment. Some products contain relays with moving parts and are not ignition-protected.
- Ensure AC, DC, and ground cable sizes conform to local codes.
- See product manuals for minimum size requirements.
- Ensure all conductors are in good condition.
- Do not operate the unit with damaged or substandard cabling.
CAUTION!Equipment Damage
- When connecting cables from the inverter to the battery terminals, ensure the proper polarity is observed. Connecting the cables incorrectly can damage or destroy the equipment and the warranty may be annulled.
- Thoroughly inspect the equipment before energizing it. Verify that no tools or equipment have been inadvertently left behind.
- Ensure clearance requirements are strictly enforced.
- Keep all vents clear of obstructions that can prevent proper airflow around, or through, the unit.
CAUTION! Equipment Damage
- Static electricity may damage electronic components. Take appropriate steps to prevent such damage to the inverter; otherwise, the warranty may be annulled.
DISCLAIMERS
IMPORTANT: Please follow installation and wiring instructions exactly as outlined to ensure safety. We recommend installation by an RV technician or professional electrician to ensure adherence to relevant electrical codes. We have made every reasonable effort to ensure the accuracy of the instructions in this manual, but Carmanah does not guarantee that the information is error-free, nor do we make any other representation, warranty, or guarantee that the information is accurate, correct, reliable, or current. The specifications in this manual are for reference purposes only and are subject to change without notice. For additional information please see www.gpelectric.com.
DISCLAIMER: Carmanah disclaims liability for any direct, indirect, or incidental damages caused by, or in case of, installation not performed following the instructions and cautions in this manual. Carmanah will refuse requests for exchanges or returns, resulting from the purchase and installation of items that do not comply with local codes. To avoid such concerns Carmanah recommends installation by a professional electrician or RV technician. Examples that are shown within this manual are for illustrative purposes only.
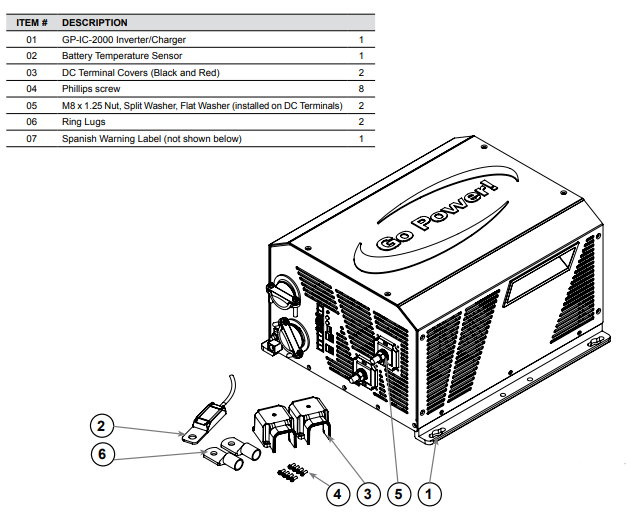
GP-IC-2000 KIT PARTS
Please unpack and make sure all parts shown in the list below are included in the kit. If any parts are missing please contact Carmanah’s customer service team at customerservice@carmanah.com or 1.866.247.6527.
PARTS CHECKLIST
UNIT FEATURES
WARNING: Turning the unit OFF does not disconnect the batteries or AC power source. Therefore the “AC output load” is still active
CAUTION: This Inverter does not include any output circuit breakers. So 20A branch-rated circuit breakers must be installed in the inverters output wiring (breaker panel).
CAUTION: The Inverter’s internal transfer AC transfer relay is rated for 50 amps a leg. The pass-thru current must be no greater than 50 amps a leg or damage to the relays and/or the input circuit breakers may occur.
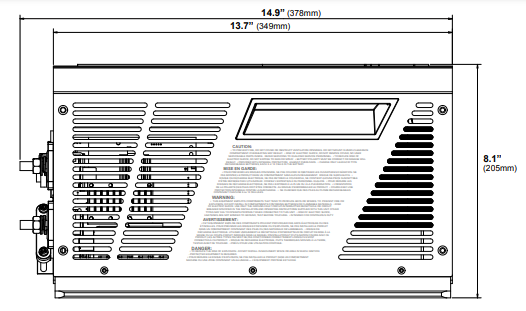
UNIT DIMENSIONS 
UNIT ACCESSORIES
The IC 2000 Inverter/Charger has two accessories available:
- IC 2000 series remote (not included).
- Battery temperature sensor (BTS) (included).

IC 2000 Remote
This remote control device can be used for monitoring the performance of the unit. It is also used to program certain settings on the Inverter, Charger, and AC pass-through.
Battery Temperature Sensor (BTS)
This sensor monitors the temperature of the battery bank. The temperature data is used to provide optimum battery charging even during extreme temperature changes.

REQUIRED TOOLS AND MATERIALS
- Required Tools
- a. 13mm or adjustable wrench
- b. Screwdriver (Phillips & Flathead)
- c. Wire strippers and cutters
- d. Electric hand drill and drill bits
- Optional Tools
- e. Keyhole saw
- f. Pencil or marker
- g. Pliers
- h. Caulking gun
- i. Sealant
- j. Digital multimeter
- k. Torque driver
- l. Butt splice crimping tool
- Materials
- a. Conduit
- b. Strain-reliefs
- c. Electrical tape (Black, Red, Green, Blue, Brown, White)
- d. Zip-ties
- e. Mounting hardware
TYPICAL SYSTEM OVERVIEW
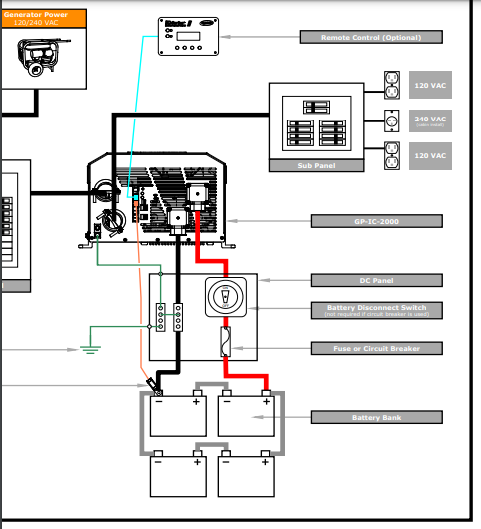
The following diagrams on pages 12-15 show how the GP-IC-2000 is typically installed in a mobile RV application. The diagrams show where the Inverter/Charger is installed and how the mobile power system can be integrated with Go Power! RV Solar Kit (sold separately by Go Power, please contact us directly.)


INSTALLATION 
LOCATION AND ENVIRONMENTAL REQUIREMENTS
The GP-IC-2000 Inverter Charger must be installed in a location that meets the following requirements
- TEMPERATURE
Make sure the GP-IC-2000 is installed in a location where the normal air temperature is between 0 °C and 50 °C. The cooler the better within this range. Note the GP-IC-2000 maximum output wattage will derate in temperatures above 45 °C. - MOISTURE
Do not allow water or other fluids to come into contact with the GP-IC-2000. Do not expose to rain, snow, or water.CAUTION! Equipment Damage. Installing the GP-IC-2000 in environments where moisture may occur will cause
the Inverter/Charger to be exposed to the harmful effects of corrosive environments and certain components’ service
lives’ will be compromised and not covered by the warranty. - VENTILATION
For optimum Inverter/Charger performance, the GP-IC-2000 must be installed so the front, side, and rear air vents are not blocked or obstructed in any way. Do not install the GP-IC-2000 in an area with limited airflow. Allow as much space around the Inverter / Charger as possible, leaving at least 6” of airspace clearance around all ventilation areas.CAUTION! Equipment Damage. Do not mount the GP-IC-2000 in a zero-clearance compartment. Do not cover the
ventilation openings. Overheating and mechanical failure may occur - FIRE
Install the GP-IC-2000 away from the battery bank, away from any flammable or combustible material (paper, flammable liquids, gasoline, cloths) that may be ignited by heat, sparks, or flames. Never place the Inverter/Charger directly above the battery bank – gases from the batteries will corrode and damage the Inverter/Charger, never allow battery acid to drip onto the unit. - ACCESSIBILITY / ORIENTATION
Do not block access to the GP-IC-2000 remote control and battery temperature access ports, status LEDs, and the On/Off switch. Allow enough room to access the AC and DC wiring terminals and connections as they will need to be checked and tightened periodically. The GP-IC-2000 must be installed in one of the approved mounting orientations detailed on page 17. - CLEAN
The GP-IC-2000 should be installed in a location that is clean and limits the introduction of dust, fumes, insects, or rodents that could enter and block the Inverter/Chargers ventilation openings. - PROXIMITY TO BATTERY BANK
The GP-IC-2000 should be located as close to the batteries as possible but not within the same compartment. The length and size of the DC Cables will affect performance. Long DC wires tend to lose efficiency and reduce the overall performance of the Inverter/Charger. Use the DC cables recommended on page 20.
MOUNTING THE INVERTER/CHARGER
- Before connecting any wires to the Inverter / Charger the unit must be mounted securely in a location that meets the
requirements detailed in section 3.2. - The GP-IC-2000 weighs 39 lbs (17.6 kg). Take the necessary precautions required whilst lifting, moving, and installing the unit. It is recommended to use two people whilst mounting the unit. All mounting surfaces and hardware must be capable of supporting at least twice the weight of the Inverter / Charger.
- The Inverter/Charger base can reach high temperatures and should be mounted on a non-combustible surface.
- The GP-IC-2000 must be mounted in the positions highlighted below to meet regulatory requirements.
- After determining the mounting position use the dimensions on page 10 or use the base of the Inverter / Charger to mark the mounting screw locations. Mount the unit with the appropriate mounting hardware (not supplied). Ensure the unit is fastened securely.

GENERAL WIRING SPECIFICATIONS
The following sections detail how the GP-IC-2000 should be wired. Before starting any wiring read and understand these instructions. Wiring should meet all local codes and standards and be performed by qualified personnel such as a licensed electrician. The NEC (National Electrical Code) and CEC (Canadian Electrical Code) provide the standards for safe wiring, wire sizes, over-current protection, installation methods, and requirements. The GP-IC-2000 system can handle power from multiple sources (utility, generator, and batteries) which makes the wiring hazardous and challenging. The input and output AC and DC circuits are isolated from the inverter/charger chassis. The Inverter/Charger grounding is the responsibility of the installer by NEC/CEC or the local electrical codes.
CABLE PROTECTION
All the DC and AC cables leading to/from the GP-IC-2000 must be protected as required by the code. This can be accomplished using a jacketed (armored) cable or by feeding the wire through a conduit.
CABLE STRAIN RELIEF & TORQUE REQUIREMENTS
The GP-IC-2000 AC input/output terminals can handle multi-core cables up to 1.3” in diameter. If using large-diameter cable it is highly recommended to use additional (nonmetallic) cable strain relief clamps mounted outside the Inverter / Charger these will ease the torque and leverage forces that could be present at the cable entry/exit locations.
Torque all AC and DC wiring connections to 16 in lbf (1.8 N-m), make sure the connections are secure, and re-check all connections periodically (at least every 6 months, more frequently for heavy RV use) to make sure they remain secure.
CABLE REQUIREMENTS
- Protect all conductors that may be at risk of physical damage by using conduit, tape, or placing them in a raceway.
- Do not mix AC and DC Wiring in the same conduit or panel. Where DC wiring must cross AC, try to make sure the wires cross perpendicular to each other.
- Both AC and DC over-current protection must be provided.
- The Inverter/Charger requires a reliable negative and ground return path to the battery.
- Use only copper wires with a minimum temperature rating of 75 °C.
CABLE LAYOUT PLANNING
Before connecting any cables, determine all cable routes to/from the GP-IC-2000.
- AC Input cables from the external transfer switch (if using shore and generator).
- DC Input cables from the batteries.
- AC Output cables from the Inverter / Charger to the AC breaker panel.
- Battery Temperature Sensor cable from the Inverter / Charger to the batteries.
- Remote Control cable to the Inverter / Charger.
- Ground wiring to/from the Inverter / Charger.
DC OVERCURRENT PROTECTION AND DC DISCONNECT
- Batteries are capable of providing very large currents in case of a short circuit, if this occurs with no DC overcurrent protection, it will result in overheating and melting of the cables and possibly serious injury and/or fire.
- DC overcurrent protection is not included with the GP-IC-2000. It must be installed between the Inverter / Charger and battery bank for safety reasons and to comply with code regulations.
- Use a very fast-acting DC fuse or circuit breaker in the positive cable, the fuse should be installed as close as possible to the battery-positive terminal. Ideally, the fuse/circuit breaker should be installed within 18” (45cm of the battery). The fuse required for DC Cable lengths up to 5ft is detailed in the above table.
- In all installations a battery disconnect switch is required, if you install a circuit breaker for overcurrent protection this will suffice as a disconnect switch. If you install a fuse for overcurrent protection then a separate disconnect switch will need to be installed.
PREPARING THE DC CABLES
Go Power! supplies 2 ring lugs with the GP-IC-2000 which can be used for the Inverter / Charger end of the DC Cables. Source the correct ring terminals for the batteries you are using.
- Cut the negative and positive cables to the required length.
- Strip off enough insulation so you can install the ring lugs provided.
- Use the correct crimp connector to install the ring lugs.
- Attach the connectors to both ends of both cables. Make sure no stray wire strands protrude from the connectors.
DC CABLE CONNECTIONS
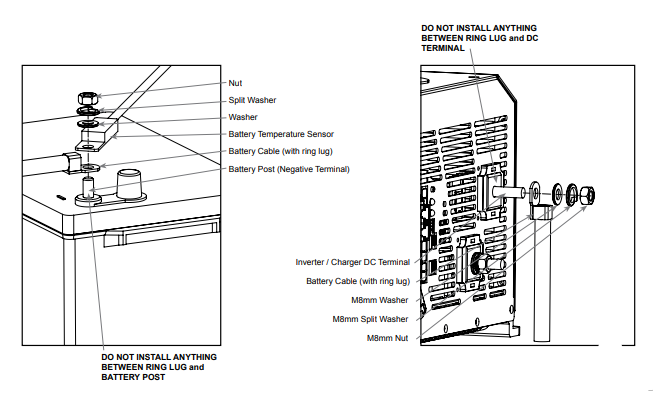
When installing the battery cable ring lug onto the GP-IC-2000 DC terminal and the battery post – do not put anything between the ring lug and the metal surface. Incorrectly installed hardware causes a high resistance connection which could lead to poor Inverter/Charger performance and may melt the cable and terminal connections. Refer to the figures on page 21 to connect the DC Cables and install the hardware correctly. Use a 13mm wrench or socket to tighten the M8 x 1.25mm Nuts. Tighten the terminal connections securely and periodically check the connections to make sure they remain tight and secure.
To help prevent seizing and corrosion around the terminals the use of an anti-seize lubricant is highly recommended. Apply the antioxidant grease or spray after all the connections are made and tightened.
BATTERY TEMPERATURE SENSOR INSTALLATION
The Battery Temperature Sensor (BTS) extends the life of the battery by preventing overcharging in warm temperatures and undercharging in cold temperatures. The BTS provides the Inverter / Charger with precise battery temperature information to automatically adjust the absorb and float charge voltage set points. If the BTS is NOT installed and the battery bank is subjected to large temperature changes the battery life will be reduced.
- Install the battery temperature sensor ring terminal onto the NEGATIVE battery terminal.
- Route the sensor’s cable to the Inverter / Charger following existing wire runs.
- Connect the RJ11 connector end of the BTS cable to the ‘Battery Temp’ port on the Inverter / Charger.

AC POWER SOURCE TYPES
AC Input power to the GP-IC-2000 can be supplied from a split-phase or dual-input single-phase AC source. These sources typically include utility power or a generator.
- Split Phase: This source has 4 lines: 2 hotlines, one neutral, and one ground. The 2 hotlines are 120VAC and are 180 degrees out of phase with each other so the 2 voltages equal 240VAC. The voltage between each hot line and neutral is 120VAC and the voltage between the neutral and ground is approximately zero. Because the 2 lines are out of phase, the currents from each line subtract from the neutral, and the neutral current will be approximately zero if the loads on each line are equal. For example, if Hot 1 is supplying 20A and Hot 2 is supplying 15A, the current in the neutral will be 5A.
- Dual Input: This source has 4 lines: 2 Hotlines, one neutral, and one ground. The 2 Hot Lines are 120VAC and are in phase and must come from the same source. The voltage between the 2 hotlines is zero. The voltage between each hotline and the neutral is 120VAC and the voltage between the neutral and the ground is approximately zero. Because the 2 lines are in phase, the currents from each line add together in the neutral. For example, if Hot 1 is supplying 20A and Hot 2 is supplying 15A, the current in the neutral will be 35A.
AC WIRE SIZE AND OVERCURRENT PROTECTION
The wires used for the Input AC and Output AC must be sized to meet local electrical safety requirements. The AC wiring must be protected from short circuits and overloads by an overcurrent protection device, these requirements are usually met using a main panel and sub-panel (with suitable circuit breakers/fuses installed) located before and after the Inverter / Charger as shown on pages 30 – 33.
FINAL INSPECTION
- Verify all cables/conduit runs are secured with zip ties or other non-conductive cable clamps to prevent damage from vibration.
- Ensure all cables that pass through walls, bulkheads, or any other openings are protected against abrasion by using strain reliefs and/or grommets.
- Check all AC, DC, and ground connections are securely tightened, and if required covered with suitable anti-seizing grease.
- Check the AC terminal connection cover plate has been securely re-attached.
- Check all connections are secure in the main and sub panels – replace all covers.
- If required by code, have the installation inspected by an electrical inspector.
TESTING THE INSTALLATION
- Apply battery power to the inverter by engaging the fuse, switching the breaker, or switching the battery disconnect switch to the ON position. The GP-IC-2000 will remain off.
- Disconnect all AC loads from the breaker panel by switching the main on/off breaker to OFF.
- Press the ON/OFF button. Verify the inverter status indicator is solid green (ON).
- Connect a 25W light bulb to the inverter output and verify it comes on and shines normally.
- Press and release the ON/OFF button to turn the Inverter / Charger off, the bulb will turn off and the status indicator will turn off.
- Apply AC shore power (utility or generator) to the GP-IC-2000. After around 10 seconds the Inverter / Charger will click and the incoming power will be passed through and the light bulb will turn on. The status indicator will be green.
- The inverter is currently OFF because the AC shore power is powering the light bulb. Press and release the ON/OFF switch on the GP-IC-2000 to turn on the Inverter.
- Disconnect the AC shore power, the light bulb should remain on and is now being powered by the Inverter (battery bank).
WARNING LABELS
- When an Inverter / Charger is installed in a building the NEC requires a label or plaque to be provided. This label/plaque is required to be easily visible and to provide information that informs users of the location of all electrical system disconnects. Buildings with stand-alone power systems (solar, generator) and utility power must have a permanent plaque or directory providing the location of both system disconnects.
- An Inverter warning label should be installed in a visible location on the breaker panel that is being powered by the GP-IC-2000. This label is used because it might be falsely assumed that the panel is no longer “live” after the AC Shore Power is turned off, when power may still be available from the Inverter (battery bank) powering the sub panel.
FACTORY DEFAULT VALUES
The GP-IC-2000 uses default values for the following adjustable settings;

GP-IC-2000 FAULT CONDITIONS
The GP-IC-2000 is protected against fault conditions and in normal use it will be rare to see any. If a fault condition does occur, the GP-IC-2000 will shut down as a safety measure to protect itself, the battery bank, and the AC loads. The following fault conditions could be the cause of the Inverter / Charger shut down;
- LOW BATTERY – The GP-IC-2000 will shut off whenever the battery bank voltage falls to the LBCO (Low Battery Cut Out) level to protect the batteries from being over-discharged. When the Inverter / Charger has reached the LBCO and is turned off, the unit will automatically restart when AC shore power is supplied to the AC Input and the battery bank voltage rises above the LBCI (Low Battery Cut In) 12.5 VDC level
- HIGH BATTERY – The GP-IC-2000 will shut off whenever the battery bank voltage approaches the HBCO (High Battery Cut Out) level the Inverter / Charger will automatically shut down to prevent un-regulated AC output voltage from being supplied to the AC loads. The unit will automatically restart when the battery bank voltage falls below the HBCI (High Battery cut) 14.5 VDC level
- OVER TEMPERATURE – The GP-IC-2000 monitors the temperature of several key components within the Inverter / Charger – if these components begin to exceed their safe operating temperature level, the unit will shut down to protect itself. The unit will automatically restart after the unit cools down.
- OVERLOAD – When the GP-IC-2000 is in Inverting or AC pass-through mode, the Inverter / Charger monitors the current levels, in the event of a short circuit or an overload condition the unit will shut down. To start operating after this fault, the Inverter / Charger must be turned on using the on/off switch on the unit or remote control once the AC loads are reduced/removed.
- INTERNAL FAULT – The GP-IC-2000 continues to monitor several internal components, if a condition occurs that does not allow normal operation the Inverter / Charger will shut down to protect itself, the battery bank, and the AC loads. To start operating after this fault, the Inverter / Charger must be turned on using the on/off switch on the unit or remote control
MAINTENANCE AND TROUBLESHOOTING
The GP-IC-2000 is designed to be service-free, even though there are no user-serviceable parts, it is recommended that every 6 months you perform the following maintenance steps to ensure optimum performance and extend the life of your batteries.
- Visually inspect the batteries for cracks, leaks, or swelling – replace them if necessary.
- Use baking soda to clean and remove any electrolyte spills or buildup.
- Check and tighten all battery terminal connections.
- Check and fill battery water levels in flooded lead acid batteries.
- Check individual battery voltages (load tests those that have a voltage difference of more than 0.3 VDC from each other) and replace them if necessary.
- Check the Inverter / Chargers ventilation vents – clean if necessary.
- Visually inspect all cables in both the DC and AC systems – check for wear/abrasion – replace if necessary and ensure strain reliefs and cable protection are installed to prevent future damage.
- Check and tighten the Inverter / Chargers AC terminal block connections.
- Check the ground connections are secure on the Inverter / Charger, Battery Bank, Main / Sub Panels, and the Earth Ground on the RV and boat.
- Check the battery sensor is still securely attached to the battery bank.


SPECIFICATIONS 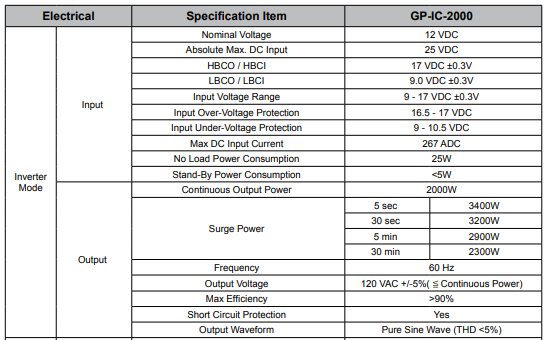

WARRANTY RETURN PROCEDURE
The Go Power! warranty is valid against defects in materials and workmanship for the specific product warranty period. It is not
valid against defects resulting from, but not limited to:
- Misuse and/or abuse, neglect, or accident.
- Exceeding the unit’s design limits.
- Improper installation, including, but not limited to, improper environmental protection and improper hook-up.
- Acts of God, including lightning, floods, earthquakes, fire, and high winds.
- Damage in handling, including damage encountered during shipment.
A warranty shall be considered void if the warranted product is in any way opened or altered. The warranty will be void if any
eyelet, rivets, or other fasteners used to seal the unit are removed or altered, or if the unit’s serial number is in any way removed, altered, replaced, defaced, or rendered illegible.
Warranty Return Procedure
Before contacting Go Power!’s customer service department, please read the “frequently asked questions” section of our website to troubleshoot the problem. If trouble persists:
- Call your Go Power!™ Technical Support team (1-866-247-6527) or
- Return defective product to place of purchase.
Unless approved by Go Power! Management, all products shipped collect to Go Power! will be refused. Test items or items that are not under warranty, or units that are not defective, will be charged a minimum bench charge of ($50.00 US) plus taxes and shipping. A 15% restocking charge will be applied to goods returned and accepted as “new” stock.
An RMA number (Return Materials Authorization number) from Carmanah Customer Service is required before returning any Carmanah Products. Carmanah reserves the right to refuse any items sent to Carmanah without an associated RMA number. To obtain an RMA number,
- please contact
- customerservice@carmanah.com or
- Telephone 1-250-380-0052 or
- Fax 1-250-380-0062
- worldwide — or
- Toll-Free for US & Canada 1-866-247-6527.
Out of Warranty
Go Power! electronic products are non-repairable, Go Power! does not perform repairs on its products nor does it contract out
those repairs to a third party. Go Power! does not supply schematics or replacement parts for any of its electronic products.
END OF LIFE – RECYCLING INFORMATION
Product E.O.L (End of life) Information
This product required the extraction and use of natural resources. It may contain substances that could be harmful to the environment or human health if improperly handled at the product’s end of life. To avoid the release of such substances into the environment and to reduce the use of natural resources, we encourage you to recycle the GP-IC-2000 in an appropriate way that will ensure most of the materials are reused or recycled appropriately.
DO NOT DISPOSE OF THIS PRODUCT WITH NORMAL GARBAGE
The easiest way to recycle the GP-IC-2000 is to take the unit to a local certified e-waste (electronics waste) recycling center.
Knowing for sure if your appliances are being recycled properly is tricky. If you are in doubt just ask. Recyclers who are certified
should gladly show you their certification. If the re-cycler is certified, chances are very high that they are recycling responsibly
To find your local e-waste centre please contact your local municipality. The following website also has information on local
recycling centers: www.earth911.com/recycling-center-search-guides
If you have no locally certified e-waste recycling center, the GP-IC-2000 can be disassembled manually and recycled responsibly. A Phillips screwdriver is required to disassemble the GP-IC-2000.
Note: The GP-IC-2000 should only be disassembled at the end of its service life, Go Power! provides no spare parts for the GP-IC-2000
FAQS About Go Power GP-IC2000 Pure Sine Wave Inverter
What is a Pure Sine Wave Inverter?
Explains the difference between pure sine wave and modified sine wave inverters.
What devices can be powered by the Go Power GP-IC2000?
Discusses the compatibility of the inverter with various electronic devices.
How do I install the GP-IC2000 Inverter?
Provides information on the installation process, including wiring and safety considerations.
What is the maximum power output of the GP-IC2000?
Specifies the inverter’s maximum continuous and surge power ratings.
Can I connect the inverter to my vehicle’s battery?
Addresses whether the inverter can be used with a vehicle’s battery and any considerations for doing so.
Does the inverter have built-in protection features?
Describes the safety features of the inverter, such as over-voltage protection and thermal shutdown.
Is the GP-IC2000 suitable for solar power applications?
Discusses the compatibility of the inverter with solar power systems.
What is the idle power consumption of the inverter?
Provides information on the power consumption when the inverter is not actively powering a device.
How do I troubleshoot common issues with the GP-IC2000?
Offers guidance on diagnosing and resolving common problems that users may encounter.
What is the warranty period for the Go Power GP-IC2000?
Specifies the warranty coverage and terms for the inverter.
For more manuals by Go Power ManualsDock

