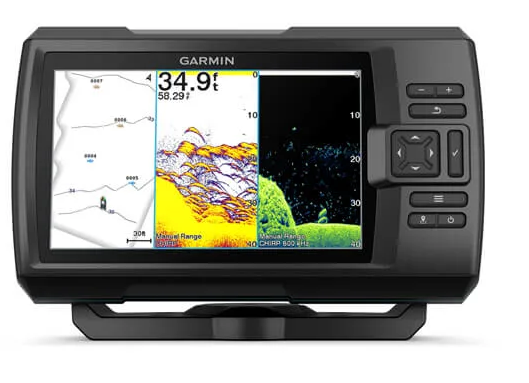
Garmin Striker Vivid Transducer
About Garmin
We create goods with internal engineering designed for outdoor use. We do this to help our clients maximize the time spent following their passions. With more than 19,000 employees spread across 35 nations, we serve the automobile, aviation, marine, outdoor, and fitness markets with GPS navigation and wearable technology. We believe that there is always room for innovation and improvement.
Introduction
WARNING See the Important Safety and Product Information guide in the product box for product warnings and other important information.
Device Keys

NOTICE Before turning on the device, you must firmly press the connectors into the appropriate holes in the device. If the cables are not pressed far enough into the device, the device appears to lose power or stop working.
Home Screen
The fishfinder home screen provides access to all of the features in the fishfinder. The features are dependent on the accessories you have connected to the fish finder. You may not have all of the options and features discussed in this manual. When viewing another screen, you can return to the home screen by holding it. You can customize the layout of the screens.
Zooming on the STRIKER Vivid 4
You can zoom in and out of the map.
- Select to zoom in.
- Select to zoom out.
Panning on the STRIKER Vivid 4
You can move the sonar views and maps to view an area other than your present location.
- Select or start panning.
- Use the arrow keys to pan.
TIP: You can select to stop panning.
GPS Satellite Signal Acquisition
When you turn on the fish finder, the GPS receiver must collect satellite data and establish the current location. When the fishfinder acquires satellite signals, appears at the top of the Home screen. When the fishfinder loses satellite signals, disappears and a flashing question mark appears on the screen. For more information about GPS, go to www.garmin.com/aboutGPS.
Customizing the Chartplotter
Customizing the Home Screen
You can add items to and rearrange items on the Home screen.
- From the Home screen, select Customize.
- Select an option:
- To rearrange an item, select Rearrange, select the item to move, and select the new location.
- To add an item to the Home screen, select Add, and select the new item.
- To remove an item you have added to the Home screen, select Remove, and select the item.
- To change the Home screen background image, select Background, and select an image.
Combination Pages
Some pages combine two or more functions on one page. The number of options available for combination pages depends on the optional devices you have connected to your STRIKER Vivid device. You can edit the combination pages and create new combination pages.
Creating a New Combination Page with the STRIKER Vivid 5/7/9
You can create a custom screen to suit your needs.
- Select Customize > Add > Add Combo.
- Select a layout.

- Select an area.
- Select a screen.
- Repeat these steps for each area of the page.
- If necessary, select Data (Hidden), and select an option:
- To customize the data shown on the screen, select Overlay Numbers.
- To turn on and off the compass tape data bar, select Compass Tape.
- Select Done when you are done customizing.
- Select Next.
- Enter a name for the page.
TIP: Select to select a letter. - Use the arrow keys to resize the windows.
- Use the arrow keys to select a location on the home screen.
- Select Done to exit.
Creating a New Combination Page with the STRIKER Vivid 4
You can create a custom page to suit your needs.
- Select Customize > Add > Add Combo.
- Select the first function.
- Select the second function.
- Select Split to choose the direction of the split screen (optional).
- Select Next.
- Enter a name for the page.
TIP: Select to select the letter. - Use the arrow keys to resize the windows.
- Use the arrow keys to select a location on the home screen.
- Select Done to exit.
Customizing a Combination Page
- Open a combination page.
- Select > Configure.
- Select an option:
- To change the name, select Name, and enter a new name.
- To change the arrangement of the information on the screen, select Change Layout, and select a new layout.
- To change the information shown on the screen, select Change Function, and select new information.
- To resize the information areas shown on the screen, select Resize Combination.
- To customize the data shown on the screen, select Overlay Numbers (Overlay Number Settings, page 17).
Adjusting the Backlight
- Select Settings > System > Display > Backlight.
- Adjust the backlight.
TIP: From any screen, press repeatedly to scroll through the brightness levels. This can be helpful when the brightness is so low you cannot see the screen.
Adjusting the Color Mode
- Select Settings > System > Display > Color Mode.
TIP: Select > Color Mode from any screen to access the color settings. - Select an option.
Setting the Beeper
You can set when the device makes sounds.
- Select Settings > System > Beeper.
- Select an option:
- To have the device beep when you select an item and when an alarm is triggered, select On (Selections and Alarms).
- To have the device beep only when alarms are triggered, select Alarms Only.
ActiveCaptain® App
WARNING This feature allows users to submit information. Garmin® makes no representations about the accuracy, completeness, or timeliness of information submitted by users. Any use or reliance on the information submitted by users is at your own risk.
The ActiveCaptain app provides a connection to your STRIKER Vivid device and the community for a connected boating experience. You can use the app to easily and quickly transfer user data, such as waypoints and routes, connect to the Garmin Quickdraw™ Contours Community, update device software, and plan your trip.
ActiveCaptain Roles
Your level of interaction with the STRIKER Vivid device using the ActiveCaptain app depends on your role.
Getting Started with the ActiveCaptain App
NOTE: The ActiveCaptain feature is only available on STRIKER Vivid 7 and STRIKER Vivid 9 models, which have Wi‑Fi® technology.
You can connect a mobile device to the STRIKER Vivid device using the ActiveCaptain app. The app provides a quick and easy way for you to interact with your chartplotter and complete such tasks as sharing data, registering, updating the device software, and receiving mobile device notifications.
- From the STRIKER Vivid device, select ActiveCaptain.
- From the ActiveCaptain page, select Wi-Fi Network > Wi-Fi > On.
- Enter a name and password for this network.
- From the application store on your mobile device, install and open the ActiveCaptain app.
- Bring the mobile device within 24 m (80 ft.) of the STRIKER Vivid device.
- From your mobile device settings, open the Wi‑Fi connections page and connect to the Garmin device, using the name and password you entered in the Garmin device.
Enabling Smart Notifications
WARNING Do not read or reply to notifications while operating the vessel. Failure to pay attention to the conditions on the water can result in vessel damage, personal injury, or death. Before your STRIKER Vivid device can receive notifications, you must connect it to your mobile device and the ActiveCaptain app.
- From the STRIKER Vivid device, select ActiveCaptain > Smart Notifications > Enable Notifications.
- Turn on Bluetooth® technology in the mobile device settings.
- Bring the devices within 24 m (80 ft.) of each other.
- From the ActiveCaptain app on the mobile device, select Smart Notifications > Pair with Chartplotter.
- Follow the on-screen instructions to pair the app to the STRIKER Vivid device.
- When prompted, enter the key on your mobile device.
- If necessary, adjust which notifications you receive in your mobile device settings. ActiveCaptain® App
Updating Software with the ActiveCaptain App
If your device has Wi‑Fi technology, you can use the ActiveCaptain app to download and install the latest software updates for your device.
NOTICE Software updates may require the app to download large files. Regular data limits or charges from your Internet service provider apply. Contact your Internet service provider for more information about data limits or charges.
The installation process can take several minutes.
- Connect the mobile device to the STRIKER Vivid device (Getting Started with the ActiveCaptain App, page 5).
- When a software update is available and you have internet access on your mobile device, select Software Updates > Download. The ActiveCaptain app downloads the update to the mobile device. When you reconnect the app to the STRIKER Vivid device, the update is transferred to the device. After the transfer is complete, you are prompted to install the update.
- When you are prompted by the STRIKER Vivid device, select an option to install the update.
- To update the software immediately, select OK.
- To delay the update, select Cancel. When you are ready to install the update, select ActiveCaptain > Software Updates > Install Now.
Sonar Fishfinder
For more information about which transducer is best for your needs, go to garmin.com/transducers. Different sonar views can help you view the fish in the area. The sonar views available vary depending on the type of transducer and sounder module connected to the chart plotter. For example, you can view certain Garmin ClearVü™ sonar screens only if you have a compatible Garmin ClearVü transducer connected. There are four basic styles of sonar views available: a full-screen view, a split-screen view that combines two or more views, a split-zoom view, and a split-frequency view that displays two different frequencies. You can customize the settings for each view on the screen. For example, if you are viewing the split-frequency view, you can separately adjust the gain for each frequency.
Traditional Sonar View
There are several full-screen views available, depending on the transducer that is connected. The full-screen Traditional sonar view shows a large image of the sonar readings from a transducer. The range scale along the right side of the screen shows the depth of detected objects as the screen scrolls from the right to the left.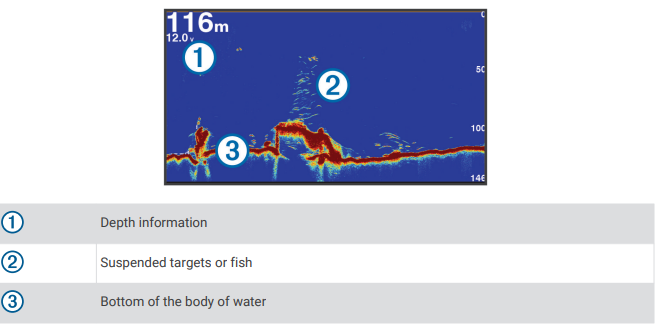
Garmin ClearVü Sonar View
NOTE: To receive Garmin ClearVü scanning sonar, you need a compatible transducer. For information about compatible transducers, go to garmin.com/transducers.
Garmin ClearVü high-frequency sonar provides a detailed picture of the fishing environment around the boat in a detailed representation of structures the boat is passing over.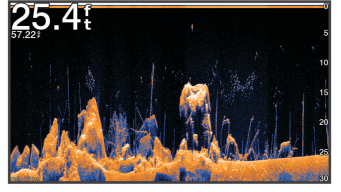
Traditional transducers emit a conical beam. The Garmin ClearVü scanning sonar technology emits two narrow beams, similar to the shape of the beam in a copying machine. These beams provide a clearer, picture-like image of what is beneath the boat.
SideVü Sonar View
SideVü scanning sonar technology shows you a picture of what lies to the sides of the boat. You can use this as a search tool to find structures and fish.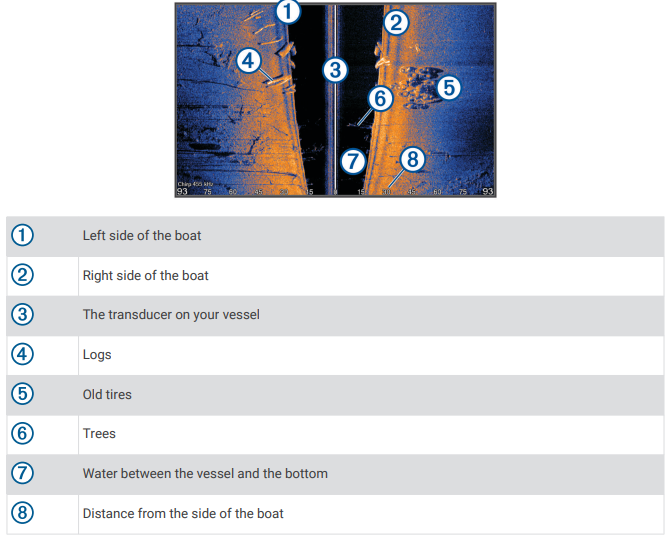
System Settings
- Select Settings > System.
- Display: Adjusts the backlight brightness (Adjusting the Backlight, page 4) and color scheme (Adjusting the Color Mode, page 4).
- Beeper: Turns on and off the tone that sounds for alarms and selections (Setting the Beeper, page 4).
- GPS: Provides information about the GPS satellite settings and fixes.
- Auto Power: Turns on the device automatically when power is applied.
- Keyboard Layout: Sets the arrangement of the keyboard to an alphabetical or computer keyboard layout.
- Language: Sets the on-screen language.
- System Information: Provides information about the device and the software version.
- Simulator: Turns on the simulator and allows you to set the speed and simulated location.
System Information
- Select Settings > Settings > System Information.
- Event Log: This allows you to view a log of system events.
- Software Information: Provides information about the device and the software version.
- Garmin Devices: Provides information about connected Garmin devices.
- Reset: Restores the device to factory settings.
NOTE: This deletes any setting information you have entered.
Sharing and Managing User Data
WARNING This feature allows you to import data from other devices that may have been generated by third parties. Garmin makes no representations about the accuracy, completeness, or timeliness of data that is generated by third parties. Any reliance on or use of such data is at your own risk.
You can share user data between compatible devices. User data includes waypoints, saved tracks, routes, and boundaries.
- You can share data if two compatible devices are connected using the blue and brown wires on the power cable or using the User Data Sharing Cable (Connecting to a Garmin Device to Share User Data, page 30).
Connecting to a Garmin Device to Share User Data
You can connect the STRIKER Vivid device to a compatible Garmin device to share user data, such as waypoints. If the devices are mounted near each other, you can connect the blue and brown wires. If the devices are mounted too far apart for the wires to reach, you can connect the devices using a User Data Sharing Cable (010-12234-06).
- Make sure both devices are connected to the same ground.
- Complete an action:
- If the devices are mounted near each other, connect the blue wire from the first device to the brown wire of the second, and connect the brown wire from the first device to the blue wire of the second.
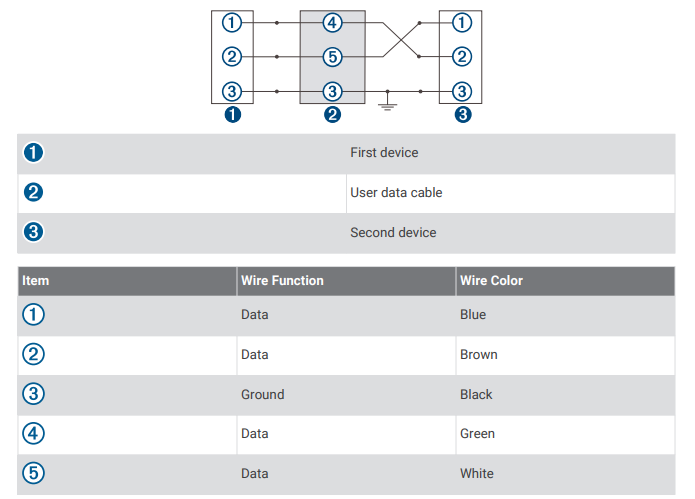
- If the devices are not mounted near each other, obtain a User Data Sharing Cable (010-12234-06), and connect the devices following the instructions included with the cable (User Data Sharing Cable Wiring Diagram, page 31).
- On both devices, select User Data > Manage Data > User Data Sharing.
User data is shared between the connected devices. If you select Clear User Data, data is removed from both connected devices.
User Data Sharing Cable Wiring Diagram
Clearing Saved Data
You can remove saved user data from the device’s memory.
- Select User Data > Manage Data > Clear User Data.
- Select an option.
NOTICE
- If you select All, all the data you have saved will be removed, except Garmin Quickdraw contours data.
- If you are connected to another device and User Data Sharing is enabled, data is removed from all connected devices.
Registering Your Device with the Serial Number
If your device does not have Wi‑Fi technology, you can register using the device’s serial number. If your device has Wi‑Fi technology, you should use the ActiveCaptain app to register the device (Getting Started with the ActiveCaptain App, page 5). Keep the original sales receipt, or a photocopy, in a safe place.
- Locate the serial number on the product box or the device.
- Go to garmin.com/registration.
- Sign in to your Garmin account.
- Enter the serial number.
Specifications
Troubleshooting
My device will not turn on or keeps turning off
Devices erratically turning off or not turning on could indicate an issue with the power supplied to the device. Check these items to attempt to troubleshoot the cause of the power issue.
- Make sure the power source is generating power. You can check this in several ways. For example, you can check whether other devices powered by the source are functioning.
- Check the fuse in the power cable. The fuse should be located in a holder that is part of the red wire of the power cable. Check that the proper size fuse is installed. Refer to the label on the cable or the installation instructions for the exact fuse size needed. Check the fuse to make sure there is still a connection inside of the fuse. You can test the fuse using a multimeter. If the fuse is good, the multimeter reads 0 ohm.
- Check to make sure the device is receiving at least 12 Vdc. To check the voltage, measure the female power and ground sockets of the power cable for DC voltage. If the voltage is less than 12 Vdc, the device will not turn on.
- If the device is receiving enough power but does not turn on, contact Garmin product support.
Changing the Fuse in the Power Cable
- Open the fuse housing .

- Twist and pull the fuse to remove it
- Insert a new 3 A fast-blow fuse.
- Close the fuse housing.
My device will not acquire GPS signals
If the device is not acquiring satellite signals, there could be a few causes. If the device has moved a large distance since the last time it acquired satellites or has been turned off for longer than a few weeks or months, the device may not be able to acquire the satellites correctly.
- Ensure the device is using the latest software. If not, update the device software (Updating Software with the ActiveCaptain App, page 6).
My sonar does not work
- Push the transducer cable into the back of the device. Even if the cable seems to be connected, you should push it firmly so that it is fully seated.
- Press, and ensure sonar is enabled.
- Select the correct transducer type (Selecting the Transducer Type, page 11).
My device is not creating waypoints in the correct location
You can manually enter a waypoint location to transfer and share data from one device to the next. If you have manually entered a waypoint using coordinates, and the location of the point does not appear where the point should be, the map datum and position format of the device may not match the map datum and position format originally used to mark the waypoint. Position format is how the GPS receiver’s position appears on the screen. This is commonly displayed as latitude/longitude in degrees and minutes, with options for degrees, minutes, and second, degrees only, or one of several grid formats. A map datum is a math model which depicts a part of the surface of the earth. Latitude and longitude lines on a paper map are referenced to a specific map datum.
- Find out which map datum and position format was used when the original waypoint was created. If the original waypoint was taken from a map, there should be a legend on the map that lists the map datum and position format used to create that map. Most often this is found near the map key.
- Select Settings > Units.
- Select the correct map datum and position format settings.
- Create the waypoint again.
My device does not display the correct time
Time is set by GPS position and time zone setting.
- Select Settings > Units > Time Zone.
- Ensure the device has a GPS fix.
FAQs About Garmin Striker Vivid Transducer
What distinguishes Vivid from Garmin Striker 4?
Although I will occasionally use the Striker on lakes up to 100′, I will primarily use it on tiny lakes with less than 50″ of water depth. The “CV” Clear View transducer, display size, and screen resolution are the main variations.
What is the depth of the Garmin Striker Vivid 4cv?
precise in fresh water down to 1750 feet (830 salt, 250 ClearVü). Supported frequencies include ClearVü (260/455/800 kHz), CHIRP (mid and high), and conventional (50/77/200 kHz).
Can two transducers be used by Garmin?
A boat can have more than one transducer installed, albeit it is not advised to run more than one transducer at once.
Are transducers made by Garmin all the same?
And for each to function at its best, a distinct transducer is needed. It’s critical to match the transducer to your device’s sonar for best results. Make sure the transducer you are purchasing pairs with your unit first, and then decide what kind of sonar technology you want to include.
What is the most accurate Garmin?
The Garmin Forerunner 255 series of watches continues to be among the top GPS running watches because of their reliable heart-rate monitoring, precise distance and route tracking, and strong heart-rate tracking.
Is the Striker from Garmin waterproof?
Because of its IPX7 waterproof rating, it is resistant to rain and water splashes.I use in a kayak, and as I drag in rambunctious fish, I get splattered.
What is the superior transducer?
While dual frequency transducers offer superior resolution for deep sea fishing, single frequency transducers are more effective in shallow coastal waters or in lakes and rivers.
Do Garmins share a common GPS?
A range of Global Navigation Satellite Systems (GNSS) are supported by Garmin watches. Some only support one GNSS, like GPS. Some provide multi-GNSS, when two or more GNS systems collaborate to provide position, speed, and time.
Can the Garmin transducer be upgraded?
With this kit, you can easily upgrade or replace your integrated Garmin transducer.
Can I use a Garmin GPS without a transducer?
Indeed, without the transducer, the Garmin echoMAP CHIRP 74sv will function as a navigation device.
For more manuals by Garmin Manuals Dock


