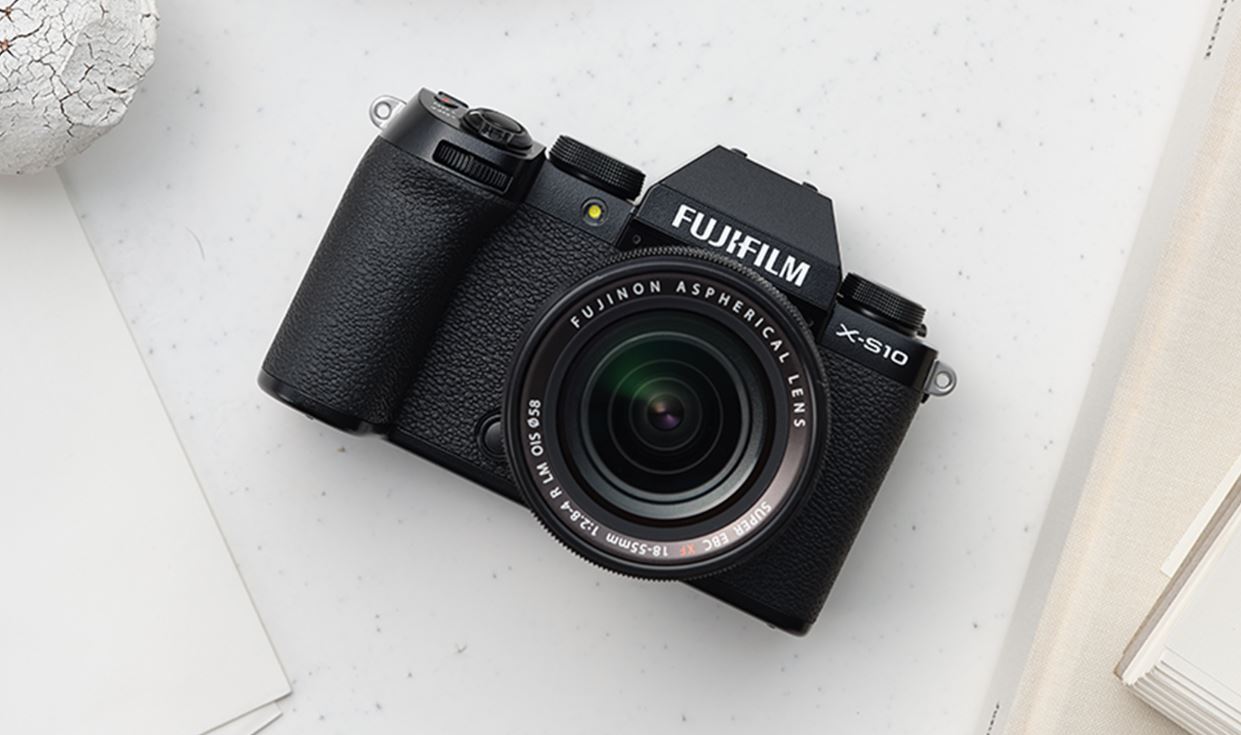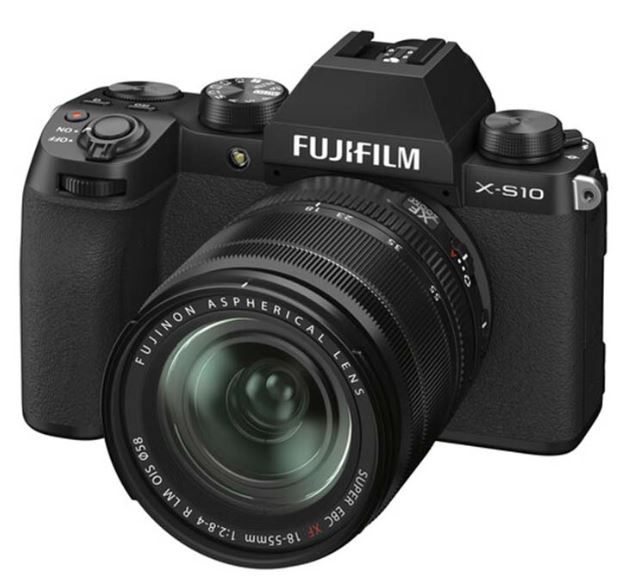
Fujifilm X-S10 Mirrorless Digital Camera
About Fujifilm
Fujifilm, also known as Fujifilm Holdings Corporation, is a Japanese multinational corporation that specializes in imaging and photographic products, as well as various other technologies and services. Fujifilm has a long and storied history dating back to its founding in 1934 as Fuji Photo Film Co., Ltd. The company’s headquarters are located in Tokyo, Japan.
Here are some key aspects and areas of focus for Fujifilm:
- Photography and Imaging: Fujifilm is renowned for its photographic film and cameras, including popular brands like Fujifilm Instax instant cameras and the Fujifilm X-series mirrorless digital cameras. They produce a wide range of photographic products, including film, digital cameras, lenses, and accessories.
- Medical Imaging: Fujifilm has a significant presence in the healthcare industry, providing medical imaging equipment and solutions, including digital X-ray systems, medical printers, endoscopy systems, and more. Their healthcare division plays a crucial role in diagnostic imaging and medical informatics.
- Graphic Arts: Fujifilm is a major player in the graphic arts and printing industry, offering a range of solutions for commercial printing, packaging, and label printing. This includes digital printing equipment, inkjet technologies, and workflow software.
- Document Solutions: Fujifilm provides document solutions, including photocopiers, multifunction devices, and document management software, aimed at improving office productivity and efficiency.
- Materials and Chemicals: The company produces a variety of high-performance materials and chemicals used in industries such as semiconductors, display panels, and flat-panel displays.
- Digital Cameras and Lenses: Fujifilm’s X-series of mirrorless cameras and Fujinon lenses have gained popularity among both amateur and professional photographers for their image quality and innovative features.
- Instant Photography: Fujifilm’s Instax series of instant cameras and film have revived interest in instant photography and are popular among young users for their retro appeal.
- Photographic Film: While digital photography has largely replaced film in many areas, Fujifilm still produces a range of film products for photographers who prefer analog photography.
- Research and Development: Fujifilm invests heavily in research and development, which has led to innovations in various fields, from photography to healthcare and materials science.
Fujifilm has adapted to the changing technological landscape by diversifying its business interests beyond traditional photography. The company’s commitment to research and innovation has allowed it to remain relevant in the digital age while maintaining a strong presence in photography and imaging.
Parts of the Camera
The parts of the camera are listed below.
 (movie recording) button
 - Q (quick menu) button
- ISO button
- Rear command dial
- Mode dial
- Hot shoe
- Microphone
- Fn (function) dial
 (flash pop-up) lever
- Connector cover
- Strap clip
- Connector cover
- Speaker
- Lens signal contacts
- Lens release button
- AF-assist illuminator
Self-timer lamp
Tally light - Front command dial
- ON/OFF switch
- Shutter button
- Flash
- Body cap
- Microphone/remote release connector (dia 3.5 mm)
- USB connector (Type-C)
- HDMI Micro connector (Type D)
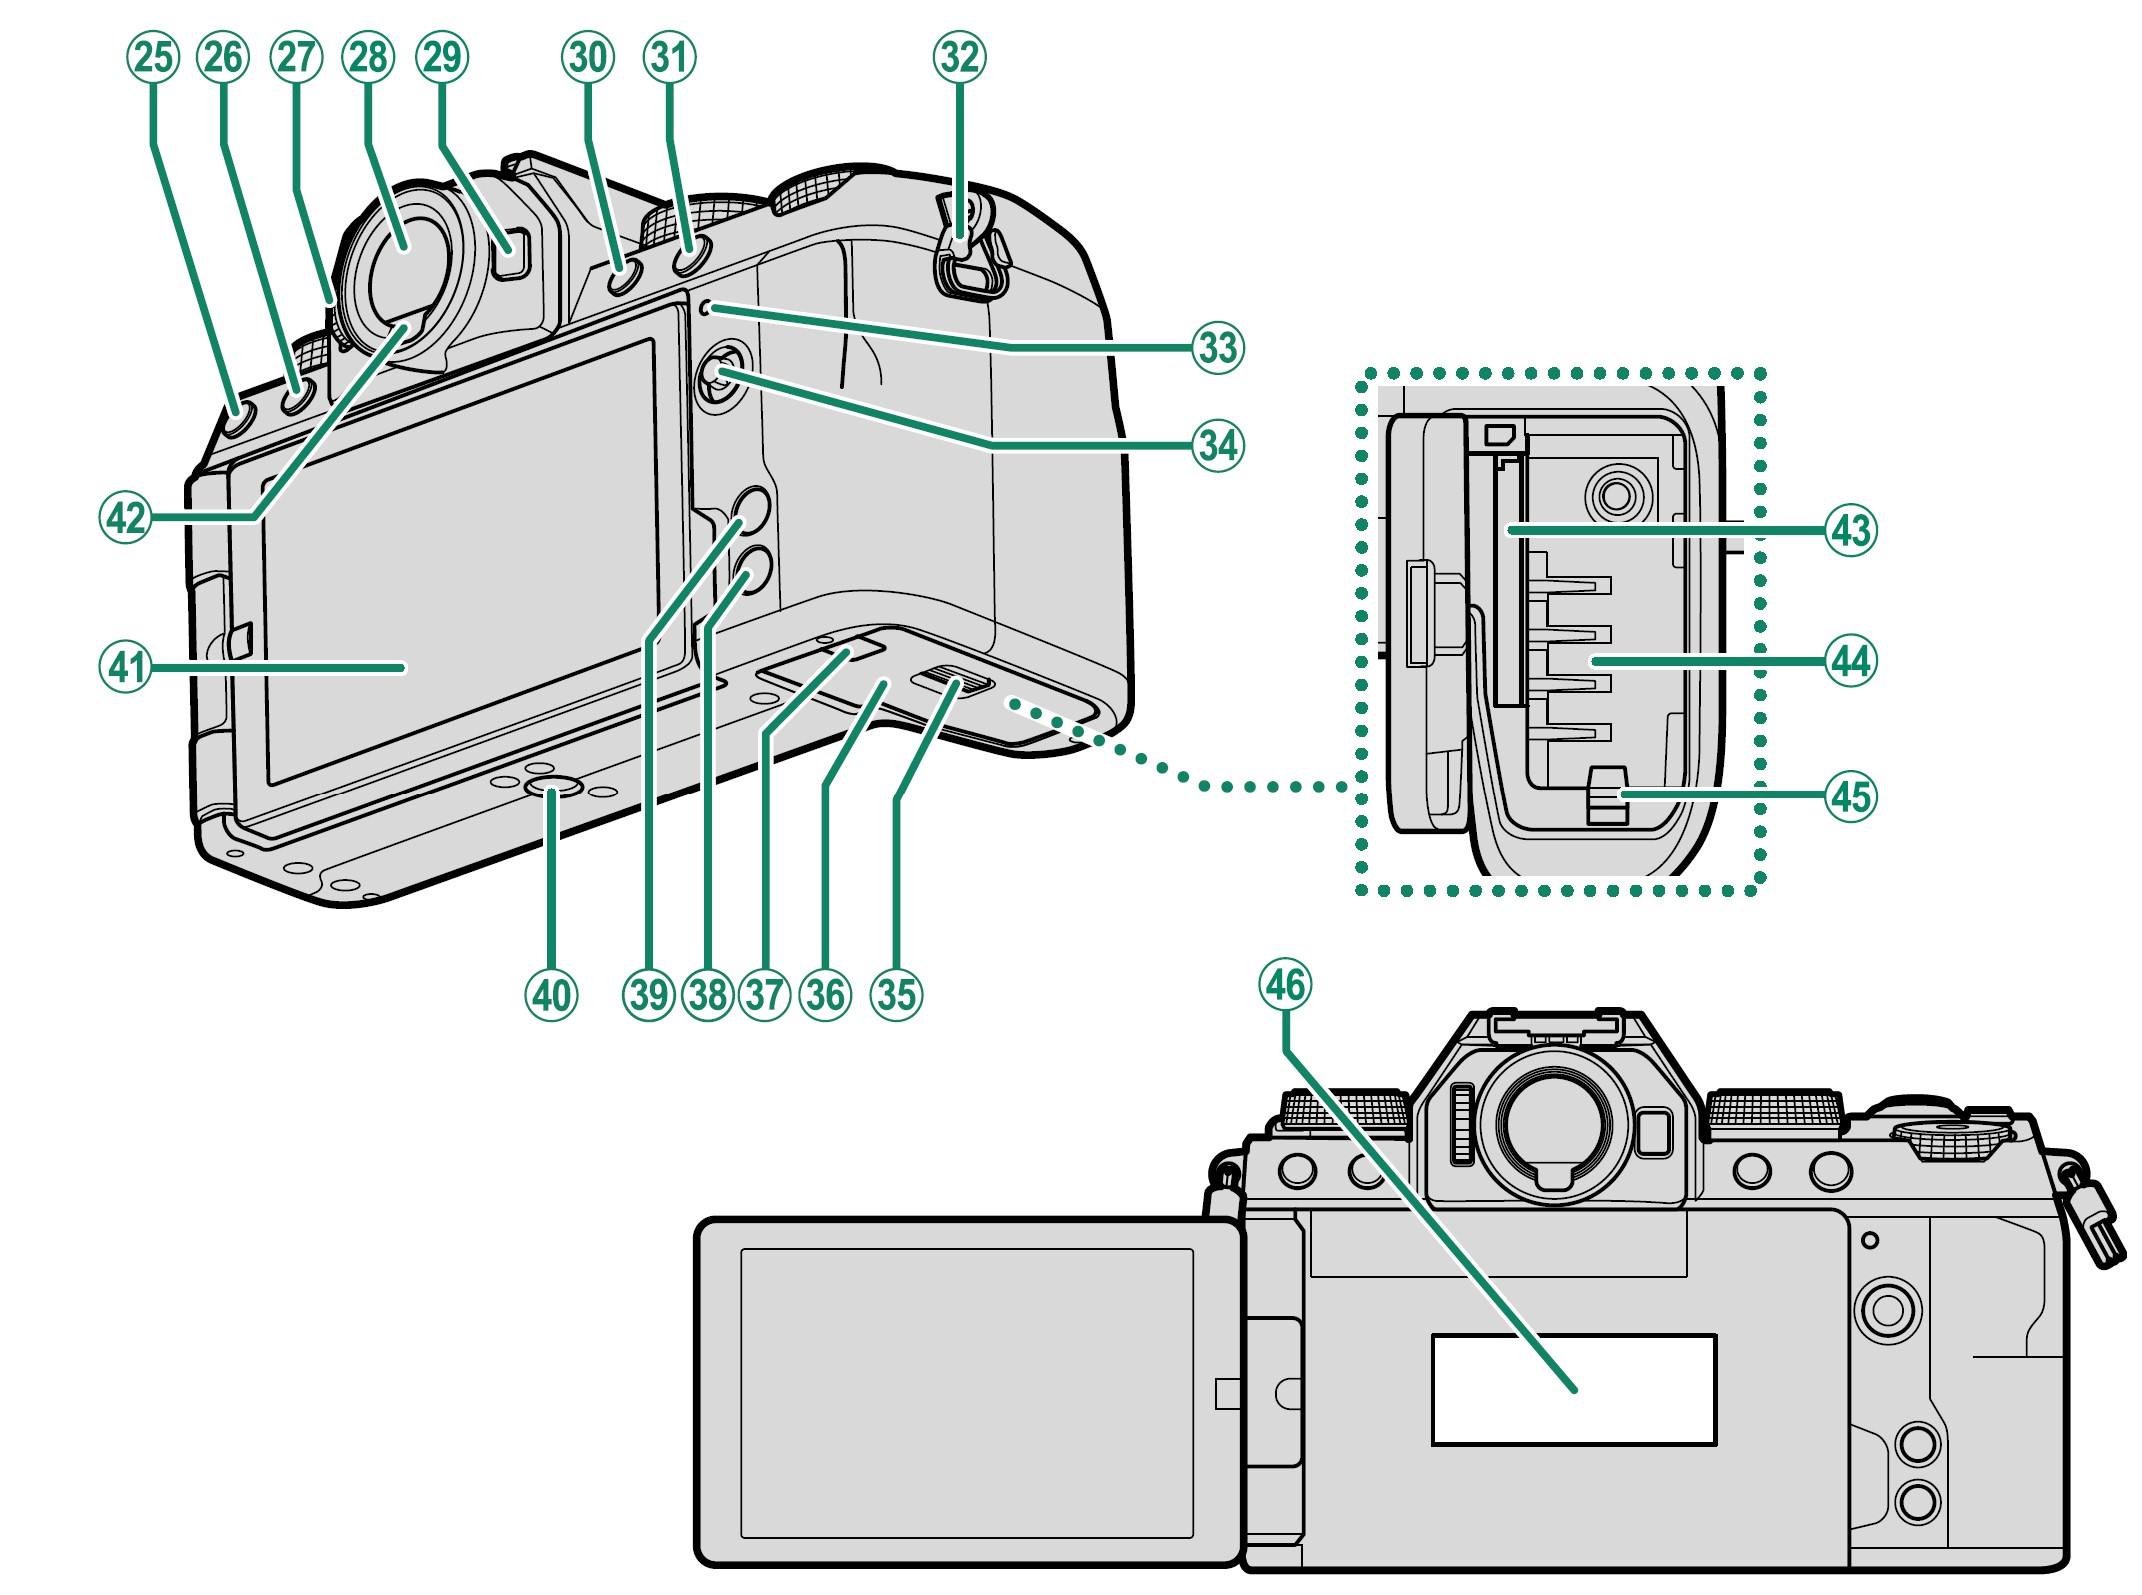
 (drive) button
  (delete) button (playback mode)
 (playback) button
- Diopter adjustment control
- Electronic viewfinder (EVF)
- Fn button
- AEL (exposure lock) button
- AFON button
- Strap clip
- Indicator lamp
Tally light - Focus stick (focus lever)
- Battery-chamber cover latch
- Battery-chamber cover
- Cable channel cover for DC coupler
- DISP (display)/BACK button
- MENU/OK button
- Tripod mount
- Vari-angle LCD monitor
Touch screen - Eye sensor
- Memory card slot
- Battery chamber
- Battery latch
- Serial number plate
Camera Functions
The Mode Dial
To select a shooting mode, rotate the dial until the icon for the desired mode aligns with the index.
The Focus Stick (Focus Lever)
Tilt or press the focus stick to select the focus area. The focus stick can also be used to navigate the menus.
(Drive) Button
Pressing the ![]() (drive) button displays a drive-mode menu, where you can choose from the following drive modes.
(drive) button displays a drive-mode menu, where you can choose from the following drive modes.

The Command Dials
The rear and front command dials are used for the operations below.
The Fn (Function) Dial
Rotate the function dial to quickly adjust settings for the assigned function during shooting.
At shipment, the dial is assigned the DEFAULT role. At this setting, the function performed by the dial varies with the position of the mode dial.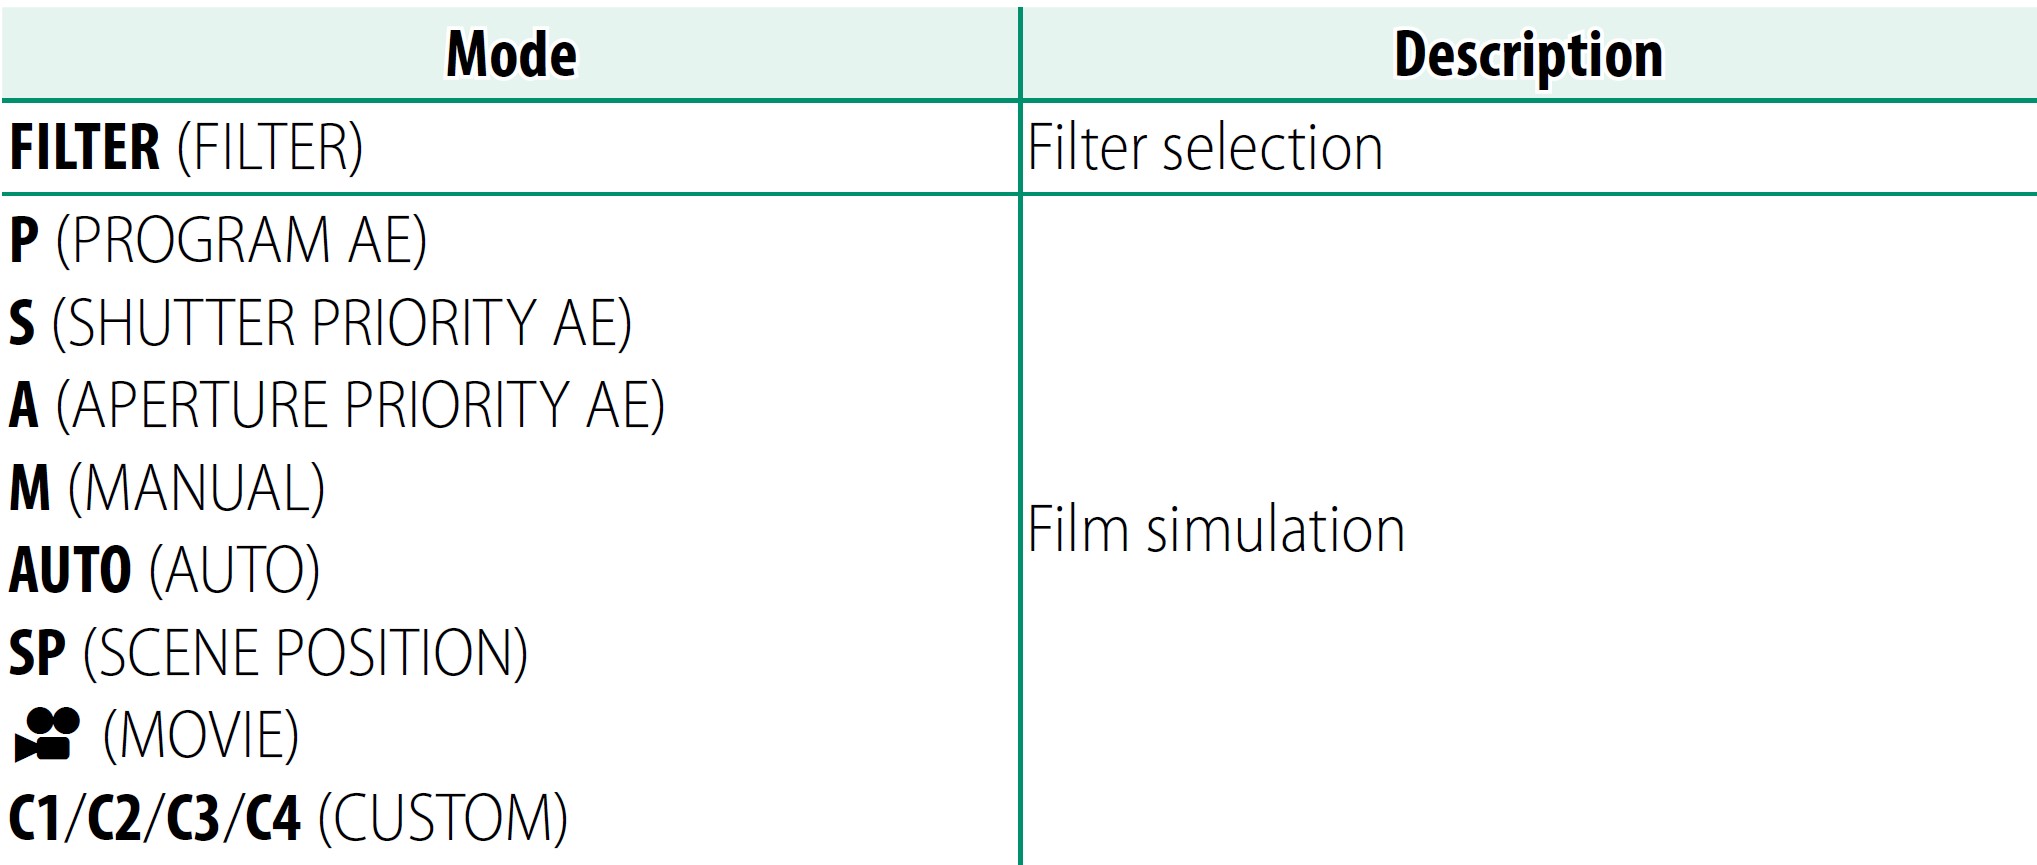
The Indicator Lamp
The camera status is shown by the indicator lamp.
* Displayed only if pictures are selected for upload.
Note:
- Warnings may also appear in the display.
- The indicator lamp remains off while your eye is on the viewfinder.
- The B MOVIE SETTING > TALLY LIGHT option can be used to choose the lamp (indicator or AF-assist) that lights during movie recording and whether the lamp blinks or remains steady.
The LCD Monitor
You can adjust the angle of the LCD monitor when framing shots, but be careful not to trap your fingers or other objects.
Caution:
- Do not apply excessive force to the hinge when rotating the LCD monitor, as this could damage the hinge.
- Be careful that the corners of the monitor do not contact the camera body, as this could leave marks.
Note: The LCD monitor also functions as a touch screen that can be used for:
- Touch photography
- Focus area selection
- Function selection
- Movie optimized control
- Full-frame playback operations
Focusing the Viewfinder
If the indicators displayed in the view-finder are blurred, put your eye on the viewfinder and rotate the diopter adjustment control until the display is in sharp focus.
Camera Displays
This section lists the indicators that may be displayed during shooting.
Caution: For illustrative purposes, displays are shown with all indicators lit.
The Electronic Viewfinder
- Crop factor
- Focus check
- Depth-of-fi eld preview
- Location data download status
- Bluetooth ON/OFF
- Image transfer status
- Movie mode
- Full HD high-speed recording
- Recording time available/ elapsed recording time
- Date and time
- Number of available frames 1
- Image size
- File format
- Image quality
- Temperature warning
- Touch screen mode
- White balance
- AWB lock
- Film simulation
- F-Log recording
- Dynamic range
- D-range priority
- Movie optimized control
- Sound and fl ash indicator.
- Virtual horizon
- Boost mode
- Histogram
- Distance indicator 2
- Power supply
- Battery level
- Sensitivity
- Exposure compensation
- Focus frame
- Aperture
- Time code
- Shutter speed
- TTL lock
- AE lock
- Metering
- Shooting mode
- Focus mode 2
- Focus indicator 2
- Manual focus indicator 2
- AF lock
- Mic jack setting
- Recording level 2
- AF+MF indicator 2
- Shutter type
- Continuous mode
- Exposure indicator
- Self-timer indicator
- Microphone
- Remote release
- Flash (TTL) mode
- IS mode 2
- Flash compensation
1 Shows “9999” if there is space for over 9999 frames.
2 Not displayed when ON is selected for D SCREEN SET-UP > LARGE INDICATORS MODE(EVF).
The LCD Monitor
- Crop factor
- Flash compensation
- Focus check
- Depth-of-fi eld preview
- Location data download status
- Bluetooth ON/OFF
- Image transfer status
- Movie mode
- Full HD high-speed recording
- Focus frame
- Recording time available/ elapsed recording time
- Number of available frames 1
- Image size
- File format
- Image quality
- Date and time
- Touch screen mode
- AWB lock
- White balance
- Film simulation
- F-Log recording
- Dynamic range
- D-range priority
- Movie optimized control
- Boost mode
- Temperature warning
- Sound and fl ash indicator
- Power supply
- Battery level
- Distance indicator 2
- Sensitivity
- Histogram
- Exposure compensation
- Aperture
- Time code
- Shutter speed
- TTL lock
- AE lock
- Metering
- Shooting mode
- Focus mode 2
- Focus indicator 2
- Manual focus indicator 2
- AF lock
- Mic jack setting
- AF+MF indicator 2
- Shutter type
- Recording level 2
- Continuous mode
- Exposure indicator
- Self-timer indicator
- Microphone
- Remote release
- Flash (TTL) mode
- IS mode 2
1 Shows “9999” if there is space for over 9999 frames.
2 Not displayed when ON is selected for D SCREEN SET-UP > LARGE INDICATORS MODE(LCD).
Adjusting Display Brightness
The brightness and hue of the viewfinder and LCD monitor can be adjusted using the items in the ![]() SCREEN SET-UP menu. Choose EVF BRIGHTNESS or EVF COLOR to adjust viewfinder brightness or hue, LCD BRIGHTNESS, or LCD COLOR to do the same for the LCD monitor.
SCREEN SET-UP menu. Choose EVF BRIGHTNESS or EVF COLOR to adjust viewfinder brightness or hue, LCD BRIGHTNESS, or LCD COLOR to do the same for the LCD monitor.
Display Rotation
When ON is selected for ![]() SCREEN SET-UP > AUTOROTATE DISPLAYS, the indicators in the viewfinder and LCD monitor automatically rotate to match the camera orientation.
SCREEN SET-UP > AUTOROTATE DISPLAYS, the indicators in the viewfinder and LCD monitor automatically rotate to match the camera orientation.
Choosing a Display Mode
Use ![]() SCREEN SET-UP > VIEW MODE SETTING to choose from the following display modes. You can choose separate display modes for shooting and playback.
SCREEN SET-UP > VIEW MODE SETTING to choose from the following display modes. You can choose separate display modes for shooting and playback.
SHOOTING
PLAYBACK
The Eye Sensor
The eye sensor may respond to objects other than your eye or to light shining directly on the sensor.
The DISP/BACK Button
The DISP/BACK button controls the display of indicators in the viewfinder and LCD monitor.
Note: Indicators for the EVF and LCD must be selected separately. To choose the EVF display, place your eye on the viewfinder while using the DISP/BACK button.
Viewfinder (EVF)
LCD Monitor
Customizing the Standard Display
To choose the items shown in the standard indicator display:
- Display standard indicators.
Use the DISP/BACK button to display standard indicators. - Select DISP. CUSTOM SETTING.
Select SCREEN SET-UP > DISP. CUSTOM SETTING in the setup menu.
 - Choose items.
Highlight items and press MENU/OK to select or deselect.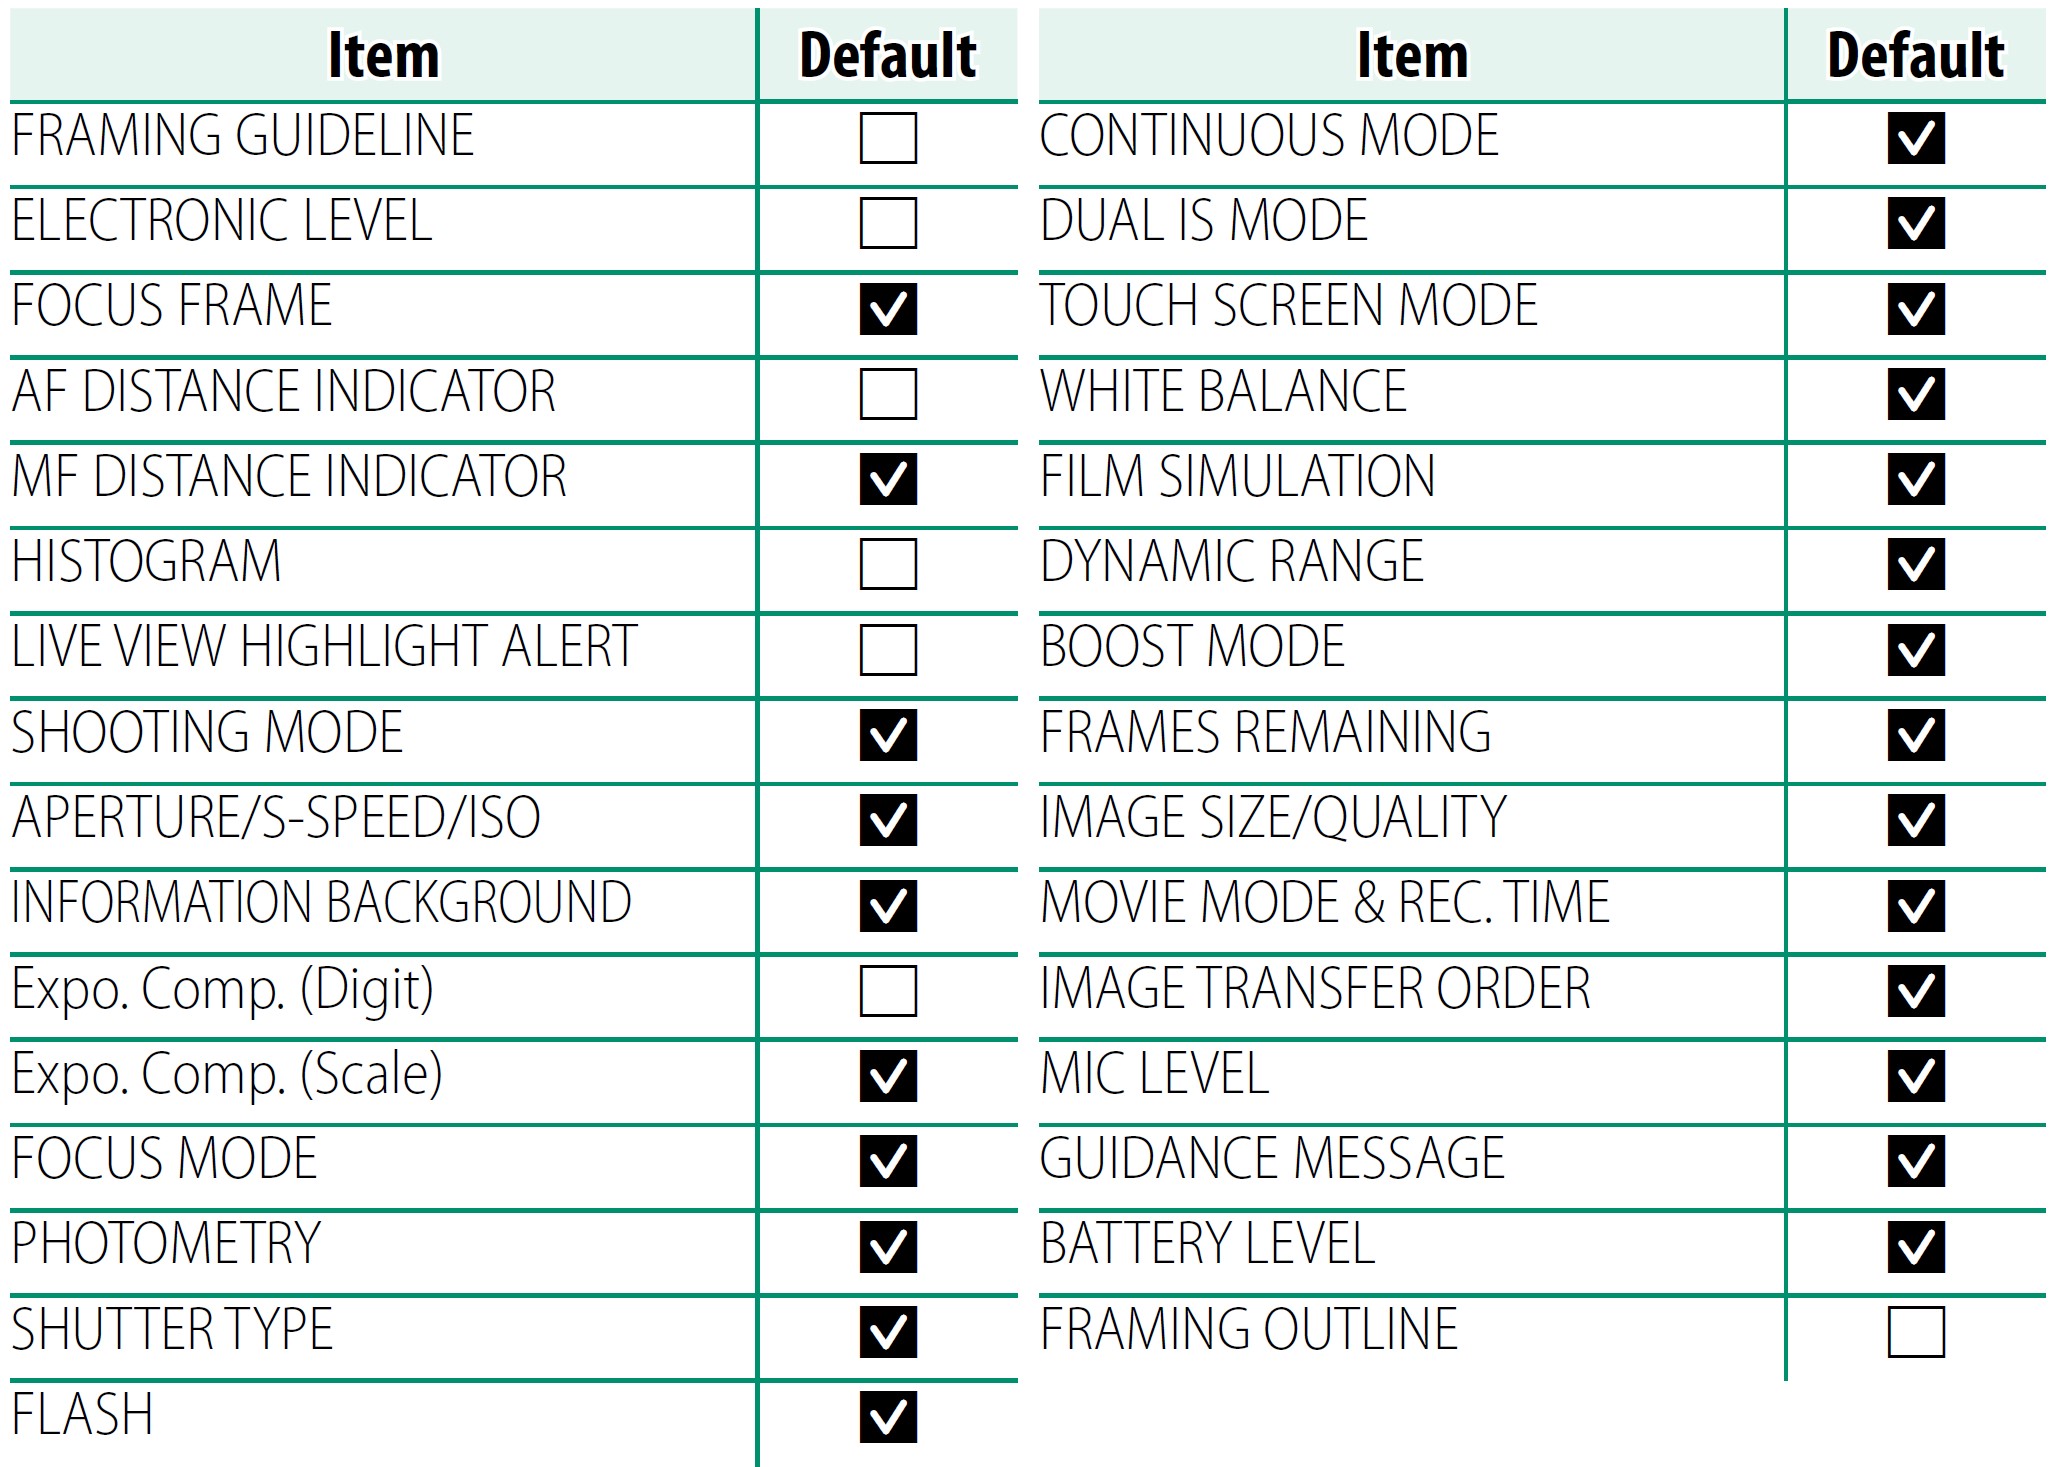
- Press DISP/BACK to save changes.
- Press DISP/BACK as needed to exit the menus and return to the shooting display.
Using the Menus
To display the menus, press MENU/OK.
The Menus
Different menus are displayed during still photography, movie recording, and playback.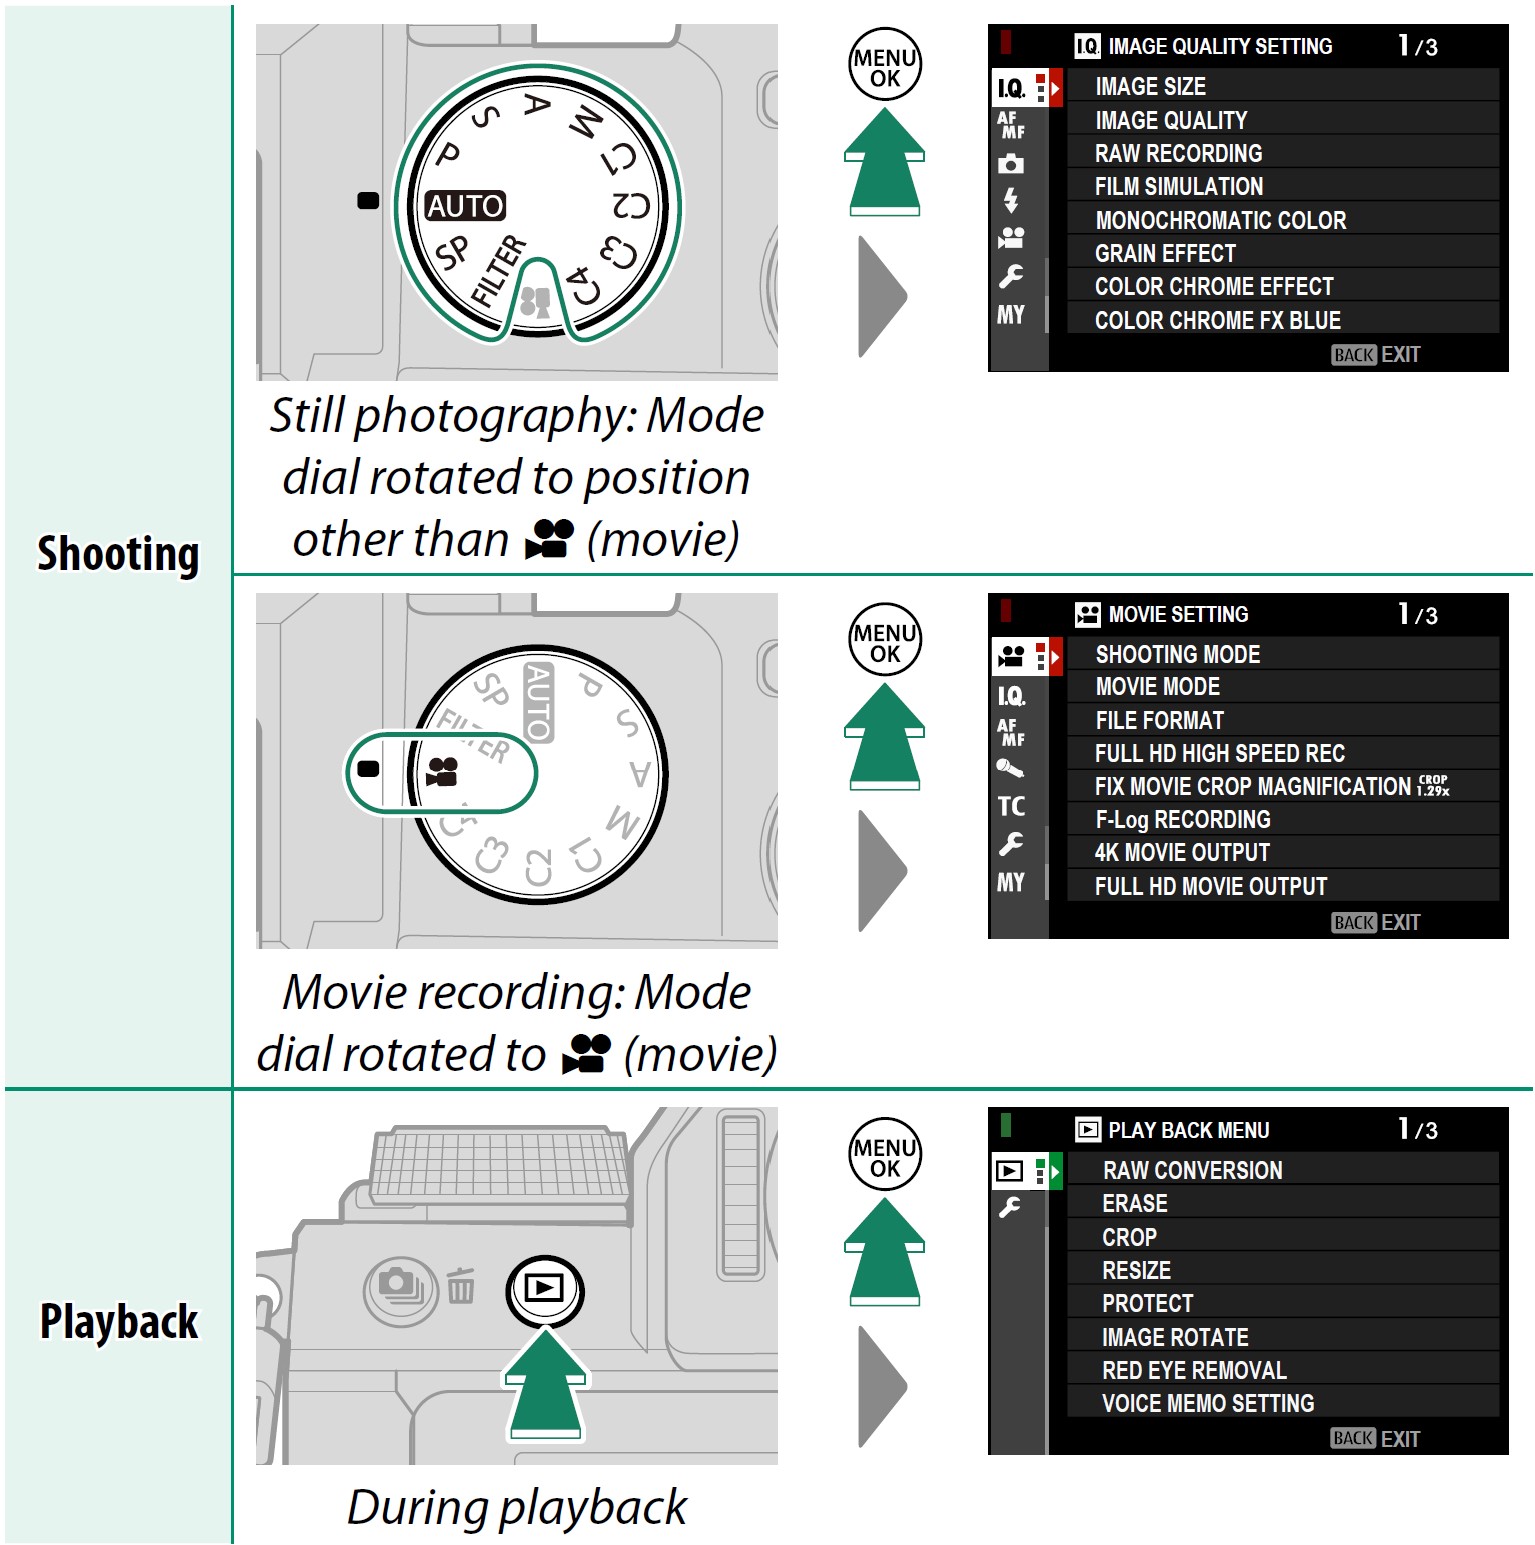
Selecting a Menu Tab
To navigate the menus:
- Press MENU/OK to display the menus.
- Press the focus stick (focus lever) left to highlight the tab for the current menu.
- Press the focus stick up or down to highlight the tab containing the desired item.
- Press the focus stick right to place the cursor in the menu.
Note: Use the front command dial to select menu tabs or pages through menus and the rear command dial to highlight menu items.
Touch Screen Mode
The LCD monitor also functions as a touch screen.
Shooting Touch Controls
To enable touch controls, select ON for ![]() BUTTON/DIAL SETTING > TOUCH SCREEN SETTING >
BUTTON/DIAL SETTING > TOUCH SCREEN SETTING > ![]() TOUCH SCREEN SETTING.
TOUCH SCREEN SETTING.
EVF
The LCD monitor can be used to select the focus area while pictures are being framed in the electronic viewfinder (EVF). Use ![]() BUTTON/DIAL SETTING > TOUCH SCREEN SETTING > EVF TOUCH SCREEN AREA SETTINGS to choose the area of the monitor employed for touch controls.
BUTTON/DIAL SETTING > TOUCH SCREEN SETTING > EVF TOUCH SCREEN AREA SETTINGS to choose the area of the monitor employed for touch controls.
Note: When FACE DETECTION ON is selected for G AF/MF SETTING > FACE/EYE DETECTION SETTING, you can choose the face used for focus.
LCD Monitor
The operation performed can be selected by tapping the touch screen mode indicator in the display. Touch controls can be used for the following operations:
Note:
- To disable touch controls and hide the touch screen mode indicator, select OFF for
 BUTTON/DIAL SETTING > TOUCH SCREEN SETTING >
  TOUCH SCREEN SETTING.
 - Touch control settings can be adjusted using AF/MF SETTING >

 TOUCH SCREEN MODE. For information on the touch controls available during movie recording, see “Movie Recording (
 TOUCH SCREEN MODE)”.
MOVIE OPTIMIZED CONTROL
Selecting ON for ![]() MOVIE SETTING > MOVIE OPTIMIZED CONTROL
MOVIE SETTING > MOVIE OPTIMIZED CONTROL![]() or tapping the movie-optimized mode button in the shooting display optimizes the command dials and touch controls for movie recording. This can be used to prevent camera sounds from being recorded with movie footage.
or tapping the movie-optimized mode button in the shooting display optimizes the command dials and touch controls for movie recording. This can be used to prevent camera sounds from being recorded with movie footage.
- SHUTTER SPEED
- APERTURE
- EXPOSURE COMPENSATION
- ISO
- INTERNAL MIC LEVEL ADJUSTMENT/EXTERNAL MIC LEVEL ADJUSTMENT
- WIND FILTER
- HEADPHONES VOLUME
 FILM SIMULATION
 WHITE BALANCE
 IS MODE
 IS MODE BOOST
 FOCUS MODE
Note:
- Enabling movie-optimized controls disables the aperture ring.
- When movie-optimized control is enabled, the movie-optimized mode button can be used to change shooting settings or disable movie-optimized control.
Touch Function
Functions can be assigned to the following flick gestures in much the same way as function buttons:
- Flick up: T-Fn1
- Flick left: T-Fn2
- Flick right: T-Fn3
- Flick down: T-Fn4
Note:
- In some cases, touch-function flick gestures display a menu; tap to select the desired option.
- Touch-function gestures are disabled by default. To enable touch-function gestures, select ON for
 BUTTON/DIAL SETTING > TOUCH SCREEN SETTING > TOUCH FUNCTION.
Playback Touch Controls
When ON is selected for ![]() BUTTON/DIAL SETTING > TOUCH SCREEN SETTING >
BUTTON/DIAL SETTING > TOUCH SCREEN SETTING > ![]() TOUCH SCREEN SETTING, touch controls can be used for the following playback operations:
TOUCH SCREEN SETTING, touch controls can be used for the following playback operations:
- Swipe: Swipe a finger across the display to view other images.
- Pinch-out: Place two fingers on the display and spread them apart to zoom in.
- Pinch-in: Place two fingers on the display and slide them together to zoom out.
- Double-tap: Tap the display twice to zoom in on the focus point.
- Drag: View other areas of the image during playback zoom.
Attaching the Strap
Attach the strap.
Attach the strap to the two strap clips as shown below.
Caution: To avoid dropping the camera, be sure the strap is correctly secured.
Attaching a Lens
The camera can be used with lenses for the FUJIFILM X-mount.
Remove the body cap from the camera and the rear cap from the lens. Place the lens on the mount, keeping the marks on the lens and camera aligned (A), and then rotate the lens until it clicks into place (B).
Caution:
- When attaching lenses, ensure that dust or other foreign matter does not enter the camera.
- Be careful not to touch the camera’s internal parts.
- Rotate the lens until it clicks securely into place.
- Do not press the lens release button while attaching the lens.
Removing Lenses
To remove the lens, turn the camera off, then press the lens release button (A) and rotate the lens as shown (B).
O To prevent dust from accumulating on the lens or inside the camera, replace the lens caps and camera body cap when the lens is not attached.
Lenses and Other Optional Accessories
The camera can be used with lenses and accessories for the FUJIFILM X-mount.
Caution:
- Observe the following precautions when attaching or removing (ex-changing) lenses.
- Check that the lenses are free of dust and other foreign matter.
- Do not change lenses in direct sunlight or under another bright light source. Light focused on the interior of the camera could cause it to malfunction.
- Attach the lens caps before exchanging lenses.
Inserting the Battery and a Memory Card
Insert the battery and memory card as described below.
- Slide the battery-chamber cover latch as shown and open the battery-chamber cover.
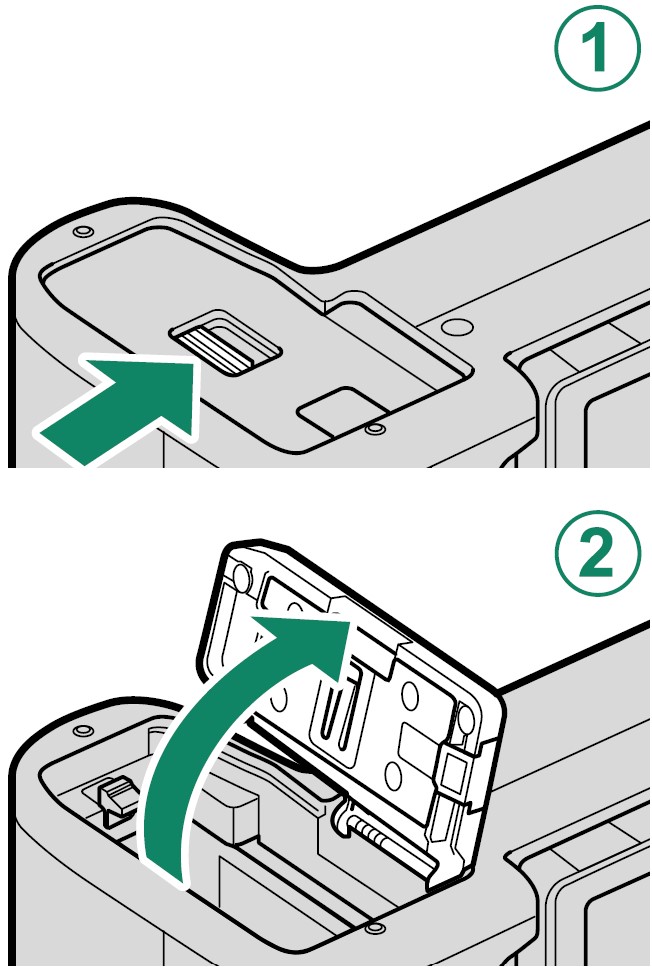
- Insert the battery.
Using the battery to keep the battery latch pressed to one side, insert the battery contacts first in the direction shown by the arrow.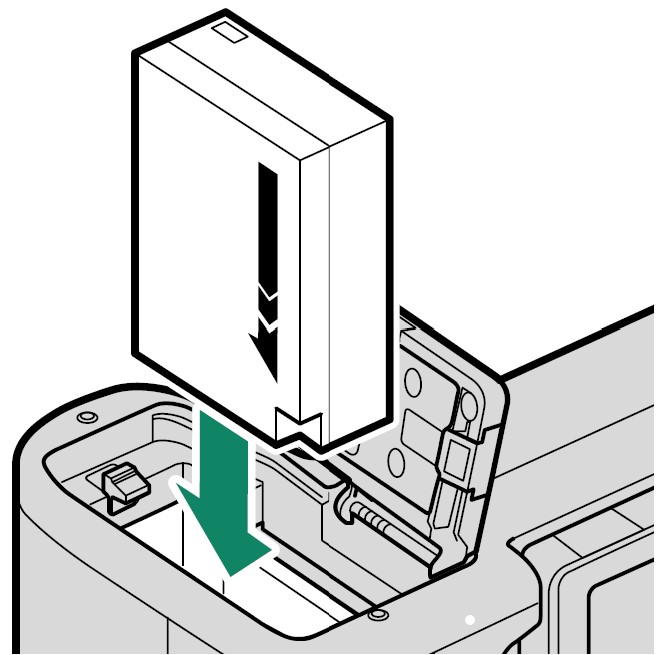
- Insert the memory card.
- Close the battery-chamber cover and slide the battery-cham-ber cover latch closed.
Removing the Battery
Before removing the battery or memory card, turn the camera off and open the battery-chamber cover.
To remove the battery, press the battery latch to the side, and slide the battery out of the camera as shown.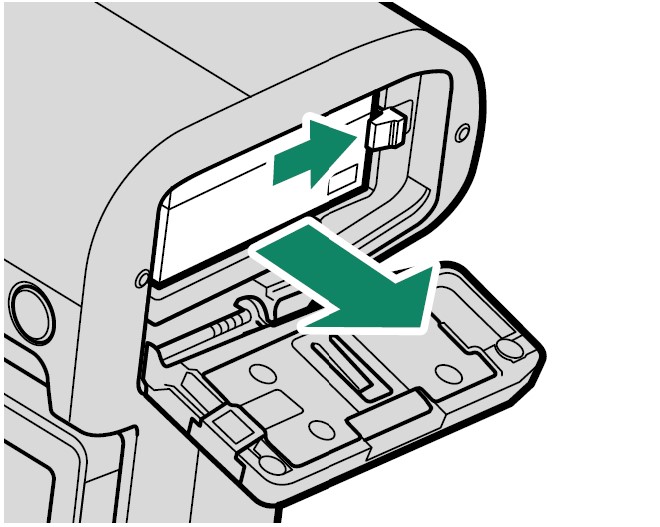
Caution: The battery may become hot when used in high-temperature environments. Observe caution when removing the battery.
Removing Memory Cards
To remove the memory card, press it in and release it slowly. The card can then be removed by hand.
Caution:
- Press the center of the card when ejecting it.
- When a memory card is removed, the card could be ejected too quickly. Use your finger to hold it and gently release the card.
Compatible Memory Cards
- The camera can be used with SD, SDHC, and SDXC memory cards.
- The camera supports UHS-I memory cards.
- To record movies, use cards with a UHS speed class of 3 or better or a video speed class of V30 or better.
- A list of supported memory cards is available on the Fujifi lm website. For details, visit https://fujifilm-x.com/support/compatibility/cameras/.
Charging the Battery
The battery is not charged at shipment. Charge the battery before use.
The camera can be charged via USB. USB charging is available with computers with a manufacturer-approved operating system and USB interface.
Caution:
- The battery will not charge while the camera is on.
- Connect the supplied USB cable.
- Connect the camera directly to the computer; do not use a USB hub or keyboard.
- Charging stops if the computer enters sleep mode. To resume charging, activate the computer and disconnect and reconnect the USB cable.
- Charging may not be supported depending on the model of the computer, computer settings, and the computer’s current state.
- The battery takes about 5 hours to charge with a charging input of 5 V/500 mA.
To charge the battery from a household AC power outlet, use a BC-W126S battery charger (available separately).
Charge Status
The indicator lamp shows the battery charge status as follows:
Caution:
- Do not affix labels or other objects to the battery. Failure to observe this precaution could make it impossible to remove the battery from
- Do not short the battery terminals. The battery could overheat.
- Read the cautions in “The Battery and Power Supply”.
- Use only genuine Fujifi lm rechargeable batteries designated for use in this camera. Failure to observe this precaution could result in product malfunction.
- Do not remove the labels from the battery or attempt to split or peel the outer casing.
- The battery gradually loses its charge when not in use. Charge the battery one or two days before use.
- If the battery fails to hold a charge, it has reached the end of its charging life and must be replaced.
- Remove dirt from the battery terminals with a clean, dry cloth. Failure to observe this precaution could prevent the battery from charging.
- Note that charging times increase at low or high temperatures.
Turning the Camera On and Off
Use the ON/OFF switch to turn the camera on and off.
Slide the switch to ON to turn the camera on, or to OFF to turn the camera off.
Caution: Fingerprints and other marks on the lens or viewfinder can affect pictures or the view through the viewfinder. Keep the lens and viewfinder clean.
Checking the Battery Level
After turning the camera on, check the battery level in the display.
Battery level is shown as follows:
Basic Setup
When you turn the camera on for the first time, you can choose a language and set the camera clock. At default settings, you can also pair the camera with a smartphone or tablet so that you can later synchronize the clocks or download pictures. Follow the steps below when turning the camera on for the first time.
- Turn the camera on.
A language-selection dialog will be displayed. - Choose a language.
Highlight a language and press MENU/OK. - Pair the camera with a smartphone or tablet.
Press MENU/OK to pair the camera with a smartphone or tablet running the FUJIFILM Camera Remote app. - Check the time.
When pairing is complete, you will be prompted to set the camera clock to the time reported by the smartphone or tablet. Check that the time is correct. - Synchronize the camera settings with the settings confi gured on your smartphone or tablet.
- Set the clock.
Press MENU/OK to set the camera clock to the time reported by the smartphone or tablet and exit to shooting mode. - Format the memory card
Skipping the Current Step
If you skip a step, a confirmation dialog will be displayed; select NO to avoid repeating any steps you skipped the next time the camera is turned on.
Choosing a Different Language
To change the language:
- Display language options.
Select USER SETTING >
  .
. - Choose a language.
Highlight the desired option and press MENU/OK.
Changing the Time and Date
To set the camera clock:
- Display DATE/TIME options.
Select USER SETTING > DATE/TIME.
 - Set the clock.
Press the focus stick (focus lever) left or right to highlight the year, month, day, hour, or minute, and press up or down to change. Press MENU/OK to set the clock.
Troubleshooting
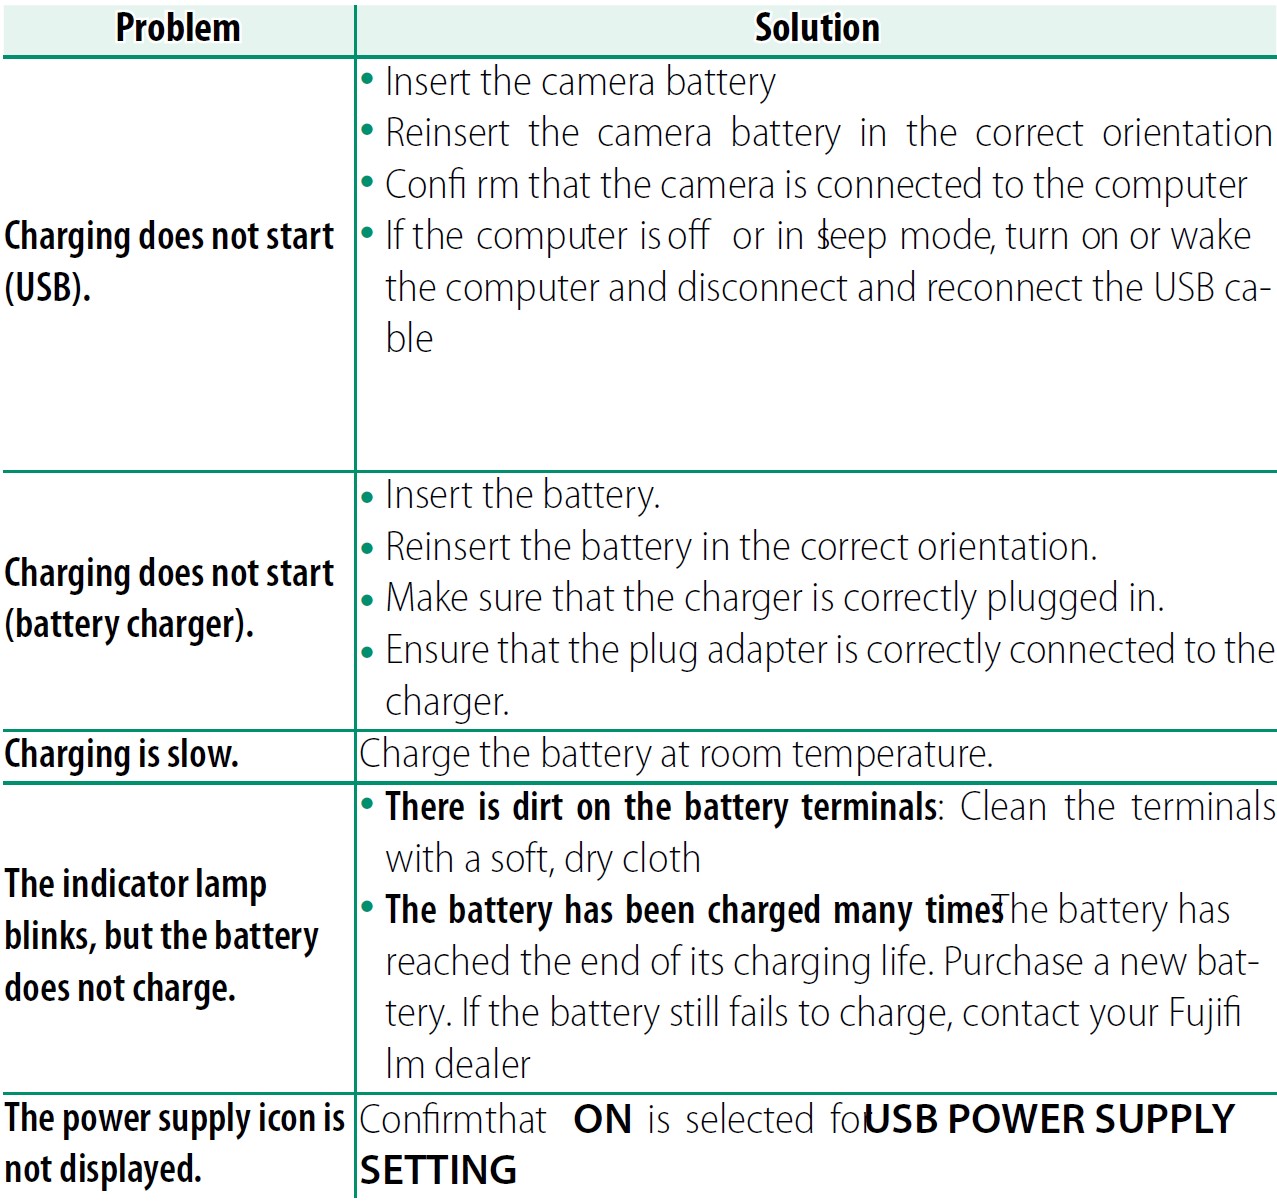
Consult the table below should you encounter problems using your camera. If you don’t find the solution here, contact your local Fujifi lm distributor.
Power and Battery
Menus and Displays
Shooting


Playback
Connections
Wireless Transfer
For additional information on troubleshooting wireless connections, visit: https://digitalcamera-support-en.fujifilm.com/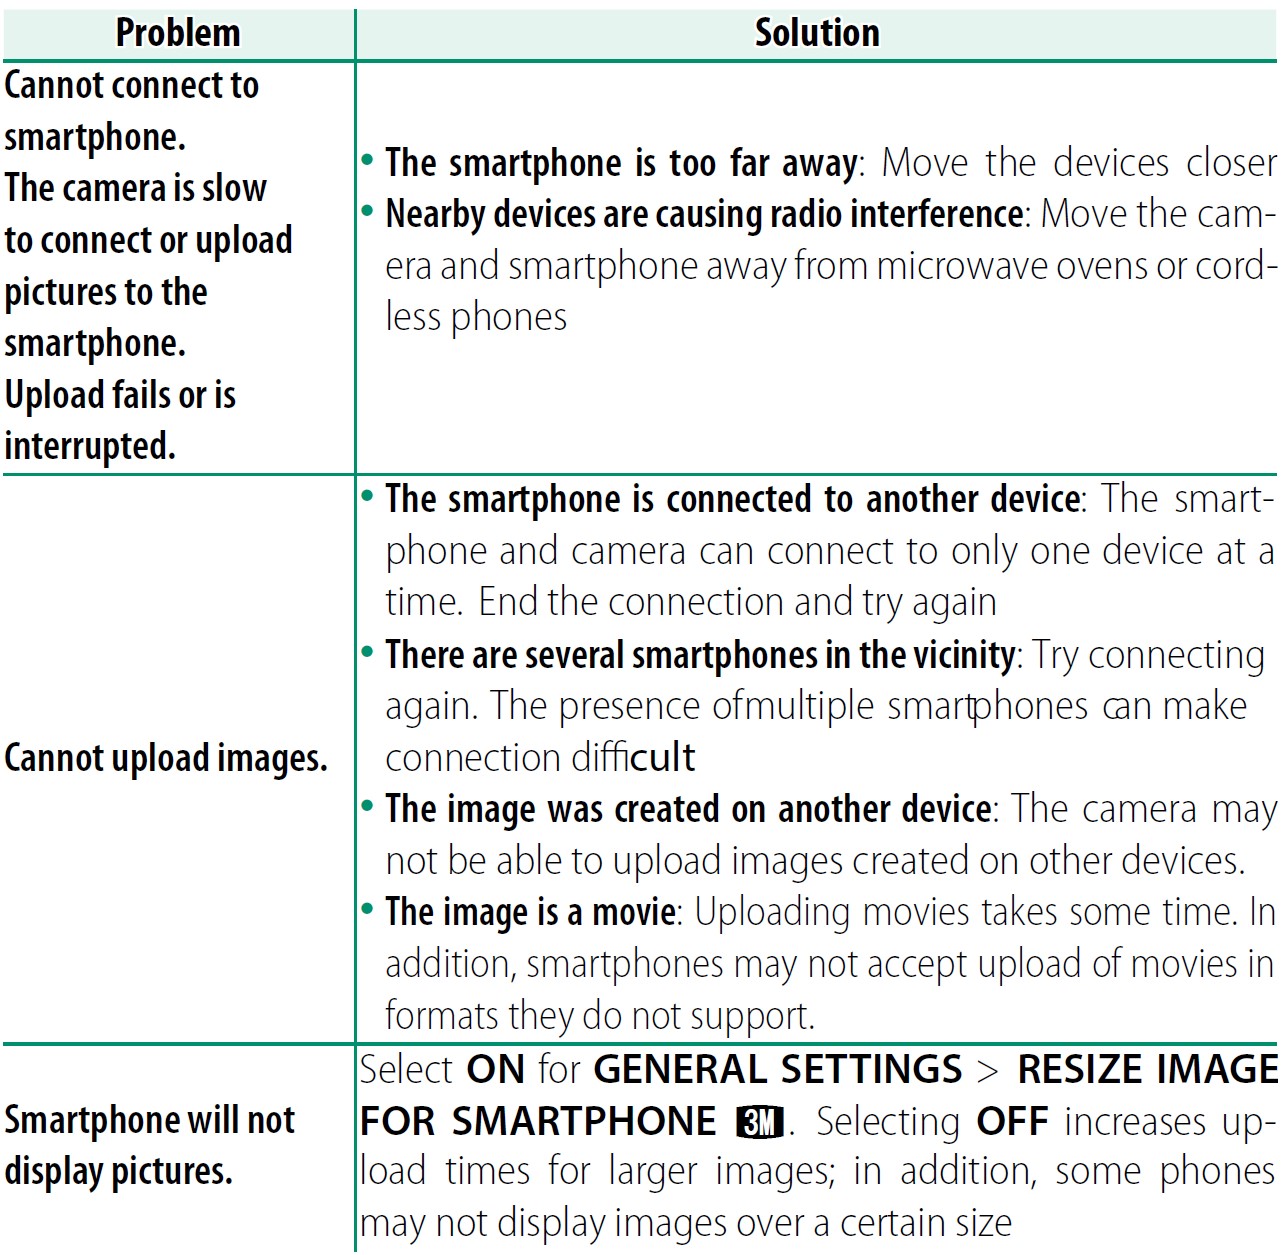
Miscellaneous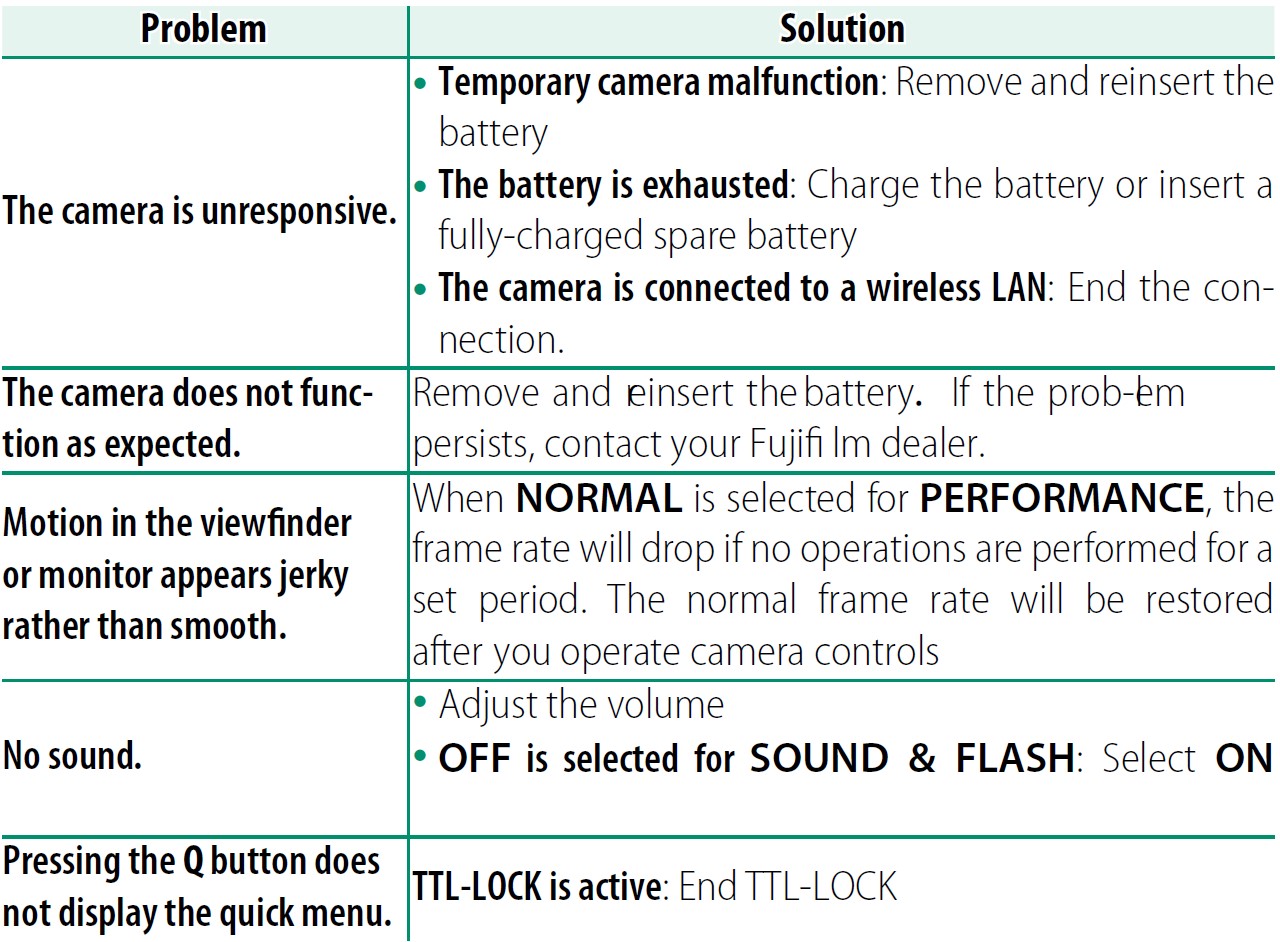
Memory Card Capacity
The following table shows the recording time or the number of pictures available at different image sizes. All fi gures are approximate; file size varies with the scene recorded, producing wide variations in the number of fi les that can be stored. The number of exposures or length remaining may not diminish at an even rate.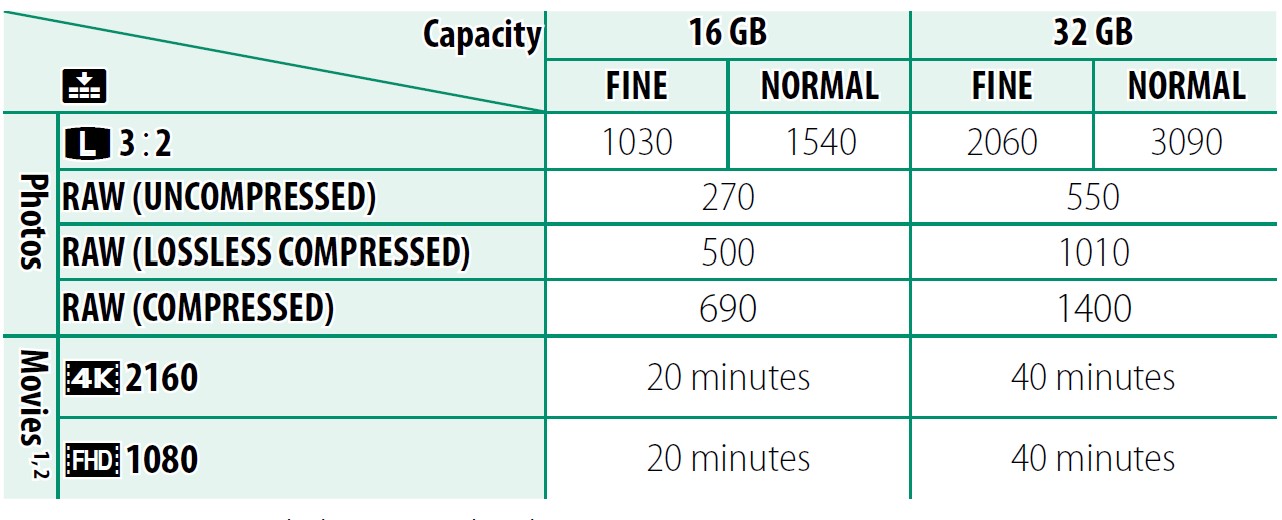
1 Use a UHS speed class 3 card or better.
2 Assumes default bit rate.
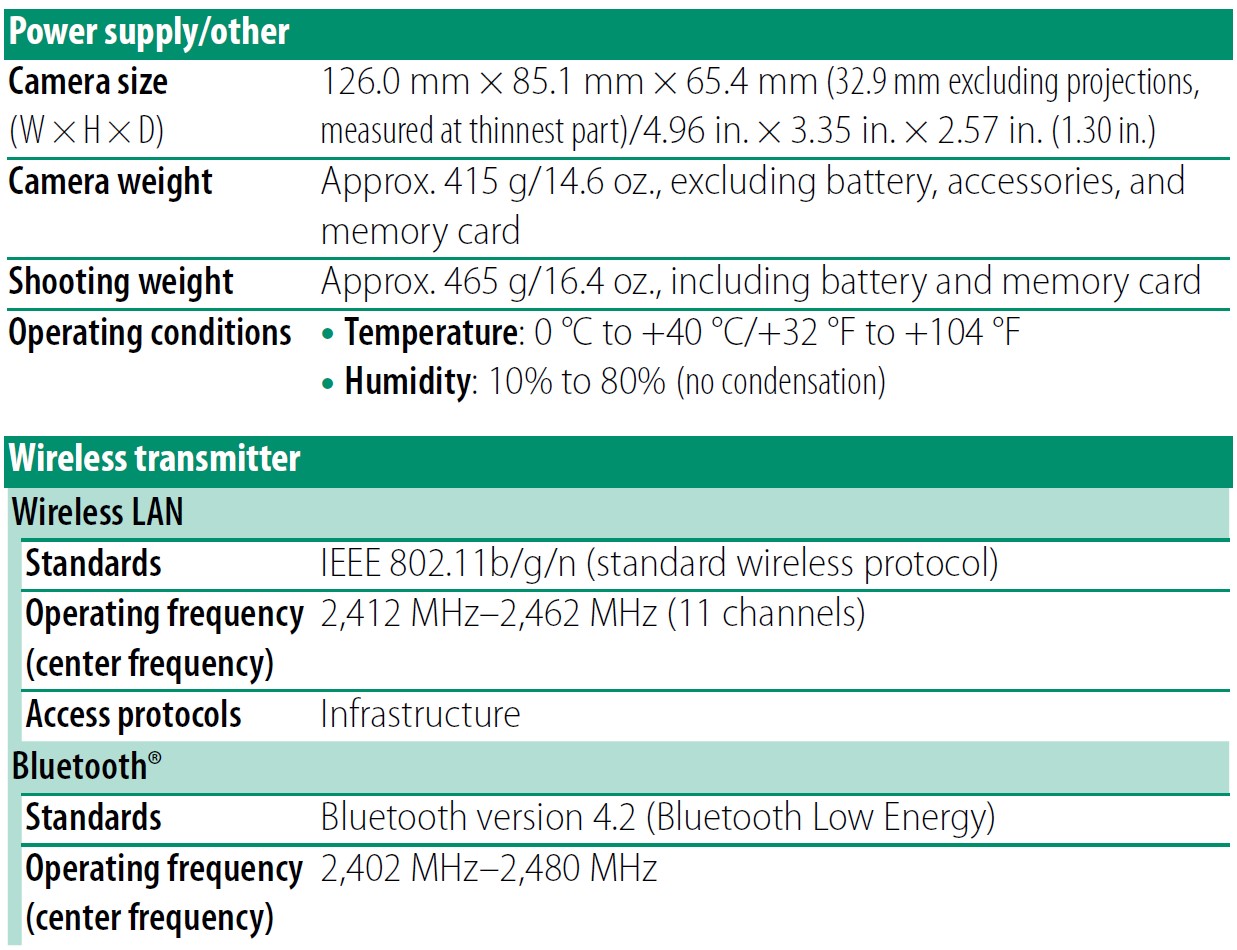
Specifications


FAQS About Fujifilm X-S10 Mirrorless Digital Camera
Image stabilization is there in the Fujifilm X-S10?
In-body image stabilization (IBIS) is a feature of the X-S10.
The Fuji X-S10 is produced where?
China
What kind of sensor is in the X-S10?
CMOS X-Trans 4
Is the X-S10 a good camera?
The X-S10 is a much better alternative for creating a new setup than APS-C mirrorless devices from Canon or Nikon. It’s not just nicer than most of the DSLRs it seeks to replace.
What is the price of the genuine Fujifilm X-S10?
$999
The Fujifilm X-S10: Is it pricey?
It’s a pleasure to use and, thanks to one of the greatest APS-C sensors available, regularly produces beautiful shots under a variety of lighting settings.
The Fujifilm X-S10 is a DSLR, right?
The Fujifilm X-S10 is a mirrorless camera that mimics a DSLR.
Why does Fujifilm cost more money?
Because FujiFilm has a small market share, they must uphold strict standards.
Do Fujifilm cameras merit the price?
The company’s cameras are best because they place a lot of emphasis on the creative process.
How does Fujifilm compare to Sony?
The majority of voters preferred the device’s overall feel, aesthetic, and Fujifilm quality.
For more manuals by Fujifilm, Visit Manualsdock
[embeddoc url=”https://manualsdock.com/wp-content/uploads/2023/09/Fujifilm-X-S10-Mirrorless-Digital-Camera-Owner-Manual.pdf” download=”all”]

