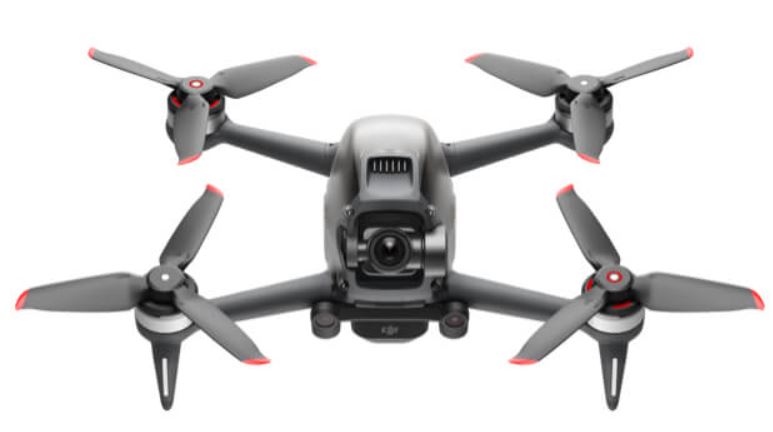
DJI FPV FirstPerson View Drone UAV Quadcopter
ABOUT DJI
DJI, or Da-Jiang Innovations Science and Technology Co., Ltd., is a Chinese technology company specializing in the manufacturing and development of unmanned aerial vehicles (UAVs), commonly known as drones. DJI is considered one of the world’s leading companies in the drone industry.
Founded in 2006 by Frank Wang, DJI is headquartered in Shenzhen, China, and has grown rapidly to become a global leader in consumer and professional-grade drones. The company’s products range from small consumer drones to advanced commercial and industrial drones used for various applications.
Read Before the First Flight
Read the following documents before using DUI™ FPV.
- User Manual
- Quick Start Guide
- Disclaimer and Safety Guidelines
It is recommended to watch all tutorial videos on the official DJI website and read the disclaimer and safety guidelines before using them for the first time. Prepare for your first flight by reviewing the quick start guide and refer to this user manual for more information.
Video Tutorials
Visit the address below or scan the QR code to watch the DJI FPV tutorial videos, which demonstrate how to use DJI FPV safely: https://www.dji.com/dji-fpv/video
Download the DJI Fly App
Scan the QR code on the right to download DJI FIv. The Android version of DJI Fly is compatible with Android v6.0 and later. The iOS version of DJI Fly is compatible with iOS v11.0 and later.
- For increased safety, the flight is restricted to a height of 98.4 ft (30 m) and a range of 164 ft (50 m) when not connected or logged into the app during flight. This applies to DJI Fly and all apps compatible with DJI aircraft.
Download the DJI Virtual Flight App
Scan the QR code on the right to download DJI Virtual Flight. The iOS version of DJI Virtual Flight is compatible with iOS v11.0 and later.
Download DJI Assistant 2 (DJI FPV series)
Download DJI ASSISTANT™M 2 (DJI FPV Series) at https://www.dji.com/dji-fpv/downloads.
Product Profile
Introduction
DJI FPV consists of an aircraft, goggles, and remote controller, which all feature DJI’s O3 technology that provides video transmission with a maximum transmission range of 6 mi (10 km), bit rate of up to 50 Mbps, and minimum end-to-end latency within 28 ms. DUI FPV works at both 2.4 and 5.8 GHz and is capable of selecting the best transmission channel automatically. The enhanced anti-interference ability greatly improves the smoothness and stability of the video transmission, providing an integrated and immersive flight experience. Featuring a Forward and Downward Vision System and Infrared Sensing System, the aircraft can hover and fly indoors as well as outdoors and automatically initiate Return to Home (RTH). With a gimbal and 1/2.3″ sensor camera, the aircraft stably shoots 4K 60fps ultra-HD video and 4K photos. The aircraft has a maximum flight speed of 87 mph (140 kph) and a maximum flight time of approximately 20 minutes. The DJI FPV Goggles V2 is equipped with a high-performance display and supports 810p 120fps HD display and real-time audio transmission. By receiving the video signal from the aircraft, users can enjoy a first-person view of their aerial experience in real-time. The goggles have a maximum runtime of approximately 1 hour and 50 minutes when used with DJI FPV Goggles Battery and where the ambient temperature is 25° C and the screen brightness is set to 6 The DJI FPV Remote Controller 2 is equipped with a range of function buttons, which can be used to control the aircraft and operate the camera. The maximum runtime of the remote controller is approximately 9 hours.
Warning
- The remote controller reaches its maximum transmission distance (FCC) in a wide-open area with no electromagnetic interference when the aircraft is at an altitude of approximately 400 ft (120 m). The maximum transmission distance refers to the maximum distance that the aircraft can still send and receive transmissions. It does not refer to the maximum distance the aircraft can fly in a single flight.
- The end-to-end latency is the total time from camera sensor input to screen display. The DJI FPV can reach its minimum latency in Low Latency mode (810p 120fps) in a wide open area with no electromagnetic interference.
- Maximum flight time was tested in an environment with no wind while flying at a consistent 24.9 mph (40 kph) and the maximum flight speed was tested in Manual mode at sea level altitude with no wind. These values are for reference only. The maximum flight speed of the aircraft varies depending on national and regional regulations
- 5.8 GHz is not supported in some regions. This frequency band will automatically be disabled when the aircraft is activated or connected to DJI Fly in these regions. Observe local laws and regulations.
- Using the goggles does not satisfy the requirement of visual line of sight (VLOS). Some countries or regions require a visual observer to assist by observing the flight. Make sure to comply with local regulations when using the goggles.
Preparing the Aircraft
- Remove the gimbal protector from the camera.

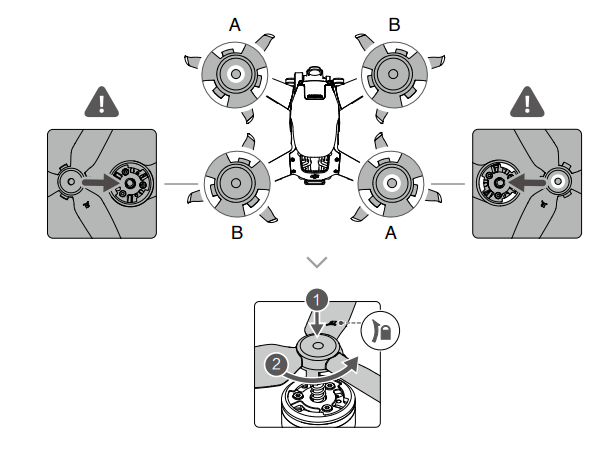
- Attach the propellers. Propellers with and without marks indicate different directions of rotation. Attach the propellers with marks to the motors with marks and the unmarked propellers to the motors without marks. Hold the motor, press the propeller down, and rotate in the direction marked on the propeller until it pops up and locks in place.
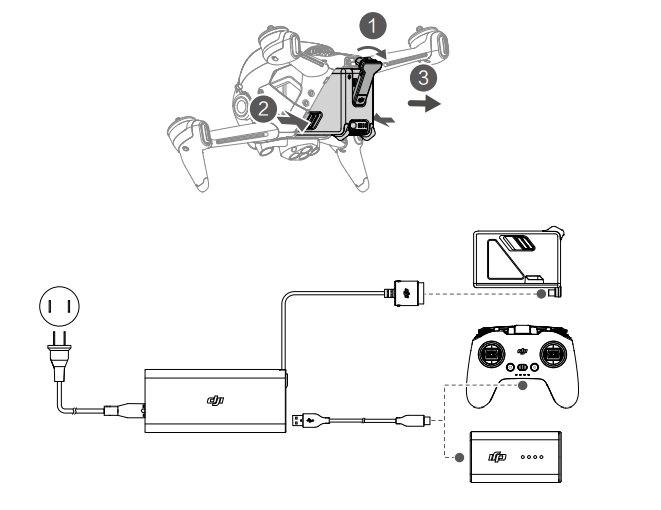
- All Intelligent Flight Batteries are in hibernation mode before shipping to ensure safety. Remove the Intelligent Flight Battery and use the provided charger to charge and activate the Intelligent Flight Batteries for the first time. It takes approximately 50 minutes to fully charge an Intelligent Flight Battery.
Warning
- It is recommended to attach a gimbal protector to protect the gimbal when the aircraft is not in use.
- Make sure the gimbal protector is removed before powering on the aircraft. Otherwise, it may affect the aircraft’s self-diagnostics.
Preparing the Goggles
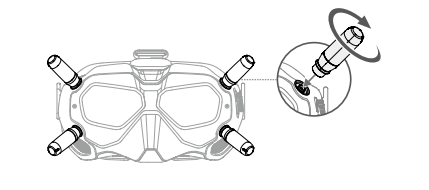
- Install the four antennas to the mounting holes on the front of the goggles. Make sure that the antennas are installed securely.
- Attach the strap to the headband attachment on the top and sides of the goggles

- Use the included power cable to connect the power port of the goggles to the goggles battery.
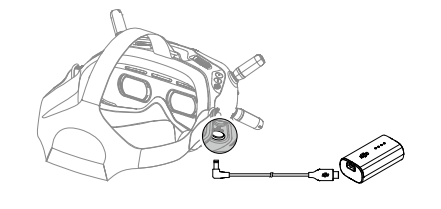
- Align the lenses over your eyes and pull the headband down. Adjust the headband size until the goggles fit securely and comfortably on your face and head.

- Turn the Interpupillary Distance (ID slider to adjust the distance between the lenses until the images are properly aligned.
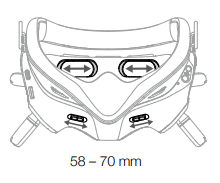
Warning
- The goggles can be worn over glasses.
- DO NOT use the goggles battery to power other mobile devices.
Preparing the Remote Controller
- Remove the control sticks from the storage slots on the remote controller and screw them into place
- Unfold the antennas.

Diagram
Aircraft
- Propellers
- Motors
- Front LED
- Landing Gears (Built-in antennas)
- Frame Arms LED
- Gimbal and Camera
- Aircraft Status Indicator
- Downward Vision System
- Infrared Sensing System
- Auxiliary Bottom Light
- Intelligent Flight Battery
- Battery Buckles
- Power Button
- Battery Level LEDs
- Power Port
- Forward Vision System
- USB-C Port
- microSD Card Slot
Goggles
- Antennas
- Front Cover
- Channel Adjustment Buttons
- Channel Display
- USB-C Port
- microSD Card Slot
- Air Intake
- IPD Slider

- Headband Attachment
- Foam Padding
- Lens
- Air Vent
- Shutter/Record Button
Press once to take photos or start or stop recording. Press and hold to switch between photo and video mode - Back Button
Press to return to the previous menu or exit the current mode. - 5D Button
Toggle the button to scroll through the menu. Press the button to confirm. On the main screen, toggle left or right to adjust the screen brightness and toggle up or down to adjust the volume. Press the button to enter the menu. - Audio/AV-IN Port
- Power Port (DC5.5×2.1)
- Link Button
Remote Controller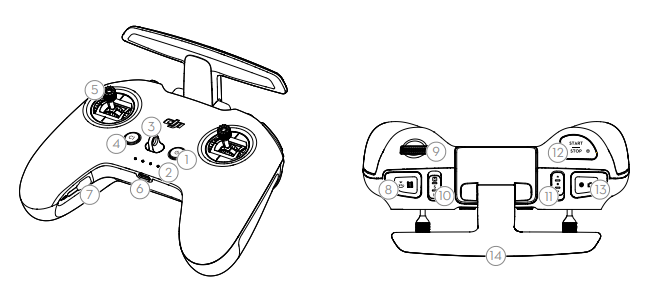
- Power Button
Press once to check the current battery level. Press once, then again, and hold to power the remote controller on or off. - Battery Level LEDs
Display the current battery level of the remote controller. - Lanyard Attachment
- C1 Button (Customizable)
The function of this button can be adjusted in the goggles. By default, press once to adjust or disable Coordinated Tum (S Mode). Press twice to enable or disable ESC Beeping. - Control Sticks
Used to control the movements of the aircraft. The control sticks mode can be set in the goggles. The control sticks are removable and easy to store. - USB-C Port
For charging and connecting the remote controller to the computer. - Control Sticks Storage Slot
For storing the control sticks. - Flight Pause/RTH Button
Press once to make the aircraft brake and hover in place (only when GPS or Downward Vision System are available). Press and hold the button to initiate RTH. The aircraft returns to the last recorded Home Point. Press again to cancel RTH. - Gimbal Dial Controls the tilt of the camera.
- Flight Mode Switch Switch between Normal, Sport, and Manual mode. Manual mode is disabled by default and must be enabled in the goggles
- C2 Switch (Customizable) The function of this switch can be adjusted in the goggles. By default, toggle the switch to recenter the gimbal and adjust up and down.
- Start/Stop Button
When using Sport mode, press once to enable or disable cruise control. When using Manual mode, press twice to start or stop the motor. When using Normal or Sport mode, press once to cancel Low Battery RTH when the countdown appears in the goggles. - Shutter/Record Button
Press once to take photos or start or stop recording. Press and hold to switch between photo and video mode. - Antennas
relay aircraft control wireless signals.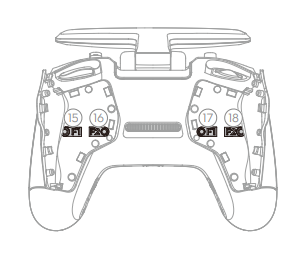
- F1 Right Stick Resistance Adjustment Screw Vertical
Tighten the screw clockwise to increase the vertical resistance of the corresponding stick. Loosen the screw to decrease vertical resistance. - F2 Right Stick Recentering Adjustment Screw (Vertical)
Tighten the screw clockwise to disable the vertical recentering of the corresponding stick. Loosen the screw to enable vertical recentering. - F1 Left Stick Resistance Adjustment Screw (Vertical)
Tighten the screw clockwise to increase the vertical resistance of the corresponding stick. Loosen the screw to decrease vertical resistance. - F2 Left Stick Recentering Adjustment Screw (Vertical)
Tighten the screw clockwise to disable the vertical recentering of the corresponding stick. Loosen the screw to enable vertical recentering.
Linking
The devices are all linked before shipping. Linking is only required when using a new device for the first time. Follow the steps below to link the aircraft, goggles, and remote controller:
- Power on the aircraft, goggles, and remote controller.
- Press the link button on the goggles. The goggles will start to beep continually.
- Press and hold the power button of the aircraft until the battery-level LEDs start to blink in sequence.
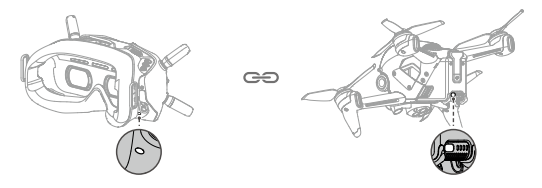
- The battery level LEDs of the aircraft turn solid and display the battery level. The goggles stop beeping when they are successfully linked and the video display is normal
- Press and hold the power button of the aircraft until the battery-level LEDs start to blink in sequence.
- Press and hold the power button of the remote controller until it starts to beep continually and the battery level LEDs blink in sequence

- Once linking is successful, the remote controller stops beeping and both the battery level LEDs turn solid and display the battery level.
Warning
- Make sure the goggles and the remote controller are within 0.5 m of the aircraft during linking.
- The aircraft must be linked with the goggles before the remote controller.
Activation
DJI FPV must be activated before use for the first time. Make sure all devices are linked after powering on the aircraft, goggles, and remote controller. Connect the USB-C port of the goggles to the mobile device, run DJI Fly, and follow the prompts to activate. An internet connection is required for activation.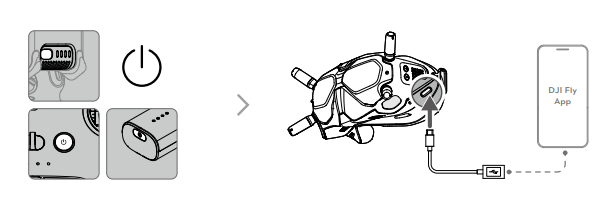
Flight Modes
DJI FPV has three flight modes, plus a fourth flight mode that the aircraft switches to in certain scenarios. Flight modes can be switched via the flight mode switch on the remote controller.
- Normal Mode: The aircraft utilizes GPS, the Forward and Downward Vision Systems, and the Infrared Sensing System to locate itself and stabilize. The aircraft will use GPS to locate itself when the GPS signal is strong and use the Downward Vision System to locate and stabilize itself when the lighting conditions are sufficient. When the Downward Vision System is enabled and lighting conditions are sufficient, the maximum flight attitude angle is 25° and the maximum flight speed is 15 m/s.
- Sport Mode: The aircraft uses GPS and the Downward Vision System for positioning. In Sport mode, aircraft responses are optimized for agility and speed making it more responsive to control stick movements. The maximum flight speed is 27 m/s, maximum ascent speed is 15 m/s, and maximum descent speed is 10 m/s.
- Manual Mode: Classic FPV aircraft control mode with the highest maneuverability, which can be used for racing and freestyle flying. In Manual mode, all flight assistance functions such as automatic stabilization are disabled, and proficient control skills are required. The throttle stick can be adjusted in this mode.
- In Normal or Sport mode, when the Downward Vision System is unavailable or disabled and when the GPS signal is weak or the compass experiences interference, the aircraft cannot position itself or brake automatically, which increases the risk of potential flight hazards. At this time, the aircraft may be more easily affected by its surroundings. Environmental factors such as wind can result in horizontal shifting, which may present hazards, especially when flying in confined spaces.
Battery Features
- Battery Level Display: the battery level LEDs display the current battery level.
- Auto-Discharging Function: to prevent swelling, the battery automatically discharges to approximately 97% of the battery level when it is idle for one day, and automatically discharges to approximately 60% of the battery level when it is idle for five days. It is normal to feel moderate heat being emitted from the battery while it is discharging.
- Balanced Charging: the voltages of the battery cells are automatically balanced during charging.
- Overcharge Protection: the battery stops charging automatically once fully charged.
- Temperature Detection: to prevent damage, the battery only charges when the temperature is between 41° and 104° F (5° and 40° C). Charging stops automatically if the temperature of the battery exceeds 122° F (50° C) during charging.
- Overcurrent Protection: the battery stops charging if an excess current is detected.
- Over-discharge Protection: discharging stops automatically to prevent excess discharge when the battery is not in-flight use. Over-discharge protection is not enabled when the battery is in-flight use.
- Short Circuit Protection: the power supply is automatically cut if a short circuit is detected.
- Battery Cell Damage Protection: the goggles display a warning prompt when a damaged battery cell is detected.
- Hibernation Mode: the battery switches off after 20 minutes of inactivity to save power. If the battery level is less than 10%, the battery enters Hibernation mode to prevent over-discharge after being idle for six hours. In Hibernation mode, the battery level indicators do not illuminate. Charge the battery to wake it from hibernation.
- Communication: information about the voltage, capacity, and current of the battery is transmitted to the aircraft.
Using the Battery
Checking Battery Level
- Press the power button once to check the battery level.
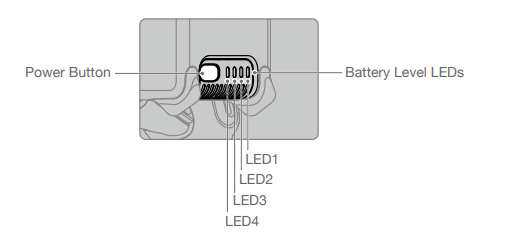
Gimbal Mode
The gimbal mode will automatically switch according to the flight mode.
- Normal/Sport mode: the gimbal is in attitude stabilization mode. The tilt angle of the gimbal remains stable relative to the horizontal plane, which is suitable for shooting stable images.
- Manual mode: the gimbal is in FPV mode. The tilt angle of the gimbal remains stable relative to the aircraft body. which is suitable for FPV flight experience.
Storing Photos and Videos
DJI FPV supports the use of a microSD card to store photos and videos. A UHS-| Speed Grade 3 rating or above microSD card is required due to the fast read and write speeds necessary for high-resolution video data. Refer to the Specifications for more information about recommended microSD cards.
Flight Test
Takeoff/Landing Procedures
- Place the aircraft in an open, flat area with the aircraft status indicator facing towards you.
- Power on the goggles, remote controller, and the aircraft.
- Wait until the aircraft status indicator blinks green slowly to indicate that the Home Point has been recorded and put on the goggles.
- Start the motors.
- Gently push the throttle stick up to take off.
- Pull the throttle stick down to land the aircraft.
- Stop the motors after landing.
- Power off the aircraft, goggles, and remote controller.
Video Suggestions and Tips
- The pre-flight checklist is designed to help you fly safely and to ensure that you can record video during flight. Go through the full pre-flight checklist before each flight.
- Select the gimbal operation mode.
- It is recommended to use Normal mode to take photos or record videos.
- DO NOT fly in bad weather conditions such as when it is raining or windy.
- Choose the camera settings that best suit your needs.
- Perform flight tests to establish flight routes and to preview scenes.
- Push the control sticks gently to keep the aircraft movement smooth and stable.
- When using Manual mode, fly in an open, wide, and sparsely populated environment to ensure flight safety.
Maintenance
Goggles
Cleaning
Make sure to disconnect the goggles from the power outlet before cleaning and make sure that there are no cables connected. Clean the surface of the goggles with a soft, dry, clean cloth. To clean the foam padding, moisten the cloth with clean water and wipe the foam padding.
Replacing the Foam Padding
The foam padding is attached to the goggles with Velcro. When replacing the foam padding, peel it gradually from the left or right side. Align the new foam padding with the goggles and press the foam padding down so it is securely attached.

Use a cleaning cloth to wipe the lenses gently.
- Moisten the cleaning cloth with alcohol or a lens cleaner.
- Wipe in a circular motion from the center to the outer edges of the lenses.
Warning
- DO NOT clean the foam padding with alcohol.
- The lenses are delicate. Clean them gently.
- DO NOT scratch them as this will damage the overall viewing experience.
- Store the goggles in a dry room at room temperature to avoid damage to the lenses from high temperatures and humid environments.
Specifications

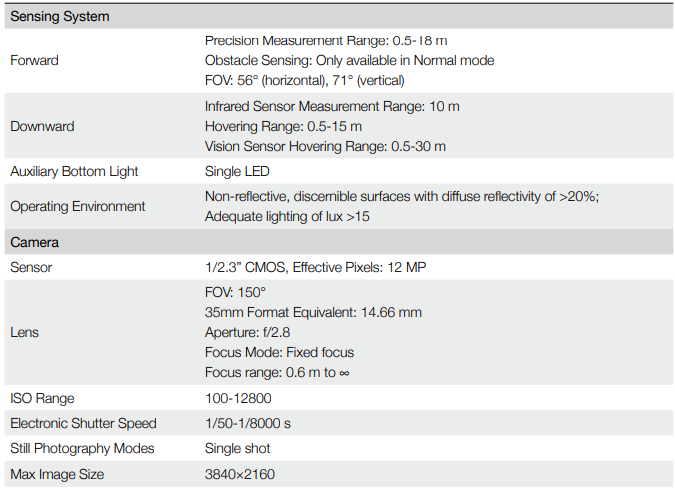
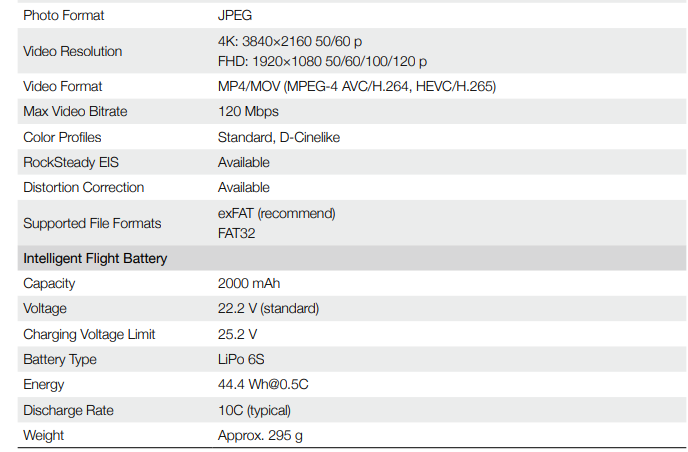
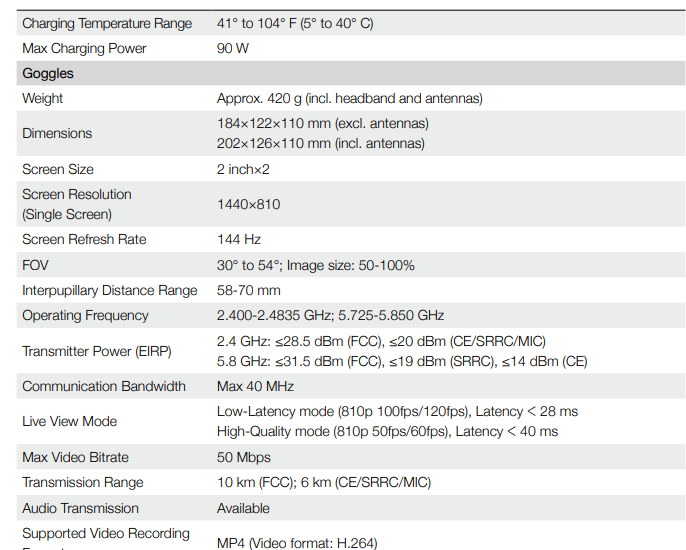


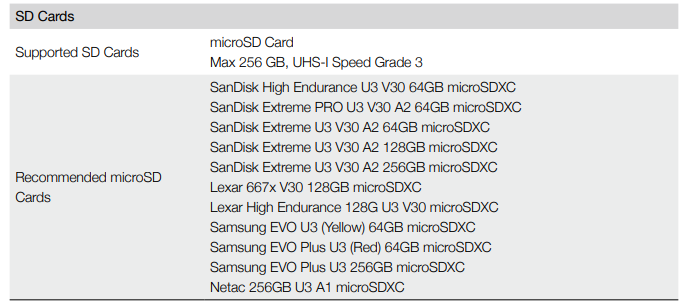
Warning
- Aircraft takeoff weight includes battery, propellers, and a microSD card.
- The FOV will be 150° when shooting at 50 or 100 fps. For other frame rates, the FOV will be 142°.
- Devices will take longer to charge if both the Intelligent Flight Battery and remote controller or goggles battery are being charged simultaneously.
- These specifications have been determined through tests conducted with the latest firmware. Firmware updates can enhance performance. It is highly recommended to update to the latest firmware.
Calibrating the Compass
It is recommended to calibrate the compass in the following situations when flying outdoors:
- Flying at a location farther than 31 miles (50 km) away from the location the aircraft was last flown.
- The aircraft has not been flown for more than 30 days.
- A compass interference warning appears in the goggles and/or the aircraft status indicator blinks red and yellow alternatively.
Warning
- DO NOT calibrate the compass in locations where magnetic interference may occur such as close to magnetite deposits or large metallic structures such as parking structures, steel-reinforced basements, bridges, cars, or scaffolding.
- DO NOT carry objects that contain ferromagnetic materials such as mobile phones near the aircraft during calibration.
- It is not necessary to calibrate the compass when flying indoors.
Calibration Procedure
Choose an open area to carry out the following procedure.
- Select Settings, Safety, and Compass Calibration in the goggles. The aircraft status indicator will be solid yellow to indicate calibration has started.
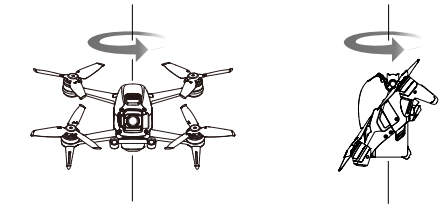
- Hold the aircraft horizontally and rotate it 360°. The aircraft status indicator will turn solid green.
- Hold the aircraft vertically and rotate it 360° around a vertical axis.
- If the aircraft status indicator blinks red, calibration has failed. Change your location and try to calibrate again.
Updating Firmware
Use DJI Fly or DJI Assistant 2 (DJI FPV series) to update the firmware.
Using DJI Fly
After powering on the aircraft, goggles, and remote controller, make sure that all devices are linked. Connect the USB-C port of the goggles to the mobile device, run DJI Fly, and follow the prompt to update. An internet connection is required.
Using DJI Assistant 2 (DJI FPV series)
Use DJI Assistant 2 (DJI FPV series) to update the aircraft, goggles, or remote controller separately.
- Power on the device and connect it to a computer with a USB-C cable.
- Launch DJI Assistant 2 (DJI FPV series) and log in with a DJI account.
- Select the device and click Firmware Update on the left-hand side.
- Select the firmware version required.
- DJI Assistant 2 (DJI FPV series) will download and update the firmware automatically.
- The device will restart automatically after the firmware update is completed
After-Sales Information
Visit https://www.dji.com/support to learn more about after-sales service policies, repair services, and support.
- DJI Support http://www.dji.com/support
FAQS About DJI FPV FirstPerson View Drone UAV Quadcopter
How much time can the DJI FPV battery be used?
Maximum 20 Minutes
How long is the DJI FPV drone powered on for?
up to 20m
What is the DJI FPV quadcopter drone’s range?
10km
Are there sensors on the DJI FPV drone?
Extraordinary Safety Features. To help ensure a safe flight, even at high speeds, DJI FPV incorporates an auxiliary bottom light, Smart Return to Home (RTH), Low Battery RTH, forward and downward object detecting, and Low Battery RTH.
How long does the DJI FPV drone battery take to charge?
the equivalent of 55 minutes
How should my DJI FPV battery be cared for?
Every two to three months, the batteries should be charged and discharged to 15% or less to keep them in good condition.
What is the FPV drone’s maximum operating range?
10, 6, 6, 6, and 6 kilometers (FCC, CE, SRRC, and MIC).
My DJI FPV can I use at night?
Just make sure that the takeoff and landing areas are illuminated.
Can FPV drones be flown at night?
Yes, drone operators with a Part 107 license and amateur operators can now fly at night without requesting a waiver.
The DJI FPV is water resistant.
No.
What is the DJI FPV drone’s top speed?
87 mph
For more manuals by DJI, Visit Manualsdock
[embeddoc url=”https://manualsdock.com/wp-content/uploads/2023/09/DJI-FPV-FirstPerson-View-Drone-UAV-Quadcopter-User-Manual.pdf” download=”all”]


