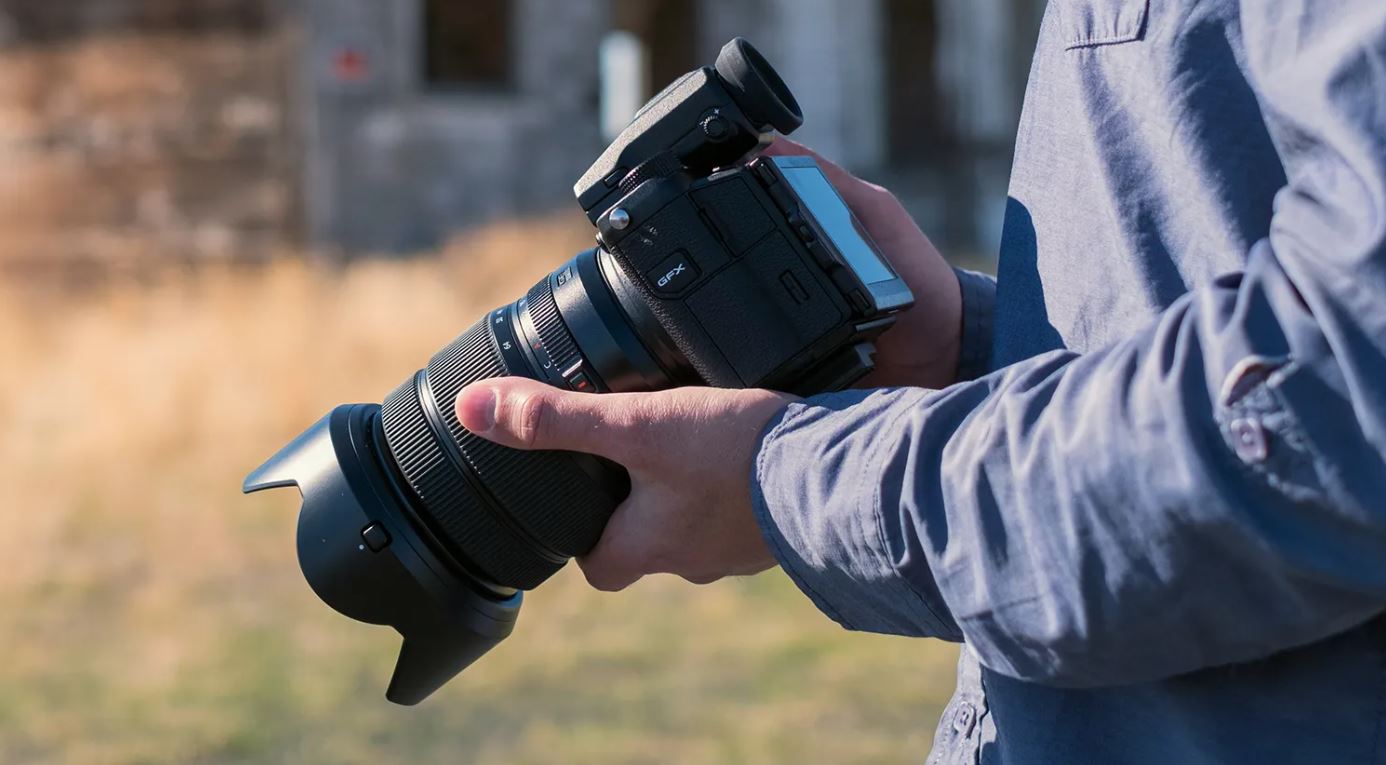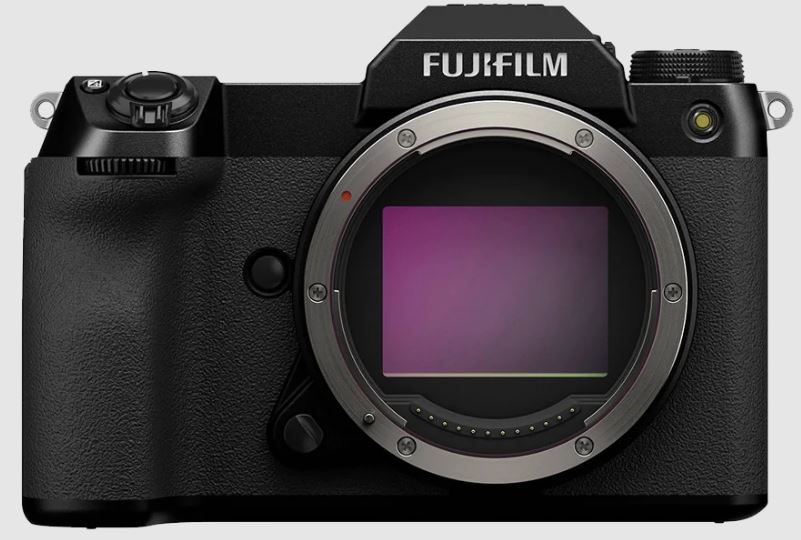
Fujifilm GFX 50s Digital Camera
About Fujifilm
Fujifilm, also known as Fujifilm Holdings Corporation, is a Japanese multinational corporation that specializes in imaging and photographic products, as well as various other technologies and services. Fujifilm has a long and storied history dating back to its founding in 1934 as Fuji Photo Film Co., Ltd. The company’s headquarters are located in Tokyo, Japan.
Here are some key aspects and areas of focus for Fujifilm:
- Photography and Imaging: Fujifilm is renowned for its photographic film and cameras, including popular brands like Fujifilm Instax instant cameras and the Fujifilm X-series mirrorless digital cameras. They produce a wide range of photographic products, including film, digital cameras, lenses, and accessories.
- Medical Imaging: Fujifilm has a significant presence in the healthcare industry, providing medical imaging equipment and solutions, including digital X-ray systems, medical printers, endoscopy systems, and more. Their healthcare division plays a crucial role in diagnostic imaging and medical informatics.
- Graphic Arts: Fujifilm is a major player in the graphic arts and printing industry, offering a range of solutions for commercial printing, packaging, and label printing. This includes digital printing equipment, inkjet technologies, and workflow software.
- Document Solutions: Fujifilm provides document solutions, including photocopiers, multifunction devices, and document management software, aimed at improving office productivity and efficiency.
- Materials and Chemicals: The company produces a variety of high-performance materials and chemicals used in industries such as semiconductors, display panels, and flat-panel displays.
- Digital Cameras and Lenses: Fujifilm’s X-series of mirrorless cameras and Fujinon lenses have gained popularity among both amateur and professional photographers for their image quality and innovative features.
- Instant Photography: Fujifilm’s Instax series of instant cameras and film have revived interest in instant photography and are popular among young users for their retro appeal.
- Photographic Film: While digital photography has largely replaced film in many areas, Fujifilm still produces a range of film products for photographers who prefer analog photography.
- Research and Development: Fujifilm invests heavily in research and development, which has led to innovations in various fields, from photography to healthcare and materials science.
Fujifilm has adapted to the changing technological landscape by diversifying its business interests beyond traditional photography. The company’s commitment to research and innovation has allowed it to remain relevant in the digital age while maintaining a strong presence in photography and imaging.
Supplied Accessories
The following are included with the camera:
- NP-T125 rechargeable battery
- BC-T125 battery charger
- Plug adapter
- EVF-GFX1 interchangeable electronic viewfinder
- Body cap
- Strap clips (× 2)
- Clip locks (× 2)
- Shoulder strap
- Cable protector
- Hot shoe cover (comes attached to hot shoe)
- Sync terminal cap (comes attached to the camera)
- Vertical battery grip connector cover (comes attached to the camera)
- Owner’s Manual (this manual)
Parts of the Camera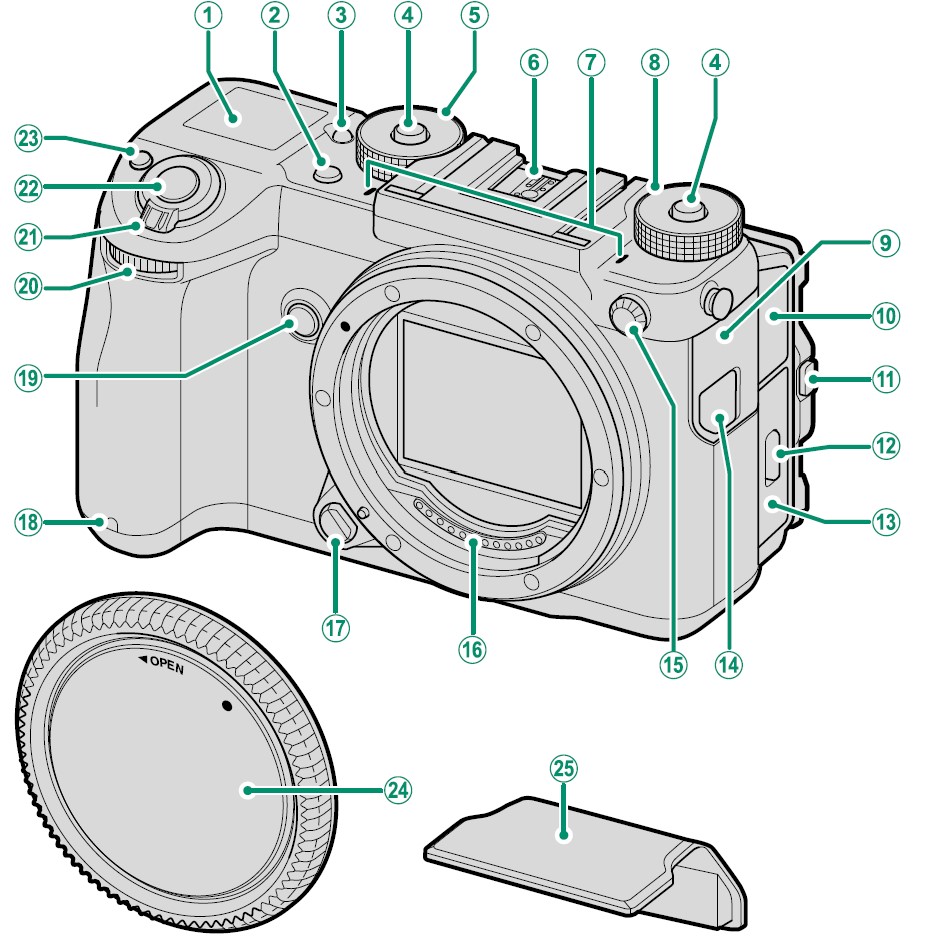
- Secondary LCD monitor
- Drive button
- Secondary monitor backlight button
- Dial lock release
- Shutter speed dial
- Hot shoe
- Microphone
- Sensitivity dial
- Connector cover 1
- Connector cover 2
- Tilt lock release
- Battery-chamber cover latch
- Battery-chamber cover
- Remote release connector cover
- Sync terminal
- Lens signal contacts
- Lens release button
- Self-timer lamp
- Fn2 button
- Front command dial
- ON/OFF switch
- Shutter button
- Fn1 button
 (exposure compensation) button.
 - Body cap
- Hot shoe cover

- LCD monitor
Touch screen - Fn5 button
- Focus stick (focus lever)
- Fn4 button
- Rear command dial
- Fn3 button
- Q (quick menu) button
- Indicator lamp
- Strap anchor
- Memory card slot cover
- Memory card slot cover latch
- MENU/OK button
- Selector buttons
- Vertical battery grip connector cover
- DISP (display)/BACK button
- Speaker
- Tripod mount
- Focus mode selector
 (delete) button
 (playback) button
- HDMI Micro connector (Type D)
- Remote release connector (⌀ 2.5 mm)
- 15 V DC-IN connector
- Micro USB (Micro-B) USB 3.0/ USB 2.0 connector
- Microphone jack (⌀ 3.5 mm)
- Headphone jack
- Battery chamber
- Battery latch
- Memory card slot 1
- Memory card slot 2
The Cable Protector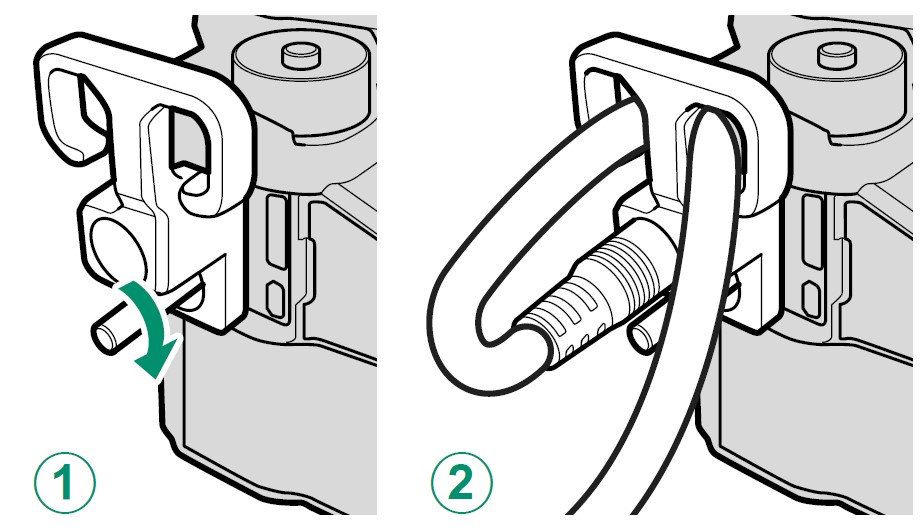
- The cable protector prevents accidental disconnection of the USB cable or AC adapter. Attach the protector as shown and tighten the lock screw.
- Connect the cable and pass it through the protector as shown.
The Serial Number Plate
Do not remove the serial number plate, which provides the FCC ID, KC mark, serial number, and other important information.
Attaching the Shoulder Strap
Attach the strap clips to the shoulder strap and then attach the strap to the camera.
- Attach a clip to the strap
Slide a clip onto the strap (A) and pass the strap through the strap adjuster and strap retainer (B).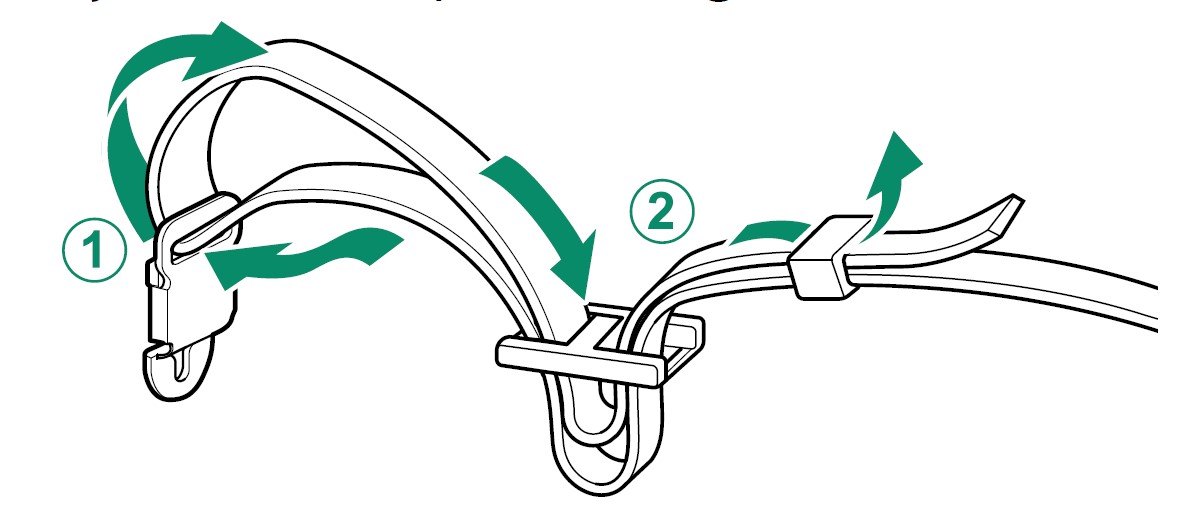
- Attach the clip to the camera.
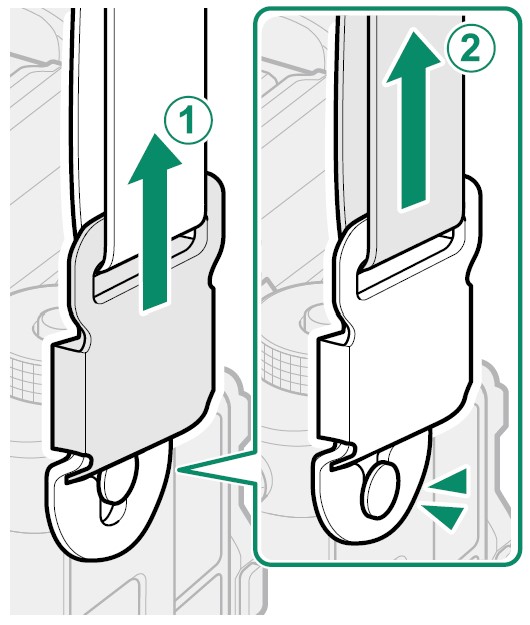
Pull the strap upwards (A) until the clip clicks securely into place (B) in the ✔ (“correct”) position. If the clip is in the (“incorrect”) position, press the tongue (C) until it clicks into place in the✔ position.
- Repeat Steps 1–2 for the second clip.
Locking the Clips
Be sure to insert the clip locks after confirming that the clips are correctly attached. To prevent the strap from becoming detached accidentally, insert the clip locks as shown.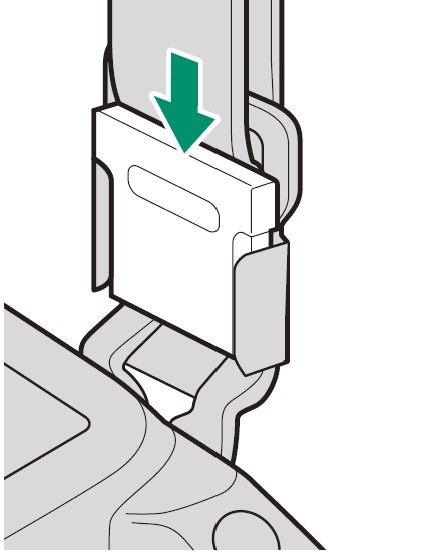
Unclipping the Strap
- Remove the clip locks.

- Grasping both sides of the clip, re-lease it as shown (A) and then slide it from the anchor (B).

Attaching a Lens
The camera can be used with lenses for the FUJIFILM G-mount.
Remove the body cap from the camera and the rear cap from the lens. Place the lens on the mount, keeping the marks on the lens and camera aligned, and then rotate the lens until it clicks into place.
Removing Lenses
To remove the lens, turn the camera off, then press the lens release button and rotate the lens as shown.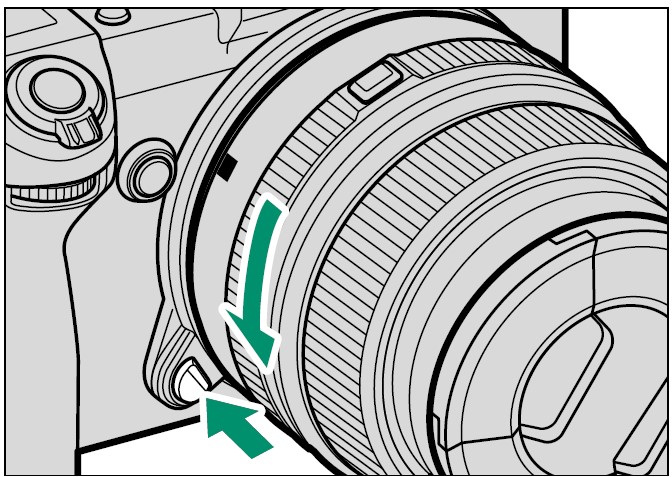
Lenses and Other Optional Accessories
The camera can be used with lenses and accessories for the FUJIFILM G-mount.
Charging the Battery
The battery is not charged at shipment. Before proceeding, use the supplied battery charger to fully charge the battery.
- Connect the plug adapter.
The plug adapter supplied with the camera varies with the country or region of purchase; use the adapter appropriate to your country or region as described in the enclosed notice. - Place the battery in the charger.
Insert the battery in the orientation shown by the arrow.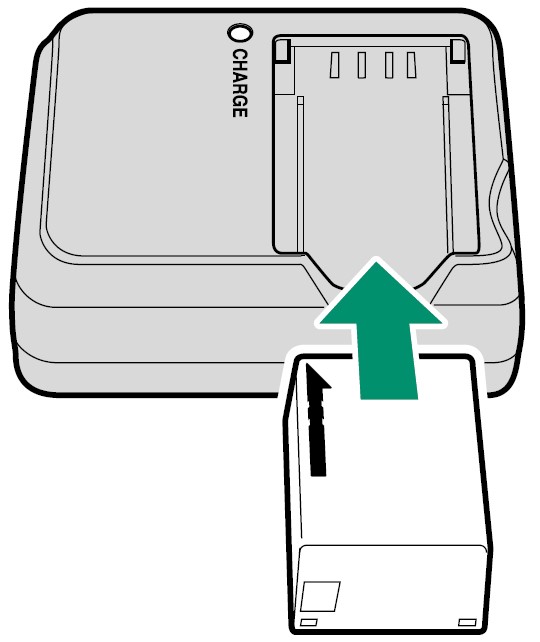
- Plug the charger in.
Plug the charger into an indoor power outlet. The charging indicator will light.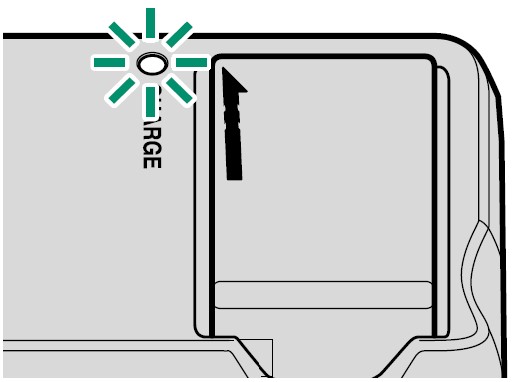
- Charge the battery.
Remove the battery when charging is complete.
The Charging Indicator
The charging indicator shows the battery charge status as follows:
Charging via AC Adapter
The battery inserted in the camera will also charge when the camera is powered by an optional AC-15V AC adapter. Charging takes about 120 minutes.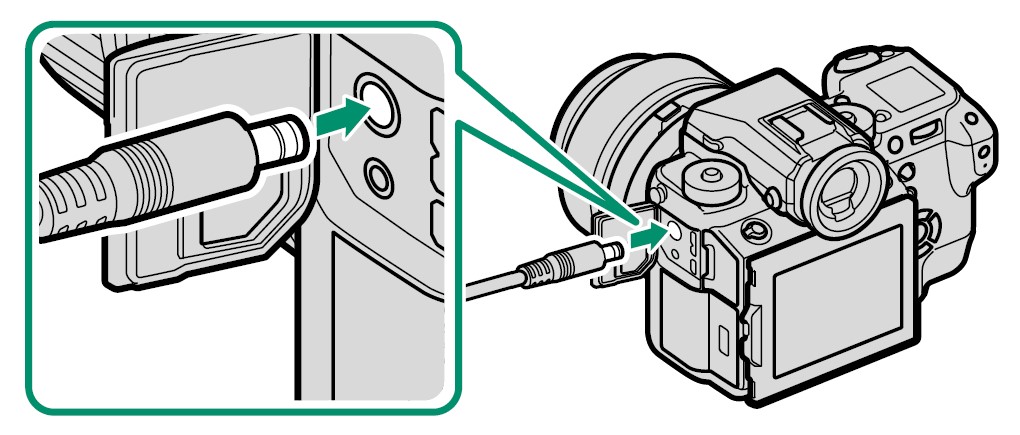
Battery charge status is shown by battery status icons when the camera is on (playback mode) and by the indicator lamp when the camera is off.
Inserting the Battery
After charging the battery, insert the battery in the camera as described below.
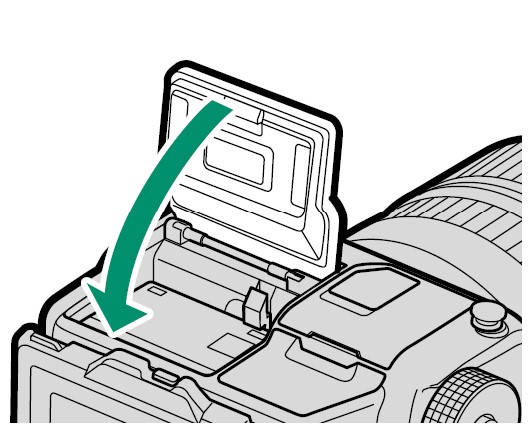
- Open the battery chamber cover.
Slide the battery-chamber latch as shown and open the battery-chamber cover.
- Insert the battery.
Using the battery to keep the battery latch pressed to one side, insert the battery contacts first in the direction shown by the arrow. Confirm that the battery is securely latched.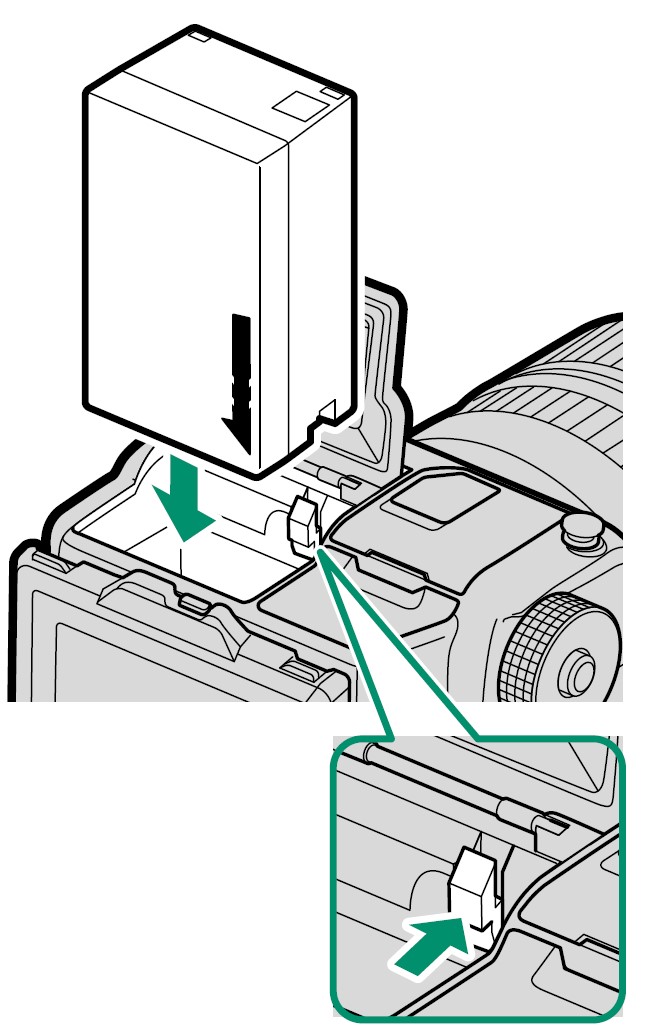
- Close the battery chamber cover. Close and latch the cover.
Removing the Battery
- Before removing the battery, turn the camera off and open the battery-cham-ber cover.
- To remove the battery, press the battery latch to the side, and slide the battery out of the camera as shown.

Inserting Memory Cards
Pictures are stored on memory cards (sold separately).
Note: The camera can be used with two cards, one in each of its two slots.
- Open the memory card slot cover.
Unlatch and open the cover.
- Insert the memory card.
Holding the card in the orientation shown, slide it in until it clicks into place at the back of the slot.
- Close the memory card slot cover.
Close and latch the cover.
Removing Memory Cards
- Before removing memory cards, turn the camera off and open the memory card slot cover.
- Press and release the card to eject it part way (to prevent the card from falling from the slot, press the center of the card and release it slowly, without removing your finger from the card). The card can then be removed by hand.

Using Two Cards
- The camera can be used with two cards, one in each of its two slots. At default settings, photos are saved to the card in the second slot only when the card in the first slot is full. This can be changed using SAVE DATA SETTING > CARD SLOT SETTING (STILL IMAGE).
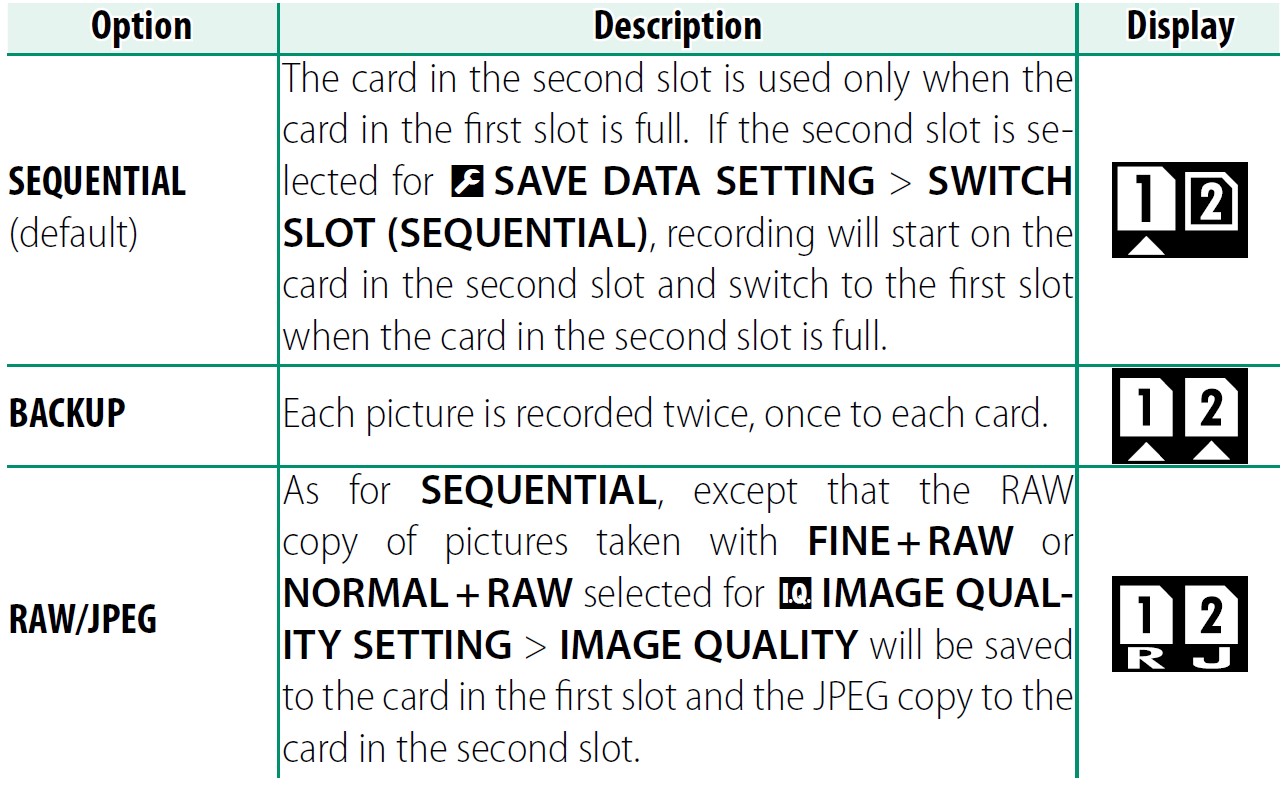
- The card used to store movies can be selected using SAVE DATA SETTING > MOVIE FILE DESTINATION.
Compatible Memory Cards
- FUJIFILM and SanDisk SD, SDHC, and SDXC memory cards have been approved for use in the camera; UHS-II cards can be used in both slots, while cards with a UHS speed class of 1 or better are recommended for movies.
- A complete list of approved memory cards is available at http://www.fujifilm.com/support/digital_cameras/compatibility/.
- Operation is not guaranteed with other cards. The camera can not be used with xD-Picture Cards or MultiMediaCard (MMC) devices.
Turning the Camera On and Off
- Use the ON/OFF switch to turn the camera on and off.
- Rotate the switch to ON to turn the camera on, or to OFF to turn the camera off.

Checking the Battery Level
After turning the camera on, check the battery level in the display.
Battery level is shown as follows: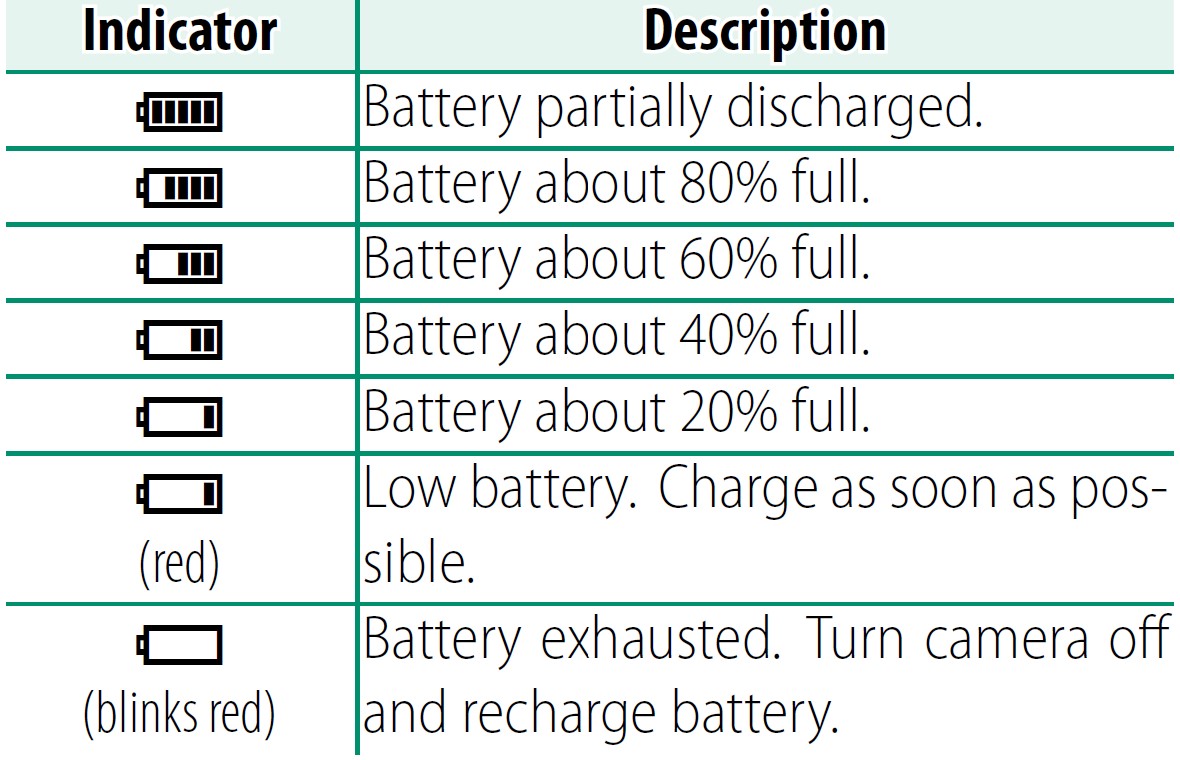
Basic Setup
A language-selection dialog is displayed the first time the camera is turned on.
- 1 Turn the camera on.
A language-selection dialog will be displayed.
- Choose a language.
Highlight a language and press MENU/OK.
- Set the date and time.
Press the selector left or right to highlight the year, month, day, hour, or minute, and press up or down to change. To change the order in which the year, month, and day are displayed, highlight the date format SET NO, and press the selector up or down.
Press MENU/OK to exit to shooting mode when settings are complete.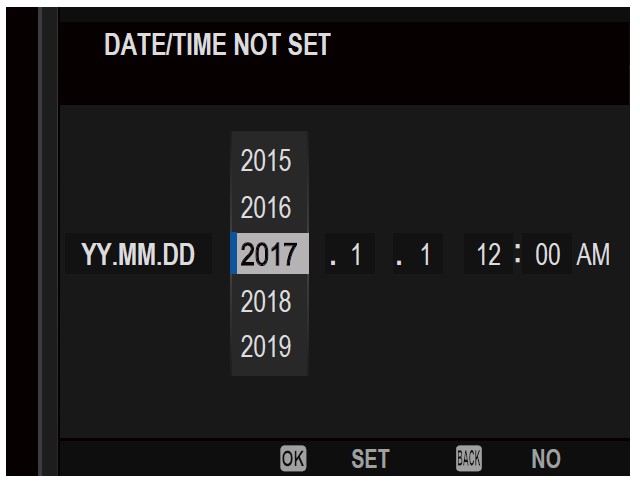
Skipping the Current Step
Press DISP/BACK to skip the current step. Any steps you skip will be displayed the next time the camera is turned on.
Choosing a Different Language
To change the language:
- Display language options.
Select USER SETTING > .
. - Choose a language.
Highlight the desired option and press MENU/OK.
Changing the Time and Date
To set the camera clock:
- Display DATE/TIME options.
Select USER SETTING > DATE/TIME. - Set the clock.
Press the selector left or right to highlight the year, month, day, hour, or minute, and press up or down to change. Press MENU/OK to set the clock.
Troubleshooting
Consult the table below should you encounter problems using your camera. If you don’t find the solution here, contact your local FUJIFILM distributor.
Power and Battery

Menus and Displays
Shooting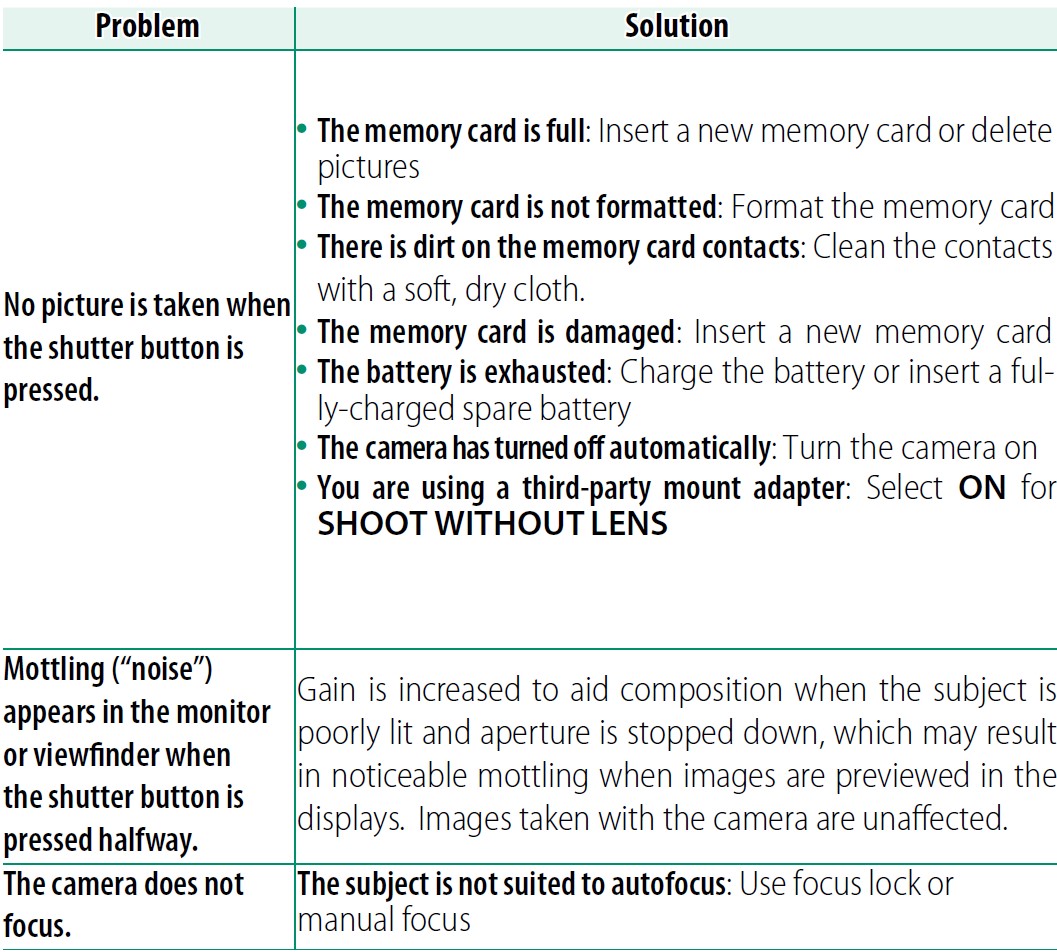
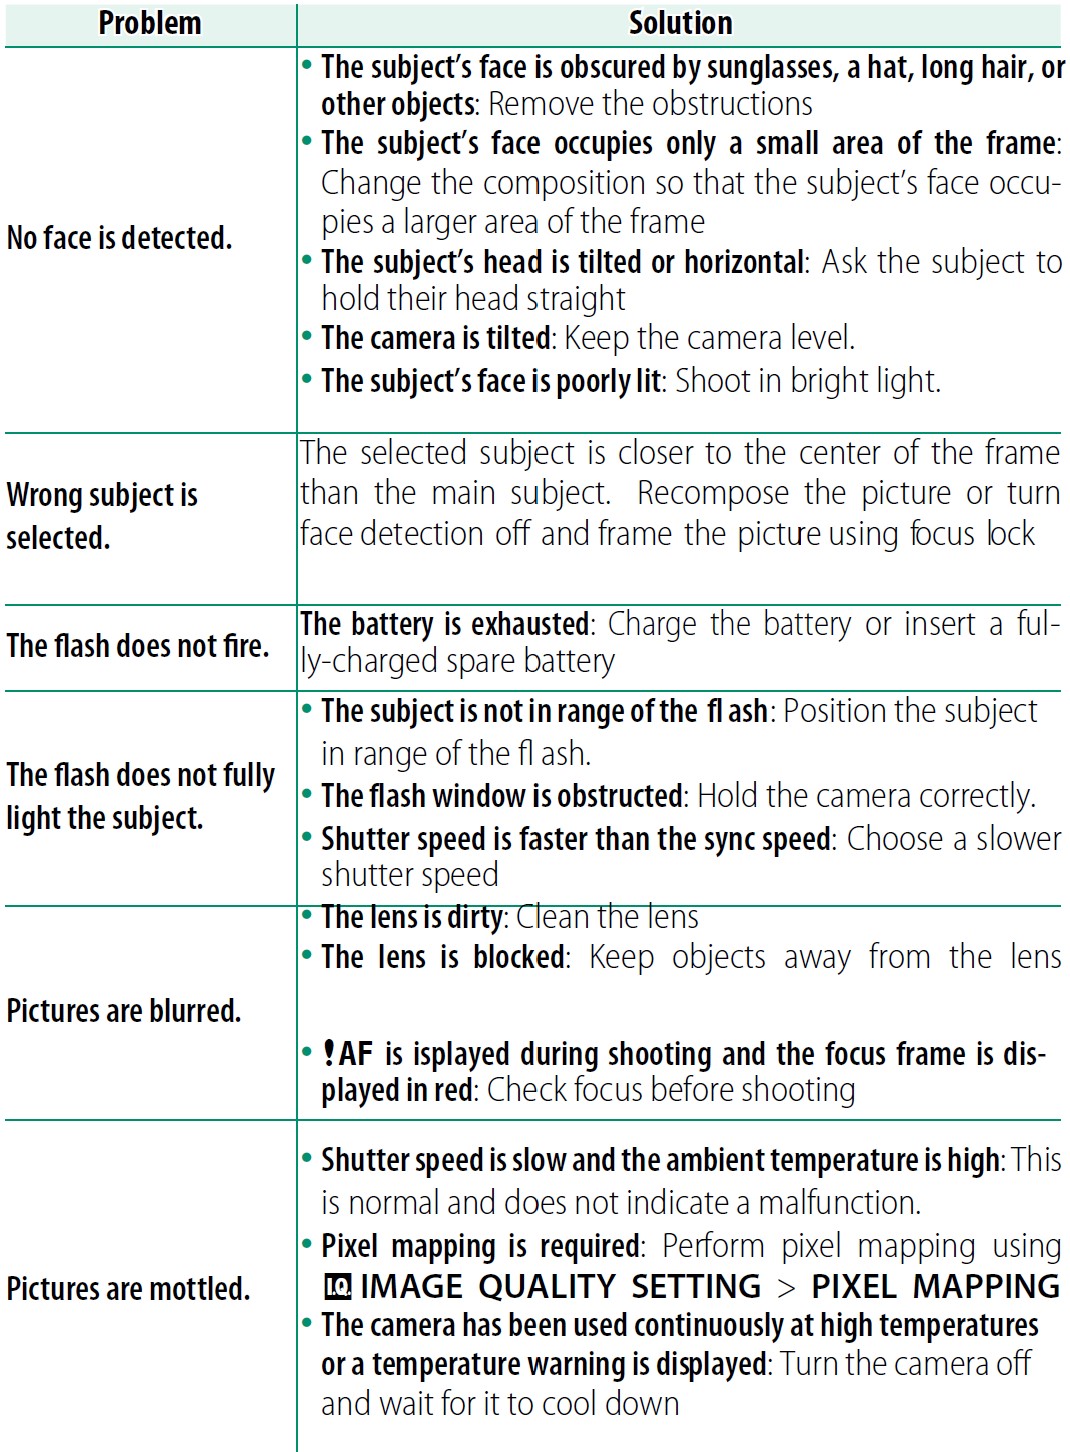
Playback
Connections
Wireless Transfer
For additional information on troubleshooting wireless connections, visit: http://digital-cameras.support.fujifilm.com/app?pid=x
Miscellaneous
Memory Card Capacity
The following table shows the recording time or the number of pictures available at different image sizes. All figures are approximate; file size varies with the scene recorded, producing wide variations in the number of files that can be stored. The number of exposures or length remaining may not diminish at an even rate.
* Use a UHS speed class 1 card or better. Individual movies can not exceed 30 minutes in length.
Specifications
System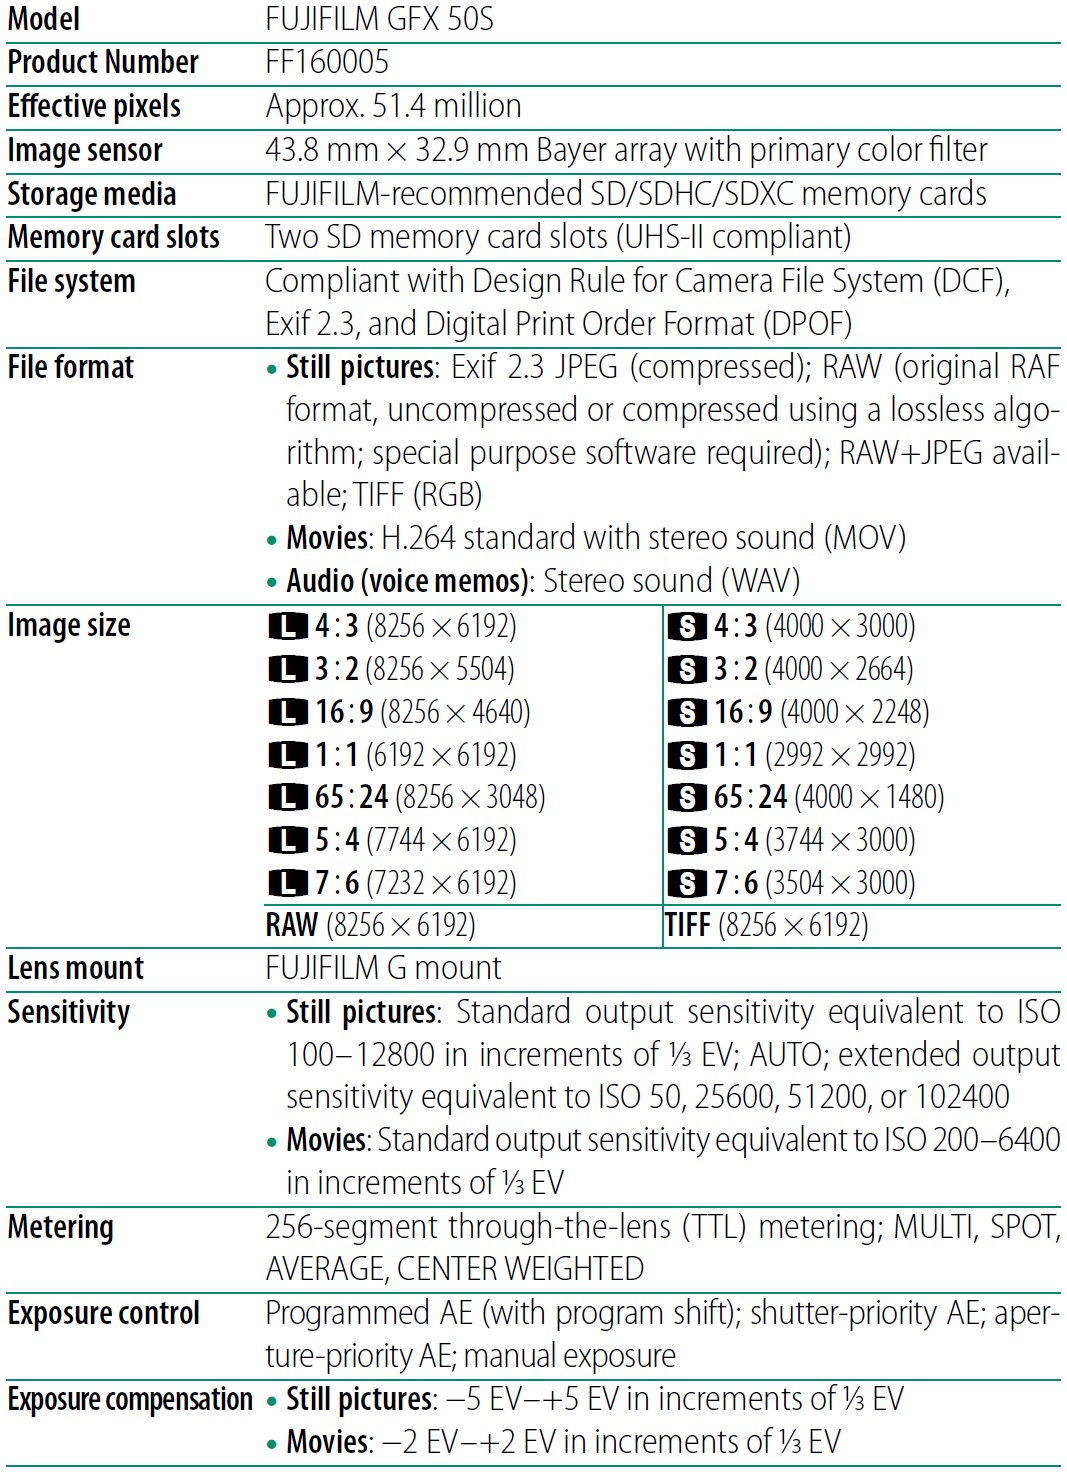


Power supply/other


NP-T125 rechargeable battery
BC-T125 battery charger
FAQS About Fujifilm GFX 50s Digital Camera
What is the GFX 50S’s battery life?
400 shots
Fuji GFX 50S: Is it full frame?
larger than the full frame norm by around 70%!
A file from a Fuji GFX 50S is what size?
JPEG files can be as large as 31MB, with an average raw size of 62MB (lossless compressed) or 121MB (uncompressed).
The Fuji GFX 50S has how many pixels?
8256×6192 pixel
What is the Fujifilm GFX’s shutter life?
1.5 million actuations
Is the GFX50S weatherproof?
weather- and dust-sealed
What mount is used by the Fuji GFX?
G Mount optics
What does the acronym Fuji GFX mean?
abbreviation for graphics.
Mirrorless is Fujifilm GFX 50S?
Mirrorless medium format camera
For more manuals by Fujifilm, Visit Manualsdock
[embeddoc url=”https://manualsdock.com/wp-content/uploads/2023/09/Fujifilm-GFX-50s-Digital-Camera-Owner-Manual.pdf” download=”all”]

