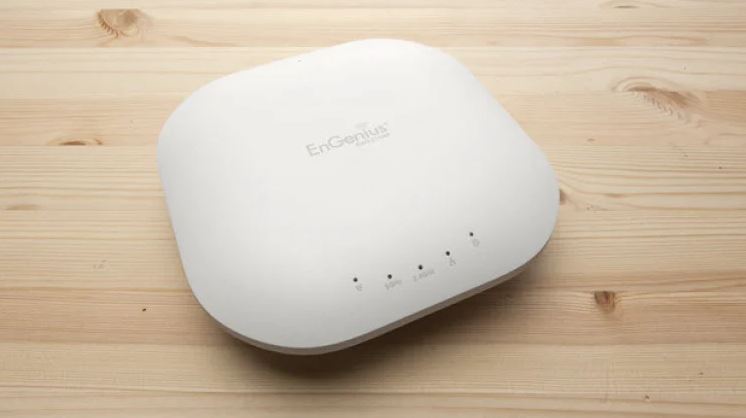
Neutron Dual-Band N900 Indoor Access PointEnGenius EWS320AP
About EnGenius
Networking solutions provider EnGenius offers equipment and solutions for wireless communications infrastructure for both commercial and residential users. Costa Mesa, California serves as the company’s corporate headquarters. It was established in 1999. Access points, wireless bridges, routers, switches, and network cameras are just a few of the wireless networking products that EnGenius has to offer. These items are made to give families and businesses dependable, fast wireless connectivity.
Package contents
- Managed indoor access point
- Power adapter
- RJ-45 Ethernet cable
- Mounting bracket
- Mounting kit
- T-Rail mounting kit
Minimum requirements
- Broadband Internet service (Cable or DSL modem)
- Internet browser (Internet Explorer, Safari, Firefox, Chrome)
- EnGenius wireless management L2 switch (To use with EWS-series management switches)
Connecting the access point
- Step 1: Connect one end of the Ethernet cable to an Ethernet port on the front panel of the EnGenius wireless management switch and the other end to the Ethernet port on the computer.
- Step 2: Connect another Ethernet cable to the LAN port of the managed access point and the other end to the Ethernet port on the wireless management switch. With the wireless management switches, the managed access point is able to obtain properly assigned IP address for further configurations.

IP adress configuration
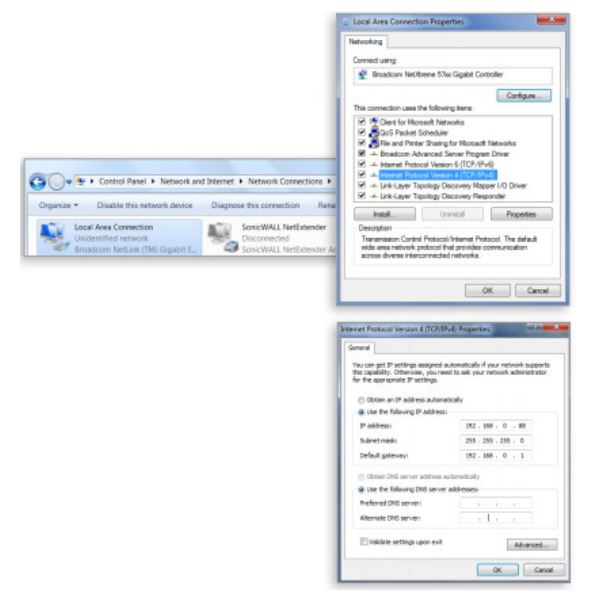
- Step 1: Once your computer is on, ensure that your TCP/IP is set to ‘On’ or ‘Enabled’. Open ‘Network Connections’ and then click ‘Local Area Connection’. Select ‘Internet Protocol Version 4’ (TCP/IPv4).

- Step 2: If your computer is already on a network, ensure that you have set it to a static IP address on the interface. (Example: 192.168.1.10 and the subnet mask address as 255.255.255.0.)

Management switch setup
- Step 1: Open a web browser on your computer.
In the address bar of the web browser, type in 192.168.0.239 and choose enter. Step 2: A login screen will appear. By default, the username is admin and the password is password. Enter the current username and password of the wireless management switch and then click ‘Login’. - Step 3: The EnGenius wireless management switch user interface will appear. Make sure the controller state is set to ‘Enabled’.
Adding managed access point (Through EnGenius wireless management switch GUI)
- Step 1: All managed access point(s) connected to the same network as the wireless management switch will appear on the right side of the screen, under the access point ‘under approval’ list. Locate and select the managed access point by checking the box and click ‘Allow’ to manage the device.

- Step 2: You may configure your managed access point(s) after successfully connecting to the wireless management switch through its GUI.
Configuring managed access point (Through EnGenius wireless management switch GUI)

- Step 1: Configure managed access point(s) through the GUI interface from the switch for WLAN settings under ‘device management’.
- Step 2: Add managed access point(s) to specific access point clusters to save repetitive configuration tasks.
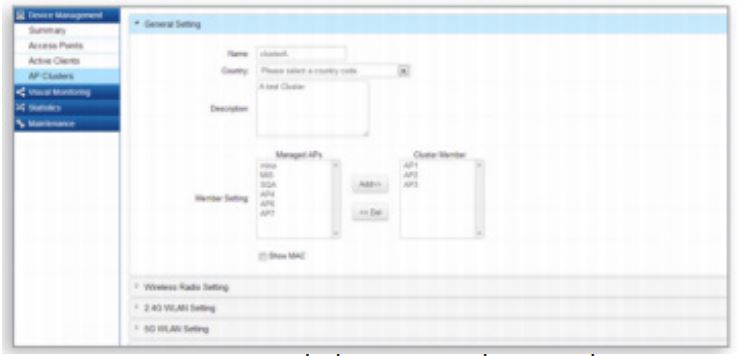
- Step 3: Users may create several clusters simultaneously to accommodate their deployments under access point clusters.

- Step 4: For distinct settings, EnGenius wireless management switches still offer individually managed access point customization for cluster members such as different channels that best adapt your local WLAN deployments.
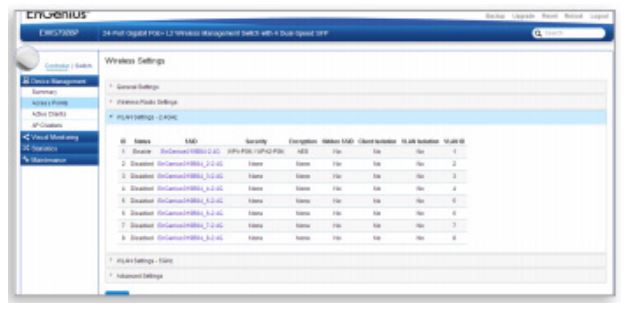
- Step 5: Upon successful connection and setup, users can go through different sections on the web management pages to unleash managed access point(s) full features for your WLAN deployment and performance monitoring.
Mounting the access point
The AP can be ceiling-mounted or wall-mounted depending on the setup. To attach the access point to a ceiling or wall using the mounting bracket:
- Step 1: Attach the mounting bracket to the wall or ceiling using the provided mounting kit.
- Step 2: Insert the provided short screws into the mounting holes. Make sure there’s enough space between the screws and the unit for the mounting bracket. If extra space is required, use the provided spacers and long screws from the T-Rail mounting kit.
- Step 3: Mount the access point to the mounting bracket by rotating the unit clockwise about 90 degrees to secure it in place.
To attach the access point to a ceiling using T-Rail connectors:
- Step 1: Attach the T-Rail connectors to the bottom cover of the access point using the provided short screws. Use appropriate size T-rail connectors
(15/16” or 9/16”). If extra space is required to accommodate drop ceiling tiles, use the provided spacers and long screws. - Step 2: Line up the connected T-rail connectors with an appropriately sized rail and press the unit onto the rail until it snaps into place.
Note: To protect your access point, use the Kensington security slot to attach a cable lock (cable lock is not included).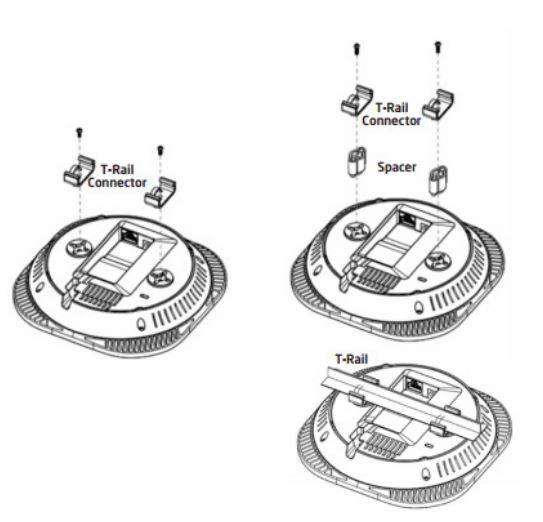
Stand-alone access point Installation
Connecting the access point
- Step 1: Connect one end of the Ethernet cable to the LAN port of the access point and the other end to the Ethernet port on the computer.
- Step 2: Connect the power adapter to the DC-IN port of the access point and plug the other end into an electrical outlet.
Note: The access point supports both IEEE802.3at PoE (Power-over-Ethernet) and the included power adapter. You may use either one as the power source. DO NOT use both at the same time.
IP address configuration
- Step 1: Once your computer is on, ensure that your TCP/IP is set to ‘On’ or ‘Enabled’. Open ‘Network Connections’ and then click ‘Local Area Connection’. Select ‘Internet Protocol Version’ (TCP/IPv4).
- Step 2: If your computer is already on a network, ensure that you have set it to a static IP address on the interface. (Example 192.168.1.10 and the subnet mask address as 255.255.255.0)
Access point setup
- Step 1: Open a web browser on your computer. In the address bar of the web browser, type in 192.168.1.1 and choose enter.
- Step 2: A login screen will appear. By default, the username of the access point is admin and the password is admin. Enter the current username and password of the access point and then click ‘Login’.
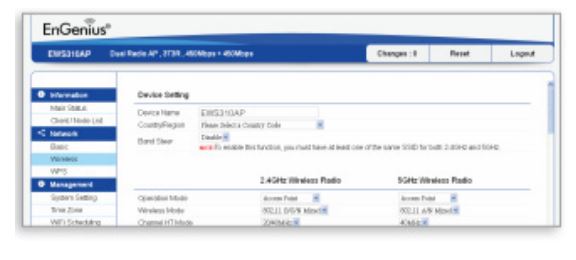
- Step 3: The EnGenius access point user interface will appear. This device can operate in the following modes: Access point, WDS AP, and WDS bridge. Switch modes by selecting the operation mode under the ‘Network’, and ‘Wireless’ tabs.
EnGenius Europe
Veldzigt 28, 3454 PW De Meern, Netherlands
0900-WIFIABC
www.wifiabc.com
Disclaimer: Information may be subject to changes without prior notification. F
Follow us
- https://www.linkedin.com/company/engeniuseurope
- https://twitter.com/engeniuseu
- https://plus.google.com/+EngeniusEuropeBVDeMeern
- https://www.youtube.com/user/engeniuseuropebv
FAQs EnGenius EWS320AP
What kind of architecture is used by the EnGenius cloud?
We created the EnGenius Cloud solution on the most recent serverless Function-as-a-Service (FaaS) architecture to address these problems. FaaS enhances performance for each function while also increasing utilization.
Where is the EnGenius product made?
The EnGenius and Senao brands are used to advertise the data networking and telephony equipment made in Taiwan by Senao Networks, Inc.
How can my EnGenius access point be reset?
Ensure your device is powered on before pressing and holding the recessed reset button for 10 seconds and releasing it to restore it to its factory settings. A paperclip or other thin object is needed to access the button, which is on the back panel of the device to the left of the LAN port.
EnGenius green mode: what is it?
Admin EnGenius. The Green Box, as seen below, is turned on by default to automatically calculate the wireless radio’s transmitting power in accordance with FCC requirements. It is possible to limit the wireless radio’s transmitting power further as needed when the Green Box is unchecked.
What is the location of my EnGenius IP address?
Enter the IP address of your EnGenius router in the address bar of your preferred web browser. The IP address is located on the router’s back.
What is the EnGenius management SSID password?
Please use the last 6 digits of the MAC address for your selected Device to connect to the EnGenius Management SSID. The Wi-Fi password by default is 12345678.
How many gadgets can be connected?
The majority of wireless access points and wireless routers have a maximum theoretical capacity of 255 connected devices. A significant number of computers, smartphones, tablets, cameras, and other gadgets are far more than what is typically needed in a home.
How can I upgrade the firmware on my Engenius?
Next select “Network Settings” (cogwheel button). Firmware can be accessed by selecting “Tools” from the left-hand menu, then. Go to the firmware’s saved location by clicking the “Select File” button. In order to upgrade the firmware, click “Open” and then “Apply.”
[embeddoc url=”https://manualsdock.com/wp-content/uploads/2023/03/EnGenius-EWS320AP-Installation-Manual.pdf” download=”all”]
For more manuals by EnGenius, visit ManualsDock

