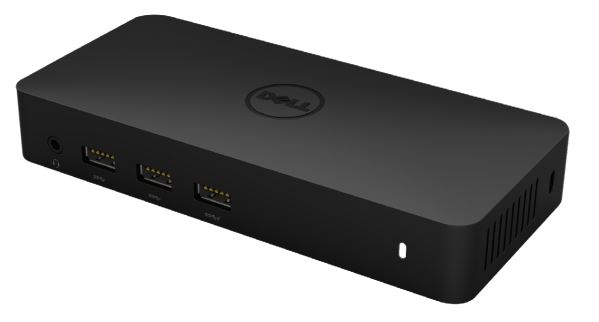
Dell D3100 Docking Station USB3.0
About DELL Technologies
Technology company Dell is based in the United States. It creates, markets, fixes, and supports computers as well as associated goods and services. The parent business of Dell, Dell Technologies, owns Dell.
NOTE:
A NOTE indicates important information that helps you make better use of your computer.
CAUTION:
A CAUTION indicates potential damage to hardware or loss of data if instructions are not followed.
WARNING:
A WARNING indicates a potential for property damage, personal injury, or death.
© 2021 Dell Inc. All rights reserved.
Information in this document is subject to change without notice. Reproduction of these materials in any manner whatsoever without the written permission of Dell Inc. is strictly forbidden.
Trademarks used in this text: Dell and the Dell logo are trademarks of Dell Inc., Intel®, Centrino®, Core™, and Atom™ are either trademarks or registered trademarks of Intel Corporation in the U.S. and other countries; Microsoft®, Windows®, and Windows start button logo are either trademarks or registered trademarks of Microsoft Corporation in the United States and/or other countries; Bluetooth® is a registered trademark owned by Bluetooth SIG, Inc. and is used by Dell under license.
Blu-ray Disc™ is a trademark owned by the Blu-ray Disc Association (BDA) and licensed for use on discs and players; Other trademarks and trade names may be used in this document to refer to either the entities claiming the marks and names or their products. Dell Inc. disclaims any proprietary interest in trademarks and trade names other than its own.
Contents

- a. Dell Docking Station – USB 3.0 (D3100)
- b. USB 3.0 I/O cable (2 ft)
- c. Power adapter & power cord
- d. Installation CD
- e. HDMI to DVI adapter
Specifications
Upstream Input
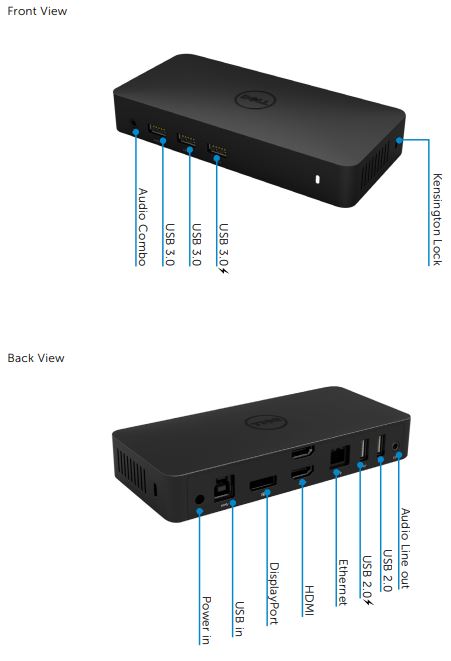
- 1 x USB 3.0 (Standard B Type)
Downstream Outputs
- 3 x USB 3.0
- 2 x USB 2.0
- 1 x DisplayPort
- 2 x HDMI
- Gigabit Ethernet
- Combo Audio (Headphone/Mic)
- Audio line out
- 2 High-powered ports for battery charging (BC 1.2).
Resolution/Refresh Rate

*Resolution supports also dependent on display EDID resolution
Product Overview
Recommended System Requirements
Hardware
- Processor: Intel Core i7 2+GHz or better
- Memory: 8 GB
- Video Card: Intel HD 4000, ATI Radeon HD5/6xxx, NVidia GeForce 4xxM or better.
- USB: USB 3.0
- Disk: 7200 RPM or SSD
Operating System
- Wins OS (Win 7, 8, 8.1, 10) 32/64 bits
Operating Temperature
- Max. operating temperature is 40oC
Windows 7/8/8.1/10 Setup
Note: Setup with Bundled CD.
- Double-click on “Setup.exe” when CD is installed.

IMPORTANT: DO NOT connect the Docking Station until you have installed the drivers on your laptop. - Once clicked on “Setup.exe”, it will run installation software end user license agreement on the window.

- Click “I Accept”. DisplayLink Core software and DisplayLink Graphics will be installed.

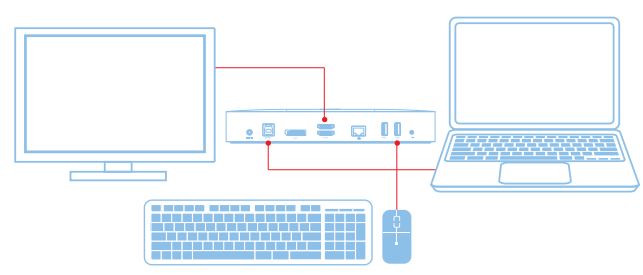
- Connect your docking station and peripherals to your PC.
Note: Setup without Bundled CD
- Connect the dock to your laptop
Note: It is recommended to download the latest drivers from the DisplayLink support website at www.displaylink.com/support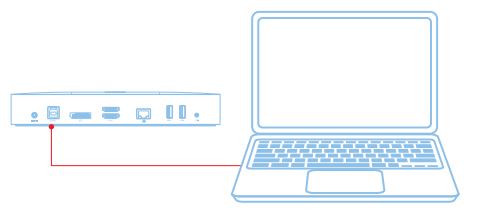
For network/IT administrators, please visit this link for a corporate installation software package. (*User registration required)
http://www.displaylink.com/corporateinstall/ - Windows will start installing the DisplayLink Driver Automatically.

- Follow the screen instructions until the installation is complete.

- Connect your docking station and peripherals to your PC.

DisplayLink Manager Menu
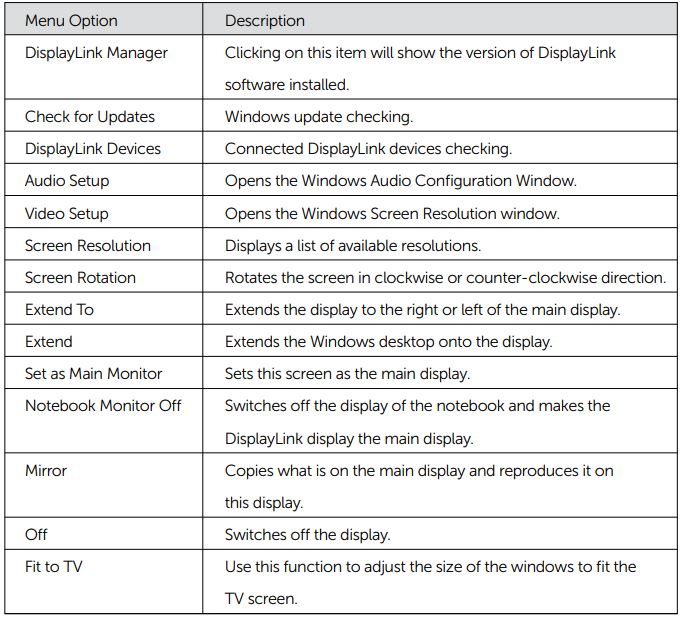
To set the display into extended mode
- Click on the DisplayLink icon
 .
. - Select Extend.
The device is now extended in the direction it was the last time the display was in this mode. For more control, use the Extend To submenu and select one of the options. This puts the device into extend mode and places it to the Left/Right/Above/Below the main (primary) monitor.
To set the display into mirror mode
- Click on the DisplayLink icon
 .
. - Select Mirror.
The resolution, color depth, and refresh rate of the primary screen are replicated on the monitor connected to the DisplayLink USB Graphics device.
Fit to TV configuration
- To configure Fit to TV, choose the option from the DisplayLink GUI. The following interface appears
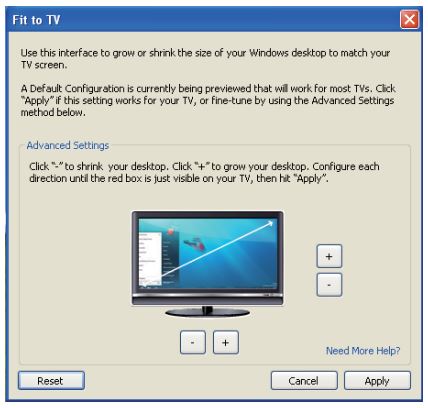
- You will also see a red border on the DisplayLink screen
The red border shows the size of the new Windows desktop. Use the “+” and “-” controls on the Fit to TV GUI to change the size of the red border until it fits on the TV screen.
Note: Finer configuration of the size of the border can be achieved by holding down the CTRL key and clicking the “+” and “-”. - Once the red border is at the edges of the TV screen, click “Apply” to resize the Windows desktop.

FAQs of Dell Docking Station – USB 3.0 (D3100)
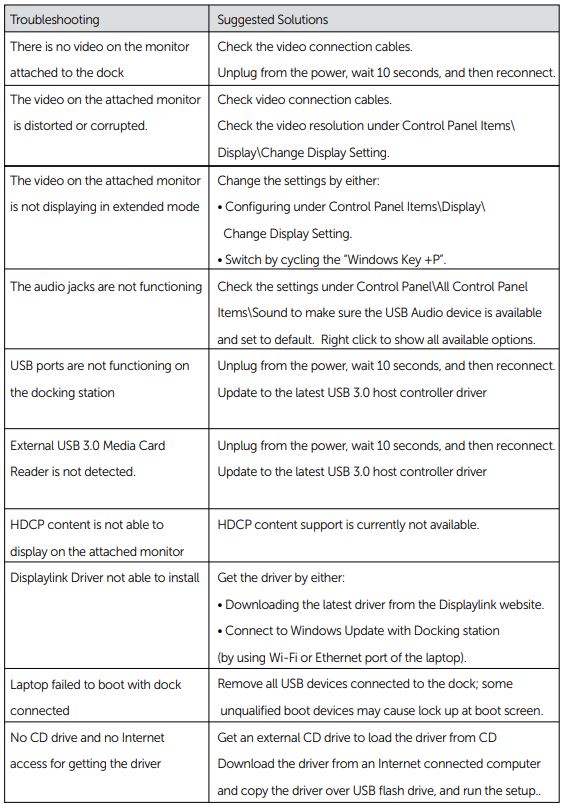

Power LED Instruction
- Normal Working Mode: Bright White LED Light
- Sleep Mode: White LED Light
- Power Off: Light Off
Regulatory Information
Dell USB3.0 SuperSpeed Universal Docking System – D3100 complies with the FCC/CE rules and abides by worldwide regulatory compliance, engineering, and environmental affairs.
Contacting Dell
- Visit www.dell.com/support
- Select your support category
- Select the appropriate service or support link based on your need.
Or Visit:
http://www.displaylink.com/support/
FAQ’s Dell D3100 Docking Station USB3.0 User Manual
How does a docking station for a Dell D3100 operate?
All of your electronic gadgets are connected to your laptop by the Dell USB Dock D3100 utilising a single USB 3.0 connection. You can use all of your gadgets, including the mouse, keyboard, stereo speakers, external hard drive, and large-screen monitors, by connecting to the docking station.
Can a laptop be powered by a Dell D3100 docking station?
Please take note that the system is not powered by this device. For the system and dock to operate normally, an AC adaptor must be attached to both. With just one USB 3.0 cable and the Dell Docking Station USB 3.0, you may connect a variety of other electronic devices to your laptop.
Does the Dell docking station boost efficiency?
On average, Dell Dock users might add up to 17 extra days of productive time to their annual schedule. By allowing connectivity to numerous monitors and peripherals, Dell Docks help customers be more productive. According to our findings, using a Dell dock reduced user completion times for a variety of tasks by 42.5%.
What does a laptop docking station serve?
With complete connectivity to displays, LAN, the internet, printers, and other devices, a USB docking station transforms your laptop into a desktop workhorse. A more organised desk surface with greater workspace is created by routing the monitor wires to the back of the laptop docking station.
Does the Dell docking station require power?
You must use the AC power adapter that is connected to the portable system while utilising a Dell SuperSpeed USB 3.0 Docking Station (D3000), D1000, or D3100 USB 3.0 Docking Station in order to power the system and charge the battery.
What is the purpose of a Dell docking station?
You may connect your laptop to a variety of devices, including a mouse, keyboard, speakers, display, and Ethernet, using a docking station or port replicator. The advantages of a desktop computer can be obtained while maintaining the portability of a laptop by using a docking station that is connected to several devices.
Does the docking station supply the monitor with power?
Docking stations upgrade your laptop to a powerful desktop computer and provide you complete connectivity to your office or smart home. This allows you the ability to hardwire a dependable internet connection, printer, and more while using any screen in the building as your 4K extended display.
Is a power cord required for my docking station?
AC/DC power adapters are frequently provided with docking stations. Your laptop can be connected to the docking station after it is plugged into the wall to receive a powerful charge that is typically equal to or even greater than the power that your laptop’s charger can deliver.
How is an Internet connection made by a docking station?
Simply plug the Ethernet network connection into the Docking Station’s Ethernet connector on the back to use. Two stereo audio ports and a microphone input are available on the Docking Station. While connecting an external speaker to the rear audio port is more common, connecting a headset to the front audio port is more common.
How many displays is a Dell docking station capable of supporting?
Using the DisplayPort, HDMI, or USB-C cable included with the monitor, connect it to the docking station. Up to four monitors* can be connected at once to the docking station (available on specific Dell laptops only).
What does the docking station’s button do?
NOTE The dock button is made to look like the power button on your computer. The dock button on the Dell Docking Station WD19 functions as your computer’s power button and can be used to turn on, put the computer to sleep, or shut it down abruptly.
Pdf – Dell D3100 Docking Station USB3.0 User Manual
For More Posts Visit: ManualsDock


