Dayton Audio M Series Speaker
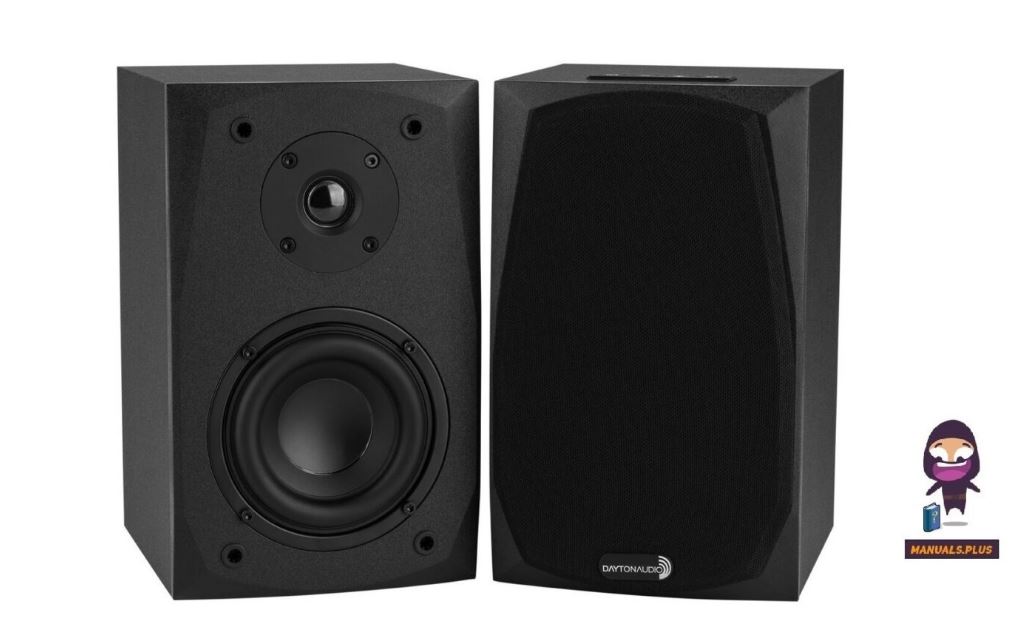
FCC Warnings
Any Changes or modifications not expressly approved by the party responsible for compliance could void the user’s authority to operate the equipment. Note: This equipment has been tested and found to comply with the limits for a Class B digital device, under part 15 of the FCC Rules. These limits are designed to provide reasonable protection against harmful interference in a residential installation.
This equipment generates uses and can radiate radio frequency energy and, if not installed and used by the instructions, may cause harmful interference to radio communications. However, there is no guarantee that interference will not occur in a particular installation. If this equipment does cause harmful interference to radio or television reception, which can be determined by turning the equipment off and on, the user is encouraged to try to correct the interference by one or more of the following measures
- Reorient or relocate the receiving antenna.
- Increase the separation between the equipment and the receiver.
- Connect the equipment to an outlet on a circuit different from that to which the receiver is connected.
- Consult the dealer or an experienced radio/TV technician for help.
This device complies with part 15 of the FCC Rules. Operation is subject to the following two conditions: - This device may not cause harmful interference, and (2) this device must accept any interference received, including interference that may cause undesired operation.
- This equipment complies with FCC radiation exposure limits set forth for an uncontrolled environment.
- This equipment should be installed and operated with a minimum distance of 20cm between the radiator & your body.
Welcome
Thank you for purchasing the M Series from Dayton Audio. Their compact design is perfect for focused applications where space is at a premium. This user manual is intended to provide all the essential information to maximize the enjoyment of your new speakers. Inside, you will find clear instructions on setup, operation, and tips for optimizing your listening experience. Please don’t hesitate to reach out if you have any questions or need further assistance. Thank you for choosing Dayton Audio – here’s to countless hours of incredible sound!
Features
Since its establishment, Dayton Audio has been synonymous with premier loudspeaker components, and ready-to-build designs. During our research and development process to develop new and interesting loudspeaker concepts, we created the M Series of powered personal monitors. This speaker system embodies our commitment to innovation, exclusively incorporating Dayton Audio’s in-house components, ensuring an audio experience that is both authentic and groundbreaking. Central to this system is the Dayton Audio Signature Series Aluminum Cone Woofer, a marvel of acoustic, engineering.
Featuring a damped aluminum cone, vented Polyamide formers, and aluminum shorting sleeves, the Signature Series woofer digs down with authority while accurately reproducing midrange detail with a high level of intelligibility. The high sensitivity of the Signature Series woofer takes advantage of every watt generated by the built-in power amplifier leading to explosive SPL levels. Handling the duty of the top-end is the Dayton Audio (whatever series this tweeter will go into) Tweeter.
The fabric dome composition of the tweeter allows for a smooth response and wide dispersion enabling a much larger and smoother listening window. These low-fatigue tweeters are the perfect complement for the Signature Series Woofers, and DSP and Active Crossovers ensure a smooth transition from the woofer to the tweeter through the 2.5kHz crossover frequency for a truly content, nno-frillslistening experience.
Aside from the aural aspect of design, Dayton Audio has designed the M Series with user experience in mind. RCA inputs, wireless Bluetooth, and a USB-C DAC provide you with all the high-fidelity inputs you need. A highly accessible volume knob controls input and volume and can be switched to the left or right speaker depending on your handedness, or control from a distance with the included IR remote control. A pre-amplified sub-out allows you to add a subwoofer to your system for extra low-end if required.
What’s In The Box
- Powered Speaker
- Passive Speaker
- This Manual
- Rubber Feet
- Power Cable
- USB-C Cable
- 3.5mm to RCA cable
- IR Remote
- I want to have these all drawn instead of listed
Unpacking
Please unpack the speakers and carefully examine them for any potential damage that may have occurred during shipping. If damage is discovered, it is important to promptly inform the shipping company. While Dayton Audio is available and willing to assist as necessary, only the recipient can initiate a claim for any shipping-related damage. If the product shows visible signs of damage upon arrival, be sure to retain the shipping carton for the shipper’s inspection.
It is strongly advised to keep all packing materials, as they may be useful in the future event the speakers need to be transported or stored. Never attempt to ship the speakers without the original factory carton and the accompanying packing materials.
Connecting To Power
M Series has a built-in universal power supply and is capable of accepting power in any country. Connect the included power cable to the AC input on the rear of the powered speaker and to mains power. Turn the main power switch on the rear of the speaker to “ON” to power on the speakers.
Note:
do not turn the speaker on before connecting the passive speaker. M Series will enter a protection mode if it is turned on without a connected speaker. If this happens, simply turn the speaker off and back on again.
Standby
To save power, M Series speakers can be placed on standby. This can be done manually or will happen automaticallyPressing and to hold the control knob on the front of the speaker or the power button on the remote control will place the speaker on standby. When in standby the front indicator LED will turn red. The speaker will also automatically enter standby after 30 minutes of silence. To exit standby press and hold the control knob on the front of the speaker of the power button on the remote. The speaker will return to the last used input and retain the bass boost setting if enabled.
Hooking Up
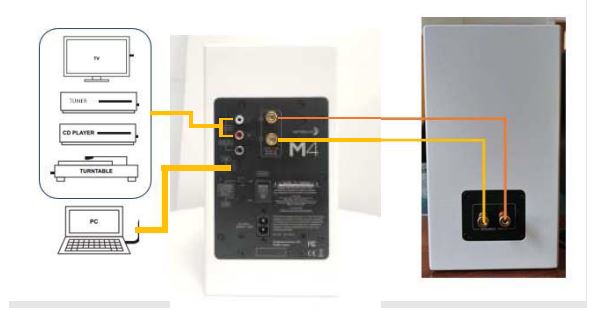
Connecting Speakers
Using the supplied speaker cable, connect the output of the powered speaker to the input of the passive speaker. Connect the red connector to positive (+) on both speakers and the black connector to negative (-) on both speakers. If this cable is installed incorrectly the speakers will be out of phase and lack bass and proper imaging. M Series speakers will enter a protection mode if the passive speaker is not connected at startup. Be sure to connect the speakers before powering them on. For custom cabling solutions be sure to use high-quality two-conductor speaker wire. Using poor-quality cable can result in diminished sound quality and can potentially cause damage to the speaker or amplifier.
Connecting a Subwoofer
An additional subwoofer can be added using the SW OUT connection on the rear of the powered speaker. This will send a mono-summed low-passed signal that is controllable by the front volume knob. Use a single RCA cable to connect to the line level input on a powered subwoofer or to any external subwoofer amplifier to power passive subwoofers. Set the subwoofer’s or amplifier’s low pass filter to a frequency appropriate for your subwoofer, which is typically around 100 Hz.
Connecting Sources
M Series speakers can receive signals directly from a wide variety of sources. Using high-quality cables will ensure the best possible transmission from your connected devices. USB-C and RCA cables have been included with the M Series for your convenience.
Connecting to USB Devices
The USB input of your M-Series speakers can accept a large variety of audio formats via USB (up to 192 kHz 32-bit). The supplied USB-C cable can connect directly to most computers, phones, and tablets. Select the USB input by pressing the front control knob until the indicator light turns amber, or with the included remote control. The Audio format can usually be changed in the sound control settings on the connected host device.
Connecting a Turntable
M Series speakers do not have a built-in phono preamp. To connect a turntable an external phono preamplifier will be required. Many modern turntables have a built-in preamplifier that can be used. Consult the user manual of the turntable for hook-up instructions. Otherwise, a small phono preamp will need to be connected between the turntable and speakers.
Bluetooth as a Source
Bluetooth is built into the M Series speakers for convenient wireless streaming.
- Select the Bluetooth input by pressing the front control knob until the indicator light turns blue, or with the included remote control
- Using a smartphone, tablet, computer, or other device capable of transmitting Bluetooth audio, go to the device’s settings and scan for available Bluetooth devices.
- Look for and select “M4” or “M6” in the device list and begin pairing. The Bluetooth source light on the front of the speaker will flash until a device is paired.
- Once the Bluetooth source light stops flashing and your device indicates that you are connected, you can begin streaming your favorite music from up to 30 feet away.
Care and Maintenance
The finish on the cabinets can be maintained with regular dusting. For extreme buildup of dust or debris, a slightly dampened microfiber cloth can be used. Exercise caution to not get moisture on the driver components. If you do wish to use a cleaning solution, please do so by applying a small amount to an inconspicuous part of the cabinet such as the bottom before applying to the entire cabinet. Do this to ensure that the solution will not cause harm to the finish of the M Series.
Troubleshooting
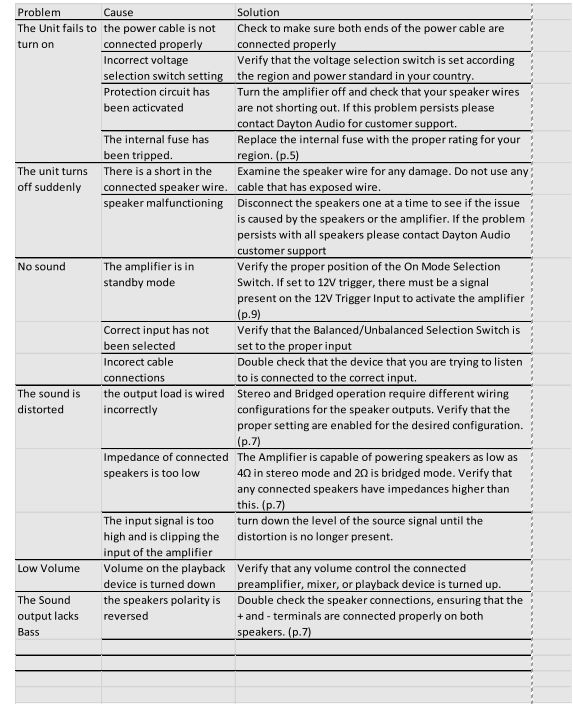
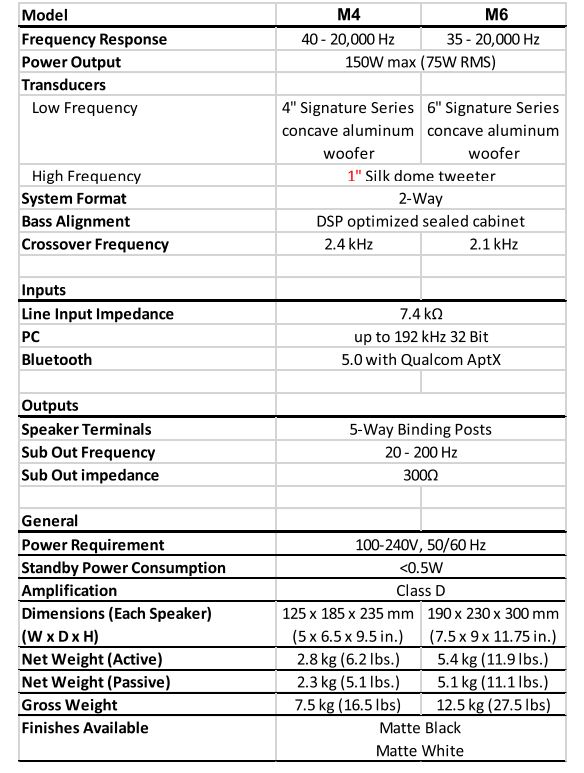
Specifications
FOR MORE MANUALS BY DAYTON AUDIO, VISIT MANUALSDOCK

