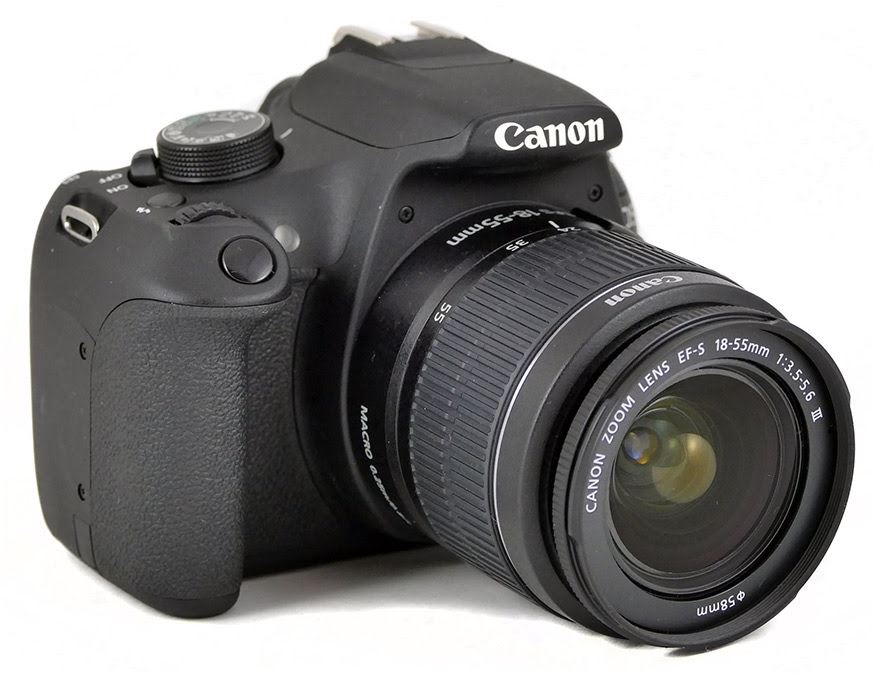
Canon EOS 1200D Rebel T5 Camera
About Canon
Canon is a well-known multinational corporation based in Japan that specializes in the manufacture of imaging and optical products. It was founded in 1937 and has since become one of the leading companies in the imaging industry. Canon produces a wide range of products, including cameras, camcorders, printers, photocopiers, scanners, projectors, and medical equipment.
In the field of cameras, Canon offers a diverse lineup catering to different user needs and skill levels. They produce both digital single-lens reflex (DSLR) cameras and mirrorless cameras. Canon’s DSLR cameras are popular among professional photographers and enthusiasts, known for their robust build quality, excellent image quality, and wide selection of lenses. Canon’s mirrorless cameras, on the other hand, are more compact and lightweight, offering advanced features like electronic viewfinders and fast autofocus systems.
Item Check List
Before starting, check that all the following items have been included with your camera. If anything is missing, contact your dealer.
* Battery Charger LC-E10 or LC-E10E is provided. (The LC-E10E comes with a power cord.)
Compatible Cards
The camera can use the following cards regardless of capacity: If the card is new or was previously formatted by another camera or computer, it is recommended that you format the card with this camera.
- SD memory cards
- SDHC memory cards
- SDXC memory cards
The camera can use UHS-I cards, but since it is not compatible with the UHS-I standard, reading/writing speeds will be equivalent to SD Speed Class 10 at most.
Cards that Can Record Movies
When shooting movies, use a large-capacity SD card rated SD Speed Class 6 “ ” or higher.
- If you use a slow-writing card when shooting movies, the movie may not be recorded properly. Also, if you play back a movie on a card with a slow reading speed, the movie may not play back properly.
- If you want to shoot still photos while shooting a movie, you will need an even faster card.
- To check the card’s reading/writing speed, refer to the card manufacturer’s Web site.
Handling Precautions
Camera Care
- This camera is a precision instrument. Do not drop it or subject it to physical shock.
- The camera is not waterproof and cannot be used underwater. If you accidentally drop the camera into water, promptly consult the nearest Canon Service Center. Wipe off any water droplets with a dry and clean cloth. If the camera has been exposed to salty air, wipe it with a well-wrung wet cloth.
- Never leave the camera near anything having a strong magnetic field such as a magnet or electric motor. Also avoid using or leaving the camera near anything emitting strong radio waves, such as a large antenna. Strong magnetic fields can cause camera misoperation or destroy image data.
- Do not leave the camera in excessive heat, such as in a car in direct sunlight. High temperatures can cause the camera to malfunction.
- The camera contains precision electronic circuitry. Never attempt to disassemble the camera yourself.
- Do not block the built-in flash, mirror operation with your finger, etc. Doing so may cause a malfunction.
- Use a blower to blow away dust on the lens, viewfinder, reflex mirror, and focusing screen. Do not use cleaners that contain organic solvents to clean the camera body or lens. For stubborn dirt, take the camera to the nearest Canon Service Center.
- Do not touch the camera’s electrical contacts with your fingers. This is to prevent the contacts from corroding. Corroded contacts can cause camera misoperation.
- If the camera is suddenly brought in from the cold into a warm room, condensation may form on the camera and internal parts. To prevent condensation, first put the camera in a sealed plastic bag and let it adjust to the warmer temperature before taking it out of the bag.
- If condensation forms on the camera, do not use the camera. This is to avoid damaging the camera. If there is condensation, remove the lens, card, and battery from the camera, and wait until condensation has evaporated before using the camera.
- If the camera will not be used for an extended period, remove the battery and store the camera in a cool, dry, well-ventilated location. Even while the camera is in storage, press the shutter button a few times once in a while to check that the camera is still working.
- Avoid storing the camera where there are chemicals that result in rust and corrosion such as in a chemical lab.
- If the camera has not been used for an extended period, test all its functions before using it. If you have not used the camera for some time or if there is an important shoot such as a foreign trip coming up, have the camera checked by your Canon dealer or check the camera yourself and make sure it is working properly.
- If you use continuous shooting, Live View shooting, or movie shooting for a prolonged period, the camera may become hot. This is not a malfunction.
LCD Monitor
- Although the LCD monitor is manufactured with very high precision technology with over 99.99% effective pixels, there may be a few dead pixels displaying only black or red, etc. among the remaining 0.01% or fewer pixels. Dead pixels are not a malfunction. They do not affect the images recorded.
- If the LCD monitor is left on for a prolonged period, screen burn-in may occur where you see remnants of what was displayed. However, this is only temporary and will disappear when the camera is left unused for a few days. The LCD monitor display may seem slow in low temperatures, or look black in high temperatures. It will return to normal at room temperature.
Cards
To protect the card and its recorded data, note the following:
- Do not drop, bend, or wet the card. Do not subject it to excessive force, physical shock, or vibration.
- Do not touch the card’s electronic contacts with your fingers or anything metallic.
- Do not affix any stickers, etc., on the card.
- Do not store or use the card near anything that has a strong magnetic field, such as a TV set, speaker, or magnet. Also, avoid places prone to having static electricity.
- Do not leave the card in direct sunlight or near a heat source.
- Store the card in a case.
- Do not store the card in hot, dusty, or humid locations.
Lens
After detaching the lens from the camera, put down the lens with the rear end up and attach the lens caps to avoid scratching the lens surface and electrical contacts.
Smudges Adhering to the Front of the Sensor
Besides dust entering the camera from outside, in rare cases, lubricant from the camera’s internal parts may adhere to the front of the sensor. If visible spots remain on the image, having the sensor cleaned by a Canon Service Center is recommended.
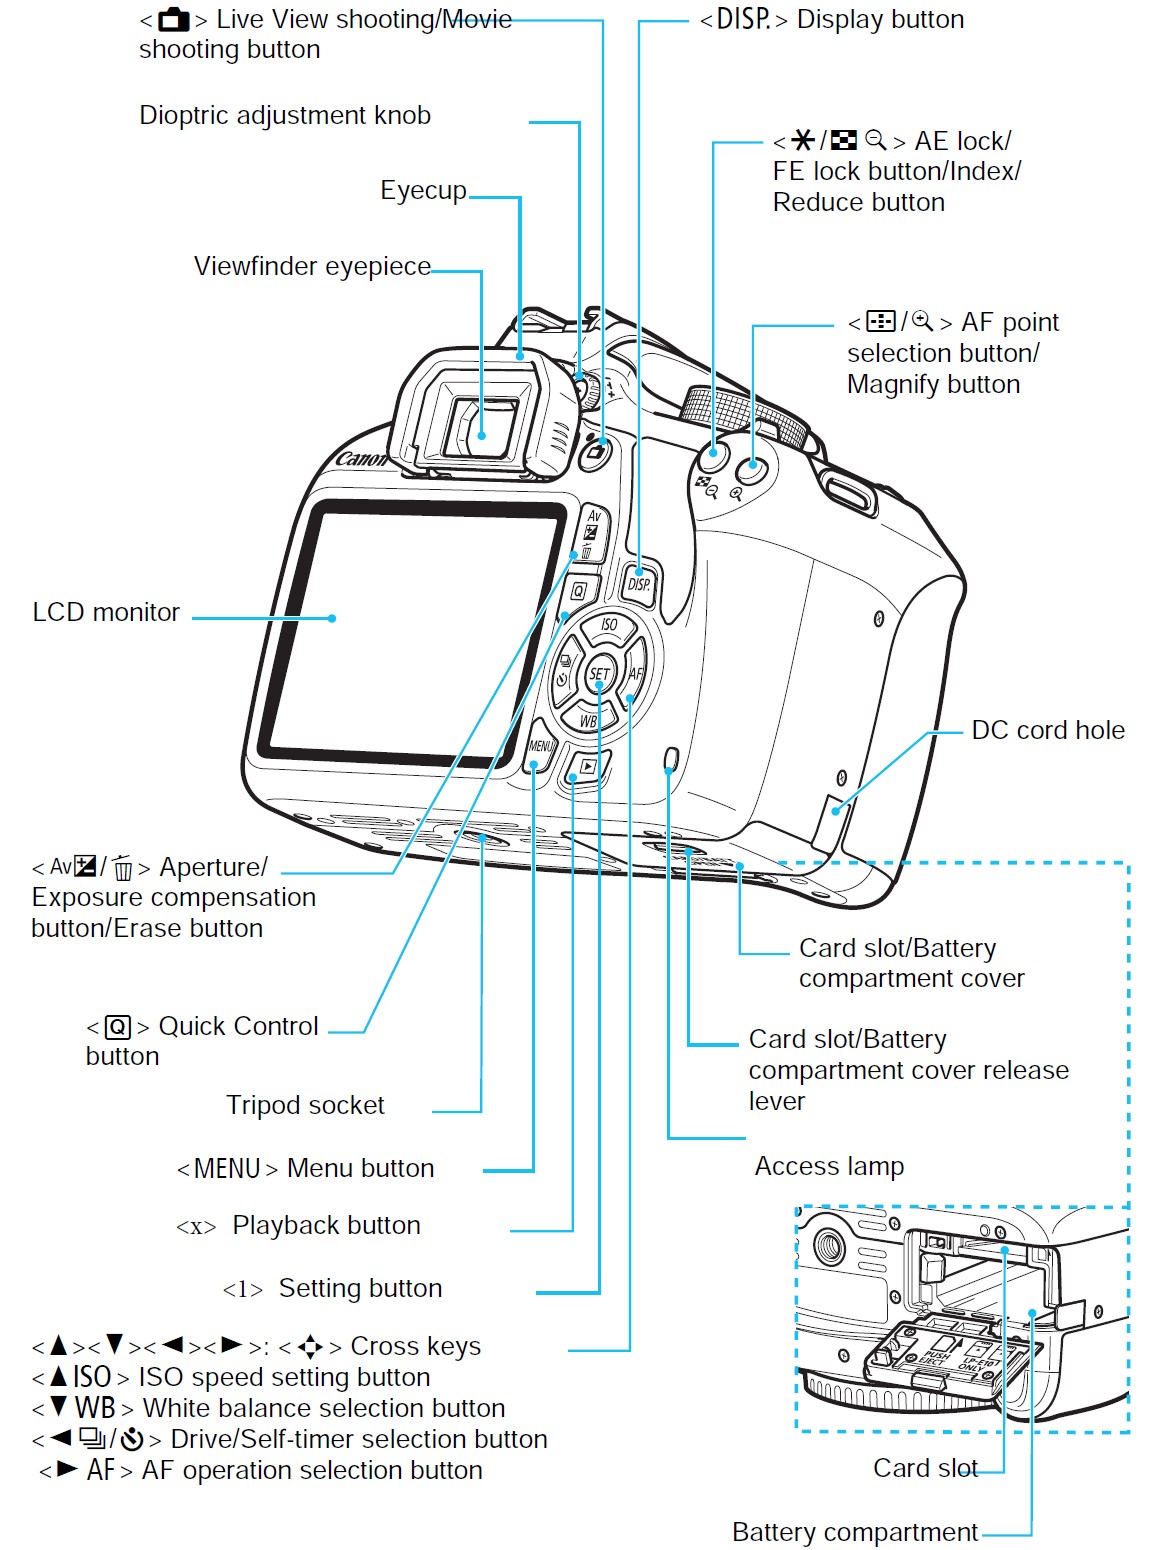
Nomenclature
Attaching the Strap
Pass the end of the strap through the camera’s strap mount eyelet from the bottom. Then pass it through the strap’s buckle as shown in the illustration. Pull the strap to take up any slack and make sure the strap will not loosen from the buckle.
- The eyepiece cover is also attached to the strap.

Charging the Battery
- Remove the protective cover.
Detach the protective cover provided with the battery. - Attach the battery.
Attach the battery securely to the charger.
To detach the battery, follow the above procedure in reverse. - Recharge the battery.
For LC-E10
As shown by the arrow, flip out the battery charger’s prongs and insert the prongs into a power outlet.
For LC-E10E
Connect the power cord to the charger and insert the plug into a power outlet.
Recharging starts automatically and the charge lamp lights up in orange.
When the battery is fully recharged, the full-charge lamp will light up in green.
- It takes approx. 2 hours to fully recharge a completely exhausted battery at room temperature (23°C / 73°F). The time required to recharge the battery will vary greatly depending on the ambient temperature and the battery’s remaining capacity.
- For safety reasons, recharging in low temperatures (6°C – 10°C / 43°F – 50°F) will take longer (up to approx. 4 hours).
Installing and Removing the Battery and Card
Load a fully charged Battery Pack LP-E10 into the camera. The camera can use an SD, SDHC, or SDXC memory card (sold separately). The captured images are recorded onto the card.
Installing the Battery and Card
- Open the cover.
Slide the lever and open the cover. - Insert the battery.
Insert the end with the battery contacts.
- Insert the battery until it locks in place.
- Insert the card.
Face the card’s label side toward the back of the camera and insert it until it clicks in place. - Close the cover.
Press the cover until it snaps shut.
- When you set the power switch to <1>, the number of possible shots will be displayed on the LCD monitor.
Removing the Battery and Card
- Set the power switch to <OFF>
- Open the cover.
Make sure the access lamp is off, then open the cover.
If [Recording…] is displayed, close the cover. - Remove the battery.
Press the battery lock lever and remove the battery.- To prevent short-circuiting of the battery contacts, be sure to attach the provided protective cover to the battery.
- Remove the card.
Gently push in the card, then let it go to eject.
- Pull the card straight out.
- Close the cover.
Press the cover until it snaps shut.
Turning on the Power
<ONN> : The camera turns on.
<OFF>: The camera is turned off and does not operate. Set to this position when not using the camera.
If you turn on the power and the date/time/zone setting screen appears, see page 37 to set the date/time/zone.
Auto Power Off
- To save battery power, the camera turns off automatically after approx. 30 seconds of non-operation. To turn on the camera again, just press the shutter button halfway.
- You can set the auto power off time with [
 1: Auto power off]
Checking the Battery Level
When the power is turned on, the battery level will be indicated in one of the four levels.
Number of Possible Shots
- The figures above are based on a fully-charged Battery Pack LP-E10, no Live View shooting, and CIPA (Camera & Imaging Products Association) testing standards.
Attaching and Detaching a Lens
The camera is compatible with all Canon EF and EF-S lenses. The camera cannot be used with EF-M lenses.
Attaching a Lens
- Remove the caps.
Remove the rear lens cap and the body cap by turning them as shown by the arrows.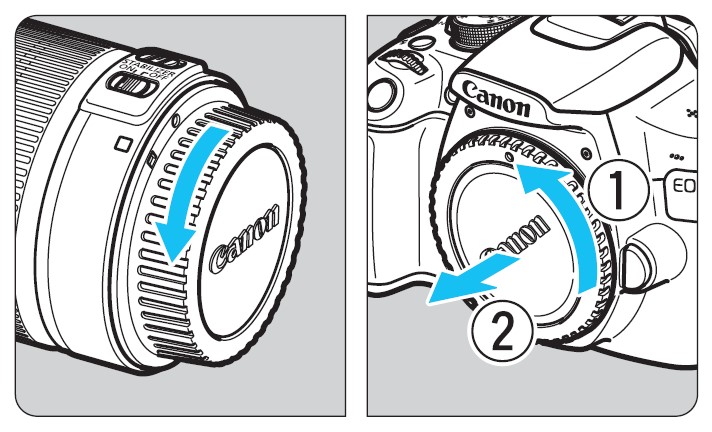
- Attach the lens.
Align the lens’s red or white index with the camera’s index matching the same color. Turn the lens as shown by the arrow until it clicks in place.
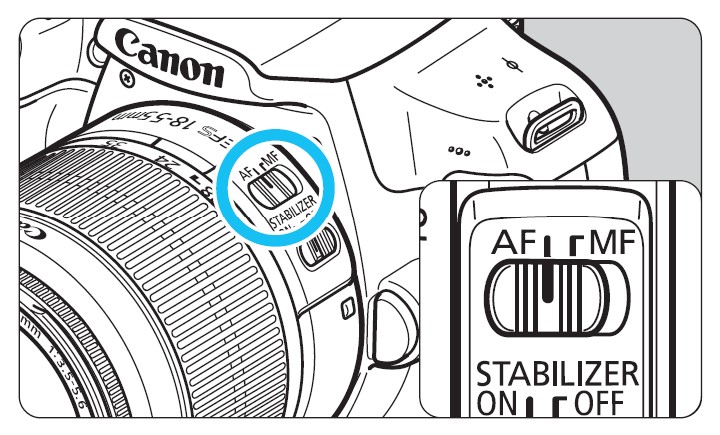
- Set the lens’s focus mode switch to <AF>.
- <AF> stands for autofocus.
- If it is set to <MF> (manual focus), autofocus will not operate.
- Remove the front lens cap.
Zooming
To zoom, turn the zoom ring on the lens with your fingers.
If you want to zoom in, do it before focusing. Turning the zoom ring after achieving focus may throw off the focus.
Detaching the Lens
While pressing the lens release button, turn the lens as shown by the arrows.
- Turn the lens until it stops, then detach it.
- Attach the rear lens cap to the detached lens.
Attaching a Lens Hood
A lens hood can block unwanted light and diminish rain, snow, dust, etc. adhering to the front of the lens. Before storing the lens in a bag, etc., you can attach the hood in reverse.
If there is no index mark on the lens and hood:
Attach the lens hood.
- Turn the hood as shown by the arrow to attach it securely.

If there is an index mark on the lens and hood:
- Align the red dots on the hood and lens edges, then turn the hood as shown by the arrow.

- Turn the hood as shown in the illustration.

- Turn the hood clockwise until it attaches securely.
Lens Image Stabilizer
When you use an Image Stabilizer (IS) lens, the camera shake is corrected to obtain a sharper shot. The procedure explained here is based on the EF-S18-55mm f/3.5-5.6 IS II lens as an example.
* IS stands for Image Stabilizer.
- Set the IS switch to <ON>.
Set also the camera’s power switch to <ON>. - Press the shutter button halfway.
The Image Stabilizer will operate. - Take the picture.
When the picture looks steady in the viewfinder, press the shutter button completely to take the picture.
Basic Operation
Adjusting the Viewfinder Sharpness
Turn the dioptric adjustment knob.
- Turn the knob left or right so that the AF points (nine boxes) in the viewfinder look sharp.
Holding the Camera
To obtain sharp images, hold the camera still to minimize camera shake.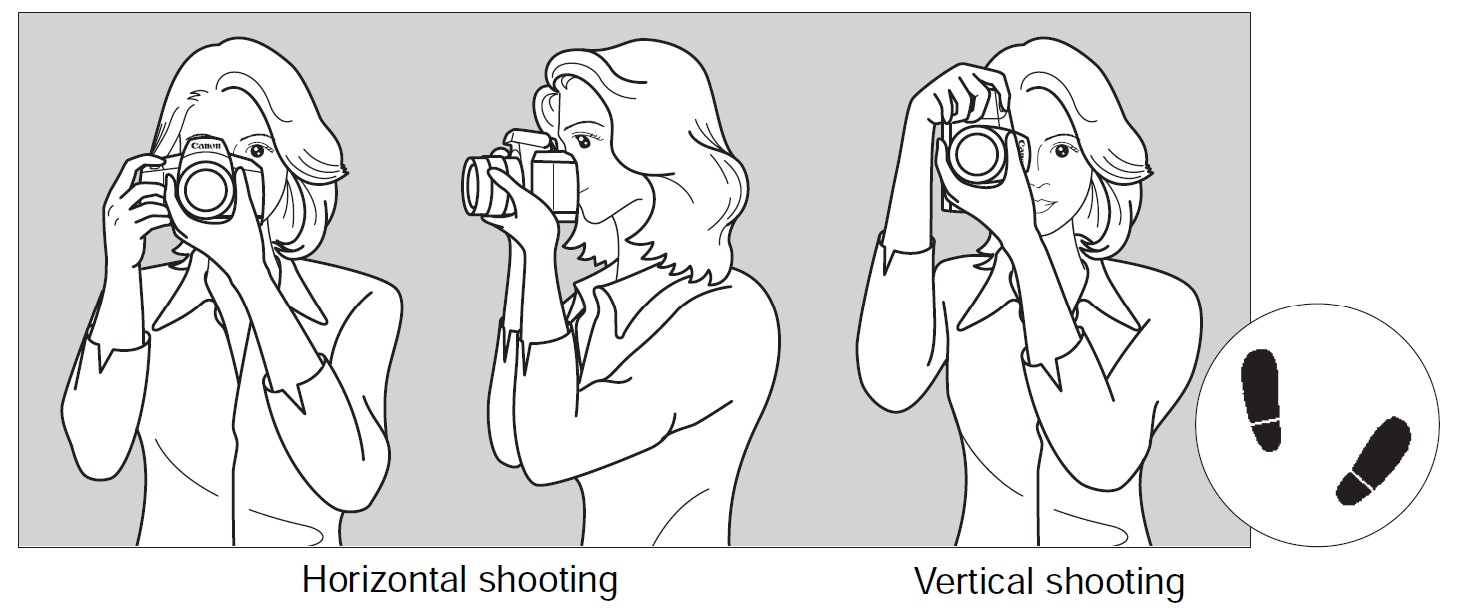
- Wrap your right hand around the camera grip firmly.
- Hold the lens bottom with your left hand.
- Rest your hand’s right index finger lightly on the shutter button.
- Press your arms and elbows lightly against the front of your body.
- To maintain a stable stance, place one foot slightly ahead of the other.
- Press the camera against your face and look through the viewfinder.
Shutter Button
The shutter button has two steps. You can press the shutter button halfway. Then you can press the shutter button completely.
Pressing Halfway
This activates autofocusing and the automatic exposure system that sets the shutter speed and aperture.
The exposure setting (shutter speed and aperture) is displayed in the viewfinder (![]()
When you press the shutter button halfway, the LCD monitor will turn off.
Pressing Completely
This releases the shutter and takes the picture.
Preventing Camera Shake
Hand-held camera movement during the moment of exposure is called camera shake. It can cause blurred pictures. To prevent camera shake, note the following:
- Hold and steady the camera as shown on the preceding page.
- Press the shutter button halfway to autofocus, then slowly press the shutter button completely.
Specifications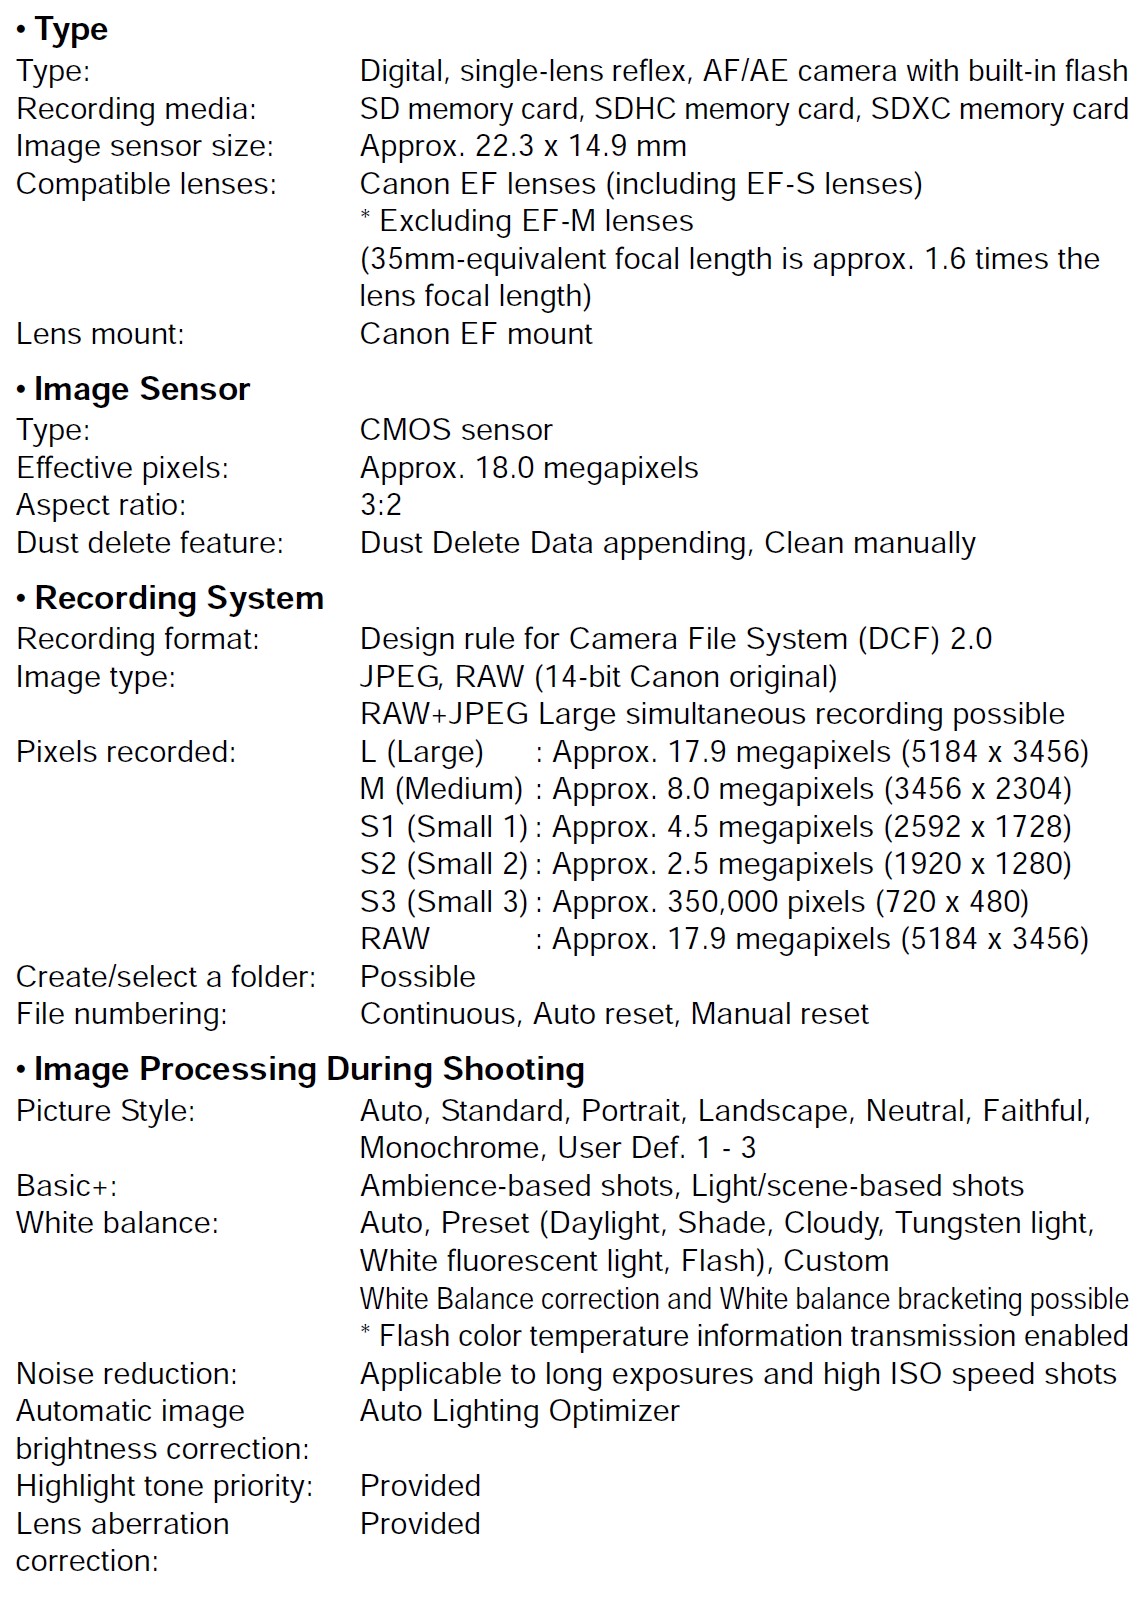
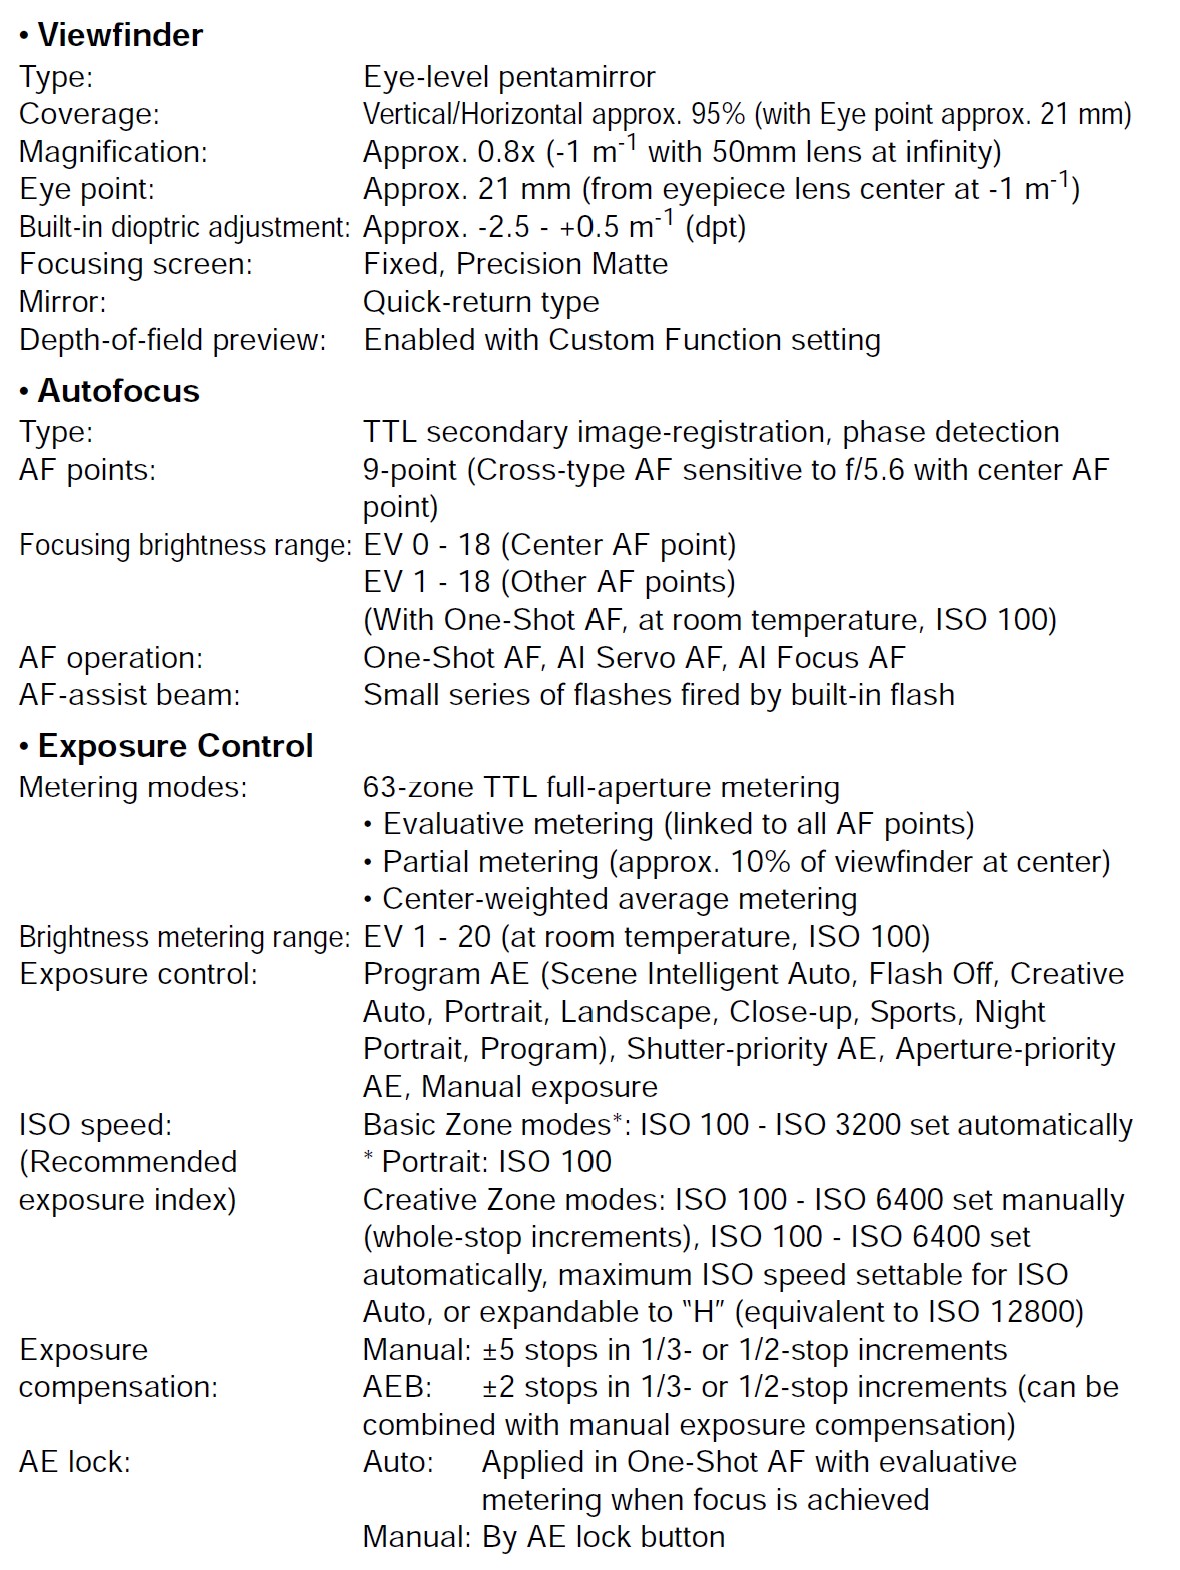


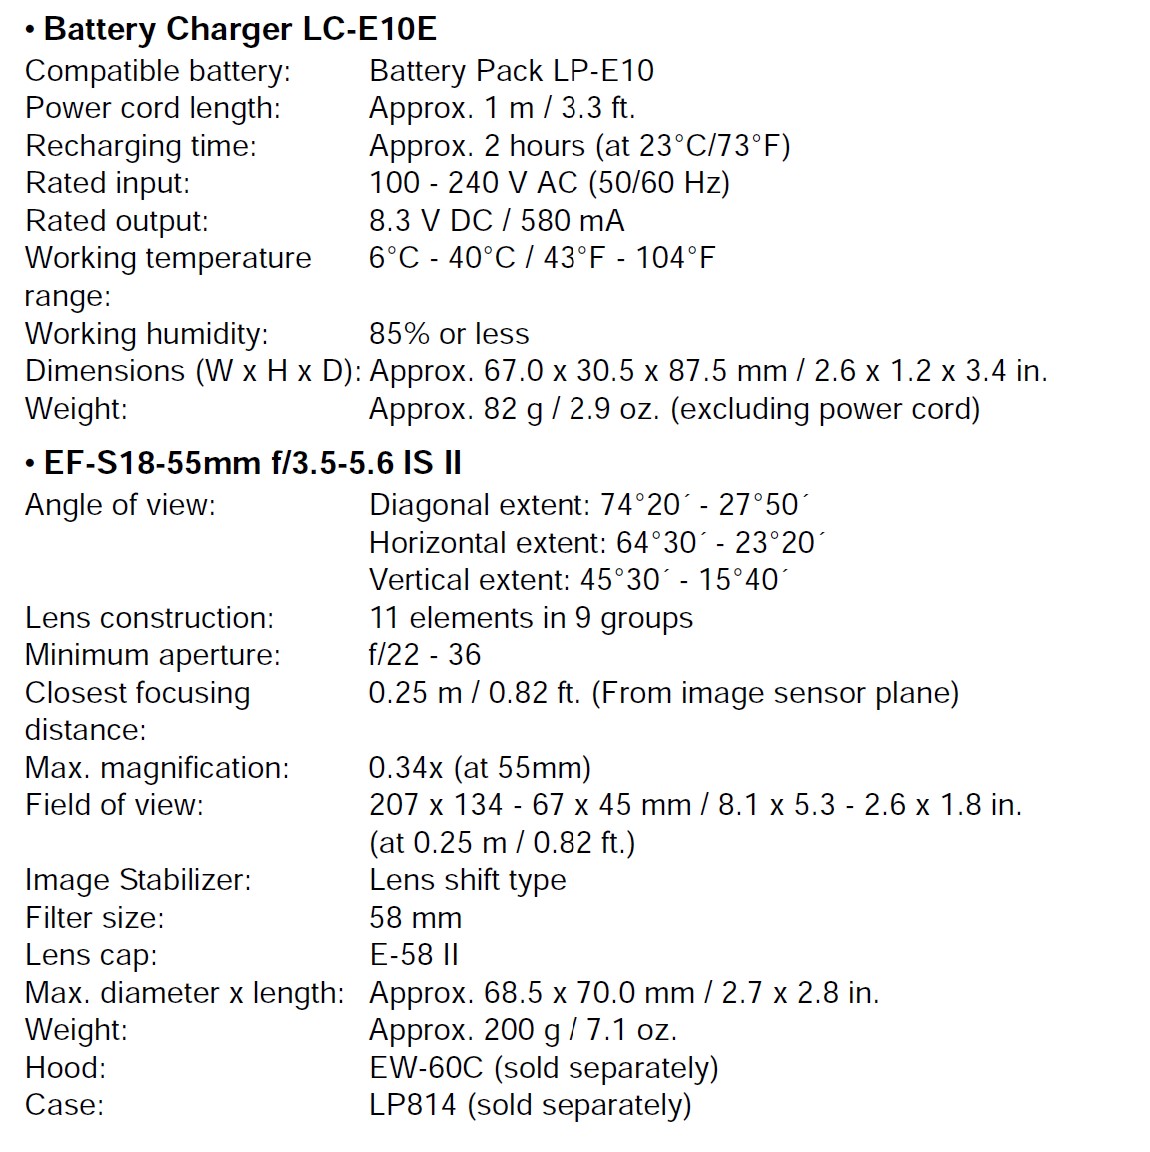
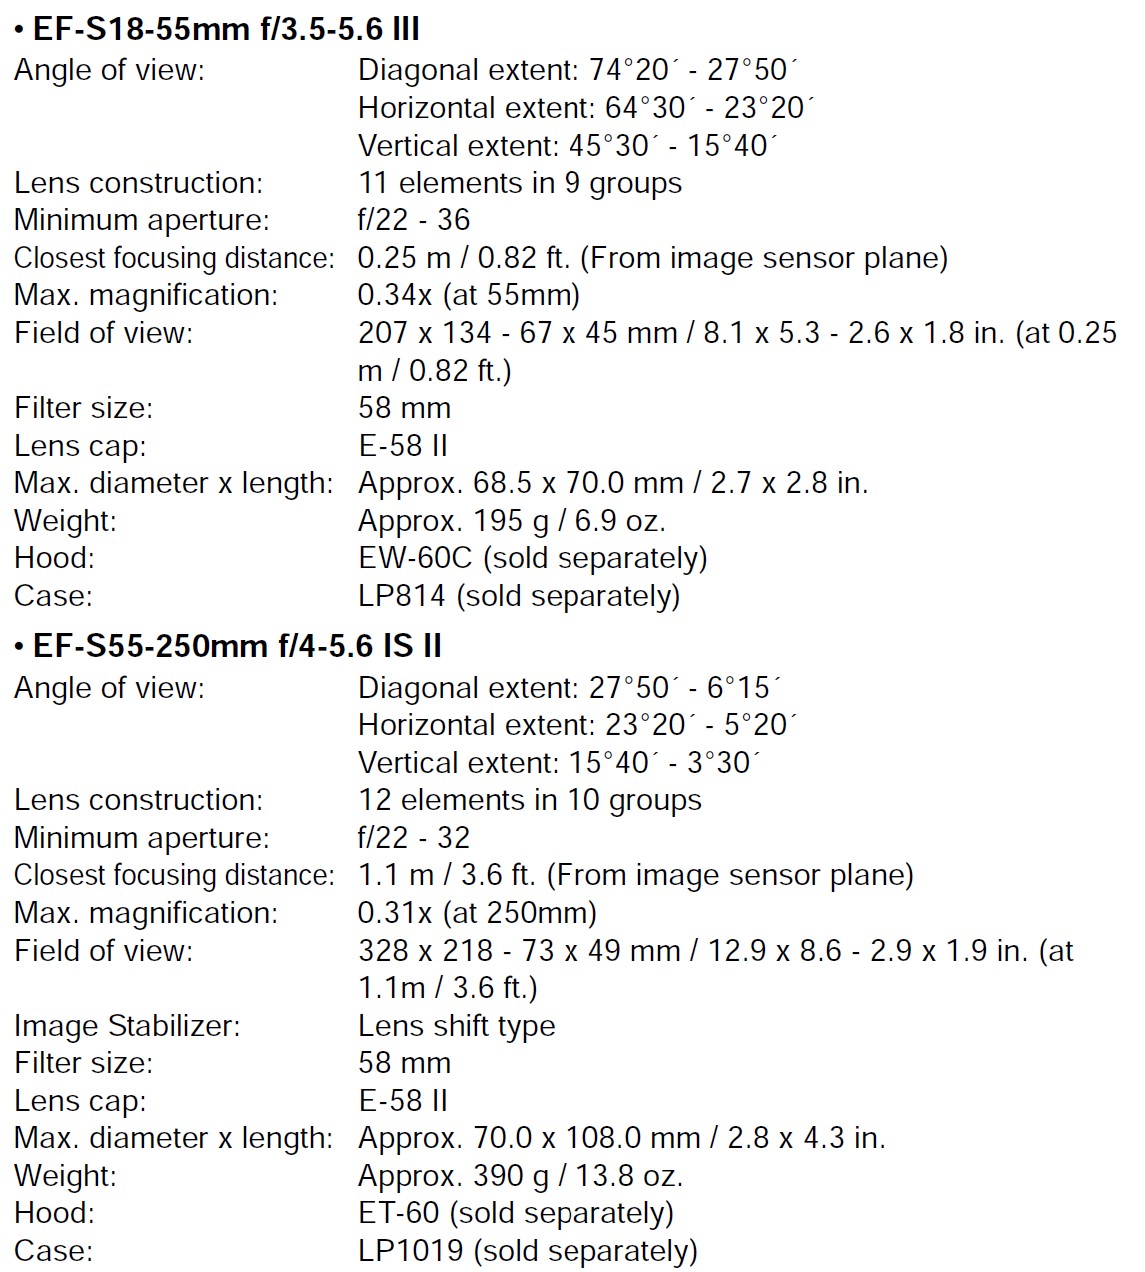
- All the data above is based on Canon’s testing standards and CIPA (Camera & Imaging Products Association) testing standards and guidelines.
- Dimensions, maximum diameter, length, and weight listed above are based on CIPA Guidelines (except weight for camera body only).
- Product specifications and the exterior are subject to change without notice.
- If a problem occurs with a non-Canon lens attached to the camera, consult the respective lens manufacturer.
FAQS About Canon EOS 1200D Rebel T5 Camera
What is the 1200D’s maximum shutter speed?
a million actuators.
What about live view on the Canon Rebel T5?
On the 7.5 centimeter-wide, 460,000-pixel screen in live view
Has the Canon 1200D live view?
Using the EOS REBEL T5 or EOS 1200D’s Live View and default settings to take photos
What other names are used to the Canon Rebel T5?
1200D
What is the Canon 1200D’s image quality setting?
ISO 100 through ISO 800, with noise starting to show at ISO 1600.
What can you use the Rebel T5 for?
It will carry out the functions necessary of a fundamental interchangeable lens camera for beginners wishing to purchase a DSLR for cheap learning or travel purposes.
How much video can the Canon Rebel T5 record?
29 min 59 sec.
Has the Canon 1200D been image stabilized?
With four stops of image stabilization, it performs admirably in dim lighting.
Canon’s 1200D is wireless, right?
Despite not having built-in Wi-Fi, the 1200D nevertheless offers a dedicated app.
Can I link my Canon 1200D to WiFi?
The Canon 1200D is lacking NFC and WiFi.
Canon Rebel T5 has a video camera?
Full-HD video capture
For more manuals by Canon, Visit Manualsdock
[embeddoc url=”https://manualsdock.com/wp-content/uploads/2023/09/Canon-EOS-1200D-Rebel-T5-Camera-Instruction-Manual.pdf” download=”all”]


