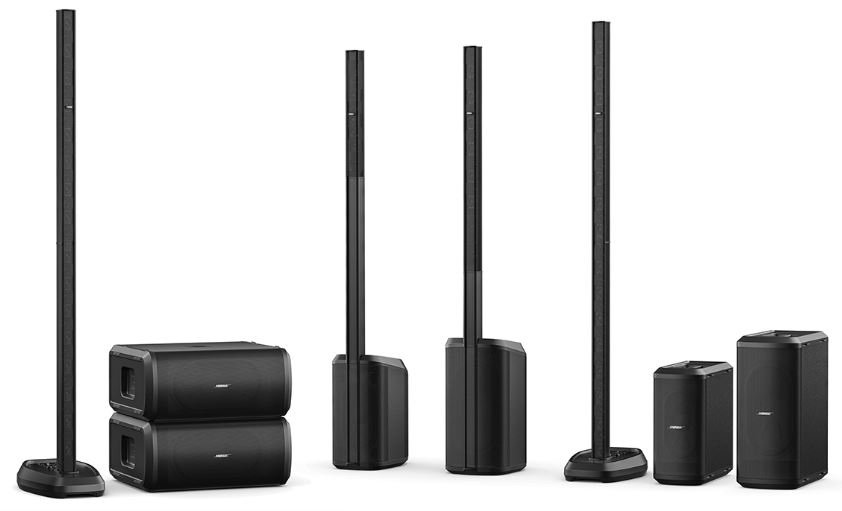
Bose L1 Pro32 Portable Line Array System
About Bose
Bose is a company that designs and manufactures audio equipment, including speakers, headphones, and home theater systems. The company was founded in 1964 by Dr. Amar G. Bose, an MIT professor, and audio engineer. Bose is known for its high-quality sound systems and innovative technology. The company also sells automotive sound systems, professional audio equipment, and noise-canceling technology.
Important Safety Instructions
Please read and keep all safety and use instructions. Bose Corporation hereby declares that this product is in compliance with the essential requirements and other relevant provisions of Directive 2014/53/EU and all other applicable EU directive requirements.
The complete declaration of conformity can be found at: www.Bose.com/compliance.
- Read these instructions.
- Keep these instructions.
- Heed all warnings.
- Follow all instructions.
- Do not use this apparatus near water.
- Clean only with a dry cloth.
- Do not block any ventilation openings. Install in accordance with the manufacturer’s instructions.
- Do not install near any heat sources such as radiators, heat registers, stoves, or other apparatus (including amplifiers) that produce heat.
- Do not defeat the safety purpose of the polarized or grounding-type plug. A polarized plug has two blades one wider than the other. A grounding-type plug has two blades and a third grounding prong. The wide blade or the third prong is provided for your safety. If the provided plug does not fit into your outlet, consult an electrician for the replacement of the obsolete outlet.
- Protect the power cord from being walked on or pinched, particularly at plugs, convenience receptacles, and the point where it exits from the apparatus.
- Only use attachments/accessories specified by the manufacturer.
- Use only with the cart, stand, tripod, bracket, or table specified by the manufacturer or sold with the apparatus. When a cart is used, use caution when moving the cart/apparatus combination to avoid injury from tip-over.
- Unplug this apparatus during lightning storms or when unused for long periods of time.
- Refer all servicing to qualified personnel. Servicing is required when the apparatus has been damaged in any way such as a power-supply cord or plug is damaged, liquid has been spilled or objects have fallen into the device, the apparatus has been exposed to rain or moisture, does not operate normally, or has been dropped.
WARNINGS/CAUTIONS
- Do NOT make unauthorized alterations to this product.
- Do NOT use in vehicles or boats.
- Do NOT place the product in a confined space such as in a wall cavity or in an enclosed cabinet while in use.
- Do NOT place or install the bracket or product near any heat sources, such as fireplaces, radiators, heat registers or other apparatus (including amplifiers) that produce heat.
- Keep the product away from fire and heat sources. Do NOT place naked flame sources, such as lighted candles, on or near the product.
- To reduce the risk of fire or electrical shock, do NOT expose the product to rain, liquids, or moisture.
- Do NOT expose this product to dripping or splashing and do not place objects filled with liquids, such as vases, on or near the product.
- Do NOT use a power inverter with this product.
- Provide an earth connection or ensure the socket outlet incorporates a protective earthing connection before connecting the plug to the main socket outlet.
- Where the mains plug or an appliance coupler is used as the disconnect device, the disconnect device shall remain readily operable.
Overview
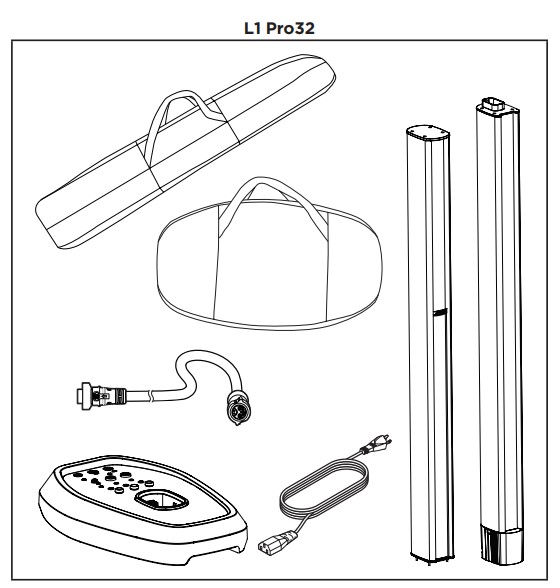
Optional Accessories
- L1 Pro32 Array & Power Stand Bag
- SubMatch Cable
For additional information on L1 Pro accessories, visit PRO.BOSE.COM.
Connections and Controls
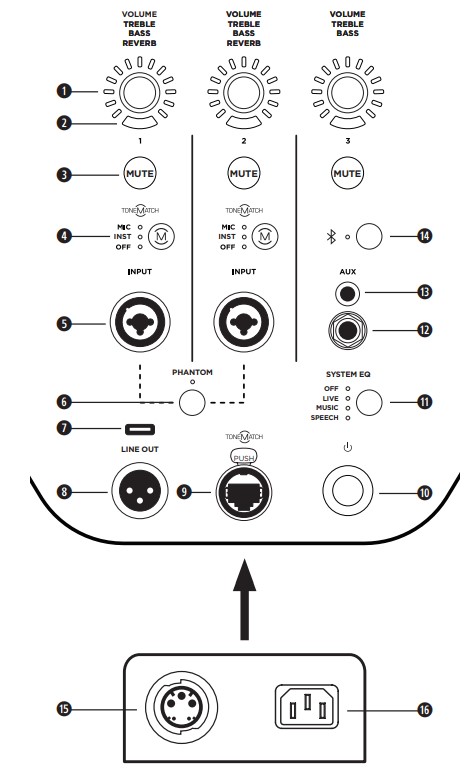
- Channel Parameter Control: Adjust the level of volume, treble, bass, or reverb for your desired channel. Press the control to switch between parameters; rotate the control to adjust the level of your selected parameter.
- Signal/Clip Indicator: The LED will illuminate green when a signal is present and will illuminate red when the signal is clipping or the L1 Pro is entering limiting. Reduce the channel or signal volume to prevent signal clipping or limiting.
- Channel Mute: Mute the output of an individual channel. Press the button to mute the channel. While muted, the button will illuminate white.
- Channel ToneMatch Button: Select the ToneMatch preset for an individual channel. Use MIC for microphones and use INST for acoustic guitar. The corresponding LED will illuminate white while selected.
- Channel Input: Analog input for connecting microphone (XLR), instrument (TS unbalanced), or line level (TRS balanced) cables.
- Phantom Power: Press the button to apply 48-volt power to channels 1 and 2. The LED will illuminate white while phantom power is applied.
- USB Port: USB-C connector for Bose service use.
Note: This port is not compatible with Thunderbolt 3 cables. - XLR Line Output: Use an XLR cable to connect the line-level output to a Sub1/Sub2 or another bass module.
- ToneMatch Port: Connect your L1 Pro to a T4S or T8S ToneMatch mixer via a ToneMatch cable.
CAUTION: Do not connect to a computer or phone network. - Standby Button: Press the button to power on the L1 Pro. The LED will illuminate white while the L1 Pro is on.
- System EQ: Press the button to scroll through and select a master EQ suitable for the use case. The corresponding LED will illuminate white while selected.
- TRS Line Input: Use a 6.4-millimeter (1/4-inch) TRS cable to connect line-level audio sources.
- Aux Line Input: Use a 3.5-millimeter (1/8-inch) TRS cable to connect line-level audio sources.
- Bluetooth® Pair Button: Set up pairing with Bluetooth-capable devices. The LED will flash blue while the L1 Pro is discoverable and illuminates solid white when a device is paired for streaming.
- SubMatch Output: Connect a Sub1/Sub2 bass module with a SubMatch cable.
- Power Input: IEC power cord connection.
Assembling the Power Stand and Array
Before connecting the power stand to a power source, assemble the L1 Pro32 using the upper mid-high array and lower mid-high array.
- Insert the lower array into the power stand.
- Insert the upper array into the lower array.
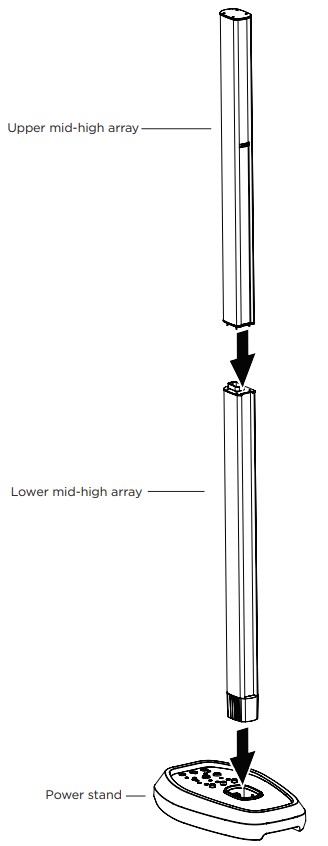
The L1 Pro32 can be used without the upper array. This configuration is useful when a venue ceiling cannot accommodate the height of the cL1 Pro32.
Connecting Power and a Sub1/Sub2
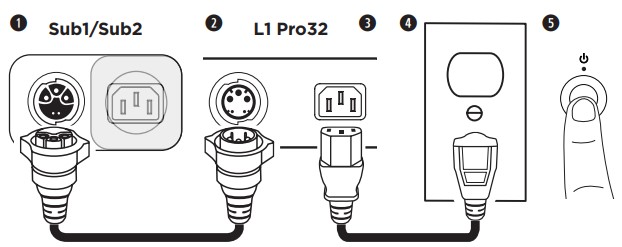
- Plug the SubMatch cable into the SubMatch Input on a Sub1/Sub2.
- Plug the other end of the SubMatch cable into the SubMatch Output of the L1 Pro32.
- Plug the power cord into the Power Input on the L1 Pro32.
- Plug the other end of the power cord into a live electrical outlet.
Note: Do not power on the L1 Pro until after you’ve connected your sources. See Connecting Sources on page 9. - Press the Standby Button. The LED will illuminate white while the L1 Pro is on.
Note: Press and hold the Standby Button for 10 seconds to reset the L1 Pro to factory settings. Press the Standby Button on any connected Sub1/Sub2. For additional information on how to set up a Sub1/ Sub2, see the Sub1/Sub2 owner’s guide at PRO.BOSE.COM.
Note: When two Subs are connected to the L1 Pro32, first turn on the Sub connected directly to the L1 Pro32, then turn on the second Sub.
AutoOff/Low-power Standby After four hours of no use, the L1 Pro will enter AutoOff/Low-power Standby mode to save power. To wake the L1 Pro from AutoOff/Low-power Standby mode, press the Standby Button. When the L1 Pro32 goes into AutoOff/Low-power Standby mode, this will cut power to any Sub1/Sub2 connected with a SubMatch cable. Press the Standby Button on a connected Sub1/Sub2 to wake it from AutoOff/Low-power Standby mode.
Note: Disable AutoOff/Low-power Standby mode by pressing and holding all three Channel Parameter Controls for 10 seconds, or via the Settings page in the L1 Mix app. Enable AutoOff/Low-power Standby mode by repeating this step. Disabling AutoOff/Low-power Standby mode will result in higher energy usage when the L1 Pro is not in use.
Connecting Sources

Channel 1 & 2 Controls Channel 1 and 2 are for use with microphones, guitars, keyboards, or other instruments. Channel 1 and 2 will automatically detect when a source is close to clipping and will reduce the analog gain to avoid clipping.
- Connect your sound source to the Channel Input with the appropriate cable.
- Apply a ToneMatch preset—to optimize the sound of your microphone or instrument—by pressing the Channel ToneMatch Button until the LED for your chosen preset is illuminated. Use MIC for microphones and use INST for acoustic guitars and other instruments. Use OFF if you do not want to apply a preset.
Note: Use the L1 Mix app to choose custom presets from the ToneMatch library. The corresponding LED will illuminate green when a custom preset is selected. - Press the Channel Parameter Control to choose a parameter to modify. The parameter name will illuminate white while it is selected.
- Rotate the Channel Parameter Control to adjust the level of the selected parameter. The parameter LED will indicate the level of the selected parameter.
Note: While Reverb is selected, press and hold the control for two seconds to mute the reverb. While the reverb is muted, Reverb will flash white. To unmute the reverb, press and hold for two seconds while Reverb is selected. Reverb mute will reset when the L1 Pro is powered off.
FAQs Bose L1 Pro32 Portable Line Array System
What is the Bose L1 Pro32 Portable Line Array System?
The Bose L1 Pro32 is a portable line array system designed for live performances, DJs, and musicians. It provides a full-range sound with its unique design and multiple drivers.
What are the dimensions and weight of the Bose L1 Pro32 Portable Line Array System?
The dimensions of the Bose L1 Pro32 Portable Line Array System are 89 x 12.9 x 53.3 cm (H x W x D), and it weighs approximately 25.9 kg.
What is the power output of the Bose L1 Pro32 Portable Line Array System?
The Bose L1 Pro32 Portable Line Array System has a peak power output of 2000 watts.
How many inputs does the Bose L1 Pro32 Portable Line Array System have?
The Bose L1 Pro32 Portable Line Array System has two combos XLR-1/4″ inputs, one 3.5 mm input, and one TOSLINK optical input.
What are the frequency response and SPL of the Bose L1 Pro32 Portable Line Array System?
The frequency response of the Bose L1 Pro32 Portable Line Array System is 40 Hz to 20 kHz, and the maximum SPL is 126 dB.
Does the Bose L1 Pro32 Portable Line Array System come with a mixer?
No, the Bose L1 Pro32 Portable Line Array System does not come with a mixer. However, it has built-in ToneMatch processing that can be controlled with the Bose Connect app.
Can I add additional bass modules to the Bose L1 Pro32 Portable Line Array System?
Yes, you can add up to two Bose Sub1 or Sub2 bass modules to the Bose L1 Pro32 Portable Line Array System for additional low-frequency extension.
What is the warranty for the Bose L1 Pro32 Portable Line Array System?
The Bose L1 Pro32 Portable Line Array System comes with a 5-year transferable limited warranty.
For more manuals by Bose, visit ManualsDock
[embeddoc url=”https://manualsdock.com/wp-content/uploads/2023/03/Bose-L1-Pro32-Portable-Line-Array-System_compressed.pdf” download=”all”]

