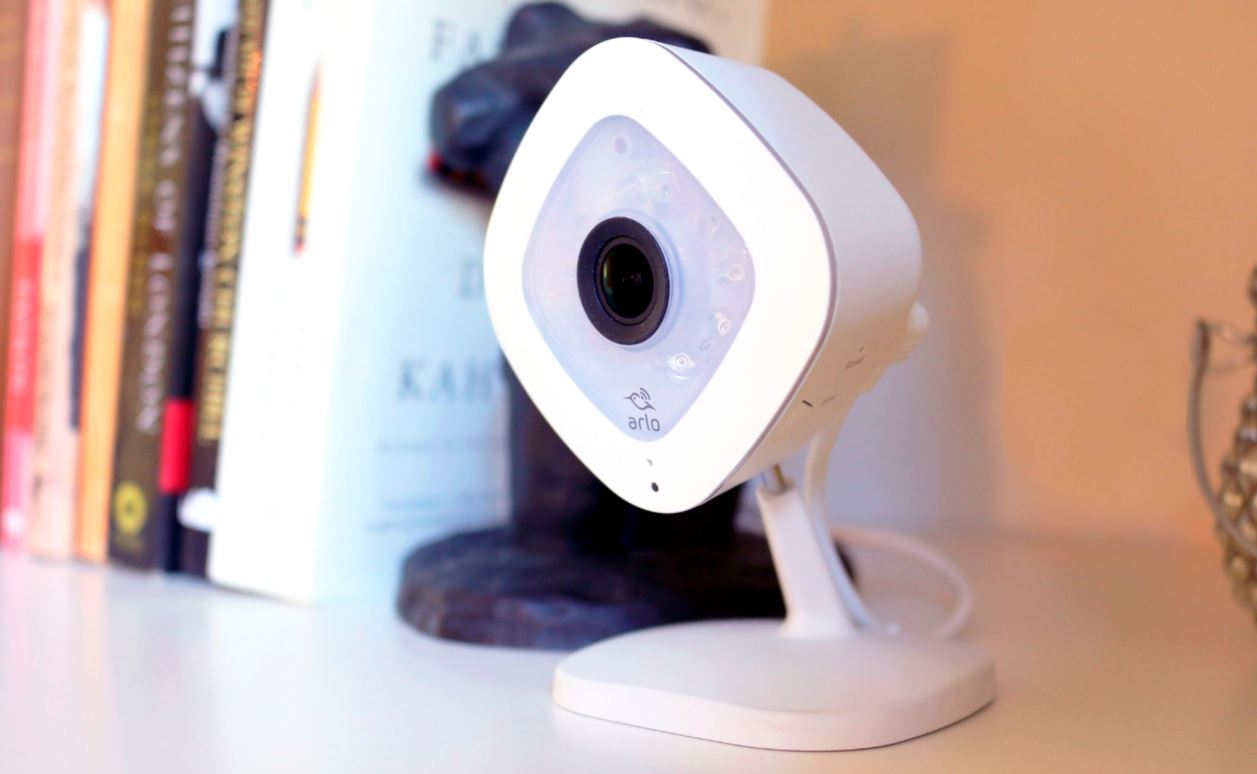
Arlo VMC3040 Wired 1080p HD Security Camera
About Arlo
Arlo Technologies, Inc. is a leading company in the field of smart home security and surveillance solutions. Founded in 2014, Arlo is dedicated to creating innovative and user-friendly products that help protect and monitor homes and businesses.
Arlo offers a range of wire-free and wire-connected cameras, video doorbells, and security lighting systems. Their products are designed to provide high-quality video monitoring, motion detection, two-way audio communication, and remote access through mobile apps or web browsers.
Support Trademarks
For product updates and web support, visit http://www.arlo.com/en-us/support/.
Compliance
- For the current EU Declaration of Conformity, visit http://support.netgear.com/app/answers/detail/a_id/11621/.
- For regulatory compliance information, visit http://www.netgear.com/about/regulatory/.
- See the regulatory compliance document before connecting the power supply.
Set Up Your System
Setting up your Arlo Q camera involves a few simple steps: Get the Arlo app, and then use the app to get an Arlo account and connect your camera to your network. Your Arlo account lets you view videos from any Internet-connected computer or mobile device. You can use the same Arlo app to set up and manage both Arlo Q and Arlo Wire-Free Cameras.
Connect Your Arlo Q or Arlo Q Plus Camera
You can connect your Arlo Q camera using WiFi. You can connect your Arlo Q Plus camera to the Internet in any of three different ways:
- WiFi. Connect the Arlo Q or Arlo Q Plus camera to your router using WiFi and power the camera with the included micro USB cable and power adapter.
- Arlo Q Plus Power over Ethernet (PoE). Connect the Arlo Q Plus camera to a PoE switch using the included PoE adapter if you want to power and connect the camera to the Internet with a single cable.
- Arlo Q Plus Ethernet. Connect the Arlo Q Plus camera to your router with Ethernet, but power the camera with the included micro USB cable and power adapter.
Connect an Arlo Q or Arlo Q Plus Camera With WiFi
- To connect an Arlo Q or Arlo Q Plus camera with WiFi:
- Connect the micro USB cable that was included with your camera to the connector on the back of the camera. For Arlo Q Plus, connect the micro USB cable to the larger half of the port on the back of the camera. See the following diagram.
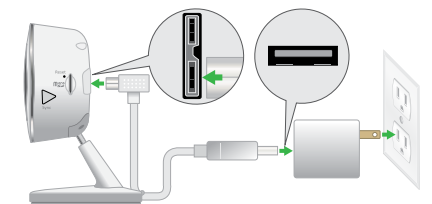
- Connect the other end of the micro USB cable to the power adapter.
- Plug the USB adapter into a wall socket and wait for the camera LED to blink amber.
- Continue installing your camera.
Connect an Arlo Q Plus Camera With PoE
- To connect an Arlo Q Plus camera with PoE:
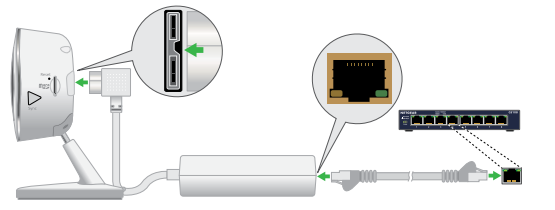
- Connect the PoE adapter to the camera.
- Connect your own Ethernet cable to the PoE adapter.
- Connect the other end of the Ethernet cable to your PoE switch.
- Continue installing your camera.
Connect an Arlo Q Plus Camera With Ethernet
- To connect an Arlo Q Plus camera with Ethernet:
- Connect the PoE adapter to the back of your camera.
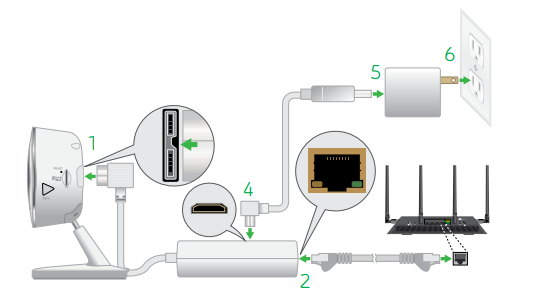
- Connect your own Ethernet cable to the PoE adapter.
- Connect the other end of the Ethernet cable to an Ethernet switch or a router.
- Connect the included micro USB cable to the side of the PoE adapter.
- Connect the other end of the micro USB cable to the USB power adapter.
- Plug the USB adapter into a wall socket.
- Continue installing your camera.
Set Up a New Camera
Use the Arlo app and your Arlo account to set up your Arlo Q or Arlo Q Plus camera. If you already set up an Arlo account, you can add the camera to your account.
- To set up a new Arlo Q or Arlo Q Plus camera:
- Tap the Arlo icon on your mobile device. Your mobile device must be connected to the same WiFi network as the Arlo camera. If you are using a computer, enter arlo.netgear.com in the address bar of a browser. If you are using a mobile device with a Touch ID® fingerprint identity sensor, you are prompted to enable Touch ID or skip it.
- To use Touch ID, tap Enable Touch ID.
 If you tap Skip, you can turn on the Arlo app fingerprint ID login later. See Turn the Arlo App Fingerprint ID Login On and Off on page 50.
- Tap or click New to Arlo.
- list of camera displays.
- Tap or click the camera that you want to set up.
- Apply power to your camera:
- Arlo Q camera. Plug in your Arlo Q camera.
- Arlo Q Plus or Arlo Q camera WiFi connection. See Connect an Arlo Q or Arlo Q Plus Camera With WiFi on page 6.
- Arlo Q Plus camera PoE connection. See Connect an Arlo Q Plus Camera With PoE on page 7.
- Arlo Q Plus camera Ethernet connection. See Connect an Arlo Q Plus Camera With Ethernet on page 8.
- Wait until the camera LED is blinking amber.
- slow blinking amber LED indicates that the camera is powered on and is ready for setup.
- Tap or click Continue.
- Enter the name and password for the WiFi network that you want your camera to connect to. If you use an existing Arlo Wire-free system, do not sync your Arlo Q camera to your base station.
- Press the Sync button on your camera until the blue LED starts blinking. A slow-blinking blue LED indicates that the camera is connecting to a WiFi network. A fast-blinking blue LED indicates that the camera is connecting to Arlo servers.
- Tap or click Continue.
- Hold the QR code 4 to 8 inches (10 to 20 cm) in front of the camera until you hear a chime sound.
- Tap or click Yes if you hear a chime sound.
- Tap or click No if you did not hear a chime sound.
- Wait for the app to discover the Arlo Q camera. If you did not hear a chime sound, try moving the camera closer to or farther away from the QR code. If you hear a buzzing sound, try the following remedies:
-
- Check to ensure that you entered the WiFi network name and password correctly. The WiFi network name and password are case-sensitive.
- Try moving your Arlo Q camera closer to your WiFi router. Do not place your camera farther than 300 feet (91 meters) from your WiFi router.
Note: For initial setup, you can place the camera in the same room as your WiFi router, and then move the camera to another location after you finish the setup. During setup, the Arlo Q camera must connect to the same WiFi network that you plan to use later.
- Choose a service plan.
Add a Camera From Another Arlo Account
- To add a camera from another Arlo account:
- Tap the Arlo icon on your mobile device.
- If you are using a computer, enter arlo.netgear.com in the address bar of a browser. The Devices page displays.
- Log in to the old Arlo account.
- Tap or click Settings. The Settings page displays.
- Tap or click My Devices.
- list of camera displays.
- Tap or click the camera. The settings for the camera display.
- Scroll down and click the Remove Device The camera is removed from your account.
- Log out of the Arlo app.
- Log in to your current Arlo account.
- Tap or click Add Device.
- Tap or click the image of the Arlo Q camera.
- Plug in your camera and wait until the light is blinking amber.
- slow blinking amber LED indicates that the camera is powered on and is ready for setup.
- Tap or click Continue.
- Enter the name and password for the WiFi network that you want your camera to connect to.
- Tap or click Continue.
- Press the Sync button on your camera until the blue light starts blinking.
- slow blinking blue LED indicates that the camera is connecting to a WiFi network. A fast-blinking blue LED indicates that the camera is connecting to Arlo servers.
- Tap or click Continue. Your monitor or mobile device displays a QR code.
- Hold your camera in front of your monitor or hold your smartphone or mobile device in front of your camera until you hear a chime sound.
- If you hear a chime sound, tap or click Yes.
- If you do not hear a chime sound, tap or click No and follow the onscreen instructions.
Arlo Q Camera Position
When positioning your Arlo Q camera, keep these tips in mind:
- Avoid positioning the camera in an area that gets a lot of light shining directly into the camera lens.
- You can configure Arlo Q cameras to monitor part of the field view and to detect motion only in the areas that you want to monitor.
- Keep active locations in the camera’s field of view. Arlo Q provides a 130-degree viewing angle. Position your camera so that the space that you want to monitor is within the camera’s field of view.
- Aim with the cloud. To help with positioning your camera, do a live stream from the Arlo Q camera. Aim the camera while watching the video feed on your Arlo smartphone app to make near-real-time adjustments to the camera’s position.
Place or Mount Your Arlo Q Camera
You can place your Arlo Q camera on a shelf or a flat surface or you can mount it on the wall.
- To mount your Arlo Q camera on the wall:
- Make sure that the mounting plate is separate from the camera base.

- Place the wall plate and secure it in place with four screws.
Note: If you’re mounting the camera to drywall, be sure to use the plastic drywall anchors that are provided.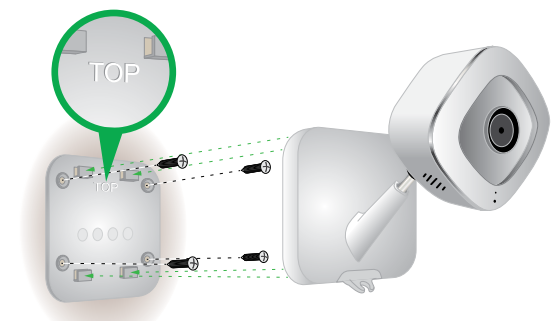
- Slide the camera into the wall plate. Arlo Q also comes with a magnetic plate that can attach to any flat steel or iron surface. (Magnets do not stick to aluminum or stainless steel.)
Caution: Do not attempt to mount the Arlo Q camera to a half-dome Arlo Wire-free Camera mount. This might result in the camera falling from the mount and being damaged.
For more information, see the YouTube video How to Install Arlo Q Smart Home Security Cameras https://www.youtube.com/watch?v=gI-Mk9FOmoQ.
View Your Content
Videos recorded by your camera are stored in a library. You can view your recordings and snapshots, mark them as favorites, and search using the filter.
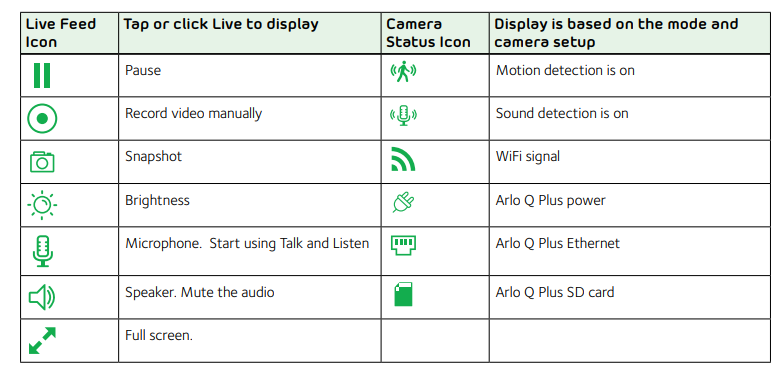
View the Camera Image Status
When you launch the Arlo app, the Devices page displays.
Manage Your Cameras and Devices
If you use more than one camera, you can change the order in which the camera feeds are displayed on the Devices page. You can also zoom, invert, or rotate the camera image.
Change the Camera Order
- To change the camera order on the Devices page:
- Tap the Arlo icon on your mobile device. If you are using a computer, enter arlo.netgear.com in the address bar of a browser. The Devices page displays.
- Tap or click Settings. The Settings page displays.
- Under System, tap or click Camera Order.
- list of cameras displays in the order that they display on the Devices page.
- If you are using a smartphone or tablet, tap Edit at the top of the page.
- list icon displays.
- Tap and hold or right-click the list icon and drag the camera to the correct position on the list.
- Tap or click Done. Your settings are saved.
View Recordings and Snapshots
Your Arlo Q camera stores recordings and snapshots in the library. You can use the filter and the calendar to find and view specific recordings.
Use the Library
You can use the library to find and view recordings based on the date.
- To use the library:
- Tap the Arlo icon on your mobile device. If you are using a computer, enter arlo.netgear.com in the address bar of a browser. The Devices page displays.
- Tap or click Library. The calendar is displayed at the top of the page.
- If it is more than one month since you started recording, use the arrows on either side of the month to select a month to view. The days on which a video clip was recorded are indicated with a green circle.
- Tap or click a highlighted date. Recordings from that date are displayed below the calendar.
Use the Filter
You can use the filter to find and view recordings based on the criteria that you select.
- To use the filter to view your library:
- Tap the Arlo icon on your mobile device. If you are using a computer, enter arlo.netgear.com in the address bar of a browser. The Devices page displays.
- Tap or click Library.
- Tap or click the Filter icon in the upper left corner of the page. The filter page displays.
- Tap or click the filtering criteria that you want to use.
- To remove filtering, tap or click Reset.
- Tap or click Done.
The Filter icon becomes solid green to show that you are using filtering. Recordings that match your filter selections display. Dates with recordings are highlighted in dark green.
Use an SD Card With Arlo Q Plus
All recordings are stored in the cloud, but with an Arlo Q Plus camera, you can use an SD card as a backup location to store recordings. Simply insert an SD card and the camera automatically enables all the settings for you. The SD card cannot be used on its own as a substitute for cloud recording.
If you put an SD card in the camera, the camera records to both the cloud and the SD card for motion-triggered and audio-triggered recordings (not CVR). If the camera is powered on, but the Internet goes down, the camera continues to record to the SD card. We support MicroSD cards, class 10 or higher, with up to 128 GB capacity, file format FAT32.
The Arlo app notifies you if the SD card format is incorrect if the SD card is full, and so on. The camera can reformat the card for you. See Format an SD Card on page 28.
Insert an SD Card
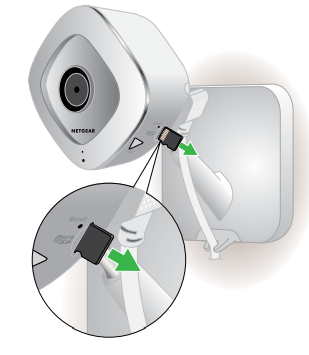
- To insert an SD card in an Arlo Q Plus camera:
- Insert the SD card into the SD card slot on the camera.

- Press the edge of the card until it is completely seated in the slot.
View the SD Card Status
The Arlo app notifies you if the SD card is getting full or if the SD card is not in the correct format. You can also use the Arlo app to view the SD card status.
- To view the status of the SD card for a camera:
- Tap the Arlo icon on your mobile device. If you are using a computer, enter arlo.netgear.com in the address bar of a browser. The Devices page displays.
- Tap or click Settings > My Devices. A list of camera displays.
- Tap or click the camera. The camera settings display.
- In the Storage section, tap or click SD Card.
The SD Card Status shows whether the SD card is ready, needs to be formatted, or is full.
Safely Eject and Remove an SD Card
Note: Cards must be safely ejected so that recordings do not occur as you are removing the card. Removing the card while it is in use can cause the card to become corrupted.
- To safely eject an SD card:
- Tap the Arlo icon on your mobile device. If you are using a computer, enter arlo.netgear.com in the address bar of a browser. The Devices page displays.
- Tap or click Settings > My Devices. A list of camera displays.
- Tap or click the camera. The camera settings display.
- In the Storage section, tap or click SD Card. The SD Card page displays.
- Tap or click Safely Eject SD Card. The settings on the page dim to show that the SD card is ejected. The camera stops recording onto the SD card. The SD card can now be safely removed.
- To release the SD card, press the edge of the card to push it into the slot.
Status LED
The status LED on the Arlo Q lights is in different colors. You can turn off the status LED. The Arlo Q status LED is color-coded.
Arlo Connect
Arlo Connect is a simple way to integrate Arlo devices into other smart home platforms using standard and secure cloud integration.
Use Arlo With IFTTT
You can use the Arlo app with IFTTT (If This Then That), a free cloud-based service that connects smart home devices and applications.
- To add Arlo to your IFTTT app, visit ifttt.com/arlo.
- To learn more about Arlo and IFTTT, visit arlo.com/community.
Use Arlo Cameras With SmartThings
You can integrate your Arlo cameras into the SmartThings app, so all your smart devices work together. For example, if your Arlo camera detects motion, SmartThings can tell your Aeon Labs Siren to trigger your alarm.
Use Arlo With Stringify
Stringify is an iOS app that transforms the way you connect your life by bringing your physical and digital things together. Integrating your Arlo cameras into the Stringify app allows them to connect and interact with more than 600 smart home products and digital services. Stringify connects your smart products and services using flows that you can download, modify, or create using the Stringify app on your iOS device.
Motion, audio, or low battery notifications from Arlo cameras can be triggers for Stringify flows, or Stringify flows can instruct Arlo cameras to arm, disarm, and record video clips.
Add Arlo Cameras to the Stringify App
Stringify is compatible with Arlo Wire-Free, Arlo Pro Wire-Free, Arlo Q, and Arlo Q Plus cameras. Your camera must be in Armed mode or in a custom mode to detect motion or audio and report it to Stringify.
You can also create custom modes to detect motion or audio or both, but not record a video clip. This can be useful for advanced flows when you want to use the Arlo camera as a detection device, but not capture video unless other conditions in the flow are met.
- To add Arlo cameras to the Stringify app and use them in a flow:
- Install the Arlo app, create an account, and complete the setup process.
- Download the Stringify app from the App Store.
- To create a free Stringify account, from the main screen of the Stringify app, select Things and tap New at the top right of the screen.
- Scroll down to Netgear Arlo Cameras and tap the Arlo
- Tap Connect and log in with your Arlo username and password.
- Accept the terms and conditions.
- A list of discovered cameras displays. Your Arlo cameras are now connected to your Stringify account.
- Tap Done to return to the previous menu.
- From the main screen, tap Flows > Create.
- Tap the + button to add devices, including Arlo cameras, to your flow.
- Drag from one icon to another to connect your Things. To download pictured flows directly to the Stringify app, visit
- Tap each item in your flow to set its trigger or action.
- Give your flow a name and tap Enable Flow when finished.
Visit stringify.com for more information about how to create flows and for premade example flows that include Arlo cameras.
Use SmartThings With Arlo Cameras
With Samsung SmartThings, you can integrate your Arlo cameras into the SmartThings app, so all your smart devices can work together. For example, if your Arlo camera detects motion, SmartThings tells your Aeon Labs Siren to trigger your alarm.
After you integrate your Arlo Wire-Free Cameras into the SmartThings app, you must use the SmartThings app to configure your modes and rules. If you try to edit your modes and rules in the Arlo app, you will disarm the SmartThings mode. You can
continue to use the Arlo app to view the library.
Note: After syncing your Arlo cameras with the SmartThings app, a SmartThings mode displays in your Arlo app. Your Arlo system must remain in the SmartThings mode for your system to work correctly with the SmartThings app. All mode configurations must be done in the SmartThings app. If you choose to no longer use the SmartThings app, delete the SmartThings mode in your Arlo app, and delete the Arlo cameras from the things menu in the SmartThings mobile app.
Prepare Arlo to Work With SmartThings
Use Arlo Camera Names That Are Easy to Recognize
Before integrating your cameras with the SmartThings app, make sure that the names of your cameras are easy to understand. If you choose not to rename your cameras, the camera’s serial number becomes the camera’s name in the SmartThings app.
Disarm Your Cameras
When you integrate your Arlo Wire-Free cameras with SmartThings, a new SmartThings mode is created in the Arlo app. Because SmartThings manages your Arlo cameras, they must be in Disarmed mode before you can begin the integration setup. You cannot use Schedule mode or Geofencing mode at the same time as SmartThings mode. You must also disable any IFTTT recipes that change the Arlo system mode.
- To disarm your cameras:
- Tap the Arlo icon on your mobile device. If you are using a computer, enter arlo.netgear.com in the address bar of a browser. The Devices page displays.
- Tap or click Mode. A list of camera displays.
- Tap or click the camera. The Mode page displays.
- Tap Disarmed.
- Exit the Arlo app.
Troubleshooting
Manage Bandwidth for Streaming
The bandwidth used by Arlo Q cameras depends on the resolution setting for the camera. Maximum bandwidth usage when streaming is as follows:
- 1080P. 1500 kbps
- 720P. 700 kbps
- 480P. 300 kbps
- 360P. 200 kbps
- 240P. 100 kbps
If a camera detects low bandwidth, the Arlo system automatically reduces the setting of the video stream to accommodate the lower bandwidth. The bandwidth values are for each camera. To learn how much bandwidth your Arlo system uses, multiply the number of cameras that are streaming video at the same time by the bandwidth for the video quality setting.
Can’t See Video Streams in a Browser
The Arlo web client uses the Adobe Flash plug-in to display your camera streams in a browser. Make sure that your browser is not blocking the plug-in and that you are using the latest version of Adobe Flash. Your router might be blocking the ports to which Arlo sends data. To ensure that Arlo can stay connected, you must keep ports 443 and 80 open on your router.
Not Receiving Push Notifications
You must be logged in to the Arlo app to receive Arlo alerts on your smartphone or mobile device. Arlo registers your device for push notifications when you log in. If you used the logout option instead of simply exiting the app, you must log back into the app. You receive Arlo alerts even if your device is sleeping. If you did all of the following and are still not getting Arlo Q alerts, contact NETGEAR support.
Check the Rules Settings for Armed Modes
Check the rules in your modes. Make sure that Push Notification is enabled in the Armed mode or a custom mode if you created one.
- To check push notifications when you use an Armed mode:
- Tap the Arlo icon on your mobile device. If you are using a computer, enter arlo.netgear.com in the address bar of a browser. The Devices page displays.
- Tap or click the Mode
- list of cameras displays.
- Select the Arlo Q camera.
- list of modes displays.
- Tap or click the Edit icon next to Armed. The Edit Rule page displays.
- Under Alert, make sure that the Push Notification check box is selected.
- Save your changes.
Check the Arlo App Settings on an iOS Device
Make sure that you allow the Arlo app to receive push notifications. The Arlo app push notifications can be disabled on iOS and Android devices. ¾ To allow Arlo push notifications on iOS devices:
- Tap the Settings icon for your iOS device.
- Tap Notifications > Arlo. The Arlo notification settings display.
- Make sure that Allow Notification is selected.
Check the Arlo App Settings on an Android Device
- To allow Arlo push notifications on Android devices:
- Tap the Settings icon for your Android device.
- Tap Application Manager > Arlo. The Arlo notification settings display.
- Make sure that the Show Notifications setting is enabled.
If You Said No to Push Notifications at Installation
When you install the Arlo app for the first time, to receive alerts, you must select Allow when asked if you want Arlo to send you push notifications. For iOS apps, after you respond to this alert, it is not presented again unless the device is restored or the app is uninstalled for at least a day.
If you said no on an iOS device, uninstall the app, wait for a day, and then reinstall it, and allow notifications. If you do not want to wait a day before you reinstall the app, you can use the system clock on your device to simulate a day. Set the system clock forward a day or more, turn your device off, and then turn the device back on. After you reinstall the app, return the system clock to the correct setting
FAQS About Arlo VMC3040 Wired 1080p HD Security Camera
What flaws exist in Arlo cameras?
The cameras made by Arlo are some of the priciest in our ranking.
How frequently do Arlo cameras require charging?
2000 monthly seconds
How close to the Wi-Fi does the Arlo camera need to be?
A minimum of 10 feet (3 meters) should separate your camera from your WiFi router.
Arlo, does he require internet?
High-speed Internet access is required.
What number of cameras can Arlo use?
The Arlo Secure App allows you to stream up to 15 Arlo cameras simultaneously.
What number of devices can Arlo accommodate?
On the Arlo Secure app and five (5) on my.arlo.com, you can stream up to fifteen (15) Arlo cameras live at once.
How many cameras can be supported for free by Arlo?
5 cameras are supported by Arlo.
What is the Arlo battery life?
roughly 3 to 6 months
Arlo uses how much internet?
Per month, 700 MB to 2 GB.
Where should Arlo cameras be placed?
at the entrance.
For more manuals by Arlo, Visit Manualsdock
[embeddoc url=”https://manualsdock.com/wp-content/uploads/2023/09/Arlo-VMC3040-Wired-1080p-HD-Security-Camera-User-Manual.pdf” download=”all”]

