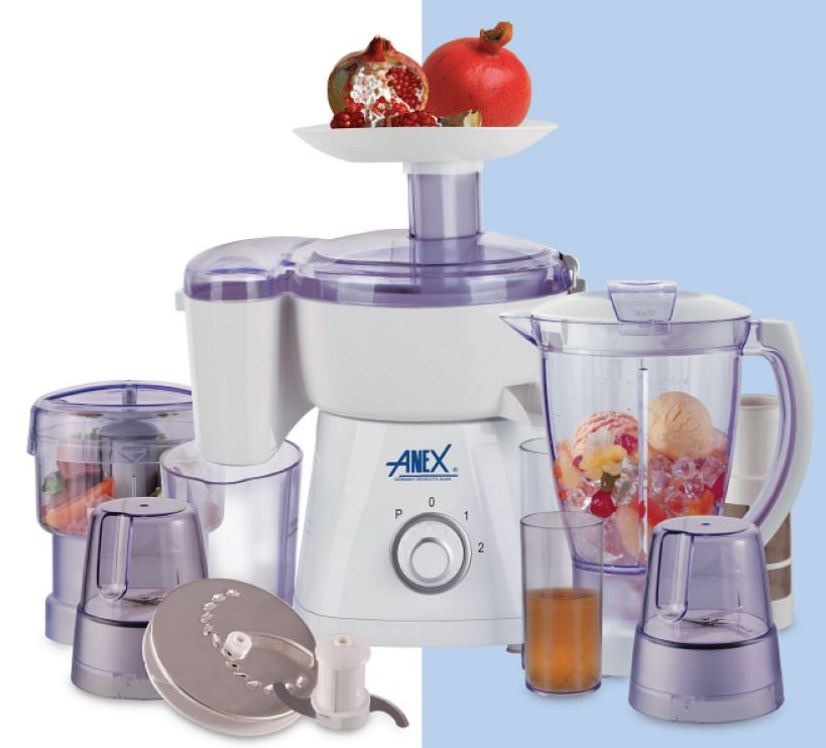
Anex AG-3053 Food Processor
About Anex
Alex is a well-known leader in home appliances, sourcing premium goods from top factories across the globe to offer consumers a wide selection of appliances. Alex takes great satisfaction in acquiring only high-grade items, a feat made possible by strict quality control management. Anex also aims to guarantee that every product is designed with reliable, distinctive designs, high-quality standards, and acknowledged safety precautions. We exceed customers’ expectations for a fresh and fulfilling home experience by providing innovative, high-quality products that provide outstanding outcomes, all thanks to our experience and ongoing research and development. Our in-depth expertise and comprehension of customer needs, which allow us to create cutting-edge solutions that transform how people use appliances, is what sets us apart from the competition.
Cleaning And Maintenance
- The Power Plug Must Be Pulled Out From Mains Socket Before Cleaning The Parts And Main Engine To Prevent Electric Shock.
- Except Main Engine All Parts be cleaned In Water And Then Dried Up.
- Any Residue Shouldn’t Remain In The Filter Screen To Ensure A Running Balance.
- A Certain Volume Of heated water And Several Drops Of Food Cleaner be added to the Water When The Mixing And Mincing Are To Be Washed. They Can Be Cleaned Through An Idle Running By Switching On The Power Button Or Quick Cleaning Button For 10 Seconds. Also, They Can Be In Water By A Brush.
- The Device Should Be Stored In A Dry And Ventilated Place When They Are Not In Use.
- Switch Off And Pull The Plug Before Change Of Accessories.
FOOD PROCESSOR
Combination With Mincing Cup And Usage
- a) Put The Main Engine A On The Flat Top Of A Table.
- b) Amount of The Mincing Cup X To The Main Engine. Press Down The Cup And Screw It Counterclockwise To Get The Cramo On The Cup Firmly Locked At The Cramping Position Of the Main Engine.
- c) Cut The Meat Into Small Pieces (Get Rid Of Skins, Bones, And Tendons) And put them Into The Mincing Cup. Put On The Cover Of Mincing Cup And Get It Pressed Tighty.
- d) Press The Mincing Cup By One Hand And Switch On The Power By Another Hand To Start The Mincing Operation.
Caution:
- a) Overload And Idle Running Is Forbidden During Use.
- b)The Milling Cup Is Only Suitable For Processing Dry Food Into Power. Don’t Pour Any Liquid Into It. The Recommended Quantity Of Food Put In The Cup Is 1/3 To 2/3 Of The Volume Of The Cup.
- c) Water Of Edible Oil Must Remain In The Filter Screen To Ensure A Running Balance.
- d) A Certain Volume Of Heat Water And Several Drops Of Food Cleaner May Be Added to the Water When The Mixing and mixing Cups Are To Be Washed. They Can Be Cleaned Through An Idle Running By Switching On The Power Button Or Quick Clean- ing Button For 10 Seconds. Also, They Can Be Cleaned In Water with a Brush.
- e) The Device Should Be Stored In A Dry And Ventilated Place When They Are Not In Use.
- f) The Blade Is Very Sharp, At Cleaning With The Agitation Knife Hour Must Look Out
- g) If The Supply Cord Is Damaged, It Must Be Replaced By The Manufacturer Its Service Agent, Or A Similarly Qualified Person To Avoid A Hazard.

COMBINED MULTIFUNCTION
Main technical parameters
- Rated Voltage: 220-240V-
- Rated Frequency: 50Hz
- Rated Power: 500W
- Protection Class
-
- Continue Work Time: Don’t Exceed 1 Minute The Turning Of Electric
- Appliances Are Soon: About 12000 Rpm.
Combination of juicer and method for use
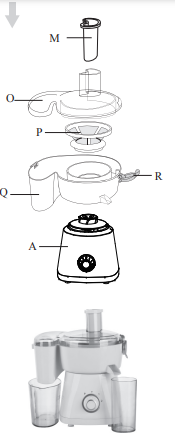
- Put The Engine A On A Table
- Put The Juice-Residue Separating Slot Q Onto The Engine And Tighten It Counterclockwise.
- Amount The Filter P To The Driving Gear.
- Put The Transparent Cover O Onto The Separating Slot Q And Then Get The Safety Buckle Engaged In And Make The Separating Slot Q Firmly Fixed With The Transparent Cover O.
- Let The Juicer Have An Idle Operation For Five Seconds Before Putting It Into Work Operation, Which May Prolong The Service Life Of This Product.
- Get Rid Of Fruit Skin And Slice Up The Fruit Properly. Put The Sliced Fruit Into the Feeding Port And Push Them Into The Juicer By the Feeding Bar.
- The Juicer Can Be Disassembled Only After The Running Of the Motor Has Completely Stopped.
 Caution:
- The Power Switch Must Be Turned On Before Feeding Sliced Foods. Don’t Use This Juicer For Processing Those Fruits That Are Extremely Soft And The Separation Of Juice From Residues Is Difficult.
- The Power Must Be Turned Off Immediately If The Motor Doesn’t Run After The Switch Has Been Turned On. It Can Be Restarted Only After The Trouble Has Been Found Out And Remedied.
- When It Is Used For Pressing Sugarcane, The Sugarcane Must Be Cut Into Proper Pieces With Proper Thickness. During Operation, The Sugarcane Pieces Should Be Pressed Down While Being Rotated.
- When the Operation Is Finished, All Parts Or Components Must Be Cleaned Up And Assembled To Have A Dewater Operation.
- The Main Engine Mustn’t Be Cleaned In Water Or Rinsed With Water. It Should Be Cleaned With a Wet Cloth.
- Don’t Operate The Juice By Children.
- Don’t Use The Appliance If The Rotating Sieve Is Damaged
Combination Of Mixer And Method For Use (In Combination With Milling Cup, Mixing Cup, And Mincing Cup)
- Combination With Milling Cup And Usage
-
- a) Put The Main Engine A On The Flat Top Of A Table.
- b) Make The Milling Cup Stand Upside Down And Put The Food Into It. Attach The Blade Assembly To The Milling Cup By Screwing It Clockwise.
- c) Get The Milling Cup T Stood Upward And Put It Onto The Main Engine. Press Down The Mill- ing Cup And Screw It Counterclockwise At The Same Time To Make The Cramp On The Milling Cup Firmly Fixed At The Cramping Position Of the Main Engine.
- d) The Milling Operation Starts When The Power Switch Is Turned On.

- Combination With Mixing Cup And Usage
-
- a) Put The Main Engine On The Flat Top Of A Table.
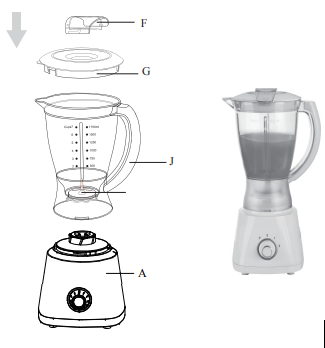
- b) Amount of The Mixing Cup J To The Main Engine. Press Down The Cup And Screw It Counterclockwise To Get The Cramp On The Cup Firmly Locked At The Cramping Position Of The Main Engine.
- c) Cut The Food Into Cubes Or Slices And Then Put Them Into the Mixing Cup. Put On The Mixing Cover And Fix It Firmly By Cramp.
- d) Press The Mixing Cup By One Hand And Switch On The Power By Another Hand To Start The Mixing Operation.
Model Number: LSU-1411
Food Processor
Thank You For Your Choice To Buy And Use The Series Combined Multifunction Food Processor. Please Read This Instruction Carefully Before Use To Make The Functions Of This Product A Full User.
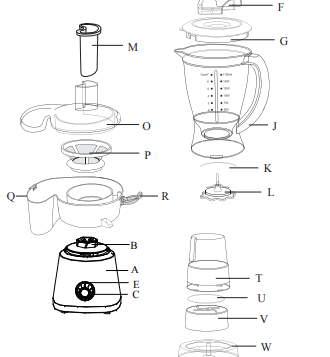
- A. Engine
- B. Driving Gear
- C. Knob For Selection Of Speed
- D. Bottom Cover
- E. Knob For Quick Cleaning
- F. Fixing Cramp
- G. Cover Of Mixing Cup
- J Mixing Cup
- K Rub Seal Ring
- L Assembly Of Blade
- M Feeding Bar
- N Feeding Passage
- O Transparent Cover
- P Juice Filer
- Q Residue-Juice Separating Slot
- R Safety Buckle
- S Residue Collector
- T Milling Cup
- U Rub Seal Ring
- V Assembly Of Miffing Blade
- W Cover Of Mincing Cup
- X Mincing Cup
- Z Juice Cup
Caution
- The Device Should Be Stored In A Dry And Ventilated Place When They Are Not In Use.
- The Razor Blade Is Very Sharp, At The Agitation Knife Hour Must Look Out.
- If The Supply Cord Is Damaged, It Must Be Replaced By The Manufacturer Its Service Agent, Or A Similarly Qualified Person To Avoid A Hazard.

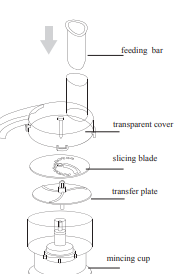
Combination And Use Of Slicing And Section
- a) The Main Engine Is Placed On The Flat Table.
- b) The Cup Body Installed With The Speed Regulator Is Placed On The Principal To Press Up And Down And It Is Rotated Counterclockwise At the Same Time So That The Clip Foot On The Cup Is Locked With The Clipper Of the Main Engine.
- c) The Feed Tray (Y Stripe Faces Upward) Is Installed In The Rotating Shaft Of Speed Regulator (Pay Attention To The Alignment).
- d) The Cutter Head Of the Slicing Section Is Installed On The Feed Tray (Pay Attention To Hexagonal Alignment) The Cutter Head Of the Slicing Knife Can Be Used On the Front And Back Faces. The Front Face Is Slicing And the Back Face Is Section. The Slicing Knife Faces Upward For Slicing. In The Contrast, It Is Tightened.
- e) The Cropping Cover Is Placed On The Cup Body To Press Up And Down And It Is Tightened Counterclockwise At the Same Time.
- f) Please Operate The Engine With No More than 5 Seconds Before Processing The Food To Prolong The Service Life Of the Engine.
- g) The Food Materials To Be Sliced Or Cut Are Placed In The Charging Opening For Slicing And Section. If Necessary, The Charging Arm Presses The Food Materials By Applying The Force Evenly.
- h) When Cleaning The Food Materials Or Assembly, The- attaching Plug Must Be Unplugged To Avoid Danger.
FAQS About Anex AG-3053 Food Processor
What is the capacity of the Anex AG-3053 Food Processor?
Check the product specifications or user manual for information on the capacity of the food processor.
What functions does the Anex AG-3053 Food Processor perform?
Food processors typically have various functions, including chopping, slicing, grating, and kneading. Refer to the product features or manual for details.
Is the Anex AG-3053 Food Processor dishwasher safe?
Check the user manual to determine which parts of the food processor are dishwasher safe. Not all components may be suitable for dishwashers.
What safety features does the Anex AG-3053 Food Processor have?
Food processors usually come with safety features like interlocking systems. Refer to the manual for details on the safety measures in place.
Can the Anex AG-3053 Food Processor handle hard foods like nuts or ice?
Review the user manual to see the recommended uses and limitations of the food processor, including its ability to handle hard foods.
How do I clean and maintain the Anex AG-3053 Food Processor?
Follow the cleaning and maintenance instructions provided in the user manual for the specific model.
Is there a warranty for the Anex AG-3053 Food Processor?
Check the warranty information provided by Anex for details on coverage and duration.
What accessories come with the Anex AG-3053 Food Processor?
Review the product packaging, specifications, or user manual to see the included accessories.
Can the Anex AG-3053 Food Processor handle liquids?
Some food processors have limitations on processing liquids. Refer to the manual for guidance on using liquids with the appliance.
Where can I find replacement parts for the Anex AG-3053 Food Processor?
Contact Anex customer support or check their official website for information on purchasing replacement parts.
For more manuals by Anex ManualsDock


