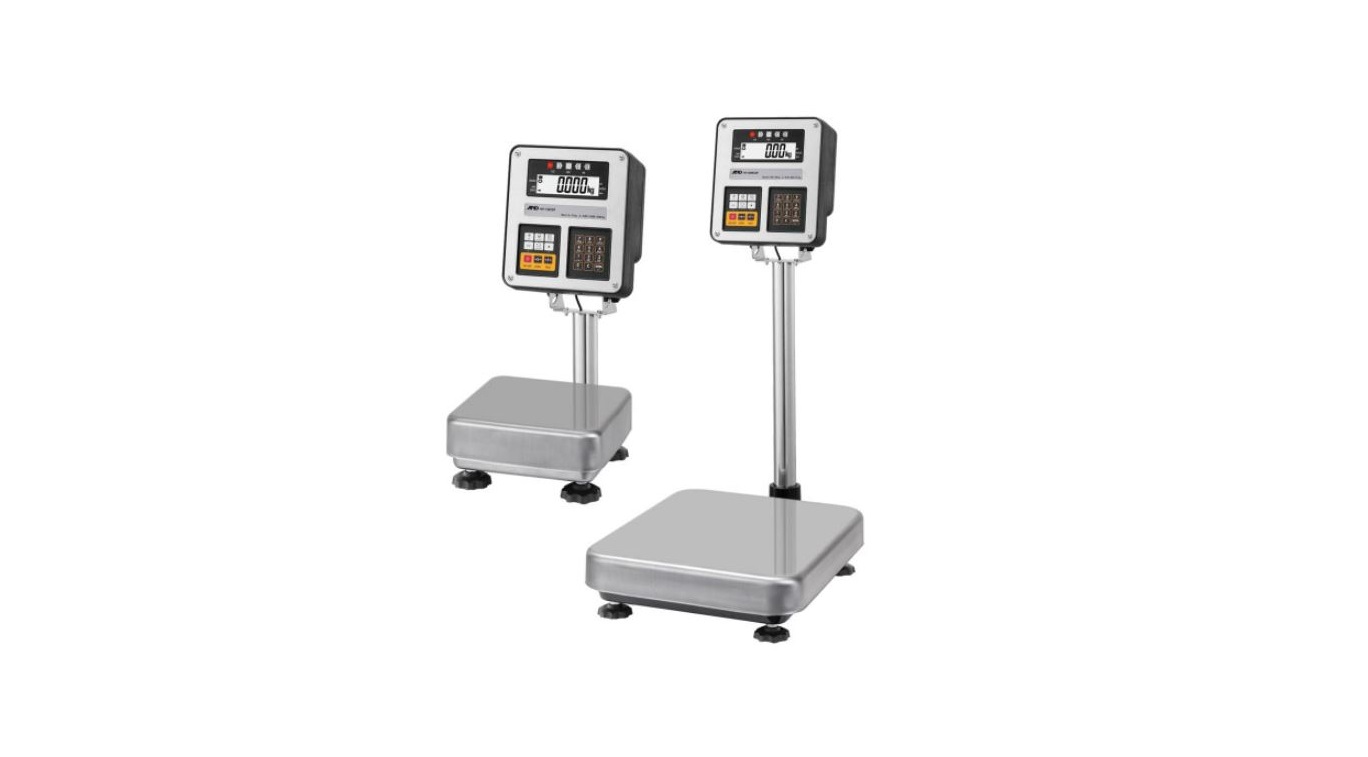
AND HW-10KGL Digital Platform Scale
About AND Weighing
They can comprehend and make use of environmental information thanks to the core technology of A&D, analog, and digital conversion. They supply instruments utilizing precision measurement and controlling technology and work with customers to help them add value and contribute to the growth of the industry and healthy living through this competency and our dedication to quality standards.
Since its founding in 1977, A&D has expanded into an international company with operations in the US, Germany, Japan, Australia, Korea, and Great Britain, and with global sales of more than $400 million.
Compliance with FCC rules
Please note that this equipment generates, uses, and can radiate radio frequency energy. This equipment has been tested and has been found to comply with the limits of a Class A computing device under Subpart J of Part 15 of FCC rules. These rules are designed to provide reasonable protection against interference when this equipment is operated in a commercial environment. If this unit is operated in a residential area it might cause some interference and under these circumstances, the user would be required to take, at his own expense, whatever measures are necessary to eliminate the interference. (FCC = Federal Communications Commission in the U.S.A.)
Outline and Features
- The HW-G series is a platform scale with a minimum resolution of 1/10000.
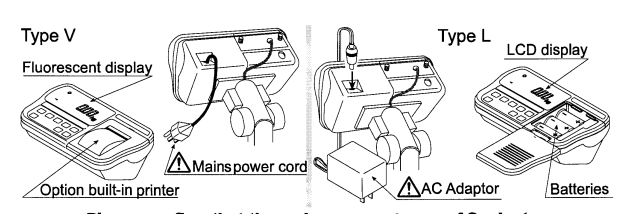
- Type L scales have an LCD (Liquid Crystal Display) and use batteries as a power source to provide portability. This type can also use an AC mains adaptor.
- Type V scales have a fluorescent display so the weighing value can be read in dim light. This type uses the AC power line as a power source.
- The base unit (platform) is water-resistant by IP-65 specifications.
- The counting mode function converts the total mass value (total weight) of articles to a count, assuming all items to have the same mass.
- The percentage mode function displays the mass of an item as a percentage of a stored 100% mass.
- The accumulation function accumulates each weighing value and counts the number of weighings.
- The comparator function compares the display value with the upper limit value (HI) and the lower limit value (LO) and displays the result. The result can be output if option OP-03 is installed.
- The simple batch function or full/dribble batch function can be used for filling to a target mass value. The status of a weighing value can be output if option OP-03 or OP-04 is installed. The outputs are Zero Band, Preliminary, and Final.
- The optional RS-422/RS-485 serial interface can control up to 16 scales from a computer when this option is installed in place of the standard RS-232C serial interface.
- Type V scales can be equipped with option OP-06, a built-in impact dot matrix printer.
Unpacking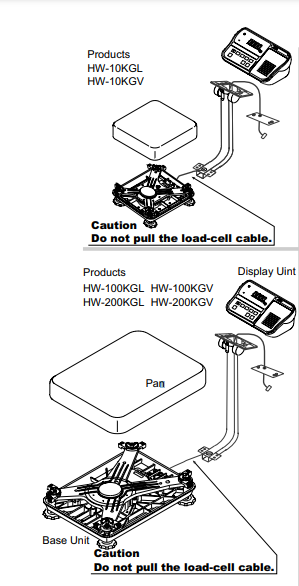

Accessories for HW-G series
Caution
Precautions for installing the scale
Consider the following conditions to get the most from your scale. The best operation is where the temperature and relative humidity are stable, the scale is installed on a solid floor or bench and there is no draft.
- Do not install the scale in direct sunlight.
- Do not install the scale near heaters or air conditioners.
- Do not install the scale where there is flammable or corrosive gas present.
- Do not install the scale near equipment which produces magnetic fields.
- Do not install the scale where there is likely to be static electricity discharges in a place where the relative humidity is lower than 45%RH. Plastic and isolators are likely to be charged with static electricity.
- The display unit is not water resistant. Use the display unit cover to avoid damage.
- Do not use an unstable power source.
Precautions for operating the scale
Periodically check the scale with a known weight. Calibrate the scale before using it and after moving it to another location. Do not place anything on the pan which is heavier than the weighing capacity Do not drop anything onto the pan.
- Do not use a sharp instrument such as a pencil or ballpoint pen to press the switches. Press the switches gently using only your finger.
- We recommend pressing the ZERO or TARE switch before each weighing to prevent possible errors.
- Replace used dry cells with six new ones when the BATT symbol is displayed.
- The dry cell (battery) is size D.
Precautions for storing the scale
- Do not disassemble the scale.
- Do not use solvents to clean the scale.
- For the best cleaning of the display unit, wipe with a dry lint-free cloth or a lint-free cloth that is moistened with warm water and a mild detergent.
- The base unit can be cleaned with gentle water jets while brushing the base unit.
- Weigh only after the unit is dry.
- Protect the display unit from dust and water by using the vinyl cover.
- Remove batteries from the display unit when the scale is not in use for a long time. If you leave the batteries installed they may leak and damage the scale.
Installing the Scale
This procedure includes all of the steps for installing the HW-G series scales
- Step 1 Unpacking
Remove the weighing pan from the carton and place to one side. Remove the base unit and column from the carton, taking care not to pull on the loadcell cable.
- Step 2 Secure the Column
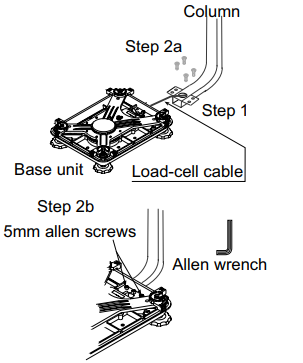
- Step 2a Remove the 4 Allen screws from the column lower bracket.
- Step 2b Pull the excess loadcell cable through the column as you position the column to the base unit, so as not to damage the loadcell cable. Affix the column to the base unit using four 5mm Allen screws.
- Step 3 Secure the Display Unit
-
Step 3a Remove the 2 screws from the rear of the display unit, position the display unit onto the column bracket, and pull the excess cable back down the center of the column to the base unit. Ensure that the cable exits via the cut-out in the display unit column bracket and secure the headwork with the 2 screws.
-
Step 3b Carefully make the connection between the cable connector and J1 inside the headwork, then secure the rear display panel.

-
- Step 4 Fit the Pan
Step 4 Fold the excess cable at the basework end and secure with the ‘twist and(1)” tie’ strip provided. Fit the pan to the base unit.
- Select the place where you intend to install the scale. Consider “4. Caution” on page 8.
- Step 5 Level the Scale
Level the base unit by using the “Bubble spirit level” and “Levelling feet”.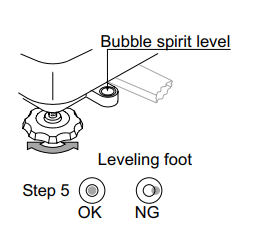
- Step 6 Adjust the Display Unit
Press the caps at the pole top from both sides and adjust the angle of the display unit.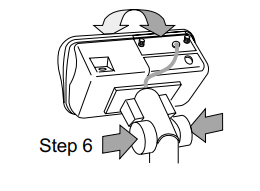
- Step7 Connect the Power
Install the batteries (see page 11) or connect the AC adaptor or main cable. Check the weighing accuracy. If the scale needs calibration, refer to “14 Calibration”.
Installing the Batteries for TYPE L
- Step 1
If necessary turn off the display and remove the AC adaptor.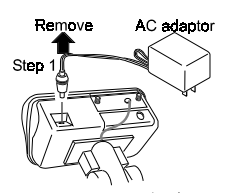
- Step 2
- Press and slide downwards to remove the external cover.
- Press the hook of the internal cover to the left side and lift off the cover.

- Step 3
Insert six new dry cells ensuring correct polarity (+,-). Battery size is ‘D’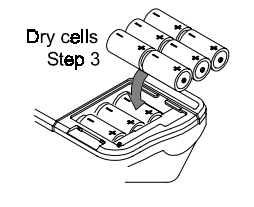
- Step 4
Replace the covers removed in step 2.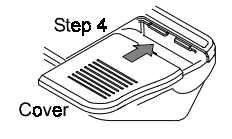
Caution
- Replace used dry cells with six new ones, when BATT is displayed. Do not mix used and new batteries. It may cause damage to the battery or product.
- Check the polarity when installing the batteries. If you do not observe this it may cause battery leakage. Also if the polarity of a battery is wrong the scale may only work temporarily.
- The battery life is dependent upon the environmental temperature. Remove batteries from the display unit when the scale is not to be used for a long time. They may leak and cause damage.
- Damage which is due to battery leakage is not covered under warranty.
NAMES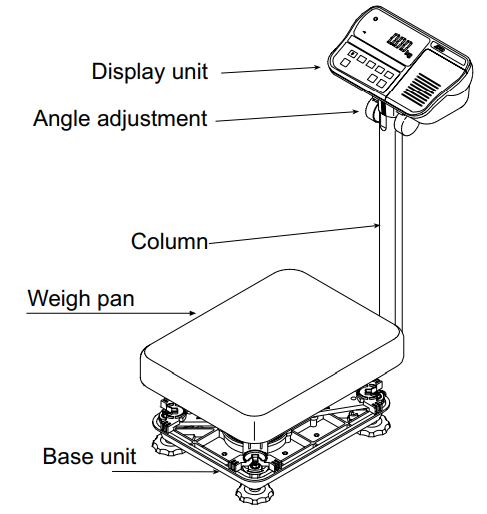
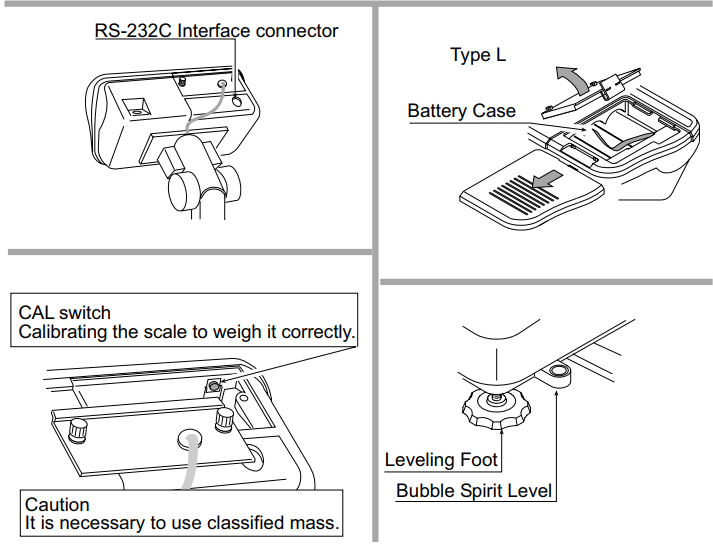
DISPLAY AND SYMBOLS
Turning the Scale on/off
Type V or Type L with AC adaptor
- Step 1 Ensure that the pan is empty.
- Step 2 Confirm that local voltage and receptacle type match your scale.
- Step 3 The scale turns on/off using the ON/OFF switch alternately.
- Step 4 Check the accuracy of weighing. If you calibrate the scale, perform it after allowing the scale to warm up for 30 minutes.
- Step 5 Press the ZERO switch to display zero. (With nothing on the pan.)
- Step 6 Place something gently onto the pan.
- Step 7 You can read the weight after the stability mark is displayed.
- Step 8 Remove the item from the pan.
- Step 9 Turn the scale off using the ON/OFF switch.
Memo
With the power cord connected, type V consumes only sufficient power for standby status after turning off the scale. With the AC adaptor connected, type L consumes only the power of the AC adaptor after turning off the scale.
Type L with Batteries
- Step 1 Install six new batteries. Refer to “5.1. Installing the batteries for Type L”.
- Step 2 Ensure that the pan is empty.
- Step 3 The scale turns on/off using the ON/OFF switch alternately.
- Step 4 Check the accuracy of weighing. If you calibrate the scale, perform it after warming up the scale for 30 minutes. You will need to disable the auto power-off function. See 15.2 page 43.
- Step 5 Press the ZERO switch to display zero. (With nothing on the pan.)
- Step 6 Gently place something on the pan.
- Step 7 You can read the weight value after the stability mark is displayed.
- Step 8 Remove the item from the pan.
- Step 9 Turn the scale off using the ON/OFF switch.
Caution
- Replace used dry cells with six new ones when BATT is displayed.
- Battery life is affected by the environmental temperature.
- Remove batteries from the display unit when the scale is not to be used for a long time. The batteries may leak and cause damage.
Preparation
- Step 1 Turn off the display.
Press the ON/OFF switch while the ZERO switch is pressed and held. The function table is displayed. - Step 2 Press the ENTER switch to display an item of the accumulation function.
- Step 3 Select a parameter of the accumulation function with the switch.
- Step 4 Press the ENTER switch to store the new parameter. Press the F switch and then the ENTER switch to exit from the function table. Then the scale displays the weighing mode.

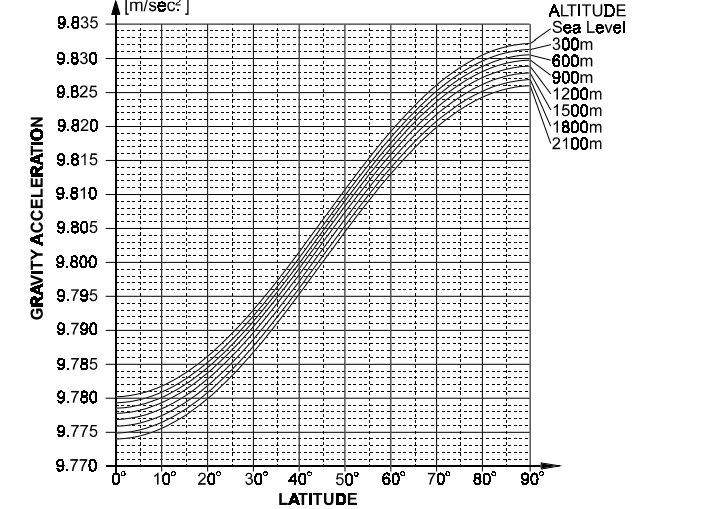
The Gravity Acceleration Table

Specification
- Kind 5×7 dot matrix impact type
- Characters 16 characters per line
- Width of roll paper 44.5mm
- Accessories a special roll of paper, an ink ribbon
Consumables
- Special roll paper AX-PP156-S (Including 8 rolls in a set)
- Ink ribbon AX-ERC-05-S (Including 5 pieces in a set)
Installation
Caution
This option cannot be used with type L (Liquid Crystal Display) scales. Packed with the option OP-06 are the following items which are used to install the printer into your scale

- Disassembly
- Disconnect the scale power plug from the AC mains supply socket.
- Loosen the lock screws and remove the rear cover unit (Item 3)
- Loosen 4 x screws (Item c) and remove the upper case unit.
- Remove 2 screws (Item a) and remove the Battery Cover.
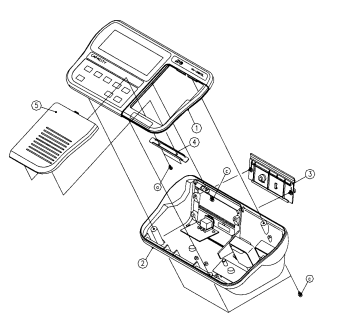
- Installation
- Connect CN2, of the printer board (Item 8), to J5 on the main board (Item 1)
- Install the printer board (Item 8) to the stand-offs on the board on the upper case (Item 1).
- Secure the printer unit (Item 7) to the upper case (Item 1).
- Connect the printer unit cable to CN4 on the printer board (Item 8).

- Connect the cable between J2 and J3 on the upper case (Item 1).
- Free the 2-pin cable on the lowercase (Item 2) and connect it to CN1.
- Screw the upper case (Item 1) to the lower case (Item 2) using the 4 screws (Items c).
- Secure the rear cover (Item 3) to the lower case (Item 2) with the 2 lock screws.
- Secure the printer cover (Item 6 to the upper case (Item 1).

- Performance Check
- Press the ON/OFF key while holding the ZERO key pressed.
- F1 will be displayed – press the MODE
- F 9 0 will be displayed – press the RANGE
- F 9 1 will be displayed – press the MODE
- F10 will be displayed – press the F key
- The end will be displayed – press the MODE
- Prepare the paper roll and open the printer cover.
- While holding the F key, press the PRINT key and feed in the paper.
- Place a weight onto the scale and when the stable mark flashes press the PRINT key.

Maintenance
- Refer to “4. Caution” for use.
- Refer to “6.1. Display and Symbols “ and the corresponding mode for the displayed error code.
- Refer to “14. Calibration (Adjusting Scale)” for precision weighing.
- Periodically check the accuracy of weighing. Calibrate the scale, if it is moved to another location or the environment has changed.
Repair
Do not disassemble/ assemble the scale without an authorized service engineer. It may cause an electric shock or damage to the scale, etc. In this case, repair is not covered under warranty. Contact your local A&D dealer if your scale needs service or repair.
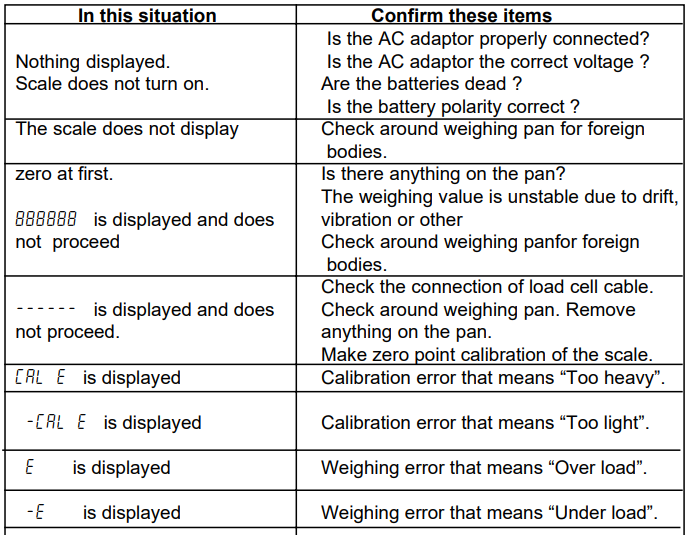
Checkpoints before calling maintenance

FAQS About AND HW-10KGL Digital Platform Scale
How frequently does a platform weighing for calibration need to be done?
once a month, or sometimes even each week.
Are weight scales calibrated before use?
For the sake of keeping the product safe, it is important to have precise readings.
Scales are calibrated how frequently?
Some are only calibrated once a year, while others are calibrated once a month.
When should a scale be calibrated?
Depending on the level of accuracy and usage, scales should be calibrated often.
How is a platform balance calibrated?
To calibrate, click the button. Both the calibration weight and the test weight must be positioned in the center of the platform. Before pressing enter, pause for a moment.
How durable are digital scales?
five to ten years
Does temperature affect scales?
As temperatures rise, wire resistance also rises, resulting in a drop in voltage that might cause the scale controller to present findings that are actually different from the output of the load cell.
Why is it vital to calibrate scales?
Utilizing calibrated equipment ensures that measurements taken in one location and those taken in another are compatible.
How can a scale be used correctly?
Put your scale on a flat, firm surface that is free of carpet.
How is scale tolerance determined?
Calculating the percent tolerance is as follows: goal weight value multiplied by the permitted variation.
For more manuals by AND Weighing, Visit Manualsdock

