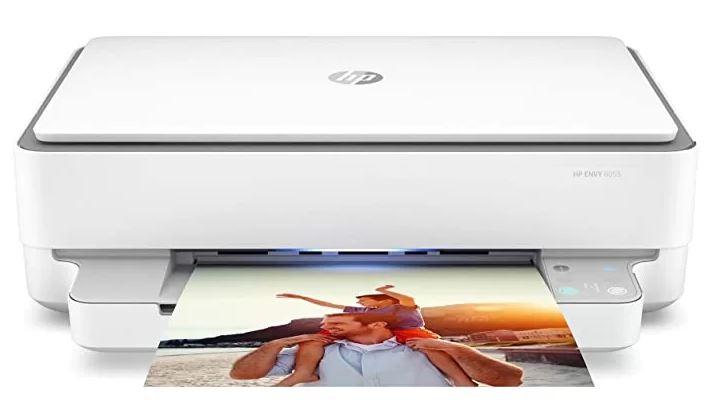
HP ENVY 6000 All-in-One series
About HP
HP (short for Hewlett-Packard) is a multinational technology company headquartered in Palo Alto, California, United States. The company specializes in developing and manufacturing a wide range of computer hardware and software products, including personal computers, laptops, printers, scanners, and storage devices.
HP was founded in 1939 by Bill Hewlett and Dave Packard in a garage in Palo Alto, California. Today, the company has grown into one of the largest technology companies in the world, with operations in more than 170 countries and over 60,000 employees.
Some of HP’s most popular products include its line of HP Pavilion and HP Envy laptops, as well as its HP OfficeJet and HP LaserJet printers. In addition to its hardware products, HP also offers a range of software and services, including cloud-based solutions, data analytics, and cybersecurity solutions. The company is also committed to sustainability and has implemented various initiatives to reduce its environmental impact.
Printer parts
This section contains the following topics:
- Printer Overview
- Buttons
- Print reports from the control panel
- Edge lighting and status lights
- Quiet Mode
- Auto- Off
- Sleep mode
- Adjust printer lights or volume
Printer Overview
- Top and front view
- Back view
Top and front view
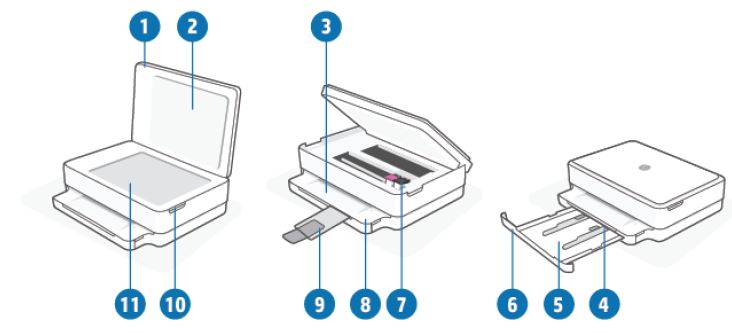
- Scanner lid
- Lid-backing
- Output tray
- Paper-width guides
- Paper tray
- Paper tray door
- Ink cartridges
- Control panel
- Output tray extender (also referred to as the tray extender)
- Cartridge access door
- Scanner glass
Back view
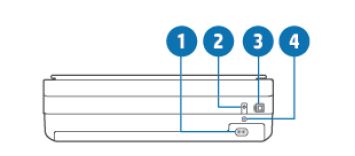
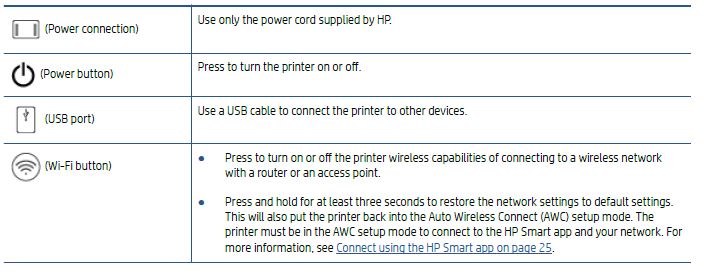
- Power connection
- Power button
- USB port
- Wi-Fi button
Buttons
- Control panel buttons
- Buttons on the back of the printer
- Button combinations
Control panel buttons
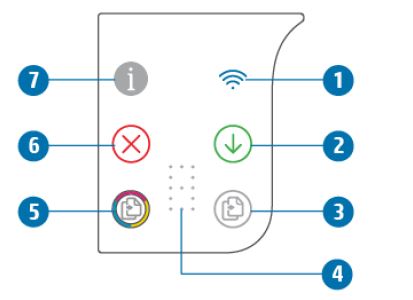
 (Wireless light): Lights blue. Indicates the status of the printer’s wireless connection. Lights up solid when connected, and blinks when not connected.
 (Resume button): When it lights up, press to resume a job after a disruption (for example, after loading paper or clearing a paper jam).
For more information, see the Printer warning or error status on page 96.- (Start Copy Black): Lights white. Starts a black-and-white copy job. To increase the number of copies, press the button multiple times.
 (Number Counter indicator): Used to show copy count and error codes (lights white). For more information, see the Printer warning or error status on page 96.
 (Start Copy Color): Lights colored, slowly changing color. Starts a color copy job. To increase the number of copies, press the button multiple times.
 (Cancel button): When it lights up, press to stop the current operation.
 (Information button): Prints out a printer information page on the current status.
- If it is blinking white, press to confirm a connection attempt from other devices.
- If it is amber (possibly blinking), it indicates an HP Instant Ink warning or error. Press the button to print an information page, check the HP Instant Ink section for diagnostic results, and then follow the instructions on the page.
NOTE: HP Instant Ink service might be available in all countries. To check availability, visit hpinstantink.com.
Buttons on the back of the printer
Button combinations


Print reports from the control panel
NOTE: Before printing reports, press and hold![]() (the Information button) for at least three seconds to light up all the buttons on the control panel, and then follow the instructions in the table.
(the Information button) for at least three seconds to light up all the buttons on the control panel, and then follow the instructions in the table.

Edge lighting and status lights
- Status lights overview
- Edge lighting
Status lights overview
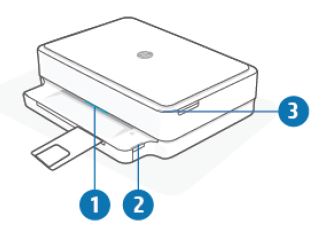
- Edge lighting: Can glow blue, white, green, amber, or purple to show various printer statuses. For more information, see the following section.
- Paper tray light: The paper tray light blinks to the right of the control panel, on the side, above the edge of the paper tray. When lit, it indicates media errors or warnings such as media size mismatch, paper width mismatch, or paper length mismatch. For more information, see the Printer warning or error status on page 96.
- Cartridge access door light: The cartridge access door light is a curved strip of lighting in the top right corner. When lit, it indicates an ink error.
Ink cartridge lights: The black and colored ink cartridges have a light for each that blinks to indicate an error. Open the door to investigate the issue. For more information, see the Printer warning or error status on page 96.
Edge lighting
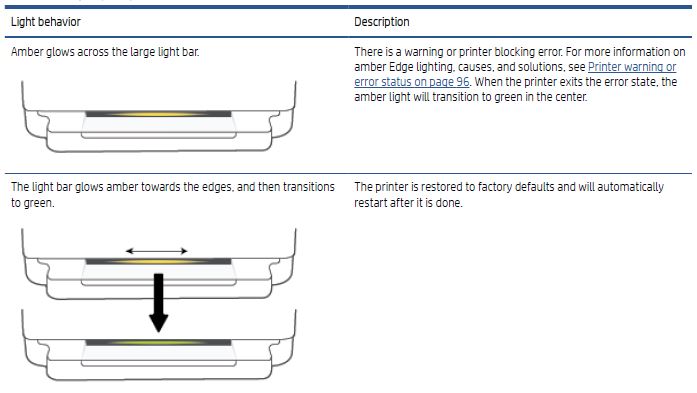
The printer Edge lighting consists of a large light bar across the front of the printer. These lights communicate printer states with color and movement.
Table 1-1 Edge lighting – purple

Adjust printer lights or volume
You can adjust the brightness of the printer lights or the volume of the sound effects according to your environment and needs.
To adjust printer lights or volume from an Android or iOS device
- Open HP Smart. For more information, see Use the HP Smart app to print, copy, scan, and troubleshoot on page 37.
- Tap the printer image on the Home screen.
- Find and change the settings from Preferences.
Load media and paper basics
- Load media
- Load original
- Change the default paper size detected by the printer
- Paper basics
Connect your printer
- Connect using the HP Smart app
- Connect to a wireless network with a router
- Connect wirelessly without a router
- Change the connection type
- Wireless settings
- Advanced printer management tools (for wireless printers)
- Tips for setting up and using a wireless printer
Change the connection type
If you first set up your printer and installed the software with a USB cable, directly connecting the printer to your computer, you can easily change to a wireless network connection. You will need a wireless 802.11a/b/g/n network that includes a wireless router or access point.
NOTE: The printer supports connections using 2.4GHz or 5GHz.
Before changing from a USB connection to a wireless network, make sure that:
- The printer is connected to your computer with the USB cable until you are prompted to disconnect the cable.
- The computer is connected to the wireless network that you intend to install the printer on.
You can also change from a wireless connection to a USB connection.
To change from a USB connection to a wireless network (Windows)
- Open the HP printer software. For more information, see Open the HP printer software (Windows) on page 38.
- In the printer software, click Tools.
- Click Device Setup & Software, and then select Connect a new device.
- Follow the on-screen instructions.
To change from a USB connection to a wireless network using the HP Smart app (Windows 10/macOS)
- Open the HP Smart app. For information about how to open the app on a Windows 10 computer, see Use the HP Smart app to print, copy, scan, and troubleshoot on page 37.
- Make sure your printer is selected.
TIP: If you want to select a different printer, click the ( ) on the toolbar at the left side of the screen, and then select a different printer from the list of all available printers. - Click Learn More when you see “Make printing easier by connecting your printer wirelessly” on top of the home page of the app.
To change from a wireless connection to a USB connection (Windows/macOS)
Connect the printer and the computer with a USB cable. The USB port is at the back of the printer.
Tips for setting up and using a wireless printer
Use the following tips to set up and use a wireless printer:
- When setting up the wireless networked printer using a computer, make sure:
- Your wireless router or access point is powered on.
- Your computer is connected to a wireless network (not using an Ethernet cable).
- The printer is in the AWC setup mode.
The printer searches for wireless routers and then lists the detected network names on the computer.
- If your computer or mobile device is connected to a Virtual Private Network (VPN), you need to disconnect from the VPN before you can access any other device on your network, including the printer.
- Learn more about configuring your network and the printer for wireless printing. Click here to go online for more information.
- Learn how to find your network security settings. Click here to go online for more information.
- Learn about the HP Print and Scan Doctor. Click here to go online for more information.
NOTE: This utility is only available for the Windows operating system. - Use the HP online firewall troubleshooter to determine if a firewall or antivirus program is preventing your computer from connecting to the printer and find resolutions.
Printer management tools
- Use the HP Smart app to print, copy, scan, and troubleshoot
- Open the HP printer software (Windows)
- Toolbox (Windows)
- Embedded web server
- Update the printer
Use the HP Smart app to print, copy, scan, and troubleshoot
HP Smart helps you to set up, copy, scan, print, share, and manage your HP printer. You can share documents and images through email, text messages, and popular cloud and social media services (such as iCloud, Google Drive, Dropbox, and Facebook). You can also set up new HP printers, as well as monitor and order supplies.
NOTE: The HP Smart app might not be available in all languages. Some features might not be available with all printer models.
To install the HP Smart app
The HP Smart app is supported on iOS, Android, Windows 10, and macOS devices. To install the app on your device, go to 123.hp.com and follow the onscreen instructions to access your device’s app store.
To open the HP Smart app on a Windows 10 computer
After installing the HP Smart app, from the device desktop, click Start, and then select HP Smart from the app list.
Connect to your printer
Make sure that your device is connected to the same network as the printer. Then HP Smart will automatically detect the printer.
Get more information about the HP Smart app
For basic instructions on how to print, copy, scan, and troubleshoot using HP Smart, see Print using the HP Smart app on page 44, Copy and scan on page 64 and Get help from the HP Smart app on page 79.
For more information about using HP Smart for printing, copying, scanning, accessing printer features, and troubleshooting issues, go to:
- iOS/Android: www.hp.com/go/hpsmart-help
- Windows 10: www.hp.com/go/hpsmartwin-help
- macOS: www.hp.com/go/hpsmartmac-help
Open the HP printer software (Windows)
After installing the HP printer software, double-click the printer icon on the desktop or do one of the following to open the printer software:
- Windows 10: From the computer desktop, click Start, select HP from the app list, and then select the icon with the printer name.
- Windows 7: From the computer desktop, click Start, select All Programs, click HP, click the folder for the printer, and then select the icon with the printer name.
NOTE: If you have not installed the HP printer software, visit 123.hp.com to download and install the necessary software
Embedded web server
When the printer is connected to a network, you can use the printer’s embedded web server (EWS) to view status information, change settings, and manage it from your computer.
- NOTE: For your security, some settings in the EWS are password-protected. If prompted for a password, enter the PIN from the label on your printer. It might be near the cartridge access area inside the printer or on the back, side, or bottom of the printer.
- NOTE: You can open and use the embedded web server without being connected to the Internet. However, some features are not available.
About cookies
The embedded Web server (EWS) places very small text files (cookies) on your hard drive when you are browsing. These files let the EWS recognize your computer the next time you visit. For example, if you have configured the EWS language, a cookie helps remember which language you have selected so that the next time you access the EWS, the pages are displayed in that language. Some cookies (such as the cookie that stores customer-specific preferences) are stored on the computer until you clear them manually.
You can configure your browser to accept all cookies, or you can configure it to alert you every time a cookie is offered, which allows you to decide which cookies to accept or refuse. You can also use your browser to remove unwanted cookies.
Depending on your printer, if you disable cookies, you also disable one or more of the following features:
- Using some setup wizards
- Remembering the EWS browser language setting
- Personalizing the EWS Home page
For information about how to change your privacy and cookie settings and how to view or delete cookies, see the documentation available with your Web browser.
The embedded web server cannot be opened
Check your network setup
- Make sure you are not using a phone cord or a crossover cable to connect the printer to the network.
- Make sure the network cable is securely connected to the printer.
- Make sure the network hub, switch, or router is turned on and working correctly.
Check the computer
Make sure the computer that you are using is connected to the same network as the printer.
Check your web browser
- Make sure the web browser meets the minimum system requirements. For information about system requirements, see Specifications on page 112.
- If your web browser uses any proxy settings to connect to the Internet, try turning off these settings. For more information, see the documentation available with your web browser.
- Make sure JavaScript and cookies are enabled in your web browser. For more information, see the documentation available with your web browser.
Update the printer
By default, if the printer is connected to a network and Web Services has been enabled, the printer automatically checks for updates.
To enable the printer to automatically check for updates
- When HP Web Services are enabled during printer setup, the printer will automatically be enrolled to check for updates.
- To turn auto-updates off, turn off Web Services first.
To update the printer using the embedded web server
- Open the EWS. For more information, see Open the embedded web server on page 34.
- Click the Tools tab.
- In the Printer Updates section, click Firmware Updates, and then follow the onscreen instructions.
NOTE: If prompted for a password, enter the PIN from the label on your printer. It might be near the cartridge access area inside the printer or on the back, side, or bottom of the printer.
NOTE: If prompted for proxy settings and if your network uses proxy settings, follow the onscreen instructions to set up a proxy server. If you do not have the details, contact your network administrator or the person who set up the network.
NOTE: If a printer update is available, the printer downloads and installs the update, and then restarts.
Solve problems using Web Services
If you are having problems using Web Services, such as HP ePrint, check the following:
- Make sure the printer is connected to the Internet using a wireless connection.
NOTE: You cannot use these web features if the printer is connected using a USB cable. - Make sure the latest product updates have been installed on the printer.
- Make sure Web Services is enabled on the printer. For more information, see Set up Web Services on page 75.
- Make sure the network hub, switch, or router is turned on and working correctly.
- If you are connecting the printer using a wireless connection, make sure the wireless network is functioning properly. For more information, see Network and connection issues on page 94.
- If you are using HP ePrint, check the following:
- Make sure the printer’s email address is correct.
- Make sure that the printer’s email address is the only address listed in the “To” line of the email message. If other email addresses are listed in the “To” line, the attachments you are sending might not print.
- Make sure you are sending documents that meet the HP ePrint requirements. For more information, visit the HP Smart website. This site might not be available in all countries/regions.
- If your network uses proxy settings when connecting to the Internet, make sure the proxy settings you are entering are valid:
- Check the settings being used by the web browser you are using (such as Internet Explorer, Firefox, or Safari).
- Check with the IT administrator or person who set up your firewall.
If the proxy settings used by your firewall have changed, you must update these settings in either the printer control panel or the embedded web server. If these settings are not updated, you will not be able to use Web Services.
For more information, see Set up Web Services on page 75.
TIP: For additional help on setting up and using Web Services, visit the HP Smart website. (might not be available in all countries/regions).
Technical information
The technical specifications and international regulatory information for the HP ENVY 6000 All-in-One series are provided in this section. For additional specifications, see the printed documentation that came with the HP ENVY 6000 All-in-One series. This section contains the following topics:
- HP Company notices
- Specifications
- Regulatory notices
- Environmental product stewardship program
HP Company notices
The information contained herein is subject to change without notice. All rights reserved. Reproduction, adaptation, or translation of this material is prohibited without prior written permission of HP, except as allowed under the copyright laws. The only warranties for HP products and services are set forth in the express warranty statements accompanying such products and services. Nothing herein should be construed as constituting an additional warranty. HP shall not be liable for technical or editorial errors or omissions contained herein. © Copyright 2020 HP Development Company, L.P. Microsoft and Windows are either registered trademarks or trademarks of Microsoft Corporation in the United States and/or other countries. Bluetooth is a trademark owned by its proprietor and used by HP Inc. under license.
Specifications
The information here is subject to change without notice. For more product specifications, see the Product Data Sheet at www.support.hp.com.
System requirements
For information about software and system requirements or future operating system releases and support, visit the HP online support website at www.support.hp.com.
Environmental specifications
- Recommended operating temperature range: 15°C to 30°C (59°F to 86°F)
- Allowable operating temperature range: 5°C to 40°C (41°F to 104°F)
- Humidity: 25% to 75% RH non-condensing (recommended);
- Nonoperating (Storage) temperature range: –40°C to 60°C (–40°F to 140°F)
- In the presence of high electromagnetic fields, it is possible the output from the printer may be slightly distorted
paper tray capacity
- Plain paper sheets: Up to 80
- Envelopes: Up to 10
- Index cards: Up to 40
- Photo paper sheets: Up to 30
Output tray capacity
- Plain paper sheets: Up to 25
- Envelopes: Up to 5
- Photo paper sheets: Up to 10
Paper size
- For a complete list of supported media sizes, see the printer software.
Paperweights
- Plain Paper: 60 to 90 g/m² (16 to 32 lb bond)
- Envelopes: 75 to 90 g/m² (20 to 55 lb bond envelope)
- Cards: Up to 200 g/m² (110 lb index maximum)
- Photo Paper: Up to 300 g/m² (145 lb bond)
Print specifications
- Print speeds vary according to the complexity of the document
- Method: drop-on-demand thermal inkjet
- Language: PCL3 GUI
Print resolution
- For a list of supported print resolutions, visit the product support website at www.support.hp.com.
Scan specifications
- Optical Resolution: up to 1200 dpi
- Hardware Resolution: up to 1200 x 1200 dpi
- Enhanced Resolution: up to 1200 x 1200 dpi
- Bit depth: 24-bit color, 8-bit grayscale (256 levels of gray)
- Maximum scan size from glass: 215.9 x 297 mm (8.5 x 11.7 inches)
- Supported File Types: RAW, JPEG, PDF
- Twain Version: 1.9
Copy specifications
- Copy Resolution (black and color): up to 300 x 300 dpi
- Digital image processing
- The maximum number of copies varies by model.
- Copy speeds vary according to the complexity of the document and model.
Cartridge yield
- Visit www.hp.com/go/learnaboutsupplies for more information on estimated cartridge yields.
Acoustic information
- If you have Internet access, you can access acoustic information from the HP website.
Regulatory notices
The HP ENVY 6000 All-in-One series meets product requirements from regulatory agencies in your country/region.
This section contains the following topics:
- Regulatory model number
- FCC statement
- Notice to users in Korea
- VCCI (Class B) compliance statement for users in Japan
- Notice to users in Japan about the power cord
- Noise emission statement for Germany
- European Union Regulatory Notice
- Visual display workplaces statement for Germany
- Declaration of conformity
- Regulatory wireless statements
Regulatory model number
For regulatory identification purposes, your product is assigned a Regulatory Model Number. The Regulatory Model Number for your product is SNPRC-1807-01 and this number should not be confused with the marketing names or product numbers.
FCC statement
The United States Federal Communications Commission (in 47 CFR 15.105) has specified that the following notice be brought to the attention of users of this product.
This equipment has been tested and found to comply with the limits for a Class B digital device, pursuant to Part 15 of the FCC Rules. These limits are designed to provide reasonable protection against harmful interference in a residential installation. This equipment generates, uses, and can radiate radio frequency energy and, if not installed and used in accordance with the instructions, may cause harmful interference to radio communications. However, there is no guarantee that interference will not occur in a particular installation. If this equipment does cause harmful interference to radio or television reception, which can be determined by turning the equipment off and on, the user is encouraged to try to correct the interference by one or more of the following measures:
- Reorient or relocate the receiving antenna.
- Increase the separation between the equipment and the receiver.
- Connect the equipment to an outlet on a circuit different from that to which the receiver is connected.
- Consult the dealer or an experienced radio/TV technician for help.
For further information, contact: Manager of Corporate Product Regulations, HP Inc. 1501 Page Mill Road, Palo Alto, CA 94304, U.S.A.
Modifications (part 15.21)
The FCC requires the user to be notified that any changes or modifications made to this device that are not expressly approved by HP may void the user’s authority to operate the equipment.
This device complies with Part 15 of the FCC Rules. Operation is subject to the following two conditions: (1) this device may not cause harmful interference, and (2) this device must accept any interference received, including interference that may cause undesired operation.
FAQs About HP ENVY 6000 All-in-One series
What is the HP Envy 6000 All-in-One series?
The HP Envy 6000 All-in-One series is a line of printers that combine the features of a printer, scanner, copier, and fax machine into one device. It is designed for home and small office use and comes with features like wireless connectivity, mobile printing, automatic two-sided printing, and more.
What models are included in the HP Envy 6000 All-in-One series?
The HP Envy 6000 All-in-One series includes several models, including the HP Envy 6055, HP Envy Pro 6455, HP Envy Pro 6458, HP Envy 6075, and HP Envy 6078.
What is the maximum print resolution of the HP Envy 6000 All-in-One series?
The maximum print resolution of the HP Envy 6000 All-in-One series is up to 4800 x 1200 optimized dpi (color) and up to 1200 x 1200 rendered dpi (black).
What is the maximum scan resolution of the HP Envy 6000 All-in-One series?
The maximum scan resolution of the HP Envy 6000 All-in-One series is up to 1200 x 1200 dpi optical.
What paper sizes does the HP Envy 6000 All-in-One series support?
The HP Envy 6000 All-in-One series supports a wide range of paper sizes, including 3 x 5 in, 4 x 6 in, 5 x 7 in, 8 x 10 in, and 8.5 x 11 in (letter), as well as No. 10 envelopes.
What types of ink cartridges does the HP Envy 6000 All-in-One series use?
The HP Envy 6000 All-in-One series uses HP 67 and HP 67XL ink cartridges, which are available in black and tri-color (cyan, magenta, and yellow) options.
What mobile printing options does the HP Envy 6000 All-in-One series support?
The HP Envy 6000 All-in-One series supports mobile printing via the HP Smart app, Apple AirPrint, and Mopria Print Service.
What is the warranty on the HP Envy 6000 All-in-One series?
The HP Envy 6000 All-in-One series comes with a one-year limited hardware warranty, which includes 24/7 technical support by phone or online.
Pdf for HP ENVY 6000 All-in-One series User Manual
[embeddoc url=”https://manualsdock.com/wp-content/uploads/2023/07/HP-ENVY-6000-All-in-One-series-User-Manual.pdf” download=”all”]
For More Manuals Visit: ManualsDock

