![]()
Vizio Sound Bar

About Vizio
A publicly traded American firm called Vizio Inc. creates and markets televisions, sound bars, viewer data, and advertising. The business is headquartered in Irvine, California, and was established in 2002. Costa Mesa, California-based Vizio Inc.
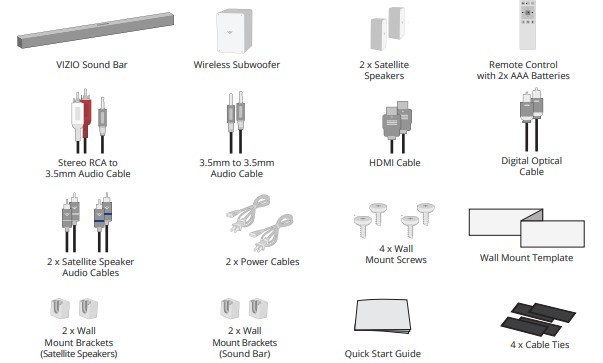
Package Contents
Remote Control
- Power – Press to turn the sound bar on or off.
- Input – Press to change the input source.
- Bluetooth – Press to enter Bluetooth input. (To enter force pair mode, press and hold for 5 seconds)
- Volume (+/-) – Press to increase and decrease volume levels.
- Enter/Play/Pause – Press to select an option. Press to play or pause.
- Previous – Press to return to the previous track. (Changes Subwoofer, Treble, and Bass levels)
- Next – Press to skip to the next track. (Changes Subwoofer, Treble, and Bass levels)
- TruVolume – Press to enable/disable TruVolume.
- TruSurround HD – Press to enable/disable TruSurround HD.
- Mute – Press to mute/unmute.
- Movie – Press to enable Movie preset EQ mode.
- Music – Press to enable Music preset EQ mode.
- SUB – Press to enter subwoofer level adjustment mode. (Use Previous/Next buttons to adjust levels)
- Bass – Press to enter bass level adjustment mode. (Use Previous/Next buttons to adjust levels)
- Treble – Press to enter treble level adjustment mode. (Use Previous/Next buttons to adjust levels)
Inserting and replacing batteries
Two AAA batteries are included for you to use with the basic remote control. To insert/replace the batteries:
- Remove the battery cover by gently sliding it away from the remote.
- Insert two AAA batteries (included). Be sure to align the + and – signs on the batteries and remote.
- Replace the battery cover.
WARNING: keep the remote control batteries away from children. It may cause choking and/or lead to a fire or chemical burn if mishandled. Do not dispose of batteries in fire. Replace only with batteries of the correct type.
When needed, VIZIO recommends replacing the batteries that came with this remote with two, new Duracell ‘AAA’ alkaline batteries.
Controls & Connections
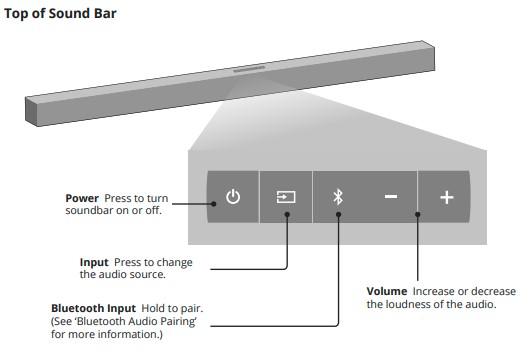
- Bluetooth Input – Hold to pair. (See Bluetooth Pairing for more information)
- Volume – Increase or decrease the loudness of the audio.
- Input – Press to change the audio source.
- Power – Press to turn the sound bar on or off.
Back of Sound Bar

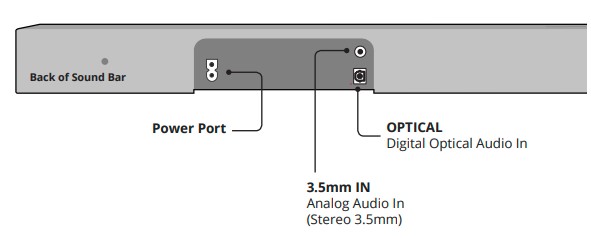
- DC IN – Power Port
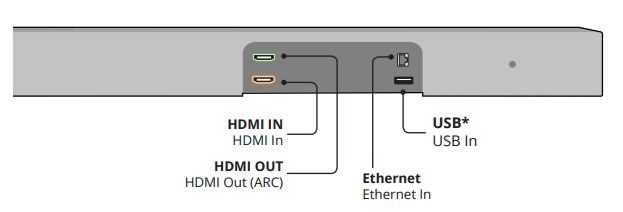
- USB – USB In
- Optical – Digital Optical Audio in
- Digital – Coaxial In
- AUX – Analog Audio In (Stereo RCA)
- AUX – Analog Audio In (Stereo 3.5mm)
First-Time Setup
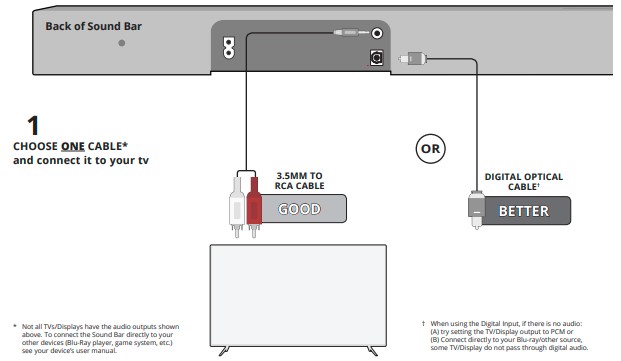
Note: Not all TVs have the audio outputs shown above. To connect the Sound Bar directly to your other devices (Blu-Ray player, game system, etc.) see your device’s user manual.
When using either of the Digital Inputs, if there is no audio: (A) try setting the TV output to PCM or (B) Connect directly to your Blu-ray/other source, some TVs do not pass through digital audio.
- Connect the power cable to the Subwoofer AC IN as shown. Plug the power cable into an electrical outlet. Flip the Power Switch into the On position.
- For the best surround sound experience, position the Sound Bar as shown. The Sound Bar should be close to ear level. The Subwoofer should be placed in a corner of the room.
- Turn your TV on, the Sound Bar will automatically turn on and begin searching for an active input.
The LED indicators on the front of the Sound Bar will begin cycling in pairs through inputs until an audio source is detected.* You can press the INPUT button to switch between audio sources.
For example, if you connected your TV to Input 1, set the Sound Bar to Input 1.
LED Indicators
Bluetooth Pairing
To pair the Sound Bar with a Bluetooth device:
- Press and hold the Bluetooth button on the Sound Bar or the Bluetooth button on the remote for five (5) seconds. When the Sound Bar is in Bluetooth Pairing Mode, the LED Indicators on the Display Panel on the front of the Sound Bar will light sequentially from bottom to top and back again. Once the device is paired, the LED Indicators will stop flashing.
- You can now search for the Sound Bar (VIZIO SB2821) using your Bluetooth device. For more information, refer to the user documentation that came with the device.
- Play audio from your Bluetooth device. Volume can be controlled on your source device and the Sound
Bar.
Using Bluetooth Mode
Your Sound Bar supports music streaming from smartphones, tablets, and computers with Bluetooth capability. Device compatibility will vary, see your device’s documentation for more information. Once you have paired your source device to the Sound Bar, as long as you stay within range of the Sound Bar, your device should remain paired, even if you change the input on the Sound Bar.
Maximizing Signal
A Bluetooth signal has a range of up to 30 feet. Keep in mind that Bluetooth is a compressed audio format, so streamed music may lose some integrity when compared to a wired connection.
Try the following if your sound quality is less than optimal:
- If you hear any break-up or disconnect while streaming music from your device, move the source device closer to the Sound Bar.
- Be sure that there are no solid obstructions in the line of sight between the Sound Bar and the source device.
- Other wireless devices can affect Bluetooth range, including wireless security cameras, wireless video baby monitors, cordless phones, and microwave ovens. Turning off or moving these devices may improve Bluetooth range.
Reconnecting the Subwoofer
The Subwoofer has already been paired with the Sound Bar by VIZIO. However, the Subwoofer may need to be re-linked to the Sound Bar if there is no sound coming from the Subwoofer.
What does pairing mean? Pairing means to wirelessly connect.
- First, confirm that the power switch is in the ON position. Press and hold the Pairing button on the back of the Subwoofer for 5 seconds. The LED on the back of the Subwoofer will begin to blink.
- Press and hold the Power button on the top of the Sound Bar for 5 Seconds. The LED indicators on the front will flash 3 times. The Subwoofer is now linked to the Sound Bar.
Using Button Combinations
There are 3 functions that are triggered by 3 different button combinations on the Sound Bar.
Wall-Mounting the Sound Bar
- Insert the two wall-mount screws into the wall-mount screw holes, and then tighten them with a Phillips screwdriver.
- Place the included wall mounting template against the wall under your TV. Mark the four bracket holes using a pencil.
- Be sure your screws are attached to wood studs, drywall anchors (for drywall), or concrete anchors
(for brick/concrete walls). Screws for attaching the brackets to the wall are not included. Choose the screw type and length appropriate to your home’s construction. If in doubt, consult a professional installer. - Questions about your Zylux Acoustic Corporation 28-inch Sound Bar 2.1 System? Post in the comments!
NEED HELP?
NGo to: support.vizio.com
Find help with:
- New product setup
- Connecting your devices
- Technical problems
- Product updates and more
HELP & TROUBLESHOOTING
There is no power.
- Press the POWER button on the remote control or on the top of your Sound Bar.
- Ensure the power cord is securely connected.
- Plug a different device into the electrical outlet to verify that the outlet is working correctly
There is no sound.
- Increase the volume. Press Volume Up on the remote control or on the top of your Sound Bar.
- Press MUTE on the remote to ensure the Sound Bar is not muted.
- Press INPUT on the remote or on the top of your Sound Bar to select a different input source.
- When using either of the Digital Inputs, if there is no audio: (A) Try setting the TV output to PCM
or (B) Connect directly to your Blu-ray/other source, some TVs do not pass through digital audio. - On digital inputs, the input LEDs will flash rapidly if an unsupported format is present. Set the
source to output PCM. - Your TV may be set to variable audio output. Confirm that the audio output setting is set to FIXED
or STANDARD, not VARIABLE. Consult your TV’s user manual for more detailed information. - If using Bluetooth, ensure that the volume on your source device is turned up and that the device
is not muted.
I hear buzzing or humming.
- Ensure all cables and wires are securely connected.
- Connect a different source device (TV, Blu-ray player, etc) to see if the buzzing persists. If it does not, the problem may be with the original device.
- Connect your device to a different input on the Sound Bar.
The remote isn’t working
- Replace the remote batteries with new ones.
- Point the remote directly at the center of the Sound Bar when pressing a button.
- If using a Bluetooth connection, some of the buttons on the remote may not be supported by the
streaming application. (e.g., Pandora doesn’t support the Back button.)
LIMITED WARRANT
UNITED STATES AND CANADA
BY USING YOUR VIZIO PRODUCT YOU AGREE TO BE BOUND BY ALL THE TERMS OF THIS WARRANTY. BEFORE USING YOUR VIZIO PRODUCT, PLEASE READ THIS WARRANTY CAREFULLY. IF YOU DO NOT AGREE TO THE TERMS OF THIS WARRANTY, DO NOT USE THE VIZIO PRODUCT AND, WITHIN THIRTY (30) DAYS OF THE DATE OF PURCHASE, RETURN IT FOR A REFUND TO THE AUTHORIZED RETAILER WHERE YOU PURCHASED IT.
This warranty contains a binding arbitration agreement and a class action waiver for United States residents. If you live in the United States, the binding arbitration agreement and class action waiver affect your rights under this warranty. Please read the text under the section titled “Binding Arbitration Agreement; Class Action Waiver (U.S. Residents Only)” carefully.
Specifications
| Sound Bar: | Forward Firing – Two 1.89” x 2.99” Full Range Driver for Each Channel (1 for left, 1 for right, 1 for center) Upward Firing – Two 1.89” x 2.99” Full Range Driver for Each Channel (1 for left, 1 for right) |
| Satellite Speakers: | Two 1.8″ Full Range Driver for Each |
| Subwoofer: | One 6″ Full Range Driver |
|
Connections: |
One 3.5mm Stereo Audio One Optical (Toslink)
One USB (Supports .WAV and .MP3 format only) HDMI In HDMI Out (Arc) Bluetooth 802.11 a/b/g/n/ac (Wireless) Ethernet (RJ45) |
| Power Output | DC 5V,500mA |
| Sound Pressure Level
(System): |
101 dB |
| Frequency Response
(System): |
40 Hz – 20 KHz |
| Voltage: | 120 VAC, 60 Hz |
| Compliances: | cTUVus / FCC Class B / ICES-003 /CEC / Energy star |
LEGAL & COMPLIANCE
FCC Class B Radio Interference Statement
NOTE: This equipment has been tested and found to comply with the limits for a Class B digital device, pursuant to Part 15 of the FCC Rules. These limits are designed to provide reasonable protection against harmful interference in a residential installation. This equipment generates, uses, and can radiate radio frequency energy, and if not installed and used in accordance with the instructions, may cause harmful interference to radio communications. However, there is no guarantee that interference will not occur in a particular installation. If this equipment does cause harmful interference to radio or television reception, which can be determined by turning the equipment off and on, the user is encouraged to try to correct the interference by one or more of the following measures:
- Reorient or relocate the receiving antenna.
- Increase the separation between the equipment and the receiver.
- Connect the equipment to an outlet on a circuit different from that to which the receiver is connected.
- Consult the dealer or an experienced radio/TV technician for help.
This device complies with Part 15 of the FCC Rules. Operation is subject to the following two conditions: This device may not cause harmful interference, and This device must accept any interference received, including interference that may cause undesired operation.
- The device for operation in the band 5150-5250 MHz is only for indoor use to reduce the potential for harmful interference to co-channel mobile satellite systems;
- The maximum antenna gain permitted for devices in the bands 5250-5350 MHz and 5470-5725 MHz shall comply with the e.i.r.p. limit; and
- The maximum antenna gain permitted for devices in the band 5725-5825 MHz shall comply with the e.i.r.p. limits specified for point-to-point and non-point-to-point
operation as appropriate. - Users should also be advised that high-power radars are allocated as primary users (i.e. priority users) of the bands 5250-5350 MHz and 5650-5850 MHz and that these radars could cause interference and/or damage to LE-LAN devices.
RF Exposure Information
This device meets the government’s requirements for exposure to radio waves. This device is designed and manufactured not to exceed the emission limits for exposure to radio frequency (RF) energy set by the Federal Communications Commission of the U.S. Government. This device complies with FCC radiation exposure limits set forth for an uncontrolled environment.
FAQs Vizio Sound Bar
What is a Vizio Sound Bar?
A Vizio Sound Bar is a type of audio device produced by Vizio, a well-known manufacturer of consumer electronics. It is designed to enhance the audio experience of TVs and other multimedia devices by providing improved sound quality, especially for dialogue, music, and special effects in movies, TV shows, and music.
How does a Vizio Sound Bar work?
A Vizio Sound Bar typically connects to your TV or multimedia device via various methods, such as HDMI, optical audio cable, or Bluetooth. Once connected, it takes the audio output from your TV or device and amplifies it through its built-in speakers, delivering a better and more immersive audio experience.
Can I use a Vizio Sound Bar with any TV brand?
Yes, in most cases, you can use a Vizio Sound Bar with any TV brand as long as the TV has the appropriate audio output or connectivity options that match those of the Sound Bar.
How do I control the Vizio Sound Bar?
Vizio Sound Bars usually come with a remote control, allowing you to adjust volume, change audio modes, and perform other functions. Some models also support HDMI-CEC, which enables you to control the Sound Bar using your TV remote.
What audio input options does a Vizio Sound Bar have?
The available audio input options can vary depending on the specific model of the Vizio Sound Bar, but common options include HDMI, optical audio input, 3.5mm auxiliary input, and Bluetooth.
Can I use a Vizio Sound Bar for music streaming?
Yes, many Vizio Sound Bars come with Bluetooth connectivity, allowing you to wirelessly stream music from your smartphone, tablet, or computer to the Sound Bar.
Are there different models of Vizio Sound Bars available?
Yes, Vizio offers various models of Sound Bars with different features and specifications. Some models may come with additional subwoofers or support for surround sound formats, while others focus on simplicity and space-saving design.
How do I mount a Vizio Sound Bar on the wall?
Vizio Sound Bars often come with mounting hardware and instructions for wall mounting. You’ll need a compatible wall bracket and tools to secure it properly. It’s essential to follow the manufacturer’s guidelines for safe and secure installation.
Can I use a Vizio Sound Bar without a TV?
Yes, you can use a Vizio Sound Bar without a TV. If it has Bluetooth connectivity or other input options like a 3.5mm auxiliary port, you can connect it to other devices like smartphones, tablets, or music players to enjoy better audio quality for your media.
What is a subwoofer, and does a Vizio Sound Bar come with one?
A subwoofer is a type of speaker that is dedicated to reproducing low-frequency sounds, commonly known as bass. Some Vizio Sound Bars come with a wireless subwoofer included in the package. The subwoofer enhances the overall audio experience by adding deep and powerful bass to the sound output.

