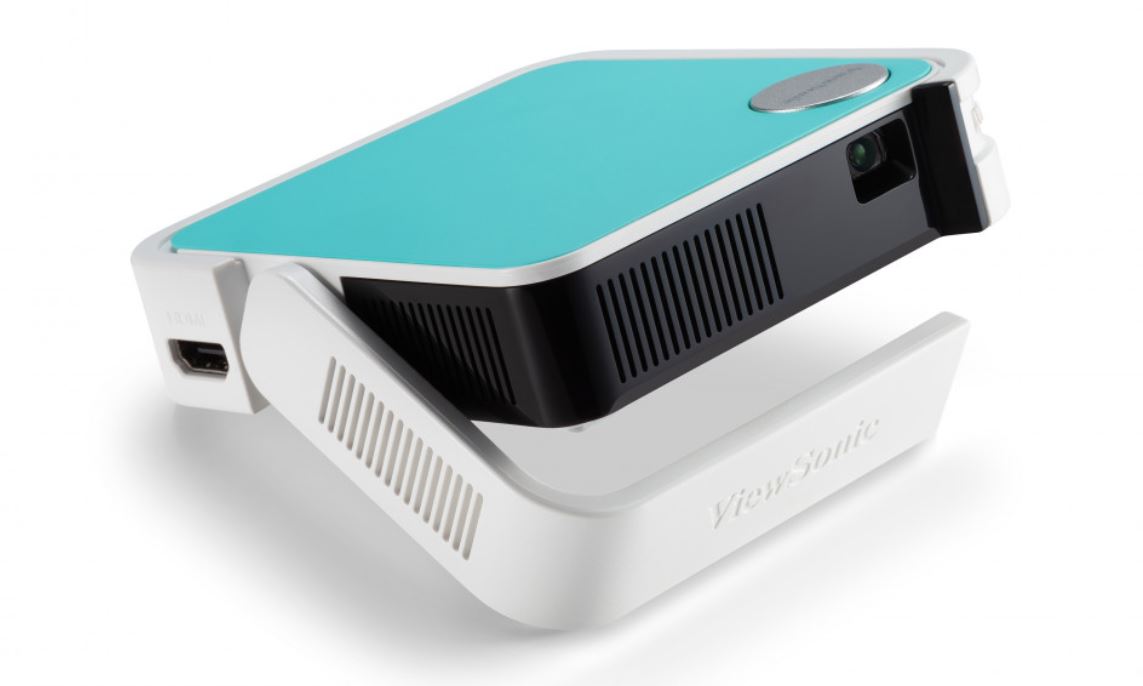
ViewSonic M1 Mini-Plus Ultra Portable LED Projector
About ViewSonic
ViewSonic is a global company that specializes in visual display solutions, including monitors, projectors, digital signage, and interactive displays. Founded in 1987, ViewSonic has established itself as a leading provider of innovative and high-quality display products for both consumer and professional markets.
The company offers a wide range of display solutions to cater to various needs and environments. Their product lineup includes computer monitors for gaming, business, and home entertainment purposes, interactive flat panel displays for education and collaboration, projectors for classrooms and conference rooms, and digital signage solutions for advertising and information displays.
Safety Precautions
Please read the following Safety Precautions before you start using the projector.
- Keep this user guide in a safe place for later reference.
- Read all warnings and follow all instructions.
- Allow at least 20“ (50 cm) clearance around the projector to ensure proper ventilation.
- Place the projector in a well-ventilated area. Do not place anything on the projector that prevents heat dissipation.
- Do not place the projector on an uneven or unstable surface. The projector may fall over, causing personal injury or projector malfunction.
- Do not use if the projector is tilted at an angle of more than 10° degrees left or right, nor at an angle of more than 15° degrees forwards or backward.
- Do not look straight at the projector lens during operation. The intense light beam may damage your eyes.
- Always open the lens shutter or remove the lens cap when the projector lamp is on.
- Do not block the projection lens with any objects when the projector is under operation as this could cause objects to become heated and deformed or even cause a fire.
- The lamp becomes extremely hot during operation. Allow the projector to cool for approximately 45 minutes prior to removing the lamp assembly for replacement.
- Do not use lamps beyond the rated lamp life. Excessive use of lamps beyond the rated life could cause them to break on rare occasions.
- Never replace the lamp assembly or any electronic component unless the projector is unplugged.
- Do not attempt to disassemble the projector. There are dangerous high voltages inside which may cause death if you should come into contact with live parts.
- When moving the projector, be careful not to drop or bump the projector on anything.
- Do not place any heavy objects on the projector or connection cables.
- Do not stand the projector on end vertically. Doing so may cause the projector to fall over, causing personal injury or projector malfunction.
- Avoid exposing the projector to direct sunlight or other sources of sustained heat. Do not install near any heat sources such as radiators, heat registers, stoves, or other devices (including amplifiers) that may increase the temperature of the projector to dangerous levels.
- Do not place liquids near or on the projector. Liquids spilled into the projector may cause it to fail. If the projector does become wet, disconnect it from the power supply and call your local service center to have the projector serviced.
- When the projector is in operation, you may sense some heated air and odor from its ventilation grill. It is a normal operation and not a defect.
- Do not attempt to circumvent the safety provisions of the polarized or grounding-type plug. A polarized plug has two blades one wider than the other. A grounding-type plug has two blades and a third grounding prong. The wide and third blades are provided for your safety. If the plug does not fit into your outlet, obtain an adapter and do not attempt to force the plug into the outlet.
- When connecting to a power outlet, DO NOT remove the grounding prong. Please ensure grounding prongs are NEVER REMOVED.
- Protect the power cord from being trodden upon or pinched, particularly at the plug, and at the point where it emerges from the projector.
- In some countries, the voltage is NOT stable. This projector is designed to operate safely within a voltage between 100 to 240 volts AC but could fail if power cuts or surges of ±10 volts occur. In areas where voltage may fluctuate or cut out, it is recommended that you connect your projector through a power stabilizer, surge protector, or uninterruptable power supply (UPS).
- If smoke, an abnormal noise, or a strange odor is present, immediately switch the projector off and call your dealer or ViewSonic®. It is dangerous to continue using the projector.
- Use only attachments/accessories specified by the manufacturer.
- Disconnect the power cord from the AC outlet if the projector is not being used for a long period of time.
- Refer all servicing to qualified service personnel.
Features
- Short-throw lens design allows for a projected 39” screen size from only 1 meter away.
- Auto V. keystone to correct a distorted image automatically.
- Excellent audio performance by JBL.
- Instant on/off and great colors.
- Swappable color top plates and flexible angle adjustment.
- Multi-language On-Screen Display (OSD) menus.
- Embedded battery for easy outdoor projection.
- User-friendly UI design for easy navigation.
- LED light source with excellent light source life (30,000 hours).
- Color modes for every occasion.
NOTE: The apparent brightness of the projected image will vary depending on the ambient lighting conditions, selected input signal contrast/brightness settings, and projection distance.
Package Contents
Product Overview
Projector
- In the event of a system crash, use the Reset Button to restart the projector.
Remote Control
Remote Control – Effective Range
To ensure the proper function of the remote control follow the steps below:
- The remote control must be held at an angle within 30° perpendicular to the projector’s IR remote control sensor(s).

- The distance between the remote control and the sensor(s) should not exceed 8 m (26 ft.) NOTE: Refer to the illustration for the location of the infrared (IR) remote control sensor(s).
Remote Control – Replacing the Batteries
- Place the remote control face down and remove the battery tray from the bottom of the remote control by pressing the side tab and pulling it out.
- Remove any existing battery (if necessary) and install one CR2032 battery. NOTE: Observe the battery’s polarities as indicated.
- Replace the battery tray by aligning it with the base and pushing it back into position.

- Avoid leaving the remote control and batteries in excessive heat or a humid environment.
- Replace only with the same or equivalent type recommended by the battery manufacturer.
- If the battery is drained or if you will not be using the remote control for an extended period of time, remove the battery to avoid damage to the remote control.
- Dispose of used batteries according to the manufacturer’s instructions and local environmental regulations for your region.
Initial Setup
This section provides detailed instructions for the initial setup of your projector.
Choosing a Location – Projection Orientation
Personal preference and room layout will decide the installation location. Consider the following:
- Size and position of your screen.
- Location of a suitable power outlet.
- Location and distance between the projector and other equipment.
The projector is designed to be installed in one of the following locations: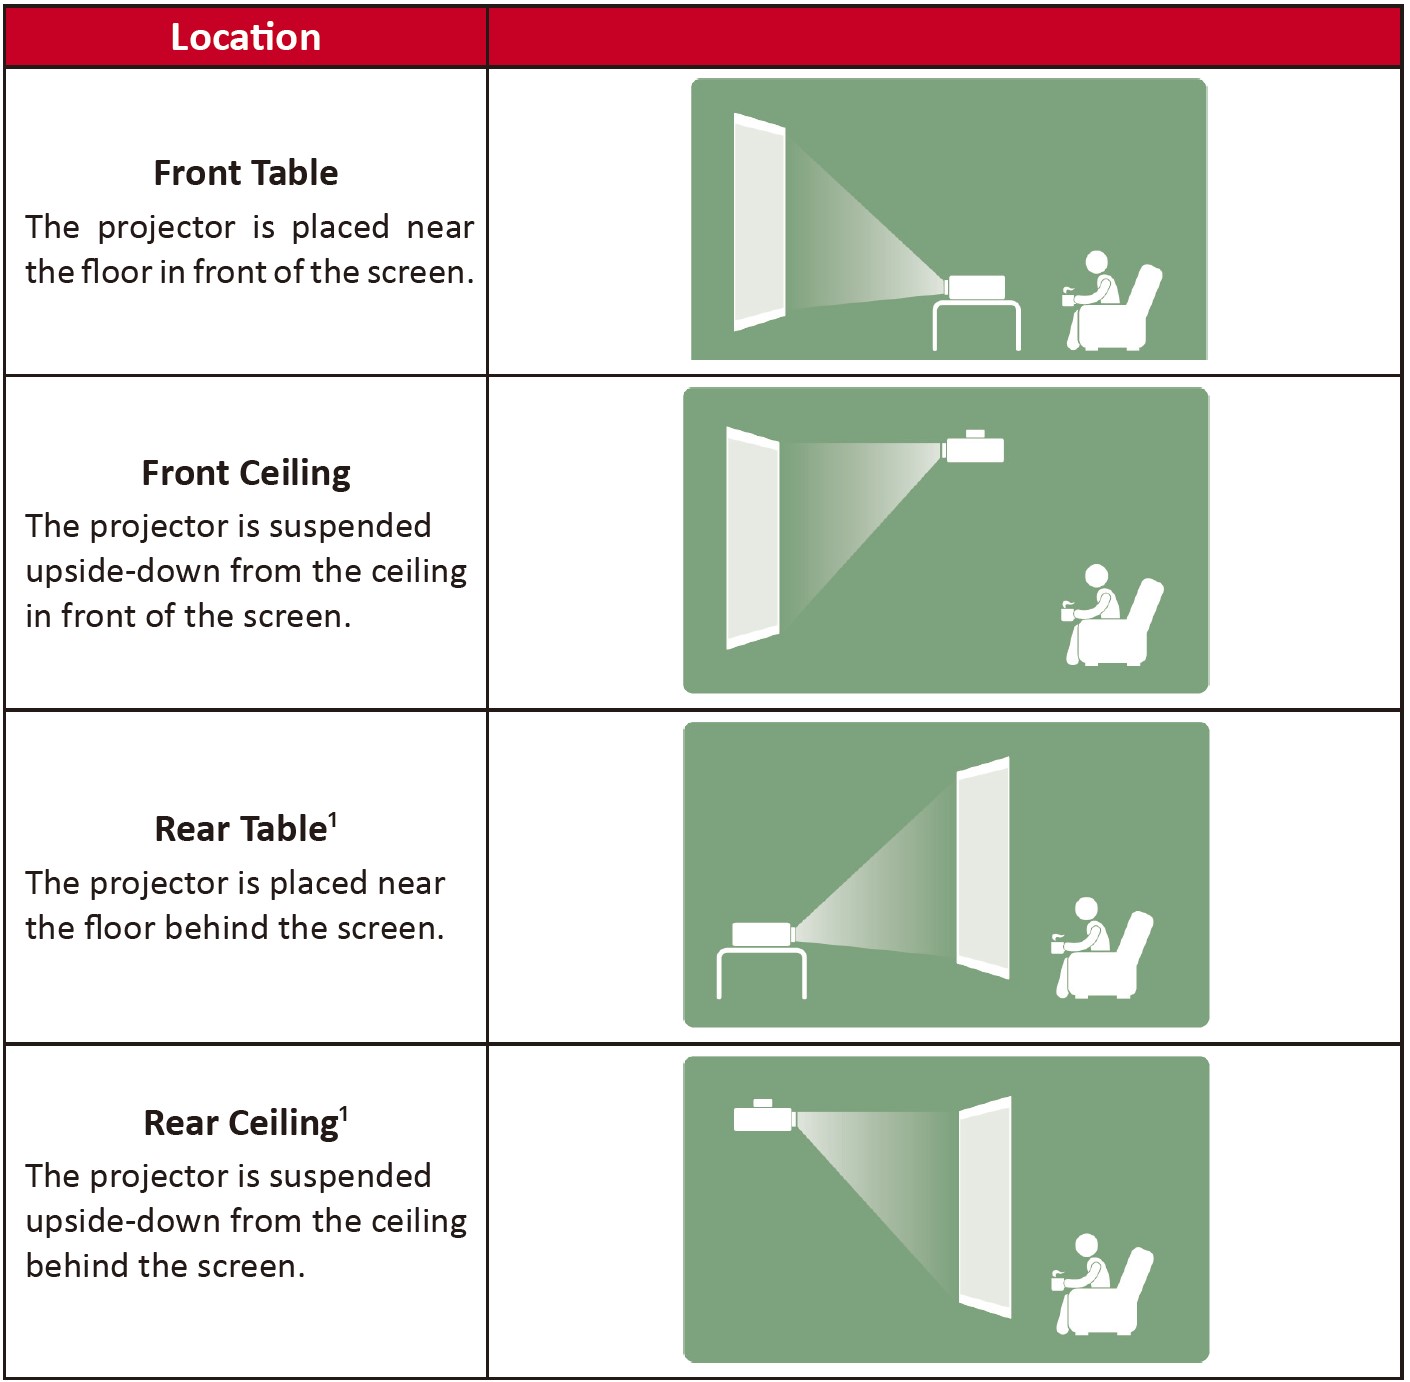
Projection Dimensions
- 16:9 Image on a 16:9 Screen

16:9 image on a 16:9 Screen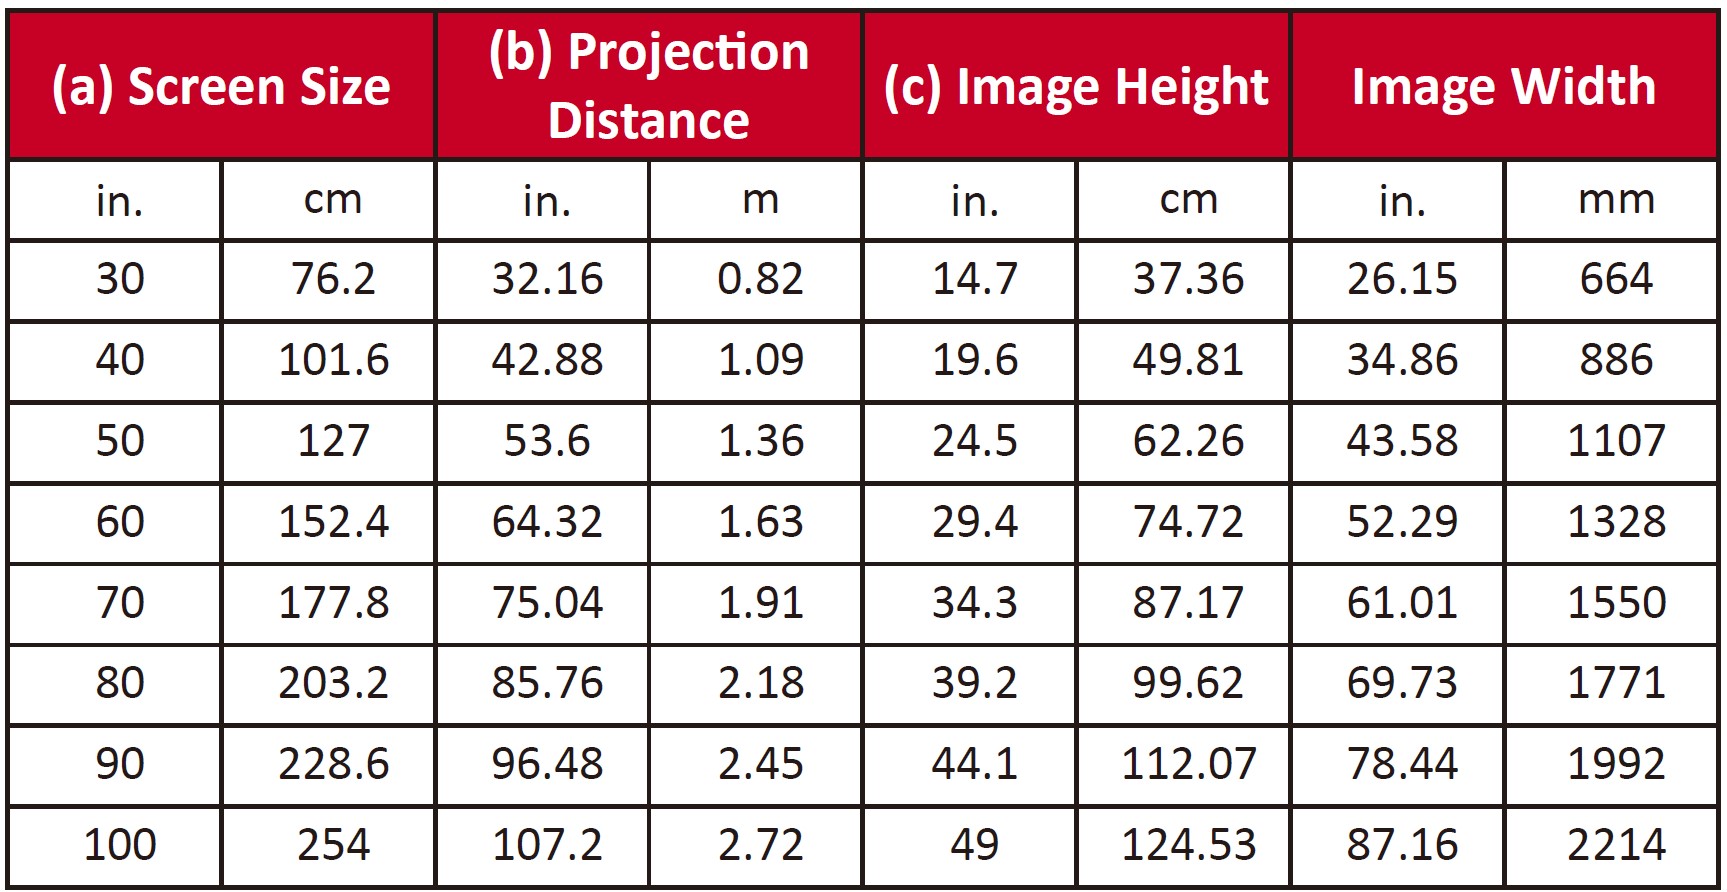
NOTE: There is a 3% tolerance among these numbers due to optical component variations. It is recommended to physically test the projection size and distance before permanently installing the projector.
Top Plate Removal/Installation
The M1 mini comes with different color top plates.
To change the top plate: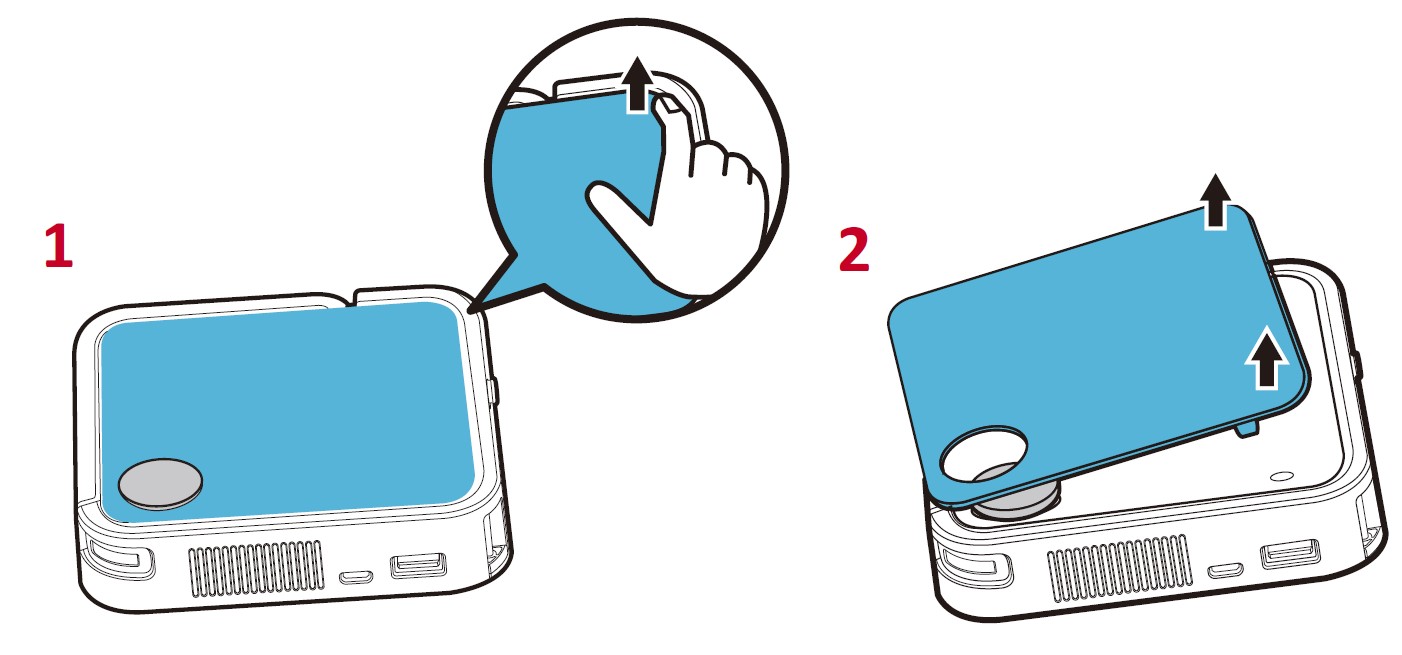
- Remove the top plate by carefully prying up one corner and lifting the top plate off (as shown above).
- To install a top plate, line up the circular holes and prongs located under the top plate with the spacing and holes of the projector. Gently press the top plate into place.
Specifications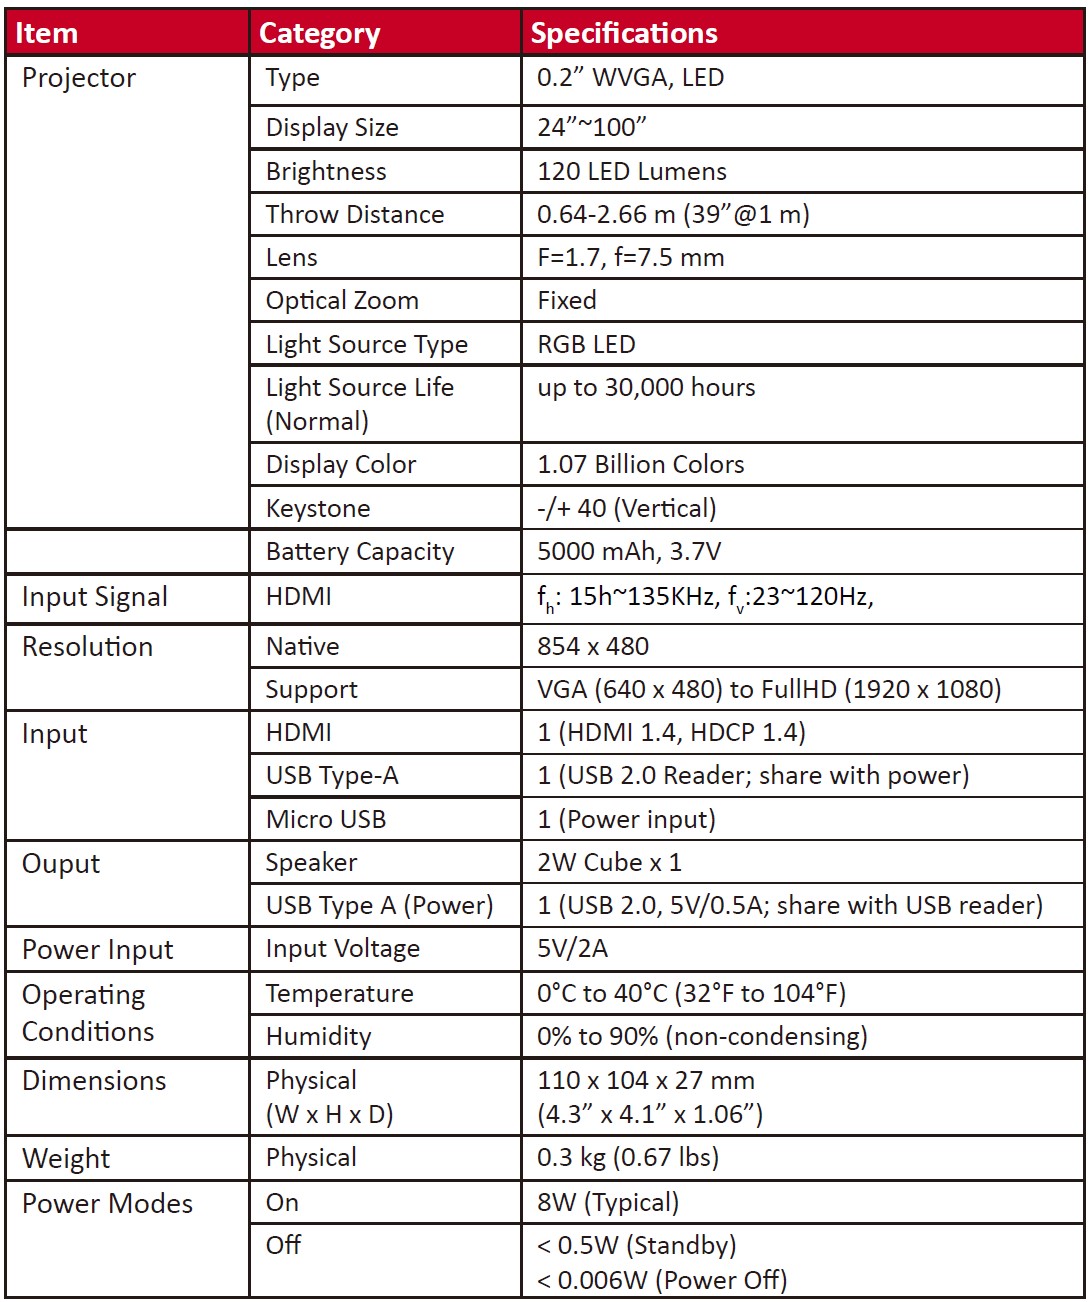
Projector Dimensions
110 mm (W) x 104 mm (H) x 27 mm(D)
Timing Chart
HDMI Video Timing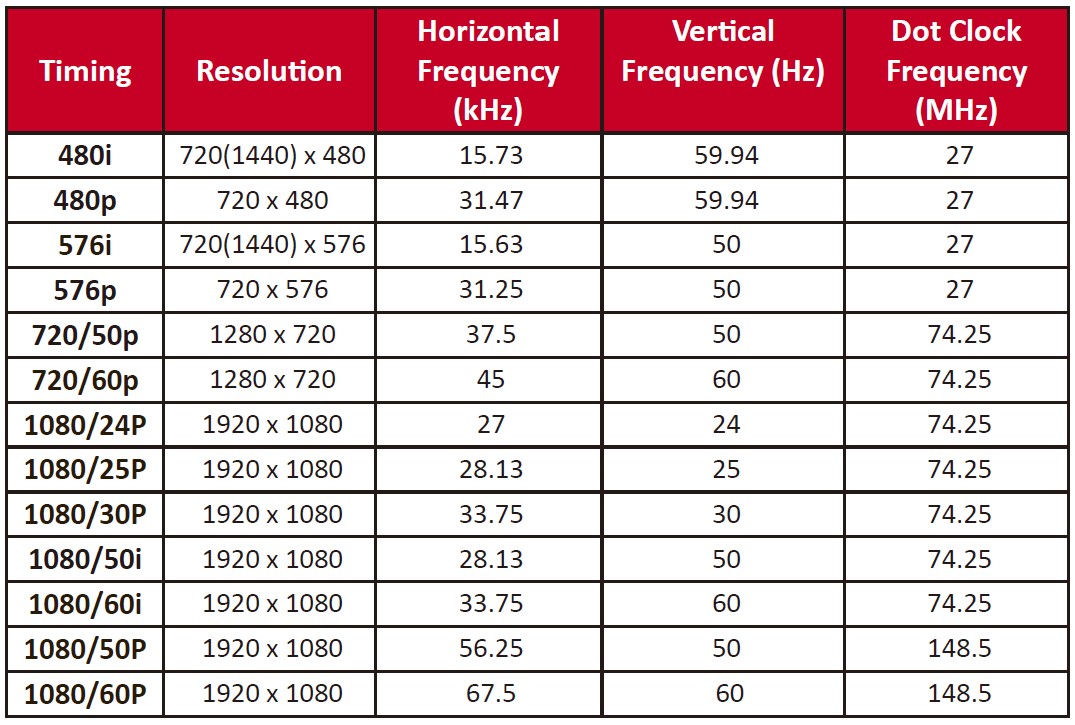
HDMI Support PC Timing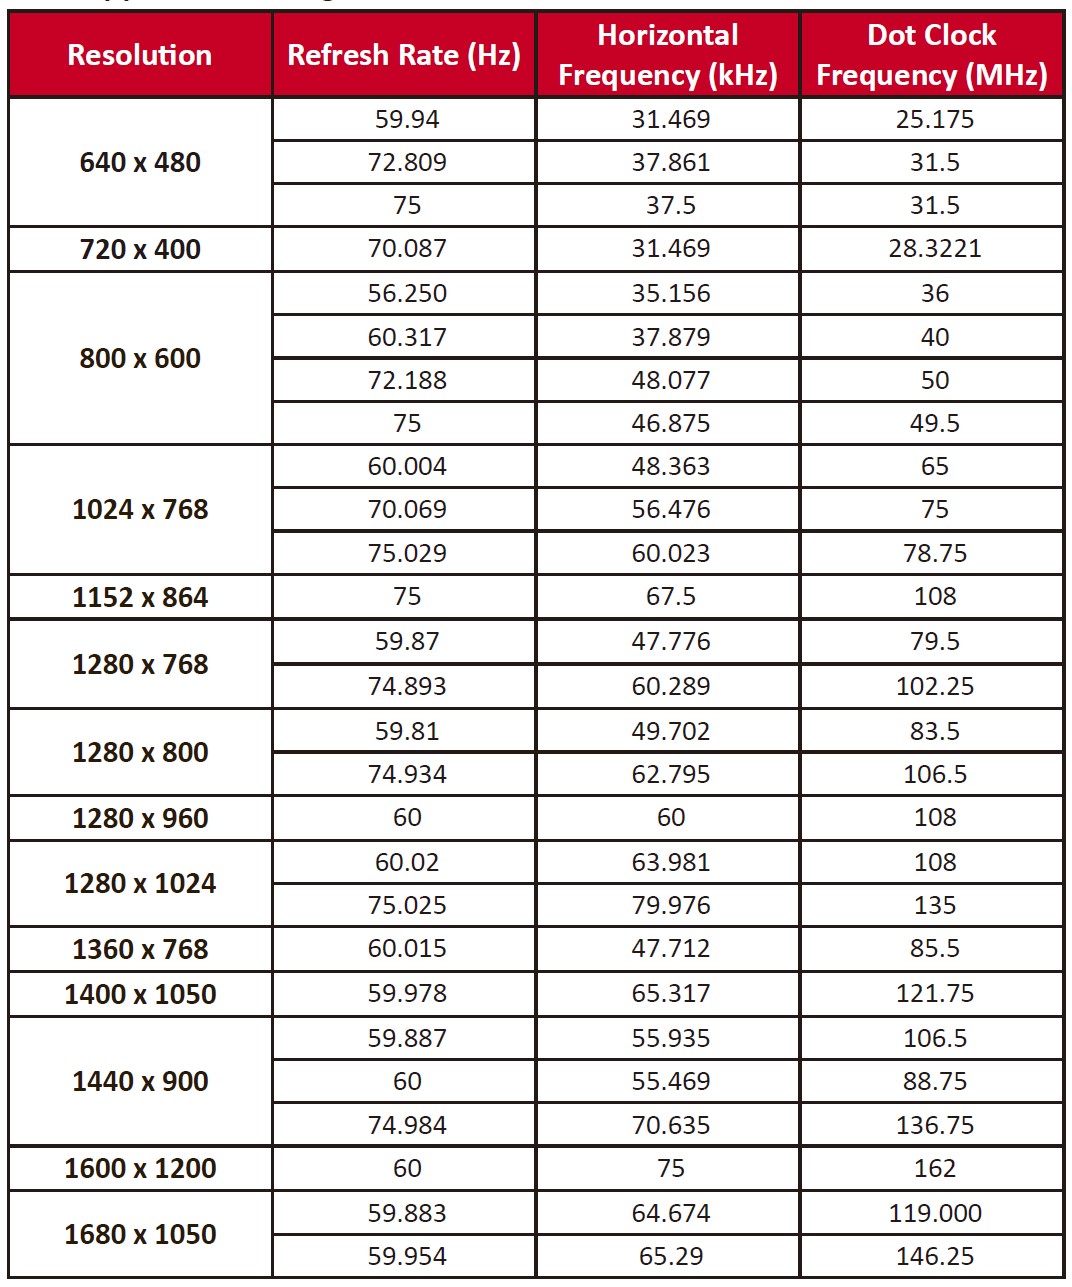
Troubleshooting
This section describes some common problems that you may experience when using the projector.

1 The battery may need to be charged for two (2) hours (5V/2A) first if the device has not been used for a long time.
Maintenance
General Precautions
- Make sure the projector is turned off and the power cable is unplugged from the power outlet.
- Never remove any parts from the projector. Contact ViewSonic® or a reseller when any part of the projector needs replacing.
- Never spray or pour any liquid directly onto the case.
- Handle the projector with care, as a darker-colored projector, if scuffed, may show marks more clearly than a lighter-colored projector.
Cleaning the Lens
- Use a canister of compressed air to remove dust.
- If the lens is still not clean, use lens-cleaning paper or moisten a soft cloth with lens cleaner and gently wipe the surface.
CAUTION: Never rub the lens with abrasive materials.
Cleaning the Case
- Use a soft, lint-free, dry cloth to remove dirt or dust.
- If the case is still not clean, apply a small amount of non-ammonia, non-alcohol-based, mild non-abrasive detergent onto a clean, soft, lint-free cloth, then wipe the surface.
CAUTION: Never use wax, alcohol, benzene, thinner, or other chemical detergents.
Storing the Projector
If you intend to store the projector for an extended period of time:
- Ensure the temperature and humidity of the storage area are within the recommended range.
- Retract the adjuster foot completely.
- Remove the batteries from the remote control.
- Pack the projector in its original packaging or equivalent.
Disclaimer
- ViewSonic® does not recommend the use of any ammonia or alcohol-based cleaners on the lens or case. Some chemical cleaners have been reported to damage the lens and/or case of the projector.
- ViewSonic® will not be liable for damage resulting from the use of any ammonia or alcohol-based cleaners.
FAQS About ViewSonic M1 Mini-Plus Ultra Portable LED Projector
The ViewSonic M1 Plus can throw how far?
2.6 metres
The ViewSonic M1 Plus is intelligent.
A smart pocket theater that provides convenient audiovisual pleasure anywhere is the ViewSonic M1 tiny Plus.
What is the M1 mini plus’s resolution?
For effectiveness and quality, the M1 mini Plus downconverts a 1080p input to a native 854×480 resolution.
What is the M1 tiny projector’s resolution?
The ViewSonic M1 Mini is composed of a 0.20-inch DLP chip with a native resolution of 854 × 480 (FWVGA) and an LED light source with a 30,000-hour lifespan.
How long does the ViewSonic M1 Plus battery last?
1 to 1.5 hours
Are speakers included with the ViewSonic projector?
Bluetooth speakers from Harman Kardon in pairs
Who or what is ViewSonic?
A privately held international electronics corporation with Taiwanese and American roots is called ViewSonic Corporation.
A M1 mini has how many monitors.
TWO screens
What is the Viewsonic M1 mini’s aspect ratio?
16:9
Has the ViewSonic M1 Mini Bluetooth capability?
Bluetooth-enabled JBL speaker built-in
For more manuals by ViewSonic, Visit Manualsdock
[embeddoc url=”https://manualsdock.com/wp-content/uploads/2023/09/ViewSonic-M1-Mini-Plus-Ultra-Portable-LED-Projector-User-Guide.pdf” download=”all”]

