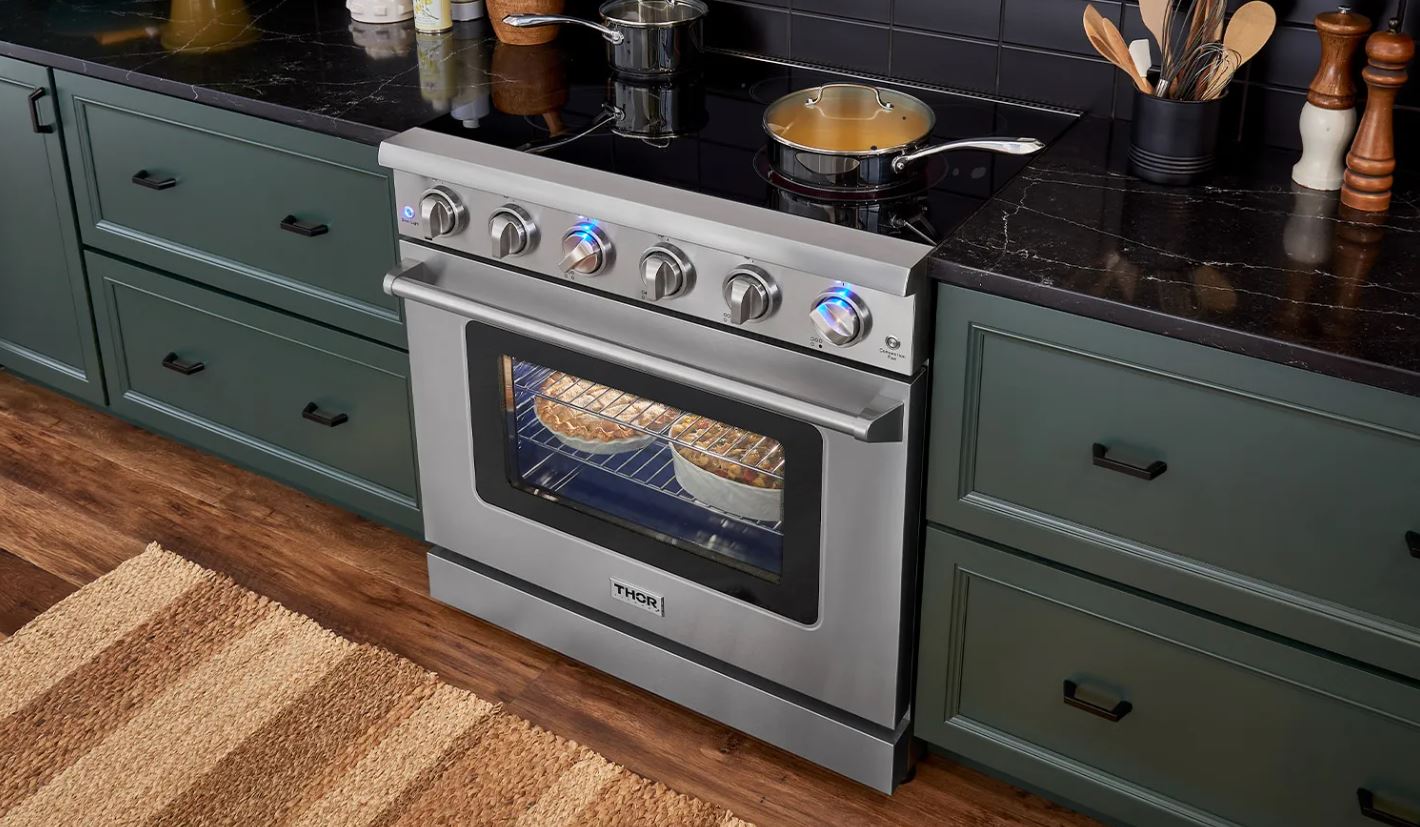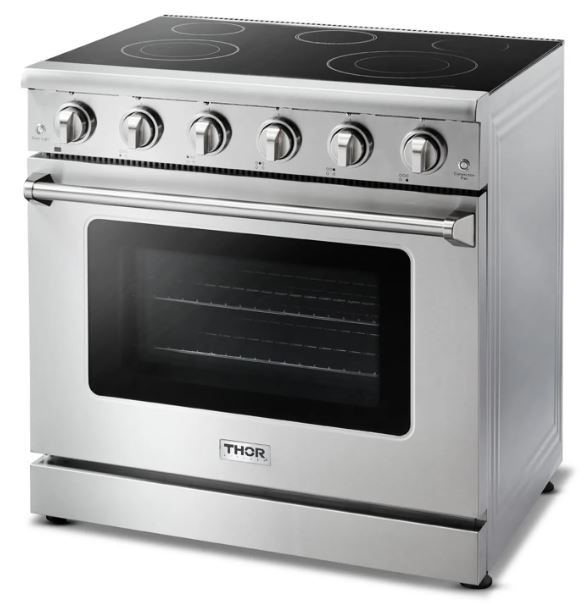
Thor Kitchen HRE3601 professional electric range
About Thor Kitchen
Thor Kitchen Offers state-of-the-art electric appliances, including ranges, ovens, and cooktops, combining technology and style for a superior cooking experience.
Before you begin
READ THESE INSTRUCTIONS COMPLETELY AND CAREFULLY.
Important note to the installer
- Read all instructions contained in these installation instructions before installing the range.
- Remove all packing materials from the oven compartments before connecting the electric supply to the range.
- Observe all governing codes and ordinances.
- Be sure to leave these instructions with the consumer.
- Installation of this appliance requires basic mechanical skills.
- Proper installation is the responsibility of the installer.
- Product failure due to improper installation is not covered under the Warranty.
WARNING
To reduce the risk of tipping the range, the range must be secured by a properly installed Anti-Tip device. AFTER THE RANGE HAS BEEN INSTALLED, CONFIRM THAT THE ANTI-TIP DEVICE HAS BEEN PROPERLY INSTALLED AND VERIFY THAT THE ANTITIP DEVICE IS PROPERLY ENGAGED.
- If the anti-tip device is not installed, a child or adult can tip the range and be killed.
- Verify that the anti-tip device has been properly installed and engaged at the rear right (or rear left) of the range bottom.
- If you move the range and then move it back into place, ensure the anti-tip device is re-engaged at the right or left rear of the range bottom.
- Do not operate the range without the anti-tip device in place and engaged.
Important note to the consumer
- Keep these instructions with your user manual for future reference.
- When using any appliance generating heat, there are certain safety precautions you should follow.
- Be sure your range is installed and grounded properly by a qualified installer or service technician.
- Make sure the wall coverings around the range withstand the heat generated by the range.
- Cabinet storage space above the surface burners should be a minimum of 30 in.
Important note to the servicer
- The electrical diagram is attached to the back of the range.
Warning
- Do not step, lean, or sit on the doors of the range. You can cause the range to tip, resulting in burns or serious injuries.
- Confirm that the Anti-Tip device is installed properly. Then, to verify that the Anti-Tip device is engaged, grasp the top rear edge of the range and carefully attempt to tilt it forward. The Anti-Tip device should prevent the range from tilting forward more than a few inches.
- If you pull the range out from the wall for any reason, make sure the anti-tip device is properly engaged when you push the range back against the wall. If it is not, there is a risk of the range tipping over and causing injury if you or a child stand, sit, or lean on the open door.
- Never completely remove the leveling legs. If you remove the leveling legs, the range will not be secured to the anti-tip device properly.
CALIFORNIAPROPOSITION65 WARNING
- Cancer and Reproductive Harm-www.P65Warnings.ca.gov.
Important safety instructions
Read and follow all instructions before using your oven to prevent the risk of fire, electric shock, personal injury, or damage when using the range. This guide does not cover all possible conditions that may occur. Always contact your service agent or manufacturer about problems that you do not understand.
WHAT NEED TO KNOW ABOUT INSTRUCTIONS
- Warnings and Important Safety Instructions in this manual do not cover all possible conditions and situations that may occur.
- It is your responsibility to use common sense, caution, and care when installing, maintaining, and operating your oven.
Important safety symbols and precautions What the icons and signs in this user manual mean:
WARNING
- Hazards or unsafe practices that may result in severe personal injury or death.
CAUTION
- Hazards or unsafe practices that may result in minor personal injury or property damage.
CAUTION
- To reduce the risk of fire, explosion, electric shock, or personal injury when using your oven, follow these basic safety precautions.
- Do NOT attempt.
- Do NOT disassemble.
- Do NOT touch.
- Follow directions explicitly.
- Unplug the power plug from the wall socket.
- Make sure the machine is grounded to prevent electric shock.
- Call the service center for help.
Note
These warning signs are here to prevent injury to you and others. Please follow them explicitly. After reading this section, keep it in a safe place for future reference.
FOR YOUR SAFETY
When using electrical appliances, you should follow basic safety precautions, including the following:
CAUTION
- Use this appliance only for its intended purpose as described in this Owner’s Manual.
- Potentially hot surfaces include the cooktop, areas facing the cooktop, oven vent opening, surfaces near the opening, and crevices around the oven door.
- Do not enter the oven.
- Do not store items of interest to children in cabinets above a range or on the back guard of a range. Children climbing on the range to reach items could be seriously injured
- Do not leave children alone. Never leave children alone or unattended in an area where this appliance is in use. They should never be allowed to sit or stand on any part of the appliance.
- Never use your appliance for warming or heating the room.
- Do not use water on grease fires. Turn off the oven to avoid spreading the flames. Smother the fire or flames by closing the door or using a dry chemical, baking soda, or foam-type extinguisher.
- Avoid scratching or impacting glass doors, cooktops, or control panels. Doing so may lead to glass breakage. Do not cook on a product with broken glass. Shock, fire, or cuts may occur.
- Do not lean on the range as you may turn the control knobs inattentively.
Important safety instructions
- Storage in or on the appliance. Do not store flammable materials in the oven or near the surface units. Be sure all packing materials are removed from the appliance before operating it.
- Keep plastics, clothes, and paper away from parts of the appliance that may become hot.
- Wear proper apparel. Never wear loose-fitting or hanging garments while using the appliance.
- Use only dry potholders. Placing moist or damp potholders on hot surfaces may result in burns from steam. Do not let the potholder touch hot heating elements. Do not use a towel or other bulky cloth.
- Teach children not to play with the controls or any other part of the range.
- For your safety, do not use high-pressure water cleaners or steam jet cleaners.
- The appliance is not intended for use by persons (including children) with reduced physical, sensory, or mental capabilities, or lack of experience and knowledge unless they have been given supervision or instruction concerning the use of the appliance by a person responsible for their safety.
SURFACE COOKING UNITS
- Never leave surface units unattended at high heat settings. Boilovers cause smoking and greasy spillovers that may ignite.
- Protective Liners – Do not use aluminum foil to line surface unit drip bowls or oven bottoms, except as suggested in the manual. Improper installation of these liners may result in a risk of electric shock or fire.
- To avoid oil spillover and fire, use a minimum amount of oil when shallow pan-frying and avoid cooking frozen foods with excessive amounts of ice.
- Do not operate the cooktop without cookware. If the cooktop operates without cookware, the control knobs will become hot.
- Never use the glass cooktop surface as a cutting board.
- Use care when touching the cooktop. The glass surface of the cooktop will retain heat after the controls have been turned off.
- Be careful when placing spoons or other stirring utensils on the glass cooktop surface when it is in use. They may become hot and could cause burns.
- Use proper pan sizes. This appliance is equipped with surface units of different sizes. Select pots and pans that have flat bottoms large enough to cover the surface area of the heating element. Using undersized cookware will expose a portion of the heating element to direct contact and may result in the ignition of clothing. Matching the size of the pot or pan to the burner will also improve efficiency.
- Utensil Handles Should Be Turned Inward and Not Extend Over Adjacent Surface Units.
- To reduce the risk of burns, ignition of flammable materials, or spillage due to unintentional contact with utensils, position utensil handles so that they are turned inward and do not extend over adjacent surface units.
- Glazed cooking utensils. Only certain types of glass, glass/ ceramic, ceramic, earthenware, or other glazed cookware can be used for range-top service without breaking due to sudden temperature changes.
- Be sure you know which control knob operates each surface unit. Make sure you turn on the correct surface unit.
- Always turn the surface units off before removing cookware.
- When preparing flaming foods under the hood, turn the fan on.
- Keep an eye on foods being fried at high or medium-high heat settings.
- Do not store heavy items above the cooktop surface that could fall and damage it.
ELECTRICAL SAFETY
- Proper Installation – Be sure your appliance is properly installed and grounded by a qualified technician.
- Flush-mounted appliances may be operated only after they have been installed in cabinets and workplaces that conform to the relevant standards. This ensures that the appliances are installed in compliance with the appropriate safety standards.
- If your appliance malfunctions or if fractures, cracks, or splits appear:
- – switch off all cooking zones
- – unplug the range from the AC wall outlet
- – contact your local service center.
WARNING
- If the surface is cracked, switch off and unplug the appliance to avoid the possibility of electrical shock. Do not use your cooktop until the glass surface has been replaced.
WARNING
- Ensure that the appliance is switched off before replacing the lamp to avoid the possibility of electric shock.
- The range should not be placed on a base.
CHILD SAFETY
WARNING
- This appliance is not intended for use by young children or infirm persons without the adequate supervision of a responsible adult.
- Young children should be supervised to ensure that they do not play with the appliance.
- Keep children away from the door when opening or closing it as they may bump themselves on the door or catch their fingers in the door.
- The cooking zones will become hot when you cook. To keep small children from being burned, always keep them away from the appliance while you are cooking.
OVEN
- DO NOT TOUCH THE HEATING ELEMENTS OR INTERIOR SURFACES OF THE OVEN. Heating elements may be hot even though they are dark in color. The interior surfaces of an oven become hot enough to cause burns. During and after use, do not touch or let clothing or other flammable materials contact the heating elements or interior surfaces of the oven until they have had sufficient time to cool. Other surfaces of the appliance may become hot enough to cause burns. Among these surfaces are oven vent openings and surfaces near these openings, the oven door, and the window of the oven door.
- Do not heat unopened food containers. The build-up of pressure may cause the container to burst and result in injury.
- Do not use the oven to dry newspapers. If overheated, newspapers can catch on fire.
- Do not use the oven for a storage area. Items stored in an oven can ignite.
- Use care when opening the door. Let hot air or steam escape before you remove food from or put food into the oven.
- Protective liners. Do not use aluminum foil to line the oven bottoms, except as suggested in the manual. Improper installation of these liners may result in a risk of electric shock or fire.
- Keep oven vent ducts unobstructed. The oven vent is located above the right rear surface unit. This area could become hot during oven use. Never block this vent or place plastic or heat-sensitive items on it.
- Placement of oven racks. Always place oven racks in the desired location while the oven is cool. If the rack must be moved while the oven is hot, use potholders.
- Do not let the potholders come in contact with the hot heating element in the oven.
- Do not allow aluminum foil or a meat probe to contact the heating elements.
- During use, the appliance becomes hot. Care should be taken to avoid touching heating elements inside the oven.
- Do not use harsh abrasive cleaners or sharp metal scrapers to clean the oven door glass. They can scratch the surface which may result in the glass shattering.
CAUTION
- Do not attempt to operate the oven during a power failure. If the power fails, always turn the oven off. If the oven is not turned off and the power returns, the oven may begin to operate again. Food left unattended could catch fire or spoil.
VENTILATING HOOD
- Clean ventilating hoods frequently. Do not let grease accumulate on the hood or filter.
- When flaming foods under the hood, turn the fan on.
GLASS/CERAMIC COOKING SURFACES
- DO NOT TOUCH SURFACE UNITS OR AREAS NEAR UNITS. Surface units may be hot even though they are dark in color. Areas near surface units may become hot enough to cause burns. During and after use, do not touch, or let clothing or other flammable materials contact the surface units or areas near the units until they have had sufficient time to cool. Among these areas are the cooktop and the facing of the cooktop.
- Do not cook on a broken cooktop. If the cooktop breaks, cleaning solutions, and spillovers may penetrate the broken cooktop and create a risk of electric shock. Contact a qualified technician immediately.
CRITICAL INSTALLATION WARNINGS
- This appliance must be installed by a qualified technician or service company.
- – Failing to have a qualified technician install the range may result in electric shock, fire, an explosion, problems with the product, or injury.
- Unpack the oven, remove all packaging material, and examine the oven for any damage such as dents on the interior or exterior of the oven, broken door latches, cracks in the door, or a door that is not lined up correctly. If there is any damage, do not operate the oven and notify your dealer immediately.
- Plug the power cord into a properly grounded outlet with the proper configuration. Your oven should be the only item connected to this circuit.
- Keep all packaging materials out of the reach of children. Children may use them for play and injure themselves.
- Install your appliance on a level and hard floor that can support its weight.
- – Failing to do so may result in abnormal vibrations, noise, or problems with the product.
- This appliance must be properly grounded.
- Do not ground the appliance to a gas pipe, plastic water pipe, or telephone line.
- – This may result in electric shock, fire, an explosion, or problems with the product
- Do not cut or remove the ground prong from the power cord under any circumstances.
- Connect the oven to a circuit that provides the correct amperage.
- Do not install this appliance in a humid, oily, or dusty location, or a location exposed to direct sunlight or water (raindrops).
- – This may result in electric shock or fire.
- Do not use a damaged power cord or loose wall socket.
- – This may result in electric shock or fire.
- Do not pull or excessively bend the power cord.
- Do not twist or tie the power cord.
- Do not hook the power cord over a metal object, place a heavy object on the power cord, or insert the power cord between objects.
– This may result in electric shock or fire. If the power cord is damaged, contact your nearest service center.
- Do not stand on top of the appliance or place objects (such as laundry, oven cover, lighted candles, lighted cigarettes, dishes, chemicals, metal objects, etc.) on the appliance.
- Items, such as a cloth, may get caught in the door.
- This may result in electric shock, fire, problems with the product, or injury.
- Do not operate the appliance with wet hands. – This may result in electric shock.
- Do not spray volatile substances such as insecticide onto the surface of the appliance.
- – As well as being harmful to humans, it may also result in electric shock, fire, or problems with the product.
- Do not put your face or body close to the appliance while cooking or when opening the door just after cooking.
- Take care that children do not come too close to the appliance.
- Failing to do so may result in children burning themselves.
- Do not place food or heavy objects over the edge of the oven door.
- – If you open the door, the food or object may fall and this may result in burns or injury.
CAUTION
- If the surface is cracked, turn the appliance off. – Failing to do so may result in electric shock.
- Dishes and containers can become hot. Handle with care.
- Hot foods and steam can cause burns. Carefully remove container coverings, directing the steam away from your hands and face.
- Remove lids from baby food jars before heating. After heating baby food, stir well to distribute the heat evenly. Always test the temperature by tasting before feeding the baby. The glass jar or the surface of the food may appear to be cooler than the interior, which can be hot enough to burn an infant’s mouth.
- Take care as beverages or food may be very hot after heating.
- – Especially when feeding a child. Check that it has cooled sufficiently.
- Take care when heating liquids such as water or other beverages. – Make sure to stir during or after cooking.
- Avoid using a slippery container with a narrow neck.
- Wait at least 30 seconds after heating before removing the heated liquid.
- Failing to do so may result in an abrupt overflow of the contents and cause burns.
- Do not abruptly cool the door, the inside of the appliance, or a dish by pouring water over it during or just after cooking.
- – This may result in damage to the appliance. The steam or water spray may result in burns or injury.
- Do not operate while empty except for self-cleaning.
- Do not defrost frozen beverages in narrow-necked bottles. The bottles can break.
- Do not scratch the glass of the oven door with a sharp object. – This may result in the glass being damaged or broken.
- Do not store anything directly on top of the appliance when it is in operation.
- Do not use sealed containers. Remove seals and lids before cooking. Sealed containers can explode due to the build-up of pressure even after the oven has been turned off.
- Take care that the food you are cooking in the oven does not come into contact with the heating element.
- – This may result in fire.
- Do not overheat food.
- – Overheating food may result in fire.
Product Dimension
- 24” Electric Range
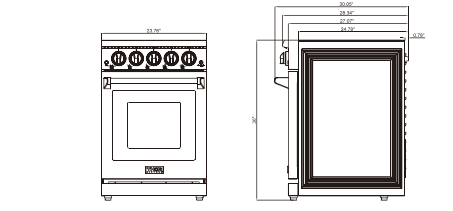
- 30” Electric Range

- 36” Electric Range

Clearances and dimensions
To install the range, refer to the following figure. For installation in CANADA, a Free-standing range is not to be installed closer than 12mm from any adjacent surface.
Minimum dimensions
MINIMUM DIMENSIONS BETWEEN COOKTOP, WALLS AND ABOVE THE COOKTOP:
- A: Make sure the wall covering, countertop, flooring, and cabinets around the range can withstand the heat (up to 200°F) generated by the range.
- B: Allow 30” minimum clearance between surface units and the bottom of unprotected wood or metal cabinet, or allow a 24″ minimum when the bottom of wood or metal cabinet is protected by no less than 1/4″ thick flame retardant millboard covered with not less than No 28 MSG sheet metal, (.015″), .015” thick stainless steel, .024″ aluminum or .020″ copper.
B C Both NOTE C Sides A A - C: This appliance has been approved for 0″ spacing to adjacent surfaces above the cooktop. However, a 6″ minimum spacing to surfaces less than 15″ above the cooktop and adjacent cabinet is recommended to reduce exposure to steam, grease splatter, and heat. To reduce the risk of burns or fire when reaching over hot surface elements, cabinet storage space above the cooktop should be avoided. If cabinet storage space is to be provided above the cooktop, the risk can be reduced by installing a range hood that projects at least 5″ beyond the front of the cabinets. Cabinets installed above the cooktop must be no deeper than 16″.
- D: Allow 24″/30″/36″ (depending on your range width) minimum clearance between right and left cabinets.
Connecting the power
- STEP 1. MEETING ELECTRICAL CONNECTION REQUIREMENTS
- STEP 2. POWER CORD
- Remove the rear terminal block cover and loosen the 6 screws with a screwdriver. The terminal block will then be accessible. Do not discard these screws.
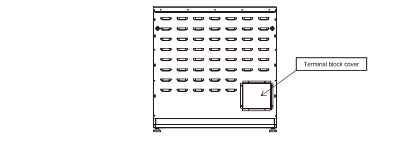
- For power cord installations only, hook the strain relief over the power cord hole located below the rear of the
drawer body. Insert the power cord through the strain relief and tighten the device.
- Remove the rear terminal block cover and loosen the 6 screws with a screwdriver. The terminal block will then be accessible. Do not discard these screws.
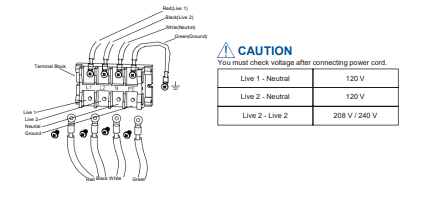
- STEP 3. 4-WIRE POWER CORD INSTALLATION
WARNING
-
- Electrical Shock Hazard
- Electrical ground is required on this appliance.
- Do not connect to the electrical supply until the appliance is permanently grounded.
- Disconnect power to the circuit breaker or fuse box before making the electrical connection.
- This appliance must be connected to a grounded, metallic, permanent wiring system, or a grounding connector should be connected to the grounding terminal or wire lead on the appliance. Failure to do any of the above could result in a fire, personal injury, or electrical shock. See below for more information on electrical grounding.
-
- Remove the 4 lower terminal screws from the terminal block.
- . Insert the 4 terminal screws through each power cord terminal and into the lower terminals of the terminal block. Be
certain that match the wire and terminals by color - Tighten screws securely into the terminal block

- STEP 4 3-wire power cord
WARNING
-
- Electrical Shock Hazard
- Electrical ground is required on this appliance.
- Do not connect to the electrical supply until the appliance is permanently grounded.
- Disconnect power to the circuit breaker or fuse box before making the electrical connection.
This appliance must be connected to a grounded, metallic, permanent wiring system, or a grounding connector should be connected to the grounding terminal or wire lead on the appliance. Failure to do any of the above could result in a fire, personal injury, or electrical shock. See below for more information on electrical grounding.
- Remove the 4 lower terminal screws from the terminal block.
- Insert the Green ground terminals together with the white one.
- Insert the 4 terminal screws through each power cord terminal and into the lower terminals of the terminal block. Be certain that match the wire and terminals by color. Tighten screws securely into the terminal block.
- Tighten screws securely into the terminal block
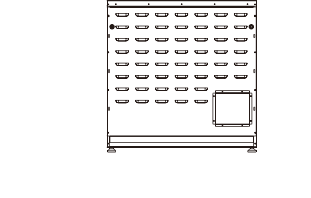
- STEP 5. REPLACING THE TERMINAL BLOCK COVER
KD Installation Procedures
Your Thor Kitchen range might have a KD Knob + handle design that needs to be installed. Please Follow up on the following procedures for Knob + Oven door handle installation.
- Check the knobs

- See the sheet for the number of each knob

- Find the right knobs for each shaft on the range. Push the knob in to fully attach the shaft and make sure there’s no friction between knobs and bezels.

Your Thor range might have a KD handle that needs to be installed. Please Follow up on the following procedures for the oven door handle installation
- Check your Installation Kits for Door Handles

- Connect door handle holders to each side of the handle

- Secure the oven handle with two screws on each door handle holder (if not, the handle might be loose

- Secure the oven handle with two screws on each door handle holder (if not, the handle might be loose)

- Lay the door handle against the oven door fit it on the connection part, and use the wrench to get the door handle holder tight;

- Use the wrench to tighten the door handle holders.
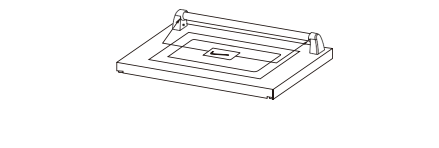
Rubber Pad Installation on Back Panel
- check the installation kit packed with manual
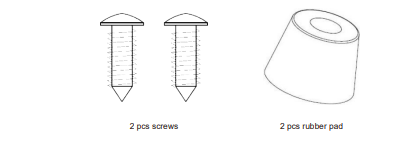
- Install 2 pcs rubber pad as shown above

Introducing your new range
24-inch Overview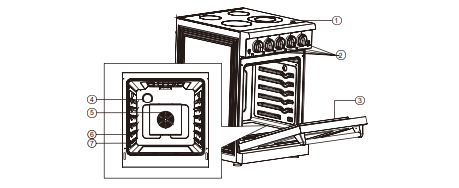
30/36 inch Overview
- Glass surface
- Control knob
- Oven door
- Oven light
- Oven fan
- shelf position
- Gasket
Introducing your new range
What’s included with your range

Before you begin
Clean the oven thoroughly before using it for the first time. Then, remove the accessories, set the oven to bake, and then run the oven at 350 °F for 30 minutes. There will be a distinctive odor. This is normal. Ensure your kitchen is well-ventilated during this conditioning period.
Energy saving tips
- During cooking, the oven door should remain closed except when you turn food over. Do not open the door frequently during cooking to maintain the oven temperature and to save energy.
- Whenever possible, cook more than one item at a time.
Positioning the oven racks
The rack position above 6 is not usable. 
- Centering the baking pans in the oven produces better cooking results.
- When baking multiple items, make sure that you leave a 1 to 1.5 in. (2.5 to 3.8 cm) space around
each item. - When baking or fan baking on a single rack, place the oven rack in positions 3 or 4.
- When baking or fan baking on multiple racks, place the oven racks in positions 3 and 5. Place two pans in the rear of the top rack and the other two pans in the front of the bottom rack.
Cleaning and maintenance
Cleaning the oven door
- DO NOT clean the oven door gasket. The oven door gasket is made of a woven material which is essential for a good seal. Care should be taken not to rub, damage, or remove this gasket.
- DO NOT immerse the door in water.
- DO NOT spray or let water or the glass cleaner enter the door vents.
- DO NOT use oven cleaners, cleaning powders, or any harsh abrasive cleaning materials on the outside of the oven door.
The oven door has multiple surfaces that require different cleaning techniques. The gasket on the oven door frame should never be cleaned or moved to clean other surfaces. The gasket is made of woven material which is essential for a good heat seal not use spray cleaners on the surface burner control panel. Spray entering the valve holes could contact electrical components resulting in death, personal injury, or product damage.
- Make sure that all surface burner knobs are in the OFF position.
- Pull the control knobs straight off the surface burner control valve stems. Do not clean the control knobs in a dishwasher. They are not dishwasher-safe.
- Clean the knobs in warm, soapy water. Rinse and completely dry all surfaces (including the back and stem hole).
- Clean stainless steel surfaces with a stainless steel cleaner on a damp, soft cloth.
- Replace the control knobs in the OFF position by pushing them straight onto the control valve stems.
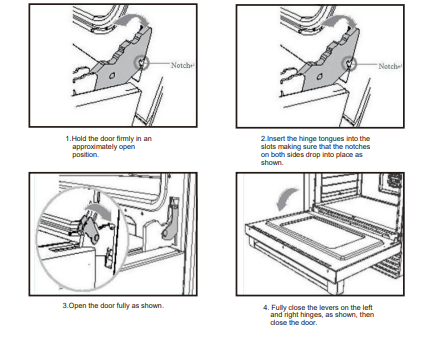
Removing the Oven Door
Removing and replacing the oven door
Do not lift the oven door by its handle. Doing so may damage the door. Make sure the oven and the door are cool before you begin to remove the door.
Troubleshooting
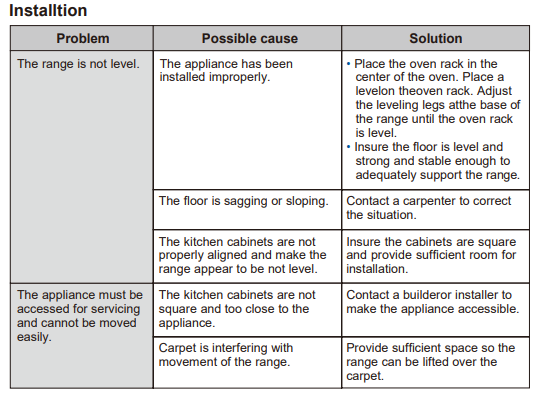
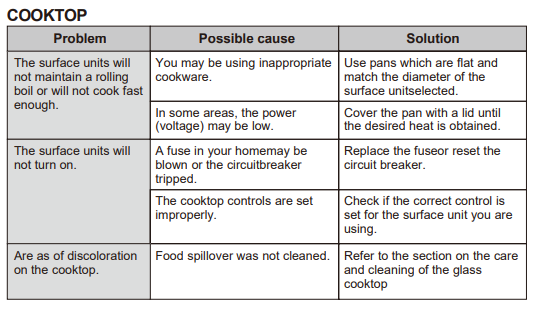
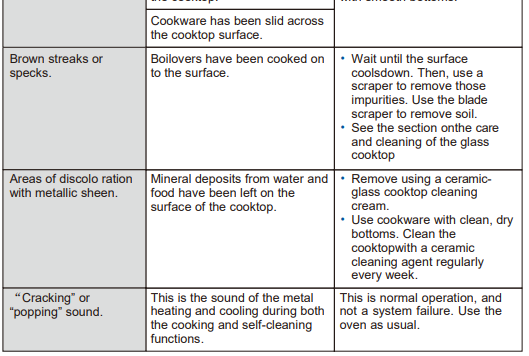
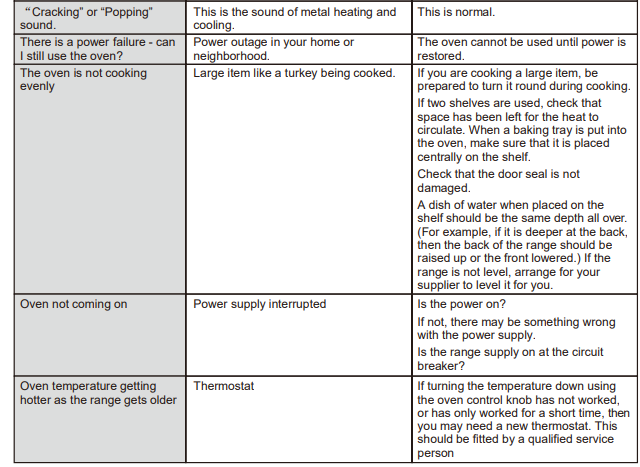
Thor kitchen works hard to ensure that you don’t have problems with your new gas range. If you experience a problem, look first for a solution in the table below. If, after trying the suggested solution, you’re still having trouble, call Thorkitchen
at 877-288-8099.


Warranty and Service
- This product has been manufactured by Thor Group, 4651 E Airport Drive. California 91761.
- For the most up-to-date warranty and service policy, please refer to our website WWW.THORKITCHEN.COM/WARRANTY-REGISTRATION
- For in-warranty service requests, please visit our website at WWW.THORKITCHEN.COM/SERVICE
- Please Note: You must provide proof of purchase or installation date for any warranty service requests
FAQS About Thor Kitchen HRE3601 professional electric range
What are the dimensions of the Thor Kitchen HRE3601 electric range?
Refer to the product manual or the manufacturer’s website for information on the dimensions of the electric range. This is important for fitting it into your kitchen space.
How do I install the Thor Kitchen HRE3601 electric range?
Typically, ranges come with installation instructions in the user manual. Follow the step-by-step guide provided by the manufacturer for proper installation.
What features does the Thor Kitchen HRE3601 electric range have?
Review the product specifications or user manual to learn about the specific features of the electric range, such as cooking modes, oven capacity, and any advanced functions.
How do I clean and maintain the Thor Kitchen HRE3601 electric range?
Regular maintenance is crucial for the performance and longevity of the range. Follow the maintenance guidelines in the user manual, including cleaning recommendations for different components.
How do I troubleshoot common issues with the Thor Kitchen HRE3601 range?
The user manual often includes a troubleshooting section with solutions for common problems. Follow the provided steps to identify and address issues.
What cookware is suitable for use with the Thor Kitchen HRE3601 electric range?
Check the user manual for recommendations on the types of cookware that are suitable for the electric range. Some ranges have specific requirements for optimal performance.
How do I use the different cooking modes on the Thor Kitchen HRE3601 range?
Familiarize yourself with the cooking modes and functions by reviewing the user manual. It should provide instructions on how to use each feature effectively.
Is the Thor Kitchen HRE3601 electric range energy-efficient?
Look for information on the range’s energy efficiency in the product specifications or user manual. Energy efficiency ratings are often provided.
How do I set and control the temperature on the Thor Kitchen HRE3601 oven?
The user manual should provide instructions on how to set and control the oven temperature. Make sure to follow the recommended steps for accurate cooking results.
What is the warranty on the Thor Kitchen HRE3601 electric range?
Warranty information is typically included in the user manual or on the manufacturer’s website. Be sure to register your appliance and understand the warranty terms.
For more manuals by Thor Kitchen ManualsDock

