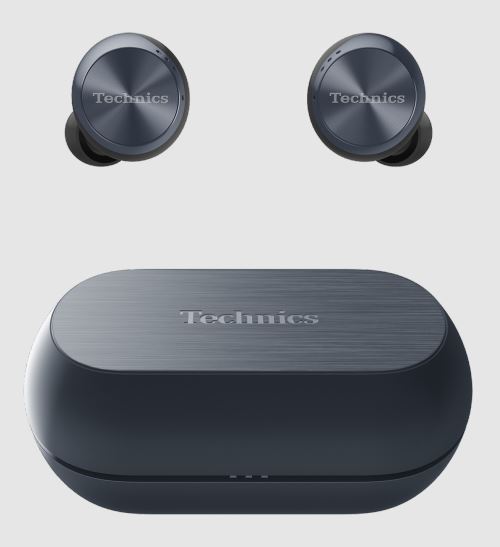
Technics EAH-AZ70W-K True Wireless Earbuds
About Technics
Technics is a brand and subsidiary of the Japanese company Panasonic Corporation that is known for its high-quality audio and electronic equipment. The brand was established in 1965 and quickly gained a reputation for producing innovative and top-notch audio products, particularly in the field of turntables, amplifiers, and speakers.
Technics also developed advanced audio technologies, such as the Quartz Direct Drive System, which ensured accurate and stable rotation of the turntable platter. This technology significantly reduced wow and flutter (speed fluctuations), making Technics turntables highly sought after by audiophiles and DJs alike.
Safety precautions
Unit
WARNING
- To reduce the risk of fire, electric shock, or product damage,
- Do not expose this unit to rain, moisture, dripping, or splashing.
- Do not place objects filled with liquids, such as vases, on this unit.
- Use the recommended accessories.
- Do not remove covers.
- Do not repair this unit by yourself. Refer servicing to qualified service personnel.
Avoid the use of the following conditions
- High or low extreme temperatures during use, storage, or transportation.
- Disposal of a battery into a fire or a hot oven, or mechanically crushing or cutting of a battery, that can result in an explosion
- Extremely high temperatures and/or extremely low air pressure can result in an explosion or the leakage of flammable liquid or gas.
- Avoid using or placing this unit near sources of heat.
- Do not listen with this unit at high volume in places where you need to hear sounds from the surrounding environment for safety, such as at railroad crossings, and construction sites.
- Keep this unit away from something susceptible to magnetism. Such devices as a clock may not operate correctly.
- Be aware that this unit (earphones) may get warm while charging or immediately after charging. Depending on your constitution and health status, putting the earphones on may trigger adverse reactions such as skin redness, itching, and rash if the earphones have just been taken out of the charging cradle and are still warm.
CAUTION! To reduce the risk of fire, electric shock, or product damage,
- Do not install or place this unit in a bookcase, built-in cabinet, or in another confined space. Ensure this unit Is well-ventilated.
- Do not obstruct this unit’s ventilation openings with newspapers, tablecloths, curtains, and similar items.
- Do not place sources of naked flames, such as lighted candles, on this unit.
Batteries
- Do not heat or expose to flame.
- Do not leave the battery(ies) in a car exposed to direct sunlight for a long period with doors and windows closed.
Before Use
Accessories
Please check and identify the supplied accessories.
- 1 x USB charging cord
- 1 x Earpieces set (2 each of sizes XS, S, M, L, and XL) (M size fitted to the earphones)
Maintenance
Clean this unit with a dry and soft cloth.
- When the unit is very dirty, wipe off the dirt with a cloth that has been dipped in water and well-wrung, then wipe with a dry cloth.
- Do not use solvents including benzine, thinner, alcohol, kitchen detergent, a chemical wiper, etc. This might cause the exterior case to be deformed or the coating to come off.
- Wipe off dust from the charging terminals with a soft, dry cloth.
- Do not use pointy objects. Remove the earpieces from the earphones and get rid of earwax, foreign matter, etc. If you clean the earpieces while they are attached to the earphones, you may damage the protective mesh on the earphones. (Do not touch the protective mesh as this can affect audio characteristics.) Keeping the battery performance
- During the long period of disuse, fully charge this unit once every 6 months to keep the battery performance.
How to fit the earphones
- Check the orientation (up (@), down) L (left), and R (right) of the earphones.
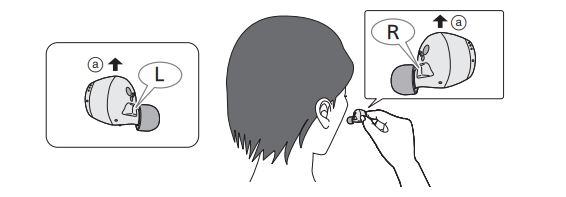
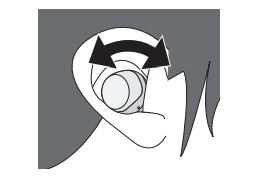
- Fit firmly by turning the earphones a small amount at a time in the directions indicated by the arrow in the illustration.
Select the earpieces
- How to remove the earpieces
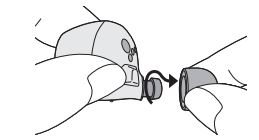
- How to attach the earpieces
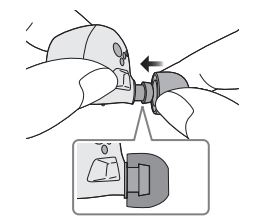
Parts Names
- L side earphone (left)
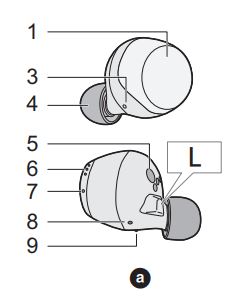
- R-side earphones (right)
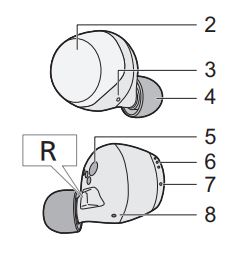
- Touch sensor (L) (left)
- Touch sensor (R) (right)
Touching these enables you to perform a variety of operations. (- 21, “Operating with the touch sensors) - Microphones for calls
- Earpieces
- Charging terminals
- Microphone for noise canceling
- Earphone LEDs*1, 3
- Driver rear ports
- A raised dot indicating the L side
Main unit (charging cradle) (Charging cradle hereafter in the instructions) - Charging cradle lid
- Certification information label
The model number is shown on the certification information table - Terminal section (for the L-side earphones)
- Terminal section (for the R-side earphones)
Do not touch the terminal sections with hare hands - Charging cradle LEDs
- Charging terminal
Connect the USB charging cord (supplied) to this terminal when charging. (- 11, “Charging”)
Charging
Use the USB charging cord (supplied) to charge the earphones and the charging cradle When the earphones have not been put into the charging cradle, the charging cradle itself is charged.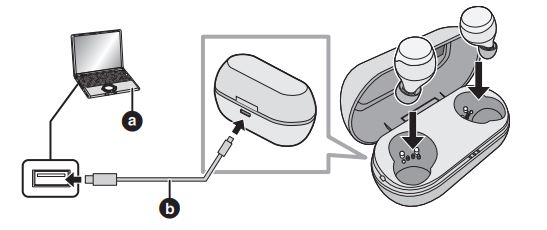
- Use the USB charging cord (supplied) to connect the charging cradle to a computer.
Charging of the charging cradle starts. The charging cradle LEDs light or blink (white) while the charging cradle is charging. Charging is complete when they turn off.
Check the direction of the USB charging cord terminals and plug in/out straight holding onto the plug. (It may result in malfunction or the deforming of the terminal if it is placed obliquely or in the wrong direction. result in malfunction by the deforming of the terminal if it is plugged in obliquely or in the wrong direction.) - Put the earphones into the charging cradle.
Confirm the L side and R side of the earphones, and match the positions of the charging terminals on the earphones with the terminal sections in the charging cradle. charging of the earphones will not start the earphones with the terminal sections in the charging cradle. (Charging of the earphones will not start if the positions do not match.)
The way the earphone LEDs light when you put the earphones into the charging cradle depends on the usage
- Confirm that the earphone LEDs (red) have been illuminated (charging starts).
The earphone LEDs light (red) while the earphones are charging. Charging is complete when they turn off.
Charging time (- 25, “Specifications*)
Note
- Do not use any other USB charging cords except the supplied one. Doing so may cause malfunction.
- Charging may not be performed or may stop if the computer is in or switched to standby or sleep mode.
Charging the earphones with the charging cradle
Earphones can only be charged with a charged charging cradle. You can charge your earphones while you are out, even if there is no power source. •When the charging cradle is fully charged, it can charge the earphones about 2 times.
- Put the earphones into the charging cradle.
The earphone’s LEDs light (red). Refer to Step 2 on page 11 for how they light. - Confirm that the earphone LEDs (red) have been illuminated. (charging starts)
The earphones LED light (red) while the earphones are charging. Charging is complete when they turn off.
It takes approx. 2 hours to charge the earphones from empty to full.
Battery level notification
The LED lighting or flashing on this unit indicates the remaining battery charge
Earphones When the battery level starts to run low while you are using the earphones, the blinking earphone LEDs change from blue to red, and then you will be notified by one beep every 5 minutes. When no charge remains, you will hear a guidance message and then the unit automatically turns off.
Charging cradle When you open the charging cradle lid, the charging cradle LEDs light or blink to indicate the charge remaining in the battery.
Turning the earphones on and off
To turn the earphones on
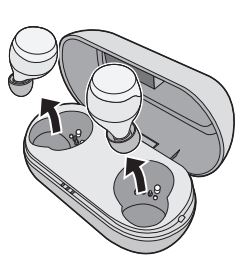
Take the earphones out of the charging cradle.
- The earphones turn on. A beep will sound and the earphone LEDs blink (blue)* slowly.
- The batteries are low when they are blinking in red.
To turn the earphones off
Put the earphones into the charging cradle.
- The way the LeUs light when you put the earphones into the charging cradle depends on the usage status. Refer to Step 2 on page 11 for how they light.
Using the app “Technics Audio Connect”
By creating a Bluetooth connection with a smartphone or tablet installed with the “Technics Audio Connect* app (free of charge), you can enjoy a wide variety of features, such as the following:
- Software updates
- Customization of various settings (Connection mode setting/Auto power off setting/Guidance language setting, etc.)
- “Switch/Find headphones” function
- Check the remaining battery charge
- Access to this document
- Download the “Technics Audio Connect” app (free of charge) to the smartphone or tablet.

- Start up the “Technics Audio Connect” app.
Follow the on-screen instructions to operate
Using the external sound control
function switches between noise canceling, ambient sound, and off. The sound quality is set so that it is optimized for each mode.
- While wearing the earphones, touch and hold the touch sensor (R) for about 2 seconds.
The mode is switched each time you touch and hold the touch sensor. (A guidance message will notify you of the mode you switched to.)
- Adjust the volume of the playback device.
- Noise-canceling Reduces the sounds (noise) you can hear from outside.
- While using the noise canceling function, a very small amount of noise is generated from the circuit that reduces noise may be heard, but this is normal and not indicative of any trouble. This very low-level noise may be heard in quiet places or the blank parts between tracks.)
- Ambient sound You can hear ambient sound through the microphones embedded in the earphones while enjoying music.
Operating with the touch sensors
You can operate the touch sensors on the earphones to change to the Bluetooth® pairing mode, or remote control the Bluetooth® device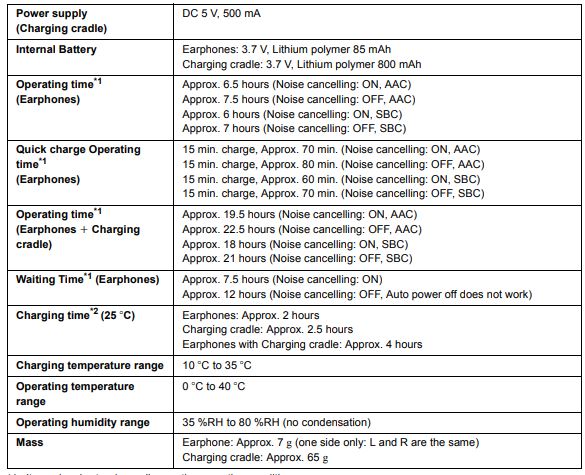
Troubleshooting
Before requesting service, make the following checks. If you are in doubt about some of the checkpoints, or if the remedies indicated do not solve the problem, consult your dealer for instructions.
Sound and audio volume
No sound.
- Make sure that the earphones and the Bluetooth device are connected correctly. (- 15)
- Check if music is playing on the Bluetooth® device
- Make sure that the earphones are turned on and the volume is not set too low.
- Pair and connect the Bluetooth® device and the earphones again. (- 15)
- Check if the Bluetooth-compatible device supports the “A2DP* profile. For details on profiles, see “Listening to music* (- 17). Also, refer to the operating manual for the Bluetooth® compatible device
Low volume.
- Also, raise the volume on the Bluetooth device. not just on the earphones.
- Make sure there is no earwax, foreign matter, etc., attached to the earpieces of the earphones.
- Remove the earpieces from the main unit (earphones) and refer to “Earphones/Earpieces” (- 3) to clean them.
The sound from the device is cut off.
/ Too much noise. / Sound quality is bad.
- The sound may be disrupted if signals are blocked. Do not fully cover the earphones with the palm of your hand, etc. •The device may be out of the 10 m communication range. Move the device closer to the earphones.
- Remove an obstacle between the earphones and the device
- Switch off any wireless LAN device when not in use Bluetooth® device connection The device cannot be connected.
- You can pair a maximum of 10 Bluetooth® devices with the earphones. When you pair a device after the maximum has been exceeded, previous devices are overwritten. To use overwritten devices again, do the pairing again.
- Delete the pairing information for this unit from the Bluetooth device, then pair them again. (- 15)
Bluetooth® device connection
The device cannot be connected.
- You can pair a maximum of 10 Bluetooth® devices with the earphones. When you pair a device after the maximum has been exceeded, previous devices are overwritten. lo use overwritten devices again, do the painting again.
- Delete the pairing information for this unit from the Bluetooth® device, then pair them again. (- 15)
Phone Calls
The voice of the person on the other end of the call is small.
- Also, raise the volume on the Bluetooth device not just on the earphones
Cannot make a phone call.
- Check if the Bluetooth® compatible device supports the “HSP’ or “HFP* profile. For details on profiles, see “Listening to music* (- 17) and “Making a phone call’ (- 18). Also, refer to the operating manual for the Bluetooth® enabled phone
- Check the audio settings on the Bluetooth® compatible telephone, and if the setting does not allow communication with this unit, change the setting. (- 15)
General
cannot operate the earphones.
- Try turning the power off and on. (- 13)
The left and right batteries deplete at different rates.
- There may be some difference between left and right due to signal and usage conditions.
Amazon Alexa is not responding.
- Make sure that the Amazon Alexa app is activated.
- Make sure that the voice assistant is set to Amazon Alexa
- Make sure that data communication is enabled on the mobile device.
- Make sure that the device is paired with the Amazon Alexa app
Power supply and charging
Cannot charge the unit.
- Is the USB charging cord connected firmly to the USB terminal of the computer? (- 11)
- Have the earphones been put into the charging cradle correctly? (- 11)
- If the earphone LEDs do not light even after putting the earphones into the charging cradle, then there is no charge remaining in the charging cradle battery. First charge the charging cradle.
- Make sure to charge a room temperature between 10 °C and 35 °C.
- Make sure the computer is turned on and is not on standby or sleep mode.
- Is the USB port you are currently using working properly? If your computer has other USB ports, unplug the connector from its current port and plug it into one of the other ports.
- If the measures mentioned above are not applicable, unplug the USB charging cord and plug it in again. •Is the unit already fully charged? The charging cradle LEDs will turn off immediately if the unit is fully charged.
- If the charging time and operating time get shorter, the batteries in the earphones and charging cradle may be depleted. (Charging cycles for built-in batteries: about 500 times each)
The earphones or charging cradle get warm during charging.
- The earphones and charging cradle may get warm while charging, but this is normal.
The earphones do not turn on.
- After placing once into the charging cradle and the earphone LEDs light (red), take them out again.
The charging cradle LEDs do not light even when you open the charging cradle lid.
- There is no charge in the battery. Use the USB charging cord (supplied to charge. (- 11)
- Take the earphones out of the charging cradle, and after unplugging the USB charging cord, close the lid and leave it for 3 minutes. Then open the lid of the charging cradle and confirm that the power turns on.
Specifications
- General

- Bluetooth Section

- Earphones Section

- Charging Cardle Section

- Accessories Section

- Water Resistant

When disposing of the product
The built-in batteries are a valuable recyclable resource. When disposing of this product, recycle according to local environmental laws and regulations. Refer to the specifications in this document for information about the batteries.
Declaration of Conformity (DoC) Hereby,
“Panasonic Corporation” declares that this product complies with the essential requirements and other relevant provisions of Directive 2014/53/EU. Customers can download a copy of the original DoC to our RE products from our DoC
- server: http://www.ptc.panasonic.eu
- Contact Authorised Representative: Panasonic Marketing Europe GmbH, Panasonic Testing Centre. Winsbergring 15. 22525 Hamburg. Germany
For the United Kingdom and Ireland customers
Sales and Support Information Customer
Communications Centre
- For customers within the UK: 0333 222 8777
- For customers within Ireland: 01 447 5229
- Monday-Friday 9:00 am-5:00 pm (Excluding public holidays).
- For further support on your product, please visit our website: www.technics.com/uk/
FAQS About Technics EAH-AZ70W-K True Wireless Earbuds
Technics earbuds are water resistant.
IPX4 water resistance and a lightweight, comfortable design provide protection from sweat and splashes.
How long are wireless earbuds good for?
Longer battery life is often seen with larger headphones. The majority of wireless earphones can last for five to six hours on a single charge.
The Technics az70 driver’s size is what?
The wide 10mm dynamic driver used in these truly wireless headphones produces a wide soundstage.
How long should I use my earbuds for?
According to Dr. Foy, you should only listen to MP3 players for a total of 60 minutes per day at volumes no higher than 60% of their maximum. “Your duration should be shortened the louder the noise. You should only listen at maximum volume for around five minutes every day.
How long do earbuds last?
Popular wireless earphones on the market have an average lifespan of one to three years. Use your wireless earphones carefully if you want them to last as long as possible. We’ll discuss some advice on how to keep them operating for a long period later in the text.
Are earbuds repairable?
Don’t throw away an expensive pair of headphones, but cheap ones can be thrown away. If the issue is a damaged connection, you can repair it yourself using an electronics soldering iron and solder. Learn to solder electronic components. As you start a project on how to mend headphones, find the issue first.
How can you safely clean earbuds?
Although you shouldn’t use hydrogen peroxide on your earbuds, it can assist to soften and remove ear wax in your ears. Your earbuds may become damaged or discolored by hydrogen peroxide. Use rubbing alcohol instead.
How are Technics earbuds recharged?
Earbuds. All you need to do to charge the earphones is put them in the charging case and close the top. The earbuds will begin charging on their own.
What is the weight of Technics?
GR: 11.5 kg in weight.
For more manuals by Technics, Visit Manualsdock
[embeddoc url=”https://manualsdock.com/wp-content/uploads/2023/08/Technics-EAH-AZ70W-K-True-Wireless-Earbuds-Operating-Instructions.pdf” download=”all”]

