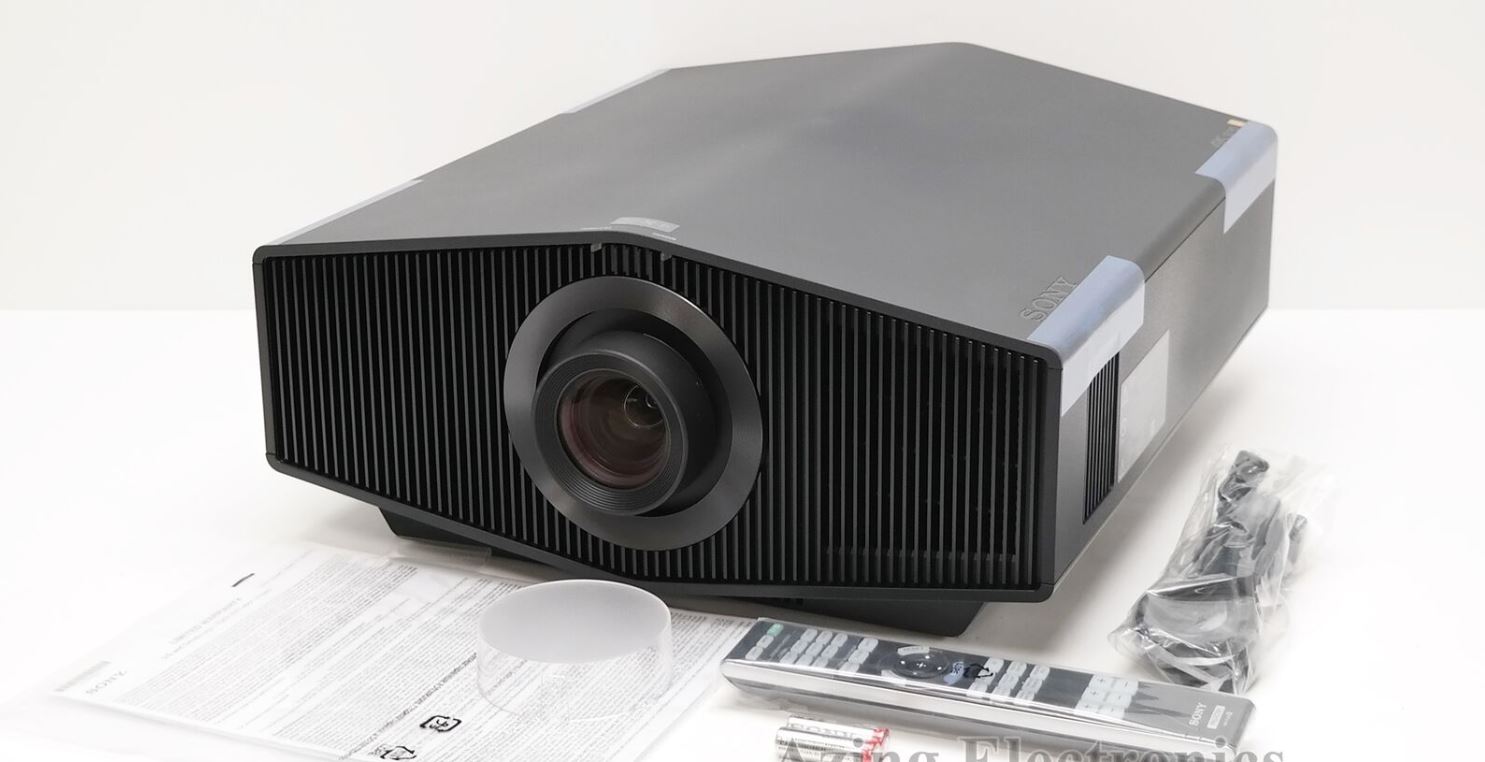
Sony VPL-XW6000ES 4K HDR Laser Projector
About SONY
Sony was founded in 1946 by Masaru Ibuka and Akio Morita, originally as Tokyo Tsushin Kogyo. The company started with a focus on producing innovative consumer electronics, such as radios and tape recorders, and later expanded into various other areas, including televisions, audio equipment, cameras, video game consoles, and mobile devices.
Notes on Installation and Usage
Unsuitable installation
Do not place the unit in the following situations, which may cause malfunction or damage to the unit.
Near walls
To maintain the performance and reliability of the unit, leave space between walls and the unit as illustrated.

Note that the wall on the ventilation hole side may become hot.
Air from air conditioners or the ventilation holes of this unit or other devices may cause oscillation on the screen. Be sure not to install this unit in the area where the air from air conditioners or the ventilation holes of these devices reach the front side of this unit.
Poorly ventilated location
Leave space of more than 30 cm (11 7/8 inches) around the unit.

Hot and humid

Locations subject to direct cool or warm air from an air-conditioner
Installing the unit in such a location may cause a malfunction of the unit due to moisture condensation or a temperature rise.

Near a heat or smoke sensor
A malfunction of the sensor may occur.
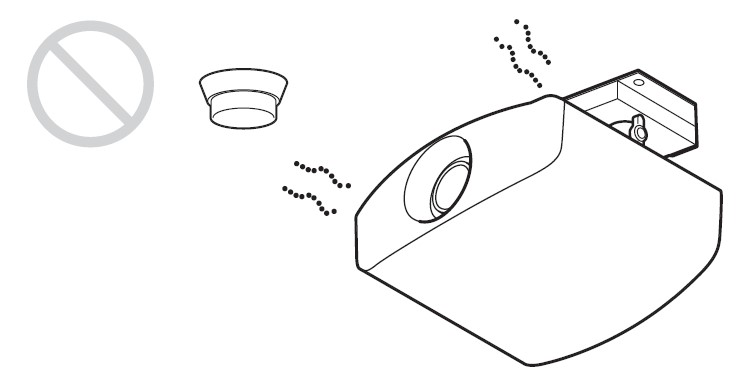
Very dusty and extremely smoky locations
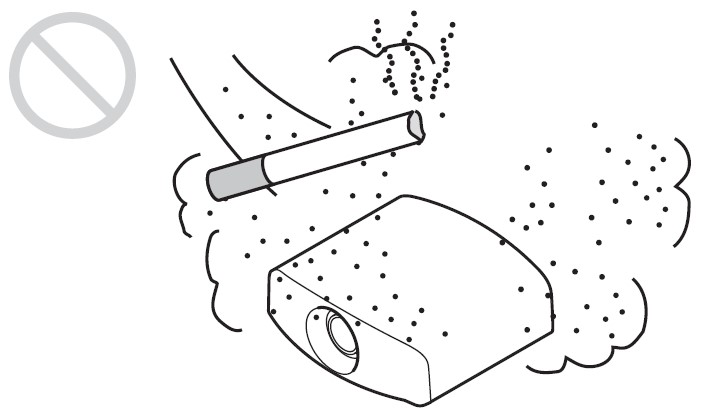
Unsuitable Conditions
Do not do any of the following while using the unit.
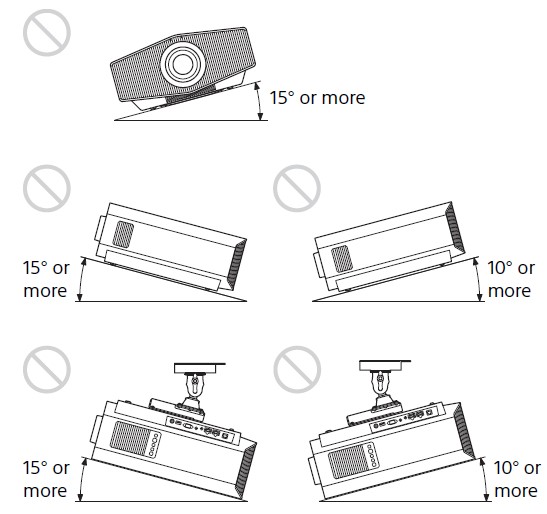
Tilting front/rear and left/right
Avoid using the unit tilted at an angle, as shown in the following illustrations.
Do not install the unit anywhere other than on a level surface or the ceiling. Installing the unit in such a location may result in uneven color uniformity.
If the unit is tilted up or down, the image on the screen may be trapezoidal. Position the unit so that the lens is parallel to the screen.
When installing the unit at high altitudes
When using the unit in a location at an altitude of 1,000 m (approx. 3,280 feet) or higher, appropriately set “High Altitude Mode” in the Setup menu. Failing to do so could have adverse effects, such as reducing the reliability of certain components.
Safety precautions for installing the unit on a ceiling
- Never mount the projector on the ceiling or move it by yourself. Be sure to consult with qualified Sony personnel (charged).
- When installing the unit on a ceiling, be sure to use a safety wire, etc., to prevent the unit from falling. Entrust the installation to an experienced contractor or installer.
For dealers
Be sure to secure the cabinet cover firmly when installing it to the ceiling.
Preparing
Checking the Supplied Accessories
Check the carton to make sure it contains the following items:
- Remote control RM-PJ24 (1)
- Size AA (R6) batteries (2)
- Lens cap (1) When you purchase the projector, a lens cap is on the lens.
- AC power cord (1)
- Setup Guide (this manual) (1)
Inserting the Batteries into the Remote Control

Caution when handling the remote control
- Handle the remote control with care. Do not drop it, and do not step on or spill liquids on it.
- Do not place the remote control in a location near a heat source, a place subject to direct sunlight, or a damp room.
Removing the Lens Cap
Remove the lens cap before you use the projector.
- Notes on the lens cap
When removing the lens cap
When removing the lens cap, hold the parts other than the catches and pull them toward you. If you pull while holding the catches, the lens may be damaged.
 When attaching the lens cap
When attaching the lens cap, be sure to hook the catches of the lens cap on the notches of the lens to prevent it from falling out.

Note: The positions of the notches on the lens may differ from the ones shown in the figure.
Installing the Unit
- Position the unit so that the lens is parallel to the screen.
- After connecting the AC power cord to the unit, plug the AC power cord into a wall outlet.
Rear of the unit
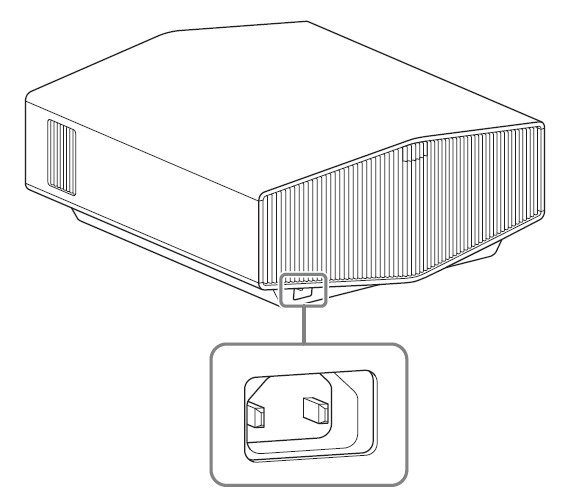
Front of the unit

Note: After connecting the AC power cord to the unit, the ON/STANDBY indicator may blink orange. You may not be able to control the unit while the indicator is blinking, but this is not a malfunction. Wait until it stops blinking and remains lit in red.
- Press the / (On/Standby) button to turn on the unit.

Front of the unit

- Project an image on the screen, then adjust the focus, size, and position.

- Adjust the focus.
Press the LENS ADJUSTMENT (FOCUS) button to display the Lens Focus adjustment window (test pattern). Then adjust the focus of the picture by pressing the /// button. - Adjust the picture size.
Press the LENS ADJUSTMENT (ZOOM) button to display the Lens Zoom adjustment window (test pattern). Then adjust the size of the picture by pressing the /// button. - Adjust the picture position.
Press the LENS ADJUSTMENT (SHIFT) button to display the Lens Shift adjustment window (test pattern). Then adjust to the proper position of the picture by pressing the /// button.
Note: Do not touch the lens when you adjust the image position. Your fingers may be pinched when the lens extends/retracts.
To adjust the tilt of the installation surface
If the unit is installed on an uneven surface, use the front feet (adjustable) to keep the unit level.

Note
- Note that if the unit is tilted up or down, the projected image will be distorted in a trapezoidal shape.
- Be careful not to pinch your fingers when rotating the front feet (adjustable).
Lens adjustment window (test pattern)

The dashed lines show the angle of view of each aspect ratio.
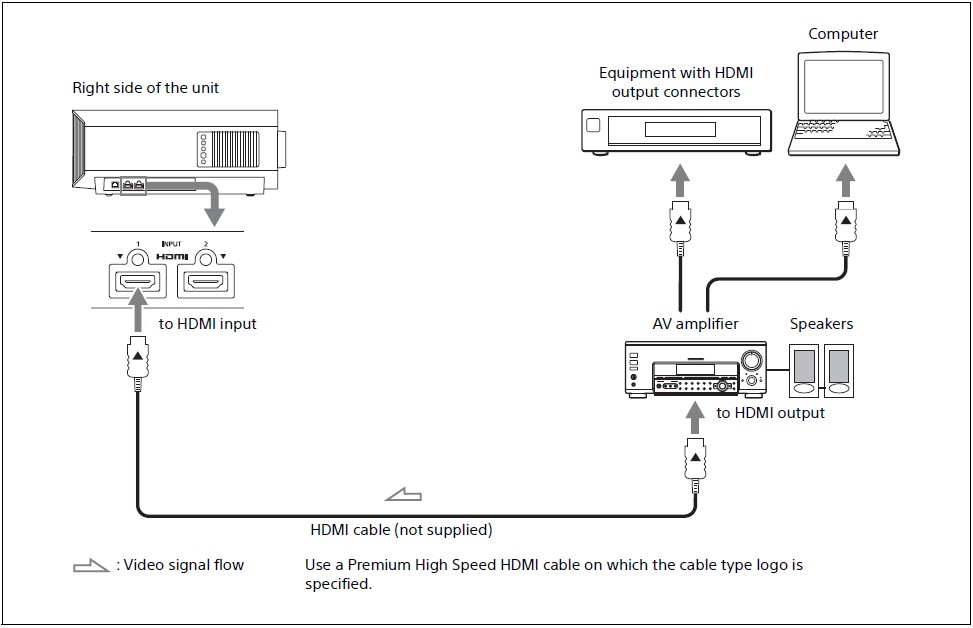
Connecting the Unit
When making connections, be sure to do the following:
- Turn off all devices before making any connections.
- Use the proper cables for each connection.
- Insert the cable plugs firmly; Loose connections may reduce the performance of picture signals or cause a malfunction. When unplugging a cable, be sure to grip the plug, not the cable itself.
- For more information, refer also to the instruction manual of the device to be connected.
FAQS About Sony VPL-XW6000ES 4K HDR Laser Projector
When you monitor and control the projector via the network, access the Setup page of the projector (refer to “Using Network Features” in the Help Guide) via a Web browser and enable the desired control protocol.
Projecting
Projecting the Picture
- Turn on both the unit and the device connected to the unit.
- Press INPUT to display the input palette on the screen.
- Select the device from which you want to display images.
Press INPUT repeatedly or press // (enter) to select the device from which to project.
Turning Off the Power
- Press the / (On/Standby) button.
The message “POWER OFF?” appears. - Press the / (On/Standby) button again before the message disappears.
The ON/STANDBY indicator flashes in green and the fan continues to run to reduce the internal heat.
The fan stops and the ON/STANDBY indicator changes from flashing green to remaining red. The power is turned off completely, and you can disconnect the AC power cord.
Note: Never disconnect the AC power cord while the indicator is flashing.
Tip: You can turn off the unit by holding the / (On/Standby) button for about 1 second, instead of performing the above steps.
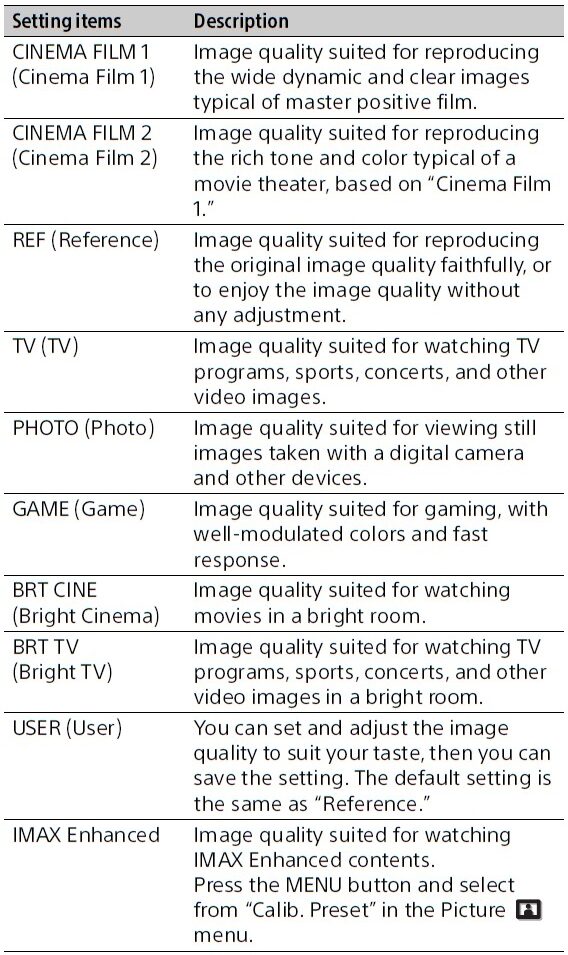
Selecting the Picture Viewing Mode
Press one of the CALIBRATED PRESET buttons.

About Indicators
The ON/STANDBY or WARNING indicator lights up or flashes if there is any trouble with your projector. If there is any problem or an error message appears on the screen, refer to “Error Handling” in the Help Guide.

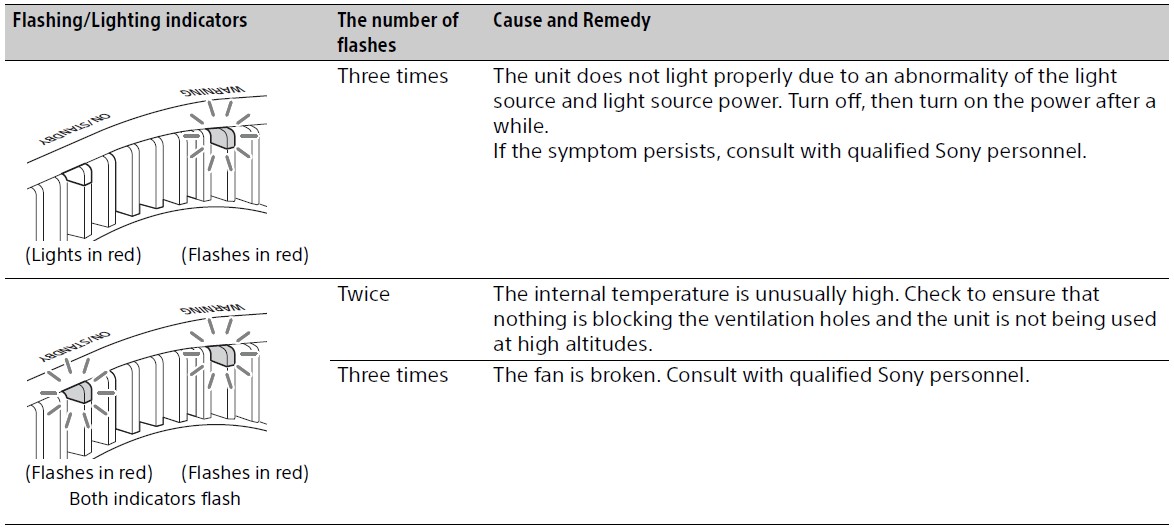
Note: If the symptom persists even after carrying out the above methods, consult with qualified Sony personnel. If the indicator starts flashing in a way other than the above, turn it off, and then turn on the power with the (On/Standby) button on the remote control or control panel of the unit. If the symptom is shown again, consult with qualified Sony personnel.
Dimensions
Front
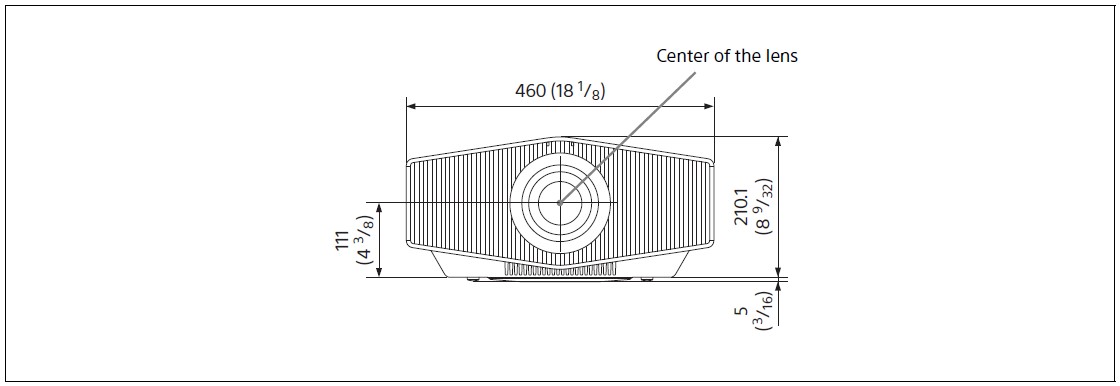
Bottom

Note
Holes for the ceiling mount
Use the screws with a length of 6.4 mm (1/4 inches, minimum) to 8.0 mm (5/16 inches, maximum) for the ceiling mount.
Recommended tightening torque (tension when turning a screw towards the direction of rotation): 1.4 ± 0.2 N-m

Help Guide (Web operating instructions)
Explains the features of the unit and how to use it in detail. You can view the Help Guide on a smartphone or computer.
https://rd1.sony.net/help/vpl/xw5000/en/
How big is the VPL xw6000es’ screen?
0.61-inch
What is the Sony laser projector’s refresh rate?
120Hz
How long will a Sony projector’s lamps last?
Up to 20,000 hours of lamp life for a Sony projector
Why isn’t my Sony projector working?
Make that the projector is connected to a functioning outlet properly.
How big should a projector screen be, exactly?
Throw Distance / Image Width = Throw Ratio
What dimensions are projector screens?
60 inches, 72 inches, 96 inches, 120 inches, 140 inches, and 170 inches are the most common projector screen sizes.
How long is a Sony projector bulb good for?
Typically, projector bulbs last 1,500 to 2,000 hours.
How long is the life of a laser projector?
A laser projector could operate for 20,000 to 30,000 hours.
How long can a laser projector be used?
20,000 hours.
What occurs when a projector lamp burns out?
The projector will no longer turn on because the lamp is unable to ignite.
For more manuals by Sony, Visit Manualsdock
[embeddoc url=”https://manualsdock.com/wp-content/uploads/2023/10/Sony-VPL-XW6000ES-4K-HDR-Laser-Projector-Setup-Guide.pdf” download=”all”]

