Secura TA5026-UL 4 Slice Toaster
IMPORTANT SAFEGUARDS
- Please read this User Manual before operating or cleaning the toaster.
- The toaster should only be plugged into an easily accessible 120V 60Hz electrical outlet so that you can quickly disconnect it in the event of an accident.
- Do not use the toaster for other than intended use. Do not use outdoors or in any type of wet or extreme conditions.
- Use the toaster on an easily accessible, level, dry, and sufficiently stable work surface. Do not place the toaster on the edge of the work surface.
- Do not let the cord touch hot surfaces. Do not place anything on top of the toaster while in use.
- The toaster must not be operated with an external timer or a separate control system.
- Do not place the toaster on or near a hot gas or electric burner or in a heated oven. Do not submerge the toaster, the power cord, or the power plug in water or other liquids. Never touch the power plug with damp hands. Never pull the power plug out of the socket by the power cord. Never use the power cord as a carrying handle.
- To reduce the risk of fire, do not leave this toaster unattended during use.
- When using this toaster, provide adequate clearance above and on all sides for air circulation. Do not operate this toaster while it is touching or near curtains, wall coverings, clothing, dishtowels, or other flammable materials.
- Never force foods into the toasting slots. Foods should fit freely between the guide wires.
- This toaster should not be used by or near children. Make sure that children do not insert any objects into the toaster or play with the toaster. Cleaning and user maintenance must not be performed by children. Keep the packaging wrappers out of your children’s reach to avoid suffocation.
- Do not operate the toaster with a damaged cord or plug, or after the toaster malfunctions or has been damaged in any manner. If the toaster begins to malfunction during use. immediately unplug it from the outlet. Do not use or attempt to repair a malfunctioning appliance. Contact our customer service department at CustomerCare@thesecura.com for additional information.
- The use of accessory attachments not recommended by the manufacturer may cause injuries.
- A short power-supply cord is provided to reduce the risk resulting from becoming entangled in or tripping over a longer cord. Carefully position the power cord so no one can become entangled in the cord and so that the cord is not a tripping hazard. Longer detachable power-supply cords or extension cords may be used if care is exercised in their use. If a longer detachable power-supply cord or extension cord is used, the marked electrical rating of the cord set or extension cord should be at least as great as the electrical rating of the appliance. Do not kink the power cord and do not lay it over sharp edges.
- This appliance is not intended for use by persons with reduced physical sensory or mental capabilities, or lack of experience and knowledge unless they have been given supervision and instruction concerning the use of the appliance by a person responsible for their safety.
- Do not use any abrasive cleaners, solvents, scouring pads, brushes with metal or nylon bristles, sharp or metallic deaning utensils such as knives, hard scrapers, or anything similar, as this will damage or scratch the surface. Use a soft damp doth to wipe the exterior.
NOTICE:
This appliance has a polarized plug (one blade is wider than the other). As a safety feature, this plug will fit in a polarized outlet only one way. If the plug does not fit fully in the outlet, reverse the plug. If it still does not fit, contact a qualified electrician. Do not attempt to defeat this safety feature.
CAUTION:
- DO NOT toast pastries with runny fillings or frosting.
- DO NOT toast torn slices of bread.
- DO NOT place buttered bread or wrapped food into the toaster.
CAUTION HOT SURFACES:
This appliance generates heat during use and retains heat for some time after turning off. Proper precautions must be taken to prevent the risk of burns, fires, or other injury to persons or property damage. Always use oven mitts when handling hot toaster and allow the toaster to cool thoroughly before deaning.
PARTS IDENTIFICATION

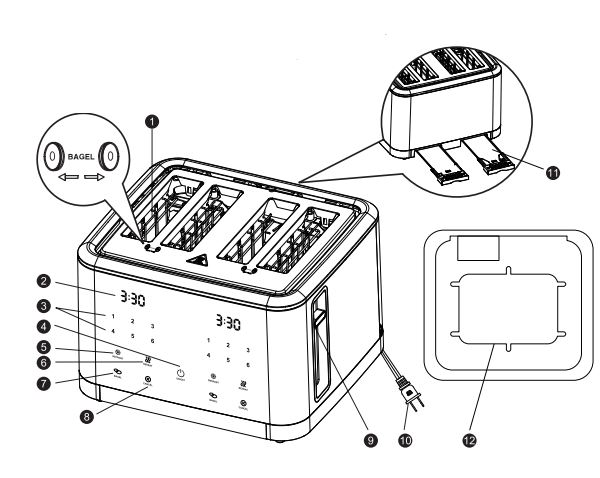
- Toasting Slots: Two sets of toasting slots under separate controls to toast two sets of toasts with different shade settings at the same time.
- Time Display (Countdown): The digital timer counts down until the toast cycle is completed.
- Shade Setting Buttons: Toasting Level 1-6 buttons, from light to dark.
- ON/OFF Button: After the toaster is plugged in, press this button to turn the ON/OFF button lights. The toaster is ready for use when all the button lights are illuminated. The light for this button is always on after the toaster is plugged in. The lights for all the other buttons will be off when the toaster is not in operation or the buttons are not touched within 3 minutes. Please note that the left side and right side are under separate controls. During toasting, press this button to turn off both sides of the toaster.
- DEFROST Button: Defrost button is designed to first defrost and then toast. Frozen bread, waffles, bagels, and pancakes need to be defrosted before toasting. Press this button to select DEFROST, and press again to cancel DEFROST. This button may combine with the Shade Setting Button or BAGEL button to carry out joint functions. Pressing the DEFROST button will add 25
- REHEAT Button: Heats for 30 seconds without browning the toast. This button cannot combine with other buttons to carry out joint functions.
- BAGEL Button: When the Bagel feature is selected, only the side with the BAGEL icon of each toasting slot toasts. The cut side of the bagel should face that side. Press this button to select BAGEL, and press again to cancel BAGEL. This button may combine with the DEFROST button to carry out joint functions.
- CANCEL Button: The Cancel button can be pressed at any time during toasting to stop the toasting process.
- High-lift Lever: When all the buttons are lit up, lower the Lever until it is locked in a down position to start toasting. When the toasting cycle is finished, the Lever will pop up automatically, raising the bread close to the top of the toaster. High Lift Function: Allows the Lever to be raised further for easier access to smaller breads. This ensures smaller pieces of bread and bagels can be removed easily. Please note that the Lever can be locked in place only when all the buttons are lit up. If not lit up, lowering the Lever will only turn on the lights.
- Power Cord with Plug: After plugging the toaster into the electrical outlet, the ON/OFF Button will remain illuminated, indicating the toaster is in standby mode.
- Removable Crumb Tray: Collect the crumbs at the bottom of the toaster.
- Cord Storage: Cord Storage cleats on the underside to keep the countertop neat.
FEATURES
- Two sets of toasting slots under separate dual control panels.
- 1½ Wide toasting slots toast a wide variety of items.
- Six shade settings, with a bagel reheat, and defrost options.
- Memorizes the last used shade setting.
- Countdown display.
- Removable crumb tray easy for deaning.
- Cord Storage deaths on the underside keep the countertop neat.
BEFORE FIRST USE
- Remove all packaging materials.
- Wipe the exterior with a damp doth. Do not use abrasive cleaners.
- Be sure that the Removable Crumb Tray is secured inside the back of the toaster.
- Unwind the power cord from the Cord Storage underneath the toaster and plug it into a 120V 60Hz electrical outlet.
- Lower both Levers until they lock in the Down position.
- Operate the toaster without bread once or twice to burn off any manufacturing residue. Occasionally a very small amount of smoke may emit from the toaster and will dissipate as the heating elements continue to heat.
HOW TO USE
- Place the toaster on a flat, level, heat-resistant surface.
- Make sure that the Removable Crumb Trays have already been pushed into the back of the toaster and that no objects are inside the toasting slots.
- Insert slices of bread or halved bagels into the Toasting Slots. Be sure to remove all protective wrappings from food before placing them into the Toasting Slots.
- Plug the power cord into a 120V 60Hz electrical outlet, and the ON/OFF button light will be on.
- Press the ON/OFF button, and the other button lights will be on.
- Press the Shade Setting Button 1-6 (from light to dark) to select your desired browning level. The default Shade Setting is Level 3 for golden toast. This toaster has a Memory Function when it is used continuously. When you start a new toasting cycle, the shade setting is always the one you used in the previous toasting cycle, unless you have unplugged the toaster for about one minute in between.
- Press the buttons of Bagel, Defrost, or Reheat as needed.
- Lower down the Lever until it is locked in the Down position to begin the toasting. You can use one or both sets of toasting slots. The two sets of toasting slots are under separate controls. The digital timer will start to count down.
- To stop toasting press the CANCEL button at any time. When the toasting cycle is finished, the Lever will pop up automatically, at the same time the toast will be raised to the top of the toaster. The Lever can be further raised for easier access to smaller pieces of bread and bagels.
- If the toast is not dark enough, you can toast the bread again. Adjust the shade setting as desired and replace the toast. Ensure the toast does not bum while re-toasting.
- Remove the bread from the toasting slot. Use care when removing bread as the bread and the top of the toaster are still hot.
- The button lights (except the ON/OFF Button) will be off when the toaster is not in use or the buttons are not touched within 3 minutes.
- Unplug the toaster from the electrical outlet after use.
Handy Tips:
- We recommend that you test the toasting time at first, starting from the lowest browning level, to avoid over-toasting in the subsequent toasting.
- For slightly dry bread, use a lower setting. For very fresh bread or whole wheat bread, use a higher setting than normal.
- Breads with uneven surfaces require a higher toast setting. Thickly cut pieces of bread take longer to toast. Very thick pieces may require two cycles.
- Before toasting panels slice each hane into town’s initial halves.
CAUTION
- Never place bread on the top of the toaster. Always insert slices of bread into the slots.
- Do not toast the food with extremely runny ingredients such as butter.
- When toasting raisins or other fruit breads, remove any loose raisins, etc., from the surface of the bread before placing them into the slots. This will help prevent fruit pieces from falling into the toaster or sticking on the guide wires in the slots.
- If the toaster starts to smoke, press Cancel to stop toasting immediately.
- Never attempt to remove bread jammed in the slots without unplugging the toaster from the electrical outlet first.
- Never use a fork or sharp-edged utensil to remove toast, because that may damage the heating element or damage the internal mechanism.
Toasting Time:
- The time for each toasting level will vary under different temperature conditions. Thermal compensation memory will be evoked if toasting consecutively, i.e., the toasting time for any browning level will gradually decrease within a certain temperature range. The hotter the toasting slot, the shorter the toasting time needed. It has been shown that this design is very useful in preventing excessive toasting when the toasting slot is already very hot.
- Proper toasting times vary from one bread to another due to the moisture level, thickness, freshness, evenness, ingredients, as well as the current temperature of the toasting slot. You need to adjust the browning level to achieve your desired level of toasting.
CLEANING AND STORAGE
- Before cleaning, unplug the toaster from the electrical outlet and allow it to cool down completely.
- Do not use abrasive materials or abrasive cleaners or chemical cleaners to clean the interior or exterior of the toaster or any of its components. Simply wipe the exterior with a clean, damp cloth and dry thoroughly.
- Slide out the crumb tray and discard the crumbs. Wipe clean and replace.
- To remove any pieces of bread remaining in the toaster, turn the toaster upside down and gently shake. Never insert any hard or sharp instruments into the slots, as this could damage the toaster and cause a safety hazard.
- Never wrap the cord around the outside of the toaster. Use the cord storage deats on the underside of the toaster.
- Store the toaster in the box in a clean, dry place. Never store the appliance while it is still wet or dirty.
TECHNICAL INFORMATION

DISPOSAL
When this appliance has reached the end of its life, please dispose of the unit properly. This and other electrical appliances contain valuable materials that can be recycled. Electronic waste may be harmful to our environment if not disposed of properly. We ask that you follow your governing agency’s rules and regulations when disposing of electronic appliances. Please find an authorized recycling facility near you.
CONTACT
If you have any questions or concerns not addressed in this user manual, please call our customer service department at 888-792-2360 or email: CustomerCare@thesecura.com Please read the operating instructions before using this product. Please keep the original box, packing materials, and all documentation if service is required.
FOR MORE MANUALS BY SECURA, VISIT MANUALSDOCK


