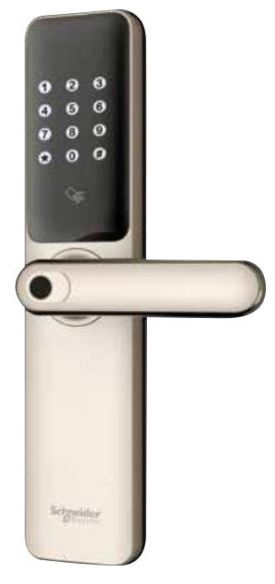
Schneider S51-DG Smart Door Lock
About Schneider
The mission of Schneider is to enable everyone to maximize energy and resource use, fostering growth and sustainability for all. We refer to this as “Life Is On” at Schneider. We believe access to energy and digital is a basic human right. With rapid digitization in a more electric environment, our generation is witnessing a tectonic upheaval in the industrial revolution and energy transition. As part of the UN Sustainable Development Goals, we will accomplish a climate-positive impact by combining a circular economy approach with electricity, which is the most effective and best vector for decarbonization.
Important Information
Safety instruction
- Read and understand all instructions before using this smart lock. The warranty does not cover damages caused by failure to follow instructions.
- It is recommended to use the enclosures/accessories specified by the company
- Use only alkaline batteries configured with this product.
- Do not forcibly disassemble this product to avoid alarm sound or damage to the product.
- Do not scratch the fingerprint reader with sharp objects, otherwise, it may cause permanent long-term damage.
- Do not expose the product to corrosive substances to not damage the outer protective layer.
- Do not hang objects on the handle, so as not to affect the normal use of the door lock.
- Cleaning the product, please wipe it with a soft cloth.
- Do not disassemble the battery while the device is operating.
- Please choose a professional engineer to install the door lock, follow the company’s standard installation instructions, and do not install it yourself.
- After the door lock is installed, please modify the default master PIN code immediately and keep the mechanical key in a safe place. Don’t disclose the PIN code to an unknown person.
- When a low battery alarm is triggered, please replace all the batteries in time.
Warning
- Do not place the battery close to the fire in case of an explosion.
- Do not short-circuit the two poles of the battery lead with metal objects to avoid explosion.
- Do not let the connection of two terminals of the battery lead shorted with metal objects in case of explosion.
- Make sure replacement or maintenance is done by a professional person authorized by Schneider.
- Your warranty may be invalidated if you used accessories produced by other manufacturers or not recommended by Schneider.
Disposal of used battery and lock
- Please understand the local electronic product classification and collection system.
- Please follow the local regulations and do not discard used batteries into ordinary household garbage.
- Properly disposing of used products helps to avoid potential negative impacts on the environment and human health.
- The battery can not be disposed of with ordinary household garbage.
Install your smart lock
Package list
This Package list is for reference only, and all contents are subject to the actual packaging contents.
Front panel (with rubber gasket)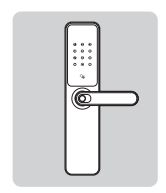
Back panel (with rubber gasket)
Installation template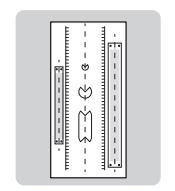
Mortise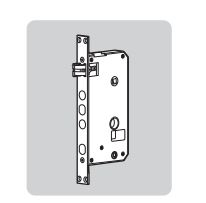
Side plate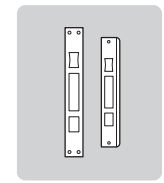 Mechanical key
Battery & key card**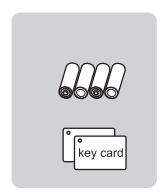
Screw pack
User manual
Explosive view
- Battery cover
- M6 mounting screws (3)
- Back panel assembly
- Spring (2)
- Mounting plate
- Square shaft (2)
- mortise
- M6 connecting screw bolt
- Front panel assembly
- Bottom cover
- Screws (4)

Before installation
Check the door open direction before installation
Right-out open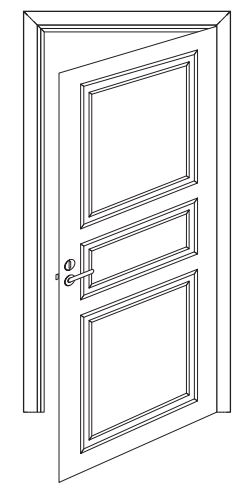
Right-in open
Left-out open
Left-in open
Change cylinder direction

Remark: change the directional screw per door opening way (the screw must be installed on the inner side of the door).
Change handle direction
Change the handle direction of the front panel.
Unscrewing and taking out the screws, positional component, and shield sleeve in order, then moving the cable to the middle hole.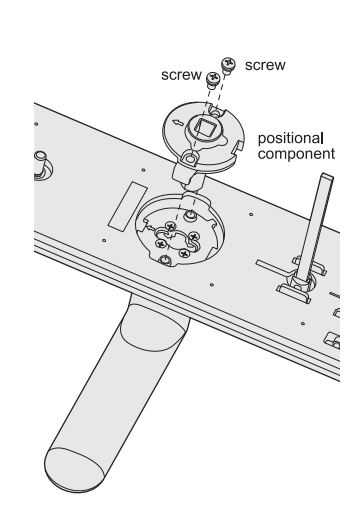
Rotate the handle 180° to the other side.
Put the cable into the right side, then put the positional component and shield the sleeve back and tighten the screws in order properly.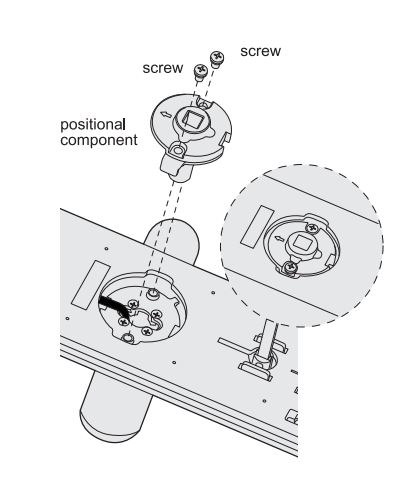
Change the handle of the back panel direction.
Take out positional components.
Rotate the handle 180° to the other side.
Tighten the screws.
Installation steps
Drill bores following the installation template and then put the mortise into the door and tighten the four mounting screws.
Note: The mortise connecting cable needs to pass through the hole position shown in the above picture into the door.
Install the connecting screw bolt on the front panel, and put the pressure spring and square shaft in the hole.
Note: According to the thickness of the door, select the appropriate length square shaft and connecting screw.
Pass the connecting cables and screw bolts through the bore on the door, and then insert the square shaft into the mortise hole of the front panel.
Install mounting plate to tighten front panel.
Insert the pressure spring and the square shaft into the hole of the back panel. Then insert the front panel cable and mortise cable into the corresponding interfaces on the back panel. The excess cable plugsback the cable holes and then tighten the screws to fix the back panel.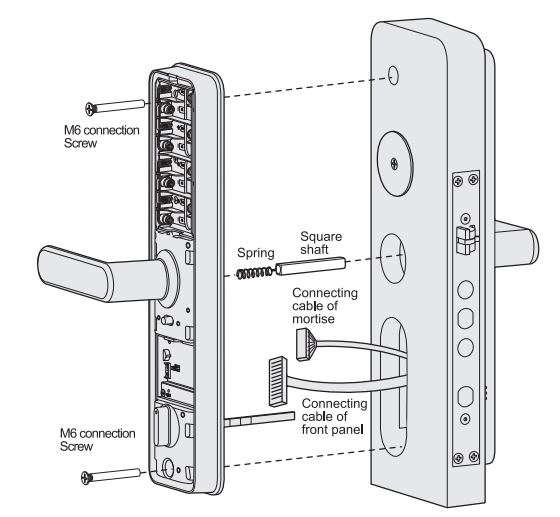
Install the battery(4 AA batteries)in the battery compartment and cover it with a battery cover. Check if the front and back panels and other components are connected properly.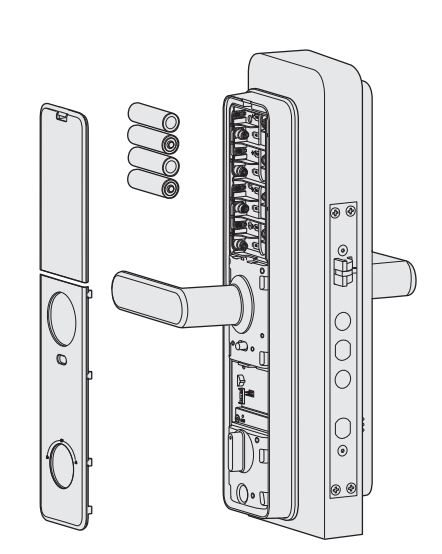
Overview
Outside panel

Inside panel
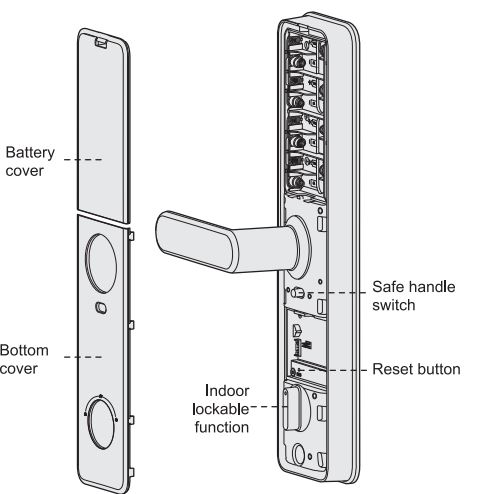
Note: This illustration is for reference, please be subject to the actual product.
Set up your smart door lock
Before you set up
The system mode of the smart lock is divided into security mode and common mode, and the default system mode is common.

User Number
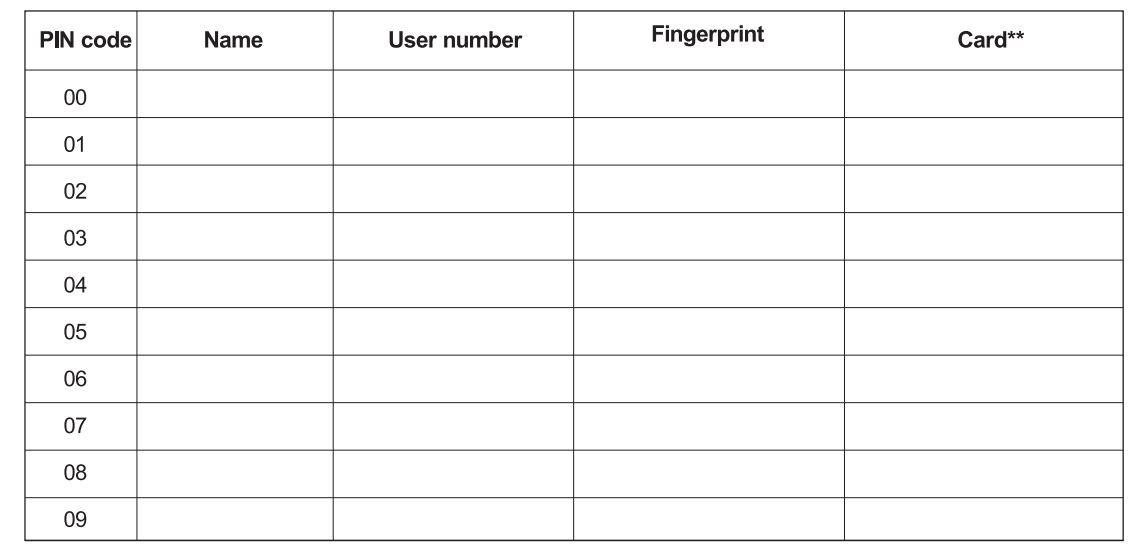
Under security mode, when you enroll in PIN code, fingerprint, and card**, you should enter the user number You can fill in the user information in this table for easy management :
Enter administrator mode
- Touch the keypad area to light up the keypad.
- Press * twice and enter the administrator PIN code with the # key to confirm.
- Voice prompt: administrator mode.

Before changing the default administrator PIN code(default is 12345678), all the settings menus will be disabled. You have to change the administrator PIN code first, then do other lock settings. For the first time, you need to choose the language, 1 is Chinese, 2 in English;
Modify the administrator PIN code
Under administrator mode:
Press 1 for a user setting, then press 9 to modify the administrator PIN endo.
Enter the new administrator PIN code and press the # key to confirm, then repeat the above operation. Voice prompt settings succeeded.![]()
Enroll user PIN code
Under administrator mode:
Press 1 for the user setting, then press 1 to enroll the user PINcode. Enter 2 digital user numbers and press # to confirm.![]()
Enter 6-12 digitals user PIN code and press the #key to confirm, then repeat the above operation. Voice prompt: setting succeeded.
00-04 is a normal user; 05-08 is a temporary user, which will be invalid after one-time use or under security mode; 09 is a duress user, which works with wireless modules when a duress event occurs.
00-04 is a normal user; 05-08 is a temporary user, which will be invalid after one-time use or under security mode; 09 is a duress user, which works with wireless modules when a duress event occurs.
Enroll User fingerprint
Under administrator mode:
Press 1 for the user setting, then press 2 to enroll the user fingerprint. Enter 2 digital user numbers and press the # key to confirm.![]()
Place your finger on the fingerprint sensor and then take away your finger after the voice prompt ” remove your finger and scan again “. Repeat the above steps until the voice prompts “setting succeeded”.
00-99 is a normal user, and 95-99 is a duress user who works with a wireless module and triggers an alarm when a duress event occurs.
Enroll user card**
Under administrator mode:
Press 1 for a user setting, then press 3 to enroll the card. Enter 2 digital user numbers with # to confirm.
Put the card close to the card sensor area until one beep sounds Voice prompt: Settings succeeded.![]()
Delete user PIN code
Under administrator mode:
Press 1 for the user setting, then press 4 to delete the user PIN code. Press 1 to delete single user PIN code and enter 2 digital user numbers with # to confirm. Voice prompt: deletion succeeded.![]()
Press 1 for the user setting, then press 4 to delete the user PIN code. Press 2 to delete all user PIN codes. Voice prompt: deletion succeeded.![]()
Delete user fingerprint
Under administrator mode:
Press 1 for the user setting, then press 5 to delete the user’s fingerprint. Press 1 to delete a single user fingerprint and then enter 2 digital user numbers with # to confirm or place your finger on the fingerprint sensor until one beep sounds. Voice prompt: deletion succeeded.
Press 1 for the user setting, then press 5 to delete the user’s fingerprint. Then press 2 to delete all user fingerprints. Voice prompt: deletion succeeded.
Delete user card**
Under administrator mode:
Press 1 for the user setting, then press 6 to delete the user card. Press 1 to delete a single user fingerprint and then enter 2 digital user numbers with # to confirm or put the card deletion close to the card sensor until one beep sounds. Voice prompt: deletion succeeded.
Press 1 to enter the user settings, then press 6 to enter the user card, and then press 2 to enter all the deletions, the voice prompt is deleted successfully.![]()
Opening mode setting
Under Administrator mode:
Press 1 for a user setting, then press 7 to set opening mode. Pressing 1 for common mode means it can be unlocked by single verification( PIN code or fingerprint).
Press 1 for a user setting, then press 7 to set opening mode. Press 2 for security mode which means it is unlocked by dual verification ( PIN code and fingerprint).
System settings
Voice settings
Under Administrator mode:
Press 2 for system settings, then press 1 to set voice: Press 1 to enter voice mode where all voice is enabled; Press 2 to enter mute mode where voice is disabled except alarm sound and voice guide under master mode.![]()
language settings
Under Administrator mode
Press 2 for the language setting then press 2 to enter the system setting: press 1 for Chinese voice; press 2 for English voice.![]()
Record query
System query
Under Administrator mode:
Press 3 to query record then press 1 to enter system query. The voice reads the serial number.
Extended function (optional)
Join the network
Under Administrator mode’
Press 4 to enter the extended function: press 1 to join the network; press 2 to exit the network.![]()
Use your smart lock
How to open the door from outside
Touch the pad screen to lighten the keypad; then enter the enrolled PIN code. After the voice prompt “Verification succeeded, welcome home”, pressed down the handle to open the door.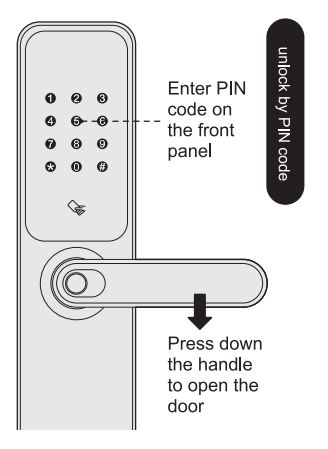
Place the enrolled finger properly on the fingerprint sensor area. After the voice prompt”Verification succeeded, welcome home”, I pressed down the handle to open the door.
Place the enrolled card properly on the card icon area. After the voice prompt “Verification succeeded, welcome home”, I pressed down the handle to open the door.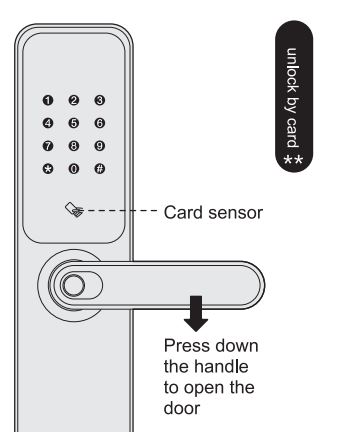
Under security mode, PIN code + fingerprint (PIN code + card** or card** + fingerprint) is required to unlock by dual verification.
Unlock with Mechanical Key
If an emergency occurs such as a password loss, running out of battery, or the system not working, you can use the spare mechanical key to unlock it.
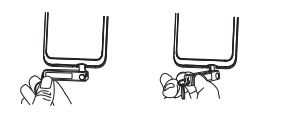
- Open the box, take out the key holder, and push the button to release the key.

- Insert the key into the keyhole, and make sure the key holder button releases the key. is perpendicular to the key, rotate the key holder towards the door holder until it is next to the door;
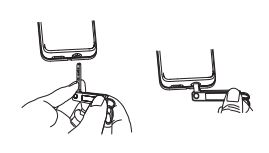
- Turn the key holder 180 degrees downwards and in a horizontal position, rotate the key holder towardthe s door holder, and open the door.
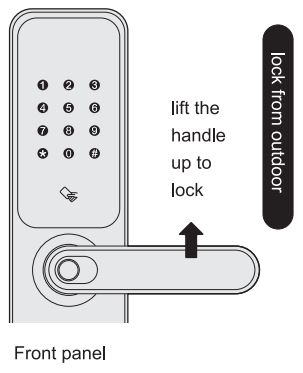
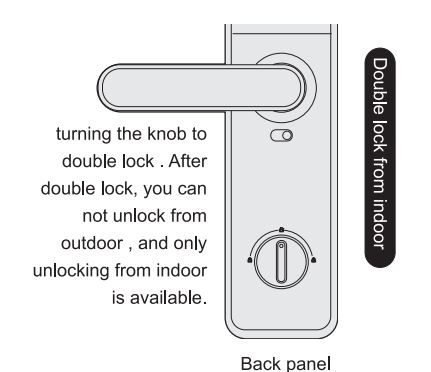
Lock from Outdoor/ Lock from Indoor/Double-lock from Indoor.
Front panel
Back panel

Back panel
Anti-Lockpicking from peephole
Anti-lockpicking by fastening the door handle.
Operation
- Switch the button to the red position and turn on the peephole security function.
- Switch the button to the green position and turn off the peephole security function. from inside.

Other functions
Restore to factory setting
If you forgot your administrator PIN code, long press the [RES]button for 5 seconds to restore the factory setting. After the voice prompts “Restored to factory setting, please change Administrator PIN code”, that means to restore to factory setting succeeds, and all user data and settings will be deleted.
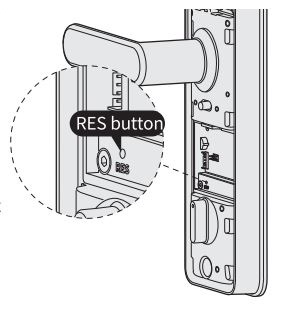
Emergency power supply
When the battery voltage is too low to open the lock from outside, you can use a 5V power bank to charge the door lock via a Micro USB port. After the door is unlocked, please replace all batteries immediately. When the lock system crashes down, you can restart the system by pressing the reboot button.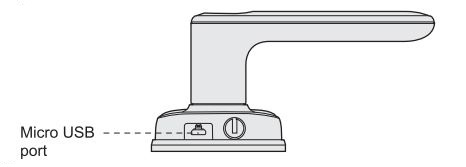
FAQS About Schneider S51-DG Smart Door Lock
Which 8-inch subwoofer has the highest volume?
For serious automotive audio competitors seeking the loudest, cleanest sound possible, the American Bass USA VFL Competition subwoofer is the way to go. This subwoofer has the punch to magnify your music and make your rivals tremble with its 5,000 watts of RMS power and 10,000 RMS peak.
What does bass accuracy mean?
What it is: The degree of variation (weighted standard error) in the bass frequency response (20Hz-250Hz) relative to the ideal response, which most people would perceive as being perfectly balanced.
Can smart doors be compromised?
Hacking your lock will be very tough if it is setup correctly and has the most recent firmware. Regretfully, criminals never stop thinking of inventive ways to get into homes. It implies that landlords and tenants should constantly be ready for anything.
Which smart locks are better?
While, like conventional locks, smart locks are not flawless, they do provide a plethora of alternatives to improve convenience and security in your house. Ultimately, how you want to control who can enter and leave your house will determine whether or not this is an investment that is right for you.
Are smart door locks energy-dependent?
Because of their design, smart locks can still work while the power is down. The majority of these gadgets have backup batteries built in, which kick in to keep the device running in such circumstances.
Which sensor does the smart lock use?
Optical, PIR, and other types of sensors are used to read and detect objects. The PIR (Passive Infrared) sensor is the most widely utilized motion sensor in smart locks. With the use of electrical semiconductors, the PIR sensor detects the infrared light that an object emits [1].
Can Wi-Fi be used without smart locks?
In summary. In conclusion, smart locks have a limited range of operations even without Wi-Fi.
What is a smart lock’s temperature?
The temperature range that the Lockly smart locks can withstand is -4°F to 140°F (-20°C to 60°C). When these circumstances are not met, we do not advise utilizing the Lockly smart locks.
Does a smart lock withstand the weather?
It’s crucial to remember that not all smart locks are watertight first. Not all of them are immune to extreme weather conditions such as high and low temperatures, frost, ice, snow, strong winds, dirt, dust, etc. despite having sturdy hardware.
Can a smart lock be reset?
Find the digital door lock’s reset button. This might be behind the battery cover or on the inside of the lock. To reach the reset button, take off the battery cover. Hold down the reset button for five to ten seconds, or until the LED light flashes or a beeps.
For more manuals by Schneider ManualsDock


